1
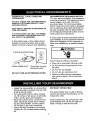
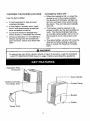
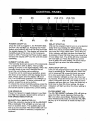
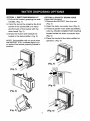
Use & Care Guide
Manual i de Uso y Cuidado
English / Espa_ol
Models, Modelos: 407.52501,407.52701
I(enmore
chum °d f °er
D÷shum]d_ficador
Sears Brands Management Corporation
Hoffman Estates, IL 60179 U.S.A.
www.sears.com
www.kenmore.com
Package Contents ........................................ 2
Warranty ....................................................... 2
Safety Instructions ........................................ 3
Electrical Requirements ............................... 4
Installation ................................................. 4,5
Key Features ................................................ 5
Control Panel ............................................... 6
• Kenmore Dehumidifier
Water Disposing Optk)ns ..................... i........7
Care and Maintenance ........................ :....... 8
Troubleshooting ....................................... 9,10
Product Specification., ................................. 11
SpanishlEspaAol ....... !.......................... i...... 12
Sears Service .............................. Back Cover
• Use and Care Guide
Kenmore Limited Warranty
When installed, operated and maintained accordingto all supplied instructions, if this appliance
fails due to a defect in mateda] and workmanship within one year from the date of purchase,
call 1-800-4-MY-HOME® to arrange for free repair.
If this appliance is ever used for other than private family purposes, thiswarranty applies for
only 90 days from the date of purchase.
This warranty covers only defects in material and workmanship. Warranty coverage
does NOT include:
1. Expendable items that can wear out from normal use, including but not Iimited to filters,
belts, light bulbs, and bags.
2. A service technician to instruct the user in correct product installation,operation or
maintenance.
3. A service technician to clean or maintain this product.
4, Damage to or failure of this product if it is not installed, operated or maintained according to the all instructionssupplied with the product,
5. Damage to or failure of this product resultingfrom accident, abuse, misuse or use for
other than its intended purpose.
6. Damage to or failure of this product caused by the use of detergents, cleaners, chemicals or utensils other than those recommended in all instructions supplied with the product.
7. Damage to or failure of parts or systems resulting from unauthorized modifications
made to this product.
Disclaimer of implied warranties; limitation of remedies
Customer's sole and exclusive remedy under this limited warranty shall be product repair as
provided herein, implied warranties, includingwarranties of merchantabilityor fitnessfor a
particular purpose, are limited to one year or the shortest period allowed by law, Sears shall
not be liable for incidentalor consequential damages, Some states and provinces do not allow
the exclusion or limitation of incidental or consequential damages, or limitation on the duration
of implied warranties of merchantability or fitness, so these exclusions or limitations may not
apply to you.
This warranty applies only while this appliance is used in the United States.
This warranty gives you specific legal rights, and you may also have other rights which vary
from state to state.
Sears Brands Management Corporation, Hoffman Estates, IL 60179
IMPORTANT
CAUTIONS
FORUSING
YOUR
DEHUMIDIFIER.
Toreduce
theriskoffire,electrical
shock,
injury,
ordamage
tothe
dehumidifiers,
these
safety
precautions
must
befollowed:
Safety
, Do not place the power cord near a heater.
• Do not use an electrical outlet near flammable or combustible materials such as
gasoline, propane, paint thinners, etc.
• Do not disassemble or modify dehumidifier
parts or components. It may cause electric
shock and failure.
• Plug in the power cord properly.
• Do not turn the unit on and off by inserting
or pulling out the power plug.
, Do not damage the power cord or use an
unspecified power cord.
• Do not modify power cord length.
• Do not share the outlet with another appliance.
• Always plug into a grounded outlet. Not
grounding unit may cause electrical shock.
• Unplug the unit if it emits strange sounds,
odors, or smoke.
° Do not use an electrical outlet if it is loose
or damaged.
• Do not operate or plug in unit with wet
hands or in a wet environment.
° Ventilate area before operating dehumidifier. Check for the presence d natural gas
or the buildup d other combustible vapors.
• Do not clean the dehumidifier with water.
Water may enter the unit and degrade the
insulation resulting in an electrical shock.
• If water enters the product, turn off the dehumidifier's power switch, then unplug the
unit. Do not plug in unit until it has been
inspected by an authorized repair service.
• Because the fan rotates at high speed during operation, always unplug dehumidifier
before attempting any recommended maintenance or cleaning.
• Do not block the inlet or outlet. It may
cause unit to fail or to operate inefficiently.
• Do not remove plug from outlet by pulling
on the cord.
° When not in use, turning the unit off wilt
save energy. Unplug the dehumidifier
when not using for long periods of time.
• When removing the filter, be aware that
some metal parts may have sharp edges
and may cause injury.
• Do not use the water collected in the
bucket for drinking purposes. It is not
sanitary and could cause illness.
• Do not allow children to play with this
product.
Tips
• Make sure the dehumidifier is the correct
size for the area you want to dehumidify.
It is not designed to dehumidify the entire
house.
• For proper operation, the dehumidifier
should only be placed on a level floor.
• Close all doors, windows and other
openings to the room. The dehumidifier
must operate in an enclosed area to be
effective.
• To clean, use a soft c[oth;do not use
wax, thinners, or strong detergents as
they may change the coJorofthe unitor
cause surface damage.
• Be sure to replace the bucket properly
after emptying to prevent water from collecting on the floor causing damage to
some types of flooring.
• Do not put a pet or house plant where it
will be exposed to direct air flow. This
couldinjure the pet or plant.
• Operation without filter will cause unit
failure. Insert the filter securely. Clean it
every two weeks. (See Care and Maintenance section in this manual.)
OBSERVE ALL LOCAL CODES AND
ORDINANCES.
DO NOT, UNDER ANY CIRCUMSTANCES,
REMOVETHEPOWERSUPPLYCORD
GROUND
PRONG.
ELECTRICAL
GROUNDIS
THIS APPLIANCE
REQU|REDON
A I15-VOLT60H_
AC ONLY, 15A FUSED
AND PROPERLY GROUNDED ELECTRICAL SUPLLYIS REQUIRED,
A time delay fuse or time delay circuit
breaker is recommended. Use a dedicated circuit serving only this appliance.
RECOMMENDEDG_OUNDINGMETHOD
For your personal Safety,this appliance
must be grounded!This appliance has a
power supply cord'witha 3-prong:
grounded plug, To minimize possible
shock hazard the cord must be plugged
into a matching grounded electrical outletthat complies with the latest edition
of the National Electrical Codes and all
local codes and ordinances+
If a grounded 3-prong electrical outlet is
not available, it is the personalresponsibility and obligation of the customer to
have one installed by a qualified electrician.
_WARNING
3-prong grounded plug
Power supply cord
Grounded 3-prong
electrical outlet
DO NOT USE AN EXTENSION CORD.
• Install the dehumidifier on a level floor
strong enough to support the unit with
a full bucket of water.
• For best performance, allow at least
12-18 inches of air space on all sides
of the unit for good air circulation.
° Keep all outside doors, windows and
other openings closed when operating the dehumidifier. Humid outdoor
air will add to the unit's workload.
• Leave the dehumidifier in an upright
position for 30 minutes before turning
on.
ELECTRICAL SHOCK HAZARD
• Plug into a grounded 3-prong outlet.
• Do not remove the ground pin from
the plug
+ Do not use an adapter
• Do not use an extension cord.
• Failure to follow these instructions
can result in death, fire or electrical
shock.
DEFROST OPERATION
The dehumidifier has a built-in defrost
control that senses frost buildup on the
evaporator coils.
During defrosting, the compressor will
automatically turn off; the fan will continue running to defrost the coils.
CHOOSING THE PROPER LOCATION
Use the dehumidifier:
* in the_basement to help prevent
moistwe damage.
• in the!kitchen, laundry room, bathroom,' and spa/exercise areas that
have excessive moisture.
•
to prevent moisture damage anywhere books or valuables are stored.
•
during construction or remodeling to
reduce drying time for drywall and
paint however check and clean filter
often.
AUTOMATIC SHUT OFF
• When the bucket is full, or when the
bucket is not in the properposition,
the Bucket Full indicatorwiltlight up
andyou will hear a ten second audible alarm. The unit will automatically
shut off.
• The bucket must be placed in the
proper positionfor the dehumidifier to
work. The Bucket Full lightwill stay
on and the dehumidifierwill not run if
the bucket is not in the proper position.
• The dehumidifierwill shut offonce the
desired humiditysettingis reached
plusor minus 5% Relative Humidity
(RH).
WARNING
To reduce the risk of fire, electric shock or injury to persons, read the important
SAFETY INSTRUCTIONS found on page 3 before operating this appliance.
Washable Filter
Enclosure ..... ;
......................
Continuous Drain
Connector Door"'!
Carry Handle
..... Control Panel
i
....
...... Bucket
_aster
Power Cord
(T)
(4)
(_)
(s)
(_)
(2) (3)
(lp) (_1)
(1)
(1_2)(l_)
(6)
POWER ON/OFF (I)
DELAY START (4)
Once the unitisplugged in,the POWER
INDI- Unit can be programmed to turn on at a desired
CATOR (10) will light up. Pressing the Power
delay time by pressing the Timer (4) key.
button once will turn the unit ON and illuminate
When the unit is powered OFF, press the timer
the digital display (9). The display will show the key once for 2-hour delay star[ The 2 Hrs (7)
humidity level of the room in 5% increments
timer indicator will light up when the timer key
down to 25%, Pressing the Power button again is pressed. Press the timer key once more for a
will turn the display OFF and the unit wilt cease 4-hour delay start. The 4 Hrs (7) timer indicator
operating.
will now light up. Press the timer key a third
time to clear the timer setting. No timer indicaHUMIDITY LEVEL (2/3)
tors will light up when the timer setting is
The humidity level can be set in 5% increments cleared.
in a range from 35% to 80%. The humidity
setting is shown in the digital display. When the AUTO SHUT-OFF (4)
humidity level of the room reaches the set
Unit can be programmed to turn off at a desired
level the unit will stop dehumidifying.
time by pressing the Timer (4) key. When the
To set the unit to continuous operation, press
unit is powered ON, press the timer key once
the down arrow button until the display shows
for 2-hour automatic shut-off. The 2 Hrs (7)
35%. Press again and the display will show
timer indicator will light up when the timer key
CO, The Continuous indicator (13) will light up is pressed. Press the timer key once more for a
On the control panel To leave continuous op4-hour automatic shut-off. The 4 Hrs (7) timer
eration, press the up arrow button.
indicator will now light up. Press the timer key a
To check the current humidity setting, press the third time to clear the timer setting. No timer
up or down arrow button. The display will show indicators will light up when the timer setting is
and set 5% above or below the current setting. cleared.
FAN SPEED (5)
Press Fan Speed to toggle between Low, Med,
and High fan speeds. Speed will be shown in
FAN SPEED INDICATOR (8)
BUCKET FULL INDICATOR (tl)
When the collection bucket is full, the BUCKET
FULL indicator (11) will light up and you will
hear an audible alarm. The audible alarm will
last up to ten seconds The dehumidifier will not
run until the bucket is removed, emptied and
replaced.
FILTER RESET (12)
The FILTER RESET indicator (t2) will light up
when the filter needs cleaning. Remove the
filter and dean accordingly. Replace the filter
when finished and press and hold the FILTER
(6) key up to 5 seconds to reset the filter indicator.
6
OPTION 1: EMPTYING MANUALLY
1. Pull out the bucket, grasping the side
handles. (Fig. 1)
2. Carry !he bucket by grasping the front
corner_of the bucket with one hand
and the back of the bucket with the
other l_and(Fig. 2)
3. Empty the bucket and replace the
bucket in the dehumidifier.(Fig. 3)
NOTE: Dehumidifier will not work when
the BUCKET FULL indicator light is on
or without the bucket properly placed in
position
OPTION 2: GRAVITY DRAIN HOSE
(Hose Not Provided)
1. Remove the BUCKET from the unit.
(Fig. 4)
2. Open the drain connector door (Fig. 5)
3.Thread a garden hose (sold separately)
onto the DRAIN CONNECTOR NOZZLE
located inside the drain connectordoor.
(Fig. 5)
4. Place the bucket in the dehumidifier for
operation, (Fig, 6)
(Fig. 4)
(Fig.
(Fig. 5)
(Fig. 2.)
(Fig. 3)
CLEANING THE AIR FILTER
After 250 hours of operation the FILTER
RESET indicatorwill light up to remind
you to clean and change the air filter.
WARNING
• Disconnect power supply cord from
receptacle before performing ahy
maintenance.
It is recommended
to periodically check
the filter for excess dirt even if the
FILTER RESET indicator is off.
CLEANING THE EXTERIOR
Clean the cabinet using a damp cloth
and a mild detergent. Do not use bleach
or abrasives.
1.To remove the air filter, press the two
filter tabs and pull the filter holder
away from the back of the unit.
2+Remove the filter and clean with
warm, soapy water. Rinse and allow
the filter to dry before placing back in
the unit.
3. Place the filter back into dehumidifier.
Plug unit back into outlet, power the
unit on and press and hold the FILTER key up to 5 seconds on the contro! panel to reset the filter setting.
CONTROL PANEL
Wipe down the control panel with a dry
cloth+
CLEANING THE BUCKET
Every few weeks, clean the dehumidifier
bucket. Partially fill the bucket with
clean water and mild detergent. Swish
the mixture around in the bucket, empty
and rinse. Replace the bucket when
finished
NOTE: DO NOT place the filter in a
dishwasher
CA.UTtON: DO NOT operate the dehumidifier without a filter. Doing so may
cause a unit failure.
NOTE: Do not place the bucket in a
dishwasher.
FILTER TABS
8
Problem
_
Dehumidifier does not
start,
i
Possible
Causes
Solutions
The dehumidifier is unplugged,
Make sure the dehumidifier's plug is pushed
completely into the outlet.
The fuse is blown t circult breaker is tripped,
Check the house fuse t circuit breaker box and
replace fuse or reset breaker.
Dehumidifier has
reached the user set
humidity level or the
bucket is full.
The dehumidifier automaticaliy turns off when
either conditionoccurs. Change to a lower
setting or empty the water bucket and replace
properly.
Bucket is not in the
proper position,
The bucket must be in place and securely
seated for the dehumidifier to operate.
Power Failure.
There is a protectivetime delay (up to 3 rain.)
to prevent trippingof the compressor overload.
For this reason, the unit may not start normal
dehumidification for 3 min. after it is powered
back on.
Not enough time allowed
for unit to remove toolsture.
When first installed, allow at least 24 hours to
achieve the desired humidity level.
Airflow is restricted.
Make sure there are no curtains, blinds, or
furniture blocking the side or back of the dehumidifier.
Dirty filter.
See the Cleaning The Air Filter section
The user set Humidity
Level may not be set low
enough,
To reduce moisture, press the down arrow
button to lower the percent humidity desired in
the room, or set the dehumidifier to CO for
continuous operation.
Doors and windows may
not be closed tightly,
Check that all doors, windows, and other
openings are securely closed.
, ,,, ,,,,,,,,,,,,,,,,,,,,,,,,,,,,,,,
Dehumidifier is not
operating as
Intended.
Filter Indicator is ]it.
Water is not draining
through drain hose
Make sure the drain is placed below the drain
connector nozzle to allow gravity to drain the
iwater (Refer to Gravity Drain Hose section in
:this manual).
Room temperature is too
tow.
Moisture removal is best at higher room ternperatures. Lower room temperatures will reduce the moisture removal rate. This model is
designed to operate at temperatures above
41°F.
Filter needs to be
i cleaned every 250 hours
of use.
9
Once filter has been cleaned, press the FILTER button for 3 seconds to turn the filter
indicator off.
Dehumidifier runs
too much
The area to be dehumidified is too large.
The capacity of your dehumidifiermay
not be adequate for the room size.
Doors and windows are
open,
Close all doors and windows to the
outside.
Frost appears on
the coils
The dehumidifier has
recently been turned on
or the room temperature
is below41°F.
This is normal. ,Frost will usually disapt
pear within 60 minutes.
The controls cannot
be set or changed
The compressor turns off
and the fan continues to
run for approximately 3
minutes at a fixed setting.
This is normal. Wait approximately 3
minutes until this automatic process
finishes, then the fan control can be set
to the desired level.
Fan Noise
Air is moving through the
unit.
This is normal,
Hose connection may be
loose.
Check the hose connection. See the
Drainage Section.
Hose is attached but not
draining into a drain,
Check hose for obstruction.
,, ,,,,,,, ,, , , ,,,,, ,,, ,,,, ,,,,,,,,,,,,,
,,,,........
....
,,,, ,, ,, ,,,,, ,,,,, ,,, ,H
Water on the floor
Error Code
FI
Error Type
Ambient
Temperature
Sensor
Malfunction
Possible Cause
1. Sudden Change
in the surround-
Corrective Action
1.
!2.
ing temperature.
3.
F2
2. Faulty Sensor
Evaporative
Coil
i Temperature
Sensor
Malfunction
4.
10
Unplug the dehumidifier.
Check the surrounding area
for possibte reasons for sudden temperature changes.
Wait 30 minutes before plugging the dehumidifier back in
for normal operation.
If the "Error" is still indicated,
please contact your nearest
service center. Call
1-800-488-1222 for service
center locations.
' 'I
ITEM #
'!'"
, 52501
Moisture Removal per 24 hours
52701
, , _, ,,,,,,,
........
,, ,,,
50 Pints per day
(23.5 Liters per day)
70 Pints per day
(32,9 Liters per day)
, ,,,,,,,
765 Watts
Power Consumption (W)
615 Watts
Bucket Capacity
17 Pints (8 Liters)
•Power Source
17 Pints (8 Liters)
, ........ ,,,,,,,,,,,
,,, ,, ,,,,
115 VI60
HZ
115V160
HZ
,, ,,,
5.2A
Rated Current (Amps)
,,, ,,
7.3A
......
Sound Pressure Leve_dB (L/MfH)
45147t49 riB(A)
45147149 rIB(A)
Weight
44 Ibs kg
45.2 lbs kg
Dimensions (W x D x H)
15.1" x 11.1° x 24,1 "
(384x282x613 mm)
15.1" x 11.1" x 24.1"
(384x282x613 mm)
Energy Star
Yes
Yes
1]
Master Protection Agreements
Congratulations on making a smart purchase. Your new Kenmore® product is designed and manufactured for years of dependable operation. But like all products,it
may require preventive maintenance or repair from time to time..That's when having a Master Protection Agreement can save you money and a_ggravation.The
Master Protection Agreement also helps extend the fife of your new product. Here's
what the Agreement* includes:
'
[]
[]
[]
[]
[]
[]
[]
[]
[]
Parts and labor not just for repairing defects, but to help l_eep products operating properly under normal use. Our coverage goes well beyond the product warranty. No deductibles, no functional failure excluded from coverage-real protection,
Expert service by a force of more than 10,000 authorized Sears service
technicians, which means someone you can trust will be working on your
product.
Unlimited service calls and nationwide service, as often as you want us,
whenever you want us.
"No, lemon" guarantee - replacement of your covered product if four or more
product failures occur within twelve months.
Product replacement if your covered product can't be fixed.
Annual Preventive Maintenance Check at your request- no extra charge.
Fast help by phone - we call it Rapid Resolution - phone support from a
Sears representative on all products. Think of us as a "talking owner's manual."
Power surge protection against electrical damage due to power fluctuations.
$250 Food Loss Protection annually for any food spoilage that is the result of
mechanical failure of any covered refrigerator or freezer.
Rental reimbursement if repair of your covered producttakes longer than
promised.
10% discount offthe regular price of any non-covered repair service and related installed parts.
Once you purchase the Agreement, a simple phone call is all that it takes for you to
schedule service. You can call anytime day or night, or schedule a service appointment online.
The Master Protection Agreement is a risk free purchase. If you cancel for any reason during the product warranty period, we will provide a full refund. Or, a prorated
refund anytime after the product warranty period expires. Purchase your Master
Protection Agreement today!
Some limitations and exclusions apply. For prices and additional information
in the U.S.A. call t-800-827-6655.
* Coverage in Canada varies on some items. For full details call Sears Canada at 1-800-361-6665.
Sears Installation Service
For Sears professiona/instat/ation of home appliances, garage door openers, water
heaters, and other major home items, in the U.S.A. or Canada call 1-800-4-MYHOME®.
12
SPANISH
SECTION
13
SPANISH
SECTION
14
SPANISH
SECTION
15
Your Home
Fort_oubleshooting,productmanuals and expert advice:
managemylife
www.m anag ern yl[fe.com
For repair- in your home - of all major brand appliances,
lawn and garden equipment, or heating and coolingsystems,
no matter who made it, no matter who sold it!
Forthe rep[acementparts, accessoriesand
owner's manuals that you need to do-it-yourself.
For Sears professionalinstailationof home appliances
and items like garage door openers and water heaters.
1-800-4-MY-HOME
"_ (_-s0o-_694663)
Carl anytime, day or night
www._ears,com
Our Home
For repair of carry-in items like vacuums, lawn equipment,
and electronics,call anytime for the locationof your nearest
Sears Parts & Repair Service Center
t -800-488-1222
(u+s.A.)
www, sears.com
To purchase a protectionagreement on a productservicedby Sears:
1-800-8,27-6655 (U.S.A.)
Para pedir servicio de reparaciSn
a domicilio, y para ordenar piezas:
1-888-SU-HOGAR
e
(1-888_78,to642T)
W_NW.Se 3rs,coFn
_Registered
_ t_arc_
Tmd_m_"_
R_ada
1= = Tradema_
ofKCD
_ _ t_farc_ de F._bdca
IP,LLC
de KCD
_theUr_itedS_s,
IP ,LLC
e_ E_ados
orSears_rat_cis_LLC
U_do_,
o S_
B_n_,
_h_coun_s
_C
in _os
p_s