1
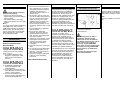
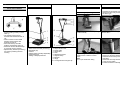
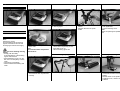
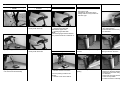
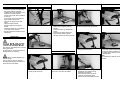
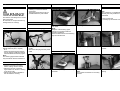
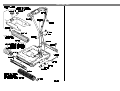
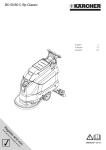
BR VS 400 *USA
www.karcher.com
1.139 - 108
1.139 - 308
5.959 - 333 A2001537 (06/01)
BR VS 400 *USA
Operating Instructions
Spare Parts List
3
21
Notice d'instructions
12
Liste des pièces de rechange
21
English
BR VS 400 *USA
CONTENTS
Important Information
4
Important Safety Instructions
4
GROUNDING INSTRUCTIONS
4
Connect to a properly grounded
outlet only
4
Intended use
Each time after usage
Pull out the plug
Emptying the tank
Switching off the cleaner
Dismantle the roller brushes
9
9
9
9
9
Transport
10
Cleaning and care
10
Protection from freezing
10
Reccommended
cleaning agents
11
Accessories
10
Fault tracing instructions
11
Technical data
11
4
Operating description of the floor
cleaner
5
Device elements
5
Assembly for the first time
Installing the pushing handle
Installing the rotary brushes
Install the tank
5
5
5
6
Operation
6
Filling the tank
6
Fitting the plug
6
Set the splash guard
6
Turning the pushing handle
6
Releasing/locking the pushing
handle
7
Starting/stopping the rotary brushes
7
Measuring out the cleaning agent 7
Steering the cleaner
7
Changing the rotary brushes
7
Each time before operation
8
Operation
Working in a lateral direction
Working in lanes
Switching off the cleaner
8
8
8
8
Application instructions
Application instructions
Scrubbing
Polishing
9
9
9
9
3
English
IMPORTANT INFORMATION
Please comply with the following
points before starting:
* Should you discover anything
please notiffy your Kärcher sales at
888-253-2648.
* The voltage listed on the rating
plate must correspond to the supply
voltage.
Note:
To comply with the National Electrical
Code (NFPA 70), and to provide
additional protection from the risk of
electric shock, this BR 400 should
only be connected to the receptacle
that is protected by a ground fault
circuit interrupter (GFCI).
IMPORTANT SAFTY
INSTRUCTIONS
READ ALL INSTRUCTIONS
BEFORE USING.
WARNING
To reduce the risk of fire, electric
shock, or injury:
1. Do not leave appliance when
plugged in. Unplug from outlet
when not in use and before
servicing.
WARNING
2. TO REDUCE THE RISK OF
ELECTRIC SHOCK-USE
INDOORS ONLY
3. Do not allow to be used as a toy.
Close attention is necessary when
used by or near children.
4. Use only as discribed in this
manual. Use only manufacturer`s
recommended attachments.
BR VS 400 *USA
5. Do not use with damaged cord or
plug. If appliance is not working
as it should, has been dropped,
damaged, left outdoors, or
dropprd into water, return it to a
service center.
6. Do not pull or carry by cord, use
cord as a handle, close a door on
cord, or pull cord around sharp
edges or corners. Do not run
appliance over cord. Keep cord
away from heated surfaces.
7. Do not unplug by pulling on cord.
To unplug, grasp the plug, not the
cord.
8. Do not handle plug or appliance
with wet hands.
9. Do not put any object into
openings. Do not use with any
opening blocked; keep free of
dust, lint, hair, and anything that
may reduce air flow.
10. Keep hair, loose clothing, fingers,
and all parts of body away from
openings and moving parts.
11. Turn off all controls before
unplugging.
12. Use extra care when cleaning on
stairs.
13. Do not use to pick up flammable
or combustible liquids, such as
gasoline, or use in areas where
they may be present.
14. Connect to a properly grounded
outlet only. See Grounding
Instruction.
SAVE THESE INSTRUCTIONS
GROUNDING INSTRUCTIONS
4
CONNECT TO A PROPERLY
GROUNDED OUTLET ONLY
This appliance must be grounded. If it
should malfunction or breakdown,
grounding provides a path of least
resistance for electric current to
reduce the risk of electric shock. This
appliance is equipped with a cord
having an equipment-grounding
conductor and a grounding plug. The
plug must be inserted into an
appropriate outlet that is properly
installed and grounded in accordance
with all local codes and ordinances.
WARNING
Improper connection of the
equipment grounding conductor can
result in a risk of electric shock.
Check with a qualified electrician or
service person if you are in doubt as
to whether the outlet is properly
grounded. Do not modify the plug
provided with the appliance-if it will
not fit the outlet, have a proper outlet
installed by a qualified electrician.
This appliance is for use on a nominal
120-volt circuit and has a grounding
attachment plug that looks like the
plug illustrated in sketchpicture A.
Make sure that the appliance is
connected to an outlet having the
same configuration as the plug. No
adaptor should be used with this
appliance.
INTENDED USE
This floor cleaner is designed for
cleaning and caring for hard and
elastic floor coverings in inside areas.
Note:
This unit is suitable for commercial
use.
1. Grounded outlet
2. Grounded outlet Box
3. Grounded Pin
We expressly point out that, in
accordance with the product
liability law, we are not liable for
any damage caused by our units if,
in the case of use or repair or
exchange, original KÄRCHER
spare parts are not used and repair
is not carried out by a KÄRCHER
service centre or an authorised
specialist.
The same also applies to spare
parts and accessories.
English
OPERATING DESCRIPTION OF
THE FLOOR CLEANER
BR VS 400 *USA
DEVICE ELEMENTS
5
FIRST INSTALLATION
Installing the pushing handle
Install rotary brushes
– Carefully lay the cleaner down
– Always use two rotary brushes of
the same type
* The BR VS 400 has two rotary
*
*
*
*
*
brooms rotating contrary to each
other (1)
The cleaner can be moved
forwards and backwards when in
use
Work is carried out in a lateral
direction (large surface area
cleaned) or in lanes
Dirt is removed by the roller
brushes and cleaning agent (2)
Removed dirt must be cleaned up
by a dry/wet vacuum cleaner
Special rotary brushes (accessory)
are used for polishing the floor
covering
1. Unlocking thrust clip
2. Water suck-off socket (accessory)
3. Recessed grip
4. Castors
5. Splash guard (vertically adjustable)
6. Tank fill opening
7. Sliding U-shaped protection
1. Clip for water pump
2. Clip for brush motor
3. Power cable
4. Strain relief
5. Tank
6. Releasing brushes
7. Support stirrup
8. Brushes
9. Hinge
10. Turning handle for hinged clip
Position the lower half of the pushing
handle vertically
Place the rotary brush with gearing
onto the drive
Adjust the upper half of the pushing
handle and fix it with the knurled
screw
Note:
Do not jam cable when fitting
– Press the rotary brush down and
place it into the thrust bearing
– Install the second rotary brush as
described
– Check that the rotary brushes are
in the correct position
– Position the cleaner vertically
English
BR VS 400 *USA
6
Install the tank
Place the tank on the cleaner
Open the cap
Fill the tank with the required amount
of cleaning agent
– Hang the power cable in the strain-
– Set the splash guard according to
reliever
– Plug the cable into the power
socket
– Tighten fastening screw.
OPERATION
each application.
Note:
Adjust the splash guard parallel to the
floor
Fill the tank
Note:
Observe the dosing
recommendations of the cleaning
agent's manufacturer and mix the
cleaning agent solution thoroughly.
Take care when handling cleaning
agents!
* Comply with the safety
recommendations of the cleaning
agent's manufacturer
* Rinse splashes in eyes or on the
skin out or off with plenty of clean
water
* Call a doctor immediately
* Wash contaminated clothing with
water
Fill the tank with the required amount
of fresh water
Note:
The maximum water temperature
must be 50°C.
– Close the catch
– Use a cloth to wipe away excess
liquid that pours out
– Mix the cleaning agent well
Fitting the plug
– Place the tank onto the cleaner
– Check that the tank is positioned
correctly
Connect the plug to the power cable
Set the splash guard
– Undo the fastening screw
Turning the pushing handle
– Press the pushing handle
downwards and turn to the LEFT or
RIGHT
– Release strain on the pushing
handle and turn, it locks in several
positions
English
Releasing/locking the pushing
handle
BR VS 400 *USA
Starting/stopping the rotary
brushes
Measuring out the cleaning agent
7
Changing the rotary brushes
– Remove the tank
– Carefully lay the cleaner down
– Always refit two rotary brushes of
the same type
Pull the catch upwards and hold
Tip the pushing handle backwards
Tip the pushing handle forwards;
* The catch locks automatically
Pull the lower lever;
* Rotary brush drive ON
Release the lower lever;
* Rotary brush drive OFF
Press the upper lever;
* Cleaning agent feed ON
Release the upper lever;
* Cleaning agent feed OFF
Note:
The cleaning agent feed is effected
only if the brush drive is switched on.
– Lay down the rotary brush on the
drive side (gearing)
– Dismantle the second rotary brush
as described
Steering the cleaner
Press down and suspend the rotary
brushes
Fit on a new rotary brush with the
gearing located on the drive
Turn the pushing handle to the LEFT
* Machine moves to the LEFT
Remove the rotary brushes from the
gearing
– Press the rotary brush down and
place it into the thrust bearing
– Install the second new rotary brush
Turn the pushing handle to the
RIGHT
* Cleaner moves to the RIGHT
as described
– Check that the rotary brushes are
in the correct position
– Position the cleaner vertically
English
BR VS 400 *USA
EACH TIME BEFORE OPERATION
8
Working in a lateral direction
Switching off the cleaner
– Check the cleaner and especially
the power cable for damage
– Checked the rotary brushes for the
presence of foreign objects
– Fit the rotary brush that is suitable
for the job
– If necessary top up the cleaning
agent solution in the tank
– Connect the plug to the power
cable
– Hang the strain-reliever
– Plug the cable into the power
Pull the catch upwards and hold
socket
– Check that there are no obstacles
in the area to be cleaned
* See the Operation Chapter for the
description
– Move the cleaner to the LEFT and
RIGHT by turning the pushing
handle
– At the same time go backwards
slowly
– Press the top switch-stirrup as
required, the cleaning agent
solution is fed to the rotary brooms
Pull the catch upwards and hold
Tip the pushing handle backwards
Release both levers
Pull the lower lever;
* Rotary brush drive ON
– Tip the pushing handle forwards;
* The catch locks automatically
– When necessary push the pushing
OPERATION
WARNING!
The cleaner must always be in motion
during operation!
Do not work on one spot as this may
damage the floor covering!
Tip the pushing handle backwards
Working in lanes
handles down and turn back to the
initial position
Note:
Do not leave the cleaner on the rotary
brushes
Do not start an unfilled appliance on
delicate floors!
Prior to start-up, tilt unit, activate
cleaning agent supply and switch on
drive unit for brush rollers.
Pull the lower lever;
* Rotary brush drive ON
Press the pushing handle downwards
and turn to the LEFT or RIGHT
– Move the appliance slowly
backwards or forwards in long
sweeping movements
– Press the top switch-stirrup as
required, the cleaning agent
solution is fed to the rotary brooms
English
BR VS 400 *USA
INSTRUCTIONS FOR USE
Polishing
9
Dismantle the rotary brushes
Emptying the tank
* Polishing is carried out without
Note:
If the machine is not positioned
vertically the rotary brushes must be
dismantled
using liquid
WARNING!
The cleaner must always be in motion
during operation!
Do not work on one spot as this may
damage the floor covering!
Instructions for use
Prior to using the appliance on
delicate surfaces (PVC, carpets)
– tilt it
– Switch the cleaning agent feed on
– Do not operate it until the machine
has been filled with cleaning agent.
Note:
The cleaning agent feed is effected
only if the brush drive is switched on.
* The brush well must be as dry as
possible before the pad is fitted
– Remove the tank
– Carefully lay the cleaner down
EACH TIME AFTER USAGE
Pull out the plug
Remove the tank, empty and rinse
with water
Note:
Dispose of the cleaning agent
solution in accordance with the
relevant regulations.
Heed the instructions of the cleaning
agent's manufacturer.
– Pull the power cable out of the
socket
– Disconnect the plug from the power
cable
Lift the appliance
Engage the safety device
Press down and suspend the rotary
brushes
Position the cleaner vertically
Note:
Do not leave the cleaner on the rotary
brushes
Remove the rotary brushes from the
gearing
Switching off the cleaner
Scrubbing
* Remove loose dirt by brushing
before working with the cleaner
* Match the amount of cleaning
agent solution on the floor covering
to the level of dirt
* Select rotary brushes suitable for
the dirt and floor covering
Remove the strain-reliever
Release the pushing handles and tip
forwards
English
BR VS 400 *USA
RECOMMENDED CLEANING
AGENTS
* Only use cleaning agents that do
not contain solvent, hydrochloric
acid or hydrofluoric acid
Maintenance cleaning
(also on floors sensitive to alkalis)
RM 746
6.291-462
Cleaning grease
RM 69 ASF
– Lay down the rotary brush on the
drive side (gearing)
Push the appliance onto the track
rollers
– Dismantle the second rotary brush
10
ACCESSORIES
Rotary brush (white)
For thorough cleaning with little
soiling or for sensitive floors
1 only
4.762-249
Pads (bright red)
Medium
The appliance requires 2x25
20 pieces
6.369-453
Rotary brush(grey)
Nylon Grit, hard
For thoroughly cleaning heavily soiled
floors
1 only
4.762-252
Pads (yellow)
Soft
The appliance requires 2x25
20 pieces
6.369-451
Thorough cleaning (stripping) of PVC
RM 752
6.291-466
Rotary brush (red)
high/low, for structured floors
1 only
4.762-251
Pads (white)
Very soft
The appliance requires 2x25
20 pieces
6.369-388
Thorough cleaning (stripping) of
linoleum
RM 754
6.291-425
Rotary brush(black)
soft, for polishing
1 only
Tank
Contents 3 litres
For low heights
Sanitary cleaner
RM 68 ASF
6.291-680
Rotary broom (light blue)
soft, for carpeting
1 only
4.762-254
Disinfection cleaner
RM 732
6.291-382
6.291-523
as described
– Position the cleaner vertically
CLEANING AND CARE
4.762-250
2.639-080
– Only use a damp cloth for cleaning
TRANSPORTATION
Note:
Movement on rollers in inside areas
and on smooth floors is not
problematic.
Take care when moving on nonsmooth floors and in outside areas.
the cleaner
– Wipe afterwards with a clean, dry
cloth
– Do not use chemical cleaning
agents
PROTECTION FROM FREEZING
– Store the cleaner in a room
Rotary broom (horsehair)
natural, for polishing to a mirror finish
1 only
4.762-274
Pad
For mounting pads
1 only
–
–
–
–
operate the upper lever until no
more liquid flows
Emptying the tank
Fill the tank with warm water
(max. 50°C) before taking into use
Wait until any ice that may be in the
pump has been melted
Only operate the upper lever now
for measuring out liquid.
2.639-081
Additional weight
7 kg, for polishing
5.031-790
4.762-228
protected from freezing
– If there is a danger of freezing
Tank
Contents 10 litres
For larger amounts of
cleaning agent
Pads (green)
Hard
The appliance requires 2x25
20 pieces
6.369-452
Additional weight
12 kg, for crystallizing
2.639-193
English
BR VS 400 *USA
FAULT INDICATIONS
No or too little cleaning agent
solution on the floor
– Fill the tank with the cleaning agent
solution
– Check that the tank is firmly fitted
Unsatisfactory cleaning results
– Replace worn rotary brooms
– Check that the rotary broom or the
pads match the application on
hand.
Rotary brushes do not turn
– Remove jammed foreign bodies
– The appliance is overloaded, the
overcurrent protection switch
triggered, allow it to cool down. The
appliance is operable again after
approx. 30 s.
– Use rotary brushes suitable for job
Mains circuit breaker triggers
when the cleaner is switched on
– Ensure adequate mains fuse
protection (15 A time-lag) or use
starting current limiter
– Switch off other consumers or use
other power circuit.
Cleaner runs unevenly or vibrates
heavily
– Check the proper fit of the rotary
brooms
– Exchange the right for the left hand
rotary broom and vice versa
– Soak the rotary brooms in hot water
(approx. 15°C) for approx. 80 min.
If fault cannot be rectified, have
unit checked by After-Sales
Service.
TECHNICAL DATA
Mains fuse
(slow)
15 A
Power drive
Rated voltage
120 V (1~60Hz)
Nominal power consumption
Total
1,6 kW
Brush motor
1,55 kW
Spray pump
0,05 kW
Area performance
(theoretical)
450 m²/h
Brushes
Number
Diameter
2 pieces
95 mm
Tank
Capacity
option
3 Litres
10 Litres
Dimensions and weights
Length
Width
Height without protective
bracket
Empty weight
Working width
Protection class
Noise emission
Mean sound level
according to IEC 60704-1
Machine vibration
according to ISO 5349
upper limbs
530 mm
450 mm
180 mm
30 kg
400 mm
I
70 dB(A)
< 1m/s²
11
BR VS 400 *USA
21