1
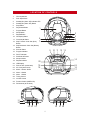
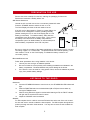
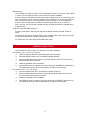
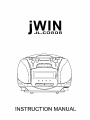
LOCATION OF CONTROLS
1.
CD Compartment
2.
Push Open/Close
3.
Standby/On (Alarm Off) Indicator LED
4.
Standby/On (Alarm Off) Button
5.
Stop Button
6.
Play/Pause Button
7.
Program Button
8.
Sleep Button
9.
Repeat Button
10.
CD Display Button
1
2
3
8
7
11.
Clock Adjust Button
12.
Skip Forward / Clock Set (Hour)
Button
13.
Skip Backward / Clock Set (Minute)
Button
14.
Snooze Button
15.
Program Indicator
16.
FM ST. Indicator
17.
Dial Scale & Pointer
18.
Sleep Indictaor
19.
Repeat Indicator
20.
LED Display
21.
Phones Jack (at the back)
22.
AC Cord (at the back)
23.
Music / Buzzer Switch
24.
Alarm 2 Switch
25.
Alarm 1 Switch
9
4
5
6
10 11 12 13
14
20
15
16
17
19
18
26.
Tuning Control
27.
Volume Control
28.
Function Switch (AM/FM CD)
29.
FM Antenna (at the back)
21
22
29
23 24
26
25
1
27 28
PREPARATION FOR USE
Remove the stereo carefully from the box, retaining the packaging for future use.
Read these instructions carefully before use.
AC P O W E R O PERATION
Unravel the AC cord and connect it to a convenienty located AC outlet.
Press the STANDBY button to switch the unit on or off.
The Clock Display will show 12:00 and needs to be set.
AC O u tle t
AC Plu g
9V
If the AC cord is disconnected or if there is a power failure, the
electronic clock is designed to continue operating internally
(without showing the time on the Clock Display) with a 9 volt
battery (not included). To install the battery, slide down the
compartment cover at the back of unit) to open. Then, connect
the battery to the terminals of the battery snap inside the
compartment (use of an alkaline battery is recommended) and
slide the battery compartment cover back into place.
Be sure to check the condition of the battery periodically by disconnecting the AC cord and
connecting it again 2 or 3 minutes later. The preset times should continue operating. If the
clock resets to ]12:00^ on the Clock Display, it indicates the battery is dead or not
connected properly.
B ATTERIES P RECAUTIONS
Follow these presautions when using batteries in this device:
1.
Use only the size and type of batteries specified.
2.
Be sure to follow the correct polarity when installing the batteries as indicated in the
battery compartment. Reversed batteries may cause damage to the device.
3.
If the device is not to be used for a long period of time, remove the batteries to prevent
injury from possible battery leakage.
LISTENING TO THE RADIO
O PERATION
m
Press the STANDBY/ON button to turn the unit on, the STANDBY/ON LED indicator will
light.
m
Silde the FUNCTION switch to the desired band (AM or FM) and tune a station by
turning the TUNING control.
m
When a strong FM stereo signal is received while listening to FM, the FM ST indicator
will light and the sound will be heard in stereo.
m
Adjust the VOLUME control as desired.
A NTENNA
For FM reception there is a built-in one-meter FM aerial wire at the rear of the unit. Unravel
the wire and move it around to obtain the best reception. For MW reception the signals are
picked up through the built-in ferrite antenna. You may have to move the unit to obtain the
best reception.
2
IMPORTANT
Since movement of the CD mechanism and the sensitive circuitry may cause interference to
a radio tuner nearby, switch this unit off while operating other radio devices.
This product utilizes a laser
Danger -
Invisible laser radiation when opened and interlock failed or defeated. Avoid
direct exposure to the beam.
Caution -
Use of controls, adjustments, or procedures not listed in this manual may
result in hazardous radiation exposure.
C O N C E R N I N G C OMPACT D I S C S
Only compact discs identified with this mark can be used with this player.
HANDLING COMPACT DISCS
To remove a disc from its storage case, press down on the centre of the case and lift the
disc out, holding it carefully by the edges.
Fingerprints and dust should be carefully wiped off the disc\s
recorded surface with a soft cloth. Unlike conventional records, compact discs have no
grooves to collect dust and microscopic debris so gently wiping with a soft cloth should
remove most particles. Wipe in a straight line from the inside to the outside of the disc. Small
dust particles and light stains will have absolutely no effect on reproduction quality.
Never use chemicals such as record sprays, antistatic sprays, benzine, or thinners to clean
compact discs. These chemicals can damage the disc′s surface.
Discs should be returned to their cases after use. This avoids serious scratches that could
cause the Laser pickup to skip.
Do not expose discs to direct sunlight, high humidity, or high temperatures for extended
periods. Long exposure to high temperatures can warp the disc.
Do not stick paper or write anything with a ballpoint pen on the label side of the disc.
3
LOADING AND UNLOADING COMPACT DISCS
L OAD ING
AND
U N L O A D I N G C OMPACT D I S C S
m
Press the STANDBY button to turn the unit on.
m
Slide the FUNCTION Switch to the CD position.
m
Press the right side of the CD door, labelled ]PUSH OPEN/CLOSE^ to open the CD
compartment.
m
When the disc compartment has opened, insert the disc with the label side facing up.
Push down in the centre until disc is locked in place.
m
Close the disc compartment by pressing the ]PUSH OPEN/CLOSE^. When the
compartment is fully closed, the disc will start turning automatically. The total number
of tracks will appear in the display.
m
The disc compartment may be opened at any time by first pressing the stop button and
then pressing the ]PUSH OPEN/CLOSE^. Remove the CD only after the compartment
has fully opened.
C AUTION
Do not put anything except a compact disc into the compartment. Foreign objects can
damage the mechanism.
Keep the disc compartment closed when not in use to prevent dirt and dust from entering
the mechanism.
Never place more than one disc into the disc compartment at any time.
If the disc is correctly loaded, the total number of tracks on the disc will be displayed:
Notes:
After the disc compartment is fully closed, the disc information may not
appear on the display. This means that the disc is improperly loaded (most
likely it is upside down). To check, open the disc compartment again and
reload the disc.
DISC PLAY
m
Insert a CD as described in the previous section and close the disc compartment.
m
The display will then show the total number of tracks.
m
Press the PLAY/PAUSE button to start playback.
m
Adjust the VOLUME control as desired.
To skip forward or backward through the tracks on the disc, press the SKIP forward /
backward buttons.
m
When the disc is through playing, it will stop. Press STOP button to stop disc before it
is finished.
Notes:
- If the disc is deeply scratched, or too dirty, disc play may not start. If an
improperly centred disc is played, noise can be heard in the mechanism.
The use of such discs should be avoided.
- If the disc is inserted incorrectly, or the disc is damaged the display will
show ]No disc^.
4
DISC ERRORS
This compact disc player has built-in error compensation circuits to correct for minor defects
in a disc. There are limits, however, to the amount of correction available.
In some cases, the CD player may skip some tracks, or parts of tracks, on a disc during disc
play. This problem may be caused by defects (such as scratches) in the disc being played,
which are too large for the error compensation circuits to handle. If you encounter this
problem, check the CD player's operation as follows, before having the unit serviced:
Play a new disc. If the CD player operates normally, the skipping problem is probably due to
a defective disc.
T O S TOP
A
CD P ART W AY T H R O U G H
Press the STOP button. Disc play will stop and the display will show the total number of
tracks
To temporarily stop disc play (pause mode), press the Play/Pause button. Disc play will stop
at the current play position. The track playing time will flash.
To resume disc play, press the PLAY/PAUSE button again.
REPEAT DISC PLAY
Use the REPEAT button to listen to an entire disc, one track repetitively.
F OR
REPEAT PLAY OF O N E OF THE TRACKS
m
With a CD inserted, silide the FUNCTION switch to the CD position.
m
Press the REPEAT button once. The REPEAT indicator will blink.
m
Press the Play/Pause button and the unit will then play the same track over and over
until the STOP button is pressed.
m
Adjust the VOLUME control as desired.
m
If the REPEAT button is pressed 2 more times during play, the REPEAT indicator will go
off, Repeat Mode will end and normal playback will resume from that point.
F OR
REPEAT PLAY O F ALL THE TRACKS
m
Press the Repeat button twice. The REPEAT indicator will light up.
m
Press the Play/Pause button and the unit will then play all the tracks on the CD over
and over until the STOP button is pressed.
m
Adjust the VOLUME control as desired.
m
If the REPEAT button is pressed 1 more time during play, the REPEAT indicator will go
off, Repeat Mode will end and normal playback will resume from that point.
5
PROGRAMMED DISC PLAY
m
Insert a CD as described in the previous section and close the disc compartment.
m
Silide the FUNCTION switch to the CD position.
m
Press the PROGRAM button, ]P 01^ will show on the display, select the first track to
be played back using the SKIP forward/backward buttons, then press the PROGRAM
button again.
m
Repeat this step to program additional tracks up to a maximum of 20 tracks.
m
Press the PLAY/PAUSE button to begin Program playback and adjust the VOLUME
control as desired.
m
To skip forward or backward through the programs, press the SKIP buttons.
m
When the disc is through playing, it will stop.
Notes:
- Press the STOP button to stop the program before it is finished.
- To clear the memorized tracks, press the PROGRAM button to enter the
Program mode (PROGRAM indicator will blink) and then press STOP
button or open the CD door as explained.
- Programming is the ability to select the order in which a series of tracks
will be played.
- Each track may be stored in the program memory as many times as
desired (up to 20 tracks).
- To repeatedly play the memorized tracks, press the REPEAT button
twice; the REPEAT indicator will light.
CLOCK SETTING
T O S ET
OR
R ESET
THE
A CTUAL T I M E
m
To set the minute: Press and hold the CLOCK ADJ button, then press the SKIP 9/M
button until the present minute appears in the display.
m
To set the hour: Press and hold the CLOCK ADJ button, then press SKIP :/H button
until the present hour appears in the display.
T O S ET
OR
R ESET
THE
A LARM T I M E S
m
Slide the ALARM 1 or ALARM 2 switch to the ADJ position, the Alarm time will blink in
the display.
m
To set the wake minute: Press the SKIP 9/M button until the desired wake minute
appears in the display.
m
To set the wake hour: Press the SKIP :/H button until the desired wake hour appears
in the display.
m
Slide the desired alarm switch (1 or 2) to the ON (Set) or OFF (Not Set) position.
Notes:
- When the ALARM 1 or ALARM 2 switch is in the SET position, all CD and
function buttons will not operation, so make sure to return the switch to the
NO or OFF position after setting the alarm time(s).
- This unit has 2 alarms, each can be set for a different wake time.
6
T O S ET
THE
A LARM
TO
W AKE
TO
BUZZER
m
Set the alarm time as previously instructed.
m
Slide the BUZZER/MUSIC switch to the BUZZER position. When the actual time matchs
one of the selected preset alarm times, the buzzer will sound for 60 minutes and then
shuts off.
T O S ET
THE
A LARM
TO
W AKE
TO
R ADIO
m
Set the alarm time as previously instructed. Slide the FUNCTION switch to the AM or
FM position.
m
Select a radio station and make sure the volume is set as desired.
m
Make sure the power is off (STANDBY/ON indicator is NOT lit). Slide the BUZZER/
MUSIC switch to the MUSIC position. When the actual time matches one of the
selected preset alarm times, the unit automatically turns on for 60 minutes and then
shuts off.
T O S ET
THE
A LARM
TO
W AKE
TO
CD
m
Set the alarm time as previously instructed. Slide the FUNCTION switch to the CD
position.
m
Insert a CD and make sure the volume is set as desired.
m
Make sure the power is off (STANDBY/ON indicator is NOT lit). Slide the BUZZER/
MUSIC switch to the MUSIC position. When the actual time matches one of the
selected preset alarm times, the unit automatically turns on for 60 minutes and then
shuts off.
Note:
T O S HUT
THE
- When the disc is through playing it will stop.
A LARM O F F
m
To shut the alarm off, press the STANBY/ON button once and the alarm time will be
reset for the next day. Slide the desired ALARM 1 or ALARM 2 switch to the OFF
position to turn off the alarm and not set it for the next day.
m
The alarm can be temporarily turned off manually by pressing the SNOOZE button; the
alarm will turn back on automatically 6 minutes later.
T O A CTIVATE
m
m
THE
S LEEP FUNCTION
Tune the desired radio station or insert a CD previously instructed.
Press the SLEEP button and ] - - ] will appear on the clock display.
Repeatedly press the SLEEP button for the desired sleep time of 90, 60 or 30 minutes.
The SLEEP indicator will light to indicate the Sleep mode is activated. The sleep time
will internally count down and then turn off when the desired amount of time has passed.
m
To turn the Sleep mode off, either press the STANDBY/ON button, which will turn the unit
off, or press the SLEEP button until ] - - ] appears on the display to keep the radio/CD on,
but cancel the Sleep mode.
HEADPHONE
Headphones should have a 3.5mm diameter stereo plug and an impedance of 8-32 ohms.
When headphones are connected, the speakers are automatically disconnected.
7
MAINTENANCE AND CARE
Electronic products of this kind should never be subjected to extreme temperatures or high
humidity. For instance, this set should not be placed in bathing areas or around stoves and
radiators.
If necessary, clean the unit with a piece of cloth dampened with water only (Be sure the AC
Power Cord is disconnected from the Mains). Never use a polish or a strong detergent as
this will damage the finish of the cabinet.
This equipment has been designed and manufactured to meet the highest international
standards, but, like any electrical apparatus which is operated at mains voltage, care must
be taken if you are to obtain the best results and safety is to be assured. This is particularly
important with audio equipment.
DO. . .
read the operating instructions before you attempt to use the
equipment.
DO. . .
ensure that all electrical connections (including the mains plug,
extension leads and interconnections between pieces of
equipment) are properly made and in accordance with the
manufacturer′s instructions. Check that the mains fuse rating is
correct.
DO. . .
always consult your dealer if you are ever in doubt about the
installation, operation or safety of your equipment. He is the best
person to advise you.
DO NOT...
obstruct the necessary all-round ventilation - especially DON\T
stand the set close to curtains or on soft furnishing such as
carpets. Overheating can cause unnecessary damage and
shorten the life of the set.
Remember that to obtain the best performance and lasting satisfaction from your equipment,
have it regularly maintained by a reliable service organization. Ensure that it is correctly used
by all the family.
ABOVE ALL:Never let children push anything into holes or slots in the case - this could result in an
electric shock; Never guess or take chances with electrical equipment of any kind - it is
better to be safe than sorry!
8