1
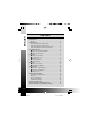
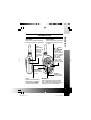
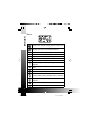
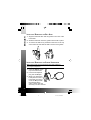
PacTronics, Inc.
800-607-2243
www.pactronics.com
UBZ-GR14
FM TRANSCEIVER/ STEREO RADIO
INSTRUCTION MANUAL
EMETTEUR-RECEPTEUR FM
MODE D’EMPLOI
TRANSCEPTOR FM/ RADIO ESTÉREO
MANUAL DE INSTRUCCIONES
KENWOOD CORPORATION
© B62-XXXX-00 (K)
09 08 07 06 05 04 03 02 01 00
UBZ-GR14 E 0 cover
1
01.4.12, 9:35 AM
T HANK Y OU
ENGLISH
We are grateful for your purchase of this KENWOOD product
and welcome you to the Family Radio Service (FRS). FRS is a
personal, short range 2-way radio band for family & friends to
keep in touch without the need for a license, radio knowledge, or
radio is called a
monthly charges. Your KENWOOD
“transceiver”, meaning “transmitter & receiver”. Your transceiver
provides safety and convenience almost anywhere.
Communication distance depends on your location; you’ll get a
maximum distance of up to approximately 2 miles (3.2 km) in
open areas, less in buildings and vehicles.
P RECAUTIONS
•
•
•
•
•
Do not modify or attempt to adjust the transceiver for any
reason.
Avoid extremes in exposure to weather, heat, and cold. This
transceiver can be used in mild weather conditions, but it is
not waterproof.
Do not expose the transceiver to long periods of direct
sunlight, nor place it close to heating appliances.
Do not place the transceiver in excessively dusty, humid, or
wet areas, nor on unstable surfaces.
If an abnormal odor or smoke is detected coming from the
transceiver, immediately switch OFF the power and remove
the batteries from the transceiver. Contact your KENWOOD
dealer.
F EATURES
•
•
•
•
•
•
•
•
14 transceiver channels
38 code settings for each channel
Call alert
Automatic battery power saver
Low battery power warning tone
Key lock
2 mile (3.2 km) communication range
FM radio (in stereo when using the supplied headphones)
i
UBZ-GR14 E 0i contents
1
01.4.12, 9:35 AM
ENGLISH
CONTENTS
ORIENTATION .......................................................................... 1
DISPLAY ................................................................................ 2
PREPARATION ......................................................................... 3
INSTALLING/ REMOVING THE BATTERIES ...................................... 3
INSTALLING/ REMOVING THE BELT HOOK .................................... 4
INSTALLING/ REMOVING THE STEREO HEADPHONES ..................... 4
INSTALLING/ REMOVING OPTIONAL ACCESSORIES ........................ 5
GETTING STARTED ................................................................ 6
1 SWITCHING THE POWER ON/ OFF ...................................... 6
2 SELECTING AN OPERATING MODE ........................................ 6
3 ADJUSTING THE VOLUME ..................................................... 6
FRS MODE ............................................................................... 7
1 SELECTING A CHANNEL ....................................................... 7
2 LISTENING FOR A CALL ....................................................... 7
3 MAKING A CALL ................................................................. 8
4 CHANNEL SCANNING .......................................................... 9
5 CODE SCANNING ............................................................... 9
FM MODE ............................................................................... 10
1 SELECTING A STATION ...................................................... 10
2 SCANNING THE FM BAND ................................................. 10
FRS/FM MODE ....................................................................... 11
1 SELECTING AN FRS CHANNEL .......................................... 11
2 SELECTING AN FM STATION .............................................. 11
3 SCANNING THE FM BAND ................................................. 12
4 MAKING A CALL ............................................................... 12
OPERATING FEATURES ....................................................... 13
MONITORING AN FRS CHANNEL ............................................. 13
KEY LOCK ........................................................................... 13
DISPLAY ILLUMINATION ........................................................... 14
BATTERY POWER SAVER ........................................................ 14
LOW BATTERY WARNING ....................................................... 14
NOTICES TO THE USER ....................................................... 15
LIMITED WARANTY STATEMENT (U.S.A.) .......................... 17
LIMITED WARANTY STATEMENT (CANADA) ...................... 19
ii
UBZ-GR14 E 0i contents
2
01.4.12, 9:35 AM
ORIENTATION
M key
Press before
making a call,
to alert the
other party.
Press and
hold to turn
the squelch
OFF.
Microphone
Speak here
when making
a call.
L key
Press to turn the display
backlight ON. Press and
hold to lock the MODE
key and Power switch.
Power switch
Press and hold for 3 seconds
to switch the transceiver ON
or OFF.
ENGLISH
PTT switch
Press and hold while speaking
into the microphone, to transmit.
/
keys
Press
or
to increase or
decrease the
volume, channel
number, channel
code, or station
when in the
appropriate
mode. Also
used to scan
the radio band.
Speaker
Listen here for
received calls.
MODE key
Press and hold to select the FRS,
FM, or FRS/FM operating mode.
Press while in an operating mode to
change the transceiver settings.
1
UBZ-GR14 E 1-20
1
01.4.12, 9:35 AM
ENGLISH
D ISPLAY
Displays the channel number and the volume level.
Displays the code for the selected channel.
Represents the FRS operating mode.
Represents the FM operating mode.
Represents the FRS/FM operating mode.
Appears when listening to an FM station in stereo.
Blinks while you are adjusting the volume level.
Blinks when you are able to change the operating
channel.
Blinks when you are able to adjust the channel
code.
Blinks while scanning.
Appears while pressing the M key to make a call.
Appears while pressing the PTT switch to transmit.
Appears when a signal is present on the selected
channel.
Blinks while the Key Lock function is activated.
Blinks when the battery power is low.
2
UBZ-GR14 E 1-20
2
01.4.12, 9:35 AM
PREPARATION
THE
B ATTERIES
This transceiver requires 4 AAA batteries. Use high quality
alkaline batteries to enjoy longer periods of battery life.
1
If the belt hook is installed, first remove it from the
transceiver (refer to “INSTALLING/ REMOVING THE BELT HOOK”
on page 4).
2
Pull back on the battery cover latch, then remove the
battery cover.
3
Insert or remove 4 AAA batteries.
•
4
ENGLISH
I NSTALLING / R EMOVING
When inserting batteries, be sure to match the battery
polarities with those marked in the battery compartment.
Replace the battery cover, making sure the battery cover
latch locks in place.
3
UBZ-GR14 E 1-20
3
01.4.12, 9:35 AM
ENGLISH
I NSTALLING / R EMOVING
THE
B ELT H OOK
1
Align the belt hook tabs with the guides on the rear of the
transceiver.
2
Slide the belt hook down the guides until it locks in place.
3
To remove the belt hook, pull back on the lever on the top
of the belt hook and slide the belt hook out of the guides.
I NSTALLING / R EMOVING
THE
S TEREO H EADPHONES
Note: Always switch OFF the transceiver power when installing or
removing the headphones.
1
Open the SP tab on the
top of the transceiver.
2
Insert the headphone
plug into the SP jack.
3
When you remove the
head-phones from the
transceiver, be sure to
cover the SP jack with
the attached tab in
order to keep dust and
dirt away from the contacts.
4
UBZ-GR14 E 1-20
4
01.4.12, 9:35 AM
I NSTALLING / R EMOVING O PTIONAL A CCESSORIES
The following accessories can be used with this transceiver:
•
SMC-34 Speaker-Microphone
•
HMC-3 Headset
•
EMC-3 Clip Microphone with Earphone
ENGLISH
Note: Always switch OFF the transceiver power when installing or
removing the optional accessories.
To install these accessories:
1
Open the MIC-SP tabs on the top of the transceiver.
2
Insert the accessory’s plugs into the MIC-SP jacks.
3
When you remove the accessory from the transceiver, be
sure to cover the MIC-SP jacks with the attached tabs in
order to keep dust and dirt away from the contacts.
Note:
◆ Refer to the accessory instruction manuals for detailed instruction
on each of the accessories.
◆ The 3 programmable function keys on the SMC-34 cannot be used
with this transceiver. To use the speaker-microphone, press the
PTT switch to transmit and release it to receive. You can also
adjust the volume level using the SMC-34 Volume control.
5
UBZ-GR14 E 1-20
5
01.4.12, 9:35 AM
ENGLISH
GETTING STARTED
1 S WITCHING
THE
P OWER ON/ OFF
To switch the transceiver power ON (or OFF), press and
hold the switch for 3 seconds.
•
A tone sounds to confirm that the power has been switched
ON (or OFF).
2 S ELECTING
1
O PERATING M ODE
Press and hold the MODE key to cycle through FRS, FM,
and FRS/FM Models.
•
•
2
AN
Each time you press and hold the MODE key for 0.5 seconds,
the operating mode cycles to the next mode.
FRS, FM, or both icons appear, indicating the selected
operating mode.
Depending on the operating mode you have selected,
refer to the appropriate section:
•
•
•
FRS Mode – page 7. FRS Mode allows you to send and
receive transmissions.
FM Mode – page 10. FM Mode allows you to listen to FM
radio broadcasts.
FRS/FM Mode – page 11. FRS/FM Mode allows you to
monitor only a single channel for sending and receiving
transmissions, while also listening to FM radio broadcasts.
3 A DJUSTING
THE
V OLUME
Press the ▲ or ▼ key to increase or decrease the volume
level.
•
•
Press and hold the ▲ or ▼ key to continuously increase or
decrease the volume until you release the key, or until the
volume is at its maximum or minimum level.
The volume level (1 ~ 8) appears for approximately
5 seconds before returning to the channel number/ station.
6
UBZ-GR14 E 1-20
6
01.4.12, 9:35 AM
FRS MODE
1
The FRS and CH icons blink.
Press the ▲ or ▼ key to increase or decrease the
channel number.
•
3
C HANNEL
Press the MODE key momentarily.
•
2
A
Press and hold the ▲ or ▼ key to continuously increase or
decrease the channel number until you release the key.
Once you have selected your desired channel number
(1 ~ 14), press the PTT switch to complete the selection
and return to normal operation.
2 L ISTENING
FOR A
C ALL
1
If a calling party first presses their M key to alert you that
they are going to speak, you will hear a 2 second ringing
tone.
2
You will hear audio from the speaker. Readjust the
volume if necessary.
•
3
ENGLISH
1 S ELECTING
The reception indicator appears while you are receiving.
When the party has finished speaking, you can respond
to the call (refer to “3 MAKING A CALL” on page 8).
This transceiver has a feature that allows you to ignore
unwanted calls. To ignore unwanted calls, you can set up a
code on your selected channel. However, you must ensure
that each member of your group is using the same code,
otherwise you will be unable to communicate with each
other. If you set the code on your selected channel to “OF”
(off), you will hear calls from everyone within range who is
using the same channel you have selected.
7
UBZ-GR14 E 1-20
7
01.4.12, 9:35 AM
1
Press the MODE key momentarily, two times.
ENGLISH
•
2
The FRS and SUB icons blink.
Press the ▲ or ▼ key to increase or decrease the code
number of the selected channel.
•
Press and hold the ▲ or ▼ key to continuously increase or
decrease the code number until you release the key.
3
Once you have selected your desired code number
(01 ~ 38 or OF), press the PTT switch to complete the
selection and return to normal operation.
4
Make sure your other party members are using the same
code that you have set up.
•
If each party member is using a different code, you will not
be able to hear each other’s calls.
3 M AKING
1
The transmission indicator and CALL icon appear.
This step is not necessary when you are responding to a
call, as the other party is already expecting a response.
Press and hold the PTT switch, hold the transceiver
about 3 inches (7 1/2 cm) from your mouth, then speak
into the microphone using your normal voice.
•
3
C ALL
When you want to make a call on your selected channel,
first press the M key to alert the other party that you are
about to make a call.
•
•
2
A
The transmission indicator appears while you are
transmitting.
When you finish speaking, release the PTT switch.
Note: If you do not release the PTT switch after you finish talking, you
will not be able to receive any calls. Additionally, pressing the PTT
switch for extended periods will reduce the battery power.
8
UBZ-GR14 E 1-20
8
01.4.12, 9:35 AM
4 C HANNEL S CANNING
When you want to scan all channels for a signal, press
the MODE key momentarily, three times.
•
•
2
When a signal is found on a channel, scan will pause at
that channel for 10 seconds.
•
3
The FRS, CH, and SCAN icons blink and the transceiver
scans the channels from channel 1 to 14.
All channel codes are turned off during scan.
ENGLISH
1
To resume scanning before the 10 second timer elapses,
press the ▲ or ▼ key.
To end scan and return to normal operation, press the
PTT switch.
5 C ODE S CANNING
1
When you want to scan all code settings on a single
channel, press the MODE key momentarily, four times.
•
2
When a signal is found at a code setting, scan will pause
at that code for 10 seconds.
•
3
The FRS, SUB, and SCAN icons blink and the transceiver
scans the codes from code 01 to 38.
To resume scanning before the 10 second timer elapses,
press the ▲ or ▼ key.
To end scan and return to normal operation, press the
PTT switch.
9
UBZ-GR14 E 1-20
9
01.4.12, 9:35 AM
ENGLISH
FM MODE
1 S ELECTING
1
A
S TATION
Press the MODE key momentarily.
•
The FM icon blinks.
2
Press the ▲ or ▼ key to increase or decrease the FM
station.
3
Once you have selected your desired station, press the
PTT switch.
•
Pressing the M key after selecting a station will return to the
last station you were using.
2 S CANNING
1
The FM and SCAN icons blink and the transceiver scans
the FM radio band.
When a station is found, scan will pause at that station
for 10 seconds.
•
3
FM B AND
When you want to scan the FM radio band to find a
station, press and hold the ▲ or ▼ key for 0.5 seconds.
•
2
THE
To resume scanning before the 10 second timer elapses,
press the ▲ or ▼ key.
To end scan and keep the radio station that has been
found, press the PTT switch.
•
Pressing the M key after finding a station will end scan and
return to the last station you were using.
10
UBZ-GR14 E 1-20
10
01.4.12, 9:35 AM
FRS/FM MODE
AN
FRS C HANNEL
Only one FRS station can be monitored while in FRS/FM
Mode. The channel monitored is the last channel you
used while in FRS Mode.
ENGLISH
1 S ELECTING
To select a channel, you must first enter FRS Mode, then
select a channel as described in “1 Selecting a Channel”
on page 7.
While operating the transceiver, the FRS channel is
continuously monitored. When a signal is present, the
transceiver automatically switches to the FRS channel.
When the signal is finished, the transceiver will wait for
1 second before returning to the FM radio band.
2 S ELECTING
1
AN
FM S TATION
Press the MODE key momentarily.
•
The FM icon blinks.
2
Press the ▲ or ▼ key to increase or decrease the FM
station.
3
Once you have selected your desired station, press the
PTT switch.
•
Pressing the M key after selecting a station will return to the
last station you were using.
11
UBZ-GR14 E 1-20
11
01.4.12, 9:35 AM
ENGLISH
3 S CANNING
1
The FM and SCAN icons blink and the transceiver scans
the FM radio band.
When a station is found, scan will pause at that station
for 10 seconds.
•
3
To resume scanning before the 10 second timer elapses,
press the ▲ or ▼ key.
To end scan and keep the radio station that has been
found, press the PTT switch.
•
Pressing the M key after finding a station will end scan and
return to the last station you were using.
4 M AKING
1
C ALL
The transmission indicator and CALL icon appear.
This step is not necessary when you are responding to a
call, as the other party is already expecting a response.
Press and hold the PTT switch, hold the transceiver
about 3 inches (7 1/2 cm) from your mouth, then speak
into the microphone using your normal voice.
•
3
A
When you want to make a call on the FRS channel, first
press the M key to alert the other party that you are
about to make a call.
•
•
2
FM B AND
When you want to scan the FM radio band to find a
station, press and hold the ▲ or ▼ key for 0.5 seconds.
•
2
THE
The transmission indicator appears while you are
transmitting.
When you finish speaking, release the PTT switch.
•
The transceiver returns to the FM radio band after 1 second.
Note: If you do not release the PTT switch after you finish talking, you
will not be able to receive any calls. Additionally, pressing the PTT
switch for extended periods will reduce the battery power.
12
UBZ-GR14 E 1-20
12
01.4.12, 9:35 AM
OPERATING FEATURES
AN
FRS C HANNEL
When you are not receiving a call, the squelch on the
transceiver automatically mutes the speaker so that you will
not hear very weak signals or background noise.
Deactivating this feature to listen to background noise makes
adjusting the volume simpler as well.
1
Press and hold the M key for more than 0.5 seconds.
•
2
ENGLISH
M ONITORING
Squelch is deactivated while you are pressing this key. You
will hear background noise at this time.
Release the M key to reactivate the squelch.
K EY L OCK
You can lock the MODE key and the switch to prevent
accidentally changing the operating mode, the channel/
station settings, and switching the transceiver OFF.
1
Press and hold the L key for more than 0.5 seconds.
•
2
The key lock icon blinks. You can continue to perform
functions in each of the operating modes which does not
involve the MODE key or the
switch.
To unlock the keys, press and hold the L key again for
more than 0.5 seconds.
13
UBZ-GR14 E 1-20
13
01.4.12, 9:35 AM
ENGLISH
D ISPLAY I LLUMINATION
1
To turn the display backlight ON, press the L key
momentarily.
•
•
2
The display backlight turns ON for 10 seconds.
Each time you press any key other than the PTT switch
while the display backlight is ON, the 10 second timer will
reset, allowing the display to remain illuminated for an
additional 10 seconds after releasing the key.
To turn the display backlight OFF, press the L key
momentarily while the display backlight is ON.
B ATTERY P OWER S AVER
This transceiver has been designed to give you the most out
of your battery power. While using the transceiver in FRS
Mode, the battery saver will automatically switch ON after
10 seconds have elapsed with no operations or received
calls. Operating the transceiver or receiving a call will switch
this feature OFF until 10 seconds of non-operation occurs
again.
L OW B ATTERY W ARNING
When battery power becomes low, the “BATT” icon will flash.
Replace the batteries at this time.
When replacing batteries, replace all batteries at the same
time; do not mix old and new batteries together. Additionally,
use batteries of only the same type; do not mix different
types of batteries together.
14
UBZ-GR14 E 1-20
14
01.4.12, 9:35 AM
NOTICES TO THE USER
ENGLISH
This device complies with Part 15 of the FCC Rules. Operation is
subject to the following two conditions:
(1) this device may not cause harmful interference, and
(2) this device must accept any interference received, including
interference that may cause undesired operation.
One or more of the following statements may be applicable:
FCC WARNING
This equipment generates or uses radio frequency energy. Changes or
modifications to this equipment may cause harmful interference unless
the modifications are expressly approved in the instruction manual.
The user could lose the authority to operate this equipment if an
unauthorized change or modification is made.
INFORMATION TO THE DIGITAL DEVICE USER
REQUIRED BY THE FCC
This equipment has been tested and found to comply with the limits for
a Class B digital device, pursuant to Part 15 of the FCC Rules. These
limits are designed to provide reasonable protection against harmful
interference in a residential installation.
This equipment generates, uses and can generate radio frequency
energy and, if not installed and used in accordance with the
instructions, may cause harmful interference to radio communications.
However, there is no guarantee that the interference will not occur in a
particular installation. If this equipment does cause harmful
interference to radio or television reception, which can be determined
by turning the equipment off and on, the user is encouraged to try to
correct the interference by one or more of the following measures:
• Reorient or relocate the receiving antenna.
• Increase the separation between the equipment and receiver.
• Consult the dealer for technical assistance.
15
UBZ-GR14 E 1-20
15
01.4.12, 9:35 AM
ENGLISH
SAFETY INFORMATION:
Your wireless hand-held portable transceiver has been designed using
a low power transmitter.
When the PTT switch is pressed, the transceiver generates radio
frequency (RF) electromagnetic energy (EME).
This transceiver is designed to comply with the FCC Report and Order
FCC 96-326 (August, 1996).
CAUTION:
To stay within the standards of the FCC’s RF exposure guidelines, hold
the transceiver and antenna at least 2 inches (5 cm) from your face
and speak in your normal voice. Keep the antenna pointed up and
away from your face.
If you wear the transceiver on your body, ensure that the antenna is at
least 1 inch (2.5 cm) away from your body while you are transmitting.
Use only KENWOOD genuine accessories and the supplied antenna.
Unauthorized antennas, modifications, or attachments may damage
the transceiver and violate FCC regulations.
16
UBZ-GR14 E 1-20
16
01.4.12, 9:35 AM
Kenwood Communications Corporation (“KENWOOD”) warrants this
product and accessory for ninety (90) days on parts and labor,
measured from the date of purchase by the first end user. This
Warranty is enforceable only by the first end user.
ENGLISH
LIMITED WARRANTY STATEMENT
(U.S.A.)
Except as specified below, this warranty covers all defects in material
and workmanship in this product. The following are not covered by the
Warranty:
1. Damage, deterioration or failure resulting from:
A. Accident, misuse, abuse, neglect, product modification or failure
to follow instructions contained in your Instruction Manual.
B. Repair or attempted repair by anyone not authorized by
KENWOOD.
C. Installation of parts that do not conform to the quality or
specifications of the original parts.
2. Damage or loss occurring during shipment (claims must be
presented to the carrier).
3. Any unit which is not new when sold to the first end user or upon
which the serial number has been defaced, modified or removed.
Your KENWOOD transceiver must be returned to the original place of
purchase for warranty service. Whenever the product is presented for
warranty service, you must supply a sales receipt or other evidence of
the date of purchase. Kenwood reserves the right to repair or replace
the product with a new or reconditioned product.
Unless considered unlawful or unenforceable under applicable law:
A. ALL IMPLIED WARRANTIES WITH RESPECT TO KENWOOD
TRANSCEIVERS, INCLUDING IMPLIED WARRANTIES OF
MERCHANTABILITY AND FITNESS FOR A PARTICULAR
PURPOSE, HEREBY ARE EXCLUDED.
17
UBZ-GR14 E 1-20
17
01.4.12, 9:35 AM
ENGLISH
B. KENWOOD’S LIABILITY UNDER THIS WARRANTY SHALL BE
LIMITED TO THE REPAIR OR REPLACEMENT, AT KENWOOD’S
OPTION, OF ANY DEFECTIVE PRODUCT, AND SHALL NOT
INCLUDE DAMAGES OF ANY KIND, WHETHER INCIDENTAL,
CONSEQUENTIAL OR OTHERWISE.
This Warranty is enforceable only in the United States of America.
If a problem develops during or after the Limited Warranty Period, or if
you have any questions regarding the operation of the product, you
should contact your KENWOOD Authorized Dealer or Distributer. If the
problem or your question is not handled to your satisfaction, please
contact our Customer Relations Department at (310) 639-5300.
KENWOOD SERVICE CORPORATION
P. O. Box 22745
2201 East Dominguez St.
Long Beach, CA 90801-5745
Phone: (310) 639-5300
18
UBZ-GR14 E 1-20
18
01.4.12, 9:35 AM
Kenwood Electronics Canada Inc. (hereinafter called “KENWOOD”)
gives the following written warranty to the original purchaser of each
new Kenwood product distributed in Canada by KENWOOD which is
purchased from a KENWOOD authorized dealer. KENWOOD warrants
this product to be free of defects, attributable to faulty materials or
workmanship at time of manufacture, for a period of ninety (90) days
from the date of original purchase. This warranty is valid only in
Canada.
ENGLISH
LIMITED WARRANTY STATEMENT
(CANADA)
The following are not covered by this warranty:
• Products purchased in a foreign country or purchased in Canada
and taken to a foreign country.
• Products purchased from a dealer not authorized by KENWOOD.
• Products used in commercial or professional applications.
• Products with the serial number defaced, altered or removed.
• Periodic check-ups that do not disclose any defects covered by this
warranty.
• Damage, deterioration or failure resulting from accident, misuse,
abuse, neglect or lack of periodic maintenance, product modification
or failure to follow Instructions contained in your owner’s manual.
• Repair or attempted repair by a person or party not authorized by
KENWOOD.
• Defects resulting from the use of parts or devices that do not
conform to KENWOOD specifications.
• Damage or deterioration occurring to any exterior finishes cosmetic
parts, adapters, antennas, cables or damages resulting from
defective batteries.
• Loss, defects or damages occurring during shipping
(claims must be presented to the carrier).
• In-home or on-site service and installation or removal charges.
19
UBZ-GR14 E 1-20
19
01.4.12, 9:35 AM
ENGLISH
Should this unit fail within the warranty period, return it to the original
place of purchase. When applying for warranty you must present the
original copy of your bill of sale as proof of warranty. Upon confirmation
by the dealer that the unit has failed as per the terms and conditions
set forth in this warranty, the unit will be replaced. The replacement unit
will be warranted for the balance of the warranty period of the original
unit. KENWOOD reserves the right to repair or replace the unit with a
new or reconditioned product. In the event it is necessary to ship your
unit to your dealer, carefully pack the unit and return it to them freight
prepaid. Please include your complete return address, a detailed
description of the fault(s) and your bill of sale as proof of warranty.
Products repaired or replaced within warranty will be returned to you
freight prepaid. The customer is responsible for all freight and related
costs for the return of product(s) to destinations outside Canada.
This warranty constitutes the entire written warranty given by
KENWOOD. No person, party, dealer, service centre or their agents or
employees are authorized to extend or enlarge any portion of this
warranty on behalf of KENWOOD by any written or verbal statement or
advertisement or promotion, including any extended warranty program
or plan that may be offered by the dealer or service centre, unless
approved in writing by KENWOOD.
KENWOOD disclaims any responsibility for loss of time or use of the
product or any other indirect, incidental or consequential damage to
other products or goods, inconvenience or commercial loss.
The provisions contained in this written warranty are not intended to
limit, modify, take away, disclaim or exclude any warranties or rights
you may have which are set forth in any applicable provincial or federal
laws or legislation.
This warranty card by itself is not considered by KENWOOD as a valid
proof of purchase. When applying for warranty you must present the
original copy of your bill of sale as proof of warranty.
KENWOOD ELECTRONICS CANADA INC.
6070 Kestrel Road
Mississauga, Ontario, Canada L5T 1S8
Tel.: (905) 670-7211 Fax: (905) 670-7248
20
UBZ-GR14 E 1-20
20
01.4.12, 9:35 AM
UBZ-GR14 E 0 cover
2
01.4.12, 9:35 AM