1
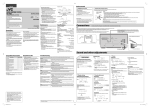
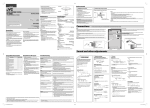
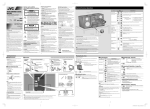
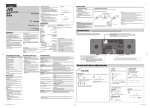
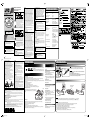
Warnings, Cautions and Others
Mises en garde, précautions et
indications diverses
CD PORTABLE SYSTEM
RD-EZ11
The lightning flash with arrowhead
symbol, within an equilateral triangle, is
intended to alert the user to the presence
of uninsulated “dangerous voltage” within
the product’s enclosure that may be of
sufficient magnitude to constitute a risk of
electric shock to persons.
The exclamation point within an equilateral
triangle is intended to alert the user to
the presence of important operating and
maintenance (servicing) instructions in the
literature accompanying the appliance.
Thank you for purchasing a JVC product.
Before operation, please read the instructions
carefully.
INSTRUCTIONS
LVT1977-002B
[J]
For customer use:
Enter below the Model No. and Serial No. which are
located either on the rear, bottom or side of the cabinet.
Retain this information for future reference.
Model No.
Serial No.
CLASS II apparatus with double insulation,
and no protective earth provided.
Appareil de CLASSE II avec isolant double et
sans protection de mise à la terre.
Le symbole de l’éclair à l’intérieur d’un
triangle équilatéral est destiné à alerter
l’utilisateur sur la présence d’une “tension
dangereuse” non isolée dans le boîtier du
produit. Cette tension est suffisante pour
provoquer l’électrocution de personnes.
Le point d’exclamation à l’intérieur d’un
triangle équilatéral est destiné à alerter
l’utilisateur sur la présence d’opérations
d’entretien importantes au sujet desquelles
des renseignements se trouvent dans le
manuel d’instructions.
WARNING:
TO PREVENT FIRE OR SHOCK HAZARDS, DO NOT
EXPOSE THIS APPARATUS TO RAIN OR MOISTURE.
AVERTISSEMENT :
POUR PRÉVENIR LES RISQUES D’INCENDIE OU DE
CHOCS ÉLECTRIQUES, NE PAS EXPOSER CE APPAREIL À
LA PLUIE OU À L’HUMIDITÉ.
EN
©2009 Victor Company of Japan, Limited
CAUTION: Proper Ventilation
To avoid risk of electric shock and fire, and to prevent
damage, locate the apparatus as follows:
1. Front: No obstructions and open spacing.
2. Sides/Top/Back: No obstructions should be placed
in the areas shown by the dimensions below.
3. Bottom: Place on the level surface. Maintain an
adequate air path for ventilation by placing on a
stand with a height of 10 cm or more.
ATTENTION: Aération correcte
Pour prévenir tout risque de décharge électrique
ou d'incendie et éviter toute détérioration, installez
l'appareil de la manière suivante:
1. Avant: Bien dégagé de tout objet.
2. Côtés/dessus/dessous: Assurez-vous que rien ne
bloque les espaces indiqués sur le schéma
ci-dessous.
3. Dessous: Posez l’appareil sur une surface plane et
horizontale. Veillez à ce que sa ventilation correcte
puisse se faire en le plaçant sur un support d’au
moins dix centimètres de hauter.
Front view/Face
Side view/Côté
Pour les Etats-Unis
Attention : Les changements ou les modifications
qui ne sont pas explicitement approuvés par la partie
responsable de l’observance pourraient mettre fin au
droit de l’utilisateur d’utiliser le matériel.
Remarque : Cet appareil a été testé et il s’est avéré
conforme aux limites applicables à un appareil
numérique de classe B, en vertu de la Partie 15
des Règles de la FCC. Ces limites sont conçues de
manière à assurer une protection raisonnable contre
les interférences nuisibles dans une installation
résidentielle. Cet appareil produit, utilise et peut émettre
une énergie de haute fréquence et, s’il n’est pas installé
et utilisé en conformité avec les instructions, il peut
causer des interférences nuisibles aux communications
radio. Il n’y a, toutefois, aucune garantie que des
interférences ne se produiront pas dans une installation
particulière. Si cet appareil cause effectivement des
interférences nuisibles à la réception de la radio ou de
la télévision, ce qu’on peut établir en mettant l’appareil
en marche et à l’arrêt, nous encourageons l’utilisateur à
tenter de corriger l’interférence par une ou plusieurs des
mesures suivantes :
– réorienter ou déplacer l’antenne de réception ;
– accroître la séparation entre l’appareil et le récepteur ;
– brancher l’appareil dans une prise ou un circuit autre
que celui auquel le récepteur est branché ;
– consulter un vendeur ou un technicien radio/TV
expérimenté pour obtenir de l’aide.
For Canada/pour le Canada
THIS DIGITAL APPARATUS DOES NOT EXCEED THE CLASS
B LIMITS FOR RADIO NOISE EMISSIONS FROM DIGITAL
APPARATUS AS SET OUT IN THE INTERFERENCE-CAUSING
EQUIPMENT STANDARD ENTITLED “DIGITAL APPARATUS,”
ICES-003 OF THE DEPARTMENT OF COMMUNICATIONS.
CET APPAREIL NUMERIQUE RESPECTE LES LIMITES
DE BRUITS RADIOELECTRIQUES APPLICABLES AUX
APPAREILS NUMERIQUES DE CLASSE B PRESCRITES DANS
LA NORME SUR LE MATERIEL BROUILLEUR; “APPAREILS
NUMERIQUES”, NMB-003 EDICTEE PAR LE MINISTRE DES
COMMUNICATIONS.
CAUTION
To reduce the risk of electrical shocks, fire, etc.:
1. Do not remove screws, covers or cabinet.
2. Do not expose this appliance to rain or moisture.
ATTENTION
Afin d’éviter tout risque d’électrocution, d’incendie, etc.:
1. Ne pas enlever les vis ni les panneaux et ne pas ouvrir le
coffret de l’appareil.
2. Ne pas exposer l’appareil à la pluie ni à l’humidité.
CAUTION
The
OFF switch in any position does not disconnect the
mains line.
Disconnect the mains plug to shut the power off completely.
The MAINS plug or an appliance coupler is used as the
disconnect device, the disconnect device shall remain
readily operable.
ATTENTION
OFF, quel que soit sa position, ne
Le commutateur
coupe pas la ligne principale.
Débrancher la fiche principale pour couper complètement
l’alimentation du secteur.
La fiche secteur ou un coupleur est utilisé comme dispositif
de déconnexion de l’appareil, et l’appareil déconnecté doit
être prêt à être utilisé.
CAUTION: Battery shall not be exposed to excessive heat
such as sunshine, fire, or the like.
ATTENTION: Les piles ne doivent en aucun cas être exposées
à une chaleur excessive (lumière du solei, feu, etc.).
SPECIFICATIONS
CD player
CD capacity:
1CD
Signal-to-noise ratio:
60 dB
Dynamic range:
60 dB
Tuner
FM tuning range:
88 MHz – 108 MHz
AM tuning range:
530 kHz – 1 700 kHz
Antennas:
Telescopic antenna for FM
Ferrite core antenna for AM
General
Speakers:
9 cm (3-9/16 in) cone x 2
Speaker impedance:
4Ω
Output power:
1.5 W per channel, min. RMS,
driven into 4 Ω at 1 kHz with no
more than 10% total harmonic
distortions
Input terminal:
AUDIO IN (φ 3.5) x 1
Power supply:
AC 120 V
, 60 Hz
DC 9 V (R14(SUM-2)/C(14D)
-size batteries x 6)
Power consumption:
10 W (at operation)
1 W or less (on standby)
Dimensions (W/H/D):
306 mm x 238 mm x 140 mm
(12-1/16 in × 9-3/8 in × 5-9/16 in)
Mass:
Approx. 1.7 kg (3.8 lbs)
(without batteries)
Accessories provided:
Power cord x 1
Design and specifications are subject to change without notice.
[European Union only]
[Union européenne seulement]
0509RYMMDWMTS
CAUTION
• Do not block the ventilation openings or holes.
(If the ventilation openings or holes are blocked by
a newspaper or cloth, etc., the heat may not be able
to get out.)
• Do not place any naked flame sources, such as
lighted candles, on the apparatus.
• When discarding batteries, environmental
problems must be considered and local rules or
laws governing the disposal of these batteries must
be followed strictly.
• Do not expose this apparatus to rain, moisture,
dripping or splashing and that no objects filled
with liquids, such as vases, shall be placed on the
apparatus.
ATTENTION
• Ne bloquez pas les orifices ou les trous de
ventilation.
(Si les orifices ou les trous de ventilation sont
bloqués par un journal un tissu, etc., la chaleur peut
ne pas être évacuée correctement de l’appareil.)
• Ne placez aucune source de flamme nue, telle
qu’une bougie, sur l’appareil.
• Lors de la mise au rebut des piles, veuillez prendre
en considération les problèmes de l’environnement
et suivre strictement les règles et les lois locales sur
la mise au rebut des piles.
• N’exposez pas cet appareil à la pluie, à l’humidité,
à un égouttement ou à des éclaboussures et ne
placez pas des objets remplis de liquide, tels qu’un
vase, sur l’appareil.
IMPORTANT FOR LASER PRODUCTS
1. CLASS 1 LASER PRODUCT
2. CAUTION: Do not open the top cover or cabinet. There are no user serviceable parts inside the unit; leave all
servicing to qualified service personnel.
3. CAUTION: (For U.S.A.) Visible and/or invisible class II laser radiation when open. Do not stare into beam.
(For Canada) Visible and/or invisible class 1M laser radiation when open. Do not view directly with
optical instruments.
4. CAUTION: Use of any controls, adjustments, or procedures other than those specified herein may result in
hazardous radiation exposure.
5. REPRODUCTION OF LABEL: CAUTION LABEL, PLACED INSIDE THE UNIT.
IMPORTANT POUR PRODUITS LASER
1. PRODUIT LASER CLASSE 1
2. ATTENTION: N’ouvrez pas le couvercle supérieur ni le coffret de l’appareil. Il n’y a aucune pièce réparable par
l’utilisateur à l’intérieur de l’appareil; confiez toute réparation à un personnel qualifié.
3. ATTENTION: (Pour les Etats-Unis) Radiation laser de classe II visibles et/ou invisible si l’appareil est ouvert. Ne
regardez pas le rayon.
(Pour le Canada) Rayonnement laser visible et/ou invisible de classe 1M une fois ouvert. Ne pas
regarder directement avec des instruments optiques.
4. ATTENTION: Toute utilisation des commandes, réglages ou procédures autres que celles spécifiées dans ce
document risque d’entraîner une exposition dangereuse aux rayonnements.
5. REPRODUCTION DE L’ÉTIQUETTE: ÉTIQUETTE DE PRÉCAUTION PLACÉE À L’INTERIEUR DE L’APPAREIL.
RD-EZ11[J]revB_2nd.indd 1
For U.S.A.
Caution: Changes or modifications not expressly
approved by party responsible for compliance could
void the user’s authority to operate the equipment.
Note: This equipment has been tested and found
to comply with the limits for a Class B digital device,
pursuant to Part 15 of the FCC Rules. These limits are
designed to provide reasonable protection against
harmful interference in a residential installation. This
equipment generates, uses and can radiate radio
frequency energy and, if not installed and used in
accordance with the instructions, may cause harmful
interference to radio communications. However, there
is no guarantee that interference will not occur in a
particular installation. If this equipment does cause
harmful interference to radio or television reception,
which can be determined by turning the equipment
off and on, the user is encouraged to try to correct the
interference by one or more of the following measures:
– Reorient or relocate the receiving antenna.
– Increase the separation between the equipment and
receiver.
– Connect the equipment into an outlet on a
circuit different from that to which the receiver is
connected.
– Consult the dealer or an experienced radio/TV
technician for help.
PREPARATION
REFERENCES
Playable discs
Troubleshooting
You can play back CDs with one of the marks below on the surface.
• You can also play back files in audio CD format on a finalized
CD-R or CD-RW.
– The reflection factor of CD-RW is lower than that of other
CDs, possibly causing CD-RW to take a longer time to read.
NOTE
If you have a problem with this unit, check this list
for a possible solution before calling for service.
Power cord
(supplied)
General
Care and maintenance
Playback sound is at a very low level.
Cleaning the unit
• Disconnect the power cord before cleaning.
• Wipe off stains with a soft cloth. If the unit is heavily stained, wipe it with a cloth soaked in waterdiluted neutral detergent and wrung well, then wipe clean with a dry cloth.
• Since the unit may deteriorate in quality, become damaged or get its paint peeled off, be careful about
the following:
– DO NOT wipe it with a hard cloth.
– DO NOT wipe it forcefully.
– DO NOT wipe it with thinner or benzine.
– DO NOT apply any volatile substances such as insecticides to it.
– DO NOT allow any rubber or plastic to remain in contact for a long time.
Blower
AC outlet
\ When power is supplied with batteries: Batteries
are run down. Replace the batteries with new
ones.
No sound is heard.
• The power can also be supplied through the batteries (see below).
• A small amount of power is always consumed even while on standby.
CAUTION
Power does not come on.
\ No power is supplied. Check the power cord
connection or battery power.
To get the best performance from the unit, keep your discs and mechanism clean.
Cleaning the CD pickup lens
Keep the CD pickup lens clean, or the sound may be degraded.
Use a blower (available at a camera store, etc.) to blow dust off
the lens.
Connecting the power cord
• Only use JVC power cord provided for this unit to avoid malfunction or
damage to the unit.
• Remove batteries when using the power cord.
• Be sure to unplug the power cord from the outlet when going out or when
the unit is not in use for an extended period of time.
Inserting batteries
\ The volume is set to minimum.
Radio operations
Match the polarities (+ and –) of the batteries.
Hard to listen to broadcasts because of noise.
R14(SUM-2)/C(14D)
(not supplied)
\ Direction of the antenna is inappropriate. Adjust
the antenna correctly.
Disc operations
The disc does not play.
Lens
Handling discs
• Remove the disc from its case by holding it at the edge while pressing the center hole lightly.
• Do not scratch or touch the reflective recorded surface.
• Do not stick or write anything on the label side.
• Do not bend discs.
• Avoid exposure to direct sunlight, extreme temperature or moisture.
• When cleaning the disc, wipe it with a soft cloth in a straight line from center to edge. DO NOT use
thinner, benzine, record cleaner or antistatic spray.
\ The FUNCTION selector is not set to CD.
\ The disc is placed upside down. Place the disc
with the label side facing up.
\ The disc or the lens is dirty. Clean the disc or the
lens.
\ There is moisture condensation. Turn the unit
on and wait a few hours before use.
The sound is discontinuous.
\ The disc is scratched or dirty.
Other equipment operations
The sound from the other equipment cannot be
heard.
\ The FUNCTION selector is not set to AUDIO IN.
\ Check the connection.
Battery compartment
NOTE
• The power will not be supplied through the batteries when the power is supplied through the AC IN
jack on the unit.
• The battery is consumed more quickly than usual when operating the unit continuously or operating it in a cold place.
CAUTION
To avoid battery leakage or explosion, handle batteries properly.
• If you are not going to use this unit for a month or more, remove the batteries from the battery compartment.
• Dispose of batteries in the proper manner, according to federal, state, and local regulations.
• Do not mix with batteries of different types or with new and old ones.
• Do not attempt to charge any batteries other than rechargeable ones.
• Discard leaky batteries immediately. Battery leakage can cause skin burns or other personal injuries.
• If chemicals leak onto the unit, clean the unit completely.
• Battery shall not be exposed to excessive heat such as sunshine, fire or the like.
10.3.11 10:48:37 AM
GENERAL CONTROLS
TUNER OPERATIONS
Improving the FM reception
When an FM stereo (FM ST) broadcast is hard to receive or noisy, select the monaural reception
(MONO).
Disc holder
Volume knob and
function selector
Radio controls
Display
• To restore stereo reception, switch to FM ST.
Basic procedure
1
Set the source to TUNER.
3
Select a station.
Adjusting the antenna
AM
The AM antenna is built in, so adjusting the
position of the unit may help AM reception.
FM
Disc controls
2
Selecting the source to play
Slide the FUNCTION selector to select CD, TUNER
or AUDIO IN.
Adjusting the volume
CD:
To play back a disc. (See “DISC OPERATIONS.”)
TUNER:
To listen to the radio broadcast. (See “TUNER
OPERATIONS.”)
Moves to indicate the
current frequency
Turning the unit off
Turn the VOLUME knob to increase or decrease the
volume.
• Set the volume to minimum when you turn on the
unit.
Decrease
Select the band—FM or AM.
Slide the FUNCTION selector to
OFF.
4
Adjust the volume.
Increase
AUDIO IN:
To listen to the other equipment connected to
the AUDIO IN jack. (See “LISTENING TO OTHER
EQUIPMENT.”)
DISC OPERATIONS
Program playback
Up to 20 tracks can be programmed to play in a
desired order.
Repeat/Random playback
4
Repeat steps 2 and 3.
• When the 20th track is programmed, “- - -”
flashes on the display and the 21st track
cannot be programmed.
5
Start playback.
To program the playing order
While playback is stopped...
1
Show the program creation display.
Select the desired playback mode.
LISTENING TO OTHER
EQUIPMENT
Playback mode indicator (See below.)
Each time you press the button, the playback
mode changes as follows:
Program number
• Now you can select the first track of the
program.
Basic procedure
1
4
Load a disc.
Adjust the volume.
To select a track
2
2
Select a desired track.
To locate a desired position on the disc
During playback...
3
Set the source to CD.
Add the track to the program.
To stop playback
Press and hold
The total number of
tracks
3
• After program playback ended or stopped, the
program playback mode is automatically canceled.
(The PROGRAM indicator disappears from the
display.)
To play back the program again, press PROGRAM,
then PLAY/PAUSE 6.
• The next program number appears on the
display, then track selection display is shown.
To edit the program
1 While playback is stopped, press PROGRAM
repeatedly to select the program number of the
track you want to replace.
• To add a track at the end of the program, select
the last program number.
2 Perform steps 2 and 3 on the left column to select
a new track.
To erase the entire program
While playback is stopped...
1 Press PROGRAM.
• PROGRAM indicator lights up on the display.
2 Press 7.
Start playback.
To pause playback
Program number
The current track
number
RD-EZ11[J]revB_2nd.indd 2
Indicator
Playback mode
REPEAT
Repeats the current track.
REPEAT ALL
Repeats all tracks.
RANDOM
Plays tracks at random.
To cancel, press the same button repeatedly until
the indicator above disappears from the display.
• Repeat playback is also canceled if the playback
is stopped.
• Random playback cannot be used during
program playback. If you program the playing
order during random playback, random
playback is canceled.
Basic procedure
1
2
Turn the volume to minimum.
Connect the equipment.
3
Set the source to AUDIO IN.
4
Start playing the equipment.
5
Adjust the volume.
• Connect the equipment with the stereo
mini plug (3.5 mm (3/16 in) diameter) to
the AUDIO IN jack on the rear.
• The entire program is also erased in the following
cases:
– when you open the disc holder.
– when the unit is turned off.
– when you select another source.
• To resume, press the same button again.
10.3.11 10:48:40 AM