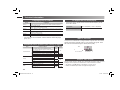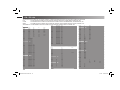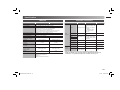
1
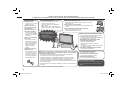
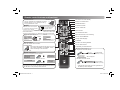
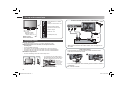
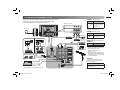
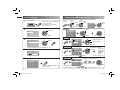
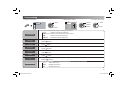
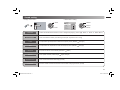
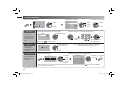
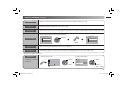
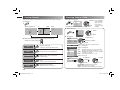
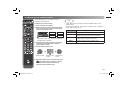
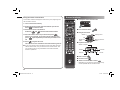
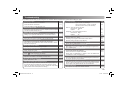
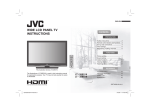
ENGLISH WIDE LCD PANEL TV INSTRUCTIONS Contents PREPARATION Safety precautions ............................... 2 Remote control buttons and functions ... 3 Set up and connections ....................... 4 Initial settings ....................................... 6 Registering / Editing channels ............. 6 FUNCTIONS Picture setting ...................................... 7 Sound setting ...................................... 9 Useful functions ................................. 10 Viewing Teletext ................................. 12 Watching Video or DVDs ................... 12 Configuring your remote control ........ 13 REFERENCE LT-32Z49 LT-42Z49 Troubleshooting ................................. 15 Technical information ......................... 16 CH/CC List......................................... 18 Specification ...................................... 19 GGT0312-002A-H GGT0312-002A-H-EN.indd 1 6/1/09 9:56:01 AM Thank you for buying this JVC LCD panel television. To make sure you understand how to use your new TV, please read this manual thoroughly before you begin. • Follow this manual regarding setup! - Connect only to a 110-240 V, 50/60Hz AC outlet. • Make enough room for inserting and removing the power plug! • Place the TV as close to the outlet as possible! - The main power supply for this TV is controlled by inserting or removing the power plug. • Never cut or damage the power cord! - If the AC plug is not the right shape, or the power cord is not long enough, use an appropriate plug adapter or extension cable. (Consult your retailer.) • Unplug the power cord when going out! - The power buttons on the remote control and the TV unit cannot completely turn off the TV. (Make appropriate arrangements for bedridden people.) • Do not allow the TV to fall! - Do not rest your elbows on, or allow children to hang from the TV. - There is a risk that the TV will fall and cause injuries. - Make use of the hole on the back of the stand to prevent the TV from falling easily. (P. 4) • Never place anything on the TV! - Placing liquid, naked flames, cloths, paper, etc. on the TV may cause a fire. • Never expose to rain or moisture! - To prevent fire or electric shock, never allow liquids to enter the unit. • Never insert objects into the cabinet openings! - It may cause a fatal electric shock. - Take care when children are near. If the TV is damaged or behaving strangely, stop using it at once! ➡ Unplug the power cord and contact your retailer. If a television is not positioned in a sufficiently stable location, it can be potentially hazardous due to falling. Many injuries, particularly to children, can be avoided by taking simple precautions such as: • Using cabinets or stands recommended by the manufacturer of the television. • Only using furniture that can safely support the television. • Ensuring the television is not overhanging the edge of the supporting furniture. • Not placing the television on tall furniture (for example, cupboards or bookcases) without anchoring both the furniture and the television to a suitable support. • Not standing the televisions on cloth or other materials placed between the television and supporting furniture. • Educating children about the dangers of climbing on furniture to reach the television or its controls. • Hold the TV so as not to scratch the screen! - Do not touch the screen when carrying the TV. • Do not carry the TV on your own! - In order to prevent accidents, ensure that the TV is carried by two or more people. • When attaching the TV to the wall, use the optional JVC wall mounting unit! - Consult a qualified technician. - See the included manual on mounting procedures. - JVC assumes no responsibility for damage due to improper mounting. • Never listen to headphones at high volume! - It may damage your hearing. • Never dismantle the rear panel! - It may cause an electric shock. • Never obstruct the ventilation holes! - It may cause overheating or a fire. • Handle LCD panel with care! - Use a soft, dry cloth when cleaning. Never try repair the TV yourself! ➡ If the problem cannot be solved in “Troubleshooting” (P. 15), unplug the power cord and contact your retailer. • For more details on installation, usage and safety ➡ Consult your retailer. 2 GGT0312-002A-H-EN.indd 2 6/1/09 9:56:22 AM Remote control buttons and functions “AAA/R03” Batteries • Insert the batteries Use two “AAA/R03” dry cell batteries. Insert the batteries from the · end, making sure the · and ª polarities are correct. WARNING: Batteries shall not be exposed to excessive heat such as direct sunshine, fire or the like. If this symbol is shown, it is only valid in the European Union. Switch between “TV, STB, BD/DVD, AUDIO” Select TV or Video input Channel information, Turn the on-screen guide off / on. (While on-screen menu is displayed) Change the aspect ratio (P. 8) :OOM 1. Select !UTO 0ANORAMIC 2EGULAR 0ANORAMIC :OOM :OOM :OOM3UBTITLE &ULL V-Scroll Turn the TV on from standby Display on-screen menu Operate the menu To previous screen Turn on “Clear SD” Colour button Turn the Volume off/on Adjust the volume, Turn off muting Turn on “Sound Meister” 16:9 Zoom Change channel/page 2. Set Move the picture with 5 or ∞ while this bar is displayed. Channel selection Select the desired channel number. For Hyper Scan PR changes without changing the picture. Once you stop pressing CHANNEL+ or CHANNEL - button, picture will change to the desired PR. Press and hold To Teletext Functions for viewing Teletext Turn on “Eco Sensor” To operate your other devices Favourite channel setting. (P. 11) 1. Register the favourite channel RETURN PLUS function Return to the frequently viewed channel. Choose the channel you want to programme Set 1-4 ? Return Plus Programmed! Press and hold To cancel Press number button (1-4 only) Press and hold Programmed! will be displayed. 2. Recall the favourite channel Return Plus Canceled! Press and hold RETURN function If you have not set or have cancelled the RETURN PLUS channel, this will return to the previously viewed channel. Favourite 1-4 ? Press number button (1-4 only) Press • If the favourite channel has not been registered then “No Memory” will be displayed. 3 GGT0312-002A-H-EN.indd 3 6/1/09 9:56:27 AM Set up and connections TV/VIDEO MENU/OK CHANNEL Power lamp ON : Lit (Blue) OFF : Unlit Power lamp lights while the TV is on. • “Power Lamp” (P. 11) Remote control sensor / Eco Sensor VOLUME Connect an aerial and VCR / DVD Player Switch between TV / VIDEO devices Display on-screen menu / set AERIAL 2 Change channel / Page / Hyper Scan Function (P. 3) , 6 6)$%/ Volume / Adjust Power On / Off To Headphone (P. 5) OR Care when setting ■ Power requirements • Connect the power cord only to a 110-240V, 50/60Hz AC outlet. ■ When attaching the TV to the wall, use the optional JVC wall mounting unit • Consult a qualified technician. • JVC assumes no responsibility for damage due to improper mounting. • LT-32Z49 : 200 mm x 200 mm mount which conforms to VESA standards. • LT-42Z49 : 400 mm x 200 mm mount which conforms to VESA standards. ■ Installation requirements • To avoid overheating, ensure the unit has ample room. VCR (DVD Player) • After all the connections have been made, insert the plug into an AC outlet. Stand Assembly - Insert the stand into the panel at the position where the screw holes are, and fasten the screws. • To prevent the TV from falling, thread the belt through the hole on the back of the stand and secure it to the TV rack. 200mm Hole for belt (under the stand) 150mm 50mm 150mm Screw for attach the belt to the stand (provided) 50mm Screw (not provided) Belt (provided) - If you have any problem with assembly, please contact a retailer or a dealership. Note: 4 screws included. 4 GGT0312-002A-H-EN.indd 4 6/1/09 9:57:13 AM Set up and connections (continued) VIDEO-1 Watching videos You can connect many different devices to the rear panel of the TV. Please read the user manuals of each device before setup. (Connecting cables are not supplied with this TV.) Output Headphones HDMI-1 HDMI-2 HDMI-3 DIGITAL VIDEO/AUDIO To “HDMI-1” Input • Composite signal / Component signal (P. 16) • Sound L / R • Use Component signal “Video - 1 Setting” (P. 12) HDMITM Connector. To “HDMI-3” VIDEO-2 Watching videos Output HD Video camera Component input R L L R V VIDEO-1 Pr Pb DVD player (HDMI compatible) Composite input V VIDEO-1 Pr Y Pb To “HDMI-2” DVD player (HDMI compatible) VCR / DVD recoder Y HDMI-1 HDMI-2 HDMI-3 Video JV (L) R L V L R L V R Pr Pb Y R L V C VCR DVD Player Game consoles Video camera JV To Video-2 ( DVI ANALOG AUDIO ) PC input line in PC PC AUDIO • • • VIDEO-1 HDMI-1 C OUTPUT (R) VIDEO-2 PC PC IN (D-SUB) Connecting HDMI devices Output Amplifier Game Input • Composite signal • Sound L / R • Input • HDMI signal (P. 19) “HDMI Setting” (P. 12) HDMI-2 and HDMI-3 inputs do not support analogue sound. Connect a “DVI” device to “HDMI-1” (P. 16) Please use a High Speed HDMITM Cable. High Speed HDMITM Cables are tested to carry an HD signal up to 1080p and higher. OUTPUT Video and sound signal of a TV channel you are viewing outputs from this terminal Output • Check for PC compatibility. “PC signals that can be displayed” (P. 16) • Composite signal • Sound L / R 5 GGT0312-002A-H-EN.indd 5 6/1/09 9:57:17 AM Initial Settings Registering / Editing channels You can edit the channel list or register new channel manually. 1 Turn on the TV • Show only when powering on for the first time. • The power on the unit can also be used. JVC logo appears 2 ไทย 3 ID Select the Teletext language group )$ #(## #( #( #( #( #( #( #( #( #( #( (Red) 'ROUP 'ROUP 'ROUP 'ROUP 'ROUP 'ROUP • See “Language group for Teletext” (P. 16) 02 Automatically register channels (Auto Program) 2. Move )$ (Green) #( Finish 1. Select character #(## #( #( #( #( #( #( #( #( #( #( 2. Move position 3. Set Insert/Delete Insert / Delete a channel !UTO0ROGRAM #(## #( #( #( #( #( #( #( #( #( #( %DIT ! !"#$% & 4 )$ Edit a channel name Select 4ELETEXT,ANGUAGE Select a channel %DIT 1. Start %DIT 02 2. Set 2. Next 02 Move a channel position ®ÅËAÈÌ×ÅA #ASTELLANO -ELAYU Tieáng Vieät Select “Edit / Manual” 1. Select 2. Next 1. Select ,ANGUAGE &RANÎAIS 0YCCÅÃÄ Select “Set Up” 1. Select Move Select a language %NGLISH Display the menu bar 02 1. Select a 2. Enter a number 0-9 CH/CC button, then receives the broadcast signal. %DIT )$ ! " # $% & #(## #( #( #( #( #( #( #( #( #( #( (Yellow) 5 Check what was registered 02 button. • Delete a channel by press • “CH/CC List” (P. 18) Register a new channel Manual -ANUAL 1. Beginning channel search %DIT )$ #(## #( #( #( #( #( #( #( #( #( #( (Blue) • If you want to edit channel, read the next column. 02 )$ "" #!" # ! " # $% & #(## #( #( #( "' #( #( #( #( #( #( #( (Yellow) (Red) (Green) or From high From low frequencies frequencies 2. Set (Blue) • Channel fine tunning ➡ / • If the picture or sound is unnatural ➡ to select a system. (P. 16) 6 GGT0312-002A-H-EN.indd 6 6/1/09 9:57:19 AM Picture setting 2. Select item or setting 1. Select 0ICTURE 2. Enter • To enter an items menu 0ICTURE 0ICTURE-ODE "ACKLIGHT #ONTRAST "RIGHTNESS 3HARPNESS #OLOUR 4INT 7HITE "ALANCE &EATURES 1. Display “Picture” menu "RIGHT 1. Select 1. Select 2. Adjust 3. Finish 2. Enter #OOL You can select a preset picture setting according to your favour. Bright : Hightens contrast and sharpness. Picture Mode Game Mode : Adjusts picture setting when play the game. Soft : Softens contrast and sharpness. Standard : Standardizes picture adjustment. Backlight You can change the backlight brightness. Darker Brighter Contrast You can change the contrast of the picture. Lower Higher Brightness You can change the brightness of the picture. Darker Brighter Sharpness You can change the sharpness of the picture. Sharper Softer Colour Tint You can change the colour intensity of the picture. Deeper Lighter You can change the colour tint only in NTSC. Greenish Reddish You can change the white balance of the picture to better match the type of video being viewed. Cool : Bluish white colour. White Balance Warm : Reddish white colour. Mid : Normal white colour. 7 GGT0312-002A-H-EN.indd 7 6/1/09 9:59:12 AM Picture setting (continued) Finer picture adjustment &EATURES /FF #LEAR3$ $IGITAL6.2 /FF $IGI0URE /FF 0ULL$OWN/FF #OLOUR-ANAGEMENT /FF 0ICTURE-ANAGEMENT /FF 3MART0ICTURE /FF $YNAMIC"ACKLIGHT /FF /FF -0%'.OISE2EDUCTION #OLOUR3YSTEM :OOM : For clearly picture (Off / Mode-1 / Mode-2) When Clear SD set to Mode-1 or Mode-2, then Digital VNR, DigiPure, Picture Management and MPEG Noise Reduction cannot be operated. Clear SD : Reduces the amount of noise in original picture. (Off / On) Digital VNR : For natural - looking outlines (Off / On) DigiPure : For smooth cinema film (Auto / Off / On) Pull Down Features Colour Management : For natural - looking pictures (Off / On) Picture Management : Fixs bright / dark pictures. (Off / On) : Makes it easier to view white areas (Off / On) Smart Picture Dynamic Backlight : Reduces the brightness of the backlight when the screen is dark (Off / On) MPEG Noise Reduction : Reduces MPEG video noise (Off / On) : When there is no colour, change the colour system. (PAL / SECAM / NTSC 3.58 / NTSC 4.43 / AUTO) Colour System Zoom Panoramic :OOM !UTO 2EGULAR 0ANORAMIC :OOM :OOM :OOM3UBTITLE &ULL 0ANORAMIC When HD (720p,1080i or 1080p), PC signal is received, the following zoom mode can be selected. : Changes the aspect ratio. Regular/Slim Zoom mode 14:9 Zoom 16 : 9 4:3 14 : 9 signal 720p 1080i 1080p PC mode Panoramic Full Native Zoom Full Slim ● ● ● - ● ● ● ● ● ● ● - - ● ● ● (Regular) 8 GGT0312-002A-H-EN.indd 8 6/1/09 9:59:45 AM Sound setting 1. Display “Sound” menu. 2. Select item or setting 1. Select Sound Stereo/I■II Sound Meister Treble Bass Surround Balance Voice Enhancer Al Volume 3OUND 2. Enter Stereo/I II ■ Sound Meister 1. Select D < I II Mono Off 3. Finish Off Off Selects the broadcast sound stereo, mono or bilingual language (u: Mono / m : Stereo / I : SUB1 / II : SUB2 / Mono) Sets sound theme to match your listening source (Off / Dynamic / Pure / Living) Treble Compensates high frequencies to widen the frequency band. (Weaker Bass Compensates low frequencies to widen the frequency band. (Weaker Surround Expands the stereo sound naturally. (Narrower Balance Sets speaker balance (Left Stronger Voice Enhancer Al Volume 2. Adjust Stronger) Stronger) Wider) Right Stronger) Uses sound enhancement technology (On/Off) Prevents sudden increase or decrease of sound when changing channels. (On/Off) 9 GGT0312-002A-H-EN.indd 9 6/1/09 9:59:47 AM Useful functions 1. Display “Features” menu. &EATURES 1. Select /N4IMER 3LEEP4IMER #HANNEL'UARD "LUE"ACK #HILD,OCK !UTO3HUTOFF &AVOURITE3ETTING 0OWER,AMP %CO3ENSOR &EATURES 2. Enter 1. Select PR channel that you want to watch. Channel Guard 2. Adjust /FF /FF /FF 3. Finish 2. Enter /FF /FF 2. Set the On time to your desired period of time. Select PR channel /N4IMER &EATURES 3. Set 1. Select “On Timer” (Blue) Note : Press /FF Note : When the remaining elapse is one minute, “Good Night!” appears on the screen. 1. Select time in 10 minutes intervals 3LEEP 4IMER 2. Set time, maximum 12 hours (12:00) to reset the time. > 2. Set 1. Select “Channel Guard” Stops children from watching specific channels. 1. Select 02 /N4IMER Sleep Timer TV to turn off automatically to standby mode after a set time. 1. Select TV to turn on automatically from standby mode at a set channel and time. > On Timer • To enter an items menu 2. Select item or setting 3ET)$.O 2. Select a channel and lock it ( 1. Select a number 02 #HANNEL 'UARD )$ "" # !" # ! " #$% & #(## #( #( #( #( #( #( #( #( #( #( 2. To the next position 3. Enter • View a locked channel by use the numerical buttons to enter the channel number. When button and enter your “ID No.” : locked ) 1. Select a channel Lock / Release (Blue) appears, press “DISPLAY” 10 GGT0312-002A-H-EN.indd 10 6/1/09 10:00:10 AM Useful functions (continued) Blue Back Displays a blue screen and mute the sound when the signal is weak or absent. (On / Off) Child Lock Disables the side control buttons of the TV. (On / Off) Auto Shutoff Sets the power to turn off if no TV signal (RF) is received and no operation is performed for about 15 minutes. (On / Off) Deletes the favourite channel that you registered. Favourite Setting &AVOURITE3ETTING (Blue) 1. Select 02 02 02 &AVOURITE3ETTING 02 02 To delete Power Lamp Sets power lamp lighting while the TV is on. (On / Off) (P. 4) Eco Sensor Automatically adjusts the picture contrast according to the brightness of your room (On / Demo / Off) • Change the on screen menu size. Appearance 2. Select “Appearance” 1. Display “Set Up” menu. 1. Select Change the on-screen menu size. 3ET5P 2. Enter 3ET5P !UTO0ROGRAM %DIT-ANUAL ,ANGUAGE 6IDEO3ETTING 6IDEO !PPEARANCE 3IZE 4ELETEXT,ANGUAGE ($-)3ETTING 0#3ETTING 1. Select 2. Adjust to Size-1 / Size-2 11 GGT0312-002A-H-EN.indd 11 6/1/09 10:01:47 AM Viewing Teletext Watching Video or DVDs This TV can display TV broadcasts and Teletext on the same channel in two windows. Select the input Source. 6IDEO 6IDEO ($-) ($-) ($-) 0# 1. When watching TV TV TEXT 4%84 4%84 TEXT 4%84 4%84 1. Select !63ELECT 2. Set • Operate the connected device and play video. 1. Select “Set Up” 1. Select 3ET5P 2. Enter 2. Select item 2. Select a Teletext page by pressing number button (0-9) • Move up or down a page by Hold Holds the current page. • Cancels by pressing this button again. 1. Select item 3ET5P !UTO0ROGRAM %DIT-ANUAL ,ANGUAGE 6IDEO3ETTING !PPEARANCE 4ELETEXT,ANGUAGE ($-)3ETTING 0#3ETTING Doubles the size of the displayed text. 3. Set Video - 1 Setting Switch between video and component signal (Video / Component) HDMI Setting 3IZE !UDIO -ODE ($-) 3IZE -ODE !UTO 3IZE -ODE Returns to page “100” or a previously designated page. Sub-page Reveal Displays, and/or changes the number of Subpage. • Cancel by press this button again. Displays hidden information • Example : answer to a quiz, etc. !UTO PC Setting > PC Setting PC Position Phase Pixel > Setting for HDMI input Size !UTO $IGITAL ($-) Index 2. Setting or Adjust 6IDEO 3IZE ($-)3ETTING ($-) Size Note: TV/VIDEO button select the video source by move down or use button 0-6 for selection. : Normally set to “Auto.” If wrong screen size appears in 480p (525p), change to “1” or “2” Audio : Normally set to “Auto.” If no sound, change to “Analogue” or “Digital.” Mode : If no picture, change to “1” or “2”. Setting for PC input 1. Select PC Position 1. Adjust 2. Enter 2. Set PC Position : Adjusts screen position. Phase : Sets the focus of screen. Pixel : Adjusts the horizontal feature of screen. 12 GGT0312-002A-H-EN.indd 12 6/1/09 10:02:23 AM Configuring your remote control You can configure your TV’s remote control to operate your other devices. Note Configure your remote control. 1. Turn on the device manually. • If your device does not respond, try all the available codes for the device’s brand. 2. Switch the remote control mode that matches • If none of the code works, or the brand is not listed, refer to “Using the search code function” (P. 14). your device. Refer to the table on the right to select an appropriate mode. TV AUDIO STB MODE TV 3. Find the remote control code for your device This TV only STB Cable Set Top Box, Cable/PVR Combination, Satellite Set Top Box, SAT/PVR Combination BD/DVD DVD, Blu-Ray DVD, HD DVD, DVD-R, Home Theater in Box, TV/DVD Combination BD/DVD • The indicator lights for 3 seconds each time the remote control is operated. Applicable devices AUDIO Amplifier, Receiver, Home Theater in Box according to its brand from the “Remote control codes” manual. 4. Set the remote control code. Press and hold 5. Enter four digit number Release the button Point the remote control at your device, press and confirm that your device is turned off. If your device does not respond, try entering another available code. 13 GGT0312-002A-H-EN.indd 13 6/1/09 10:03:20 AM Using the search code function This function searches through the codes one by one, beginning from the first code in the list. Button functions ■ Change the remote control mode 1. Turn on the device manually. 2. Switch the remote control mode that matches your device. Press to select the mode. 3. Activate the search code function. and Hold down until the mode indicator blinks. 4. Point the remote control at your device and press . If there is no response, try the next code by pressing } and press off. ■ Turn on/off the device ■ Navigate the menus OK again. Repeat the process until your device turns 5. Press to register the code. The code is now set. Confirm that the mode indicator goes out. ■ If your TV’s remote control still does not work even after using the search code function, use your device’s own remote control. The TV’s remote control is not guaranteed to work with all models, brands or operations. Display menu Select Back to previous menu Display top menu ■ Playback / Record, etc. Select a chapter Rewind Record Forward Stop Play ■ Mute ➡ Press “ ■ Volume ➡ Press “ Pause ” ” ■ Select a surround mode ➡ Press “ ” • Depending on your device, some functions may not be operable with this remote control. 14 GGT0312-002A-H-EN.indd 14 6/1/09 10:04:09 AM Troubleshooting If a problem occurs when you are using the TV, check the below troubleshooting guide before calling for repair. Severe noise or snow Page Check the aerial cable and TV connections . P. 4 Check the direction of the aerial. P. 4 Check the aerial or its cable damaged or not. -- Patterns, stripes or noise Interference caused by devices such as an amplifier, personal computer, or a hair drier, Move it away from TV. -- Ghosting ( Doubling of images ) Interference occurs caused by signal reflection from mountains or building. Try to adjust the aerial’s direction or use another antenna. -- Cannot turn it on Ensure the power cord is connected to the AC outlet correctly. -- Cannot operate the remote control. The batteries may be exhausted. Replace with new batteries. Ensure that you are operation the remote control at less than 7 meters from the front of your TV. -- Remote control stops working Unplug TV, several minutes later plug it in again. -- Side control buttons do not work Switch “Child Lock” to “Off”. P. 11 Aspect ratio changed unintentionally Press “ ” button to return to your settings. P. 8 PC screen alignment is off Adjust the “PC Position” in “PC Setting” of Set Up menu. P. 12 Blue screen appears on the screen Switch “Blue Back” to “Off”. P. 11 Strange picture when using an external device If the top of the image is distorted, check the video signal quality itself. If movement appears unnatural when receiving a signal from a DVD player, etc. with 625p (progressive-scanning), change the output setting of the external device to 625i (interlace-scanning) --- Poor picture quality Unnatural colour >> Adjust “Colour” and “Backlight” Check “Colour System”. If “Auto” is selected select the specific colour system manually. Noise >> Set to the following functions. Picture Mode : Standard DigiPure : On Dull picture >> Set to the following functions. Picture Mode : Bright DigiPure : On Poor sound Adjust the “Bass” and “Treble”. If receiving a poor signal in “Stereo/I II” switch to “Mono”. Adjust the channel reception using “Manual”. For HDMI signal, wrong screen size in 480p (525p). Switch “Size” in “HDMI Setting” to “1” or “2”. For HDMI signal, green and distorted screen Wait a little for the signal to stabilize when switching the signal format for an “HDMI” device. For HDMI signal, No picture / No sound Use the cable marked with HDMI logo. Check if the device is compliant with HDMI. Switch “Audio” in “HDMI Setting” to “Digital” or “Auto” for HDMI devices, or “Analogue” or “Auto” for DVI devices. Some functions do not work. It is not a malfunction. Some functions (dark background) in the menu do not work depending on the situation. Black or white dots appear on the screen. LCD panels use fine dots (“pixels”) to display images. While more than 99.99% of these pixels function properly, a very small number of pixels may not light, or may light all the time. It is not a malfunction. No picture, No sound Some input do not output from OUTPUT terminal. ■ Page P. 7 P. 8 P. 7 P. 8 P. 7 P. 8 P. 9 P. 9 P. 6 P. 12 -- P. 5 P. 12 -- -- -- 15 GGT0312-002A-H-EN.indd 15 6/1/09 10:04:55 AM Technical information Language group for Teletext Group PC Signals that can be displayed • Languages If the signal doesn’t appear, check that the vertical frequency on the PC is set to “60Hz”. Group-1 Turkish, Hungarian, English, German, French, Italian, Spanish, Portuguese, Greek, Swedish, Finnish Group-2 Polish, Serbian, Croatian, Slovenian, Czech, Slovak, Rumanian, Hungarian, German, French, Italian, Swedish, Finnish Resolution Group-3 Russian, Bulgarian, Lettish, Lithuanian, Estonian, Ukrainian, Serbian, Croatian, Slovenian, Czech, Slovak, English, German Vertical frequency (Hz) Group-4 Arabic, Czech, Slovak, Hungarian, English, German, French, Italian, Spanish, Portuguese, Swedish, Finnish Group-5 English, French, Turkish, Farsi Group-6 Lettish, Lithuanian, Estonian, Ukrainian, Czech, Slovak, English, German • If the characters are unreadable. ➡ Select different Teletext language group. (P. 6) Sound and Colour system in your country or region Area Asia, Middle East Country or Region System Bahrain, Kuwait, Oman, Qatar, United Arab Emirates, Yemen, Indonesia, Malaysia, Singapore, Thailand, India, etc. B/G China, Vietnam, etc. D/K Hong Kong, etc. Islamic Republic of Iran, Lebanon, Saudi Arabia, etc. Philippines, Taiwan, Myanmar, etc. Russia, etc. Europe Czech Republic, Poland, etc. Germany, Holland, Belgium, etc. UK, etc. Oceania Africa M D/K B/G B/G Republic of South Africa, etc. I Nigeria, etc. Egypt, Morocco, etc. B/G What is “Clear SD” LCD picture is unstable due to a large number of signal noise. Such noise appears extensively especially when an LCD displays SD signals. Clear SD mode resolves disadvantage for better picture quality. PAL No use "Clear SD" Use "Clear SD" SECAM NTSC SECAM PAL I Australia, New Zealand, etc. 60.0 System I B/G 640 x 480(VGA) / 1024 x 768(XGA) PAL PAL Connect “DVI” devices Connect a “DVI” device to “HDMI” using “DVI-HDMI” conversion cable. Connect analogue sound output of the DVI device to L and R terminals in HDMI-1. • Set “Audio” in “HDMI Setting” to “Analogue” or “Auto” (P. 12) • HDMI-2 and HDMI-3 input does not support analogue sound. SECAM 16 GGT0312-002A-H-EN.indd 16 6/1/09 10:04:57 AM Technical information (continued) What is “Full Native”? • With the full HD LCD display and “Full Native”, you can enjoy full native HD resolution of 1920 x 1080. It exposes flaws in the video that were hidden when viewing on “Full”. Full Full Native * The illustrations are emphasised to make clear differences between “Full” and “Full Native”. • Dark bar or noise may appear at the edges of the screen when viewing in “Full native” for some videos. This is resulted from the signal itself, not due to TV malfunction. What is “Eco Sensor”? You can adjust this TV so that the screen automatically adjusts to the optimum contrast of light and dark according to the brightness of your room. This function reduces eyestrain and the power consumption of this TV. • Set “Eco Sensor” (P. 11) • Make sure not to block the Eco Sensor on front of the TV (P. 4) • To fully reduce eyestrain and the power consumption of this TV. Set to the following functions. Eco Sensor : On or Demo (P. 11) Smart Picture : On (P. 8) ■ Using “Demo” in “Eco Sensor”, you can display the effect of the “Eco Sensor” on the screen. Eco Sensor Dark Light 17 GGT0312-002A-H-EN.indd 17 6/1/09 10:04:58 AM CH / CC List To use the Insert function (P. 6), find the “CH/CC” number corresponding to the TV’s channel number from this table. US: The US channel numbers are the channel numbers used in the United States, Philippines, etc. CCIR: The CCIR channel numbers are the channel numbers used in the Middle East, Southeast Asia, etc. OIRT: The OIRT channel numbers are the channel numbers used in Eastern Europe, Russia, Vietnam, etc. AUSTRALIA: The AUSTRALIA channel numbers are the channel numbers used in Australia, etc. CH CH 02 CH 03 CH 04 CH 05 CH 06 CH 07 CH 08 CH 09 CH 10 CH 11 CH 12 CH 13 CH 14 CH 15 CH 16 CH 17 CH 18 CH 19 CH 20 CH 21 CH 22 CH 23 CH 24 CH 25 CH 26 CH 27 CH 28 CH 29 CH 30 CH 31 CH 32 CH 33 CH 34 CH 35 CH 36 CH 37 CH 38 CH 39 CH 40 CH 41 CH 42 CH 43 CH 44 CH 45 CH 46 CH 47 Channel US US-02 US-03 US-04 US-05 US-06 US-07 US-08 US-09 US-10 US-11 US-12 US-13 US-14, W+29 US-15, W+30 US-16, W+31 US-17, W+32 US-18, W+33 US-19, W+34 US-20, W+35 US-21, W+36 US-22, W+37 US-23, W+38 US-24, W+39 US-25, W+40 US-26, W+41 US-27, W+42 US-28, W+43 US-29, W+44 US-30, W+45 US-31, W+46 US-32, W+47 US-33, W+48 US-34, W+49 US-35, W+50 US-36, W+51 US-37, W+52 US-38, W+53 US-39, W+54 US-40, W+55 US-41, W+56 US-42, W+57 US-43, W+58 US-44, W+59 US-45, W+60 US-46, W+61 US-47, W+62 CCIR E2 E3 E4 E5 E6 E7 E8 E9 E10 E11 E12 E21 E22 E23 E24 E25 E26 E27 E28 E29 E30 E31 E32 E33 E34 E35 E36 E37 E38 E39 E40 E41 E42 E43 E44 E45 E46 E47 OIRT R1 R2 R6 R7 R8 R9 R10 R11 R12 AUSTRALIA AU-0 AU-1 AU-2 AU-6 AU-7 AU-8 AU-9 AU-10 AU-11 CH 48 CH 49 CH 50 CH 51 CH 52 CH 53 CH 54 CH 55 CH 56 CH 57 CH 58 CH 59 CH 60 CH 61 CH 62 CH 63 CH 64 CH 65 CH 66 CH 67 CH 68 CH 69 US-48, W+63 US-49, W+64 US-50, W+65 US-51, W+66 US-52, W+67 US-53, W+68 US-54, W+69 US-55, W+70 US-56, W+71 US-57, W+72 US-58, W+73 US-59, W+74 US-60, W+75 US-61, W+76 US-62, W+77 US-63, W+78 US-64, W+79 US-65, W+80 US-66, W+81 US-67, W+82 US-68, W+83 US-69, W+84 Channel CC CC 01 CC 02 CC 03 CC 04 CC 05 CC 06 CC 07 CC 08 CC 09 CC 10 CC 11 CC 12 CC 13 CC 14 CC 15 CC 16 CC 17 CC 18 CC 19 CC 20 CC 21 CC 22 CC 23 E48 E49 E50 E51 E52 E53 E54 E55 E56 E57 E58 E59 E60 E61 E62 E63 E64 E65 E66 E67 E68 E69 US A B C D E F G H I J CCIR S-1 S-2 S-3 S-4 S-5 S-6 S-7 S-8 S-9 S-10 S-11 S-12 S-13 S-14 S-15 S-16 S-17 S-18 S-19 S-20 S-21 S-22 S-23 OIRT AUSTRALIA AU-5 AU-5A CC 24 CC 25 CC 26 CC 27 CC 28 CC 29 CC 30 CC 31 CC 32 CC 33 CC 34 CC 35 CC 36 CC 37 CC 38 CC 39 CC 40 CC 41 CC 42 CC 43 CC 44 CC 45 CC 46 CC 47 CC 48 CC 49 CC 50 CC 51 CC 52 CC 53 CC 54 CC 55 CC 56 CC 57 CC 58 CC 59 CC 60 CC 61 CC 62 CC 63 CC 64 CC 75 CC 76 CC 77 CC 78 CC 79 CC 95 CC 96 CC 97 CC 98 CC 99 K L M N O P Q R S T U V W W+1 W+2 W+3 W+4 W+5 W+6 W+7 W+8 W+9 W+10 W+11 W+12 W+13 W+14 W+15 W+16 W+17 W+18 W+19 W+20 W+21 W+22 W+23 W+24 W+25 W+26 W+27 W+28 S-24 S-25 S-26 S-27 S-28 S-29 S-30 S-31 S-32 S-33 S-34 S-35 S-36 S-37 S-38 S-39 S-40 S-41 X Y Z Z+1 Z+2 R3 R4 R5 AU-3 AU-4 A-5 A-4 A-3 A-2 A-1 18 GGT0312-002A-H-EN.indd 18 6/1/09 10:05:00 AM Specification Main unit Model Broadcasting systems Terminals / Connectors LT-42Z49 LT-32Z49 Colour systems PAL, SECAM, NTSC 3.58 / NTSC 4.43 MHz Channels and frequencies VHF low channel (VL) = 46.25 to 140.25 MHz VHF high channel (VL) = 147.25 to 423.25 MHz UHF channel (U) = 431.25 to 863.25 MHz Receives cable channels in mid band (X to Z+2, S1 to S10), super band (S11 to S20) and hyper band (S21 to S41). Sound-multiplex systems NICAM (I / B / G / D / K), A2 (B / G / D / K) Teletext systems FLOF (Fastext), WST (World System Teletext) Power requirements AC 110 V - 240 V, 50/60Hz Audio output (Rated power output) Speakers Power consumption [standby] Screen size (visible area size measured diagonally Dimensions (W x H x D: mm [without stand] Weights [without stand] Accessories Terminal name B/G/I/D/K/M Input terminals 6W+6W (4 cm x 16 cm) x 2 (4 cm x 16 cm) x 2 160 W [1.3 W] 94 W [1.4 W] 106.7 cm 80.1 cm 1014 x 695 x 279 [1014 x 646 x 109] 791 x 570 x 279 [791 x 521 x 104] 20 kg [19 kg] 13 kg [12 kg] Remote control unit : RM-C2510 x 1 AAA/R03 dry cell battery x 2 Screw x 4 Safety band (belt) and Screw x 1 Output terminals Signal type (IN) VIDEO-1 Composite video, Analogue component 576i (625i) / 480i (525i), Progressive : 576p (625p) / RCA connectors x 6 480p (525p), HD : 1080i (1125i), 720p (750p) / 1080p (1125p) Audio L / R VIDEO-2 RCA connectors x 3 Composite video, Audio L / R HDMI-1 HDMI-3 HDMI 576i (625i) / 480i (525i) HDMI connector x 1 / 576p (625p) / 480p (525p), 720p (750p) / 1080p (1125p) / 1080i (1125i) IN HDMI -1 RCA connectors x 2 Audio L/R PC INPUT D-SUB (15 pins) x 1 Analogue PC signal PC AUDIO PC-IN (3.5 pinjack) x 1 Audio HDMI-2 10 W + 10 W Terminal type MONITOR OUT RCA connectors x 3 Headphone Stereo mini-jack x 1 (3.5 mm in diameter) Signal type (OUT) Composite video, Audio L / R Headphone output • We may change the design and specifications without notice. • HDMI, the HDMI Logo and High-Definition Multimedia Interface are trademarks or registered trademarks of HDMI Licensing LLC. 19 GGT0312-002A-H-EN.indd 19 6/1/09 10:05:02 AM © 2009 Victor Company of Japan, Limited GGT0312-002A-H-EN.indd 20 0509GLT-NF-MT 6/1/09 10:05:03 AM