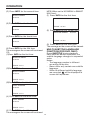
1
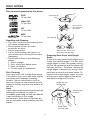
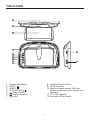
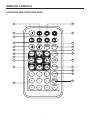
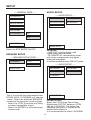
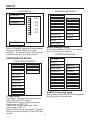
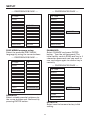
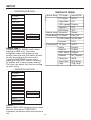
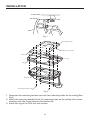
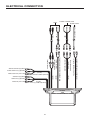
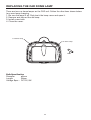
CONTENTS
Safety Information ........................................................................................4
Disc Notes .....................................................................................................5
The Player ......................................................................................................6
Remote Control.............................................................................................7
Location and Function of Keys...............................................................................7
Preparing the Remote Control ................................................................................9
Loading/Ejecting a disc................................................................................9
Loading a Disc ........................................................................................................9
Ejecting a Disc ........................................................................................................9
Operation .....................................................................................................10
Basic Play .............................................................................................................10
Display Adjust Function ........................................................................................11
On-Screen Display Function.................................................................................11
Multi-Subtitle Language Function ........................................................................12
MP3 Disc Play.......................................................................................................13
Setup ............................................................................................................14
Initial Setup ...........................................................................................................14
General Setup .......................................................................................................14
Speaker Setup ......................................................................................................16
Audio Setup ..........................................................................................................16
Preferences Setup ................................................................................................17
Defaults Table .......................................................................................................19
Installation ...................................................................................................20
Electrical Connection .................................................................................21
Replacing the Car Dome Lamp .................................................................22
Trouble Shooting .........................................................................................23
Specifications..............................................................................................24
2
NOTICES
Use the Proper Power Supply
This product is designed to operate with
a 12 volt DC, negative ground battery
system (the regular system in a North
American car).
Protect the Disc Mechanism
Avoid inserting any foreign objects into
the slot of this player.
Failure to observe this may cause
malfunction to the DVD
mechanism in this unit.
Use Rosen Authorized Dealers
Do not attempt to disassemble or adjust
this precision product. Please refer to
www.rosenentertainment.com for a list of
authorized dealers in your area for service
assistance.
For Installation
The unit is designed for overhead
installation.
About Registered Marks
This product incorporates copyright
protection technology that is protected
by method claims of certain U.S. patents
and other intellectual property rights
owned by Macrovision Corporation and
other rights owners. Use of this copyright
protection technology must be authorized
by Macrovision Corporation, and is
intended for home and other limited
viewing uses only unless otherwise
authorized by Macrovision Corporation.
Reverse engineering or disassembly is
prohibited.
Region Management Information
This Mobile DVD Player is designed and
manufactured to respond to the Region
Management Information that is recorded
on a DVD disc. If the Region number
described on the DVD disc does not
correspond to the Region number of this
Mobile DVD Player, this Mobile DVD
Player cannot play this disc.
3
SAFETY INFORMATION
CAUTION:
MOBILE DVD PLAYER IS A CLASS 1
LASER PRODUCT. HOWEVER THIS
MOBILE DVD PLAYER USES A
VISIBLE/INVISIBLE LASER BEAM
WHICH COULD CAUSE HAZARDOUS
RADIATION EXPOSURE IF VIEWED
DIRECTED. BE SURE TO OPERATE THE
MOBILE DVD PLAYER CORRECTLY AS
INSTRUCTED.
USE OF CONTROLS OR
ADJUSTMENTS OR PERFORMANCE OF
PROCEDURES OTHER THAN THOSE
SPECIFIED HEREIN MAY RESULT IN
HAZARDOUS RADIATION EXPOSURE.
DO NOT OPEN COVERS AND - DO NOT
REPAIR YOURSELF. REFER SERVICING
TO QUALIFIED PERSONNEL.
WARNING:
• TO REDUCE THE RISK OF FIRE OR
ELECTRIC SHOCK, DO NOT EXPOSE
THIS EQUIPMENT TO RAIN OR
MOISTURE.
• TO REDUCE THE RISK OF FIRE OR
ELECTRIC SHOCK, AND ANNOYING
INTERFERENCE, USE ONLY THE
RECOMMENDED ACCESSORIES.
NOTICE OF INTENDED USE
Rosen Entertainment Systems are
designed to enable viewing of video
ONLY for rear-seat occupants, and are
not intended for viewing by driver when
the vehicle is in motion. Such use might
distract the driver or interfere with the
driver’s safe operation of the vehicle, and
thus result in serious injury or death.
Such use might also violate state or local
laws. Rosen Entertainment Systems
disclaims any liability for any bodily injury
or property damage that might result
from any improper or unintended use.
4
DISC NOTES
Disc formats supported by this player
Label side up
DVD
12 cm disc
Video CD
12 cm disc
Do not touch
the underside
of the disc
CD
12 cm disc
MP3
12 cm disc
Do not bend
Handling and Cleaning
• Dirt, dust, scratches and warping disc
will cause misoperation.
• Do not place stickers or make
scratches on discs.
• Do not warp discs.
• A disc should always be kept in its
case when not in use to prevent from
damaging.
• Do not place discs in the following
places:
1. Direct sunlight
2. Dirty, dusty and damp areas
3. Near car heaters
4. On the seats or dashboard
Wipe the disc from center
toward the outside edge
Preparing New Discs with Rough
Spots
A new disc may have rough edges on its
inside and outside edges. If a disc with
rough edges is used, the proper setting
will not be performed and the player will
not play the disc. Therefore, remove the
rough edges in advance by using a ball
point pen or pencil as shown below. To
remove the rough edges, press the side
of the pen or pencil against the inside
and outside edges of the disc.
Disc Cleaning
Use a dry soft cloth to wipe the surface.
If the disc is dirty, use a soft cloth slightly
moistured with isopropyl (rubbing)
alcohol. Never use solvents such as
benzine, thinner or conventional record
cleaners as they may mar the surface of
the disc.
Note
A disc may become somewhat scratched
(although not enough to make it
unusable) depending on how you handle
it and conditions in the usage
environment. Note these scratches are
not an indication of any problem with the
player.
Rough spots on
outside edge
Ball point pen
or pencil
Rough spots
on inside edge
5
THE PLAYER
7
12
11
10
1
2
4
6
5
3
8
1.
2.
3.
4.
5.
6.
7.
9
8. Speaker Enable Switch
9. AV IN Interface
10. Monitor release botton: Push the
botton to eject the screen display from
the base.
11. TFT Color Monitor
12. Indicator LED of mode
Dome Lamp Switch
EJECT ( )
MODE
PLAY/PAUSE (
)
Chapter Back
Chapter Forward
Disc slot
6
REMOTE CONTROL
LOCATION AND FUNCTION KEYS
1
10
2
11
21
3
12
DISPALY
MODE
4
DISC
ZOOM
5
6
13
14
MODE
INFO
EJECT
15
SUB
TITLE
16
RANDOM
17
22
7
8
ENTER
DISC
MENU
SETUP
18
1
2
3
REPEAT
19
4
5
6
DISPLAY
ADJUST
20
7
8
9
0
9
7
REMOTE CONTROL
1.
2.
3.
/
4.
5.
6. MODE
7.
/ , /
8. SETUP
9. 0-9
10.
11.
12. DISPLAY MODE
Press it to pause playback.
Press it to turn the unit ON or OFF.
Press
to skip to the next track & press
to skip back one track.
Press it to enable or disable sound through the car radio.
Press to mute the sound.
Changing between DVD mode, GAME mode and AUX mode.
Cursor buttons.
Display the SETUP menu.
Numeric buttons
Press it to stop playback.
Press to play the disc.
Press it to change the display mode among WIDE,STANDARD
and ZOOM.
13. DISC ZOOM
Allows the picture to be increased in size.
14. INFO
Display disc information during playback.
15. EJECT
Press to eject the disc.
16. SUBTITLE
Changing of the SUBTITLE language on multi-subtitle language
DVD disc.
17. RANDOM
Allows the track played in random order.
18. DISC MENU
Shows the DVD disc menu.
19. REPEAT
Switch the Repeat mode of discs.
20. DISPLAY ADJUST Shows menus to adjust the display.
21.
/
Press
to search forward rapidly &
to search reverse rapidly.
22. ENTER
Use ENTER to confirm a selection.
8
REMOTE CONTROL
To Play the Integrated Video Game:
Preparing the Remote Control
1. To turn on the infrared wireless
controller, press the RESET button.
Inserting the Batteries
1. Open the battery compartment cover.
2. Insert the new batteries. Make sure
that the positive and negative
terminals of the batteries are oriented
as indicated.
3. Close the cover
Battery: one button cell lithium
battery, CR2025.
2. Press SOURCE unitil “INTERNAL
GAME” appears on the screen.
3. Use the arrow keys to select a game
on the video game controller.
4. Press the START button on the game
controller.
Using the Remote Control
Point the remote control towards the
base of the unit.
Operation angle: About ± 30 degrees in
each the direction of the base of the unit.
LOADING/EJECTING A DISC
2
Loading a Disc
When you have installed the unit and all
connections have completed, you can
load a disc as follows:
1. Press the OPEN button (1), to release
and turn on the monitor.
2. Insert the disc with printed side facing
up into the disc slot (2).
3. The player will start playback
automatically.
1
3
Ejecting a Disc
Press (EJECT) button (3) to eject the
disc.
9
OPERATION
FOR VCD/CD:
Press the REPEAT button to select repeat
mode as follow.
BASIC PLAY
STOPPING PLAY
- Briefly press the (Stop) button to stop
the unit playback, when the (Play)
button is pressed, normal playback will
continue.
- Press (Stop) button twice to stop the
playback and go back to initial
Track/Chapter.
REP-ONE
2X
4X
6X
8X
1X
2X
3X
4X
VCD/CD:
Normal Playback
DISC MENU
Pressing the DISC MENU will show the
DVD DISC MENU if a DVD is installed.
MP3:
Normal Playback
2X
4X
6X
8X
DISC ZOOM
Allows the picture to be incresed in size.
Press DISC ZOOM to toggle among 1.5
scale, 2.0 scale and 3.0 scale.
During Zoom mode, press / , /
buttons to move pictures up, down, left
or right direction.
SKIPPING TRACK
/
buttons on the remote
Press
control during playback.
Press
to skip to next track, and
to back one track.
PAUSE
Pressing on the remote control or
on
the front panel of the DVD unit during
playback will stop play temporarily. To
return to normal playback, press on the
remote control or
on the front panel.
RANDOM (CD only)
Press RANDOM button, track selection
will be made in random order. The display
screen will show “SHUFFLE ON” on the
screen. Press RANDOM button again,
“SHUFFLE OFF” appears and release the
mode.
MUTE
Press the button on the remote control
will mute the sound, but the disc continues
playing. When you unmute the sound
(press the button again) the sound will
resume.
MODE SELECTION
Press MODE button on the front panel of
the unit or MODE button on the remote
control to select among DVD/AUX mode
(for GAME version will select among
DVD/GAME/AUX mode ).
REPEAT
FOR DVD:
Press REPEAT button to select repeat
mode as follow.
CHAPTER REPEAT ON
REPEAT OFF
1. Continuously repeat at the current
chapter/track, when selected REPONE mode.
2. Select REP-ALL mode to continuously
repeat all chapter/track on the current
disc.
3. When the player finishes playback the
last chapter/track, it will stop and
display the elapsed time. When
REPEAT OFF mode is selected, REPONE & REP-ALL disappears from
screen display.
4. REPEAT feature does not support
VCD2.0 (with PBC ON).
RAPID FORWARD/RAPID REVERSE
Press
/
during play. Each time the
button is pressed, the speed of rapid
forward/reverse changes according to the
disc as follow.
DVD:
Normal Playback
REP-ALL
LIGHT SWITCH
The two car dome lamps on the unit will
be on in some needed situations. There
are two settings for the car dome lamp
operation. Refer to the light switch.
State 1: To make the lamp turn on only
TITLE REPEAT ON
REPEAT OFF
10
OPERATION
when car doors are opened.
State 2: To turn on the lamp.
ON-SCREEN DISPLAY FUNCTION
Press the INFO button during playback
to display the contents of the current
disc on the screen.
Example:
TURNING THE UNIT ON/OFF
Press OPEN button on the front panel to
release and turn on the monitor.
DVD:
FM TRANSMITTER FUNCTION
Press button on the front panel or on
the remote control to turn the FM
TRANSMITTER ON or OFF.
(1) Press INFO for the first time:
TITLE 01/03 CHAPTER 002/025
00:02:25
DISPLAY ADJUST FUNCTION
Press the DISPLAY ADJUST button
on the remote control during DVD/AUX
mode or DVD/GAME/AUX mode (for
GAME version only) to display the
adjustment items on the screen.
Title Number, Total Title Number, Chapter
Number, Total Chapter Number of this
Title of the disc currently being played
will be shown on the screen, along with
the elapsed time.
BRIGHTNESS
32
CONTRAST
32
COLOR
32
TITLE REMAIN
TINT
32
01:46:58
(2) Press INFO for the second time:
Press / button repeatedly to select
among BRIGHTNESS, CONTRAST,
COLOR,TINT (For the unit with NTSC
system) . Press / buttons on the
remote control to adjust the
corresponding item.
(3) Press INFO for the third time:
CHAPTER ELAPSED
00:00:24
(4) Press INFO for the fourth time:
CHAPTER REMAIN
00:01:39
(5) Press INFO for the fifth time:
The message on the screen will be cleared.
VCD:
(1) Press INFO for the first time:
SINGLE ELAPSED
00:00:25
11
OPERATION
(2) Press INFO for the second time:
MP3 (When set to NO MENU in SMART
NAV item):
(1) Press INFO for the first time:
SINGLE REMAIN
00:03:15
CHAPTER ELASPED 00:00:25
(3) Press INFO for the third time:
TRACK : 01/123
TOTAL ELAPSED
00:00:25
(2) Press INFO for the second time:.
CHAPTER REMAIN
00:04:25
(4) Press INFO for the fourth time:
TOTAL REMAIN
TRACK : 01/123
00:40:35
(3) Press INFO for the third time:
The message on the screen will be cleared.
(5) Press INFO for the fifth time:
The message on the screen will be cleared.
CD:
(1)Press INFO for the first time:
MULTI-SUBTITLE LANGUAGE
FUNCTION (FOR DVD ONLY)
Press SUBTITLE during playback.
Each time the button is pressed, the
subtitle language changes in sequential
order.
Notes:
- The language number is different
according to the disc.
- Some discs only contain one subtitle
language.
- When no different subtitle language
are recorded,
will be displayed at
screen left top corner.
SINGLE ELASPED
00:00:25
TRACK : 01/14
(2)Press INFO for the second time:
SINGLE REMAIN
00:03:15
TRACK : 01/14
(3)Press INFO for the third time:
TOTAL ELASPED
00:00:25
TRACK : 01/14
(4) Press INFO for the fourth time:
TOTAL REMAIN
00:40:35
TRACK : 01/14
(5) Press INFO for the fifth time:
The message on the screen will be cleared.
12
OPERATION
MP3 DISC PLAY
MP3 disc is playing as the format of
FOLDER.
For example:
SMART NAVI
ROOT
CD01
MP3 001 PLUMT
CD02
MP3 002 RZID
CD03
MP3 003 ASCIS
CD04
MP3 004 DCYI
CD05
MP3 005 BFZ
PLAY MODE
DISC
In stop mode, use / , / on the
remote control to select the item or folder
(such as CD01, CD02...), and press
ENTER button on the remote control to
confirm, then select the desired track
(such as 001 PLUMT, 002 RZID...) on the
current folder to play.
Pressing REPEAT button repeatedly can
select three kinds of repeat play mode.
REP-ONE:
Play the same song over and again.
FOLDER REP:
Play all songs in the current directory
in sequence, over and again.
FOLDER:
Play all songs in the current directory
once.
When select PLAY MODE , press / to
change between the following mode:
SINGLE
REP-ONE
DISC SCAN
SHUFFLE ON
DISC
FOLDER
FOLDER REP
DISC REP
PROGRAM PXXX
In the playback, use
or
to skip an
item ahead or back.
: Rapid reverse,
: Rapid advance
Note: The FOLDER cannot be selected
during playing. It can be selected after
(Stop) button pressed.
13
SETUP
GENERAL SETUP
INITIAL SETUP
--- GENERAL PAGE ---
SETUP MENU --- MAIN PAGE
GENERAL SETUP
TV DISPLAY
NORMAL/PS
SPEAKER SETUP
PIC MODE
NORMAL/LB
AUDIO SETUP
ANGLE MARK
WIDE
PREFERENCES
OSD LANG
CAPTIONS
SCR SAVER
EXIT SETUP
1. Press SETUP in the stop mode.
(Press the stop button twice to ensure
the player is in STOP mode.)
MAIN PAGE
TV Screen
2. The initial SETUP menu is displayed.
4:3
Video Material
Normal
3. Select the preferred item by using the
/ buttons.
Pan Scan
Wide (16:9)
Letter-box
4:3
16:9
4. Press OK buttons.
a. GENERAL SETUP
This setup page includes all the
item of TV display & audio output
feature. For the detail please refer
to GENERAL SETUP MENU.
Normal/PS (For 4:3 TV)
Played back in the PAN & SCAN style.
(If connected to wide-screen TV, the left
and right edges are cut off.)
Normal/LB (For 4:3 TV)
Played back in letterbox style.
(If connected to wide-screen TV, black
bands appear at top and bottom of the
screen.)
b. SPEAKER SETUP
This is to activate the audio output
from DOLBY AC3 5.1 DOWNMIX
to 2 channel mode. Please refer to
SPEAKER SETUP MENU.
Wide (For 16:9 TV)
Select when a wide-screen TV set is
connected.
c. AUDIO SETUP
This setup page includes all the
items for AUDIO. Please refer to
AUDIO SETUP MENU.
d. PREFERENCE SETUP
This setup page includes all the
configuration of support feature.
For the detail please refer to
PREFERENCES SETUP MENU.
14
SETUP
--- GENERAL PAGE ---
--- GENERAL PAGE --TV DISPLAY
TV DISPLAY
PIC MODE
AUTO
PIC MODE
ANGLE MARK
HI-RES
ANGLE MARK
OSD LANG
N-FLICKER
OSD LANG
ENGLISH
CAPTIONS
CAPTIONS
FRENCH
SCR SAVER
SCR SAVER
GERMAN
ITILAIN
SPANISH
MAIN PAGE
MAIN PAGE
PIC mode setup
Select AUTO, the player PIC mode will
depend on DVD disc.
Select HI-RES format for best image
resolution.
Select N-FLICKER format on format on
image or picture with noise or distortion.
OSD LANG type setup
Select the preferred OSD (On Sreen
Display) language by using the /
buttons.
--- GENERAL PAGE --TV DISPLAY
--- GENERAL PAGE ---
PIC MODE
TV DISPLAY
ANGLE MARK
PIC MODE
OSD LANG
ANGLE MARK
ON
CAPTIONS
ON
OSD LANG
OFF
SCR SAVER
OFF
CAPTIONS
SCR SAVER
MAIN PAGE
CAPTIONS setup
When playing DVD disc, activate the
CAPTIONS feature by selecting ON and
the captions (such as the actor dialogue)
appear on the screen; deactivate this
feature by selecting OFF and the
captions will not appear.
MAIN PAGE
ANGLE MARK display setup
If it is set to ON, when the multi-angle
DVD disc is playing, (the angle mark)
will appear on the screen; if it is set to
OFF, the mark will not appear.
15
SETUP
AUDIO SETUP
--- GENERAL PAGE ---
--- AUDIO SETUP ---
TV DISPLAY
PIC MODE
ANGLE MARK
OP MODE
LINE OUT
LPCM OUTPUT
RF REMOD
DYNAMIC
OSD LANG
CAPTIONS
SCR SAVER
ON
OFF
MAIN PAGE
MAIN PAGE
SCREER SAVER setup
Select the SCR SAVER ON/OFF.
OP MODE
- LINE OUT: Line out mode, with
digital dialog normalization.
- RF REMOD: RF remodulation mode,
with heavy compression and digital
dialog normalization.
It is recommended to select LINE OUT mode.
SPEAKER SETUP
--- SPEAKER SETUP PAGE --DOWNMIX
LT/RT
--- AUDIO SETUP ---
STEREO
MAIN PAGE
OP MODE
LPCM 48K
LPCM OUTPUT
LPCM 96K
DYNAMIC
This is to activate the audio output from
DOLBY AC3 5.1 DOWNMIX to 2 channel
mode. Select the preferred SPEAKER
connection by using the cursor buttons.
- Select the LT/RT to activate the Dolby
surround compatible output.
- Select the STEREO to activate simple
stereo mode.
MAIN PAGE
LPCM OUTPUT
Select the LPCM (Line Pulse Code
Modulation) OUTPUT between LPCM
48K and LPCM 96K. The higher the
sampling frequency is, the better the
output audio quality is.
It is recommended to select LPCM 96K.
16
SETUP
--- AUDIO SETUP ---
--- PREFERENCES PAGE ---
OP MODE
TV TYPE
FULL
LPCM OUTPUT
DYNAMIC
AUDIO
ENGLISH
6/8
SUBTITLE
FRENCH
4/8
DISC MENU
SPANISH
PARENTAL
CHINESE
PASSWORD
JAPANESE
DEFAULTS
GERMAN
SMART NAV
ITALIAN
2/8
OFF
LOGO
MAIN PAGE
MAIN PAGE
DYNAMIC Range Control
Select DYNAMIC and adjust the dynamic
range of a Dobly Digital encoded
program. There are 8 steps between full
compression and off compression.
AUDIO language setup
Select the preferred AUDIO soundtrack
by using the cursor buttons.
--- PREFERENCES PAGE ---
PREFERENCES SETUP
TV TYPE
--- PREFERENCES PAGE ---
AUDIO
TV TYPE
AUTO
SUBTITLE
ENGLISH
AUDIO
NTSC
DISC MENU
FRENCH
SUBTITLE
PAL
PARENTAL
SPANISH
DISC MENU
PASSWORD
CHINESE
PARENTAL
DEFAULTS
JAPANESE
PASSWORD
SMART NAV
GERMAN
DEFAULTS
LOGO
ITALIAN
SMART NAV
MAIN PAGE
OFF
LOGO
SUBTITLE language setup
Select the preferred SUBTITLE language
by using the cursor buttons.
MAIN PAGE
TV type setup
This player can play discs recorded in
either PAL or NTSC format.
Select NTSC format, when the unit is
connected to NTSC TV.
Select PAL format, when the unit is
connected to PAL TV.
Select AUTO format, the player TV output
format will be according to the DVD disc
format.
17
SETUP
--- PREFERENCES PAGE ---
--- PREFERENCES PAGE --TV TYPE
TV TYPE
AUDIO
AUDIO
SUBTITLE
SUBTITLE
DISC MENU
ENGLISH
DISC MENU
PARENTAL
FRENCH
PARENTAL
PASSWORD
SPANISH
PASSWORD
DEFAULTS
CHINESE
DEFAULTS
SMART NAV
JAPANESE
SMART NAV
LOGO
GERMAN
LOGO
MAIN PAGE
ITALIAN
MAIN PAGE
PASSWORD
Select CHANGE and press ENTER
button. Type the old password (The
initial factory code is 3308) and key in 4
characters password now you want to
use, and retype again to confirm key in
correctly.
DISC MENU language setup
Select the preferred DISC MENU
language by using the cursor buttons.
--- PREFERENCES PAGE --TV TYPE
1G
AUDIO
2
SUBTITLE
3 PG
DISC MENU
4 PG 13
PARENTAL
5
PASSWORD
6 PG-R
DEFAULTS
7 NC-17
SMART NAV
8 ADULT
LOGO
NO PARENTAL
CHANGE
--- PREFERENCES PAGE --TV TYPE
AUDIO
SUBTITLE
DISC MENU
PARENTAL
PASSWORD
DEFAULTS
MAIN PAGE
RESET
SMART NAV
LOGO
PARENTAL
Select suitable parental guidance by
the cursor buttons and confirmed by
pressing ENTER button.
MAIN PAGE
DEFAULTS
Select reset to become factory initial
setting.
18
SETUP
--- PREFERENCES PAGE ---
DEFAULTS TABLE
General Setup TV Display
TV TYPE
Normal/PS
AUDIO
PIC Mode
AUTO
SUBTITLE
Angle Mark
ON
OSD Language English
DISC MENU
PARENTAL
PASSWORD
DEFAULTS
NO MENU
SMART NAV
WITH MENU
Captions
ON
SCR Saver
OFF
Speaker Setup Downmix
Stereo
Audio Setup OP Mode
Line Out
LPCM Output LPCM 96K
LOGO
Dynamic
MAIN PAGE
Preferences TV Type
SMART NAV
If selected WITH MENU mode, when
playing an MP3 disc, the smart
navigation menu will appear on the
screen, then the user can select a track
to play according to the menu hint.
If selected NO MENU mode, when
playing an MP3 disc, there is no menu
to display and it starts to play directly.
The user can adjust this item according
to one’s need.
--- PREFERENCES PAGE --TV TYPE
AUDIO
SUBTITLE
DISC MENU
PARENTAL
PASSWORD
DEFAULTS
ORIG LOGO
SMART NAV
CUST LOGO
LOGO
MAIN PAGE
LOGO
Select ORIG LOGO (original picture when
the unit turns on) or CUSTLOGO
(customer-set picture when the unit turns
on).
19
FULL
AUTO
Audio
English
Subtitle
English
DISC Menu
English
Parental
NO_Parental
Password
3308
Smart NAV
With Menu
Logo
Orig Logo
INSTALLATION
Fig. 1
Mounting Bracket(A)
Tapping Screw (M4x10)
Bracket
Ring
Base
DVD Deck
Mounting Boltch (M4.0 x 20)
Fig. 2
1. Determine the mounting location and drill four mounting holes on the ceiling (See
Fig.1).
2. Attach the mounting bracket (A) to the mounting holes on the ceiling with screws
matching with the screw holes on the bracket (A).
3. Install the ring to the DVD unit with screws.
20
ELECTRICAL CONNECTION
VIDEO IN (YELLOW)
(25CM)
AV IN (2) CABLE (BLACK)
21
(1M) GREEN / PURPLE
POSITIVE TRIGGER (PURPLE)
(35CM) NEGATIVE TRIGGER (GREEN)
ACC+ (RED)
GROUND (BLACK)
(30CM)
AUDIO IN (R) (RED)
AUDIO IN (L) (WHITE)
(30CM)
(25CM)
AV OUTPUT CABLE (BLACK)
(25CM)
VIDEO OUTPUT (YELLOW)
(6M)
(5M)
AUDIO OUTPUT (L) (WHITE)
BATTERY (YELLOW)
AUDIO OUTPUT (R) (RED)
POWER CONNECTION
DOME LIGHTS
FMM GROUND (BLACK W/WHITE STRIPE)
AUDIO (R) (RED)
AUDIO (L) (WHITE)
FMM 12V (BLUE)
(3M)
FMM
REPLACING THE CAR DOME LAMP
There are two car dome lamps on the DVD unit. Follow the directions shown below
for a new lamp changing.
1. Be sure the lamp is off. Push back the lamp cover and open it.
2. Remove and discard the old lamp.
3. Install a new bulb.
4. Close the cover.
Car dome lamp
Car dome lamp
Bulb
Bulb Specification
Diameter:
ø8mm
Length:
28mm
Voltage Spec.: DC12V, 5W
22
TROUBLE SHOOTING
THE PLAYER DOES NOT RESPOND TO
THE REMOTE CONTROL
• Aim the remote control directly at the
sensor on the front of the player.
• Avoid all obstacles which may interfere
with the signal path.
• Inspect or replace the remote control
batteries.
If it appears that your DVD unit is faulty,
first consult this checklist. It may be that
something simple has been overlooked.
Under no circumstances should you
try to repair the player yourself, as this
will void the warranty. Only qualified
service personnel can remove the cover
or service this player.
BUTTONS DO NOT WORK
• Turn the player off and on with the
power on/off button on the front of the
player.
NO POWER
• Check the fuse to the system.
• Check to see if the vehicle voltage is
above 11V DC.
NO PICTURE
• Check if the mode is set to proper
state, such as DVD mode, TV mode
and AV mode.
DISTORTED PICTURE
• Check the disc for fingerprints and
clean with soft cloth, wiping from center
to edge.
• Sometimes a small amount of picture
distortion may appear. This is not a
malfunction.
COMPLETELY DISTORTED PICTURE
• The disc format is not according to the
TV-set used (PAL/NTSC).
NO COLOR IN PICTURE
• The disc format is not according to the
TV-set used (PAL/NTSC).
DISC DOES NOT PLAY
• Ensure the disc label is upwards.
• Clean the disc.
• Check the mute status.
NO SOUND
• Check the batteries in the headphones.
• Check audio connections.
NO RETURN TO START-UP SCREEN
WHEN DISC IS REMOVED
• Press POWER to turn off the unit, then
press it again to turn on the unit.
23
SPECIFICATIONS
Supply Voltage
Current Consumption
Signal System
Discs Played
Operating temp
:
:
:
:
12V DC (11V-15V), test voltage 14.4V, negative ground
Less than 2A
Compositive video 1.0Vp-p 75Ω
(1) 5” (12 cm) DVD-VIDEO Disc
(2) Compact Disc (CD-DA/CD-R/CD-RW/MP3)
(3) 5” (12cm) VIDEO CD
: O˚C to +50˚C
Note:
Specifications and design are subject to modification, without notice, due to
improvements in technology.
24
88-V3581-01