1
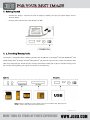
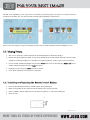
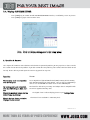
Mirage L
Photo Display 15"
Instruction Manual
��������������������������������������
JOBO Mirage L
User Manual English
Rev: 2.0
1. Introduction
Congratulations on your purchase of the JOBO Mirage L!
Before operating the unit, please read this manual thoroughly and retain it for future reference. This manual will help
you to learn many of the exciting and useful features of your new Mirage L and make viewing more enjoyable.
The Mirage L lets you view digital pictures directly from your camera's memory cards. You will be able to create a
slideshow using multiple transition effects or display one picture at a time. No computer required.
®
The Mirage L is compatible with the following popular memory card formats: SD™, MultiMediaCard™, CompactFlash ,
Microdrive™, Memory Stick , Memory Stick PRO , and xD .
®
®
®
1.1. Main F eatures
-
Displays digital pictures (JPEG) without a computer.
-
Simply insert a compatible memory card into the digital frame to show photos,
-
Compatible memory cards include Secure Digital Card (SD), MultiMedia Card (MMC), Memory Stick,Memory
Stick Pro, Compact Flash (CF) & xD, USB Disk.
-
Displays digital camera's stored JPEG images.
-
RESCALING" function: Image automatically rescaled to to the resolution of the display.
-
Supports up to 16 Mega Pixels image files (JPEG format).
-
Full screen display for clock&calendar and Alarm function.
-
Two way to control: main function buttons on body; infrared remote control.
-
Bright TFT active matrix LCD screen @ 1024x768 Pixels.
-
USB2.0 high speed connection to connect to your PC.
-
USB1.1(Host) for connecting to your digital camera, GIGA One, Spectator or any other USB disk.
-
Memory Flash ( 1GB ).
Seite 1 von 7
��������������������������������������
1.2. Precautions & Maintenanc e
-
This Mirage L is for indoor use only.
-
To reduce the risk of fire or electric shock, do not expose this appliance to rain or moisture.
-
Do not block the ventilation holes on the back of the Mirage L at any time.
-
Keep your JOBO Mirage L out of sunlight. Direct sunlight may cause damage.
-
Always use the eject buttons on the memory storage cards slots to remove the memory storage cards.
-
Do not open the case of the JOBO Mirage L. There is a risk of electric shock and there are no user
serviceable parts inside. Opening the case will void your warranty.
-
Do not use the Mirage L if conditions could allow condensation to occur, or damage may result.
1.3. Cleaning the LCD Screen
Treat the screen gently. The screen on the JOBO Mirage L is made of glass and can be scratched or broken. If
fingerprints or dust make the LCD screen dirty, we recommend using a soft, non-abrasive cloth such as the camera
lens cloth to clean the LCD screen. If you use the LCD Cleaning Kit sold on the market, do not apply the cleaning
liquid directly to the LCD screen. Clean the LCD screen with cleaning cloth moistened with the liquid.
-
THE UNIT IS LCD BY-PRODUCT,
DO NOT STRIKE BY ANY HARD OBJECT.
TO AVOID THE RISK OF FIRE OR ELECTRIC SHOCK,DO NOT EXPOSE THIS PRODUCT TO RAIN OR MOISTURE.
1.4. Sc op e of del iv ery
-
JOBO Mirage L; 15inch Photo Display incl. stand
-
User Manual
-
Remote Control
-
USB Cable
-
Power Adapter
-
Audio/Video cable
Seite 2 von 7
��������������������������������������
2. Getting Started
-
Assemble the Mirage L stand on the back for propping stability, then plug the power adapter into an
electrical outlet.
-
Push the power switch at the end of Mirage L to “ON”.
2. 1. Ins e rtin g M em ory Cards
TM
TM
The Mirage L is compatible with the following memory cards or USB Disk: Secure Digital Card (SD) MultiMedia Card
TM
TM
TM
®
(MMC) Memory Stick & Memory Stick Pro CompactFlash (CF) Card xD Card Insert the memory card with the front
label facing away from you. Do not force the memory card into the memory slot. If you are not able to easily insert
the memory card completely, you may have inserted it in the wrong way.
Rig ht S id e
Bo tt o m S i d e
Not e :The Mirage L will ONLY recognize digital pictures stored in JPEG format. Digital pictures
stored in other formats will be ignored by the device.
Seite 3 von 7
��������������������������������������
You will see the following screen if you insert the memory card correctly. Make sure you have at least one picture
stored on the memory card. The frame will not function properly without a stored picture.
Please select the memory card, press the button from the unit or remote control to enter the following screen.
2.2. Viewing Picture
1.
2.
You can use either the remote control or the on-board buttons to control the Mirage L.
Remove the plastic battery insulator (if any) on the bottom of the remote control and make sure the remote
control has a battery installed. See “Installing and replacing battery” section if you need a new battery.
3.
Use the remote control to highlight and select the Phot o folder (Use the direction keys Ri ght, L eft on the
remote control to navigate and press Enter to select).
4.
Highlight a picture and press Enter to view the picture.
5.
Press “PLAY” button to view the picture sequential.
2.3. In stall ing and Replacing th e Remote Control Bat tery
1.
Place the Remote Control with the control buttons facing downward.
2.
While pressing down on the ridged area of the battery cover pull the tray out.
3.
Place a “CR2025” lithium battery on the tray with the positive “+” end facing toward you.
4.
Close the tray.
+
Seite 4 von 7
��������������������������������������
2.4. Display CLOCK&CALENDAR
-
Press [CLOCK] key on remote control into COLCK&CALENDAR interface, see following screen cut picture:
Press [CLOCK] key again return to main menu.
N o t e : C l o ck a nd Al a r m s e t t i n g s a r e i n t h e s e tu p m e n u !
3 . Q ue s t io n & A n s we r s
This chapter will introduce some solutions to deal with the potential problems you may experience. Please consult
this section first to correct the problem. If you also cannot solve the problem, please contact the local dealer to ask
for help. Please don't try to take apart the machine by yourself at any time.
Que stion
Answer
W h a t m e m o r y c a r ds a r e c o m p a t i b l e
wit h t h e Mi r a g e L ?
Secure Digital Card (SD) MultiMedia Card (MMC) Memory Stick & Memory
Stick Pro CompactFlash (CF) Card xD Card, You can also use photostorage
devices such as GIGA ONE and attach them via the USB-OTG port.
My me m or y c a r d i s n o t c o m p a t i b l e
wit h t h e J O B O Mir a g e L . W ha t c a n I
do?
You should be able to buy a memory card adapter that is compatible with
one of the supported memory cards.
W h a t i s t h e m a x i m um p i c t u r e s i z e t h e
d i g i t a l f r a m e c a n d is pl a y?
W h a t i s t he b e s t p i c t u r e r e s o l u t io n
d i s pl a y e d o n t h e s c r e e n ?
The digital frame is able to display pictures up to 16 Mega Pixels.
The Picture's best resolution is 1024x768 pixels.
Seite 5 von 7
��������������������������������������
3.1. Specifications
Display size
15“ / 38.10 cm
Aspect ratio
4:3
Display type
TFT LCD
Resolution
1024 x 768 Pixel
Colors
16 billion
Color depth
24 Bit
Visible area
304.2 mm (H) x 228.1mm (V)
Brightness
350 cd/m²
Contrast
400:1
Viewing angle
140°(V), 110°(H)
Response time
3 seconds
Current entry
AC110-240V 3 A
Power consumption
25W
Operating voltage
12V 3A
Environmental conditions
Operation temperature: 10°-50° C, humidity: 0-85 %, non-condensating
Storage: -20°-60° C, humidity: 10-90 %, non-condensating
Internal memory
1GB
Remote control
Infrared remote control (included in delivery)
Supported Memory Cards
-
Additional interfaces
1 x USB OTG – for GIGA one or other storage devices
1 x USB 2.0 High Speed – for connection to PC
Secure Digital Card (SD)
Secure Digital High Capacity (SDHC)
MultiMedia Card (MMC)
Memory Stick,Memory Stick Pro
Compact Flash (CF)
xD Picture Card
Supported formats
JPEG
Representable size of image
Up to 16 Megapixel photos in JPEG Format
Features
-
Wall holder
Integrated
full-screen displaying
Slideshow mode with numerous transition effects
Image rotation (+/- 90 degree)
Image zoom (fourfold)
Integrated calendar and clock
Seite 6 von 7
��������������������������������������
3 .2 . I n c lu de d A cc e s s orie s
-
AC Power Adapter
Stand
Remote control
USB Cable
Manual
4. Warranty and Ser vice
4.1. Warranty conditions
This product is subject to the legal warranty periods relating to manufacturing faults and defects.
S u b s t a n c e o f t he w a rr a n t y :
1. In the event of malfunctioning caused by manufacturing defects JOBO AG will repair or replace the defective product at its own discretion.
2. JOBO AG and its suppliers do not assume any liability for data losses occurring during operation of the device or consequential damage
resulting from this. Under no circumstances will JOBO AG assume liability for any direct, concrete or special damage or consequential damage
like for example damage to or loss of property or devices, loss of profits or sales, costs for spare parts, expenditure or inconvenience caused
by the interruption of service or any other damage. The user will be exclusively responsible for the loss, damage or destruction of data during
the operation of a JOBO product. Under no circumstances will JOBO AG be liable for the recreation of such data. Under no circumstances can
claims be lodged that exceed the purchase price of the product.
3.
-
The following repairs are not covered by the warranty and must be paid for separately:
Malfunctions after the end of the legal warranty periods
Change of battery after the end of the warranty period
Change of hard disk after the end of the warranty period
Malfunctions due to incorrect operation by the user (if device is not used as described in the manual)
Malfunctions caused by other devices
Changes or damage to the device not caused by the manufacturer; especially, warranty claims will lapse if the device has been opened by
anyone other than by a JOBO AG repair workshop
Damage caused by natural disasters (acts of God)
A hard disk change during the warranty period must only be performed by JOBO. Such a change by any other party will entail the loss of all
warranty claims.
If you want to make any claims under the warranty you are asked to contact the Technical Service of JOBO AG. You will be expected to quote the serial
number of the JOBO product and may also have to submit proof of purchase to show that the warranty period has not yet elapsed.
4.2. Contact/Service
If you have any questions on or need help with our products please do not hesitate to get in touch with our Technical Service. You can reach our
service people by phone under the telephone number indicated below from Monday through Thursday from 9:00 am to 4:00 pm and on Friday from
9:00 am to 1:00 pm. Independently of these service times you can also get in touch by e-mail, fax or mail:
JOBO AG
Koelner Straße 58
D-51645 Gummersbach
Tel. 0049 2261 545-72
Fax: 0049 2261 545-42
E-mail: [email protected]
www.jobo.com
Seite 7 von 7
��������������������������������������