1
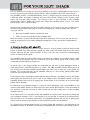
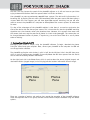
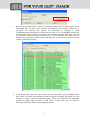
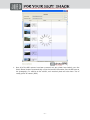
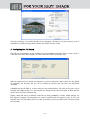
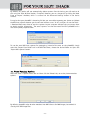
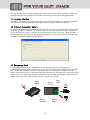
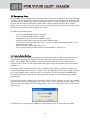
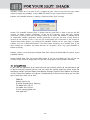
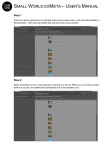
User Guide
Version 1.3
-1-
Content
1. Introduction..................................................................................................3
2. Quick Start Guide ...........................................................................................3
3. photoGPS ......................................................................................................3
4. photoGPS Software Installation ........................................................................4
5. Preparing to use photoGPS ..............................................................................4
6. Capturing Locations with photoGPS...................................................................5
7. Geotagging with photoGPS ..............................................................................6
8. Modifying the Location Data ............................................................................9
9. Configuring the POI Search............................................................................ 11
10. Managing GPS Captures ............................................................................... 12
11. Photo Metadata Options .............................................................................. 13
12. Language Selection..................................................................................... 14
13. Internet Connection Options ........................................................................ 14
14. Emergency Reset ........................................................................................ 14
15. Emergency Erase......................................................................................... 15
16. Capture Delay Setting.................................................................................. 15
17. Metadata Description .................................................................................. 16
18. Troubleshooting ......................................................................................... 19
19. Contact/Service.......................................................................................... 20
-2-
1. Introduction
Thank you for purchasing the JOBO photoGPS geotagging solution. The photoGPS enables easy
geotagging of photographs by connecting to your camera's hot shoe. This guide explains how to set
the device up ready for use, and how to use the photoGPS and software to geotag your photos. For
further information please visit www.JOBO.com
2. Quick Start Guide
1. Insert the CD included in the photoGPS package. The CD will start automatically and launch
your default browser and open a local webpage. Press the button “Installer photoGPS” and
install the photoGPS software.
2. Run the photoGPS application. Note that your computer must be connected to the internet
to allow the software to properly configure the photoGPS for the first time.
3. Charge the photoGPS by connecting it to your computer using the supplied USB cable. It can
take up to two hours to fully charge the device, but five minutes is enough for a first quick
test.
4. Attach the photoGPS to your camera hot shoe
5. Go outside and take photographs
6. Offload the photographs from your camera to a computer
7. Connect the photoGPS to your computer
8. Run the photoGPS application
9. Press the ‘Import GPS Captures’ button
10. Select the source folder containing your photos
11. When the download and processing of your GPS captures are completed, then press the
‘Match Photos’ button
12. If necessary, edit the photo location information (for more details, see section 6)
13. Press the ‘Tag Photos’ button to create your geotagged photos
14. View, edit, share etc. your geotagged photos in Picasa, Microsoft Pro Photo Tools, Flickr etc.
3. photoGPS
USB 2.0
connector
Geohint
Button
-3-
4. photoGPS Software Installation
Insert the CD included in the photoGPS package. The CD will start automatically and launch your
default browser and open a local webpage. Press the button “Installer photoGPS” and follow the
instruction to begin installation of the photoGPS software. Accept the terms of the end-user license
and follow the prompts to perform a ‘Complete’ install of the software. During the installation you
will be prompted to connect your photoGPS to the computer via the supplied USB cable.
If your computer is using a proxy server to connect to the internet you may get an error message
indicating a ‘problem downloading photoGPS.msi’. This is because some proxy servers may be
configured to block the download of .MSI files and these are needed for the photoGPS installer. To
try to resolve this problem, you can temporarily disable use of the proxy:
1. Open Internet Explorer
2. Select Tools > Internet Options... to open the Internet Options dialog
3. Select the Connections tab and then click the LAN Settings... button
4. Make a note of the current settings and then uncheck all the following check boxes:
Automatically detect settings
Use automatic configuration script
Use proxy server for your LAN
5. Click OK to save these settings and click OK to close the Internet Options dialog
6. Run the installer again (or click Retry in the error dialog), it should now successfully
download the MSI file and install the application
7. Once the installer has successfully completed, open the Internet Options dialog again and
revert any changes made to the previous settings
5. Preparing to use photoGPS
Before using your photoGPS for the first time, some preparation is required. To begin, you must run
the photoGPS application software. Under Windows XP, for example, click the Start button and select
All Programs -> JOBO -> photoGPS -> photoGPS. After a few seconds the photoGPS application
window will appear.
Note that, to use most of the features of the photoGPS application your computer must be
connected to the internet.
First, connect the photoGPS to the computer using the supplied USB cable. The Capture Device Tab
is at the top left hand corner of the application. You should see the status message change from No
Device Found to Device Connected.
The photoGPS has an internal clock, which must be set correctly for the device to function. This
clock is set automatically when the device is plugged in and the photoGPS application is running.
-4-
You can check that it has been set correctly by looking at the device configuration window, which is
accessed by pressing the ‘Configure Device’ button. (Note: photoGPS time is UTC, not local time.)
The photoGPS contains a rechargeable battery, which is charged simply by connecting the device to
a USB port. When connected, a constant red status LED indicates ‘charging’ and a constant green
status LED indicates ‘fully charged’. The charging status is also indicated in the photoGPS
configuration window. Ideally, you should fully charge the photoGPS before using it. This should
take no longer than a couple of hours.
Once you have checked that your device has been charged, and its clock is set, you are ready to test
the device. Please follow these steps to confirm that everything is working before going out and
using your device:
1. Place the photoGPS onto the camera's hot shoe
2. Take a picture, whilst observing the photoGPS LEDs.
When the shutter is pressed the LED light should flash green once. If this is the case, you are now
ready to go outside and start taking geotagged photographs. If not, consult the Troubleshooting
section.
6. Capturing Locations with photoGPS
Your photoGPS is extremely easy to use. Simply connect it to your camera via the hot shoe and take
photos as normal. Each time you take a photo, the green status LED should flash once as the device
captures GPS data for the current location. If this is not the case, consult the Troubleshooting
section at the end of this guide.
The photoGPS works by receiving GPS signals transmitted by satellites and therefore needs a good
view of the sky to function well. So, if possible, try to avoid taking photos next to walls, when
surrounded by tall buildings or indoors etc.
Of course, this is not always possible and sometimes you will want to take geotagged photos in
areas where there is poor GPS reception e.g. indoors. The JOBO photoGPS solution allows you to do
this. Simply press the device GeoHint button before you enter such an area and it will capture the
location. This can be used later, by the photoGPS software, as a hint to help geotag photos taken
inside the area of poor GPS reception.
If you forget to press the GeoHint button before entering the area, no problem, pressing the button
after leaving the area will work just as well. If you forget to press the GeoHint button at all, the
photoGPS software will still try to geotag your photos based on the positions of any earlier/later
photos and/or GeoHints.
An alternative to the GeoHint button is simply to take a photograph (with the photoGPS on the
camera) either before entering or after leaving the area of poor GPS reception. The disadvantage of
this approach is that you may have to take a photo that you don’t really want in order to geotag
those that you do.
For the best results it is advisable to keep the photoGPS connected to the camera for all photos you
wish to geotag. However, if this is not possible (e.g. the hot shoe is required for an external flash)
then the device can be removed temporarily. The photoGPS software will still try to geotag your
photos based on based on the positions of any earlier/later photos and/or GeoHints.
Tip: If you wish to take geotagged photos in an area of poor GPS reception, it may be better to use
the GeoHint button, as described, and remove the photoGPS from the camera when taking photos in
-5-
the area. This may improve the speed of the photoGPS software as it will not have to spend time
trying to determine locations from the captures taken in difficult conditions.
Your photoGPS can store approximately 1000 GPS data captures. The device will indicate when it is
becoming full, by flashing the red status LED immediately after the green status LED when taking a
capture. When this first happens, you still have about 200 captures remaining, but you will soon
need to connect the photoGPS to a computer to offload/delete the current captures to make room
for more.
Tip: One of the advantages of the photoGPS solution is that there is no need to synchronise the
time of the device with the time on your camera. This is due to the fact that the photoGPS matching
algorithm uses time intervals rather than absolute times. However, this approach does mean that
the camera clock must stay the same for all photos in a batch to be geotagged. The camera time can
be changed between batches of photos, if required e.g. to set the local time for a set of photos
taken on holiday.
7. Geotagging with photoGPS
Geotagging your photos is simple, using the photoGPS software. To begin, download the photos
from your camera onto your computer. Next, connect your photoGPS to the computer via USB and
run the application software.
The photoGPS application main window is split in half. On the left hand side is the GPS data pane,
which is used to configure your photoGPS, to transfer/delete the GPS data captures from the device
and to show the resulting location information.
On the right hand side is the Photos Pane, which is used to select the source (original images) and
destination folders (tagged images) and to display/edit the location information for each image.
GPS Data
Pane
Photos
Pane
There are a number of options and settings that control the operation of the photoGPS software.
These are explained later in this guide, but here we describe the simplest workflow using the default
options.
-6-
1. Press the ‘Import GPS Captures’ button on the Capture Device tab. The GPS captures will be
downloaded from the device and processed to determine their locations. When this is
successful, the resulting GPS position fix information is displayed in green
(time/latitude/longitude/altitude). Failed fixes are shown in red. The photoGPS software will
perform several passes, retrying the captures that originally produced failed fixes, as these
can sometimes be turned into successful fixes by using information from other fixes. In
addition, the application performs reverse geocoding, to try to provide an address for each
capture (street/town/country).
2. In the Photos Pane, select the source folder containing the photos you just offloaded from
your camera. The photos will be loaded and their thumbnails displayed. By default, the same
directory is used to store the geotagged photos. JPEGs are overwritten with geotagged
versions and RAW photos are given an XMP sidecar. If you prefer, you can select an
alternative destination folder for the geotagged photos.
-7-
3. Once all of the GPS captures have been processed and your photos have loaded, press the
‘Match Photos’ button to automatically assign the location information from the GPS pane to
the photographs. In addition to the address, each matched photo will also show a list of
nearby points of interest (POIs).
-8-
4. If you are not satisfied with the location information which has been automatically assigned
to each photo, there are a number of ways you can make changes. These are described in
the following section. Double-click on a photo to see a larger view and more details.
5. When you are satisfied that the location information for each photo is correct, press the ‘Tag
Photos’ button to save your geotagged images.
6. If you have more photos to geotag you can select another photo source folder and repeat
the process. Otherwise, you can exit the photoGPS application. Before doing so you may
wish to access the ‘Device Configuration’ window to erase the GPS captures from the
photoGPS.
7. Finally, you can load the geotagged images into a geo-aware application, such as Picasa,
Flickr, etc. to search/organise using the location information, display them on a map etc.
After tagging is completed, the photoGPS software creates a file called Photos.KML in the
destination directory. If you have Google Earth installed on your computer, you can double
click on this file to see your geotagged photos on a map of the world.
8. Modifying the Location Data
When the matching process is complete, if you are not satisfied by the location information (address
and POIs) which has been automatically assigned to your photos, there are a number of ways you
can make changes.
-9-
The first possibility is that one or more of your photos have been assigned location information from
the ‘wrong’ GPS data capture, or perhaps have not been assigned any location information at all. In
such cases you can copy/paste or drag/drop location information from one photo or GPS data
capture to one or more photos.
The table below describes the various actions that can be performed. Note: all of the usual windows
short cut keys (such as Ctrl-V for paste, Del for Delete etc.) are available if you wish to use them.
Action
Desired
Copy location
of one Photo
(or GPS
capture) to
another
What you need to do
Result
Drag and drop in the usual
way
Copy location
of one Photo
(or GPS
capture) to
many others
Right click on the photo (or
GPS capture), select copy
from the menu.
Select the photos to which
you wish to copy the
location using the mouse.
Right click the mouse button
when over one of the
selected photos and select
paste from the menu
Select one or more photos.
Right click the mouse and
select delete from the menu.
Location of the
initially selected
photo (or GPS
capture) is copied
to the photo into
which it is
dropped
The selected
photos are given
the same location
as the initial
copied photo
location (or GPS
capture)
Delete
location from
a photo or
photos
Undo the
previous copy
location
operation
Right click the mouse
anywhere in the photos area
and select Undo Paste
Location from the menu
The locations and
points of interest
will be deleted
from the photos
selected
The previous
location(s) are
restored
Photos which have automatically assigned location data are flagged with a blue pin
which have had their location data edited are flagged with a red pin .
. Photos
The second possibility is that photoGPS has been unable to automatically determine the correct
address and/or nearby POIs for one or more of your photos. In this case, you can manually edit the
information. Simply double click on a photo to show more details. In the detailed view you can edit
the address and existing POIs and/or add new POIs. Press ‘OK’ to save the new location information,
which can then be copied to other photos if required, as above.
- 10 -
The final possibility is to modify the POI search parameters (described in the next section) to see if
photoGPS can automaticaslly provide a better list of POIs for each photo.
9. Configuring the POI Search
The POI search parameters can be controlled via the photoGPS application options screen, which is
under the menu item Tools->Options and then select the “Points of Interest” tab.
POIs are separated into a number of categories e.g. Tourist Attraction, Food & Drink etc. By default
all categories are searched, but this can be limited by removing the tick from the appropriate
checkbox.
photoGPS searches for POIs in an area centred on the photo location. The radius of this area can be
selected from 100m to 5km. It is also possible to change the limit for the number of POIs returned
by the search function (maximum 20).
Ideally, these POI search parameters should be set when photoGPS is started, before loading any
GPS captures. However, the parameters can also be modified after the matching step. In this case
the POI search will be redone (which can take some time) and the new POI results will be assigned
to the photos.
- 11 -
10. Managing GPS Captures
When the device is connected to the computer, the photoGPS software displays the number of
captures currently stored on the device and the percentage of the total storage used.
The same information is accessible by pressing the ‘Configure Device’ button. This pops up a window
which includes a graphical display of the number of captures used and an estimate for the number
of captures remaining. The battery status, device identifier, firmware version and internal clock time
are also shown.
This window has an ‘Erase All Data’ button, which can be used to delete all the captures from the
device when they are no longer needed. The typical workflow is to geotag your photos, as described
earlier in the guide, then use this button to delete the captures from the device ready to start
taking new photos.
If you want to archive your GPS capture data you can bring up the ‘Options’ window (via the Tools ->
Options menu) and select the ‘GPS Data’ tab. Here you can choose a folder that captures will be
copied to when importing from the device.
- 12 -
By default, this option will not automatically delete captures from the device; you will need to do
this using the ‘Erase All Data’ button, if required. However, you can change this by ticking the ‘Auto
Erase on Import’ checkbox, which is accessed via the ‘Advanced Settings’ button in the device
window.
It may be that your photoGPS is becoming full but you are unable to geotag your photos and delete
the GPS data captures because you do not have internet access. In this case you can use the Tools > Download Data menu item to save the captures to your computer without trying to process them
to obtain position information. The saved captures can then be erased from the photoGPS and a
new set of photos/captures taken.
To use the saved GPS data captures for geotagging, instead of the ones on the photoGPS, simply
select the ‘Import From Folder’ tab in the GPS Data Pane, choose the desired folder and press the
‘Import GPS captures’ button.
11. Photo Metadata Options
Select the Tools -> Options menu item and then click the ‘Photos’ tab, to set the photo metadata
options.
By default, photoGPS writes location metadata into XMP sidecars for RAW images, but embeds it
directly into JPEG image files.
- 13 -
This tab also allows for a custom copyright message to be specified. If the checkbox is ticked, this
copyright message will automatically be added to the Copyright field of all geotagged photos.
12. Language Selection
The Tools -> Language menu option allows the user to change the language used by the photoGPS
user interface. Supported languages are: English, German, French, Italian and Spanish.
13. Internet Connection Options
In order to generate location information from the GPS data captures, the photoGPS software needs
to be able to communicate with our internet servers. This may not be possible if your computer is
using a proxy system, which is common for many businesses. If this is the case, select the Tools ->
Options menu item and then click the ‘Server Connection tab. Then tick the ‘Use HTTP Proxy Server’
checkbox and enter the Server and Port details.
14. Emergency Reset
In the unlikely event that your photoGPS is not functioning correctly, read through the
Troubleshooting section of this guide to try and discover the cause of the problem. If all else fails
you can reset the photoGPS using the reset button. This is located behind a small hole in the
bottom of the device casing, close to the hot shoe connector and red status LED. To reset the device
simply insert e.g. a bent paperclip into the hole and push until the reset button is depressed, then
release. Note, you cannot reset while the device is connected via USB.
USB 2.0
connector
- 14 -
Geohint
Button
15. Emergency Erase
The photoGPS has an emergency erase function, which can be used to delete all the currently stored
captures. This may be useful if, for example, you are away from your computer and realize that you
did not erase the captures after your last geotagging session. Or the photoGPS may be running out
of space and you want to sacrifice the current stored captures to allow new ones to be created.
Please use this function with care. If you have not previously stored the captures then they will be
lost forever and cannot be used to geotag your photos.
To perform an emergency erase:
-
-
disconnect the PhotoGPS from the computer
press and hold the Reset button, as above
simultaneously, press and hold the GeoHint button
release the reset button (continue to hold the GeoHint button
the red status LED should flash four times, if so you can release the GeoHint button, if not,
repeat the process again
wait for the green status LED to flash twice
all the captures have now been erased and the photoGPS is ready for use
16. Capture Delay Setting
Some cameras generate a lot of electromagnetic interference, which can affect the performance of
the photoGPS. Typically, this interference is worst when the camera is taking a photo. For this
reason, the photoGPS does not take a capture at exactly the same time as the camera shutter is
pressed. Instead, there is a short delay before taking the capture, to avoid the worst of the camera
interference.
The default delay is approximately one second. However, every camera is different and there is no
universal best delay setting. Even for a single camera, the interference effects may change according
to e.g. the shooting mode, image size, flash card speed etc. If you find that your photoGPS gives
consistently poor results, even with a clear view of the sky, then it may be worth trying different
delay settings.
To change the default capture delay, connect the device to your computer and run the photoGPS
software. Next press the ‘Configure Device’ button and then the ‘Advanced Settings’ button in the
device window. Now select one of the delay settings. You can choose various settings from zero to
three seconds.
If problems persist, please contact JOBO and provide details on your camera make and model.
- 15 -
17. Metadata Description
Every digital photo contains extra information, known as metadata. Some metadata is always written
to the file which contains the image data. Further information may be stored in an associated file,
known as a "sidecar". For JPEG files, the metadata is usually stored in the file itself. (Note that
image data and metadata are kept apart in JPEG files, so that each can be updated without
interfering with the other. On the other hand, camera "RAW" images are not intended to be
updated, so the metadata is held in a sidecars.
When the camera takes a photo, it writes some metadata into the file which contains the image.
This will include the date and time when the photo was taken and, typically, other information
about the image such as camera settings and exposure time. When the photos are geotagged, the
photoGPS software writes geographical metadata to the image or its sidecar file.
The photoGPS software works with four different metadata types:
IPTC (International Press Telecommunications Council). This is an older meta information format and the
information is gradually migrating to XMP. IPTC tags hold information relating to the photographer (e.g.
copyright, contact details) and information on the subject of the image (e.g. location, keywords etc.).
XMP (Extensible Metadata Platform). This is an open XML-based metadata format created by Adobe. Typically,
it duplicates (and extends) the IPTC information. photoGPS also use XMP to store the Points of Interest (POI)
data.
Windows (Microsoft Windows file properties). photoGPS sets a number of Windows XP/Vista file properties
such as Title, Subject and Keywords.
There are 3 categories of photoGPS metadata
GPS - the date, time and position (latitude,longitude and altitude) of the photoGPS when the photo was
taken.
Reverse Geocoding - the address corresponding to the GPS position. This comprises 4 lines: 3 address lines
and the Country, e.g. "Redcoat Lane, Weybridge, Surrey, England". Note that in the descriptions below, the 4
lines are represented as:
<Address Line 1>, <Address Line 2>, <Address Line 3> and <Country>
POIs - a list of points of interest, written as a string containing delimiters to separate each POI and the fields
within it.
The full list of metadata tags written by photoGPS is as follows:
The values for these 2 tags are fixed:
EXIF:GPSVersionID
2200
EXIF:GPSMapDatum
WGS-84
The values shown here are examples.
EXIF:GPSLatitudeRef
EXIF:GPSLatitude
N
51.5120877998972
- 16 -
EXIF:GPSLongitudeRef
W
EXIF:GPSLongitude
0.1100752
EXIF:GPSAltitudeRef
0
EXIF:GPSAltitude
31
EXIF:GPSTimeStamp
13:49:15
EXIF:GPSDateStamp
2008:09:13
For sidecar files which only contain XMP, the same information is written to a slightly different set of tags.
Latitude and longitude are written as signed values (rather than with a separate "ref" tag denoting E/W and
N/S).
Date and time are combined into a single tag which holds both values:
XMP:GPSLatitude
-4.743
XMP:GPSLongitude
-2.607
XMP:GPSDateTime
2008:05:14 11:06:28
IPTC:Sub-location
<Address Line 1>
XMP-iptcCore:Location
<Address Line 1>
IPTC:City
<Address Line 2>
XMP-photoshop:City
<Address Line 2>
IPTC:Province-State
<Address Line 3>
XMP-photoshop:State
<Address Line 3>
IPTC:Country-PrimaryLocationName
<Country>
XMP-photoshop:Country
<Country>
<Address Line 1>
+ <Address Line 2>
+ <Address Line 3>
+ <Country>
<Address Line 1>
+ <Address Line 2>
+ <Address Line 3>
+ <Country>
<Address Line 1>
+ <Address Line 2>
+ <Address Line 3>
+ <Country>
XMP:Subject
IPTC:keywords
IPTC:Caption-Abstract
EXIF:Copyright
<Copyright>
IPTC:CopyrightNotice
<Copyright>
Although not in the official specification, there are EXIF tags (generally referred to as "XP..." or
"XP_...") that hold the information which is shown as file attributes on Windows XP.
EXIF:XPTitle
EXIF:XPKeywords
<Address Line 1>
+ <Address Line 2>
+ <Address Line 3>
+ <Country>
<Address Line 1>
+ <Address Line 2>
- 17 -
+ <Address Line 3>
+ <Country>
<Address Line 1>
+ <Address Line 2>
+ <Address Line 3>
+ <Country>
EXIF:XPSubject
Special JOBO tags
These are custom tags defined to hold reverse geocoding and POI information.
XMP-Geotate:GeotateGRL
<GRL>
XMP-Geotate:GeotateRGCVersion
1.0
These are used internally by photoGPS
XMP-Geotate:GeotatePOI
<POI>,<POI>,...
Where <POI> is name>|<category_type>|<distance>|<lat>|<lon>
and <name> is the name of the POI,
<category_type> is the name of the photoGPS POI category e.g. "Beach", "Food&Drink" etc. Note:
the language used will be the current photoGPS application language as set by the user.
<distance> is the distance in metres to the POI
<lat> and <lon> are the latitude and longitude of the POI.
e.g. "Nigerian High Commission|”Government”|237.0|51.513|-0.108, Starbucks
Coffee|”Food&Drink”|231.0|51.513|-0.110"
Finally, the reverse geocoding and POI information is also written to the IPTC Keywords tag:
IPTC:Keywords
<Address Line 1>
+ <Address Line 2>
+ <Address Line 3>
+ <Country>
+ <POI1>
+ <POI2>
+ ...
th
where <POIn> is the n POI, formatted as <name>(<category_type>) e.g. "Nigerian High Commission
(Government)” or “Starbucks Coffee (Food&Drink)"
- 18 -
18. Troubleshooting
-
Problem: the photoGPS does not produce a single green LED flash when taking
captures/photos
-
Answer: When attempting to capture a location, the photoGPS will flash its LEDs to indicate
the result of the capture. The table below shows what these flashes mean. Each letter
indicates a flash of either red (R) or green (G).
LED Flashes
Meaning
Action Required
G
None (when taking a
photo)
Capture successful
Either the device is not properly attached to
the hot shoe or there is a triggering problem
None (when pressing
the GeoHint button)
GR
It is likely that the photoGPS battery is flat
None
Try removing the photoGPS from
the camera hot shoe and reattaching. If this does not help
consult the ‘photoGPS does not
trigger’ section below
Recharge the photoGPS via USB.
Capture successful, but getting low on
battery or memory (<20%)
GRR
Capture aborted due to error
GRRRR
Out of memory
GRRRRRRRR
Device clock not set
RRRR pause GG
Flashing Red
Reset /clear started … and completed
Device failure
If you think the battery may be
low, recharge by connecting to a
computer using the UB cable. If
the device is becoming full,
either process and delete the
captures as normal or offload
the captures for later
processing.
Retry. If the problem persists,
contact Jobo.
Either process and delete the
captures as normal or offload
the captures for later
processing.
To set the clock automatically,
connect the device to a
computer and run the photoGPS
application (whilst connected to
the internet)
Continue to use
Contact Jobo
Problem: When connected to the camera via the hot shoe, the photoGPS is not activated when a
photo is taken
Answer: For the photoGPS to function, it must receive a trigger from the camera via the centre pin
of the hot shoe. If this is not happening, usually the problem is that the device is not properly
connected to the hot shoe. Try removing and replacing the device and check the device is making
contact with the hot shoe centre pin. Another possibility is that the device is properly attached but
the camera is not triggering the hot shoe. Most cameras will do this without any problem, using
their default modes and settings. However, a small number of cameras may only trigger the hot shoe
in certain modes or after changing certain settings. For example, some cameras, in Automatic mode,
will not trigger the hot shoe at all, or only in certain lighting conditions. In such cases, try one of
the other modes (Shutter priority, Manual etc). Some cameras, by default, have the hot shoe
(external flash) turned off. Typically this is easily solved by changing the appropriate camera menu
setting. Please consult your camera manual for information. If you have an external flash device
- 19 -
available, a useful test is to check if this is triggered by your camera. If you find that your camera
refuses to trigger the photoGPS, contact JOBO with details of your camera make and model.
Problem: the photoGPS software is showing a “Communications Error” message.
Answer: The photoGPS software needs a reliable internet connection in order to process the GPS
captures to obtain location information. If you see this message, check that your internet
connection is working, then press the “Retry” button. If this works, the problem is probably due to
an intermittent network connection. Another possibility is that you are using a proxy server to
connect to the internet. If this is the case you should follow the instructions in the section on
‘Internet Connection Options’ to configure the photoGPS software to use your proxy. A related
problem can occur in Microsoft Windows, if the user’s home directory is on a network drive. If the
local network has a problem, the home directory can ‘disappear’, which may cause photoGPS to
behave erratically.
Problem: Photos are not displayed in Google Earth when viewing the Photos.KML file produce by the
photoGPS software.
Answer: Google Earth does not support RAW photos. If you are using RAW, you will still see the
positions of the photos in Google Earth, but you will not be able to see the photos themselves.
19. Contact/Service
If you have any questions on or need help with our products please do not hesitate to get
in touch with our Technical Service. You can reach our service people by phone under the
telephone number indicated below from Monday through Thursday from 9:00 am to 4:00 pm
and on Friday from 9:00 am to 1:00 pm. Independently of these service times you can also
get in touch by e-mail, fax or mail:
JOBO AG
Koelner Strasse 58
D-51645 Gummersbach, Germany
Tel. 0049 2261 545-72
Fax: 0049 2261 545-42
E-mail: [email protected]
www.jobo.com
- 20 -