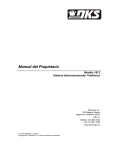
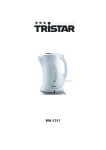
1
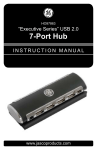
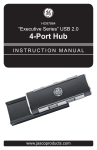
a USB port on your computer and plug the other connector
end into the bottom of the headset or into the desktop
charging cradle. LED indications are the same as above.
Bluetooth® Headset
GE Model 86708
User Guide
TURNING ON AND OFF THE HEADSET
To turn on the headset, slide the switch to the ON position.
A tone will signify the headset is being turned on. The LED
indicator will flash green. To turn off, slide the switch to OFF
position. The LED indicator will also turn off. BATTERY LOW INDICATION
The LED indicator will flash red every 2.5 seconds when the
battery becomes low in charge. Re-charging is recommended
at this time.
PAIRING YOUR HEADSET
In order for your headset to communicate with your
Bluetooth enabled phone the two must be “paired” together.
You should consult your phone’s user manual on how to make
such a pairing as all phones are slightly different. LED
Indicator
Light
Volume
Controls
On/Off
Switch
Desktop
Charger
Microphone
Earbud
Talk Button
AC Adapter
Charger
USB Cable
GE 86708 COMPONENTS
• Headset
• Desktop Charger Module
• AC Adapter/Charger
• USB Cable for PC Charging
• Two Rechargeable NiMH batteries
INSERTING BATTERIES
To insert the batteries, open the battery door on the
underside of the headset. Pull back the small tab (toward the
black dot) and at the same time use fingernail on other hand
to open battery door. The top end of the battery door (near
tab) should open. The bottom end of the door is hinged so do
not force it. Insert batteries with positive end of both batteries
pointed up toward tab. Replace door, by again sliding tab up
to allow door to fall back into original position. CHARGING YOUR HEADSET
Before using your headset you must charge the batteries. We
recommend that for the very first charging the headset be
allowed to charge for six (6) hours. Subsequent charging will
take 1-2 hours. The headset can be charged in either the ON
or the OFF position.
Desktop Cradle Charging: Plug in one end of AC adapter into
AC wall outlet and plug the connector end into the desktop
cradle. Insert the headset into the desktop charging cradle
making sure the metal contacts on the end of the headset
touch the contacts in the cradle. The LED indicator by the
ON-OFF switch will show continuous red which indicates the
headset is charging. When fully charged the LED indicator will
change to a continuous green color.
Charging With AC Adapter: Plug AC adapter into the AC wall
outlet and plug the connector end into the bottom end of the
headset (on the side with the ON-OFF switch). LED indications
are same as above.
Charging With the USB Cable: You can charge your headset
by using the power from you desktop or laptop computer.
Using the supplied USB cable plug the USB connector end into
Your headset needs to be “discoverable” by the phone (or
other Bluetooth device) so the two can be linked together.
To put the headset in the discoverable mode, push the TALK
button and hold it (for about five seconds) until the LED
indicator begins flashing green and red alternately and you
will also hear a beep tone in the earpiece. Then select the
function on your phone which makes the phone search or
“look for” Bluetooth devices. This linking procedure should be
explained in your phone’s user manual. Once it has “found” or linked with the headset then it is
ready to be paired. Your mobile phone will prompt you for
a password, PIN, or pairing code (wording varies by phone
manufacturer). At that point ENTER 0000. You will then
most likely be prompted by the phone whether you want to
connect with the headset. After you respond affirmatively you
should then get confirmation that your phone and headset
are “connected”. The GE 86708 headset is now in standby
mode and ready for use. The LED indicator will flash green
more rapidly once connected.
Pairing Notes:
•This headset can be paired with up to eight phones/devices.
The most recently paired phone will be at the top of the list.
•When the TALK button is pressed in standby mode the
headset will try to connect to the most recently paired
phone only.
•The GE 86708 can also be paired with other Bluetooth
enabled devices like computers or voice access gateway
type products.
TO MAKE CALLS
You can make calls by either a) dialing directly from your
phone, b) using Voice Dialing, or c) using Last Number Redial
function. To use Voice Dialing or Last Number Redial these
must be supported by your mobile phone. Consult your
phone’s user manual for phone-specific instructions.
Before using the Voice Dial function you must first set up
“voice tags” according to your phone’s user’s manual. To
make a Voice Dial call simply press the TALK button once to
enable Voice Dialing. You will hear a couple low tone beeps
to signify an attempt to connect. To call using Last Number
Redial press twice the TALK button. NOTE: This headset will work within 33-feet or 10-meters from
the location of the phone or other Bluetooth enabled device. TO END CALLS
To end a call, press the TALK button once after conversation
has ended. A double tone will sound.
VOLUME CONTROL
Press the VOLUME + to increase volume and VOLUME – to
decrease volume. A short beep will be heard indicating that
maximum or minimum volume level is reached. TO ANSWER AN INCOMING CALL
To answer an incoming call, press TALK once. A couple low tone beeps (repeated until call is answered) will
signify an attempt to connect is being made. A short higher
tone beep will signify the connection was successfully made.
To reject an incoming call, press and hold the TALK button for
about two seconds.
CALL WAITING
The Call Waiting function on your phone would need to be
turned on before this function could be used. Not all phones
support Call Waiting. To accept a second incoming call and
disconnect the first party, press TALK once when you hear the
beep indicating an incoming call. To accept the second caller
but place on hold the first party, press and hold the
TALK button.
TRANSFER CALL BACK TO PHONE
To transfer the call back to your phone, press TALK twice.
CUSTOMER SERVICE INFORMATION
In addition to the troubleshooting table on this page you can
email help at: [email protected] or call 800 6548483. For other Bluetooth products or support, please view
our website www.jascoproducts.com
90-Day Limited Warranty
Jasco Products Company warrants this product to be free
from manufacturing defects for a period of ninety days
from the original date of consumer purchase. This warranty
is limited to the repair or replacement of the product only
and does not extend to consequential or incidental damage
to other products that may be used with this unit. This
warranty is in lieu of all other warranties express or implied.
Some states do not allow limitations on how long an implied
warranty lasts or permit the exclusion or limitation of
incidental or consequential damages, so the above limitations
may not apply to you. This warranty gives you specific rights,
and you may also have other rights which vary from state
to state. If unit should prove defective within the warranty
period, return prepaid with dated proof of purchase to:
Jasco Products Company, 311 N.W. 122nd St., Oklahoma City, OK 73114
FCC Information
This device complies with Part 15 of the FCC Rules. Operation
is subject to the following two conditions: (1) this device
may not cause harmful interference, and (2) this device may
accept any interference received, including interference that
may cause undesired operation.
Privacy of communications may not be ensured when using
this device.
Warning: Changes or modifications to this equipment not
expressly approved by the party responsible for compliance
could void the user’s authority to operate the equipment.
NOTE: This equipment has been tested and found to comply
with the limits for a Class B digital device, pursuant to Part
15 of the FCC Rules. These limits are designed to provide
reasonable protection against harmful interference in a
residential installation. This equipment generates, uses and
can radiate radio frequency energy and, if not installed and
used in accordance with the instructions, may cause harmful
interference to radio or television reception, which can be
determined by turning the equipment off and on. The user is
encouraged to try to correct the interference by one or more
of the following measures:
• Reorient or relocate the receiving antenna.
• Increase the separation between the equipment and the receiver.
• Connect the equipment into an outlet o a circuit different from that to which the receiver is needed.
• Consult the dealer or an experienced radio/TV technician for help.
86708-1 vers. 1 7/06
Audífono inalámbrico
Bluetooth®
Modelo GE 86708
Recarga con el adaptador de corriente alterna: Conecte
al adaptador de corriente alterna al enchufe de la pared
y conecte el extremo del conector al extremo inferior del
audífono (a un lado junto con el interruptor de ENCENDIDOAPAGADO). La luz indicadora actuará como se ha
mencionado más arriba.
Recarga con el cable USB: Puede cargar el audífono con
la corriente de su computadora de escritorio o portátil.
Conecte el terminal del cable USB, incluido, al puerto USB
de su computadora y conecte el otro terminal a la parte de
abajo del audífono o a la base de escritorio para recargar.
La luz indicadora actuará como se ha mencionado más arriba.
PRENDIENDO Y APAGANDO EL AUDÍFONO
Luz
Indicadora
Volumen
+/-
Micrófono
Auricular
Botón de Hablar
Adaptador
de CA
Cable USB
COMPONENTES DEL GE 86708
•
•
•
•
•
Audífono con micro incorporado
Módulo cargador para el escritorio
Adaptador/cargador de CA
Cable USB para recargar con la PC
Dos baterías NiMH recargables
PARA PONER LAS BATERÍAS
Para poner las baterías, abra la tapa de las baterías en la
parte de abajo del audífono. Jale hacia atrás la pequeña
lengüeta (que da al punto negro) mientras abre la tapa de
la batería con la uña de la otra mano. La parte de arriba
de la puerta de la batería (cerca a la lengüeta) se abrirá.
La parte de abajo de la tapa está unida con bisagras, no la
fuerce. Ponga las baterías con el lado positivo hacía arriba
apuntando a la lengüeta. Inserte la tapa hacia arriba para
que quede nuevamente en la posición original.
RECARGA DEL AUDÍFONO
Antes de poder usar el audífono, debe recargar las baterías.
Recomendamos que deje recargando el audífono por seis
(6) horas la primera vez que lo cargue. Las cargas siguientes
tomarán de 1 a 2 horas. El audífono se puede cargar
mientras está PRENDIDO o APAGADO.
Recarga con la base de escritorio: Conecte un extremo del
adaptador de corriente alterna al enchufe de la pared y el
otro extremo a la base de escritorio. Para recargar, inserte
el audífono en la base de escritorio, asegúrese de que los
contactos metálicos en el extremo del audífono toquen los
de la base. Cuando el audífono se está cargando, la luz roja
del indicador al costado del interruptor de ENCENDIDOAPAGADO (ON-OFF) se quedará prendida. Cuando esté
completamente cargado, la luz se volverá verde y se
quedará pendida.
Para cortar una llamada, presione el botón de HABLAR una
vez después de terminar con la conversación. Escuchará un
tono dos veces.
CONTROL DEL VOLUMEN
INDICACIÓN DE BATERÍA BAJA
Presione HABLAR una vez para responder la llamada
entrante. Unos pitidos graves (hasta que la llamada
sea contestada) indicarán el intento de conexión. Un
pitido corto y más agudo indicará que la conexión se ha
realizado adecuadamente. Para rechazar una llamada
entrante, presione y mantenga el botón de HABLAR por
aproximadamente dos segundos.
SINCRONIZACIÓN DEL AUDÍFONO
Cargador para
el escritorio
PARA CORTAR LAS LLAMADAS
Prenda el audífono moviendo el interruptor a la posición
de ENCENDIDO (ON). Un tono indicará que el audífono está
encendido. La luz verde se prenderá. Para apagarlo, mueva
el interruptor a la posición de APAGADO (OFF). La luz verde
indicadora también se apagará.
Cuando la batería esté baja, la luz indicadora se prenderá
cada 2 segundos y medio. Cuando esto ocurra, se
recomienda que recargue el audífono.
Botón
En/Lejos
Para poder usar la función de Llamada activada por
voz, primero debe configurar las “marcaciones vocales”
siguiendo las instrucciones del manual del teléfono. Para
hacer una Llamada activada por voz, presione el botón de
HABLAR para activar esta función. Escuchará un par pitidos
graves que indican el intento de conexión. Para hacer una
Rellamada del último número, presione el botón de HABLAR
dos veces. NOTA: Este audífono funciona en un radio de
10 metros o 33 pies del teléfono o aparato habilitado con
Bluetooth. Para que el audífono se pueda comunicar con su
teléfono habilitado con Bluetooth, ambos deben estar
“sincronizados”. Consulte el manual de su teléfono para
poder realizar la sincronización, ya que no es igual para
todos los teléfonos. El teléfono (u otro aparato Bluetooth) tiene que “reconocer”
el audífono para que ambos puedan estar conectados.
Para poner el audífono en modo de “reconocimiento”,
presione y mantenga el botón de HABLAR (por unos cinco
segundos) hasta que la luz indicadora parpadee entre verde
y rojo y escuche un pitido por el audífono. Luego escoja la
función de su teléfono que hace que empiece a “buscar”
los aparatos con Bluetooth. El manual del teléfono deberá
explicar este procedimiento de conexión.
Una vez que haya “encontrado” o se haya conectado con
el audífono, podrá iniciar la sincronización. Su teléfono
celular le pedirá que ingrese una contraseña, PIN o código
de sincronización (las palabras cambian de acuerdo al
fabricante). En este paso, INGRESE 0000. Es probable que
luego el teléfono le pregunte si quiere conectarlo con
el audífono. Después de contestar afirmativamente, el
teléfono le confirmará que ya está “conectado” con el
audífono. El audífono GE 86708 quedará en modo de espera
y listo para usarse. La luz indicadora verde parpadeará más
rápido cuando esté conectado.
Notas sobre la sincronización:
• Este audífono se puede sincronizar hasta con ocho
teléfonos/aparatos. El último teléfono con el cual se ha
sincronizado, será el primero en la lista.
•
Cuando se presione el botón de HABLAR mientras se
está en modo de espera, el audífono intentará
conectarse sólo con el último teléfono con el que ha sido sincronizado.
• El GE 86708 también se puede sincronizar con otros
aparatos habilitados con Bluetooth como computadoras
o productos con puntos de acceso por voz.
PARA HACER LLAMADAS
Puede hacer llamadas ya sea a) marcando directamente
desde el teléfono, b) usando Marcación por voz, o c) usando
la función de Rellamada del último número. Su teléfono
debe tener las funciones de Marcación por voz o Rellamada
del último número para poder usarlas. Consulte el manual
para usar las funciones específicas del teléfono. Presione VOLUMEN + para subir el volumen y VOLUMEN
- para bajarlo. Un pitido breve le indicará que ha llegado al
nivel máximo o al mínimo.
PARA RESPONDER UNA LLAMADA ENTRANTEL
LLAMADA EN ESPERA
La función de Llamada en espera tiene que estar activada
en su teléfono para poder usarla. No todos los teléfonos
tienen la función de Llamada en espera. Para aceptar
una segunda llamada entrante y desconectar la primera,
presione HABLAR una vez cuando escuche el pitido que
indica que está entrando una llamada. Para dejar la
primera llamada en espera y aceptar una segunda llamada
entrante, presione y mantenga el botón de HABLAR.
PARA TRANSFERIR LA LLAMADA AL TELÉFONO
Para transferir la llamada al teléfono, presione HABLAR dos veces.
INFORMACIÓN SOBRE SERVICIO AL CLIENTE
Además de la tabla de solución de problemas en esta
página, también puede enviar un correo electrónico a: [email protected] o llamar al 800 654-8483.
Para otros productos con Bluetooth o ayuda, visite nuestra
página web www.jascoproducts.com.
90 Días de Garantía limitada
Jasco Products Company garantiza por un periodo de 90 días
desde la fecha original de la compra, que este producto no
presenta ningún defecto de fábrica. Esta garantía está limitada
sólo a la reparación o reemplazo del producto y no se extiende
al daño resultante o incidental de otros productos que se han
sido usados con esta unidad. Esta garantía remplaza a cualquier
otra garantía expresa o implícita. Algunos estados no reconocen
límites de tiempo en las garantías implícitas y tampoco permiten
la exclusión o limitación de daños incidentales o resultantes; por
lo tanto, las limitaciones mencionadas pueden no ser aplicables
en su caso. Esta garantía le proporciona derechos específicos;
pero dependiendo del estado, también puede tener otros
derechos. Si la unidad presenta algún defecto dentro del periodo
de garantía, devuélvala junto con el costo del envío y la prueba
de compra, a: Jasco Products Company, 311 N.W. 122nd St.,
Oklahoma City, OK 73114