1
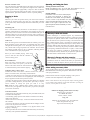
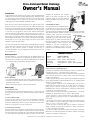
Voice-Command Robot Challenge
Owner’s Manual
Introduction
Congratulations on the purchase of your game of Voice Command Robot
Challenge. Your new robot responds to plain-language commands spoken
into the high-tech LED wristwatch controller. It has full 360 degree
movement capability and is designed to do battle with other Robot
Challenge™ robots and Commando Challenge™ tanks.
mounted IR transmitter (see diagram
below) at the robot and speak into the
controller, using the relevant command
phrase noted below (and on the face of the
controller).
Each robot has a lazer cannon integrated into its right arm and a lazer
target on its chest. The robot interacts with other robots and tanks using
the lazer as a virtual weapon to fire at opposing machines. Maneuver your
robot using the wristwatch controller to command it, with the goal being
to score hits on your opponent’s robot or tank without sustaining hits
yourself. Each time a robot sustains a hit, it loses 25% of its ‘power’ or
‘life’, one chest-mounted LED goes out and it automatically rotates 180
degrees with accompanying sound and light effects. After sustaining a
fourth and final hit, the robot is out of ‘power’ and shuts down signifying
that the game is over. To play again, simply press the red ‘reset’ button
mounted on top of the robot’s head.
Commanding the Robot
You will notice that the command phrases
are divided into two parts. Speak the first
phrase into the microphone located on the
wristwatch. The top mounted LED will flash and a short beep will sound.
This indicates that the controller is ready to accept the 2nd part of the
command. Then, speak the second phrase.
IR Transmitter
At this point the robot will respond to your
Indicator LED
command. If you have made an error partway
through, merely say STOP. This will cause the
robot to stop whatever it is doing and reset the
controller making it ready to accept a new
command. If you hear a double-beep, the
controller is signalling you that it has not
understood your command and that you should
try again.
Microphone
You can create a battle-zone using various household objects to provide
cover and to serve as obstacles. You can create goals to reach, or areas to
defend. Try using reflective surfaces to ricochet your lazer fire or
controller commands – use your imagination and let us know what your
favorite games are!
Command Phrases
Before you start
Install the batteries – you will need four fresh AA alkaline batteries for
the robot. Insert the batteries by following the diagram below. The
wristwatch voice controller comes with (3x) LR44 batteries pre-installed
– if you need to replace them, follow the diagram below.
(3x) LR44
Battery Warnings
• Use only fresh alkaline batteries from a newly opened battery pack.
• Do not leave batteries inside the robot or controller when not in use for
extended periods of time.
• Remove and properly dispose of weak or dead batteries.
How to play
1) Switch on the robot
An On/Off switch is located on the back of the robot – switch it to the ON
position. The robot will power up and identify itself by name (Chaos or
Disabler).
2) Power indicator LEDs
At power-up the 4 LEDs on the chest of the robot illuminate, indicating
that the robot has 100% of it’s ‘power’ or ‘life’. Each time it is hit, one
LED turns off indicating a 25% loss of power. When all 4 of your robot’s
LEDs are out, the game is over and you have lost.
3) Switch on the controller
The LED wristwatch / controller has a side-mounted switch which has 3
positions (center is OFF). Slide the switch forward to control a red robot
(the front-mounted LED will light up in red), slide the switch backwards
to control a blue robot (the LED will light up in green). Aim the front-
Action
Fire:
Move Forward:
Turn Left:
Turn Right:
Stop:
Spoken Command
Robot <pause> Fire
Robot <pause> Move Forward
Change direction <pause> Left
Change direction <pause> Turn to the Right
Stop
If the robot isn’t responding properly
If nothing (or something unexpected) happens when you speak into the
controller, don’t worry – you simply need to practice a bit.
1. Remember that there must be a line-of-sight between the watch and the
robot. Also, the watch must be within 15 feet of the robot and aimed
(roughly) in its direction.
2. After saying the first part of the command you should hear a beep and
the top-mounted indicator LED should flash. If not, try speaking louder
and closer to the microphone.
3. After saying the second part of the command phrase, did you hear a
double-beep? You should not have. If you did, then the controller is
telling you that it did not recognize the second phrase. Try speaking
immediately after the beep, speak louder or perhaps the problem is that
you spoke too soon after the first beep.
4. If the robot moves right or left when you speak the ‘Fire’ or ‘Forward’
command, try saying the first part (i.e. ‘Robot’), more quickly.
5. If the robot fires or moves forward when you speak the ‘Left’ or
‘Right’ command, try saying the first part (i.e. ‘Robot Change Direction’)
more slowly.
6. If the robot moves forward or turns right when you speak the ‘Left’ or
‘Fire’ command, try again, speaking the second part of the command
phrase (i.e. ‘Fire’ or ‘Left’) more quickly.
7. If the robot fires or turns left when you you speak the ‘Forward’ or
‘Right’ command, try saying the second part (i.e. 'Move Forward Now’
or ‘Turn to the right’) more slowly.
8. If you hear a single or double beep without having spoken a command,
then there is too much background noise and the controller is becoming
confused. Try playing in a quieter area.
©2001 Interactive Toy Concepts (HK) Ltd. • All Rights Reserved • Printed in China
91221/v2.1
How the controller works
The robot interprets commands based on the length of two short phrases
spoken into the controller. It recognizes the length of each of these two
speech segments and acts appropriately. It expects to hear two distinct
phrases so you must speak clearly into the watch – this may require some
experimentation. Japan Patent Number 3132815. US patent pending.
Engaging in Battle
Firing
Maneuver your robot into position where your robot’s lazer cannon is
aimed at the opposing robot’s chest, then give it the FIRE command
(robot <pause> fire). Sound and light effects will confirm that your robot
has fired.
Sustaining a hit
When a robot sustains a hit, the LEDs on it’s chest blink, it’s eyes flash,
explosion sound effects are heard and the robot staggers and turns 180
degrees away from it’s attacker. One of the chest-mounted LEDs goes out
announcing that 25% of it’s life has been used up. After a moment you
will regain control of the robot and you can continue to battle (assuming
that there is ‘life’ remaining).
Game-Over
When the robot gets hit a fourth and final time (all 4 LEDs go out) - the
Robot announces "Power Shut Down", accompanied with other sound
and light effects and the game is over. At this point, the robot’s eyes turnoff, it freezes and no longer responds to the controller. The four LEDs
will continue to blink slowly for up to 10 minutes, indicating that the
robot is disabled and not just “playing dead”.
When you have finished playing, switch off
power to both the robot and the controller to
conserve battery power.
Reset and Restart
When you wish to restart the game, or reset the
robot to have 100% of it’s power - press the red
button on the robot's head. The robot announces
its name and all four power indicators light up.
Gameplay with 2 or more robots
•Position the robots on the floor at a distance of about 8 ft, with their
backs to each other. Then, when ready, switch them ON.
• Control your robot with your voice (using your wristwatch). Make your
robot move in various directions to avoid getting hit, while attempting to
hit your opponent with fire from your lazer cannon.
• Aiming at the opposing robot requires some skill. When you command
your robot to change direction, you may find it quite tricky to stop the
robot’s rotation at exactly the point you need it to stop.
Hint: Speak the ‘Stop’ command well in advance, before your robot
rotates to face your opponent’s robot (the more you practice, the higher
your success rate will be).
General Precautions
• Always keep your robot and controller dry, away from dust and dirt, and
at normal room temperature.
• Occasionally, gently wipe the robots and the controllers with a damp
cloth to keep dust away.
• When not in use for a few days - remove the batteries from the robot
and controller.
• Never leave the robot or controller exposed to direct sunlight, near hot
ovens or near any other source of heat.
• Never subject the robot or controller to any physical shock (avoid
dropping or bumping).
• Do not open the robot or the controller (other than battery access doors),
as this may cause permanent malfunction.
Operating and Setting the Clock
Viewing clock, date and seconds
Briefly press Button B once to see the date. Press Button B twice to
see the seconds display. Press again to return to time view.
Button A
Set time and date
Press Button A twice to see the month (left part
of screen). Press button B to advance the
month to the current month. Then press Button
A once to move to day-of-month view and
again, press button B to advance the date. Press
button A once again to adjust the hour, and
again to adjust the minutes and finally to return
to the time view.
Button B
Warranty in USA and Canada:
Robot Challenge™ is warranted against any manufacturer's
defects for ninety days from date of purchase. A defective part will
be repaired or replaced, with the same or similar model provided
that the unit has been operated according to the instructions and
that a dated purchase receipt is provided. The warranty does not
apply to any product which has been subject to abuse, misuse, and
operation different than described in this manual, negligence, an
accident or not observing the general precautions. Defects caused
by tampering, unauthorized alterations or repairs, or other causes
not arising out of defects in material or workmanship are not
covered by this warranty. Product may be repaired or replaced with
the same model or similar model, at vendor's election.
Warranty in Europe and other countries:
Your distributor or retailer will provide a warranty. For further
information contact the retailer from whom you purchased the
product or contact the importer (name is printed on the package).
Before making a warranty claim:
To save needless delays, please try operating the units with FRESH
BATTERIES before returning the product. Weak batteries will often
cause poor performance.
Product must be returned in original packaging, with a proof of
purchase and a brief explanation of the problem.
Please contact Interactive Toy Concepts Ltd. before returning product
to your retailer. Most problems can be dealt with either by visiting our
web site, over the phone or via email.
•
Address for shipping products under warranty:
Interactive Toy Concepts Ltd.
1192 Martin Grove Rd.
Toronto, Ontario, Canada
M9W 5M9
•
Telephone: (416) 444-6873 Fax: (416) 444-6879
e-mail: [email protected]
http://www.interactivetoy.com
©2001 Interactive Toy Concepts (HK) Ltd. • All Rights Reserved • Printed in China
91221/v2.1