1
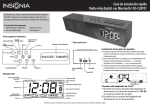
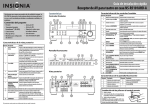
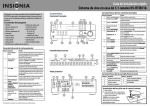
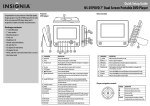
Quick Setup Guide
Clock Radio with iPod/iPhone Dock NS-CLIP01
Congratulations on your purchase of a
high-quality Insignia product. Your
NS-CLIP01 represents the state of the art in
clock radios with an iPod/iPhone dock and
is designed for reliable and trouble-free
performance.
Features
# Component
Description
Front view
1
Dock
Insert your iPod/iPhone into this dock to play selections through your clock radio.
The clock radio charges the iPhone/iPod when docked. Use the adapter that came with your
iPod/iPhone, if needed.
2
Alarm 1/Alarm 2
Press to set the alarm. See Setting the alarm on the right.
3
Sleep
Press to turn on the Sleep timer (15, 30, 45, 60, 75, 90). To turn off, press until “00” appears on
the display.
Package contents
•
•
•
•
4
Clock radio with iPod/iPhone dock
AC power adapter
AAA batteries (2)
Quick Setup Guide
/Preset
1 Open the battery compartment on the bottom of
your radio.
2 Place two AAA size batteries in the battery
compartment.
Make sure to match the + and - on the battery to
the + and - signs in the battery compartment.
3 Close the battery compartment until it clicks into
place.
1 In standby mode, press and hold
POWER/SOURCE to turn on the clock radio. The
Source name appears in the upper left-hand
corner of the display.
2 When you turn on the clock radio for the first
time, iPod mode activates by default.
For normal use, the system activates the last
source used before you powered it off.
3 Press and hold POWER/SOURCE again to switch
to standby mode. The Source name is no longer
displayed.
Volume control
• After you select the mode you want, press
Volume + or Volume - to set the volume to a
comfortable level.
Note: When the volume is turned to minimum (00),
the system enters MUTE mode.
Back view
1 Place your iPod/iPhone in the docking station.
2 Press the Clock/Sync button. The clock radio syncs the time with the
iPod/iPhone automatically.
Note: The Time Sync function can be used with most of the iPod/iPhone
models, except some older models such as iPod mini, iPod 3G, and iPod 4G.
• In iPod mode, press to go to the previous track, or press and hold to use fast back.
• In FM mode, press to go to the next lower radio frequency, or press more than one second
and release to search for a lower radio station.
6
Tune
• In iPod mode, press to go to the next track, or press and hold to use fast forward.
• In FM mode, press to go to the next higher radio frequency, or press more than one second
and release to search for a higher radio station.
7
VOL+/VOL-
Press to increase or decrease the clock radio volume.
Setting the alarm
8
SNOOZE/DIMMER
Press while the alarm is sounding to turn the alarm off for 10 minutes. You can do this as many
times as you want.
To turn the alarm off until the next day, press any other button.
To turn the alarm off, press the Alarm button until there is no source displayed next to the
alarm icon on the display.
When the alarm is not sounding, press to cycle through the display brightness levels
(high>middle>low).
Note: When the clock radio is turned on, the LCD backlight defaults to High.
9
Power/Source
Press and hold to turn on your clock radio. Press and hold to turn off your clock radio.
When your clock radio is on, press to cycle through the sound sources (iPod, RADIO, AUX).
To set the alarm time:
1 Press the Alarm button to select the alarm music source
(Buzzer/Radio/iPod) or close the alarm.
If you select iPod, make sure your iPod/iPhone is placed in the dock. If
you select Radio, the alarm will be the last radio station you listened to.
2 Press and hold ALARM 1 or ALARM 2 until the hour digits blink.
3 Press Tune or to set the hour, then press the ALARM 1 or
ALARM 2 button. The minutes digits blink.
4 Press Tune or to set the minutes, then press ALARM 1 or
ALARM 2 to save the setting and exit the alarm setting mode.
To turn the alarm off:
1 When the alarm is sounding, press any key (except SNOOZE/DIMMER)
to turn off the alarm. The alarm is set for the next day.
2 If you do not want to set the alarm for the next day, press ALARM 1 or
ALARM 2 repeatedly until the alarm icons disappear from the display.
To use the snooze:
• While the alarm is sounding, press SNOOZE/DIMMER. The SNOOZE
indicator appears in the display. The alarm turns on automatically ten
minutes later.
Notes:
• If the alarm is set to Buzzer, the alarm volume gradually increases until it
reaches the maximum.
• If the alarm is set to Radio or iPod, the volume starts from Volume 1 and
gradually increases to the volume level setting before the clock radio
was turned off.
• The alarm sounds for 20 minutes and then shuts off automatically.
• If two alarms are set, the first alarm is stopped (set for the next day)
when the second alarm time is reached.
Connecting the AC adapter
Turning the radio on and off
Using the Time Sync function
Tune
Top view
1 Plug the small connector at the end of the power
cord into the DC IN 5.9V jack on the back of your
radio.
2 Plug the AC adapter into a 100-240V, 50/60Hz
power outlet.
The clock radio enters standby mode and the time
appears on the display.
1 Press and hold Clock/Sync for two seconds until the hour blinks on the
display.
2 Press Tune or to set the hour.
3 Press the Clock/Sync button again. The minutes blink on the display.
4 Press Tune or to set the minutes.
5 To finish setting the clock, press the Clock/Sync button again, or just
wait for ten seconds until the display returns to normal.
5
Works with all docking iPods and iPhones.
Installing the batteries
• In iPod mode, press to begin playback. Press again to pause playback. Press again to resume
playback. Press and hold to turn off your iPod/iPhone screen.
• In FM mode, press to select a preset station. Continue pressing to cycle through the available
preset stations. You can store up to 10 preset stations.
Setting the time
10 ANT
Extend the antenna to improve reception.
11 CLOCK/SYNC
Press to set the time or sync the time with an iPhone. See Using the Time Sync function on the
right.
12 AUX IN jack
Plug the connector from an external sound source, such as an MP3 player, into this jack.
13 DC IN 5.9V jack
Plug the small connector from the AC adapter into this jack.
Important notes
• The two AAA batteries are only for the clock memory. When battery power is low, or if they
are installed incorrectly, the
logo shows on the display. Change or reinstall the
batteries.
• Please remove the batteries if your clock radio is not used for a long time.
Precautions when using batteries
• Use only the size and type of batteries specified.
• Do not mix different types of batteries together (e.g., alkaline, rechargeable, and standard
(carbon zinc), or old batteries with fresh ones.
• Exhausted batteries must be removed to prevent any battery leakage.
• Dispose of batteries properly according to environmental regulations.
• Battery (battery pack or battery installed) shall not be exposed to excessive heat, such as
sunshine, fire, or the like.
Selecting the mode (Source)
• Press SOURCE repeatedly to select iPod, Radio, or AUX. The source
you select appears on the display.
Using your iPod/iPhone
Docking and charging your iPod/iPhone
1 Press POWER/SOURCE to select iPod mode. The iPod icon appears in the
display.
2 Plug your iPod/iPhone into the dock.
Note: The iPod/iPhone charges automatically while it is docked with your
clock radio.
Play music on your iPod/iPhone
1 Dock your iPod/iPhone to the clock radio. Press / PRESET on the clock
radio or press Play on your iPod/iPhone.
2 Press VOL+ or VOL- to adjust the volume to a comfortable level.
3 Press TUNE
to skip to the next track forward or press TUNE
to skip
to the next track backward. Press and hold the TUNE
or TUNE
keys to fast forward or fast backward until you release the key.
Troubleshooting
Problem:
Solution:
My clock radio won’t turn on. • Make sure that the power cord is fully inserted in the power
outlet and firmly connected to the DC IN jack on the back.
No sound.
Manual tuning:
• Press TUNE
or TUNE
• Repeatedly press the POWER/SOURCE button to select FM
mode.
• Make sure that the clock radio is correctly tuned to an FM
station.
FM radio reception sounds
distorted or fuzzy.
• Move your clock radio closer to a window to improve reception.
My iPod/iPhone won’t play.
• Make sure your iPod/iPhone is on and charged.
• Repeatedly press the POWER/SOURCE button to select iPod
mode.
• Make sure your iPod/iPhone is not paused.
• Make sure that your iPod/iPhone is properly docked.
• Make sure that there are songs in your iPod/iPhone.
• Make sure that the hold function is not activated on your
iPod/iPhone .
• Make sure that your iPod/iPhone is working properly before you
dock it into your clock radio.
• Remove your iPod/iPhone from the docking compartment.
Clean the connectors in the docking compartment and on your
iPod/iPhone, then replace it in the docking compartment.
• Your iPod/iPhone software may be outdated. Upgrade its
software. For details, visit www.apple.com.
briefly to tune to a higher or lower frequency.
Auto tuning:
• Press and hold TUNE
or TUNE
for more than one second to
automatically tune to a higher or lower frequency. Tuning automatically
stops when it detects a station signal.
During auto tuning, press POWER/SOURCE to exit the auto tuning mode.
Note: If there is no station found in one cycle, auto tuning stops at the
beginning frequency.
Setting presets
You can store up to ten preset stations.
1 In radio mode, press TUNE
or TUNE
to select a station.
2 Press and hold / PRESET for two seconds to enter programming
mode. The PRESET ( ) icon appears and the memory digits flash in the
display.
3 Press TUNE
or TUNE
repeatedly to select a desired preset number
(01 to 10) to store the station.
4 Press / PRESET to confirm your choice. The preset station is stored in
the memory.
5 Repeat steps one through four to store more stations. Press any other
keys to leave the programming mode.
6 To select a preset station, briefly press / PRESET repeatedly until you
reach the station you want.
Playing music from an external sound source
1 Plug an audio cable with a 3.5 mm plug (not included) into the AUX IN
jack on the back of your clock radio and into your external sound source,
such as an MP3 player.
2 Turn on your clock radio, then press the POWER/SOURCE button
repeatedly until AUX appears on the display.
3 Control playback from your external sound source.
• Make sure that power is connected and your clock radio is
turned on.
• Make sure your external device is turned on and is playing.
• Make sure the volume on your external device is turned up and
is not set to mute.
• Make sure that the volume on your clock radio is not extremely
low.
My clock radio will not play
in FM mode.
Using the FM radio
1 Fully extend the FM antenna on the back of the clock radio.
2 Press the POWER/SOURCE button repeatedly to enter radio mode. The
tuner frequency appears after one second.
3 Adjust the antenna to get the best radio reception.
Maintaining
My external audio device
(MP3 player) won’t play.
My iPod/iPhone won’t
charge when it’s docked.
• You need to use the controls on your MP3 player to control
playback.
• Make sure your external device is on and charged.
• Repeatedly press the POWER/SOURCE button to select AUX
mode.
• Make sure your external device is not paused.
• Make sure the audio cable is fully inserted into the external
device and the AUX IN jack on the clock radio.
• Make sure that there are songs in your external device.
• Make sure that your external device is working properly before
you connected it to your clock radio.
• Make sure that your iPod/iPhone is properly docked.
• Make sure that the hold function is not activated on your
iPod/iPhone.
• Make sure that your iPod/iPhone battery is not faulty.
• Make sure that the power cord is plugged in.
• To prevent fire or shock hazard, disconnect your clock radio from the AC
power source when cleaning.
• The finish on your clock radio may be cleaned with a dust cloth and cared
for as other furniture. Use caution when cleaning and wiping the plastic
parts.
• If the front panel becomes dirty or smudged with fingerprints it may be
cleaned with a soft cloth slightly dampened with a mild soap and water
solution. Never use abrasive cloths or polishes as these will damage the
finish of your clock radio.
Caution:
• Never allow water or other liquids to get inside your clock radio.
• Modifying or tampering with the internal components of your clock radio
can cause a malfunction and might invalidate its warranty. If your clock
radio is not performing as it should, take it to the local dealer for assistance.
System requirements
Compatible with: iPod Nano (3G/4G/5G/6G), iPod Touch (1G/2G/3G/4G),
iPod classic, iPhone (original, 3G, 3Gs, 4,4S).
Canada ICES-003 statement
This Class B digital apparatus complies with Canadian ICES-003.
90-day limited warranty
Visit www.insigniaproducts.com for details.
Contact Insignia:
For customer service, call 1-877-467-4289
www.insigniaproducts.com
“Made for iPod” and “made for iPhone” mean that an electronic accessory has been designated to
connect specifically to iPod, iPhone respectively, and has been certified by the developer to meet
Apple performance standards. Apple is not responsible for the operation of this devise or its
compliance with safety and regulatory standards. Please note that the use of this accessory with
iPod or iPhone may affect wireless performance. iPod, and iPhone are trademarks of Apple Inc.
registered in the U.S. and other countries.
© 2012 BBY Solutions, Inc., Inc. All rights reserved. INSIGNIA is a trademark of BBY Solutions, Inc.
Registered in some countries. All other products and brand names are trademarks of their
respective owners.
Specifications
•
•
•
•
•
•
•
•
•
•
Number of alarms: two
Frequency range: FM 87.5 - 107.9 MHz (200 KHz steps)
Station preset: ten
External connections: 3.5 mm stereo, 30 pin iPod connector
Volume: 16 levels
Speaker: 2 × 36 mm
Output power: 1W × 2 RMS
Power source: DC 5.9V 1.8A adapter
Back-up batteries: 2 × AAA alkaline batteries
Dimensions (W × D × H): 6.81 × 2.87 × 5.70 in.
173 × 73 × 144 mm
Legal notices
FCC Part 15
This device complies with Part 15 of the FCC Rules. Operation of this product
is subject to the following two conditions: (1) this device may not cause
harmful interference, and (2) this device must accept any interference
received, including interference that may cause undesired operation.
This equipment has been tested and found to comply within the limits for a
class B digital device, pursuant to Part 15 of the FCC Rules. These limits are
designed to provide reasonable protection against harmful interference in a
residential installation. This equipment generates, uses, and can radiate radio
frequency energy and, if not installed and used in accordance with the
instructions, may cause harmful interference to radio communications.
However, there is no guarantee that interference will not occur in a particular
installation. If this equipment does cause harmful interference to radio or
television reception, which can be determined by turning the equipment off
and on, the user is encouraged to try to correct the interference by one or
more of the following measures:
• Increase the separation between the equipment and receiver.
• Connect the equipment into an outlet on a circuit different from that
to which the receiver is connected.
• Consult the dealer or an experienced technician for help.
FCC warning
Changes or modifications not expressly approved by the party responsible
for compliance with the FCC Rules could void the user’s authority to operate
this equipment.
ENGLISH 11-1380