1
ISDNmst.fm Page 1 Wednesday, January 15, 2003 9:22 AM
IBM ISDN PC Card
User’s Guide
19K5716
1
ISDNmst.fm Page 2 Wednesday, January 15, 2003 9:22 AM
2
IBM ISDN PC Card:User’s Guide
ISDNmst.fm Page 3 Wednesday, January 15, 2003 9:22 AM
Note:
Before using this information and the product it supports, read the information
under Appendix A, “Package contents” on page 219, Appendix E, “Help and
service information” on page 241, and Appendix F, “Product warranties and
notices” on page 245.
3
ISDNmst.fm Page 4 Wednesday, January 15, 2003 9:22 AM
4
IBM ISDN PC Card:User’s Guide
ISDNmst.fm Page 5 Wednesday, January 15, 2003 9:22 AM
Third Edition (November 2002)
5
ISDNmst.fm Page 6 Wednesday, January 15, 2003 9:22 AM
6
IBM ISDN PC Card:User’s Guide
ISDNmst.fm Page i Wednesday, January 15, 2003 9:22 AM
IBM ISDN PC Card
User’s Guide
IBM
ISDNmst.fm Page ii Wednesday, January 15, 2003 9:22 AM
ISDNmst.fm Page i Wednesday, January 15, 2003 9:22 AM
IBM ISDN PC Card
User’s Guide
IBM
ISDNmst.fm Page ii Wednesday, January 15, 2003 9:22 AM
Note:
Before using this information and the product it supports, read the information
under Appendix A, “Package contents” on page 219, Appendix E, “Help and
service information” on page 241, and Appendix F, “Product warranties and
notices” on page 245.
Third Edition (November 2002)
© Copyright International Business Machines Corporation 2002. All rights reserved.
US Government Users Restricted Rights – Use, duplication or disclosure restricted by GSA
ADP Schedule Contract with IBM Corp.
ISDNmst.fm Page iii Wednesday, January 15, 2003 9:22 AM
Safety
This ISDN PC Card is designed only for use in Personal Computers that have
installation instructions describing user installation of PC Cards in PCMCIA slots.
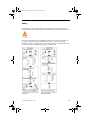
Electrical current from power and ISDN communication cables is hazardous. To
avoid shock hazards, connect and disconnect cables as shown below when
installing, moving, or opening the covers of this product or attached devices. The
power cord must be used with a properly grounded outlet.
© Copyright IBM Corp. 2002
iii
ISDNmst.fm Page iv Wednesday, January 15, 2003 9:22 AM
To avoid shock hazards, do not connect or disconnect any cables or perform
installation, maintenance, or reconfiguration of this product during an electrical
storm.
To avoid shock hazards:
•
The power cord must be connected to a properly wired and grounded
receptacle.
•
Any equipment to which this product is to be attached must also be connected
to properly wired receptacles.
This is a high-performance ISDN adapter. Prolonged high-speed data transfers
will result in the ISDN adapter becoming noticeably warm. If you need to remove
the ISDN adapter immediately after prolonged operation and you are
uncomfortable with handling the ISDN adapter while it is warm, eject the ISDN
adapter from the PCMCIA slot and let it cool for about 15 seconds before
handling it.
iv
IBM ISDN PC Card:User’s Guide
ISDNmst.fm Page v Wednesday, January 15, 2003 9:22 AM
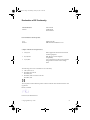
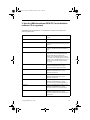
Declaration of CE Conformity
The manufacturer
Address
AVM Gmb H
Alt-Moabit 95
D-10559 Berlin
herewith declares that the product
Type
ISDN-Controller
Product
IBM International ISDN PC Card
complies with the following directives:
•
1991/5/EC
Radio equipment and telecommunications
terminal equipment
•
89/336/EEC
EMC Directive: Electromagnetic
Compatibility
•
73/23/EEC
Low Voltage Directive: Electrical equipment
designed for use within certain voltage
limits
The following norms were consulted to assess conformity:
•
•
•
CTR 3/1994.11.1.8
EN 55022/9.98 Class B
EN 55024/9.98
EN 60950/1992+A1+A2+A3+A4+A11
EN 41003/1993
The CE symbol confirms that this product conforms with the above mentioned norms and
regulations.
Berlin, 16.03.2000
Peter Faxel, Technical Director
© Copyright IBM Corp. 2002
v
ISDNmst.fm Page vi Wednesday, January 15, 2003 9:22 AM
vi
IBM ISDN PC Card:User’s Guide
ISDNmst.fm Page vii Wednesday, January 15, 2003 9:22 AM
Contents
Safety . . . . . . . . . . . . . . . . . . . . . . . . . . . . . . . . . . . . . . . . . . . . . . . . . . . . . . . . . iii
Declaration of CE Conformity . . . . . . . . . . . . . . . . . . . . . . . . . . . . . . . . . . . . . . v
1. Welcome to the IBM International ISDN PC Card . . . . . . . . . . . . . . . . . . . . 1
2. How the IBM International ISDN PC Card installation software CD is
organized . . . . . . . . . . . . . . . . . . . . . . . . . . . . . . . . . . . . . . . . . . . . . . . . . . . . . 3
3. Before you install the IBM International ISDN PC Card . . . . . . . . . . . . . . . 5
4. Installing the device drivers in Windows 95 . . . . . . . . . . . . . . . . . . . . . . . . 7
Determining the Windows 95 version in use . . . . . . . . . . . . . . . . . . . . . . . . . . . . . . . 7
Removing any PCMCIA support software . . . . . . . . . . . . . . . . . . . . . . . . . . . . . . . . . 8
Upgrading dial-up networking for Windows 95 . . . . . . . . . . . . . . . . . . . . . . . . . . . 10
Installing the IBM International ISDN PC Card in Windows 95 service release 1 .
13
Installing the IBM International ISDN PC Card in Windows 95 service release 2.x
14
NDIS WAN CAPI driver installation in Windows 95 . . . . . . . . . . . . . . . . . . . . . . . 16
5. Installing the device drivers in Windows 98 . . . . . . . . . . . . . . . . . . . . . . .
Installing the Dial-Up Networking 1.4 Update for Windows 98 . . . . . . . . . . . . . .
Installing the IBM International ISDN PC Card in Windows 98 . . . . . . . . . . . . . .
NDIS WAN CAPI driver installation in Windows 98 . . . . . . . . . . . . . . . . . . . . . . .
19
19
22
24
6. Installing the device drivers in Windows Me . . . . . . . . . . . . . . . . . . . . . . . 27
Installing the IBM International ISDN PC Card in Windows Me . . . . . . . . . . . . . 27
NDIS WAN CAPI driver installation in Windows Me . . . . . . . . . . . . . . . . . . . . . . 29
7. Installing the device drivers in Windows NT 4.0 . . . . . . . . . . . . . . . . . . . .
Before you begin . . . . . . . . . . . . . . . . . . . . . . . . . . . . . . . . . . . . . . . . . . . . . . . . . . . . . .
Checking the PCMCIA support software for Windows NT 4.0 . . . . . . . . . . . .
Installing the IBM International ISDN PC Card in Windows NT 4.0 . . . . . . . . . .
Checking and installing Remote Access Service . . . . . . . . . . . . . . . . . . . . . . . . . . .
Installing remote access. . . . . . . . . . . . . . . . . . . . . . . . . . . . . . . . . . . . . . . . . . . . . .
Installing the NDIS WAN CAPI drivers . . . . . . . . . . . . . . . . . . . . . . . . . . . . . . . . . .
33
33
34
35
39
40
42
8. Installing the device drivers in Windows 2000 . . . . . . . . . . . . . . . . . . . . . 45
Installing the device drivers in Windows 2000 . . . . . . . . . . . . . . . . . . . . . . . . . . . . . 45
9. Installing the device drivers in Windows XP . . . . . . . . . . . . . . . . . . . . . . . 49
Installing the device drivers in Windows XP . . . . . . . . . . . . . . . . . . . . . . . . . . . . . . 49
10. Configuration and diagnostics of the IBM International ISDN PC Card 53
Changing the switch type in Windows 95, Windows 98, Windows Me, and
© Copyright IBM Corp. 2002
vii
ISDNmst.fm Page viii Wednesday, January 15, 2003 9:22 AM
Windows NT 4.0 . . . . . . . . . . . . . . . . . . . . . . . . . . . . . . . . . . . . . . . . . . . . . . . . . . . . . .
Changing the switch type in Windows 2000 . . . . . . . . . . . . . . . . . . . . . . . . . . . . . .
Changing the switch type in Windows XP. . . . . . . . . . . . . . . . . . . . . . . . . . . . . . . .
Configuring multiple subscriber numbers (MSNs) . . . . . . . . . . . . . . . . . . . . . . . .
Configuring MSNs in Windows 95, Windows 98, and Windows Me . . . . . . .
Windows NT . . . . . . . . . . . . . . . . . . . . . . . . . . . . . . . . . . . . . . . . . . . . . . . . . . . . . .
Windows 2000 . . . . . . . . . . . . . . . . . . . . . . . . . . . . . . . . . . . . . . . . . . . . . . . . . . . .
Windows XP . . . . . . . . . . . . . . . . . . . . . . . . . . . . . . . . . . . . . . . . . . . . . . . . . . . . . .
Running the diagnostics in Windows 95, Windows 98, Windows Me, and
Windows NT . . . . . . . . . . . . . . . . . . . . . . . . . . . . . . . . . . . . . . . . . . . . . . . . . . . . . . . . .
53
55
57
59
60
60
62
64
65
11. Implementations of the IBM International ISDN PC Card . . . . . . . . . . . . 67
Installing cFos . . . . . . . . . . . . . . . . . . . . . . . . . . . . . . . . . . . . . . . . . . . . . . . . . . . . . . . . 67
Prerequisites for the cFos installation and additional tips . . . . . . . . . . . . . . . . 68
Installing cFos in Windows 95, Windows 98, and Windows Me . . . . . . . . . . . 69
Windows NT 4.0 Workstation . . . . . . . . . . . . . . . . . . . . . . . . . . . . . . . . . . . . . . . . 74
Windows 2000 . . . . . . . . . . . . . . . . . . . . . . . . . . . . . . . . . . . . . . . . . . . . . . . . . . . . . 78
Installing cFos in Windows XP . . . . . . . . . . . . . . . . . . . . . . . . . . . . . . . . . . . . . . . 82
Setting up Internet access . . . . . . . . . . . . . . . . . . . . . . . . . . . . . . . . . . . . . . . . . . . . . . 86
Internet access in Windows 95 and Windows 98 . . . . . . . . . . . . . . . . . . . . . . . . 86
Internet access in Windows Me . . . . . . . . . . . . . . . . . . . . . . . . . . . . . . . . . . . . . . 89
Internet access in Windows NT 4.0 . . . . . . . . . . . . . . . . . . . . . . . . . . . . . . . . . . . 92
Internet access in Windows 2000 . . . . . . . . . . . . . . . . . . . . . . . . . . . . . . . . . . . . . 96
Internet access in Windows XP . . . . . . . . . . . . . . . . . . . . . . . . . . . . . . . . . . . . . . . 99
Using CompuServe . . . . . . . . . . . . . . . . . . . . . . . . . . . . . . . . . . . . . . . . . . . . . . . . . . 104
CompuServe 3.0 and non-CAPI 2.0-compliant CompuServe dialers in
Windows 9x, Me . . . . . . . . . . . . . . . . . . . . . . . . . . . . . . . . . . . . . . . . . . . . . . . . . . 104
CAPI 2.0-compliant CompuServe 2000 in Windows 9x, Me without cFos
installed . . . . . . . . . . . . . . . . . . . . . . . . . . . . . . . . . . . . . . . . . . . . . . . . . . . . . . . . . 105
CAPI 2.0-compliant CompuServe 2000 in Windows 9x, ME with cFos installed
106
Using AOL . . . . . . . . . . . . . . . . . . . . . . . . . . . . . . . . . . . . . . . . . . . . . . . . . . . . . . . . . . 117
AOL 4.0 and other non-CAPI 2.0-compliant AOL access software. . . . . . . . . 118
CAPI 2.0-compliant AOL 5.0 and Higher without cFos Installed . . . . . . . . . . 118
CAPI 2.0-compliant AOL 5.0 and Higher with cFos Installed . . . . . . . . . . . . . 119
CAPI 2.0-compliant AOL 6.0 and higher for Windows 9x and Windows Me . . .
120
CAPI 2.0-compliant AOL 6.0 and Higher for Windows 2000 . . . . . . . . . . . . 120
Using Symantec's WinFax PRO . . . . . . . . . . . . . . . . . . . . . . . . . . . . . . . . . . . . . . . . 121
WinFax PRO 9.x. . . . . . . . . . . . . . . . . . . . . . . . . . . . . . . . . . . . . . . . . . . . . . . . . . . 121
WinFax PRO 10.0. . . . . . . . . . . . . . . . . . . . . . . . . . . . . . . . . . . . . . . . . . . . . . . . . . 124
IBM DIALs client . . . . . . . . . . . . . . . . . . . . . . . . . . . . . . . . . . . . . . . . . . . . . . . . . . . . 126
Using ISDNWatch . . . . . . . . . . . . . . . . . . . . . . . . . . . . . . . . . . . . . . . . . . . . . . . . . . . 128
CAPI Port Drivers . . . . . . . . . . . . . . . . . . . . . . . . . . . . . . . . . . . . . . . . . . . . . . . . . . . 129
Prerequisites for the CAPI Port installation . . . . . . . . . . . . . . . . . . . . . . . . . . . . . . 130
Installing the CAPI Port Drivers in Windows 95. . . . . . . . . . . . . . . . . . . . . . . . . . 130
Installing the CAPI Port Drivers in Windows 98 . . . . . . . . . . . . . . . . . . . . . . . 133
Installing the CAPI Port Drivers in Windows Me. . . . . . . . . . . . . . . . . . . . . . . . . 136
Installing the CAPI Port Drivers in Windows NT 4.0. . . . . . . . . . . . . . . . . . . . . . 139
Activating the CAPI Port Drivers in Windows NT 4.0 Workstation. . . . . . . 142
Adding CAPI Ports to an existing RAS installation . . . . . . . . . . . . . . . . . . . . 144
Installing the CAPI Port Drivers in Windows 2000. . . . . . . . . . . . . . . . . . . . . . . . 146
viii
IBM ISDN PC Card:User’s Guide
ISDNmst.fm Page ix Wednesday, January 15, 2003 9:22 AM
Installing the CAPI Port Drivers in Windows XP . . . . . . . . . . . . . . . . . . . . . . . . .
Removing the CAPI Port Drivers . . . . . . . . . . . . . . . . . . . . . . . . . . . . . . . . . . . . . . .
CAPI Port troubleshooting and frequently asked questions. . . . . . . . . . . . . .
Installing CardWizard 5.20 for Windows NT 4.0 trial version . . . . . . . . . . . . . . .
149
152
155
157
12. Using NDIS . . . . . . . . . . . . . . . . . . . . . . . . . . . . . . . . . . . . . . . . . . . . . . . . 161
Using NDIS in Windows 95, Windows 98, and Windows Me . . . . . . . . . . . . . . . 161
Using NDIS in Windows NT . . . . . . . . . . . . . . . . . . . . . . . . . . . . . . . . . . . . . . . . . . . 169
13. ISDN CAPI Port Device Driver . . . . . . . . . . . . . . . . . . . . . . . . . . . . . . . . . 177
Prerequisites for the CAPI port installation . . . . . . . . . . . . . . . . . . . . . . . . . . . . . . 177
Version 02.02.01 for Windows 95 and 98 . . . . . . . . . . . . . . . . . . . . . . . . . . . . . . . . . 177
Virtual modems . . . . . . . . . . . . . . . . . . . . . . . . . . . . . . . . . . . . . . . . . . . . . . . . . . . 177
Installing / removing the ISDN CAPI Port device driver . . . . . . . . . . . . . . . . 178
Modem settings using registry commands . . . . . . . . . . . . . . . . . . . . . . . . . . . . 179
Connections to internet service providers (ISPs) . . . . . . . . . . . . . . . . . . . . . . . 180
Using MS Money 99 and MS Exchange/Outlook. . . . . . . . . . . . . . . . . . . . . . . 183
Data communications software. . . . . . . . . . . . . . . . . . . . . . . . . . . . . . . . . . . . . . . . . 184
Data communications software and analog modems at the remote site . . . . 184
Using data communications software with an emulated COM port . . . . . . . 185
The modem "ISDN SoftCompression X.75/V.42bis": Using data compression
according to V.42bis for X.75 connections . . . . . . . . . . . . . . . . . . . . . . . . . . . . . 185
Remote access service (RAS) . . . . . . . . . . . . . . . . . . . . . . . . . . . . . . . . . . . . . . . . 186
Legal notice . . . . . . . . . . . . . . . . . . . . . . . . . . . . . . . . . . . . . . . . . . . . . . . . . . . . . . . 189
Appendix A: . . . . . . . . . . . . . . . . . . . . . . . . . . . . . . . . . . . . . . . . . . . . . . . . . . . . . . 189
Description of the registry commands . . . . . . . . . . . . . . . . . . . . . . . . . . . . . . . . 189
Version 01.02.00 for MS Windows NT and 2000 . . . . . . . . . . . . . . . . . . . . . . . . 192
Modem settings using registry commands . . . . . . . . . . . . . . . . . . . . . . . . . . . . 194
Connections to internet service providers (ISPs) . . . . . . . . . . . . . . . . . . . . . . . 195
Setting modem registers for ISDN B-channel protocols and PPP. . . . . . . . . . 196
Faxing with MS Money 98/99 and MS Exchange/Outlook and other Fax
Group 3 applications (e.g. WinFax PRO 8.x/9.) . . . . . . . . . . . . . . . . . . . . . . . . 198
Data communications software . . . . . . . . . . . . . . . . . . . . . . . . . . . . . . . . . . . . . . 199
Remote access service (RAS) . . . . . . . . . . . . . . . . . . . . . . . . . . . . . . . . . . . . . . . . 201
Legal notice and support . . . . . . . . . . . . . . . . . . . . . . . . . . . . . . . . . . . . . . . . . . . 202
Appendix A: Description of the registry commands . . . . . . . . . . . . . . . . . . . . . . . 202
14. Removing the IBM International ISDN PC Card . . . . . . . . . . . . . . . . . . . 207
Removing the IBM ISDN PC Card from Windows 95, Windows 98, and Windows
Me . . . . . . . . . . . . . . . . . . . . . . . . . . . . . . . . . . . . . . . . . . . . . . . . . . . . . . . . . . . . . . . . . 207
Removing the IBM ISDN PC Card from Windows NT . . . . . . . . . . . . . . . . . . . . . 210
Removing the ISDN PC Card from Windows 2000 . . . . . . . . . . . . . . . . . . . . . . . . 212
Removing the ISDN PC Card from Windows XP . . . . . . . . . . . . . . . . . . . . . . . . . 213
15. The FRITZ! and EXTRAS folders . . . . . . . . . . . . . . . . . . . . . . . . . . . . . . 215
The Fritz! folder . . . . . . . . . . . . . . . . . . . . . . . . . . . . . . . . . . . . . . . . . . . . . . . . . . . . . . 215
The extras folder. . . . . . . . . . . . . . . . . . . . . . . . . . . . . . . . . . . . . . . . . . . . . . . . . . . 215
Contents
ix
ISDNmst.fm Page x Wednesday, January 15, 2003 9:22 AM
Appendix A. Package contents . . . . . . . . . . . . . . . . . . . . . . . . . . . . . . . . . . . 219
Appendix B. Product features . . . . . . . . . . . . . . . . . . . . . . . . . . . . . . . . . . . . 221
Appendix C. A brief ISDN glossary . . . . . . . . . . . . . . . . . . . . . . . . . . . . . . . . 223
Historical survey . . . . . . . . . . . . . . . . . . . . . . . . . . . . . . . . . . . . . . . . . . . . . . . . . . . . 223
Glossary . . . . . . . . . . . . . . . . . . . . . . . . . . . . . . . . . . . . . . . . . . . . . . . . . . . . . . . . . . . . 223
Appendix D. Troubleshooting and frequently asked questions . . . . . . . . . 231
Appendix E. Help and service information . . . . . . . . . . . . . . . . . . . . . . . . . .
Technical support . . . . . . . . . . . . . . . . . . . . . . . . . . . . . . . . . . . . . . . . . . . . . . . . . . . .
Type of support . . . . . . . . . . . . . . . . . . . . . . . . . . . . . . . . . . . . . . . . . . . . . . . . . . .
Telephone technical support . . . . . . . . . . . . . . . . . . . . . . . . . . . . . . . . . . . . . . . .
241
241
241
241
Appendix F. Product warranties and notices . . . . . . . . . . . . . . . . . . . . . . . .
Warranty statements . . . . . . . . . . . . . . . . . . . . . . . . . . . . . . . . . . . . . . . . . . . . . . . . .
The IBM warranty for machines . . . . . . . . . . . . . . . . . . . . . . . . . . . . . . . . . . . . .
Warranty service and support . . . . . . . . . . . . . . . . . . . . . . . . . . . . . . . . . . . . . . . . .
Before you call for service . . . . . . . . . . . . . . . . . . . . . . . . . . . . . . . . . . . . . . . . . .
Calling for service . . . . . . . . . . . . . . . . . . . . . . . . . . . . . . . . . . . . . . . . . . . . . . . . .
IBM Statement of Limited Warranty Z125-4753-06 8/2000 . . . . . . . . . . . . . . .
Part 1 - General Terms . . . . . . . . . . . . . . . . . . . . . . . . . . . . . . . . . . . . . . . . . . . . .
Part 2 - Country-unique Terms . . . . . . . . . . . . . . . . . . . . . . . . . . . . . . . . . . . . . .
245
245
245
246
246
247
248
248
250
x
IBM ISDN PC Card:User’s Guide
ISDNmst.fm Page 1 Wednesday, January 15, 2003 9:22 AM
1. Welcome to the IBM International ISDN PC Card
Welcome to the IBM International ISDN PC Card. Thank you for choosing this
product.
The IBM International ISDN PC Card is a passive adapter in PCMCIA (credit-card
size) format. It was designed for ISDN basic-rate interfaces, and can be used with
one B channel at a rate of 64 kbit/s or, for multilink connections with two B
channels simultaneously (multilink connections) at 128 kbit/s.
The IBM International ISDN PC Card is fully CAPI 2.0-compliant.
The adapter can be installed and operated in Microsoft® Windows® 95, Windows
98, Windows NT 4.0 Workstation, Windows 2000 Professional, Windows
Millenium Edition (Me), and Windows XP Home and Professional Edition.
For more information on how to install and use the adapter, please see the
corresponding sections in this manual. For further assistance, please refer to the
telephone numbers included in Appendix E, “Help and service information” on
page 241. If you need additional assistance, please contact your nearest IBM
dealer or, if possible, consult one of the following Internet sites:
IBM Personal Computing Support Web
Site Language
URL
English
http://www.ibm.com/pc/support
German
http://www.ibm.com/pc/support/de
French
http://www.ibm.com/pc/support/fr
Italian
http://www.ibm.com/pc/support/it
Spanish
http://www.ibm.com/pc/support/es
Note:
If the national language version of the IBM Personal Computing Web Site
is not available or not working, you can use the English language version
at http://www.pc.ibm.com/pc/support.
© Copyright IBM Corp. 2002
1
ISDNmst.fm Page 2 Wednesday, January 15, 2003 9:22 AM
2
IBM ISDN PC Card:User’s Guide
ISDNmst.fm Page 3 Wednesday, January 15, 2003 9:22 AM
2. How the IBM International ISDN PC Card installation
software CD is organized
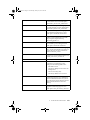
The IBM International ISDN PC Card installation software CD contains the
following directories:
\AUTORUN
Autorun menu for all Windows operating
systems
\EXTRAS
Additional Windows software
\Fritz!
Contains the AVM Fritz! Software version
3.0 in English, German, French, Italian, and
Spanish.
\GUIDE
Contains the current release of the User’s
Guide for the IBM International ISDN PC
Card
\Marketing
Contains additional software marketing
material from AVM in English (EN) and
German (DE) that will enhance the
usability of your IBM International ISDN
PC Card. For more details please review the
PDF files in the \MARKETING directory or
visit the German AVM or English AVM
home page
\WIN2000
CAPI 2.0 compliant device drivers for the
IBM International ISDN PC Card for
Microsoft Windows 2000 Professional
\WIN95
CAPI 2.0 compliant device drivers for the
IBM International ISDN PC Card for
Microsoft Windows 95
\WIN98
CAPI 2.0 compliant device drivers for the
IBM International ISDN PC Card for
Microsoft Windows 98
\WINME
CAPI 2.0 compliant device drivers for the
IBM International ISDN PC Card for
Microsoft Windows Millennium Edition
\WINNT
CAPI 2.0 compliant device drivers for the
IBM International ISDN PC Card for
Microsoft Windows NT 4.0 Workstation
\WINXP
CAPI 2.0 compliant device drivers for the
IBM International ISDN PC Card for
Microsoft Windows XP Home Edition and
Professional
© Copyright IBM Corp. 2002
3
ISDNmst.fm Page 4 Wednesday, January 15, 2003 9:22 AM
For driver and software updates, visit one of the following international IBM
support web pages:
IBM Personal Computing Support Web
Site
URL
English
http://www.ibm.com/pc/support
German
http://www.ibm.com/pc/support/de
French
http://www.ibm.com/pc/support/fr
Italian
http://www.ibm.com/pc/support/it
Spanish
http://www.ibm.com/pc/support/es
If you encounter any problems with the above links, follow these steps:
•
Connect to http://www.pc.ibm.com/support
•
Select your language.
•
Double-click the Options link underneath the Browse menu.
•
In the Category list, select Communication Adapters.
•
From the Option list, select 09N3606 International ISDN PC Card.
4
IBM ISDN PC Card:User’s Guide
ISDNmst.fm Page 5 Wednesday, January 15, 2003 9:22 AM
3. Before you install the IBM International ISDN PC Card
Before installing your IBM International ISDN PC Card, make sure your
operating system is up to date. Refer to the following Web sites if possible:
The Windows 95 update page:
http://www.microsoft.com/windows95/downloads
The Microsoft Dial-Up Networking 1.3 update download page for Windows 95:
http://www.microsoft.com/windows95/downloads/contents/wurecommended/s
_wunetworking/dun13win95/license.asp
The Windows 98 update page:
http://www.microsoft.com/windows2000/downloads
The Windows Me home page:
http://www.microsoft.com/windowsme
The Microsoft download home page:
http://www.microsoft.com/downloads
For further assistance regarding the installation of specific patches or updates for
any Microsoft Windows operating system, contact Microsoft or your computer
manufacturer’s help desk.
Be sure to have the user’s manual or installation guide for your computer
available for quick reference.
Also keep the original Windows 95, Windows 98, Windows Me, Windows NT, or
Windows 2000 CD at hand when installing the device drivers software.
If you do not have a CD for your operating system, check to see if the required
.CAB files for Windows 95, Windows 98, or Windows Me Setup are installed on
the hard disk of your computer.
If you are using Windows NT 4.0, Windows 2000, or Windows XP, check to see if
your hard disk drive contains the I386 directory and its sub-directories from the
original CDs.
If this is not the case, or if you require assistance to find the Setup files in question,
contact the manufacturer of your computer or your IT department specialist.
© Copyright IBM Corp. 2002
5
ISDNmst.fm Page 6 Wednesday, January 15, 2003 9:22 AM
6
IBM ISDN PC Card:User’s Guide
ISDNmst.fm Page 7 Wednesday, January 15, 2003 9:22 AM
4. Installing the device drivers in Windows 95
The device drivers for the IBM International ISDN PC Card are installed in two
steps:
1. Install the CAPI 2.0-compliant device drivers
2. Install the NDIS WAN CAPI device drivers
The following section explains in detail the prerequisites for the device driver
installation, and how to perform the installation on your specific version of
Windows 95.
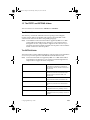
Determining the Windows 95 version in use
Before you begin installing the IBM International ISDN PC Card in Windows 95,
check which version of Windows 95 you are using. For this purpose, Microsoft
has released the following instructions for determining the Windows 95 version
on its technical support Web site:
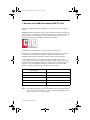
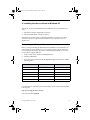
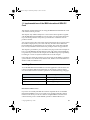
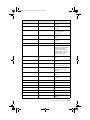
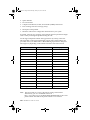
1. In the Control Panel, double-click the System icon.
2. Click the General tab.
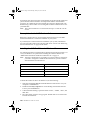
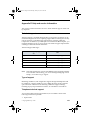
3. Locate the version number under the System heading and compare it with the
following table:
Release
Version
File Date
Windows 95 retail, OEM
400.95
11/07/95
Windows 95 retail SP1
4.00.950A
11/07/95
OEM Service Release 1
4.00.950A
11/07/95
OEM Service Release 2
4.00.1111 (4.00.950B)
24/08/96
OEM Service Release 2.1
4.03.1212-1214 (4.00.950B)
24/08/96-27/08/97
OEM Service Release 2.5
4.03.1214 (4.00.950C)
24/08/96-18/11/97
A comprehensive, up-to-date article on this subject can be found on the Web at the
following site:
http://search.support.microsoft.com
Search for the article Q158238.
© Copyright IBM Corp. 2002
7
ISDNmst.fm Page 8 Wednesday, January 15, 2003 9:22 AM
If you are running the initial release of Windows 95 (Windows 95 retail or OEM)
you must first upgrade it to Windows 95 SP1 by downloading the corresponding
Service Pack for your Windows 95 version. The Service Pack 1 can be found at:
http://microsoft.com/windows/software/localize/localize.html
If the above URL is outdated, please contact your local Microsoft support desk
for further assistance.
Removing any PCMCIA support software
Some notebook computer manufacturers install PCMCIA support software such
as Systemsoft's CardWizard as part of the Windows 95 package. IBM includes this
program with its Thinkpad notebook computer series. This section briefly
describes how to remove CardWizard from the system. This software must be
removed to ensure correct operation of the IBM International ISDN PC Card.
1. Click Settings -> Control Panel in the Windows Start menu.
2. Double-click the Add/Remove Programs icon in the Control Panel.
3. In the Add/Remove Programs Properties window, select SystemSoft
CardWorks in the list of installed programs.
4. Click the Add/Remove button to remove CardWizard.
5. Confirm that you want this software to be completely removed.
8
IBM ISDN PC Card:User’s Guide
ISDNmst.fm Page 9 Wednesday, January 15, 2003 9:22 AM
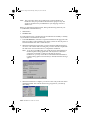
6. When the removal has been completed, click the OK button and then confirm
that you want to restart the computer.
7. After Windows has restarted, open the Control Panel again by clicking Start > Settings -> Control Panel.
8. Double-click the System icon and select the Device Manager tab. Both
PCMCIA sockets are now highlighted with a yellow exclamation mark in the
list of devices.
Select each socket in turn and click Remove to remove it from the Device
Manager.
Even if the PCMCIA sockets are not highlighted with the exclamation mark, you
must remove them, and follow the instructions in this chapter.
Attention: Make sure that you have removed both sockets.
Note:
Some Windows 95 versions might show only one PCMCIA socket instead
of two.
When you have removed the PCMCIA sockets, restart your computer.
When Windows 95 restarts, the operating system reinstalls the device drivers for
the PCMCIA sockets. After system start-up has been completed, return to the
System applet in the Control Panel and check in the Device Manager to make sure
that the PCMCIA sockets are now installed properly. If so, close the Device
Manager by clicking the OK button.
The next step is to install PCMCIA support in Windows 95. Proceed as follows:
4. Installing the device drivers in Windows 95
9
ISDNmst.fm Page 10 Wednesday, January 15, 2003 9:22 AM
1. Double-click the PC Card (PCMCIA) icon in the Control Panel. Windows 95
now asks you for some information and offers default settings. Please read the
next windows carefully and answer the questions accordingly.
2. Windows 95 prompts you to shut down your notebook computer. Confirm
this action by clicking Yes. When your notebook computer has been restarted,
it is ready to use PCMCIA adapters.
Upgrading dial-up networking for Windows 95
For proper operation of the IBM International ISDN PC Card, your computer
must have at least Windows 95 with Service Pack 1 (Windows 95 version
4.00.950A) installed.
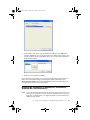
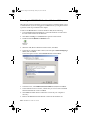
First, check to see if Dial-Up Networking or any ISDN accelerator kit is installed:
1. Click Start -> Settings -> Control Panel and then double-click Add/Remove
Programs.
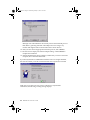
2. In the first window, entitled Install/Uninstall, check to see if a newer version
of the Microsoft Dial-Up Networking update is installed.
If an entry called Dial-Up Networking Upgrade 1.2 or Dial-Up Networking 1.3
is listed:
1. Highlight this entry in the list, then click Add/Remove to uninstall the older
Dial-Up Networking upgrade.
10
IBM ISDN PC Card:User’s Guide
ISDNmst.fm Page 11 Wednesday, January 15, 2003 9:22 AM
2. Restart your system and install the Microsoft Dial-Up Networking 1.4
Upgrade from the \EXTRAS\Win95\DUN\MSDUN14 directory on the CD,
selecting the msdun14.exe program.
Note:
The Microsoft Dial-Up Networking 1.4 upgrade is only available in
English. You can choose to leave the Dial-Up Networking 1.3 Update
installed or install it alternatively from the
\EXTRAS\Win95\DUN\MSDUN13 directory by selecting the
corresponding update fo ryour language version of Windows 95. But
for optimal performance, install the Dial-Up Networking 1.4 upgrade.
3. Run the MSDUN13.EXE file or the file corresponding to the Dial-Up
Networking 1.4 upgrade and follow the instructions on the screen.
Note:
If you choose to install the Windows 95 Dial-Up Networking 1.3 upgrade
and it is not available in your language, you can
•
install the English Dial-Up Networking update or
•
download the country specific version of it from
http://www.microsoft.com/windows95/downloads/contents/wure
commended/s_wunetworking/dun13win95/license.asp and install it
on your Windows 95 computer.
The Windows 95 Dial-Up Networking 1.4 Update is available at
http://www.microsoft.com/windows95/downloads/contents/WUReco
mmended/S_WUNetworking/dun14win95/Default.asp.
For information on how to install the English version of the Microsoft
Dial-Up Networking 1.4 upgrade for Windows 95, see Appendix D,
“Troubleshooting and frequently asked questions” on page 231 .
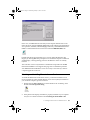
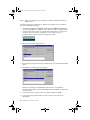
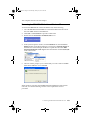
If there are no entries under Install/Uninstall referring to a Dial-Up Networking
update:
1. Click the Windows Setup tab.
2. In the next dialog, double-click the Communications icon and then deactivate
the checkbox to the left of Dial-Up Networking.
3. Click OK to confirm the operation.
If the Microsoft ISDN 1.1 Accelerator Pack is installed on your computer, a
window will open reporting that you are about to remove it. Click Yes to
confirm.
4. Installing the device drivers in Windows 95
11
ISDNmst.fm Page 12 Wednesday, January 15, 2003 9:22 AM
4. Restart your system and perform the Microsoft Dial-Up Networking 1.4
upgrade from the \EXTRAS\win95\DUN\MSDUN14 directory on the CD,
selecting the msdun14.exe program.
Note:
The Microsoft Dial-Up Networking 1.4 upgrade is only available in
English. You can choose to leave the Dial-Up Networking 1.3 Update
installed or install it alternatively from the
\EXTRAS\Win95\DUN\MSDUN13 directory by selecting the
corresponding update fo ryour language version of Windows 95. But
for optimal performance, install the Dial-Up Networking 1.4 upgrade.
5. Execute the msdun14.exe file or the file corresponding to the Dial-Up
Networking 1.3 upgrade and follow the instructions on the screen.
Note:
If you choose to install the Windows 95 Dial-Up Networking 1.3
upgrade and it is not available in your language, you can
•
install the English Dial-Up Networking update or
•
download the country specific version of it from
http://www.microsoft.com/windows95/downloads/contents/w
urecommended/s_wunetworking/dun13win95/license.asp and
install it on your Windows 95 computer.
The Windows 95 Dial-Up Networking 1.4 Update is available at
http://www.microsoft.com/windows95/downloads/contents/wure
commended/s_wunetworking/dun14win95/default.asp.
For information on how to install the English version of the Microsoft
Dial-Up Networking 1.4 upgrade for Windows 95, see Appendix D,
“Troubleshooting and frequently asked questions” on page 231.
12
IBM ISDN PC Card:User’s Guide
ISDNmst.fm Page 13 Wednesday, January 15, 2003 9:22 AM
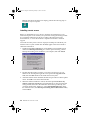
Installing the IBM International ISDN PC Card in Windows 95
service release 1
When you have prepared Windows 95 by following the instructions above, you
are ready to install the IBM International ISDN PC Card.
1. Turn off the computer, choose a PCMCIA slot and insert the IBM International
ISDN PC Card into the slot without the ISDN cable attached.
2. Turn the computer back on. The New Hardware Found window opens and
reports that it has detected an ISDN PC Card.
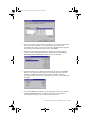
3. Make sure that the option Driver from disk provided by hardware
manufacturer is selected, then click OK.
4. The Install From Disk window opens. Click Browse and select the letter of the
CD-ROM drive containing the IBM International ISDN PC Card Driver CD
in the Open window. Select the Win95 , then the DRV directory and confirm
your selection by clicking OK.
5. In the Install From Disk window, click OK once more to confirm that you
want to install the device drivers.
6. Click OK in the Select Device window. Installation of the device drivers
begins.
7. The next window lets you select the installation language. Confirm the default
language English by clicking OK or selecting your language from the list ,
then clicking Continue.
8. In the next window, specify the installation directory for the device drivers. By
default this path is C:\IBM_ISDN. Click Continue to confirm this path, or
enter a different path in the Directory field.
9. In the next window, select the appropriate D-channel protocol for your ISDN
line. For newer ISDN lines in Europe select DSS1, the Euro-ISDN D protocol.
NI-1 and 5ESS are D-channel protocols used in the United States of America.
1TR6 is the older national D-channel protocol for Germany.
4. Installing the device drivers in Windows 95
13
ISDNmst.fm Page 14 Wednesday, January 15, 2003 9:22 AM
Although some older ISDN lines in Germany still use the D-channel protocol
1TR6 , DSS1 is generally preferable. The 1TR6 protocol is no longer very
common and might be excluded from future device driver releases for this
adapter.
10. Once you have selected the appropriate D-channel protocol, click the
Continue button.
11. The last window informs you of the resources used by the IBM International
ISDN PC Card. Click Continue to complete the installation, then connect the
ISDN cable.
Your IBM International ISDN PC Card is now ready to use with any CAPI 2.0compliant application software.
Installing the IBM International ISDN PC Card in Windows 95
service release 2.x
After you have prepared Windows 95 by following the instructions above, you are
ready to install the IBM International ISDN PC Card.
1. Turn off the computer, select a PCMCIA slot and insert the IBM International
ISDN PC Card into this slot without the ISDN cable attached.
2. Turn the computer back on. The New Hardware Found Wizard detects the
newly inserted IBM International ISDN PC Card as ISDN PC Card.
3. Now insert the CD labeled IBM International ISDN PC Card Drivers into
your computer CD-ROM drive.
4. The Update Device Driver Wizard prompts you to install the device drivers.
Click Next.
5. When the Wizard has finished searching for the device drivers, click Other
Locations, and then click Browse .
6. In the Browse for Folder window, select the letter of the CD-ROM drive
containing the IBM International ISDN PC Card Driver CD. Select the
14
IBM ISDN PC Card:User’s Guide
ISDNmst.fm Page 15 Wednesday, January 15, 2003 9:22 AM
Win95 directory, then the DRV directory and confirm your selection by
clicking OK.
7. In the Select Other Location window, click OK.
8. Next, click the Finish button in the Update Device Driver window.
9. The following message now displays:
Please insert the disk labeled ‘IBM International ISDN PC Card Installation
Windows 95
. Click OK.
10. Click OK to close this window. In the Copying Files... window, click the
Browse button, and in the Open window, select the WIN95 directory and
then the DRV directory on the CD. Click OK twice.
11. The next window enables you to select the installation language. Confirm the
default language English by clicking OK or selecting your language from the
list, then clicking Continue.
12. In the next window you can specify the installation directory for the device
drivers. The default path is C: \IBM_ISDN. Click Continue to confirm this
path, or enter a different path in the Directory field.
13. In the next window, select the appropriate D-channel protocol for your ISDN
line. For newer ISDN lines in Europe, select DSS1, the Euro-ISDN protocol.
The NI-1 and 5ESS are D-channel protocols used in the United States of
America. 1TR6 is the older national D-channel protocol for Germany.
4. Installing the device drivers in Windows 95
15
ISDNmst.fm Page 16 Wednesday, January 15, 2003 9:22 AM
Although some older ISDN lines in Germany still use the D-channel protocol
1TR6, DSS1 is generally preferable. The 1TR6 protocol is no longer very
common and might be removed from future device driver releases for this
adapter.
14. After you have selected the appropriate D-channel protocol, click the
Continue button.
15. The final window informs you of the resources used by the IBM International
ISDN PC Card. Click Continue to complete the installation, then connect the
ISDN cable.
Your IBM International ISDN PC Card is now ready to use with any CAPI 2.0compliant software.
NDIS WAN CAPI driver installation in Windows 95
If you have not yet installed the CAPI 2.0-compliant device drivers, please return
to the corresponding chapters and install them first.
During installation you might be asked to specify the location of the NDIS WAN
CAPI device drivers a second time. In this case, simply enter the path to the
device driver source files again.
1. Insert the CD labeled IBM International ISDN PC Card Installation
Software into your computer CD-ROM drive.
2. Click Start -> Settings -> Control Panel to open the Control Panel. Doubleclick the Network icon.
3. In the Network Configuration window, click Add.
4. In the Select Network Component Type window, click Adapter, then Add.
16
IBM ISDN PC Card:User’s Guide
ISDNmst.fm Page 17 Wednesday, January 15, 2003 9:22 AM
5. In the Select Network Adapters window, click Have Disk.
6. In the Install From Disk window, click Browse. Select the CD-ROM drive in
the Drives list in the Open window, then browse to the path WIN95\NDIS.
Click OK.
7. Click OK to close the Install From Disk, Select Network adapters, and
Network windows.
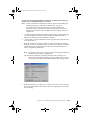
8. Windows 95 now starts the ISDN configuration. Click the Next button. Leave
the Switch protocol selection at Automatic and click Next again.
9. The next window prompts you to enter two phone numbers and the
corresponding SPIDs. The SPID entries are applicable only in the United
States of America and Canada. However, even if you are in the United States
of America or Canada, SPID entries are not mandatory. Leave these fields
blank and click the Next button.
4. Installing the device drivers in Windows 95
17
ISDNmst.fm Page 18 Wednesday, January 15, 2003 9:22 AM
10. In the last window, click Finish.
11. Restart your computer when prompted to do so.
The NDIS WAN CAPI Device Drivers are now installed. You will also find the
guide for the NDIS WAN CAPI Device Drivers as a Windows Help file on your
Windows 95 desktop. This guide is available only in English.
18
IBM ISDN PC Card:User’s Guide
ISDNmst.fm Page 19 Wednesday, January 15, 2003 9:22 AM
5. Installing the device drivers in Windows 98
The device drivers for the IBM International ISDN PC Card are installed in two
steps:
1. Install the CAPI 2.0-compliant device drivers
2. Install the NDIS WAN CAPI device drivers
Installing the Dial-Up Networking 1.4 Update for Windows 98
Microsoft has released the Dial-Up Networking 1.4 Update for Windows 98 in
two versions:
•
Windows 98 First Edition (initial release)
•
Windows 98 Second Edition
You can find these updates on the CD in the following directories:
•
\EXTRAS\Win98\DUN14\FE for Windows 98 First Edition
•
\EXTRAS\Win98\DUN14\SE for Windows 98 Second Edition
The Microsoft Windows 98 Dial-Up Networking 1.4 update can be downloaded
from
http://www.microsoft.com/windows98/downloads/contents/WURecommend
ed/S_WUNetworking/dun14/Default.asp.
Prior to the release of the Dial-Up Networking 1.4 update, Microsoft released
other fixes and updates for Windows 98 Dial-Up Networking. These were:
•
40-bit encryption update for Windows 98 First Edition
•
Virtual Private Networking update for Windows 98 First Edition
•
128-bit encryption update for Windows 98 Second Edition
The updates for Windows 98 First Edition cannot be uninstalled.
For Windows 98 Second Edition, click Start -> Settings -> Control Panel and
double-click the Add/Remove Programs icon. Click the Install/Uninstall tab in
the Add/Remove Properties and look for the 128-bit encryption update. If it is
listed, highlight it and click the Add/Remove... button to uninstall it. Reboot your
system.
© Copyright IBM Corp. 2002
19
ISDNmst.fm Page 20 Wednesday, January 15, 2003 9:22 AM
To install the Microsoft Dial-Up Networking 1.4 update to your Windows 98
computer, change to the relevant directory on the CD and launch the program for
your Windows 98 language version.
For example, for Windows 98 First Edition, you would launch
dun14-98en.exe
20
IBM ISDN PC Card:User’s Guide
ISDNmst.fm Page 21 Wednesday, January 15, 2003 9:22 AM
For Windows 98 Second Edition, you would launch
dun14-SEen.exe
5. Installing the device drivers in Windows 98
21
ISDNmst.fm Page 22 Wednesday, January 15, 2003 9:22 AM
For more information on the available language versions of the Microsoft Dial-Up
Networking 1.4 update, please read the _info.txt file in the relevant directory.
For information on how to install the English version of the Microsoft Dial-Up
Networking 1.4 update onto a non-English Windows 98 version, consult
Appendix D, “Troubleshooting and frequently asked questions” on page 231
Installing the IBM International ISDN PC Card in Windows 98
The installation for the IBM International ISDN PC Card is the same for both
Windows 98 First Edition and Second Edition.
To install the IBM International ISDN PC Card in Windows 98, proceed as follows:
1. Turn off the computer, choose a PCMCIA slot and insert the IBM International
ISDN PC Card into the cable attached.
2. Turn the computer back on. The New Hardware Found window opens on
screen and reports that it has detected an ISDN-CARD.
3. Now insert the CD labeled IBM International ISDN PC Card Installation
Software into the CD-ROM drive of your computer CD-ROM drive.
4. The Add New Hardware Wizard soon informs you that the system is
searching for a device driver for the adapter. Click Next.
5. Accept the default option Search for the best driver for your device by
simply clicking Next.
6. In the next window, you can indicate where Windows must search for device
drivers. By default, the option Floppy disk drives is checked. Activate the
option Specify a location, then click Browse. Select the letter of the CD-ROM
drive containing the IBM International ISDN PC Card Drivers CD, then click
the WIN98 directory, then the DRV directory, and confirm your selection by
clicking OK.
7. Now click the Next button to start the device driver installation.
22
IBM ISDN PC Card:User’s Guide
ISDNmst.fm Page 23 Wednesday, January 15, 2003 9:22 AM
The window that opens informs you that the computer is ready to install the
file FPCMSET.INF file for the ISDN PC Card. Click Next.
8. When the Add New Hardware Wizard reports that it has finished copying the
required software for the IBM International ISDN PC Card, click Finish.
9. The next window informs you that the device driver software in English is
ready to install. Select your language from the given list and click Continue.
10. The IBM International ISDN PC Card Setup program sign-on window opens.
Click Continue.
11. The following window enables you to select the target directory. The default
path is C:\IBM_ISDN, but you can enter any other directory desired in the
window. After completing your entries, click Continue.
12. In the next window, select the appropriate D-channel protocol for your ISDN
line. For newer ISDN lines in Europe, select DSS1, the Euro-ISDN D-channel
protocol. NI-1 and 5ESS are D-channel protocols used in the United States of
America. 1TR6 is the older national D-channel protocol for Germany.
5. Installing the device drivers in Windows 98
23
ISDNmst.fm Page 24 Wednesday, January 15, 2003 9:22 AM
Although some older ISDN lines in Germany still use the D-channel protocol
1TR6, DSS1 is generally preferable. The 1TR6 protocol is no longer very
common and might be removed from future device driver releases for this
adapter.
13. After you have selected the appropriate D-channel protocol, click Continue.
14. The final window informs you which resources are used by the IBM
International ISDN PC Card. Click Continue to complete the installation, then
connect the ISDN cable.
Your IBM International ISDN PC Card is now ready to use with any CAPI 2.0compliant software.
NDIS WAN CAPI driver installation in Windows 98
If you have not yet installed the CAPI 2.0-compliant device drivers, please return
to the corresponding chapters and install them first.
Note:
During installation you may be asked to specify the location of the NDIS
WAN CAPI drivers a second time. In this case, simply enter the path to the
driver source files again.
To install the NDIS WAN CAPI Driver in Windows 98, do the following:
1. Insert the CD labeled “IBM International ISDN PC Card Installation
Software” into your computer's CD-ROM drive.
2. Click Start -> Settings -> Control Panel to open the Control Panel. Doubleclick the Network icon.
3. In the Network Configuration window, click Add.
4. In the Select Network Component Type window, click Adapter, then Add.
5. In the Select Network Adapters window, click Have Disk.
6. In the Install From Disk window, click Browse. Select the CD-ROM drive in
the Drives list in the Open window, then browse to the path WIN98 \ NDIS.
Click OK.
7. Click OK to close the Install From Disk, Select Network adapters, and
Network dialogs.
24
IBM ISDN PC Card:User’s Guide
ISDNmst.fm Page 25 Wednesday, January 15, 2003 9:22 AM
8. Windows 98 now starts the ISDN Configuration. Click Next button. Leave the
Switch protocol selection on Automatic and click Next again.
9. The next dialog prompts you for two phone numbers and the corresponding
SPIDs. The SPID entries are applicable only in the USA and Canada. However,
even if you are in the USA or Canada, SPID entries are not mandatory. Leave
these fields blank and click Next.
5. Installing the device drivers in Windows 98
25
ISDNmst.fm Page 26 Wednesday, January 15, 2003 9:22 AM
10. In the last dialog, click Finish.
11. Restart your computer when prompted to do so.
The NDIS WAN CAPI Drivers are now installed. You will also find the guide for
the NDIS WAN CAPI Drivers as a Windows Help file on your Windows 98
desktop. This guide is only available in English.
26
IBM ISDN PC Card:User’s Guide
ISDNmst.fm Page 27 Wednesday, January 15, 2003 9:22 AM
6. Installing the device drivers in Windows Me
The device drivers for the IBM International ISDN PC Card are installed in two
steps:
1. Install the CAPI 2.0-compliant device drivers
2. Install the NDIS WAN CAPI device drivers
Installing the IBM International ISDN PC Card in Windows Me
To install the IBM International ISDN PC Card in Windows Me, proceed as
follows:
1. Turn off the computer, choose a PCMCIA slot and insert the IBM International
ISDN PC Card into this slot without the ISDN cable attached.
2. Turn the computer back on. The New Hardware Wizard opens and reports
that it has detected an ISDN-CARD.
3. Now insert the CD labeled IBM International ISDN PC Card Installation
Software into your computer CD-ROM drive.
4. Since Windows Me cannot find the proper device driver for the adapter
automatically, select the option Specify the location of the driver (Advanced)
in the Add New Hardware window. Then click Next.
5. In the next window, click to remove the check mark next to the option
Removable Media (Floppy, CD-ROM,...), then click Browse. In the Browse
for Folder window, select the CD-ROM drive and double-click the directory
WINME and then the DRV directory. Click Next to confirm your selection.
© Copyright IBM Corp. 2002
27
ISDNmst.fm Page 28 Wednesday, January 15, 2003 9:22 AM
6. Now click the Next button to start the device driver installation. Windows Me
copies a number of files to the hard disk. In the last Add New Hardware
Wizard window, click Finish.
7. The next window informs you that the New Hardware Wizard is ready to
install the device drivers in English. Select your language from the given list
and click Continue.
8. The IBM International ISDN PC Card Setup program sign-on window opens.
Click Continue.
9. The following window enables you to select the installation directory. The
default installation directory is C:\IBM_ISDN, but you can enter any other
directory desired in the window. After your entries are complete, click
Continue.
10. In the next window, select the appropriate D-channel protocol for your ISDN
line. For newer ISDN lines in Europe, select DSS1, the Euro-ISDN protocol.
NI-1 and 5ESS are D-channel protocols used in the United States of America.
1TR6 is the older national D-channel protocol for Germany.
28
IBM ISDN PC Card:User’s Guide
ISDNmst.fm Page 29 Wednesday, January 15, 2003 9:22 AM
Although some older ISDN lines in Germany still use the D-channel protocol
1TR6, DSS1 is generally preferable. The 1TR6 protocol is no longer very
common and might be excluded from future device driver releases for this
adapter.
11. After you have selected the appropriate D-channel protocol, click Continue.
12. The final window informs you which resources are used by the IBM
International ISDN PC Card. Click Continue to complete the installation, then
connect the ISDN cable.
Your IBM International ISDN PC Card is now ready to use with any CAPI 2.0compliant software.
NDIS WAN CAPI driver installation in Windows Me
If you have not yet installed the CAPI 2.0-compliant device drivers, please return
to the corresponding chapters and install them first.
To install the NDIS WAN CAPI Device Drivers in Windows Me, proceed as
follows:
1. Click Start -> Settings - > Control Panel, then double-click the Add New
Hardware icon.
2. In the Add New Hardware window, click Next twice. In the next window
you are asked if you want Windows to search for new hardware. Select the
option No, I want to select the hardware from a list, then click Next.
3. In the Hardware types window, select Network adapters and click Next.
6. Installing the device drivers in Windows Me
29
ISDNmst.fm Page 30 Wednesday, January 15, 2003 9:22 AM
4. In the Select Device window, click Have Disk, then in the Install From Disk
window, click Browse. Browse to the path WINME\NDIS. Click OK. In the
next window, click OK again to install the NDIS WAN CAPI Device Driver.
5. In the Add New Hardware window, click Finish. Windows Me now starts the
ISDN Configuration. Click Next. Leave the Switch protocol selection at
Automatic and click Next again.
30
IBM ISDN PC Card:User’s Guide
ISDNmst.fm Page 31 Wednesday, January 15, 2003 9:22 AM
6. The next window prompts you to enter two phone numbers and the
corresponding SPIDs. The SPID entries are applicable only in the United
States of America and Canada. However, even if you are in the USA or
Canada, SPID entries are not mandatory. Leave these fields blank and click
Next.
7. In the last window, click Finish.
8. Restart your computer when prompted to do so.
The NDIS WAN CAPI Device Drivers are now installed. You will also find the
guide for the NDIS WAN CAPI Device Drivers as a Windows Help file on the
desktop of your Windows Me computer. This guide is available only in English.
6. Installing the device drivers in Windows Me
31
ISDNmst.fm Page 32 Wednesday, January 15, 2003 9:22 AM
32
IBM ISDN PC Card:User’s Guide
ISDNmst.fm Page 33 Wednesday, January 15, 2003 9:22 AM
7. Installing the device drivers in Windows NT 4.0
Throughout this chapter it is assumed that you are logged on to the Windows NT
4.0 system as a local Administrator. If you are not logged on as a local
Administrator, you might not be able to perform all the steps outlined in this
chapter.
The IBM International ISDN PC Card works under Windows NT 4.0 with
CardWizard 5.10 or higher installed.
The device drivers for the IBM International ISDN PC Card are installed in two
steps:
1. Install the CAPI 2.0-compliant device drivers
2. Install the NDIS WAN CAPI device drivers
The following section provides detailed prerequisites for the device driver
installation.
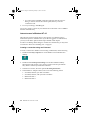
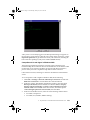
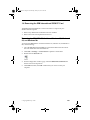
Before you begin
Before you begin installing the IBM International ISDN PC Card in Windows NT,
you must have Service Pack 3 or higher installed. To check which Service Pack
version is installed on your Windows NT 4.0 operating system, proceed as
follows:
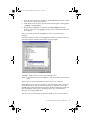
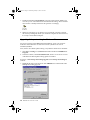
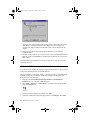
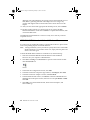
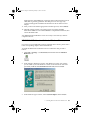
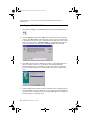
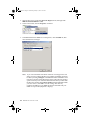
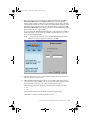
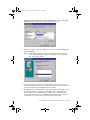
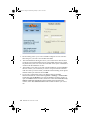
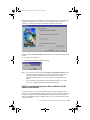
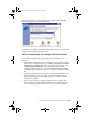
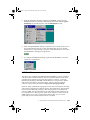
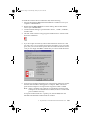
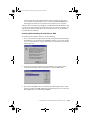
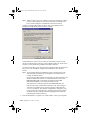
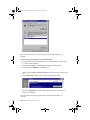
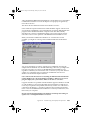
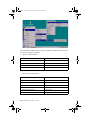
1. Click through the menus Start-> Programs -> Command Prompt. In the
command prompt window, type WINVER and press Return. A window
opens as illustrated below. In the illustration, the About Windows NT
window shows that Service Pack 3 is installed.
2. Click OK to close this window, then type
EXIT
and press Return to close the command prompt window.
© Copyright IBM Corp. 2002
33
ISDNmst.fm Page 34 Wednesday, January 15, 2003 9:22 AM
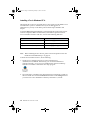
Checking the PCMCIA support software for Windows NT
4.0
Some notebook computer manufacturers install PCMCIA support software, such
as SystemSoft's CardWizard as part of the Windows NT 4.0 package. IBM includes
this program with its ThinkPad notebook computer series. This section briefly
describes how to find out what version of CardWizard is installed, and how to
remove it from the system if necessary.
Note:
The IBM International ISDN PC Card works without SystemSoft's
CardWizard installed, or with CardWizard 5.10 or higher.
1. Start SystemSoft's CardWizard by clicking Start -> Programs -> CardWizard
for Windows NT.
2. Once SystemSoft's CardWizard for Windows NT has started, click Help ->
About CardWizard. This opens a window indicating the version in use. If the
version number is lower than 5.10, use the following steps to remove it.
Note:
You can download a trial version of CardWizard 5.20 from IBM's PCD
support Web page for the IBM International ISDN PC Card or use the
trial software supplied on the IBM International ISDN PC Card
Installation Software CD in the \EXTRAS\CW52NT directory. For
additional information, please refer to “Installing CardWizard 5.20 for
Windows NT 4.0 trial version” on page 157.
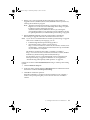
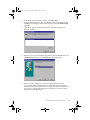
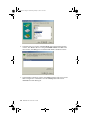
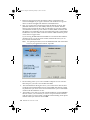
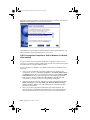
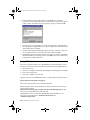
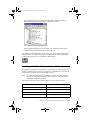
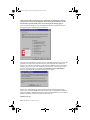
3. In order to complete a successful removal of SystemSoft’s Card Wizard, you
must shut down the computer and remove any PCMCIA card plugged
plugged into any PCMCIA slot in your computer. To remove the current
installation of SystemSoft’s Card Wizard, open the Control Panel by clicking
Setting -> Control Panel in the Start menu, then double-click the
Add/Remove Programs icon.
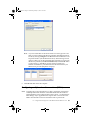
4. The first panel of the Add/Remove Programs Properties window contains an
entry for CardWizard for Windows NT. Select this entry and then click the
Add/Remove... button.
34
IBM ISDN PC Card:User’s Guide
ISDNmst.fm Page 35 Wednesday, January 15, 2003 9:22 AM
5. In the Confirm File Deletion window, confirm that you want to remove
CardWizard for Windows NT by clicking the Yes button. In the next window,
confirm that you want to remove all files.
6. After the removal of CardWizard has been completed, you are prompted to
restart your system. Click No, since restarting your system at this point might
cause problems. Instead, run the current Service Pack installation for your
Windows NT 4.0 computer.
After the Service Pack has been installed again, your computer will restart. After
the system has restarted, you can install a newer version of SystemSoft's
CardWizard for Windows NT or install the device drivers for the IBM
International ISDN PC Card.
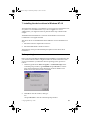
Installing the IBM International ISDN PC Card in Windows NT
4.0
To install the IBM International ISDN PC Card in Windows NT 4.0, proceed as
follows:
1. Turn off the computer, select a PCMCIA slot and insert the IBM International
ISDN PC Card into this slot without the ISDN cable attached.
2. Turn your computer back on and insert the CD labeled IBM International
ISDN PC Card Drivers into your computer CD-ROM drive.
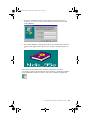
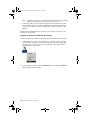
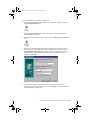
3. If you have SystemSoft's CardWizard 5.10 or higher installed on your
notebook computer, the following message might display. Click Exit to close
this window and continue the installation as described below.
7. Installing the device drivers in Windows NT 4.0
35
ISDNmst.fm Page 36 Wednesday, January 15, 2003 9:22 AM
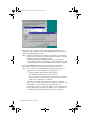
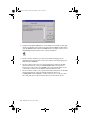
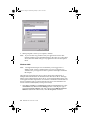
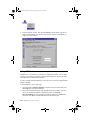
4. Double-click the My Computer icon on the Windows NT desktop, then rightclick the CD-ROM icon and select in the menu the item Open. Double-click to
open the WINNT folder and then the DRV folder. This folder contains an icon
called Setup. Double-click this icon to start the installation.
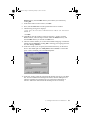
5. The first window enables you to select the installation language. If the
highlighted language selected is not the one desired, select the language you
prefer and click Continue.
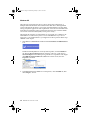
6. The next window welcomes you to the installation procedure for the IBM
International ISDN PC Card. Click View Readme now to read the latest
information on the product, or Continue to proceed with installation of the
CAPI 2.0 device drivers for the IBM International ISDN PC Card.
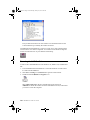
7. The next window enables you to specify the installation directory for the IBM
International ISDN PC Card. The default installation directory is
C:\IBM_ISDN. Click Continue to confirm this directory, or enter any other
drive and path name as the installation directory for the device drivers.
36
IBM ISDN PC Card:User’s Guide
ISDNmst.fm Page 37 Wednesday, January 15, 2003 9:22 AM
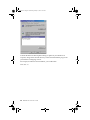
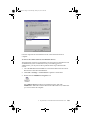
8. The next panel shows you what resources are available on your computer and
how many adapters you have installed. Since Windows NT 4.0 is not a plugand-play operating system, assigning free resources can be complicated.
9. In the next window, select the appropriate D-channel protocol for your ISDN
line. For newer ISDN lines in Europe, select DSS1, the Euro-ISDN D-channel
protocol. NI-1 and 5ESS are D-channel protocols used in the United States of
America. 1TR6 is the older national D-channel protocol for Germany.
7. Installing the device drivers in Windows NT 4.0
37
ISDNmst.fm Page 38 Wednesday, January 15, 2003 9:22 AM
Although some older ISDN lines in Germany still use the D-channel protocol
1TR6, DSS1 is generally preferable. The 1TR6 protocol is no longer very
common and might be removed from future device driver releases.
10. After you have selected appropriate D-channel protocol, click Continue .
11. The last window displays the selected adapter settings. Click Continue to
complete the installation.
12. After the installation has been completed, confirm that you want to restart the
computer, then connect the ISDN cable.
If you have SystemSoft's CardWizard for Windows NT 5.10 or higher installed,
the software notifies you of the card insertion after the computer has restarted.
With version 5.10 and some early version 5.20 releases of SystemSoft's
CardWizard, the following warning message displays.
38
IBM ISDN PC Card:User’s Guide
ISDNmst.fm Page 39 Wednesday, January 15, 2003 9:22 AM
In this case, click Exit and select the entry for the adapter marked with a red X.
Select the menu command Actions / Stop. Remove the adapter from the PCMCIA
slot. Open the \EXTRAS/CW52NT\RegUpd directory on the IBM International
ISDN Pc Card Installation Software CD and select the IBMISDN.REG file.
Double-click the file and confirm that you want to update the Windows NT
Registry by clicking OK when prompted. Now reinsert the adapter. CardWizard
should display a message letting you know the ISDN PC card is successfully
inserted.
The evaluation version of SystemSoft's CardWizard 5.20 provided on the IBM
International ISDN PC Card support Web page does not exhibit this problem.
Your IBM International ISDN PC Card is now ready to use with any CAPI 2.0compliant application software.
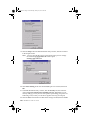
Checking and installing Remote Access Service
To install the NDIS WAN CAPI device drivers, you must have Remote Access
Service installed. To check whether Remote Access Service (RAS) is installed on
your notebook computer, proceed as follows:
1. Double-click the My Computer icon on the Windows NT 4.0 desktop, then
double-click Dial-Up Networking.
2. If the phone book displays, then RAS is properly installed on your computer
and you can continue with the section Installing the NDIS WAN CAPI
7. Installing the device drivers in Windows NT 4.0
39
ISDNmst.fm Page 40 Wednesday, January 15, 2003 9:22 AM
Drivers. If the phone book does not display, perform the following steps to
install RAS on your computer.
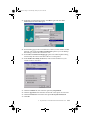
Installing remote access
Before you install Remote Access Service, check the documentation for your
notebook computer to see whether your system has an integrated analog modem.
If so, install the modem device driver according to the instructions in the
documentation, or contact the notebook computer manufacturer's technical
support.
Also make sure that you have at least one physical COM port available in your
Windows NT 4.0 system. Double-click the Ports applet in the Control Panel to
obtain this information.
1. Double-click the My Computer icon on the Windows NT 4.0 desktop, then
double-click Dial-Up Networking. If a window opens informing you that
Dial-Up Networking is not installed on your computer, then click Install.
2. The Files Needed window prompts you for the source directory of your
Windows NT 4.0 Setup files. Type the correct path in the Copy files from
field, then click OK. Windows NT installs the necessary files.
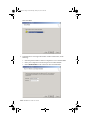
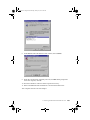
3. After these files have been installed, the RAS setup searches for a RAS-capable
device. Click OK to start the modem installer.
4. When the modem installer has started, check the option Don't detect my
modem; I will select it from a list, and click Next. If you have an integrated
analog modem, then follow the installation instructions provided by your
computer manufacturer. Otherwise, select (Standard Modem Types) in the
list of manufacturers, then Dial-Up Networking Serial Cable between 2 PCs,
and click Next.
40
IBM ISDN PC Card:User’s Guide
ISDNmst.fm Page 41 Wednesday, January 15, 2003 9:22 AM
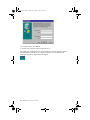
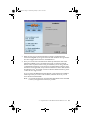
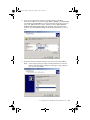
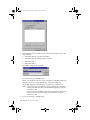
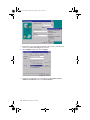
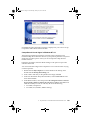
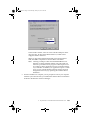
5. In the next window you must select a COM port to be assigned to the modem.
Select a port and click Next. You are then asked to type your location
information: the country you are in, the area code, and other details. Fill in the
text fields and click Next. In the last window, click Finish.
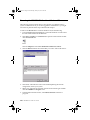
6. The Dial-Up Networking installation now displays the Add RAS Device
window. In the example illustrated below, the RAS device is the Dial-Up
Networking Serial Cable between 2 PCs on COM 2. Click OK.
7. The selected device is now displayed in the Setup window. Click Continue.
Remote Access Setup informs you that no networking protocols have been
installed. Click OK. In the Network Configuration window, select the
network protocols you want to use. The TCP/IP protocol is usually sufficient.
Click OK.
8. Now click Continue again. When you are prompted to restart your computer,
click Do Not Restart. Instead, reinstall the current Service Pack before
restarting. This will help you to avoid problems afterwards.
7. Installing the device drivers in Windows NT 4.0
41
ISDNmst.fm Page 42 Wednesday, January 15, 2003 9:22 AM
After restarting, your system is ready for the NDIS WAN device driver
installation.
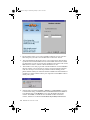
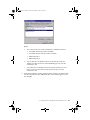
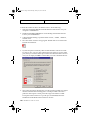
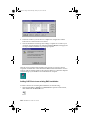
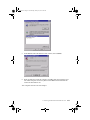
Installing the NDIS WAN CAPI drivers
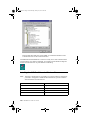
1. Click Start -> Settings -> Control Panel and double-click the Network icon.
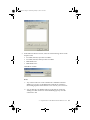
2. Click the Adapters tab, then the Add button. In the Select Network Adapter
window, click Have Disk. In the Insert Disk window, type the complete path
to the NDIS device driver location. The NDIS WAN CAPI Drivers are located
on the CD in the directory \WINNT\NDIS. If your CD-ROM drive has the
letter E, for example, enter the path E:\WINNT\NDIS. Then click OK.
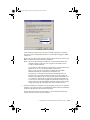
3. Click OK again in the Select OEM Option window. In the NDIS WAN CAPI
Driver Properties window you can enter the desired MSNs (Multiple
Subscriber Numbers) of your ISDN line for each B-channel. You might also
leave these fields blank for now and click OK. You can add an MSN setting
later.
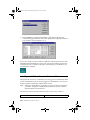
4. After the NDIS WAN CAPI Device Driver installation has completed and you
have clicked OK, Setup starts the Remote Access Setup utility. Click Add and
install the ISDN1 - CAPIWAN device by clicking OK. Repeat this step again to
install the ISDN2 - CAPIWAN device.
42
IBM ISDN PC Card:User’s Guide
ISDNmst.fm Page 43 Wednesday, January 15, 2003 9:22 AM
5. If you have installed the Dial-Up Networking Serial Cable between two
computers, you can now remove it from RAS by selecting it in the list and
clicking Remove.
6. Now click Continue to complete the installation. Click Close in the Network
Control Panel applet window. Restart your computer when prompted to do
so.
The installation of the NDIS WAN CAPI Device Drivers has now been
successfully completed. On the Windows NT 4.0 Desktop you will find a Help file
for the NDIS WAN CAPI Device Drivers. This file is available in English only.
7. Installing the device drivers in Windows NT 4.0
43
ISDNmst.fm Page 44 Wednesday, January 15, 2003 9:22 AM
44
IBM ISDN PC Card:User’s Guide
ISDNmst.fm Page 45 Wednesday, January 15, 2003 9:22 AM
8. Installing the device drivers in Windows 2000
The IBM International ISDN PC Card is fully compatible with Windows 2000 and
is listed on the Windows 2000 HCL.
Note:
Windows 2000 is the direct successor to Windows NT 4.0 and behaves
similarly to its predecessor. However, Windows 2000 is a plug-and-play
operating system.
Throughout this chapter it is assumed that you are logged on to a Windows 2000
system as a local Administrator. If you are not logged on as a local Administrator,
you might not be able to perform all the steps outlined in this chapter.
Note that the device drivers provided on the CD no longer support the German
ISDN D-channel protocol 1TR6.
The device drivers for the IBM International ISDN PC Card are installed in one
step.
No separate installation is required for the NDIS WAN CAPI Device Driver
because it is installed automatically with the CAPI 2.0-compliant device driver.
Installing the device drivers in Windows 2000
To install the device drivers in Windows 2000 , proceed as follows:
1. Turn off the computer, choose a PCMCIA slot and insert the IBM International
ISDN PC Card into this slot without the ISDN cable attached.
2. Turn the computer back on. The Found New Hardware window opens and
reports that an ISDN CARD was detected.
3. Now insert the CD labeled IBM International ISDN PC Card Drivers into
your computer CD-ROM drive.
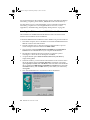
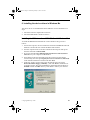
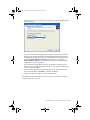
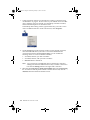
4. The Found New Hardware Wizard now opens. Click the Next button to start
the device driver installation. The following window informs you that the
© Copyright IBM Corp. 2002
45
ISDNmst.fm Page 46 Wednesday, January 15, 2003 9:22 AM
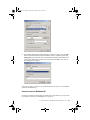
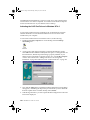
Wizard will complete the installation for this device. Make sure that the
option Search for a suitable driver for my device is activated, then click Next.
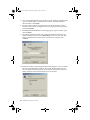
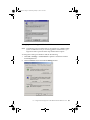
5. The next window helps you to locate the device drivers for the new adapter.
By default Windows 2000 searches the hard disk drive and CD-ROM drives.
This might result in Windows 2000 finding the wrong device driver file on the
CD. To avoid this situation, deactivate the options Floppy disk drives and
CD-ROM drives, and activate the option Specify a location. Click the Next
button.
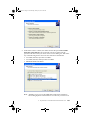
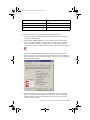
6. Windows 2000 displays a smaller window for the the device driver source.
Click the Browse button, then double-click the WIN2000 and afterwards the
DRVfolder on the CD. Select the file fpcm and click Open.
46
IBM ISDN PC Card:User’s Guide
ISDNmst.fm Page 47 Wednesday, January 15, 2003 9:22 AM
7. This returns you to the previous window, which now displays the correct
source drive and directory. Click OK.
8.
The Found New Hardware Wizard informs you that appropriate device
drivers have been found. Click the Next button. Windows 2000 begins the
device driver installation.
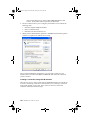
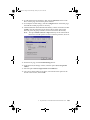
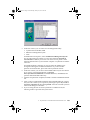
9. When the ISDN - IBM International ISDN PC Card Setup window opens with
the subtitle ISDN Switch Type or D-channel Protocol, select the appropriate
protocol for your ISDN line. For newer ISDN lines in Europe, select European
ISDN (DSS1), the Euro-ISDN D-channel protocol. NI-1 and 5ESS are Dchannel protocols used in the United States of America.
10. After you have selected the appropriate D-channel protocol, click the Next
button. If you selected Euro-ISDN, you can now enter MSNs (Multiple
Subscriber Numbers). These numbers are used to identify individual ISDN
terminal devices such as telephones and computers. when more than one
device is connected to your ISDN line. (Due to an abbreviation error in
Windows 2000, the term "Multiple Subscriber Numbers" might have been
changed to "Multisubscriber Numbers". Please make your entries in the
relevant fields despite this incorrect designation.)
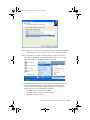
11. The Found New Hardware Wizard informs you when the installation has
been completed. Then click Finish to conclude the installation.
12. After the installation completes, connect the ISDN cable.
8. Installing the device drivers in Windows 2000
47
ISDNmst.fm Page 48 Wednesday, January 15, 2003 9:22 AM
48
IBM ISDN PC Card:User’s Guide
ISDNmst.fm Page 49 Wednesday, January 15, 2003 9:22 AM
9. Installing the device drivers in Windows XP
Windows XP is the direct successor to Windows 2000 and behaves similarly to its
predecessor.
Throughout this chapter it is assumed that you are logged on to a Windows XP
Home Edition or Professional system as a local Administrator. If you are not
logged on as a local Administrator, you might not be able to perform all the steps
outlined in this chapter.
Note that the device drivers provided on the CD no longer support the German
ISDN D-channel protocol 1TR6.
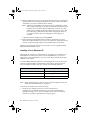
The device drivers for the IBM International ISDN PC Card are installed in one
step: install the CAPI 2.0-compliant device drivers.
No separate installation is required for the NDIS WAN CAPI Device Driver: it is
installed automatically with the CAPI 2.0-compliant device driver.
Installing the device drivers in Windows XP
To install the device drivers in Windows XP Home Edition and Professional,
proceed as follows:
1. Turn off the computer, select a PCMCIA slot and insert the IBM International
ISDN PC Card into this slot without the ISDN cable attached.
2. Turn the computer back on. The Found New Hardware window opens and
reports that an ISDN CARD was detected.
3. Now insert the CD labeled IBM International ISDN PC Card Installation
Software into your computer CD-ROM drive. Then select the option Install
from a list or specific location (Advanced) and click Next.
© Copyright IBM Corp. 2002
49
ISDNmst.fm Page 50 Wednesday, January 15, 2003 9:22 AM
4. In the next window, select the option Search for the best driver in these
locations and make sure that only the checkbox Include this location in the
search is selected. Then click Browse.
5. In the Browse For Folder window, select the CD-ROM drive and then doubleclick the WINXP and then the DRV directory on the CD-ROM, which contains
the Windows XP device drivers. Now click OK to close the Browse For Folder
window, then click Next.
6. Windows XP now copies all the necessary device driver files. After Windows
XP has finished copying the files, the D-channel switch protocol selection
window opens. Select the appropriate protocol for your ISDN line. For newer
ISDN lines in Europe, select European ISDN (DSS1), the Euro-ISDN D-
50
IBM ISDN PC Card:User’s Guide
ISDNmst.fm Page 51 Wednesday, January 15, 2003 9:22 AM
channel protocol. NI-1 and 5ESS are D-channel protocols used in the United
States of America.
7. After you have selected the appropriate D-channel protocol, click the Next
button. If you selected Euro-ISDN, the MSN (Multiple Subscriber Number)
configuration window opens. (Due to an abbreviation error in Windows XP,
the term Multiple Subscriber Numbers might have been changed to
Multisubscriber Numbers. Please make your entries in the relevant fields
despite this incorrect designation.)
If you selected one of the North American D-channel switching protocols
(5ESS or NI-1), the SPID configuration window opens. Type the numbers for
your line and click on Next.
8. The Found New Hardware Wizard informs you when the installation has
been completed. Then click Finish to conclude installation.
9. Once the installation completes, connect the ISDN cable.
Your IBM International ISDN PC Card is now ready to use with any CAPI 2.0compliant application software.
9. Installing the device drivers in Windows XP
51
ISDNmst.fm Page 52 Wednesday, January 15, 2003 9:22 AM
52
IBM ISDN PC Card:User’s Guide
ISDNmst.fm Page 53 Wednesday, January 15, 2003 9:22 AM
10. Configuration and diagnostics of the IBM
International ISDN PC Card
Note:
No diagnostics tool is available for Windows 2000 and Windows XP.
This chapter briefly describes how to change the D-channel protocol (also called
the switch type), how to change MSNs, and how to diagnose problems with the
adapter.
When you travel to another country outside Europe, it might be necessary to
change the adapter D-channel protocol, also known as the switch type. The IBM
International ISDN PC Card supports the following D-channel protocols:
•
Euro-ISDN (DSS1)
•
NI-1
•
5ESS
Euro-ISDN is used all over Europe, Australia and New Zealand. NI-1 and 5ESS
are North American switch types.
Note:
In the United States of America, Canada, Australia, or New Zealand, the
IBM International ISDN PC Card cannot be connected directly to the ISDN
line. To use this adapter in these countries, an NT1 adapter is required to
convert the U interface provided in these countries to the S/T interface
used in Europe.
Make sure that you purchase an NT1 adapter with the capability to convert the U
interface to a S/T interface.
Changing the switch type in Windows 95, Windows 98, Windows Me,
and Windows NT 4.0
To change the switch type in Windows 95, Windows 98, Windows Me, and
Windows NT 4.0, do the following:
Note:
If you are using Windows NT 4.0, the following section assumes that you
are logged on to a Windows NT 4.0 system as Administrator. If you are not
logged on as Administrator, you might not be able to perform all the steps
outlined in this chapter.
1. Click Start -> Programs -> IBM ISDN PC Card and then IBM ISDN PC Card
Setup to start the configuration tool.
© Copyright IBM Corp. 2002
53
ISDNmst.fm Page 54 Wednesday, January 15, 2003 9:22 AM
If you are using Windows NT 4.0, the first window enables you to change the
system resources used by the adapter (interrupt and I/O address). Change the
resources or simply click Continue. The next window enables you to select
the switch type.
2. Select the desired switch type and then click Continue. The next window
informs you about the new adapter configuration.
3. Click Continue again. To activate the selected switch type you must restart
your computer.
Note:
54
If you activated either of the North American switch types NI-1 and
5ESS, two windows open prompting you to enter two directory
numbers (DN) and the corresponding service profile identifiers
(SPID). This information must be obtained from your ISDN service
provider (telephone company).
IBM ISDN PC Card:User’s Guide
ISDNmst.fm Page 55 Wednesday, January 15, 2003 9:22 AM
Changing the switch type in Windows 2000
Note:
The following section assumes that you are logged on to a Windows 2000
system as Administrator. If you are not logged on as Administrator, you
might not be able to perform all the steps outlined in this chapter.
To change the switch type in Windows 2000, do the following:
1. Click Start -> Settings -> Control Panel to open the Control Panel. Doubleclick the System icon.
2. Click the Hardware tab, then the Device Manager button.
10. Configuration and diagnostics of the IBM International ISDN PC Card
55
ISDNmst.fm Page 56 Wednesday, January 15, 2003 9:22 AM
3. Click the plus sign to expand the Network adapters node, then right-click
IBM International ISDN PC Card.
4. In the context menu, click the Properties command.
5. In the IBM International ISDN PC Card Properties, click the ISDN tab, then
select the desired switch type.
Note:
56
If you activated either of the North American switch types NI-1 and
5ESS, you must configure the directory numbers and SPIDs separately.
Do this by clicking Configure in the IBM International ISDN PC Card
Properties window (see the illustration above). The following window
opens in which you can select the ISDN line and where you enter both
the directory number (in the Phone number field) and the SPID. When
you have done so, click OK to save the settings. The directory
numbers and SPIDs for your ISDN line must be obtained from your
ISDN service provider (telephone company).
IBM ISDN PC Card:User’s Guide
ISDNmst.fm Page 57 Wednesday, January 15, 2003 9:22 AM
6. Click OK and restart the computer.
Changing the switch type in Windows XP
Throughout this chapter it is assumed that you are logged on to a Windows XP
Home Edition or Professional system as a local Administrator. If you are not
logged on as a local Administrator, you may not be able to perform all the steps
outlined in this chapter.
To change the switch type in Windows XP Home Edition and Professional, do the
following:
1. Click Start -> Control Panel to open the Control Panel.
2. Double-click the icon labeled Performance and Maintenance
.
In the window that opens, double-click the System icon to open the System
Properties. Click the Hardware tab, then the Device Manager button.
10. Configuration and diagnostics of the IBM International ISDN PC Card
57
ISDNmst.fm Page 58 Wednesday, January 15, 2003 9:22 AM
3. Click the plus sign to expand the Network adapters node, then right-click
IBM International ISDN PC Card.
4. In the context menu, click the Properties command.
5. In the IBM International ISDN PC Card Properties, click the ISDN tab, then
select the desired switch type.
58
IBM ISDN PC Card:User’s Guide
ISDNmst.fm Page 59 Wednesday, January 15, 2003 9:22 AM
Note:
If you activated either of the North American switch types NI-1 and
5ESS, you must configure the directory numbers and SPIDs separately.
Do this by clicking Configure in the IBM International ISDN PC Card
Properties window (see the illustration above). The following window
opens in which you can select the ISDN line and where you type both
the directory number (in the Phone number field) and the SPID. When
you have done so, click OK to save the settings. The directory
numbers and SPIDs for your ISDN line must be obtained from your
ISDN service provider (telephone company).
6. Click OK and then restart the computer.
Configuring multiple subscriber numbers (MSNs)
Note:
The following section describes how to add or change the configuration
of Multiple Subscriber Numbers in the NDIS WAN CAPI device driver.
Although MSNs can be configured in the device driver, you should enter
MSN settings only in applications that require them. You must have the
NDIS CAPI WAN device drivers installed in order to perform the
10. Configuration and diagnostics of the IBM International ISDN PC Card
59
ISDNmst.fm Page 60 Wednesday, January 15, 2003 9:22 AM
following steps. Note that MSNs are a feature of the Euro-ISDN (DSS1)
switch protocol only!
Configuring MSNs in Windows 95, Windows 98, and Windows Me
To configure MSNs in Windows 95, Windows 98, and Windows Me, do the
following:
Note:
If you are using Windows 95, it is assumed that you have installed the
Microsoft Dial-Up Networking 1.3 or 1.4 update on your computer. If not,
please refer to 4, “Installing the device drivers in Windows 95” on page 7.
1. Click Start -> Programs -> Accessories ->Communications and start the
ISDN Configuration Wizard .
2. In the first ISDN Configuration Wizard window, click Next. In the next
section, leave the Switch protocol set to Automatic by clicking Next again. In
the next window, enter an MSN in either or both of the Phone number fields.
When you have done so, click Next.
3. In the last window, click Finish. This completes the MSN configuration.
Note:
Since the Windows operating systems are a United States software
product, the ISDN Configuration Wizard is also tailored to the United
States market. When entering an MSN in the Wizard, you can ignore the
SPID fields, which are used only in North America. If you encounter any
problems with your application software after entering an MSN, remove
the MSN settings in the same way as described above, then enter MSN
settings in any application software that requires them!
Windows NT
Note:
60
Throughout this chapter it is assumed that you are logged on to a
Windows NT 4.0 system as Administrator. If you are not logged on as
Administrator, you might not be able to perform all the steps outlined in
this chapter.
IBM ISDN PC Card:User’s Guide
ISDNmst.fm Page 61 Wednesday, January 15, 2003 9:22 AM
The following section describes how to add or change the configuration of
Multiple Subscriber Numbers in the NDIS WAN CAPI device driver. Although
MSNs can be configured in the device driver, you should enter MSN settings only
in applications that require them. You must have the NDIS CAPI WAN device
drivers installed in order to perform the following steps. Note that MSNs are a
feature of the Euro-ISDN (DSS1) switch protocol only!
1. Click Start -> Settings -> Control Panel. Double-click the Network icon.
2. In the Network Settings window, click the Adapters tab, select the NDIS
WAN CAPI Driver, and then click Properties.
3. In the Properties window, type the MSNs for each line and click OK, then
Close.
10. Configuration and diagnostics of the IBM International ISDN PC Card
61
ISDNmst.fm Page 62 Wednesday, January 15, 2003 9:22 AM
4. When prompted to restart your computer, click Yes.
Note:
If you encounter any problems with your application software after
entering an MSN, remove the MSN settings in the same way as described
above, then enter MSN settings in any application software that requires
them!
Windows 2000
Note:
Throughout this chapter it is assumed that you are logged on to a
Windows 2000 system as Administrator. If you are not logged on as
Administrator, you might not be able to perform all the steps outlined in
this chapter.
The following section describes how to add or change the configuration of
Multiple Subscriber Numbers in the NDIS WAN CAPI device driver. Although
MSNs can be configured in the device driver, you should enter MSN settings only
in the applications that require them. You must have the NDIS CAPI WAN device
drivers installed in order to perform the following steps. Note that MSNs are a
feature of the Euro-ISDN (DSS1) switch protocol only!
1. Click Start -> Settings -> Control Panel. Double-click the System icon. Click
the Hardware tab, then the Device Manager button. Click the plus sign to
expand the Network adapters node, then right-click the IBM International
ISDN PC Card. In the context menu, select the Properties command.
62
IBM ISDN PC Card:User’s Guide
ISDNmst.fm Page 63 Wednesday, January 15, 2003 9:22 AM
2. In the IBM International ISDN PC Card Properties box, click the ISDN tab,
and then the Configure button.
3. In the window that opens, enter an MSN in the field above the Add button.
Click the Add button. You can enter more than two MSNs in this window. You
should not add more than eight MSNs, however, since the number of MSNs is
limited in Euro ISDN.
4. When you have finished, click OK.
Note:
If you encounter any problems with your application software after
entering an MSN, remove the MSN settings by selecting each MSN
individually in the Multisubscriber number list and clicking Remove.
Then enter MSN settings in any application software that requires them!
10. Configuration and diagnostics of the IBM International ISDN PC Card
63
ISDNmst.fm Page 64 Wednesday, January 15, 2003 9:22 AM
Windows XP
The following section describes how to add or change the configuration of
Multiple Subscriber Numbers in the NDIS WAN CAPI driver. Although MSNs
can be configured in the driver, it is strongly recommended that you enter MSN
settings only in the applications that require them. You must have the NDIS CAPI
WAN drivers installed in order to perform the following steps. Note that MSNs
are a feature of the Euro ISDN (DSS1) switch protocol only.
Throughout this chapter it is assumed that you are logged on to a Windows XP
Home Edition or Professional system as a local Administrator. If you are not
logged on as a local Administrator, you might not be able to perform all the steps
outlined in this chapter.
1. Click Start -> Control Panel. Double-click the Performance and Maintenance
icon.
Double-click the System icon. In the System Properties, click the Hardware
tab, then the Device Manager button. In the list of devices, scroll down to
Network adapters and click the plus sign beside it to expand the node. Rightclick IBM International ISDN PC Card. In the context menu, select the
Properties command.
2. In the IBM International ISDN PC Card Properties, click the ISDN tab, then
the Configure... button.
64
IBM ISDN PC Card:User’s Guide
ISDNmst.fm Page 65 Wednesday, January 15, 2003 9:22 AM
3. In the window that opens, type an MSN in the field above the Add button.
Click the Add button. You can type more than two MSNs in this window. You
should not add more than eight MSNs, however, since the number of MSNs is
limited in Euro ISDN.
4. When you have finished, click OK.
If you encounter any problems with your application software after entering an
MSN, remove the MSN settings by selecting each MSN individually in the
Multisubscriber number list and clicking Remove. Then enter MSN settings in
any application software that requires them!
Running the diagnostics in Windows 95, Windows 98,
Windows Me, and Windows NT
Note:
If you are using Windows NT 4.0, the following section assumes that you
are logged on to a Windows NT 4.0 system as Administrator. If you are not
logged on as Administrator, you might not be able to perform all the steps
outlined in this chapter.
10. Configuration and diagnostics of the IBM International ISDN PC Card
65
ISDNmst.fm Page 66 Wednesday, January 15, 2003 9:22 AM
Note:
There is no diagnostics tool available for Windows 2000 Professional or
Windows XP!
To run the diagnostics in Windows 95, Windows 98, Windows NT, or Windows
Me, perform the following steps:
1. Click Start -> Programs -> ISDN PC Card, then click ISDN PC Card Test. If
you are using Windows 95, Windows 98, or Windows Me, a message informs
you that CAPI will no longer be available after testing until you restart your
computer. This is not the case in Windows NT 4.0, since services can
automatically be restarted without restarting the system.
2. Click Yes perform the diagnostic tests.
3. The diagnostics program then reports that the tests were completed. Click OK
again.
4. Click Exit to close the diagnostics program.
Windows 95, Windows 98, and Windows Me users must complete the
following steps in order to restart the IBM International ISDN PC Card's CAPI
2.0 device driver.
5. A message informs you that CAPI is no longer available. Click OK.
6. To reactivate CAPI, confirm that you want to restart your computer by
clicking Yes.
66
IBM ISDN PC Card:User’s Guide
ISDNmst.fm Page 67 Wednesday, January 15, 2003 9:22 AM
11. Implementations of the IBM International ISDN PC
Card
This chapter contains instructions for using the IBM International ISDN PC Card
with certain software products.
This chapter only outlines briefly how to use certain software products together
with the IBM International ISDN PC Card. It cannot cover all possible situations.
If you encounter problems of any kind, you should also consult the software
product's manual.
You may notice that some of the screen shots in this chapter do not exactly match
the windows displayed on your screen. This may be due to minor differences
between Windows 95 and Windows 98, for example. The screen shots included
here are only intended to illustrate the basic principles of the setup procedures.
This chapter is provided for your convenience only. It provides some examples of
how to use the IBM International ISDN PC Card with certain software. IBM will
not provide any assistance for this chapter, nor will IBM accept any responsibility
for damages or losses of any kind related to the use of this chapter.
If not otherwise stated, the examples cover all versions of the Windows operating
system: Windows 95, Windows 98, Windows Me, Windows NT 4.0 Workstation,
Windows 2000, and Windows XP.
Installing cFos
To use the IBM International ISDN PC Card with application software that is not
CAPI 2.0-compliant, IBM recommends that you download, purchase and use
cFos. For further assistance with cFos, please see one of the following web pages:
URL
Page Content
http://www.cfos.com
cFos main entry page
http://www.cfos.com/index2.html
cFos home page in German
http://www.cfos.com/index2_e.html
cFos home page in English
Introduction: What is cFos?
If you have successfully installed the CAPI 2.0-compliant drivers for the IBM
International ISDN PC Card, your system is now equipped with the CAPI 2.0
interface. This means you can use CAPI 2.0-compliant ISDN communications
software directly, such as AVM's FRITZ!, Symantec's WinFax PRO 9.0, PC
© Copyright IBM Corp. 2002
67
ISDNmst.fm Page 68 Wednesday, January 15, 2003 9:22 AM
Anywhere 9.x, and many others. A list of CAPI 2.0-compliant software products
can be found in the World Wide Web at
http:www.capi.org/cgi/sinfo.pl
However, many programs are not CAPI 2.0-compliant, including AOL 5.0, the
CompuServe 4.0 dialer and other applications. By installing cFos you can equip
your computer with a set of drivers that simulate analog modems, but
communicate over the digital ISDN line. In other words, cFos installs a set of
virtual modems which allow you to use practically any software designed to
communicate with a modem.
In principle, cFos inserts an additional layer between the application you use and
the CAPI 2.0 interface. It interprets the modem communication program's AT
commands and converts them into CAPI 2.0-compliant API calls, thus allowing
software which was not designed for ISDN communication to use your ISDN line.
Note:
Using cFos does not guarantee that your non-CAPI compliant software
will work with the IBM International ISDN PC Card. If this is the case,
please consult the User’s Guide for your software or your software
support.
The CAPI 2.0 interface is not restricted to Europe – it works all over the world.
Prerequisites for the cFos installation and additional tips
Before you can install cFos, the device drivers for the IBM International ISDN PC
Card must be installed in your system. Please read the corresponding chapters in
this User's Guide to install the device drivers for the IBM International ISDN PC
Card.
Tips
1. The following installation sections contain instructions for installing cFos. In
the cFos Setup program, you may find that almost all COM ports have been
selected by default. When configuring these settings, observe the following:
68
•
Avoid selecting COM1 and COM2 if possible. Selecting these ports may
cause conflicts. The safest method is to select only COM ports above
COM4, unless your application program only supports COM1 to COM4.
If this is the case, try to use either COM4 (recommended) or COM3 (if you
have no alternative).
•
Activating all COM ports will consume a considerable amount of system
memory. Try to use cFos with only as many COM ports as you actually
need. No more than two or three COM ports are recommended.
•
Using cFos with all the available COM ports results in a very large status
window.
•
If you use both an analog modem and the IBM International ISDN PC
Card, and you have selected all COM ports in the cFos Setup–that is,
COM1 to COM9 are all configured for use by cFos–then your analog
modem may be assigned the next free COM port available, such as
COM10. It is strongly recommended that you install the analog modem
IBM ISDN PC Card:User’s Guide
ISDNmst.fm Page 69 Wednesday, January 15, 2003 9:22 AM
first and assign it a free COM port between COM1 and COM4. Then
install the IBM International ISDN PC Card, followed by cFos.
•
You may be able to assign two different cFos modem emulations the same
COM port–assigning both ”cFos ISDN, FAX via CAPI” and “cFos ISDN,
Internet, Sync PPP over HDLC” to COM5 for example–and then use the
two virtual modems in alternation.
This practice is not recommended, however, since it may cause problems in
cFos. If possible, avoid configurations with shared COM ports!
2. When using SystemSoft's CardWizard under Windows 95, the CardWizard
software may not be able to detect the IBM International ISDN PC Card
properly. Removing and reinserting the ISDN PC Card allows CardWizard to
detect it. However, this may result in cFos becoming unavailable. For this
reason it is therefore strongly recommended that you remove SystemSoft's
CardWizard from your system before installing the IBM International ISDN
PC Card.
3. During the installation you may enter an MSN, although this is not required.
However, if your ISDN line is a PBX extension, cFos may be unable to dial. In
this case, reconfigure cFos to use an MSN. This problem is due to a limitation
of some currently available ISDN PBX systems.
4. In all versions of Windows, the cFos installer also automatically installs the
modem emulations “cFos ISDN, Internet, Sync PPP over HDLC” and the
“cFos ISDN, Internet, add. Sync PPP over HDLC” by default. Select at least
two COM ports during the cFos installation.
5. You may find that some software applications install a set of drivers called the
CAPI Port Driver. The CAPI Port Driver is similar to cFos, but offers fewer
functions and features. This is not a problem: cFos and the CAPI Port Driver
can coexist on a Windows computer.
Installing cFos in Windows 95, Windows 98, and Windows Me
IBM recommends to download, buy, and use the latest cFos version or use the one
provided on the CD for the IBM International ISDN PC Card for use with nonCAPI 2.0 compliant software. For further assistance with cFos, see one of the
following Web sites:
URL
Page Content
http://www.cfos.com
cFos main entry page
http://www.cfos.com/index2.html
cFos home page in German
http://www.cfos.com/index2_e.html
cFos home page in English
11. Implementations of the IBM International ISDN PC Card
69
ISDNmst.fm Page 70 Wednesday, January 15, 2003 9:22 AM
Notes:
1. Before installing the cFos drivers please read“Prerequisites for the cFos
installation and additional tips” on page 68 .
2. If you plan to only use CompuServe 2000 on your system you may not need
to install cFos at all. For further information please see “Using CompuServe”
on page 104.
To install cFos on Windows 98, Windows 95, and Windows Me, do the following:
1. On the CD you will find version 4.14 of cFos in the directory
\EXTRAS\cFos\Win9X. Alternatively you can download the latest package
from http://www.cfos.com. Double click on the cfos-win9x-me-v414.exe icon
in order to launch the cFos setup program.
2. If you install cFos completely new the first dialog box will inform you that it is
about to install cFos. ClickInstall. Click Change if you want to have cFos
installed in a directory other than C:\cFos.
Note:
The license agreement is presented in both German and English.
3. Read now the program license information which is presented in both
German and English. If you agree to the terms and conditions of usage tick the
box to the left of I agree and click Next.
70
IBM ISDN PC Card:User’s Guide
ISDNmst.fm Page 71 Wednesday, January 15, 2003 9:22 AM
4. Next you can select the communication media. By default, the items DSL
(PPPoE broadband access) and ISDN (CAPI 2.0) are selected. The DSL
feature works anywhere in the world, provided that you are using a PPPoEcontrolled DSL modem. If you do not have an ADSL/ISDN connection, then
this feature is not applicable, and you must untick the box to the left of DSL
(PPPoE broadband access). For further assistance with this additional feature,
please contact the cFos support team.
If you are using the IBM International ISDN PC Card with the Euro-ISDN Dchannel protocol, you can also enter an MSN, if desired. However, you can
leave the relevant fields blank.
Note:
For optimal performance, leave the MSN field blank and set the
MSN to use in your application software, if possible.
5. The next dialog allows you to select available COM ports for use with cFos.
Select the ports you want to use.
6. The extended features dialog box allows you to install a basic firewall, time
synchronisation with the ISDN network, and an ISDN caller monitor. Untick
any feature that you do not want to have installed on the system.
The following parameters should be used during the installation of cFos:
•
-ki
•
-kr
The above information was obtained from the cFos support team.
Click Next to continue with the installation of cFos.
11. Implementations of the IBM International ISDN PC Card
71
ISDNmst.fm Page 72 Wednesday, January 15, 2003 9:22 AM
7. The installer is now ready to proceed with the installation. Click Install. In the
next window you can chose if you want to set up an internet connection with
cFos and if you want to block your ISDN card from dialling certain phone
numbers. Make your selection and click on OK.
8. If you want to add another analog over ISDN modem for the IBM
International ISDN PC Card click through Start -> Settings -> Control Panel
and double-click on the Modems icon. Once the Modems Properties window
is open click Add. In the next window, select that you do not want to install a
PCMCIA modem.
72
IBM ISDN PC Card:User’s Guide
ISDNmst.fm Page 73 Wednesday, January 15, 2003 9:22 AM
9. In the Install New Modem dialog box select Don't detect my modem; I will
select it from a list and click Next. In the Manufacturers window, select cFos
Software Bonn and the modem emulation you wish to use.
10. In the next window select the cFos COM port you wish to use.
Note:
Some software packages require a COM port between 1 and 4. Be
careful when selecting the emulated COM port!
Now click Next. If you have not provided Windows with any dialing
information, you may now get the Location Information window in which
you enter all relevant dialing details. Complete them accordingly and then
click Finishonce you are back in the Install New Modem window. In the
modem properties window, click Close if you have chosen all modem
emulations you want to use. If you have not, repeat the relvant sections of
steps 8 through 10 again and click Close when you are done.
You are now ready to use cFos together with the IBM International ISDN PC Card.
11. Implementations of the IBM International ISDN PC Card
73
ISDNmst.fm Page 74 Wednesday, January 15, 2003 9:22 AM
Installing cFos in Windows NT 4.
Throughout this section it is assumed that you are logged on to the Windows NT
4.0 Workstation system as Administrator. If you are not logged on as
Administrator, you may not be able to perform all the steps outlined in this
chapter.
To use the IBM International ISDN PC Card with application software that is not
CAPI 2.0-compliant, IBM recommends that you download, purchase and use
cFos. For further assistance with cFos, see one of the following Web sites:
URL
Page Content
http://www.cfos.com
cFos main entry page
http://www.cfos.com/index2.html
cFos home page in German
http://www.cfos.com/index2_e.html
cFos home page in English
Note:
Before installing the cFos drivers, please read “Prerequisites for the cFos
installation and additional tips” on page 68 .
To install cFos in WIndows NT 4.0, do the following:
1. On the CD you will find version 4.14 of cFos in the directory
\EXTRAS\cFos\NT4W2K. Alternatively you can download the latest
package from http://www.cfos.com. Double-click on the cfos-nt-2000-xpv414.exe icon in odert to launch the cFos setup program.
2. If you install cFos completely new the first dialog box will inform you that it is
about to install cFos. Click on the Install button. Click on the Change button if
you want to have cFos installed in a directory other than C:\cFosNT.
74
IBM ISDN PC Card:User’s Guide
ISDNmst.fm Page 75 Wednesday, January 15, 2003 9:22 AM
3. Read now the program license information which is presented in both
German and English. If you agree to the terms and conditions of usage tick the
box left to I agree and click then on the Next button.
4. Next you can select the communication media. By default, the items "DSL
(PPPoE broadband access)" and "ISDN (CAPI 2.0)" are selected. The DSL
feature works anywhere in the world, provided that you are using a PPPoEcontrolled DSL modem. If you do not have an ADSL/ISDN connection, then
this feature is not applicable, and you must untick the box left to "DSL (PPPoE
broadband access)". For further assistance with this additional feature, please
contact the cFos support team.
If you are using the IBM International ISDN PC Card with the Euro-ISDN Dchannel protocol you can also enter an MSN, if desired. However you can
leave the relevant fields blank.
Note:
For optimal performance, leave the MSN field blank and set the MSN
to use in your application software, if possible.
11. Implementations of the IBM International ISDN PC Card
75
ISDNmst.fm Page 76 Wednesday, January 15, 2003 9:22 AM
5. The next dialog allows you to select available COM ports for use with cFos.
Select the ports you want to use and then click on the "Next" button.
6.
The extended features dialog box allows you to install a basic firewall, time
synchronisation with the ISDN network, and an ISDN caller monitor. Untick
any feature that you do not want to have installed on the system. Click on the
Next button in order to continue with the installation of cFos.
7.
The installer is now ready to proceed with the installation. Click on Install. In
the next window you can chose if you want to set up an internet connection
with cFos and if you want to block your ISDN card from dialling certain
phone numbers. Make your selection and click on OK. Once the installation is
complete you will be asked to reboot your computer. Click on OK in order to
restart your system.
8. After the reboot click through Start -> Settings -> Control Panel if you want
to add another analog over ISDN modem for the IBM International ISDN PC
Card. Double-click on the Modems icon to open the Modem Properties
window. Click Add... to install the cFos emulated modems. In the next
window, tick the box to the left of Don't detect my modem; I will select it
76
IBM ISDN PC Card:User’s Guide
ISDNmst.fm Page 77 Wednesday, January 15, 2003 9:22 AM
from a list and click Next button. In the Manufacturers window, select cFos
Software Bonn and the modem emulation you wish to use.
9. In the next window, select the COM port you wish to use and click Next and
then click Finish.
Note:
Some software packages require a COM port between 1 and 4. Be
careful when selecting the COM port. Selecting a wrong COM port
may cause sever problems.
10. Back in the modem properties window click Close if you have chosen all
modem emulations you want to use. Otherwise, repeat the relevant sections of
steps 8 and 9 again and click Close when you are done.
11. Now the Dial-up Networking needs to be reconfigured. Click on Yes in order
to launch the Remote Access Setup. Click Add... button. In the Add RAS
Device window, click on OK. Repeat the add procedure until there are no
devices that can be added. Click Continue in the Remote Access Setup and
confirm that you want to reboot your computer by clicking Yes.
11. Implementations of the IBM International ISDN PC Card
77
ISDNmst.fm Page 78 Wednesday, January 15, 2003 9:22 AM
When your computer has restarted you are ready to use cFos together with the
IBM International ISDN PC Card.
Installing cFos in Windows 2000
Throughout this section it is assumed that you are logged on to the Windows 2000
Professional system as Administrator. If you are not logged on as Administrator,
you may not be able to perform all the steps outlined in this chapter.
To use the IBM International ISDN PC Card with application software that is not
CAPI 2.0-compliant, IBM recommends that you download, purchase and use
cFos. For further assistance with cFos, see one of the following Web sites:
URL
Page Content
http://www.cfos.com
cFos main entry page
http://www.cfos.com/index2.html
cFos home page in German
http://www.cfos.com/index2_e.htm
cFos home page in English
Note:
Before installing the cFos drivers, please read “Prerequisites for the cFos
installation and additional tips” on page 68 .
To install cFos in Windows 2000, do the following:
1. On the CD you will find version 4.14 of cFos in the directory
\EXTRAS\cFos\NT4W2K. Alternatively you can download the latest
package from http://www.cfos.com. Double-click on the cfos-nt-2000-xpv414.exe icon in odert to launch the cFos setup program.
78
IBM ISDN PC Card:User’s Guide
ISDNmst.fm Page 79 Wednesday, January 15, 2003 9:22 AM
2. If you install cFos completely new the first dialog box will inform you that it is
about to install cFos. Click Install. Click Changeif you want to have cFos
installed in a directory other than C:\cFosNT.
11. Implementations of the IBM International ISDN PC Card
79
ISDNmst.fm Page 80 Wednesday, January 15, 2003 9:22 AM
3. Read now the program license information which is presented in both
German and English. If you agree to the terms and conditions of usage, tick
the box to the left of I agree and click then on the Next button.
4. Next you can select the communication media. By default, the items "DSL
(PPPoE broadband access)" and "ISDN (CAPI 2.0)" are selected. The DSL
feature works anywhere in the world, provided that you are using a PPPoEcontrolled DSL modem. If you do not have an ADSL/ISDN connection, then
this feature is not applicable, and you must untick the box left to "DSL (PPPoE
broadband access)". For further assistance with this additional feature, please
contact the cFos support team.
If you are using the IBM International ISDN PC Card with the Euro-ISDN Dchannel protocol you can also enter an MSN, if desired. However you can
leave the relevant fields blank.
Note:
For optimal performance, leave the MSN field blank and set the MSN
to use in your application software, if possible.
5. The next dialog allows you to select available COM ports for use with cFos.
Select the ports you want to use and then click Next.
6.
The extended features dialog box allows you to install a basic firewall, time
synchronisation with the ISDN network, and an ISDN caller monitor. Untick
any feature that you do not want to have installed on the system. Click Nextto
continue with the installation of cFos.
7.
The installer is now ready to proceed with the installation. Click on Install. In
the next window you can chose if you want to set up an internet connection
with cFos and if you want to block your ISDN card from dialing certain phone
numbers. Make your selection and click OK.
80
IBM ISDN PC Card:User’s Guide
ISDNmst.fm Page 81 Wednesday, January 15, 2003 9:22 AM
8. If you want to add another analog over ISDN modem for the IBM
International ISDN PC Card click through Start -> Settings -> Control Panel
and double-click the Modems icon. Once the Modems Properties window is
open, click Add. In the next window, tick the box left to Don't detect my
modem; I will select it from a list" and click Next. In the Manufacturers
window, select cFos Software Bonn and the modem emulation you wish to
use.
9. In the next window select the COM port you wish to use and click Next.
Note:
Some software packages require a COM port between 1 and 4. Be
careful when selecting the COM port. Selecting a wrong COM port
may cause sever problems.
11. Implementations of the IBM International ISDN PC Card
81
ISDNmst.fm Page 82 Wednesday, January 15, 2003 9:22 AM
10. Windows 2000 will now issue a warning that the driver has not been digitally
signed by Microsoft. In the Digital Signature Not Found window click Yes to
confirm that you want to install the driver selected.
Note:
IBM is not responsible for the software since it is supplied by a third
party company, although we strongly recommend to use this software.
Furthermore cFos Software Bonn is updating its software very often
and they have decided that having a digital signature for cFos would
be an advantage, unfortunately the process of signing the drivers is
too expensive and too time consuming (due to the frequency of
updates).
Complete the driver installation by clicking Finish.
11. Back in the Phone And Modem Options window, click Close if you have
chosen all modem emulations you want to use. Otherwise, repeat the relevant
sections of steps 8 through 10 again and click Close when you are done.
When your computer has restarted you are ready to use cFos together with the
IBM International ISDN PC Card.
Installing cFos in Windows XP
Throughout this chapter it is assumed that you are logged on to a Windows XP
Home Edition or Professional system as a local Administrator. If you are not
logged on as a local Administrator, you may not be able to perform all the steps
outlined in this chapter.
To use the IBM International ISDN PC Card with application software that is not
CAPI 2.0-compliant, IBM recommends that you download, purchase and use
cFos. For further assistance with cFos, see one of the following Web sites:
URL
Page Content
http://www.cfos.com
cFos main entry page
http://www.cfos.com/index2.html
cFos home page in German
http://www.cfos.com/index2_e.html
cFos home page in English
Note:
Before installing the cFos drivers, please read “Prerequisites for the cFos
installation and additional tips” on page 68 .
To install cFos in WIndows XP, do the following:
1. On the CD you will find version 4.14 of cFos in the directory
\EXTRAS\cFos\NT4W2K. Alternatively you can download the latest
package from http://www.cfos.com. Double-click on the cfos-nt-2000-xpv414.exe icon in odert to launch the cFos setup program.
82
IBM ISDN PC Card:User’s Guide
ISDNmst.fm Page 83 Wednesday, January 15, 2003 9:22 AM
2. If you install cFos completely new the first dialog box will inform you that it is
about to install cFos. Click Install. Click Change if you want to have cFos
installed in a directory other than C:\cFosNT.
3. Read now the program license information which is presented in both
German and English. If you agree to the terms and conditions of usage, tick
the box to the left of I agree and click Next.
4. Next you can select the communication media. By default, the items "DSL
(PPPoE broadband access)" and "ISDN (CAPI 2.0)" are selected. The DSL
feature works anywhere in the world, provided that you are using a PPPoEcontrolled DSL modem. If you do not have an ADSL/ISDN connection, then
this feature is not applicable, and you must untick the box to the left of DSL
(PPPoE broadband access).For further assistance with this additional feature,
please contact the cFos support team.
If you are using the IBM International ISDN PC Card with the Euro-ISDN Dchannel protocol you can also enter an MSN, if desired. However you can
leave the relevant fields blank.
Note:
For optimal performance, leave the MSN field blank and set the MSN
to use in your application software, if possible.
11. Implementations of the IBM International ISDN PC Card
83
ISDNmst.fm Page 84 Wednesday, January 15, 2003 9:22 AM
5. The next dialog allows you to select available COM ports for use with cFos.
Select the ports you want to use and then click Next.
6.
The extended features dialog box allows you to install a basic firewall, time
synchronisation with the ISDN network, and an ISDN caller monitor. Untick
any feature that you do not want to have installed on the system. Click Next to
continue with the installation of cFos.
7.
The installer is now ready to proceed with the installation. Click on Install. In
the next window you can chose if you want to set up an internet connection
with cFos and if you want to block your ISDN card from dialing certain phone
numbers. Make your selection and click OK.
8. If you want to add another analog over ISDN modem for the IBM
International ISDN PC Card click through Start -> Settings -> Control Panel
and double-click the Modems icon. Once the Modems Properties window is
open, click Add. In the next window, tick the box to the left of Don't detect my
modem; I will select it from a list and click Next. In the Manufacturers
window, select cFos Software Bonn and the modem emulation you wish to
use.
84
IBM ISDN PC Card:User’s Guide
ISDNmst.fm Page 85 Wednesday, January 15, 2003 9:22 AM
9. In the next window, select the COM port you wish to use and click Next.
Note:
Some software packages require a COM port between 1 and 4. Be
careful when selecting the COM port. Selecting a wrong COM port
may cause sever problems.
10. Windows XP will now issue a warning that the driver has not been digitally
signed by Microsoft. In the Digital Signature Not Found window, click Yes to
confirm that you want to install the driver selected.
Note:
IBM is not responsible for the software since it is supplied by a third
party company, although we strongly recommend to use this software.
11. Implementations of the IBM International ISDN PC Card
85
ISDNmst.fm Page 86 Wednesday, January 15, 2003 9:22 AM
Furthermore cFos Software Bonn is updating its software very often
and they have decided that having a digital signature for cFos would
be an advantage, unfortunately the process of signing the drivers is
too expensive and too time consuming (due to the frequency of
updates).
Complete the driver installation by clicking Finish.
11. Back in the Phone And Modem Option window, click Close if you have
chosen all modem emulations you want to use. Otherwise, repeat the relevant
sections of steps 8 through 10 again and click then on Close when you are
done.
When your computer has restarted you are ready to use cFos together with the
IBM International ISDN PC Card.
Setting up Internet access
This chapter explains briefly how to use one ISDN B channel for Internet access at
64 kbit/s or both B channels at 128 kbit/s.
Note: Bear in mind that the IBM International ISDN PC Card is a basic-rate
ISDN adapter, and permits the use of up to two ISDN B channels.
Internet access in Windows 95 and Windows 98
Note:
In order to use Dial-Up Networking for connections to the Internet, you
may need to install cFos. Please see “Installing cFos” on page 67.
Creating a connection using one B channel
To create an Internet connection using one B channel, do the following:
1. Double-click the My Computer icon on the Windows 95/98 desktop. Doubleclick the Dial-Up Networking icon. In the sign-on window, click Next.
2. In the Make New Connection window, enter the type and name of the
computer to be dialed in the Name field. This is the name that will be used for
the connection in Dial-Up Networking. Select any of the following devices to
use for the connection to the Internet:
•
cFos ISDN, Internet, Sync PPP over HDLC
•
cFos ISDN, Internet, add. Sync PPP over HDLC
•
NDIS WAN Line 1
•
NDIS WAN Line 2
Click Next to continue.
86
IBM ISDN PC Card:User’s Guide
ISDNmst.fm Page 87 Wednesday, January 15, 2003 9:22 AM
Note:
Since the NDIS WAN CAPI drivers are installed, you have the option
of using “NDIS WAN Line 1” or the “NDIS WAN Line 2” for the
Internet connection. However the choice depends on the Internet
access software you want to use.
3. In the next window, enter the area code and phone number to dial. If
necessary, change the country code. Click Next again. Finally, click Finish.
Now you can enter a user name and a password and dial up the connection to the
server.
Creating a connection using both B channels
This technique is also referred to as "multilinking". Proceed as follows:
1. Create a new Dial-Up Networking connection as described in “Creating a
connection using one B channel” on page 86 .
2. In the Dial-Up Networking window, click the new entry with the right mouse
button.
3. Click the Properties command in the pop-up menu.
4. Click the Multilink tab. Select Use additional devices, and then click Add.
11. Implementations of the IBM International ISDN PC Card
87
ISDNmst.fm Page 88 Wednesday, January 15, 2003 9:22 AM
5. In the Edit Extra Device window, select one of the following devices in the
drop-down list:
•
cFos ISDN, Internet, Sync PPP over HDLC
•
cFos ISDN, Internet, add. Sync PPP over HDLC
•
NDIS WAN Line 1
•
NDIS WAN Line 2
Click OK to complete this operation.
To save your settings, click OK again.
Note:
Any of the four devices can be combined in a multilink connection!
Whether you use cFos or the NDIS WAN CAPI drivers in Dial-Up
Networking depends on the Internet access software you want to use.
Note:
You can add only one additional device to the dial-up connection.
Adding more than one device in the Multilink page may cause the
connection to fail.
You cannot form a multilink connection using the same device twice.
Doing so will not increase transfer speed, and it may cause the
connection to fail.
6. To save your settings, click OK again.
88
IBM ISDN PC Card:User’s Guide
ISDNmst.fm Page 89 Wednesday, January 15, 2003 9:22 AM
Note:
In Europe you do not need to specify an additional phone number for the
second B channel. If you leave this field blank, the number originally
specified for the Dial-Up Networking connection will be dialed.
Internet access in Windows Me
Note:
In order to use Dial-Up Networking for connections to the Internet, you
may need to install cFos. Please see “Installing cFos” on page 67 .
Creating a connection using one B channel
To create a connection in Windows Me using one B channel, do the following:
1. Click the Start -> Settings -> Dial-Up Networking to open the Network and
Dial-up Connection window. Double-click the Make New Connection icon.
2. In the Connection Wizard's first window, click Next. If you have not yet
entered any country-specific telephony information, the Location Information
window opens, in which you can enter the pertinent dialing information.
3. In the Make New Connection window, enter the type and name of the
computer to be dialed in the Name field. This is the name that will be used for
the connection in Dial-Up Networking. Select any of the following devices to
use for the connection to the Internet:
•
cFos ISDN, Internet, Sync PPP over HDLC
•
cFos ISDN, Internet, add. Sync PPP over HDLC
•
NDIS WAN Line 1
•
NDIS WAN Line 2
Click Next to continue.
11. Implementations of the IBM International ISDN PC Card
89
ISDNmst.fm Page 90 Wednesday, January 15, 2003 9:22 AM
Note:
Whether you use cFos or the NDIS WAN lines in Dial-up Networking
depends on the Internet access software you want to use.
4. In the next window, enter the phone number to dial for Internet access and
then click Next. In the last window, click Finish. Your Dial-Up Networking
window now contains an icon representing your dial-up connection to the
Internet.
When you have finished the setup procedure, you are ready to connect to your
Internet Service Provider.
Creating a connection using both B channels
To create a connection in Windows Me using both B channels, do the following:
1. Create an Internet connection as described in “Creating a connection using
one B channel” on page 86. In the Dial-Up Networking window, right-click
the connection icon you want to use for a multilink connection, and select
Properties in the context menu.
2. In the Properties window, select the Multilink tab. Select the Use additional
devices option, then click Add.
90
IBM ISDN PC Card:User’s Guide
ISDNmst.fm Page 91 Wednesday, January 15, 2003 9:22 AM
3. In the Edit Extra Device window, select one of the following devices in the
drop-down list:
•
cFos ISDN, Internet, Sync PPP over HDLC
•
cFos ISDN, Internet, add. Sync PPP over HDLC
•
NDIS WAN Line 1
•
NDIS WAN Line 2
Click OK to continue.
Notes:
a. Any of the four devices can be combined in a multilink connection.
Whether you use cFos or the NDIS WAN CAPI drivers in Dial-Up
Networking depends on the Internet access software you want to use.
b. You can add only one additional device to the dial-up connection.
Adding more than one device on the Multilink page may cause the
connection to fail.
11. Implementations of the IBM International ISDN PC Card
91
ISDNmst.fm Page 92 Wednesday, January 15, 2003 9:22 AM
c. You cannot form a multilink connection using the same device twice.
Doing so will not increase the transfer speed, and may cause the
connection to fail.
4. To save your settings, click OK again.
You are now ready to connect to your Internet Service Provider over two ISDN B
channels simultaneously.
Internet access in Windows NT 4.0
The following section assumes that you are logged on to a Windows NT 4.0
Workstation system as Administrator. If you are not logged on as Administrator,
you may not be able to perform all the steps outlined in this chapter.
In order to use Dial-Up Networking for connections to the Internet, you may need
to install cFos. Please see “Installing cFos” on page 67 .
Creating a connection using one B channel
To create a connection in Windows NT 4.0 using one B channel, do the following:
1. Double-click the My Computer icon on the Windows NT 4.0 Workstation
desktop.
2. Double-click the Dial-Up Networking icon. The New Phonebook Entry
Wizard opens and prompts you to specify a name for the new phonebook
entry. Enter a name for your Internet connection.
3. In the Server window, select the option I am calling the Internet.
4. In the Modem or Adapter window, select one of the following entries:
92
•
cFos ISDN, Internet, Sync PPP over HDLC
•
cFos ISDN, Internet, add. Sync PPP over HDLC
•
NDIS WAN Line 1
•
NDIS WAN Line 2
IBM ISDN PC Card:User’s Guide
ISDNmst.fm Page 93 Wednesday, January 15, 2003 9:22 AM
Note:
Since the NDIS WAN CAPI drivers are installed, you have the
option of using “CAPIWAN (ISDN1)” or “CAPIWAN (ISDN2)”
for the Internet connection. However, the choice depends on the
Internet access software you want to use.
5. In the next window, enter the phone number to dial your access provider.
6. Finally, click Finish.
Creating a connection using both B channels
This technique is also referred to as "multilinking". To create a connection in
Windows NT 4.0 using both bB channels, do the following:
1. Create a new Dial-Up Networking connection as described in “Creating a
connection using one B channel” on page 86.
If the option Multilink all ISDN lines appears during the setup, do not
activate it. This option may result in malfunctions due to an improper
configuration.
2. Once the new connection has been completed, click More and select Edit
entry and modem properties in the drop-down menu.
11. Implementations of the IBM International ISDN PC Card
93
ISDNmst.fm Page 94 Wednesday, January 15, 2003 9:22 AM
3. On the Basic page of the Edit Phonebook Entry window, click the arrow
button to open the Dial using drop-down list.
4. Select Multiple Lines, then click Configure.
5. In the list of available devices, select the entry cFos ISDN, Internet,
additional PPP Modem, then click Phone numbers.
94
IBM ISDN PC Card:User’s Guide
ISDNmst.fm Page 95 Wednesday, January 15, 2003 9:22 AM
Notes:
a. Any of the four devices can be combined in a multilink connection.
•
cFos ISDN, Internet, Sync PPP over HDLC
•
cFos ISDN, Internet, add. Sync PPP over HDLC
•
NDIS WAN Line 1
•
NDIS WAN Line 2
b. You can add only one additional device to the dial-up connection.
Adding more than one device on the Multilink page may cause the
connection to fail.
c. You cannot form a multilink connection using the same device twice.
Doing so will not increase the transfer speed, and may cause the
connection to fail.
6. In the Phone Numbers window, enter the phone number to be dialed on the
second B channel, then click Add. When the correct number appears in the
list, click OK.
11. Implementations of the IBM International ISDN PC Card
95
ISDNmst.fm Page 96 Wednesday, January 15, 2003 9:22 AM
7. Now click OK twice to close the remaining configuration windows.
You are ready to dial up a multilink connection to your Internet account using two
ISDN B channels.
Internet access in Windows 2000
The following section assumes that you are logged on to a Windows 2000
Professional system as Administrator. If you are not logged on as Administrator,
you may not be able to perform all the steps outlined in this chapter.
In order to use Dial-Up Networking for connections to the Internet, you may need
to install cFos. Please see “Installing cFos” on page 67.
Creating a connection using one B channel
To create a connection in Windows 2000 using one B channel, do the following:
1. Click Start -> Settings -> Dial-Up Networking to open the Network and Dialup Connections window. Double-click the Make New Connection icon.
2. In the Connection Wizard's first window, click the Next button. Select the
option Dial-up to the Internet, then click Next. In the Welcome to the Internet
Connection Wizard window, select the option I want to set up my Internet
connection manually, or I want to connect through a local area network
(LAN), then click Next. In the following window, select I connect through a
phone line and a modem, and click Next.
96
IBM ISDN PC Card:User’s Guide
ISDNmst.fm Page 97 Wednesday, January 15, 2003 9:22 AM
3. In the Choose Modem window, select any of the following devices to use for
the connection to the Internet:
•
cFos ISDN, Internet, Sync PPP over HDLC
•
cFos ISDN, Internet, add. Sync PPP over HDLC
•
IBM NDIS WAN CAPI Driver
Note:
Whether you use cFos or the NDIS WAN CAPI drivers in Dial-Up
Networking depends on the Internet access software you want to use.
Note too, that there are two entries called “IBM NDIS WAN CAPI
Driver”. Each of these entries represents one B channel.
4. The next windows allow you to configure your Internet access. Perform the
following steps:
•
•
Enter the complete telephone number including country information
•
Enter the User name and Password
•
Enter a Connection name
•
Configure an Internet mail account
5. In the last window, click Finish to complete Internet access configuration.
Once you have finished the configuration, you are ready to connect to your
Internet Service Provider.
Creating a connection using both B channels
To create a connection in Windows 2000 using both B channels, do the following:
11. Implementations of the IBM International ISDN PC Card
97
ISDNmst.fm Page 98 Wednesday, January 15, 2003 9:22 AM
1. Create an Internet connection as described in “Creating a connection using
one B channel” on page 96 . Do not connect to your Internet Service Provider
upon completion, however. Instead, close the Dial-up Connection window,
and close Internet Explorer if it has been started.
In the Dial-up Networking window, right-click the entry you want to use to
create a multilink connection. In the context menu, select Properties.
2. On the General page in the properties window for the selected connection,
select the additional device you wish to use for the multilink Internet
connection from the list labeled Connect using. You can combine the
following devices to create a multilink connection:
•
cFos ISDN, Internet, Sync PPP over HDLC
•
cFos ISDN, Internet, add. Sync PPP over HDLC
•
IBM NDIS WAN CAPI Driver
Note:
You can add only one additional device to the dial-up connection.
Adding more than one additional device may cause the connection to
fail. Click the Settings button to the right of the connection.
3. Select the option All devices call the same numbers below the Connect using
list. To make sure that the phone number to dial has been stored, click the
Alternates button in the Phone number section.
98
IBM ISDN PC Card:User’s Guide
ISDNmst.fm Page 99 Wednesday, January 15, 2003 9:22 AM
4. If the field in the Alternate Phone Numbers window is empty, click the Add
button. In the Add Alternate Phone Number window, select the option Use
dialing rules, then enter the area code and phone number in the fields above
it. Select the destination country if necessary. Then click OK to close each of
the configuration windows.
You are now ready to connect to your Internet Service Provider over two ISDN B
channels simultaneously.
Internet access in Windows XP
In order to use Dial-Up Networking for connections to the Internet, you may need
to install cFos. Please see “Installing cFos” on page 67.
11. Implementations of the IBM International ISDN PC Card
99
ISDNmst.fm Page 100 Wednesday, January 15, 2003 9:22 AM
Creating a connection using one B channel
To create a connection in Windows XP using one B channel, do the following:
1. Click Start -> Control Panel. Double-click the Network and Internet
Connections icon.
Click the menu command Set up or change your Internet connection. In the
Internet Properties window, click Add to launch the New Connection Wizard.
2. In the Connection Wizard's first window, click Dial-up to private network,
then Next.
100
IBM ISDN PC Card:User’s Guide
ISDNmst.fm Page 101 Wednesday, January 15, 2003 9:22 AM
3. In the Select a Device window, first make sure that the option All available
ISDN lines multi-linked is NOT activated. If necessary, deactivate the
options for all devices that you do not want to use for dialing out. Then select
any of the following devices to use for the connection to the Internet:
•
cFos ISDN, Internet, Sync PPP over HDLC
•
cFos ISDN, Internet, add. Sync PPP over HDLC
•
IBM NDIS WAN CAPI Driver
Note:
Whether you use cFos or the NDIS WAN CAPI drivers in Dial-Up
Networking depends on the Internet access software you want to use.
11. Implementations of the IBM International ISDN PC Card
101
ISDNmst.fm Page 102 Wednesday, January 15, 2003 9:22 AM
Note too that there are two entries called “IBM NDIS WAN CAPI
Driver”. Each of these entries represents one B channel.
4. The next windows allow you to configure your Internet access. Perform the
following steps:
•
Enter the complete telephone number
•
Enter a connection name
•
Enter the User name and Password
5. When you have finished these operations, click OK in the Internet Properties
window to complete your Internet access setup.
Once you have finished the configuration, you are ready to connect to your
Internet Service Provider. Click Start -> Connect To, then select the connection
you have created.
Creating a connection using both B channels
There are two ways to create a connection for multilink Internet access. The first is
to create a new dial-up connection as described above in “Creating a connection
using one B channel” on page 100 , but to select two devices to use for the
connection rather than one as in Step 3.
102
IBM ISDN PC Card:User’s Guide
ISDNmst.fm Page 103 Wednesday, January 15, 2003 9:22 AM
Note:
Note that you only can use two ISDN devices for a multilink connection.
Configuring more than two devices may cause the connection to fail.
The second method is to modify an existing dial-up connection as follows:
1. Click Start -> Connect To and select the connection you want to modify.
Right-click it and select Properties in the context menu.
2. On the General page in the properties window for the selected connection,
select the additional device you wish to use for the multilink Internet
connection from the list labeled Connect using. You can combine the
following devices to create a multilink connection:
•
cFos ISDN, Internet, Sync PPP over HDLC
•
cFos ISDN, Internet, add. Sync PPP over HDLC
•
IBM NDIS WAN CAPI Driver
11. Implementations of the IBM International ISDN PC Card
103
ISDNmst.fm Page 104 Wednesday, January 15, 2003 9:22 AM
You can rename the modified connection if desired. You are now ready to connect
to your Internet Service Provider over two ISDN B channels simultaneously.
Using CompuServe
In order to be able to use CompuServe with your IBM International ISDN PC
Card, you must have cFos installed, unless you only plan to use CompuServe
2000 on your system. In this case, you may not need to install cFos at all.
Please ask your local CompuServe help desk what communication protocol is
used for dial-in. In Europe the X.75 protocol is widely used.
IBM has tested the CompuServe 3.0 and higher access software under Windows
95, 98 and ME, and CompuServe 4.0.x and higher access software under Windows
NT 4.0 and Windows 2000 Professional.
CompuServe 3.0 and non-CAPI 2.0-compliant CompuServe
dialers in Windows 9x, Me
Note:
The screen shots in this section may vary somewhat from the user
interface you see on your screen.
Before you can use CompuServe 3.0 or any non-CAPI 2.0-compliant CompuServe
access software, you must configure cFos for use with it by installing either the
“cFos ISDN, X.75, Defaults, Mailbox Settings” or the “cFos ISDN, CompuServe”
modem emulation on any available COM port.
104
IBM ISDN PC Card:User’s Guide
ISDNmst.fm Page 105 Wednesday, January 15, 2003 9:22 AM
When you perform a fresh installation of the CompuServe 3.0 or a non-CAPI 2.0compliant CompuServe access software, you may be offered the option of
entering or modifying the telephone number and modem properties.
Click the Choose installed modem button and select one of the following modem
entries:
•
cFos ISDN, CompuServe
•
cFos ISDN, X.75, Defaults, Mailbox Settings
Note:
You can also select the entry cFos ISDN, Analog Modem Support. Note,
however, that this entry emulates an analog modem connection with a
maximum speed of 14,400 bit/s (V.32bis). Only the two modem
emulations named above allow you to connect to CompuServe at 64
kbit/s.
If you encounter any problems in selecting the modem, please contact
your local CompuServe help desk for further assistance.
CAPI 2.0-compliant CompuServe 2000 in Windows 9x, Me
without cFos installed
In some countries, such as Germany and the UK, CompuServe ships its access
software as “CompuServe 2000”. Unlike earlier versions, this software is designed
to handle CAPI 2.0-compliant ISDN hardware. When you install CompuServe
2000, it automatically installs an OEM version of cFos which is then used only by
CompuServe 2000.
11. Implementations of the IBM International ISDN PC Card
105
ISDNmst.fm Page 106 Wednesday, January 15, 2003 9:22 AM
When the CompuServe 2000 access software searches for a modem, it detects the
IBM International ISDN PC Card as illustrated below.
Click Next to set up CompuServe 2000 with the selected modem emulation, and
follow all further instructions displayed on your screen.
CAPI 2.0-compliant CompuServe 2000 in Windows 9x, Me with
cFos installed
In some countries such as Germany and the UK, CompuServe ships its access
software as “CompuServe 2000”. Unlike earlier versions, this software is designed
to handle CAPI 2.0-compliant ISDN hardware.
To use CompuServe in Windows 9x or Windows Me with cFos installed, do the
following:
1. After you have installed the CompuServe 2000 software, check the cFos
configuration. To do so, click Start -> Programs -> cFos ISDN & DSL Driver > Configure cFos. In the cFos Configuration program, click Configure MSN
and parameters. If the parameter -kv appears in the additional parameters
field, remove it. Then click OK. Select Save changes, click OK and then
confirm that you want to restart your computer by clicking Yes.
2. After the system has restarted, verify that you have installed either the cFos
ISDN, CompuServe or the cFos ISDN, X.75, Defaults, Mailbox Settings
modem emulation. Make a note of the COM ports on which these modem
emulations are installed.
3. Now you can start CompuServe 2000 and let it search for modems. The
software detects your IBM International ISDN PC Card as illustrated below.
Select the modem entry that corresponds to your cFos modem emulation.
106
IBM ISDN PC Card:User’s Guide
ISDNmst.fm Page 107 Wednesday, January 15, 2003 9:22 AM
Click Next and follow all further instructions displayed on your screen to set up
CompuServe 2000 with the selected modem.
CompuServe 4.02 and higher in Windows NT 4.0
The following installation instructions are based on the CompuServe 4.0.2
installation Help file for Windows NT 4.0. If you experience problems of any kind
during this procedure, please contact your local CompuServe help desk for
further assistance.
During this procedure, retain the default settings for all options except where
otherwise instructed.
You must install and configure the CompuServe access software before carrying
out the steps below.
1. Double-click the My Computer icon on the Windows NT desktop, then
double-click the Dial-Up Networking icon.
2. In the window that tells you the phonebook is empty, click OK.
3. In the New Phonebook Entry Wizard window, enter COMPUSERVE as the
name and click Next.
4. In the Server window, select the options I am calling the Internet and Send
my password as plain text if that's the only way to connect. Click Next. Now
select the modem you want use. This may be one of the following:
•
cFos ISDN, CompuServe
•
cFos ISDN, X.75, Defaults, Mailbox Settings
11. Implementations of the IBM International ISDN PC Card
107
ISDNmst.fm Page 108 Wednesday, January 15, 2003 9:22 AM
5. Click Next.
6. In the Phone Number window, enter the local phone number that you dial to
connect to CompuServe. If you want to define any alternate numbers, click
Alternate and enter those numbers in the appropriate fields.
7. Click Next.
8. In the New Phonebook Entry Wizard window, click Finish.
Note:
If this is the first time you have created a Dial-Up Networking entry, a
few more windows are displayed. Simply click Next in each window.
9. In the Dial-Up Networking window, click More.
10. You can review or modify basic properties of the connection on the Basic page
in the Edit Phonebook Entry window.
11. To place a shortcut on your desktop, click Create shortcut to entry in this
menu.
108
IBM ISDN PC Card:User’s Guide
ISDNmst.fm Page 109 Wednesday, January 15, 2003 9:22 AM
12. To add alternate phone numbers to dial, click the Alternates button on the
Basic window page, then enter the phone numbers.
13. To modify the modem settings, click the Configure button on the Basic page,
then edit the modem properties as necessary.
14. Click the Server tab in the Edit Phonebook Entry window and make sure that
TCP/IP is the only network protocol selected. (If any other option in the
Network protocols group is checked, click it to remove the check mark.)
Note:
The option Enable software compression may also be selected. Note
that in rare cases this option can cause connection problems, however.
15. On the Server page, click the TCP/IP Settings button.
16. In the PPP TCP/IP Settings window, select the option Server assigned IP
address.
17. Select the option Server assigned name server addresses.
18. Leave zeroes in the WINS server entries, activate both of the options at the
bottom of the window, and click OK.
11. Implementations of the IBM International ISDN PC Card
109
ISDNmst.fm Page 110 Wednesday, January 15, 2003 9:22 AM
19. Click the Script”tab in the Edit Phonebook Entry window, and select CIS.SCP
in the drop-down list.
Note:
You may also edit the script to speed up the logon process. Change
the statement /go:pppconnect^m in the script to
/noint/go:pppconnect^m.
20. Click Before dialing, make sure that the None option is activated, then click
OK.
21. In the Edit Phonebook Entry window, click the Security tab, then select the
option Accept any authentication including clear text. Depending on your
security settings, you may also have the option of preventing your password
from being saved, so that you can enter it again if necessary (see Step 34).
22. Click the X.25 tab and make sure that all the settings are blank, then click OK.
110
IBM ISDN PC Card:User’s Guide
ISDNmst.fm Page 111 Wednesday, January 15, 2003 9:22 AM
23. In the Dial-Up Networking window, click More again and select User
Preferences in the menu that opens.
24. On the Dialing page in the User Preferences window, set the number of redial
attempts, and activate the Redial on link failure option if you want Dial-Up
Networking to redial if the connection is lost.
25. Set the Idle seconds before hanging up option so that Dial-Up Networking
automatically disconnects if the line is idle for a certain period.
26. In the Enable auto-dial by location list, make sure the checkbox for your
current location is activated.
27. Click the Callback tab, then select the option No, skip callback.
28. Click the Appearance tab and make sure that all of the options are activated.
29. Click the Phonebook tab and select the option The System Phonebook.
30. Click OK.
11. Implementations of the IBM International ISDN PC Card
111
ISDNmst.fm Page 112 Wednesday, January 15, 2003 9:22 AM
31. In the Dial-up Networking window, select Dial.
32. In the window Connect to CompuServe, enter your CompuServe member ID
number in the User name field and your password in the Password field.
33. If you want to save your password on your computer, activate the Save
password option. (This option may not be available if your security settings
prohibit saving passwords.) If you need to change your password later, you
must also click Unsave password on the Security page in the phonebook entry
properties (see Step 22).
34. Click OK to dial up the connection. Do not make any changes in the After Dial
Terminal window, but observe the logon process. Your password is incorrect if
you see the following after the password prompt:
??LOGINE - Invalid entry - try again
.
35. Once the logon has succeeded, click Done to close the terminal window and
activate the connection to CompuServe.
112
IBM ISDN PC Card:User’s Guide
ISDNmst.fm Page 113 Wednesday, January 15, 2003 9:22 AM
After you have successfully logged on, the Dial-up Networking icon appears in
the system tray on the task bar. Click this icon to hang up the connection, or select
Open Dial-up Monitor to get information about your connection, including the
DCE connection speed (bps) and your IP address (Details button).
CompuServe 4.02 and higher in Windows 2000
The following installation instructions are based on the CompuServe 4.0.2
installation Help file for Windows NT 4.0 and modified for use in Windows 2000
Professional. If you experience problems of any kind with these instructions,
please contact your local CompuServe help desk for further assistance.
Unless otherwise noted, all settings or selections should be left at their default
values.
To use CompuServe 4.02 or higher in Windows 2000, do the following:
1. Click Start -> Settings->/ Network and Dial-Up Connections. Double-click
Make New Connection to start the Network Connection Wizard.
2. In the first window, click Next. In the following window, select the option
Dial-up to the Internet, then click Next. Now select I want to set up my
Internet connection manually, or I want to connect through a local area
network (LAN) and click Next. In the next window, choose the option I
connect through a phone line and a modem, then click Next.
3. In the Choose Modem window, select one of the following modem entries:
•
cFos ISDN, CompuServe
•
cFos ISDN, X.75, Defaults, Mailbox Settings
11. Implementations of the IBM International ISDN PC Card
113
ISDNmst.fm Page 114 Wednesday, January 15, 2003 9:22 AM
Then click Next.
4. In the Internet account logon information windows that follow, do the
following:
114
•
Enter the phone number to dial for CompuServe access and click Next.
•
Enter your CompuServe User ID and password and click Next.
•
Enter COMPUSERVE as the connection name and click Next.
IBM ISDN PC Card:User’s Guide
ISDNmst.fm Page 115 Wednesday, January 15, 2003 9:22 AM
5. In the Set Up Your Internet Mail Account window, select No then click Next.
Deactivate the option To connect to the Internet immediately, select this box
and then click Finish. Now click the Finish button to complete the dial-up
configuration.
6. In the Network and Dial-Up Connections window, select the new
COMPUSERVE icon, right-click it, and select Properties in the context menu.
7. In the COMPUSERVE Properties window, click the Options tab. In the
Dialing options group, select the options Display progress while connecting
and Prompt for name and password, certificate, etc. In the Redial attempts
group, set the desired number of attempts, the delay between redial attempts,
and the delay before an idle connection should be hung up. If desired, you
may enable the option Redial if line is dropped. Click the X.25 button and
make sure the settings are blank, then click OK.
8. Click the Security tab. Select the option Typical (recommended settings) and
make sure that the option Validate my identity as follows: is set to Allow
unsecured password. In the Interactive logon and scripting group, select the
options Show terminal window and Run script, and select the script cis.scp
in the list.
Note:
You may also edit the script to speed up the logon process. Change
the statement /go:pppconnect^m in the script to
/noint/go:pppconnect^m
11. Implementations of the IBM International ISDN PC Card
115
ISDNmst.fm Page 116 Wednesday, January 15, 2003 9:22 AM
9. Now click the Networking tab. In the list labeled Type of dial-up server I am
calling, choose the entry PPP: Windows 95/98/NT4/2000/Internet. In the
option group Components checked are used by this connection, make sure
that only Internet Protocol (TCP/IP) is selected. Then click OK.
10. Double-click the COMPUSERVE icon in the dial-up window to test your
settings. If the dial-in succeeds, the terminal window will appear as illustrated
below:
116
IBM ISDN PC Card:User’s Guide
ISDNmst.fm Page 117 Wednesday, January 15, 2003 9:22 AM
Click Done to complete the connection procedure.
After you have successfully logged on, the Dial-up Networking icon appears in
the system tray on the task bar. Click this icon to hang up the connection, or select
Open Dial-up Monitor to get information about your connection, including the
DCE connection speed (bps) and your IP address (Details button).
Using AOL
In order to be able to use AOL with your IBM International ISDN PC Card, you
must have cFos installed, unless you plan to use only the CAPI 2.0-compliant
AOL 5.0 or higher access software on your system. In this case you may not need
to install cFos.
This section is based on Windows 9x. At the time of writing, there was no AOL
access software available for Windows NT 4.0 or Windows 2000, so that AOL use
could not be tested.
Please ask your local AOL help desk what communication protocol is used for
dial-in. In Europe the X.75 protocol is widely used.
IBM has tested the AOL 4.0 and higher access software.
11. Implementations of the IBM International ISDN PC Card
117
ISDNmst.fm Page 118 Wednesday, January 15, 2003 9:22 AM
AOL 4.0 and other non-CAPI 2.0-compliant AOL access
software
AOL 4.0 or a non-CAPI 2.0-compliant AOL access software version may only
detect modems assigned to COM ports 1 to 4. It is strongly recommended that
you configure cFos to use COM4.
Note:
The screen shots in this section may vary somewhat from the user
interface you see on your screen.
Before you can use AOL 4.0 or any non-CAPI 2.0-compliant AOL access software,
you must configure cFos for use with it by installing either the “cFos ISDN, X.75,
Defaults, Mailbox Settings” or the “cFos ISDN, CompuServe” modem emulation
on either COM3 or COM4.
When you perform a fresh installation of the AOL 4.0 access software or a nonCAPI 2.0-compliant AOL dialer software, or when you reconfigure the already
installed AOL dialer, select the option to Begin automatic setup. The AOL
software then searches for an installed modem. When the search is completed,
AOL announces it has found a modem as illustrated below.
Click the Next button to use AOL with the selected modem.
Note:
Please contact your local AOL help desk if AOL does not detect your
modem correctly.
CAPI 2.0-compliant AOL 5.0 and higher without cFos installed
In some countries, such as Germany and the UK, AOL ships its AOL 5.0 access
software in a version designed for CAPI 2.0. When you install AOL 5.0, it
automatically installs an OEM version of cFos which is then used only by AOL
5.0.
118
IBM ISDN PC Card:User’s Guide
ISDNmst.fm Page 119 Wednesday, January 15, 2003 9:22 AM
When the AOL 5.0 access software searches for a modem, it detects the IBM
International ISDN PC Card as illustrated below.
Click Next to set up AOL 5.0 with the selected modem emulation, and follow all
further instructions displayed on your screen.
CAPI 2.0-compliant AOL 5.0 and higher with cFos installed
To use CAPI 2.0-compliant AOL 5.0 or higher with cFos installed, do the
following:
1. After you have installed the CAPI 2.0-compliant AOL 5.0 or higher software,
check the cFos configuration. To do so, click Start -> Programs -> cFos ISDN
& DSL Driver -> Configure cFos. In the cFos configuration program, select
Configure MSN and parameters. If the parameter -kv appears in the
additional parameters field, remove it. Then click OK. Select Save changes,
click OK and then confirm that you want to restart your computer by clicking
Yes.
2. After the system has restarted, verify that you have installed either the “cFos
ISDN, CompuServe” or the “cFos ISDN, X.75, Defaults, Mailbox Settings”
modem emulation. Make a note of the COM ports on which these modem
emulations are installed.
3. Now you can start AOL 5.0 or higher and let it search for a modem. The
software detects your IBM International ISDN PC Card as illustrated below.
Select the modem entry that corresponds to your cFos modem emulation.
11. Implementations of the IBM International ISDN PC Card
119
ISDNmst.fm Page 120 Wednesday, January 15, 2003 9:22 AM
4. Click Next and follow all further instructions displayed on your screen to set
up AOL 5.0 or higher with the selected modem.
CAPI 2.0-compliant AOL 6.0 and higher for Windows 9x and
Windows Me
Obtain the correct version of AOL 6.0 for your operating system. AOL maintains
separate versions for Windows 9x and Windows Millennium Edition. The
installation instructions for AOL 6.0 in these operating systems are exactly the
same as those outlined in “CAPI 2.0-compliant AOL 5.0 and Higher without cFos
Installed” on page 118 .
CAPI 2.0-compliant AOL 6.0 and higher for Windows 2000
Obtain the AOL 6.0 software for Windows 2000. Note that AOL does not support
Windows NT 4.0. AOL 6.0 for Windows 2000 does not require that you install
cFos for Windows NT / 2000. When AOL 6.0 for Windows 2000 searches for
communication devices, it detects the IBM International ISDN PC Card and
displays it as “IBM NDIS WAN CAPI DRIVER”, alongside any analog modems
found.
120
IBM ISDN PC Card:User’s Guide
ISDNmst.fm Page 121 Wednesday, January 15, 2003 9:22 AM
AOL 6.0 for Windows 2000 uses the NDIS WAN Miniport driver to connect over
ISDN.
If you encounter problems of any kind, please contact your local AOL help desk
and tell the support personnel that you are using a fully CAPI 2.0-compliant ISDN
device to connect to AOL.
Using Symantec's WinFax PRO
This section briefly describes the use of the IBM International ISDN PC Card with
WinFax PRO 9.0 and higher. Please refer to the WinFax PRO User's guide or get in
touch with your local Symantec help desk for further assistance.
WinFax PRO 9.x
To use WinFax PRO 9.x, do the following:
1. Start WinFax PRO 9.x. Select the menu command Tools -> Setup -> Guided
Setup. In the Guided Setup window, select Modem/Other Device Setup. In
the Possible devices list, select ISDN Device (CAPI 2.0). Click the Properties
button.
11. Implementations of the IBM International ISDN PC Card
121
ISDNmst.fm Page 122 Wednesday, January 15, 2003 9:22 AM
2. If a message appears informing you that the ISDN device has not been
configured, click Yes to configure it. In the Install New Modem Type window,
scroll down to Generic ISDN (CAPI 2.0) in the Manufacturers list, then select
the corresponding entry in the Models list. Click Next.
3. In the ISDN/CAPI Properties window, enter an MSN (Multiple Subscriber
Number) and a CLID (Calling Line Identification). In the “Packet size” field,
enter 512.
122
IBM ISDN PC Card:User’s Guide
ISDNmst.fm Page 123 Wednesday, January 15, 2003 9:22 AM
4. If you did not enter an MSN in the previous step, WinFax PRO displays a
warning that you must enter an MSN in order to receive faxes. At this point
you must enter an MSN.
5. When you have done so, click Finish in the last window. Now the Select
Locations for Generic ISDN (CAPI 2.0) window opens. Usually all the options
in this window are enabled. Leave these settings as they are and click OK.
6. If you have not yet configured your country information for modem dialing, a
message appears asking whether you want to configure how this device dials
when sending faxes. Click Yes.
7. On the Locatio” page in the Dialing Properties window, select the country you
are in and add your area code and phone number. Then click OK.
8. In the Modem and Other Fax Device Properties window, click OK. This
completes the configuration of WinFax PRO 9.x.
11. Implementations of the IBM International ISDN PC Card
123
ISDNmst.fm Page 124 Wednesday, January 15, 2003 9:22 AM
WinFax PRO 10.0
To use WinFax PRO 10.0, do the following:
1. Start WinFax PRO 10.x. Select the menu command Tools -> Program Setup. In
the WinFax PRO Program Setup window, select Modems and
Communications Devices. In the Possible devices list, select ISDN Device
(CAPI 2.0) and click the Properties button.
2. If a message appears informing you that the ISDN device has not been
configured, click Yes to configure it. In the Install New Device Type window,
scroll down to Generic ISDN (CAPI 2.0) in the Manufacturers list, then select
the corresponding entry in the Models list. Click Next.
124
IBM ISDN PC Card:User’s Guide
ISDNmst.fm Page 125 Wednesday, January 15, 2003 9:22 AM
3. If a warning appears informing you that the CAPI driver has not been verified
by Symantec, simply acknowledge it by clicking OK. In the ISDN/CAPI
Properties window, you can now enter MSNs and assign them names. Click
Add after entering each MSN and its name to make them available in WinFax
PRO 10.0. When you have finished adding MSNs, click the Fax tab.
4. Now type
512
in the Packet size field, and enter one of your ISDN line's MSNs as a fax CLID
(Calling Line Identification). Click OK to complete the configuration process.
11. Implementations of the IBM International ISDN PC Card
125
ISDNmst.fm Page 126 Wednesday, January 15, 2003 9:22 AM
5. In the Install New Device Type window, click Finish. Now the Select
Locations for Generic ISDN (CAPI 2.0) window opens. Usually all the options
in this window are enabled. Leave these settings as they are and click OK.
6. If you have not yet configured your country information for modem dialing, a
message appears asking whether you want to configure how this device dials
when sending faxes. Click Yes.
7. On the Location page in the Dialing Properties window, select the country you
are in and add your area code and phone number. Then click OK.
8. In the Modem and Communications Devices Properties window, click OK. In
the WinFax PRO Program Setup window, click OK again. This completes the
configuration of WinFax PRO 10.0.
Using IBM DIALs client
This section explains the basic use of the IBM DIALs Client in Windows 95 and
Windows 98. The client software should work with the following IBM products:
•
8235 DIALs Server
•
2210 Nways Multiprotocol Router and Multiprotocol Routing Services (MRS)
•
2212 Access Utility (AIS)
•
2216 Nways Multiaccess Connector
Support for the use of the IBM DIALs client is available at the following web site:
http://www.networking.ibm.com/support
This section only describes the use of the Dial-In client.
The latest DIALs Client can be obtained from the download section of the 2210
support page located at
http://www.networking.ibm.com/support/code.nsf/2210dial?OpenView. This
client works with the 8235, 2210, 2212, and 2216.
The IBM DIALs client is included on the IBM International ISDN PC Card
Software CD in the directories \EXTRAS\Win95\Dials and
\EXTRAS\Win98\Dials.
126
IBM ISDN PC Card:User’s Guide
ISDNmst.fm Page 127 Wednesday, January 15, 2003 9:22 AM
To use the IBM DIALs client, do the following:
1. After installing the IBM DIALs client on your notebook computer, doubleclick the My Computer icon.
The Dial-In Networking icon which now appears represents the DIALs
client. Double-click this icon.
2. In the Dial-In Networking window, double-click the Make New Connection
icon.
3. The New Connection Wizard starts. Enter a name for the connection in the
New connection name field. In the Select Modem/Device window, select
AVM-GmbH (CAPI ISDN Device) in the drop-down list. Enter any phone
number and select the country code if necessary. Click Next. In the last
window, click Finish.
4. To require the router to call back, select the connection in the Dial-In
Networking window, right-click it, and select Properties in the context menu
as shown in the example below.
11. Implementations of the IBM International ISDN PC Card
127
ISDNmst.fm Page 128 Wednesday, January 15, 2003 9:22 AM
5. In the Properties window, click the Cost Savings tab. Fill in the appropriate
fields, then click Save. You may now dial up the connection immediately, or
simply close the window.
Using ISDNWatch
ISDNWatch is a small utility for Windows 9x, Millennium Edition, NT 4.0, 2000,
and XP for use with any CAPI 2.0-compliant ISDN adapter. It displays the status
of the B channels and related information.
In order to install and use ISDNWatch, you must have a CAPI 2.0-compliant ISDN
adapter installed.
To use ISDNWatch, do the following:
1. Open the folder \EXTRAS\ISDNW on the device driver CD. Double-click
the Setup file to start the installation.
2. Select the installation language and click OK. In the next window you may
choose the installation directory. The default path is C:\Program
Files\ISDNWatch. To select a different installation directory, click Browse;
otherwise, click Next to install ISDN Watch in the default path.
128
IBM ISDN PC Card:User’s Guide
ISDNmst.fm Page 129 Wednesday, January 15, 2003 9:22 AM
3. When the installation has been completed, click Finish. A shortcut to the
ISDNWatch utility is installed by default in the Start menu under Programs /
ISDNWatch. To start the program, click the ISDNWatch shortcut.
4. After starting ISDNWatch, dial up a connection. An icon in the system tray on
the task bar indicates that one or both of the B channels are in use. Each B
channel in use is represented by a green bar. If both B channels are active, then
the ISDNWatch icon displays two green bars.
5. To configure the ISDNWatch settings, right-click the ISDNWatch icon in the
system tray on the task bar.
CAPI Port Drivers
The drivers you installed for the IBM International ISDN PC Card are compliant
with the CAPI 2.0 standard interface. This means that the ISDN PC Card can be
used directly by application programs that conform to CAPI 2.0 , such as the
FRITZ! Software package included with the ISDN PC Card, Symantec's WinFax
PRO 9.0, PC Anywhere 9.x, and many others. A list of CAPI 2.0-compliant
software can be found in the Internet at http://www.capi.org/cgi/sinfo.pl.
However, many communication programs are not CAPI 2.0-compliant, including
AOL 5.0, the CompuServe 4.0 dialer and many other applications. The CAPI Port
Drivers are included in this package so that such programs can nonetheless be
used over ISDN. The CAPI Port Drivers provide analog modem emulation over
the CAPI interface, so that programs which do not conform to CAPI can use the
ISDN adapter as if it were a conventional modem. In this way you can use
practically any data communication software over ISDN.
11. Implementations of the IBM International ISDN PC Card
129
ISDNmst.fm Page 130 Wednesday, January 15, 2003 9:22 AM
In principle, the CAPI Port inserts an intermediary layer between the application
you use and the CAPI 2.0 interface. It interprets the modem communication
program's AT commands and converts them into CAPI 2.0-compliant API calls,
thus allowing software which was not designed for ISDN communication to use
your ISDN line.
Note:
The CAPI 2 0 interface is not restricted to Europe - it works all over the
world!
Prerequisites for the CAPI Port installation
Before the CAPI Port drivers can be installed, the device drivers for the IBM
International ISDN PC Card must be installed on your system.
If you already have CAPI Port drivers installed on your system, reinstallation
may not be possible without removing the older driver versions. See “Removing
the CAPI Port Drivers” on page 152 for details.
Installing the CAPI Port Drivers in Windows 95
For optimal performance, install the Microsoft Dial-Up Networking Update 1.3 or
1.4 in your Windows 95 system before installing the CAPI Port Drivers. See
“NDIS WAN CAPI driver installation in Windows 95” on page 16.
Note:
Once the CAPI Port Driver is installed, you cannot change its settings! If
you need to change the available modem emulations, you must remove
and reinstall the CAPI Port Driver.
DE
Deutsch
EN
English
FR
Français
IT
Italiano
SP
Español
To install the CAPI Port drivers in Windows 95, do the following:
1. Insert the CD labeled “IBM International ISDN PC Card Drivers” into your
computer’s CD-ROM drive.
2. Double-click the My Computer icon on the desktop, then double-click the
icon for your CD-ROM drive.
3. Continue double-clicking to open the folders "Extras", “PORT”, “W95”, and
then “EN”.
4. The “EN” folder contains a setup program. Double-click it to start the CAPI
Port Driver installation.
130
IBM ISDN PC Card:User’s Guide
ISDNmst.fm Page 131 Wednesday, January 15, 2003 9:22 AM
5. If you do not plan to install any other modem emulation software for CAPI
2.0, such as cFos, or if your other software does not need to access any COM
ports, then you can leave all the options selected as illustrated below. In most
cases you can simply click OK to confirm that you want to install the drivers.
6. Some software packages designed for use with an analog modem may require
that the CAPI Port Drivers be mapped to a COM port. Older software in
particular often requires a serial port in the range from COM1 to COM4.
Note:
Please consult the user's guide for your notebook to find out which
COM ports are used and which are available, and how to make COM
ports available if necessary.
To configure the CAPI Port drivers on a specific port, click the Ports
tab in the Installation Of The ISDN CAPI Port Drivers window.
11. Implementations of the IBM International ISDN PC Card
131
ISDNmst.fm Page 132 Wednesday, January 15, 2003 9:22 AM
In the Virtual Port field, select one of the available COM ports in the
drop-down list. In the example illustrated above, COM3 will be
mapped to ISDN CAPI Port 1.
When you have selected the desired COM port in the Virtual Port
field, click OK to complete the CAPI Port Driver installation.
Note:
Selecting a COM port rather than the ISDNPORT does not
affect the use of the emulated modems at all. The COM port
selection is provided for those programs which require access
to a COM port. These applications are few in number. The best
way to find this out whether your application requires a COM
port is to try it with the default CAPI Port settings first, then
change them if necessary by repeating the CAPI Port Driver
installation.
7. Once the installation is complete, you are prompted to restart your computer.
After the system has restarted, you will find the CAPI Port Drivers installed as
modems in the Windows 95 Device Manager.
132
IBM ISDN PC Card:User’s Guide
ISDNmst.fm Page 133 Wednesday, January 15, 2003 9:22 AM
Each modem name that starts with “ISDN” is an emulated modem for the
CAPI Port Drivers for the CAPI 2.0 interface.
Your IBM International ISDN PC Card is now ready to use with communication
software that is not CAPI-2.0 compliant. You will also find a Windows Help file
for the CAPI Port Drivers on your Windows 95 desktop.
Installing the CAPI Port Drivers in Windows 98
Note:
Once the CAPI Port Driver is installed, you cannot change its settings! If
you need to change the available modem emulations, you must remove
and reinstall the CAPI Port Driver.
DE
Deutsch
EN
English
FR
Français
IT
Italiano
SP
Español
11. Implementations of the IBM International ISDN PC Card
133
ISDNmst.fm Page 134 Wednesday, January 15, 2003 9:22 AM
To install the CAPI Port drivers in Windows 98, do the following:
1. Insert the CD labeled “IBM International ISDN PC Card Drivers” into your
computer’s CD-ROM drive.
2. Double-click the My Computer icon on the desktop, then double-click the
icon for your CD-ROM drive.
3. Continue double-clicking to open the folders "Extras", "PORT”, “WIN98”,
and then “EN”.
4. The “EN” folder contains a setup program. Double-click it to start the CAPI
Port Driver installation.
5. If you do not plan to install any other modem emulation software for CAPI
2.0, such as cFos, or if your other software does not need to access any COM
ports, then you can leave all the options selected as illustrated below. In most
cases you can simply click OK to confirm that you want to install the drivers.
6. Some software packages designed for use with an analog modem may require
that the CAPI Port Drivers be mapped to a COM port. Older software in
particular often requires a serial port in the range from COM1 to COM4.
Note:
Please consult the user's guide for your notebook to find out which
COM ports are used and which are available, and how to make COM
ports available if necessary.
To map the CAPI Port Driver to a specific port, click the Ports tab in
the Installation Of The ISDN CAPI Port Drivers window.
134
IBM ISDN PC Card:User’s Guide
ISDNmst.fm Page 135 Wednesday, January 15, 2003 9:22 AM
In the Virtual Port field, select one of the available COM ports in the
drop-down list. In the example illustrated above, COM3 will be
mapped to ISDN CAPI Port 1.
When you have selected the desired COM port in the Virtual Port
field, click OK to complete the CAPI Port Driver installation.
Note:
Selecting a COM port rather than the ISDNPORT does not
affect the use of the emulated modems at all. The COM port
selection is provided for those programs which require access
to a COM port. These applications are few in number. The best
way to find this out whether your application requires a COM
port is to try it with the default CAPI Port settings first, then
change them if necessary by repeating the CAPI Port Driver
installation.
7. Once the installation is complete, you are prompted to restart your computer.
After the system has restarted, you will find the CAPI Port Drivers installed as
modems in the Windows 98 Device Manager.
11. Implementations of the IBM International ISDN PC Card
135
ISDNmst.fm Page 136 Wednesday, January 15, 2003 9:22 AM
Each modem name that starts with “ISDN” is an emulated modem for the
CAPI Port Drivers for the CAPI 2.0 interface.
Your IBM International ISDN PC Card is now ready to use with communication
software that is not CAPI-2.0 compliant. You will also find a Windows Help file
for the CAPI Port Drivers on your Windows 98 desktop.
Installing the CAPI Port Drivers in Windows Me
Note:
Once the CAPI Port Driver is installed, you cannot change its settings! If
you need to change the available modem emulations, you must remove
and reinstall the CAPI Port Driver.
DE
Deutsch
EN
English
FR
Français
IT
Italiano
SP
Español
136
IBM ISDN PC Card:User’s Guide
ISDNmst.fm Page 137 Wednesday, January 15, 2003 9:22 AM
To install the CAPI Port drivers in Windows Me, do the following:
1. Insert the CD labeled “IBM International ISDN PC Card Drivers” into your
computer’s CD-ROM drive.
2. Double-click the My Computer icon on the desktop, then double-click the
icon for your CD-ROM drive.
3. Continue double-clicking to open the folders "Extras", “PORT”, “WINME”,
and then “EN”.
4. The “EN” folder contains a setup program. Double-click it to start the CAPI
Port Driver installation.
5. If you do not plan to install any other modem emulation software for CAPI
2.0, such as cFos, or if your other software does not need to access any COM
ports, then you can leave all the options selected as illustrated below. In most
cases you can simply click OK to confirm that you want to install the drivers.
6. Some software packages designed for use with an analog modem may require
that the CAPI Port Drivers be mapped to a COM port. Older software in
particular often requires a serial port in the range from COM1 to COM4.
Note:
Please consult the user's guide for your notebook to find out which
COM ports are used and which are available, and how to make COM
ports available if necessary.
To map the CAPI Port Driver to a specific port, click the Ports tab in the
Installation Of The ISDN CAPI Port Drivers window.
11. Implementations of the IBM International ISDN PC Card
137
ISDNmst.fm Page 138 Wednesday, January 15, 2003 9:22 AM
In the Virtual Port field, select one of the available COM ports in the dropdown list. In the example illustrated above, COM3 will be mapped to ISDN
CAPI Port 1.
When you have selected the desired COM port in the Virtual Port field, click
OK to complete the CAPI Port Driver installation.
Note:
Selecting a COM port rather than the ISDNPORT does not affect the
use of the emulated modems at all. The COM port selection is
provided for those programs which require access to a COM port.
These applications are few in number. The best way to find this out
whether your application requires a COM port is to try it with the
default CAPI Port settings first, then change them if necessary by
repeating the CAPI Port Driver installation.
7. Once the installation is complete, you are prompted to restart your computer.
After the system has restarted, you will find the CAPI Port Drivers installed as
modems in the Windows Me Device Manager.
138
IBM ISDN PC Card:User’s Guide
ISDNmst.fm Page 139 Wednesday, January 15, 2003 9:22 AM
Each modem name that starts with “ISDN” is an emulated modem for the
CAPI Port Drivers for the CAPI 2.0 interface.
Your IBM International ISDN PC Card is now ready to use with communication
software that is not CAPI-2.0 compliant. You will also find a Windows Help file
for the CAPI Port Drivers on your Windows Me desktop.
Installing the CAPI Port Drivers in Windows NT 4.0
Throughout this section, it is assumed that you are logged in to Windows NT 4.0
as a Administrator. If you are not, you may not be able to perform all the steps
outlined in this section.
Note:
Once the CAPI Port Driver is installed, you cannot change its settings! If
you need to change the available modem emulations, you must remove
and reinstall the CAPI Port Driver.
DE
Deutsch
EN
English
FR
Français
IT
Italiano
11. Implementations of the IBM International ISDN PC Card
139
ISDNmst.fm Page 140 Wednesday, January 15, 2003 9:22 AM
SP
Español
To install the CAPI Port drivers in Windows NT 4.0, do the following:
1. Insert the CD labeled “IBM International ISDN PC Card Drivers” into your
computer’s CD-ROM drive.
2. Double-click the My Computer icon on the desktop, then double-click the
icon for your CD-ROM drive.
3. Continue double-clicking to open the folders "Extras", “PORT”, “WINNT”,
and then “EN”.
4. The “EN” folder contains a setup program. Double-click it to start the CAPI
Port Driver installation.
5. If you do not plan to install any other modem emulation software for CAPI
2.0, such as cFos, or if your other software does not need to access any COM
ports, then you can leave all the options selected as illustrated below. In most
cases you can simply click OK to confirm that you want to install the drivers.
6. Some software packages designed for use with an analog modem may require
that the CAPI Port Drivers be mapped to a COM port. Older software in
particular often requires a serial port in the range from COM1 to COM4.
To map the CAPI Port Driver to a specific port, click the Ports tab in the
Installation Of The ISDN CAPI Port Drivers window.
140
IBM ISDN PC Card:User’s Guide
ISDNmst.fm Page 141 Wednesday, January 15, 2003 9:22 AM
In the Virtual Port field, select one of the available COM ports in the dropdown list. In the example illustrated above, COM3 will be mapped to ISDN
CAPI Port 1.
When you have selected the desired COM port in the Virtual Port field, click
OK to complete the CAPI Port Driver installation.
Note:
Be aware that during the installation of the CAPI Port Drivers the
selected COM port will always be assigned to the "ISDN Custom
Config" modem emulation.
If you need any other COM port assignments you must install cFos for
Windows NT 4.0. You can download this siftware from
http://www.cfos.com or install the one delivered on the IBM
International ISDN PC Card Software Installation CD.
The selection of a COM port instead of the ISDNPORT does not
influence the usage of the emulated modems at all. The COM port
selection is provided for those software packages that demand access
to a COM port. The number of applications that demand COM port
access is low. To find out if an application demands COM port access,
test the software with the standard CAPI Port settings and, if needed,
change the settings by reinstalling the CAPI Port device drivers.
7. Once the installation is complete, you are prompted to restart your computer.
After the system has restarted, you will find the CAPI Port Drivers installed as
modems in the Windows NT 4.0 Device Manager.
Each modem name that starts with “ISDN” is an emulated modem for the
CAPI Port Drivers for the CAPI 2.0 interface.
11. Implementations of the IBM International ISDN PC Card
141
ISDNmst.fm Page 142 Wednesday, January 15, 2003 9:22 AM
Your IBM International ISDN PC Card is now ready to use with communication
software that is not CAPI-2.0 compliant. You will also find a Windows Help file
for the CAPI Port Drivers on your Windows NT 4.0 desktop.
Activating the CAPI Port Drivers in Windows NT 4.0
To activate the CAPI Port Drivers in Windows NT 4.0 Workstation, first check
whether the Windows NT 4.0 Workstation Remote Access Service has been
installed onto your computer.
To activate the CAPI Port drivers in Windows NT 4.0, do the following:
1. Double-click the My Computer icon on the desktop, then the Dial-Up
Networking icon.
2. A message may then appear informing you that the phonebook is empty.
Click OK. If the New Phonebook Entry Wizard opens, or a dialog like the one
illustrated below, then Dial-Up Networking is properly installed on your
Windows NT 4.0 Workstation computer. In this case, close the My Computer
window and continue from “Adding CAPI Ports to an existing RAS
installation” on page 144. Otherwise, read “CAPI Port Drivers” on page 129.
3. Now click the Add button to install the next RAS-capable device. In the dialog
that appears, click OK again. Repeat this procedure until you have added all
the RAS-capable devices available. Finally, click Continue.
4. In the dialogs that follow you will complete the RAS configuration. Follow the
instructions displayed.
142
IBM ISDN PC Card:User’s Guide
ISDNmst.fm Page 143 Wednesday, January 15, 2003 9:22 AM
After Dial-Up Networking installation has been completed, do not reboot
your computer when prompted to do so. Instead, click Do Not Restart and
then reapply the latest Service Pack that was installed on your computer.
After the Service Pack has been reapplied, your IBM International ISDN PC Card
is ready to use with communication software that is not CAPI-2.0 compliant. You
will also find a Windows Help file for the CAPI Port Drivers on your Windows
NT 4.0 Workstation desktop.
Installing RAS and adding the CAPI Ports to RAS
To install RAS and add the CAPI Ports, do the following:
1. If you receive the following window that tells you that Dial-Up Networking is
uninstalled on your system then click Install to add it to your system. Follow
any on screen instructions you get. Ensure that as a minimum you install the
TCP/IP protocol.
2. At the end of of the installation process the Remote Access Setup will be
invoked which displays a RAS capable device. Click the OK button.
3. Now click on the Add... button to install the next RAS capable device. In the
following window click OK. Repeat this procedure until you do not have any
RAS capable device to add. Finally Continue.
11. Implementations of the IBM International ISDN PC Card
143
ISDNmst.fm Page 144 Wednesday, January 15, 2003 9:22 AM
4. In the next windows you will have to complete the configuration of RAS.
Follow the on screen instructions to do this.
5. Once the installation of Dial-Up Networking is complete do not reboot your
computer when prompted to do. Instead click Do Not Restart and reapply the
service pack that is installed on your laptop computer.
After the service pack has been reapplied You are ready to use non-CAPI 2.0
compliant communication software with the IBM International ISDN PC Card as
well. You will also find the guide for the CAPI Port Drivers as a Windows help file
on the desktop of your Windows NT 4.0 Workstation computer.
Adding CAPI Ports to an existing RAS installation
To add a CAPI Port to an existing RAS installation, do the following:
1. Click through Start -> Settings -> Control Panel to open the Control Panel,
then double-click the Network icon.
144
IBM ISDN PC Card:User’s Guide
ISDNmst.fm Page 145 Wednesday, January 15, 2003 9:22 AM
2. In the Network settings, click on the Services tab. Select Remote Access
Service in the list of installed services, then click Properties.
3. In the Remote Access Setup window, click Add to add additonal RAS-capable
devices.
4. In the Add RAS Device window, click OK. Repeat steps 3 and 4 until all of the
available RAS-capable devices have been added.
11. Implementations of the IBM International ISDN PC Card
145
ISDNmst.fm Page 146 Wednesday, January 15, 2003 9:22 AM
5. Click Continue to complete the installation. Click Close in the Network
Control Panel applet. Windows NT 4.0 then updates the configuration. Reboot
your computer when prompted to do so.
You are now ready to use non-CAPI 2.0 compliant communication software with
the IBM International ISDN PC Card as well. You will also find the guide for the
CAPI Port Drivers as a Windows Help file on the desktop of your Windows NT
4.0 Workstation computer.
Installing the CAPI Port Drivers in Windows 2000
Throughout this section it is assumed that you are logged on to the Windows 2000
system as Administrator. If you are not logged on as Administrator, you may not
be able to perform all the steps outlined in this section.
Note:
Once the CAPI Port Driver is installed, you cannot change its settings! If
you need to change the available modem emulations, you must remove
and reinstall the CAPI Port Driver.
The directory structure for the CAPI Port Drivers on the web is as follows:
DE
146
Deutsch
IBM ISDN PC Card:User’s Guide
ISDNmst.fm Page 147 Wednesday, January 15, 2003 9:22 AM
EN
English
FR
Français
IT
Italiano
SP
Español
To install the CAPI Port drivers in Windows 2000, do the following:
1. Insert the CD labeled “IBM International ISDN PC Card Drivers” into your
computer’s CD-ROM drive.
2. Double-click the My Computer icon on the desktop, then double-click the
icon for your CD-ROM drive. Continue double-clicking to open the folders
"Extras", "PORTS", "WIN2000", and then "EN". The "EN" folder contains a
setup program. Double-click it to start the CAPI Port device driver installation
3. If you do not plan to install other modem emulator software for CAPI 2.0
drivers such as cFos or your software does not need to access any COM port,
leave all selections as they are displayed below. Just click "OK" to confirm the
installation of the drivers.
4. However some software packages that are tailored for use with an analog
modem may require that the CAPI Port Drivers are installed to a physical
COM port. Especially older sofware demands access any serial port in the
range of COM1 to COM4.
11. Implementations of the IBM International ISDN PC Card
147
ISDNmst.fm Page 148 Wednesday, January 15, 2003 9:22 AM
Note:
Please consult your User's guide for your laptop computer in order to
find out which COM ports are used, which ones are available, and
how to make COM ports available if this becomes necessary.
In order to configure the CAPI Port drivers click on the Port tab of the
Installation Of The ISDN CAPI Port Driver window.
In the Virtual Port section you can select any of the ISDN CAPI Ports and
choose from the drop down list any of the available COM ports. In the above
example you will be selecting COM4 for the ISDN CAPI Port.
If you have made the correct selection of the COM port under the Virtual Port
tab you now can click OK to complete the installation of the CAPI Port
Drivers.
Note:
Be aware that during the installation of the CAPI Port Drivers the
selected COM port will always be assigned to the "ISDN Custom
Config" modem emulation.
If you need any other COM port assignments you must install cFos for
Windows 2000 Professional. You can download this software from
http://www.cfos.com or install the one delivered on the IBM
International ISDN PC Card Software Installation CD.
The selection of a COM port instead of the ISDNPORT does not
influence the usage of the emulated modems at all. The COM port
selection is provided for those software packages which demand
access to a COM port. The number of applications doing this is very
low. The best way to find this out is by testing the software with the
standard CAPI Port settings and then changing them if needed by
reinstalling the CAPI Port drivers.
5. Once the installation is complete you will be asked to restart your computer.
148
IBM ISDN PC Card:User’s Guide
ISDNmst.fm Page 149 Wednesday, January 15, 2003 9:22 AM
After the system restart you will find in the Windows 2000 Professional
Device Manager the CAPI Port Drivers installed as modems.
Every modem name that starts with "ISDN" is an emulated modem for the
CAPI 2.0 interface provided by the CAPI Port Drivers.
Your IBM International ISDN PC Card is now ready to use with communication
software that is not CAPI-2.0 compliant. You will also find a Windows Help file
for the CAPI Port Drivers on your Windows 2000 desktop.
Installing the CAPI Port Drivers in Windows XP
Throughout this section it is assumed that you are logged on to the Windows XP
system as Administrator. If you are not logged on as Administrator, you may not
be able to perform all the steps outlined in this section.
Note:
Once the CAPI Port Driver is installed, you cannot change its settings! If
you need to change the available modem emulations, you must remove
and reinstall the CAPI Port Driver.
The directory structure for the CAPI Port Drivers on the web is as follows:
DE
Deutsch
EN
English
FR
Français
IT
Italiano
SP
Espaïol
11. Implementations of the IBM International ISDN PC Card
149
ISDNmst.fm Page 150 Wednesday, January 15, 2003 9:22 AM
To install the CAPI Port drivers in Windows XP, do the following:
1. Insert the CD labeled “IBM International ISDN PC Card Drivers” into your
computer’s CD-ROM drive.
2. Click Start -> My Computer and double-click the icon for your CD-ROM
drive. Continue double-clicking to open the folders "Extras", "PORT"
"WINXP", and then "EN". The "EN" folder contains a setup program. Doubleclick it ot start the CAPI Port device driver installation.
3. If you do not plan to install other modem emulator software for CAPI 2.0
drivers such as cFos or your software does not need to access any COM port,
leave all selections as they are displayed below. Just click OK to confirm the
installation of the drivers.
4. However some software packages that are tailored for use with an analog
modem may require that the CAPI Port Drivers are installed to a physical
COM port. Especially older sofware demands access any serial port in the
range of COM1 to COM4.
Note:
Please consult your User's guide for your laptop computer in order to
find out which COM ports are used, which ones are available, and
how to make COM ports available if this shall become necessary.
In order to configure the CAPI Port drivers click on the Port tab of the
Installation Of The ISDN CAPI Port Driver window.
150
IBM ISDN PC Card:User’s Guide
ISDNmst.fm Page 151 Wednesday, January 15, 2003 9:22 AM
In the Virtual Port section you can select any of the ISDN CAPI Ports and
choose from the drop down list any of the available COM ports. In the above
example you will be selecting COM4 for the ISDN CAPI Port.
If you have made the correct selection of the COM port under the Virtual Port
tab, click OK to complete the installation of the CAPI Port Drivers.
Note:
Be aware that during the installation of the CAPI Port Drivers the
selected COM port will always be assigned to the "ISDN Custom
Config" modem emulation.
If you need any other COM port assignments you must install cFos for
Windows XP. You can download this software from
http://www.cfos.com or install the one delivered on the IBM
International ISDN PC Card Installation Software CD.
The selection of a COM port instead of the ISDNPORT does not
influence the usage of the emulated modems at all. The COM port
selection is provided for those software packages which demand
access to a COM port. The number of applications doing this is very
low. The best way to find this out is by testing the software with the
standard CAPI Port settings and then changing them if needed by
reinstalling the CAPI Port drivers.
5. Once the installation is complete you will be asked to restart your computer.
After the system restart you will find in the Windows XP Device Manager the
CAPI Port Drivers installed as modems.
11. Implementations of the IBM International ISDN PC Card
151
ISDNmst.fm Page 152 Wednesday, January 15, 2003 9:22 AM
Every modem name that starts with "ISDN" is an emulated modem for the
CAPI 2.0 interface provided by the CAPI Port Drivers.
Your IBM International ISDN PC Card is now ready to use with communication
software that is not CAPI-2.0 compliant. You will also find a Windows Help file
for the CAPI Port Drivers on your Windows XP desktop.
Removing the CAPI Port Drivers
To remove the CAPI PORT Drivers from Windows 95, Windows 98, and Windows
Me:
1. Leave the IBM International ISDN PC Card in the PCMCIA slot. Disconnect
its cable from the ISDN line.
2. Click Start -> Settings -> Control Panel to open the Control Panel.
3. Double-click the Add/Remove Programs icon.
Select ISDN CAPI Port in the list of installed programs, then click
Add/Remove. When the CAPI Port Drivers have been removed, confirm that
you want to restart the computer.
152
IBM ISDN PC Card:User’s Guide
ISDNmst.fm Page 153 Wednesday, January 15, 2003 9:22 AM
Once the computer has restarted the removal of the CAPI Port Drivers is
complete.
To remove the CAPI Port drivers from Windows NT 4.0:
Throughout this section it is assumed that you are logged on to the Windows NT
4.0 Workstation system as Administrator. If you are not logged on as
Administrator, you may not be able to perform all the steps outlined in this
section.
1. Leave the IBM International ISDN PC Card in the PCMCIA slot. Disconnect
Disconnect its cable from the ISDN line.
2. Click Start -> Settings -> Control Panel to open the Control Panel.
3. Double-click the Add/Remove Programs icon.
Select ISDN CAPI Port in the list of installed programs, then click
Add/Remove. When the CAPI Port Drivers have been removed, confirm that
you want to restart the computer.
11. Implementations of the IBM International ISDN PC Card
153
ISDNmst.fm Page 154 Wednesday, January 15, 2003 9:22 AM
Once the computer has restarted the removal of the CAPI Port Drivers is
complete.
To remove the CAPI Port drivers from Windows 2000:
1. Leave the IBM International ISDN PC Card in the PCMCIA slot. Disconnect
its cable from the ISDN line.
2. Click Start -> Settings -> Control Panel to open the Control Panel.
3. Double-click the Add/Remove Programs icon.
Make sure that Change or Remove Programs is selected in the column to the
left.
4. Select ISDN CAPI Port in the list of currently installed programs.
Click the Change/Remove button. When the software has been removed,
restart your computer.
Once the computer has restarted the removal of the CAPI Port Drivers is
complete.
154
IBM ISDN PC Card:User’s Guide
ISDNmst.fm Page 155 Wednesday, January 15, 2003 9:22 AM
To remove the CAPI Port drivers from Windows XP:
1. Leave the IBM International ISDN PC Card in the PCMCIA slot. Disconnect
its cable from the ISDN line.
2. Click Start -> Control Panel to open the Control Panel.
3. Double-click the Add or Remove Programs icon.
4. Make sure that Change or Remove Programs is selected in the column at left.
Select ISDN CAPI Port in the list of currently installed programs.
Click the Change/Remove button. When the software has been removed,
restart your computer.
Once the computer has restarted, the removal of the CAPI Port Drivers is
complete.
CAPI Port troubleshooting and frequently asked questions
General
Which of the CAPI Port Driver's modem emulations should I use to connect to
the Internet?
To set up Internet access using the CAPI Port Driver, see the section on Internet
access using cFos in the User's Guide for the IBM International ISDN PC Card.
When you are prompted to select a device for the Internet connection, you may
select the following CAPI Port driver modem emulations:
•
ISDN Internet (PPP over ISDN)
•
ISDN RAS (PPP over ISDN)
Can I use both cFos and the CAPI Port Driver?
cFos and the CAPI Port Drivers provide similar capabilities. You may use both
together, or you may replace one with the other.
Windows 95
11. Implementations of the IBM International ISDN PC Card
155
ISDNmst.fm Page 156 Wednesday, January 15, 2003 9:22 AM
I have installed the CAPI Port Drivers in Windows 95. During the software
setup, however, I was not prompted to choose the modem emulation I want.
The modem is installed and works. How can I make the dialog appear?
Some versions of Windows 95 do not display the modem emulation selection
dialog during the CAPI Port Driver installation:
The cause of the problem is an older version of the MFCxx.DLL files. To solve this
problem, first remove the CAPI Port Drivers, then install the Year 2000 fix for
Windows 95. This fix can be found on the Microsoft Windows 95 download page
at http://www.microsoft.com/windows95/downloads/. On this page, scroll
down to "Featured Updates" and then select Windows 95 Year 2000 Update.
When you install this fix, the following dialog may appear:
In this case, click Cancel to skip the installation of the Internet Explorer 4.01
Service Pack 2, then click OK in the following dialog to complete the installation
of the Year 2000 fix. The Internet Explorer Service Pack installation is not required.
Finally, reinstall the CAPI Port Drivers for Windows 95.
Windows NT 4.0
156
IBM ISDN PC Card:User’s Guide
ISDNmst.fm Page 157 Wednesday, January 15, 2003 9:22 AM
I have installed the CAPI Port Drivers in Windows NT 4.0 Workstation with
Service Pack 3. During the software set-up, however, I was not prompted to
choose the modem emulation I want. The modem is installed and works. How
can I make the dialog appear?
Windows NT 4.0 with Service Pack 3 installed does not display the modem
emulation selection dialog during the CAPI Port Driver installation:
This combination of Windows NT 4.0 Workstation and Service Pack 3 contains
older versions of the MFCxx.DLL files. To solve this problem, first remove the
CAPI Port Drivers, then install Service Pack 4 or later, and finally reinstall the
CAPI Port Drivers .
Installing CardWizard 5.20 for Windows NT 4.0 trial version
Before installing any version of SystemSoft's CardWizard software, make sure
that no adapter is currently inserted in any PC Card (PCMCIA)slot,and verify that
you have removed any older versions of CardWizard. For more information on
how to remove CardWizard from your Windows NT 4.0 Workstation system
please see “Checking the PCMCIA support software for Windows NT 4.0” on
page 34 .
You can find a trial version of CardWizard 5.20.06 on the Software CD for the IBM
International ISDN PC Card in the \EXTRAS\CW52NT directory in these
languages:
Directory
DE
Language
German (Deutsch)
11. Implementations of the IBM International ISDN PC Card
157
ISDNmst.fm Page 158 Wednesday, January 15, 2003 9:22 AM
Directory
Language
EN
English
FR
French (Français)
IT
Italian (Italiano)
SP
Spanish (Español)
For details on ordering or upgrading SystemSoft's CardWizard Software, please
visit the following web site:
http://www.systemsoft.com.
To install CardWizard 5.20 for Windows NT 4.0 trial version, do the following:
1. Download the evaluation version from the IBM International ISDN PC Card
web page and read the accompanying Readme file. Start the setup program as
instructed in the Readme file.
2. In the first two windows, click the Next button. In the Software License
Agreement window, read the End-User License agreement. If you agree to the
license conditions, click Yes.
3. The Question message reminds you that you must remove all PC Cards from
all of your computer's PCMCIA slots. If you have done so, click Yes to
continue the installation.
4. In the next window, you must select the type of notebook computer you are
using. Select the appropriate model in the list, then click Next.
158
IBM ISDN PC Card:User’s Guide
ISDNmst.fm Page 159 Wednesday, January 15, 2003 9:22 AM
5. In the next window you can select a Power Management Utility:
•
SystemSoft PowerProfiler/PPSE
•
IBM Power Management System
•
None
For IBM notebook computers, select the IBM Power Management System.
For any other notebook computer you may select either the SystemSoft
PowerProfiler or None. If you are not sure what to choose, please contact
either the manufacturer of your notebook computer or SystemSoft for further
assistance.
On Toshiba notebook computers you can also select the Toshiba Power
management during the CardWizard installation. If you have further
questions about this feature, please refer to the SystemSoft web site.
6. In the next window you can choose the installation directory for the software.
If you want to accept the default path, C:\Program
Files\SystemSoft\CardWizard\, click Next. Otherwise, click Browse and
open the desired installation directory.
7. After the setup has been completed, click Yes to read the CardWizard Readme
file.
8. After you have completed the installation and read the Readme file, confirm
that you want to restart your computer by selecting the option Yes, I want to
restart my computer now, then clicking Finish. You must restart the system in
order for the changes to take effect.
9. If you are using the trial version of SystemSoft's CardWizard 5.20, the
following window opens after the system restart.
11. Implementations of the IBM International ISDN PC Card
159
ISDNmst.fm Page 160 Wednesday, January 15, 2003 9:22 AM
10. After you have completed the installation of the IBM International ISDN PC
Card, the adapter will be listed in the CardWizard Window as a specialty card.
160
IBM ISDN PC Card:User’s Guide
ISDNmst.fm Page 161 Wednesday, January 15, 2003 9:22 AM
12. Using NDIS
This section contains instructions for using NDIS.
Using NDIS in Windows 95, Windows 98, and Windows Me
The NDIS WAN CAPI device driver
The NDIS WAN CAPI Device Driver for Windows 95 provides the capability for
dial-up networking (RAS) over ISDN. The NDIS WAN CAPI device driver is
based upon the standardized CAPI 2.0 application interface, and can be used with
all CAPI 2.0-compliant ISDN adapters.
To install the device driver into MS Windows 95, you need the Microsoft ISDN
Accelerator Pack v1.1 or its successor, Microsoft Dial-Up Networking 1.3
Upgrade.
Do not install these programs at the same time!
Both programs extend the functionality of Windows 9x and Windows Me Dial-Up
Networking and form the basis for installation of the NDIS WAN CAPI Device
Driver for Windows 9x and Windows Me. The table below shows the location of
this software on the CD-ROM for each operating system.
Operating System
Directory
Windows 95
Win95\NDIS
Windows 98
WIN98\NDIS
Windows Me
WinME\NDIS
Both products contain a WAN architecture for Windows 95, identical to that of
Windows NT, with features beyond simple modem support. This software
enables Windows 95 to support media such as X.25, Frame Relay and ISDN.
Please note that this architecture allows you to set up only ISDN connections
based on the Point-to-Point-Protocol (PPP) over ISDN and HDLC using Dial-Up
Networking, unlike the ISDN CAPI Port Device Driver, which provides a
UNIMODEM/VCOMM device driver. HyperTerminal, CompuServe client
software and similar packages cannot be used with the ISDN Accelerator Pack.
For these packages, please use the ISDN CAPI Port Device Driver or cFos.
NDIS is an abbreviation for Network Device Interface Specification and defines a
standard for binding network adapters (hardware) to network protocols
(software). NDIS WAN is a Microsoft extension of this standard for Wide-Area
© Copyright IBM Corp. 2002
161
ISDNmst.fm Page 162 Wednesday, January 15, 2003 9:22 AM
Networking (WAN). The NDIS WAN CAPI device driver thus allows the ISDN
adapter to be used as a WAN adapter, addressed through the Common ISDN API
(CAPI) 2.0 applications interface.
Installing the ISDN adapter
Install the ISDN adapter as instructed in the manual. Always use the latest CAPI
2.0 device driver.
Installing Windows 95 dial-up networking 1.3
If Dial-Up Networking has not yet been installed, install it now:
1. Click Start -> Settings -> Control Panel -> Add-> Remove Programs ->
Windows Setup tab -> Communications -> Details -> Dial-Up Networking > OK .
2. You are prompted to confirm that you want to install Microsoft Dial-Up
Networking. Click Yes.
3. Accept the terms of the license agreement by clicking Yes.
4. If the TCP/IP protocol is not yet installed on your computer, start the
installation by clicking Yes.
5. After having restarted your computer, Windows updates several files. During
this process, you must insert the Windows 95 CD-ROM when prompted. To
complete the installation of Microsoft Dial-Up Networking 1.3, restart your
computer.
Installing the Microsoft ISDN accelerator pack v1.1
Copy the file a temporary directory on your hard disk drive, then start the
installation by double-clicking the msisdn11.exe file. After you have accepted the
Microsoft license agreement, the ISDN Accelerator Pack v1.1 is installed. At the
end of the installation procedure, the following message displays:
If you are installing an ISDN adapter, you should now refer to the setup
directions provided by the manufacturer.
Acknowledge this message, then restart Windows to complete the installation of
the Microsoft ISDN Accelerator Pack v1.1. After successful installation, the
program group ISDN Programs opens in the Accessories folder.
Installing the NDIS WAN CAPI device driver for Windows 95
You can now install the NDIS WAN CAPI Device Driver for Windows 95 using
the following instructions:
1. Open the Windows 95 Control Panel and click the Network icon.
2. Select Add -> Adapter -> Add. In the next window, click the Have disk
button. In the Install from Disk window, enter the path to the directory
containing the NDIS WAN CAPI Device Driver files. Confirm this by clicking
OK.
162
IBM ISDN PC Card:User’s Guide
ISDNmst.fm Page 163 Wednesday, January 15, 2003 9:22 AM
3. A device driver with the name “NDIS WAN CAPI Device Driver” is
displayed. Confirm this by clicking OK.
4. The required files are then copied to your hard disk drive. Afterward, the
network configuration window should display at least the following
components:
•
The required files are then copied to your hard disk drive. Afterward, the
network configuration window displays at least the following
components:
•
Network Adapter: Dial-Up Adapter
•
Protocol: NDISWAN / NDIS WAN CAPI Device Driver
5. Now add any network protocols you require, such as TCP/IP, IPX/SPX or
NetBIOS (you will need TCP/IP for the test connection described below).
Check the bindings of the protocol to the dial-up adapter. Remove any
unnecessary protocol bindings. Such changes can also be carried out later.
6. To continue the installation, confirm the settings in the network configuration
window by clicking OK. The ISDN Accelerator Pack's ISDN Configuration
Wizard starts automatically to assist you with the further configuration of the
device driver. Click Next.
7. In the next window, select the setting Switch Protocol: Automatic, since the D
channel protocol was already selected during the installation of the ISDN
adapter device driver software, and does not need to be entered again here.
Click Next.
8. The next window enables you to assign Multiple Subscriber Numbers (MSNs)
for both Modem Entries of the NDIS WAN CAPI Device Driver, if required, in
the Phone Number field. Confirm your entries by clicking Next.
You must assign MSNs if the ISDN adapter is to be used in RAS Server mode,
and other CAPI applications which answer data calls (with the service
indicator DATA64K) are present on your computer. This is necessary to direct
incoming calls to the correct application. The Multiple Subscriber Number
entered is used for both incoming and outgoing calls: you cannot configure
separate incoming and outgoing MSNs. If you need a separate MSN for
outgoing calls, use the ISDN CAPI Port Device Driver or cFos. Subsequent
changes to the MSN setting will only become active after Windows is
restarted.
9. When the ISDN Configuration Wizard has finished, you are prompted to
insert the Windows 95 CD-ROM. If a version conflict is reported for the file
NDIS.VXD (Windows NDIS 3.1 Wrapper) when copying files from the CDROM, then answer Yes to the question “Do you want to keep this file?” The
file NDIS.VXD that was copied on to your computer by the ISDN Accelerator
Pack v1.1 setup is more recent than the version on the Windows 95 CD-ROM.
10. The installation is then complete. After restarting the computer, the ISDN
Accelerator Pack v1.1 is ready to use in conjunction with the NDIS WAN
CAPI Device Driver for Windows 95.
Connections to Internet Service Providers (ISPs)
12. Using NDIS
163
ISDNmst.fm Page 164 Wednesday, January 15, 2003 9:22 AM
There are no binding standards for ISDN dial-up access to ISPs. PPP and SLIP
protocol variants, fixed and dynamically assigned IP addresses, static or dynamic
name server addresses and a variety of authentication procedures are all possible.
For TCP/IP connections with the NDIS WAN device driver, you must use 32-bit
client software (such as Web browsers and FTP clients), and not 16-bit software for
Windows 3.x. Otherwise, no IP connection can be established with Windows 95's
32-bit TCP/IP protocol stack.
ISDN B channel protocols and PPP variants
Many Internet providers use HDLC or the X.75 protocol on the ISDN B channel.
Two protocol variants are used for PPP connections: “PPP over ISDN“, based on
RFC 1618 and also known as synchronous PPP; and “modem-style PPP“, based
on RFC 1162 and also called asynchronous PPP.
Your Internet Service Provider (ISP) can tell you which protocol combinations and
authentication procedures you need for ISDN access.
Incorrect protocol settings result in immediate termination of the connection or
failure to establish a connection at all, with the Dial-Up Networking error
message
The computer you are dialing in to is not answering.
These settings are fixed in the Microsoft NDIS specification, and cannot be
modified by the user. If you require other protocols or PPP variants, use the ISDN
CAPI Port Device Driver or cFos.
Connecting computers using remote access service (RAS)
This section provides information on connecting your Windows 95 computer with
another computer (Windows 95 or Windows NT) for the purpose of accessing
remote files. For assistance with RAS configuration, please refer to the Windows
95 manual or on-line Help.
In this section, “Server” refers to the computer waiting to answer an incoming
call, while “Client” refers to the computer that dials up the ISDN connection. The
RAS configuration procedures for Windows 95 and Windows NT are different.
Windows NT 3.51/4.0 enables you to operate RAS in server mode using the
appropriate NDIS WAN CAPI Device Driver for Windows NT.
Remote access service (RAS) in Windows 95
To use RAS, you need the following components:
•
An ISDN adapter with current CAPI 2.0-compliant device driver software
•
The NDIS WAN CAPI Device Driver for Windows 95
•
Dial-Up Networking (with the Dial-Up Server module for the server
computer)
•
A network protocol (such as NetBEUI) with suitable client software, bound to
the dial-up adapter
164
IBM ISDN PC Card:User’s Guide
ISDNmst.fm Page 165 Wednesday, January 15, 2003 9:22 AM
Make sure that all of these components are installed, and determine the correct
configuration options for the client software. Windows 95 only enables one DialUp Networking connection to be active at a time. In the following configuration
example, the NetBEUI protocol from Microsoft is used to map a folder on the
remote server hard disk drive to a network drive on the client computer, enabling
the client to access the remote folder over ISDN as if it were a local hard disk
drive.
RAS configuration example
(Local Site: Windows 95 computer; Remote Site: Windows 95 computer; both
equipped with ISDN adapters)
Preparations (client and server):
To prepare your client and server, do the following:
1. Install the Dial-Up Server (on the server only)
For a Windows 95 computer to operate as a RAS server, the file
RNASERV.DLL must be present in the \WINDOWS\SYSTEM directory. This
file is usually installed with the MS ISDN Accelerator Pack 1.1, but can also be
installed from the Windows 95 Plus Pack. If this DLL is present, then the
command “Dial-Up Server” opens in the Connections menu of the Dial-Up
Networking window.
2. Install the NetBEUI protocolby doing the following:
Click Control Panel -> Network -> Add... -> Protocol -> Add... ->
Manufacturer: “Microsoft” -> NetBEUI.
3. Check the protocol binding by doing the following:
Click Control Panel -> Network -> Dial-Up Adapter -> Properties ->
“Bindings” tab -> NetBEUI” must be active
4. Install the client by doing the following:
Click Control Panel -> Network -> Add... -> Client -> Add... ->
Manufacturer: “Microsoft” -> Client for Microsoft Networks
5. Install File and Print Sharing (on the server only) by doing the following:
Click Control Panel -> Network -> Add... -> Service -> Add... ->
Manufacturer: select “Microsoft”-> File and print sharing for Microsoft
Networks
Configuring the Windows 95 server
Configure the Windows 95 server by doing the following:
1. Define the computer name by doing the following:
Click Control Panel -> Network -> Identification. Computer name. Type a
name for the computer.
Example: SERVER
2. Activate file and print sharing by doing the following:
12. Using NDIS
165
ISDNmst.fm Page 166 Wednesday, January 15, 2003 9:22 AM
Click Control Panel -> Network File and Print Sharing... -> “I want to be
able to give others access to my files
3. Share a directory by doing the following:
Start the Explorer. Select the directory to be shared, such as C:\TEST. Rightclick the directory to open the context menu. Select Sharing -> Shared as:
and type a share name, such as
TEST
.
Type
FULL
in the Access Type field. and click OK.
4. Activate the server by doing the following:
My Computer -> Dial-Up Networking -> Connections -> Dial-Up Server.
Select NDIS WAN Line 1 or Line 2 and activate Allow call access.
Configuring the Windows 95 client
Configure the Windows 95 client by doing the following:
1. Create a new Dial-Up Networking connection.
Click My Computer -> Dial-Up Networking -> Make new connection ->
Enter connection name . Select modem NDIS WAN Line 1 or Line 2. Click
Continue. Type the phone number (including outside dialing prefix for a PBX
extension line if necessary). Click Finish.
2. Configure the Dial-Up Networking connection.
Select the newly created Dial-Up Networking connection. Right-click and
select Properties. Deactivate the option “Use country codes and area codes” .
Click Server Type and set Type of Dial-Up Server to PPP: Windows 95,
Windows NT 3.5, Internet. Optionally, you can activate Log on to network
and Enable software compression options. Select NetBEUI as the allowed
network protocol. Click OK.
3. Activate the Dial-Up Networking connection.
Double-click on the newly created connection in the Dial-Up Networking
window and verify the phone number.
4. Map a drive to the shared folder on the remote computer.
5. Start Explorer. Click Tools -> Map Network Drive. Select an available drive
letter. Enter the path in UNC format as follows:
\\<Computer name>\<Shared folder name>
. Click OK.
Important: You must use the exact notation for the remote computer's shared
folder!
For example: \\SERVER\TEST
166
IBM ISDN PC Card:User’s Guide
ISDNmst.fm Page 167 Wednesday, January 15, 2003 9:22 AM
Remote access service (RAS) in Windows NT
To use RAS with Windows NT, you must first install the NDIS WAN CAPI Device
Driver for ISDN/CAPI 2.0 in Windows NT. This device driver works with both
Windows NT 3.51 and Windows NT 4.0. Installation of the device driver is fully
described in the accompanying documentation. You can set up connections to a
Windows 95 computer as the RAS server. The Windows 95 server might use the
modem NDIS WAN Line 1 or Line 2 in its Dial-Up Server configuration. Please
make certain of the following:
•
the same network protocols are installed on both computers and configured
for RAS connections
•
the necessary rights have been granted (RAS dial-in access, access rights for
resources, etc.)
For further information, please see the documentation that comes with Windows
NT.
If you are using third-party products as RAS servers, determine the required
configuration for the PPP protocols being used (synchronous or asynchronous),
and for the ISDN B-channel protocols.
Multilink PPP connections
The capabilities of Windows 95 Dial-Up Networking are considerably extended
by installing the MS ISDN Accelerator Pack. This extension allows you to set up
Multilink PPP connections, in which both ISDN B-channels are bundled in a
single network connection to one destination. This doubles the available
bandwidth. Before you set up a multilink PPP connection, please note the
following:
•
Capabilities of Windows 95 Dial-Up Networking are considerably extended
by installing the MS ISDN Accelerator Pack. This extension enables you to set
up Multilink PPP connections, in which both ISDN B channels are bundled in
a single network connection to one destination. This doubles the available
bandwidth. Before you set up a multilink PPP connection, please note the
following:
•
The remote site, that is, your ISP, must also support multilink connections.
•
RAS connections (see Section 4) can also use multilink PPP. This is done by
configuring the second modem, NDIS WAN Line 2, to answer incoming calls
on the RAS server.
To set up a multilink PPP connection, proceed as follows:
1. Create a new connection in the Dial-Up Networking window.
2. With the right mouse button, click the connection and select Properties.
3. Click Settings in the Set additional devices field.
4. Activate the option Use additional devices, then click Add.
5. In the Device Name list, select the modem entry not yet used, for example,
NDIS WAN Line 2. In the Phone number field, enter the same number you
entered when creating the connection in Step 1 above.
12. Using NDIS
167
ISDNmst.fm Page 168 Wednesday, January 15, 2003 9:22 AM
6. Click OK to close the window.
Now when you activate this dial-up connection, the computer will automatically
attempt to connect to the destination ISDN number using both ISDN B channels.
If only one ISDN B channel can be used –if your ISP does not support multilink
PPP for example– no message will appear to indicate the fact. You can see how
many B channels have actually been connected, however, by double-clicking the
Dial-Up Networking icon in the Windows 95 task bar. Click Details to manually
connect and disconnect the second B channel as desired. This technique allows
you to double the connection bandwidth as needed for such tasks as
downloading large files from the Internet, and to reduce it again afterwards to
avoid excessive charges.
Legal notice
The AVM NDIS WAN CAPI Device Driver is commercial software owned by
AVM Computersysteme Vertriebs GmbH Berlin.
The AVM NDIS WAN CAPI Device Driver and accompanying documentation
may not be offered, used, altered, or marketed, nor may any of its identifying
characteristics be altered, as part of offerings by third parties, such as hardware
and software manufacturers, without written permission from AVM
Computersysteme Vertriebs GmbH. Bundling with hardware and software not
manufactured by AVM is expressly prohibited. Reverse engineering of the AVM
NDIS WAN Device Driver, in whole or in part, is not permitted.
Possible faults and remedies
•
Fault condition: RAS (Dial-Up) Error “Connection has gone down”:
Possible cause: This common error message can have many causes, such as a
busy remote terminal, faulty cabling, an incorrect D channel protocol, no
CAPI available (ISDN adapter device driver not loaded), B channel already in
use, etc.
Solution: Check the following:
Examine whether another CAPI application has access to the ISDN adapter
and the ISDN line. If not, refer to the trouble-shooting section in the ISDN
adapter manual.
•
Fault condition: CAPI applications that answer incoming data calls (with the
service indicator DATA64K) are not functioning alongside the NDIS WAN
CAPI Device Driver in RAS server mode.
Possible cause: Both the CAPI data application and RAS with the NDIS WAN
CAPI device driver are trying to answer the same calls.
Solution: Assign a different Multiple Subscriber Number (MSN) to each
application so that incoming calls can be differentiated.
•
Fault condition: Unable to establish PPP connection
Possible cause: The Windows 95 ISDN Accelerator Pack v1.1 uses the Point-toPoint Protocol (PPP) over ISDN as specified in RFC 1618. This protocol is also
referred to as synchronous PPP, and is a standard in ISDN internetworking.
168
IBM ISDN PC Card:User’s Guide
ISDNmst.fm Page 169 Wednesday, January 15, 2003 9:22 AM
Solution: The remote site, i.e. your Internet Service Provider must also
support this standard.
•
Fault condition: Multilink PPP connections are not possible.
Possible cause: Your Internet Service Provider (ISP) does not support
multilink PPP connections, or you have not configured the RAS server with a
second modem entry for incoming calls.
Solution: Use the same device driver at both ends of the connection, i.e. either
the ISDN CAPI Port device driver or the NDIS WAN device driver. Avoid
mixed operation of the two device drivers.
•
Fault condition: The modem entries “NDIS WAN Line 1” and “Line 2” are not
displayed in Dial-Up Networking, or a message appears upon starting DialUp Networking prompting you to install a modem.
Possible cause: You have not followed the installation sequence exactly (see
Section13.1.2).
Solution: Remove all components already installed (Dial-Up Networking,
NDIS WAN CAPI device driver) and begin the installation again with Dial-Up
Networking (see Section 13.1.2.2).
Using NDIS in Windows NT
The NDIS WAN CAPI Device Driver for Windows NT enables the use of Remote
Access Services (RAS) over ISDN. NDIS is an abbreviation for Network Device
Interface Specification, and represents a standard for binding network adapters
(hardware) to network protocols (software). NDIS WAN is a Microsoft extension
of this standard for Wide Area Networking (WAN). The NDIS WAN CAPI Device
Driver for Windows NT thus allows the ISDN adapter to be used as a WAN
adapter, addressed through the Common ISDN API (CAPI) 2.0 applications
interface.
Please install the software according to these instructions. You should also refer to
the Windows NT documentation pertaining to Remote Access Services (RAS).
Installation
You will need system administrator access privileges to install the NDIS WAN
CAPI Device Driver for Windows NT.
Copy the NDIS WAN CAPI Device Driver software onto a floppy disk and label it
accordingly.
The following components are necessary to use RAS services over ISDN:
•
A computer with the Windows NT 4.0 operating system
•
A fully installed ISDN adapter with CAPI 2.0 device driver (see the
installation instructions in the ISDN adapter manual)
•
A diskette (or CD) with the NDIS WAN CAPI Device Driver for Windows NT
The exact procedure for installing the NDIS WAN CAPI Device Driver depends
on the network components already installed on your computer. To illustrate
12. Using NDIS
169
ISDNmst.fm Page 170 Wednesday, January 15, 2003 9:22 AM
some of the different requirements possible, two basic configuration examples are
presented here:
1. You have not yet installed a network, and must therefore perform a complete
network installation including the NDIS WAN CAPI Device Driver and RAS
(see Section 13.2.1.1 on page 185).
2. You have not yet installed a network, and must therefore perform a complete
network installation including the NDIS WAN CAPI Device Driver and RAS
(see Section 13.2.1.1 on page 185).
Complete network installation
•
Open the Start menu and click Settings, then Control Panel. Double-click the
Network icon. If no network has been installed, you are prompted to do so
now. Click Yes to start the installation.
•
Select the option Wired to the Network, then click Next.
•
Now you must install a network adapter. The NDIS WAN CAPI Device Driver
for Windows NT makes your ISDN adapter funtion as a network adapter. In
the next window, click Select from list . The Select Network Adapter window
opens. Click Have disk.
•
Insert the diskette containing the NDIS WAN CAPI Device Driver for
Windows NT into the disk drive, and confirm the path to this drive.
•
The Select OEM Option window opens. Select the entry NDIS WAN CAPI
Device Driver for Windows NT and confirm by clicking OK.
•
Once the adapter has been installed, click Next.
•
Now you must specify the network protocols for the network adapter. Select
the desired protocols and confirm your selection by clicking Next.
•
You have now installed all the required network components. To confirm your
settings, click Next.
•
Windows NT now copies the files required for the selected components onto
your hard drive. Specify the path to the Windows NT CD or to the installation
files and confirm by clicking Next.
•
The NDIS WAN CAPI Driver Properties window opens.
•
You have the option of specifying two MSNs. If you have not installed any
other CAPI application, or if you only want to use the NDIS WAN CAPI
Device Driver for Windows NT for outgoing calls, then you can simply click
OK without entering an MSN.
•
MSNs (Multiple Subscriber Numbers, only on ISDN lines using DSS1) are
used to route incoming and outgoing calls. If you have other CAPI
applications installed on your computer that accept data calls (with the ISDN
service indicator DATA64K), then enter one of your ISDN line's numbers here
under which the NDIS WAN CAPI Device Driver for Windows NT will accept
incoming calls.
•
A setup message appears. Acknowledge it by clicking OK.
•
Windows NT then informs you that RAS needs to be installed. Insert the
Windows NT CD and enter the corresponding path. Now you must select a
RAS device. The Add RAS Device window opens. Select ISDN1 - WAN (ISDN
170
IBM ISDN PC Card:User’s Guide
ISDNmst.fm Page 171 Wednesday, January 15, 2003 9:22 AM
B channel 1) or ISDN2 - WAN (ISDN B channel 2) and confirm this by clicking
OK.
•
The Remote Access Setup window opens. Select ISDN1 - WAN or ISDN2 WAN and click Configure. The Configure Port Usage window opens. Specify
here whether you want to receive calls, dial out, or both.
•
Set the port usage to Dial out only.
•
If you intend to use both ISDN B channels for RAS, you can configure the
second B channel as a RAS device now by clicking Add. Confirm your port
usage settings by clicking OK.
•
Now click the Network button in the Remote Access Setup window. In the
Network Configuration window which opens, select only TCP/IP as Dial-out
protocol, then click OK.
•
If you also want to receive calls, and you have selected the corresponding
option in the Configure Port Usage window, then select the desired network
protocol under Server Settings, as well as the options for authentication of
incoming calls. To obtain maximum compatibility with other products,
activate the option Allow any authentication including clear text.
•
Windows NT now copies the files for the selected components. During this
process, Setup displays the message “TCP/IP Version 4.0 is already installed
on the system”. Acknowledge this message by clicking OK, and do the same
for other protocols if necessary. Windows NT now displays a summary of the
network installation. Check your bindings!
•
A message appears saying that Windows NT can now start the network. Click
Next to complete the network installation.
•
Restarting the computer completes the installation of the network
components.
Installation in an existing network
Installing the NDIS WAN CAPI device driver for Windows NT:
•
Open the Start menu and move the pointer to Settings. Open the Control
Panel and double-click the Network icon.
•
In the network configuration window, click the Adapters tab.
•
Now you must install a network adapter. The NDIS WAN CAPI Device Driver
for Windows NT makes your ISDN adapter function as a network adapter! In
the next window, click Add, then in the Select Network Adapter window,
click Have Disk.
•
Insert the NDIS WAN CAPI Device Driver for Windows NT installation disk
into the floppy disk drive and enter the path to the files. Confirm the path by
clicking OK.
•
The Select OEM Option window opens. Select the entry NDIS WAN CAPI
for Windows NT and click OK. Windows NT now copies the device driver
from the floppy disk onto your hard drive.
•
The NDIS WAN CAPI Driver for Windows NT Properties window then
opens.
12. Using NDIS
171
ISDNmst.fm Page 172 Wednesday, January 15, 2003 9:22 AM
•
You have the option of defining two MSNs for each ISDN B channel. If you
have not installed any other CAPI application or if you only want to use the
NDIS WAN CAPI Device Driver for Windows NT for outgoing calls, then you
can simply click OK.
•
MSNs (Multiple Subscriber Numbers, only on ISDN lines using DSS1) are
used to route incoming and outgoing calls. If you have other CAPI
applications installed on your computer that accept data calls (with the ISDN
service indicator DATA64K), then enter one of your ISDN line's numbers here
under which the NDIS WAN CAPI Device Driver for Windows NT will accept
incoming calls.
•
A message appears saying that the NDIS WAN CAPI Device Driver for
Windows NT setup is complete, and that RAS (Remote Access Service) will
now be installed or configured.
•
Acknowledge the message by clicking OK.
Installing remote access services (RAS) and the network protocol (TCP/IP)
•
The Windows NT RAS installation now starts automatically. Since the RAS
service has not yet been installed on your system, the Windows NT Setup
window opens first. Specify the path to the installation files or to the Windows
NT CD, and confirm by clicking Next. Windows NT now copies the necessary
files for the RAS service. Now you must select a RAS device. The Add RAS
Device window opens. Choose ISDN1 - WAN or ISDN2 - WAN and confirm
by clicking OK.
•
Next, click Configure. The Configure Port Usage window opens. Specify here
whether you want to receive calls, dial out, or both.
•
If you intend to use both ISDN B channels for RAS, you can configure the
second B channel as a RAS device now by clicking Add. Windows NT can
only use one channel for incoming calls.
•
Confirm your port usage settings by clicking OK.
•
Now click Network in the Remote Access Setup window.
•
In the Network Configuration window which then opens, select only TCP/IP
as Dial out protocol, then click OK.
•
If you have configured the RAS ports to receive or to dial and receive calls,
then an additional network configuration window opens in which you can
provide information on TCP/IP address pools, etc. In this case, select the
desired network protocols under Server Settings and configure them as
required for your network environment, then set the authentication options
for incoming calls. To obtain maximum compatibility with other product,
activate the option Allow any authentication including clear text.
•
Close the Remote Access Setup window by clicking Next. Windows NT
prompts you for additional files from the installation CD.
•
Click Close in the Network window. Windows NT now updates the protocol
bindings. If you have also installed an internal network adapter, the Microsoft
TCP/IP Properties window opens. Set the necessary options here as required
for your network environment.
•
You are then prompted to restart the computer. Confirm this by clicking Yes.
172
IBM ISDN PC Card:User’s Guide
ISDNmst.fm Page 173 Wednesday, January 15, 2003 9:22 AM
This completes the installation of the network components.
Notes on RAS server configuration in Windows NT Server 4.0
General
This section contains details about certain possible RAS configurations of in
Windows NT and Windows 95. It does not contain details specific to ISDN. If you
have any further questions, please refer to your Windows NT documentation.
These notes are based on the assumption that a Windows 95 remote client
(referred to here as “the remote“) is dialing up a Windows NT server network
(referred to here as “the central site”) over ISDN.
Windows NT server (central site)
The remote client must be able to log on to the LAN. In addition, an NT server
must be installed in the LAN as a Primary Domain Controller (PDC). The remote
client must be registered in the domain as a user (User Manager for Domains).
Extra dial-up rights must be configured for RAS.
The RAS server is installed on an Windows NT server equipped with an ISDN
adapter. If necessary, the PDC and RAS can be configured on the same machine.
The RAS port ISDN1 or ISDN2 is installed as described in Section 13.2.1, and
configured to accept incoming calls in Remote Access Setup.
RAS client with Windows 95 (remote)
The ISDN CAPI Port Device Driver for Windows 95 can be installed along with
Dial-Up Networking according to the instructions in the on-line Help. Enter the
following settings in the Control Panel:
Network/Identification:
•
Workgroup = domain name.
Network/Configuration:
•
Client for Microsoft Networks
•
Properties: Log on to Windows NT domain; enter the name of the NT domain
•
Network log-on options: Quick log-on
•
Dial-Up Networking adapter
•
Network protocol TCP/IP or NetBEUI bound to the Dial-Up Adapter (see
further details in Sections 13.2.2.2 and 13.2.2.3)
Use the ISDN RAS or ISDN Internet modem entry for the Dial-Up Networking
connection, and select the server type PPP: Windows 95, Windows NT 3.5,
Internet.
TCP/IP is a routable network protocol. The public Internet is based on this
protocol. It is also commonly used in LANs and WANs.
Windows NT server (central site)
12. Using NDIS
173
ISDNmst.fm Page 174 Wednesday, January 15, 2003 9:22 AM
If the Internet protocol (TCP/IP) is used as the transport protocol for Microsoft
networking, WINS and DHCP services can be installed on the Windows NT
server. These services manage and assign of NetBIOS names and IP addresses
where necessary. Neither service is absolutely essential, and both can be replaced
by using LMHOSTS files and fixed IP address configuration on the workstations.
Important WINS and DHCP configuration parameters are listed below:
•
Install the WINS service on the RAS server or another server in the network
by clicking on Network -> Properties -> Services -> Add -> WINS Service.
Install WINS Service with WINS Manager.
•
Install the DHCP service on the RAS server or another server in the network
by clicking on Network -> Properties -> Services -> Add -> DHCP server.
Install DHCP Service with DHCP Manager by clicking on Add Domain ->
Option Add Domain -> 003 router, 044 WINS/NBNS servers, 046
WINS/NBT node type.
The following configuration permits both DHCP and fixed IP addressing for RAS
clients:
•
Network -> Services-> Remote Access Service -> Properties... -> Port ISDN1
-> Network -> TCP/IP -> Configure: Use DHCP, Allow remote clients to
request a predetermined IP address.
RAS Client with Windows 95 (Remote)
•
Bind TCP/IP to Dial-Up Adapter:
Obtain an IP address automatically
Bindings / Client for Microsoft Networks
WINS Configuration: Use DHCP for WINS Resolution
•
Dial-Up Networking: Server Type -> Allowed Network Protocols: TCP/IP;
Server-assigned IP address
Notes on using the network protocol NetBEUI
NetBEUI is a broadcast-oriented network protocol which is not routable. This
means that its use in LANs and WANs is limited, but it is easy to configure in
Microsoft networks.
Windows NT Server (Central Site)
The following configuration installs NetBEUI for RAS clients:
•
Network -> Services -> Remote Access Service -> Properties... -> Port
ISDN1 -> Network -> NetBEUI
RAS Client with Windows 95 (Remote)
•
Network Setup: bind NetBEUI protocol (from Microsoft) to the Dial-Up
Adapter
•
Dial-Up Networking: Server type -> Allowed network protocols: NetBEUI
Problem solving
174
IBM ISDN PC Card:User’s Guide
ISDNmst.fm Page 175 Wednesday, January 15, 2003 9:22 AM
This section describes the remedies for a few errors which could occur while
operating the NDIS WAN CAPI Device Driver for Windows NT.
•
Symptom: CAPI applications which accept incoming data calls (with the
ISDN service indicator DATA64K) do not work alongside the NDIS WAN
CAPI Device Driver for Windows NT and the RAS Server mode.
Cause: Both the NDIS WAN CAPI Device Driver for Windows NT and the
other CAPI applications are attempting to answer the same incoming calls.
Remedy: Because the incoming calls for the CAPI applications and the RAS
both have the same service indicator, they can only be distinguished by
assigning them different Multiple Subscriber Numbers (MSNs, on DSS1 lines).
To assign an MSN, proceed as follows:
Configure an MSN (on a DSS1 line) for the NDIS WAN CAPI Device Driver
for Windows NT. To do this, open the Network Settings (Start -> Settings ->
Control Panel -> Network) and click the Network Adapter tab. Select the
NDIS WAN CAPI Device Driver in the list and click Properties. The NDIS
WAN CAPI Device Driver for Windows NT properties window opens, and
you can enter one of your ISDN line's MSNs.
•
Symptom: PPP connections fail.
Cause: The Windows NT RAS Service uses PPP over ISDN in accordance with
RFC 1618. This protocol is also referred to as “synchronous PPP”, and is a
widely-used standard for network connections over ISDN.
Remedy: The remote computer or Internet provider must also support this
standard. You will find further information in the Word document
STRUCTUR.DOC, which contains the specifications for the NDIS WAN CAPI
Device Driver for Windows NT.
•
Remedy: The remote computer or Internet provider must also support this
standard. You will find further information in the Word document
STRUCTUR.DOC, which contains the specifications for the NDIS WAN CAPI
Device Driver for Windows NT.
Cause: CompuServe does not use the standard PPP over ISDN (RFC 1618).
Remedy: Use a fossil device driver (such as cFos/NT) that provides a suitable
modem emulation.
Legal notice
The AVM NDIS WAN CAPI Device Driver for Windows NT is commercial
software owned by AVM Computersysteme Vertriebs GmbH, which provides the
software free of charge for use by its customers.
The AVM NDIS WAN CAPI Device Driver for Windows NT and accompanying
documentation may not be offered, used, altered, or marketed, nor may any of its
identifying characteristics be altered, as part of offerings by third parties, such as
hardware and software manufacturers, without written permission from AVM
Computersysteme Vertriebs GmbH. Bundling with hardware or software not
manufactured by AVM is expressly prohibited. Reverse engineering of the AVM
NDIS WAN CAPI Device Driver for Windows NT, in whole or in part, is not
permitted.
12. Using NDIS
175
ISDNmst.fm Page 176 Wednesday, January 15, 2003 9:22 AM
176
IBM ISDN PC Card:User’s Guide
ISDNmst.fm Page 177 Wednesday, January 15, 2003 9:22 AM
13. ISDN CAPI Port Device Driver
Prerequisites for the CAPI Port installation
Before the CAPI port device drivers may be installed, the device drivers for the
IBM International ISDN PC Card must be installed. If you already have CAPI port
device drivers installed, reinstallation may not be possible without removing
older driver versions. See “Removing the ISDN CAPI Port device driver” on page
179 for more details.
Version 02.02.01 for Windows 95 and 98
The ISDN CAPI Port Device Driver is a universal ISDN connectivity solution for
the Microsoft Windows 95/98 operating system. It facilitates the use of Remote
Access Services (RAS) and Dial-Up Networking connections to the Internet and to
on-line services.
Technically, the ISDN CAPI Port Device Driver mediates between Windows
95/98’s UNIMODEM/VCOMM architecture and the applications interface
COMMON-ISDN-API 2.0 (CAPI). The CAPI 2.0 interface, a manufacturerindependent standard, is provided with the ISDN-Controller and loaded by the
Controller's installation program.
Virtual modems
After simple installation in Windows 95/98, the CAPI Port Device Driver supplies
up to eight virtual modems which are immediately available for use. These
modems allow the ISDN-Controller in your computer to be used even by
programs that expect an analog modem.
Each of the virtual modems is available for a different application. For instance,
the ISDN FAX (G3) modem is configured for fax applications, while ISDN RAS
can be used for remote-access connections to remote computers.
The default configurations of the virtual modems allow them to be used
immediately in most conventional implementations without any further
configuration required. However, it is also possible to adapt the ISDN CAPI Port
Device Driver for special cases such as the configuration of the Internet
connection and RAS (see ” Modem Settings Using Registry Commands").
Programs that use the CAPI interface directly can exploit the CAPI Port modem to
use the second B channel for their own use, parallel to an existing Dial-Up
Networking connection. This is possible because the B-channel assignments are
performed by CAPI automatically.
© Copyright IBM Corp. 2002
177
ISDNmst.fm Page 178 Wednesday, January 15, 2003 9:22 AM
The fax functions of MS Exchange/Outlook and other Fax Group 3 applications
can be used through the virtual CAPI Port modem ISDN FAX (G3).
Installing / removing the ISDN CAPI Port device driver
If you have not yet done so, first install the CAPI 2.0 device drivers for your
ISDN-Controller according to the instructions in the manual.
Before starting installation of the ISDN CAPI Port Device Driver, note the
following:
•
During installation up to eight different virtual modems are created, each of
which fulfills a different function.
•
To use the virtual modems ”ISDN FAX (G3)” and ”ISDN Analog Modem
(V.32bis)” with passive ISDN-Controllers, the device driver software of your
ISDN-Controller must support these services. Contact the manufacturer for
more information.
•
The virtual modem ”ISDN Analog Modem (V.32bis)” can be used only with
passive ISDN-Controllers. The analog/digital conversion is performed by the
computer's CPU. A Pentium computer with 133 MHz and at least 32 MB RAM
will provide optimal performance.
•
It might be necessary to assign COM ports to the virtual modems. This is the
case when using Dial-Up Networking software which can access only COM
ports (such as older versions for Windows 3.x). See the instructions in the
section ” Using Data Communications Software with an Emulated COM
Port”. Before making any assignments, check which COM ports are already
in use by other hardware devices like serial interfaces.
Start installation
1. Insert the disk or CD with the ISDN CAPI Port Device Driver in the
appropriate drive.
2. Start the installation by double-clicking on the SETUP.EXE
3. The Modems page lists eight virtual modems which can be selected for
installation:
•
ISDN - ISDN (X.75)
•
ISDN Analog Modem (V.32bis)
•
ISDN Custom Config
•
ISDN FAX (G3)
•
ISDN Internet (PPP over ISDN)
•
ISDN Mailbox (X.75)
•
ISDN RAS (PPP over ISDN)
•
ISDN SoftCompression X.75-V.42bis
Select the desired modems from the list.
178
IBM ISDN PC Card:User’s Guide
ISDNmst.fm Page 179 Wednesday, January 15, 2003 9:22 AM
4. To learn more about the different virtual modems, click the question mark in
the title bar and then the modem type. A small window with information
about the modem opens.
5. On the Ports page, the virtual modems can be assigned to COM ports.
6. If no Dial-Up Software requiring COM ports is used, accept the default
settings.
7. Confirm the selected configuration by clicking OK.
8. Once installation is completed, you will be prompted to restart Windows.
9. To view the list of installed modems and have the opportunity to change any
modem settings, select ”Start / Settings / Control Panel / Modems.”
Removing the ISDN CAPI Port device driver
To remove the ISDN CAPI Port Device Driver completely from your system,
proceed as follows:
1. Open the COntrol Panel and double-click the Add/Remove Programs icon.
2. Select the entry ISDN CAPI Port.
3. Click the Add/Remove... button. The uninstallation routine will be started
and the modem entries will be removed from your system.
4. Once the device driver has been removed from your system, you will be
prompted to restart Windows.
Modem settings using registry commands
Using registry commands the user can control all modems universally.
During installation of the ISDN CAPI Port Device Driver, the virtual modems
initially are installed with a default configuration. It is generally not necessary to
change these default settings. If a change should become necessary, however,
modem settings can be adapted to your needs using registry commands.
Such a configuration is essentially the same for all virtual modems. The general
procedure is described below. The individual registry commands are listed in the
corresponding sections as well as in Appendix A.
1. Open Start -> Settings -> Control Panel -> Modems.
2. Select the desired modem.
3. Click the Properties button.
4. Click the Advanced... button on the Connection page.
5. Enter the registry command in the Extra Settings input field.
To enter multiple registry commands, separate commands with a semicolon
and a space. Only the first command entered should begin with the
characters "AT".
Example: ATS31=2; S35=38400; S51=0
13. ISDN CAPI Port Device Driver
179
ISDNmst.fm Page 180 Wednesday, January 15, 2003 9:22 AM
6. Confirm your entries by clicking OK and close the modem window.
Connections to internet service providers (ISPs)
There is no binding standard for ISDN dial-in access to the Internet via Internet
providers. PPP/SLIP protocol variants, fixed or dynamically assigned IP
addresses, static or dynamic DNS and a variety of authentication techniques
make it impossible to set a universally valid Internet access configuration for the
ISDN CAPI Port Device Driver.
For TCP/IP connections using the ISDN CAPI Port Device Driver, you must also
use 32-bit client software (i.e., WWW browsers, FTP clients, etc.) rather than 16-bit
applications for Windows 3.x. Otherwise, no connection to the 32-bit TCP/IP
protocol stack integrated in Windows 95/98 is possible.
ISDN B-channel protocols and PPP variants
Many providers use the ”HDLC” or ”X.75” protocol on the ISDN B channel. Two
protocol variants are used for PPP connections: "PPP over ISDN" in accordance
with RFC 1618 (also known as synchronous PPP), and "PPP modem style" in
accordance with RFC 1162 (also called asynchronous PPP).
Note:
Please ask your Internet provider which combination of protocols and
authentication procedures are required for ISDN dial-in access.
Incorrect protocol settings either result in an immediate termination of the
connection or prevent the ISDN connection from being established in the first
place (error message: "The computer you are dialing in to is not answering.").
Setting modem registers for ISDN B-channel protocols and PPP: The virtual
modem ISDN Internet (PPP over ISDN) is set by default to ”HDLC” and ”PPP
over ISDN” according to RFC 1618. If a different configuration is requested by
your Internet provider, you can change the B-channel ISDN protocol by setting
the register "S31":
•
S31=0X.75 protocol
•
S31=1HDLC protocol (default)
•
S31=2V.110 protocol
•
S31=7V.120 protocol
The registers ”S41”, ”S42” and ”S43” can also be used to set the B1, B2 and B3
protocol layers individually. However, this is not necessary in most cases.
The PPP protocol variant used can be configured using register "S51":
•
S51=0 asynchronous PPP ("modem style", RFC 1162)
•
S51=1 synchronous PPP ("PPP over ISDN", RFC 1618)
180
IBM ISDN PC Card:User’s Guide
ISDNmst.fm Page 181 Wednesday, January 15, 2003 9:22 AM
Authentication
For PPP connections, the dial-in user is authenticated by a user ID and password
(PAP/CHAP standards). This information, entered in the configuration of a DialUp Networking connection, is transmitted automatically to the remote dial-up
server upon connection. More user information generally is not required.
Some Internet providers (including many universities, etc.) use the calling line
identification transmitted over the ISDN D channel in addition to or instead of the
user name and password. The next section explains how the virtual modem must
be configured to transmit the ISDN D-channel number.
ISDN D channel
Note:
The ISDN D-channel number can be transmitted only if you did not
expressly request that your network provider deactivate transmission of
this number.
Entering the ISDN D-channel number: Using the registry command
S49=<multiple subscriber number> any multiple subscriber number (MSN)
from the block assigned can be specified for transmission in the D channel. The
block of numbers for your line is assigned by the network provider.
An invalid number entry is automatically replaced with the first MSN in the
assigned block.
If no number is set in register "S49", the first subscriber number assigned to your
DSS1 (Euro ISDN) line is sent.
Suppressing caller ID display (CLIR): Use the registry command "S54=1" to
suppress the display of the ISDN D-channel number. This allows anonymity for
ISDN connections, for instance, in Dial-Up Networking. At a number of ISDN
connections, the ISDN feature ”Case-by-case suppression of Caller ID (CLIR)”
must be explicitly requested. The network provider generally activates this
feature free of charge.
If your ISDN-Controller is connected to an internal S0 access "behind" an ISDN
telecommunication system (internal S0 bus), some ISDN telecommunications
systems require that the connected device signal an MSN when the connection is
established (please see also the documentation of your ISDN telecommunication
system). In cases where caller ID of the outgoing MSN is to be suppressed at the
remote site enter the registry ATS49=<MSN>; S54=1
Summary of charge information: To record the on-line charges accrued, specify
an MSN for outgoing calls to which all charges then will be billed.
For ISDN PBX systems with an internal S0 bus, the on-line charges for the
specified MSN can be calculated using the telecommunication system’s software.
Specify the MSN for outgoing calls using the registry command ATS49=<MSN>.
13. ISDN CAPI Port Device Driver
181
ISDNmst.fm Page 182 Wednesday, January 15, 2003 9:22 AM
Example configuration
In this section we present a sample ISDN CAPI Port Device Driver configuration
for the Internet provider UUNet (as of December 1999).
•
UUNet (HDLC, PPP over ISDN):
•
AT S31=1; IP address and DNS assigned by the server
Multi-link PPP connections
In "Multi-link PPP connections", both ISDN B channels are used to connect to the
one call destination. This doubles the available transmission capacity.
In order to use channel bundling in Windows 95, the Microsoft "ISDN Accelerator
Pack 1.1" must be installed. This feature is already included as a component of the
Windows 98 operating system; no extra installation is necessary.
The "ISDN Accelerator Pack 1.1" can be downloaded from the Internet website:
http://www.microsoft.com .
Before establishing a multi-link PPP connection, please note the following:
•
Charges will be incurred for both ISDN B channels.
•
·The remote site, e.g. your Internet service provider (ISP), must support this
operating mode.
•
·RAS connections (see "Remote Access Service") also are possible with multilink PPP.
After installing the "ISDN Accelerator Pack 1.1" (only necessary in Windows 95),
proceed as follows to establish a multi-link PPP connection:
1. Create a new connection in Dial-Up Networking.
2. Click once on the connection with the right mouse button and select
Properties.
3. Click the Settings... button in the Additional Devices: field (Windows 98:
select Multilink page).
4. Activate the option Use additional devices.
5. Click the Add... button.
6. Under Name of Device, enter the ISDN RAS (PPP over ISDN) modem.
7. Enter in the Number field the number of the main connection configured
above.
8. Close the window by clicking OK.
Now the system automatically will attempt to connect to the destination ISDN
number using both ISDN B channels whenever this dial-up connection is
activated.
182
IBM ISDN PC Card:User’s Guide
ISDNmst.fm Page 183 Wednesday, January 15, 2003 9:22 AM
If only one ISDN B channel can be connected, for instance, if your Internet
provider does not support multi-link PPP connections, no unambiguous message
to this effect is returned. To find out whether both B channels were connected,
double-click the Dial-Up Networking icon in the Windows 95/98 task bar. If
desired, select the Details button to connect or disconnect the second B channel
manually.
This technique allows you to increase the transmission capacity to download
large files from the Internet and to reduce it again afterwards to avoid excessive
charges.
Clearing internet connections automatically
Some Internet browsers offer you the option of clearing a connection
automatically when the connection is idle for a certain amount of time.
To activate this option in the MS Internet Explorer 4.x/5.x, click through the steps
below:
Start -> Settings -> Control Panel -> Internet -> Connections -> Select modem...
-> Settings... -> Advanced... -> Disconnect if idle for ... minutes
Using MS Money 99 and MS Exchange/Outlook
MS Money 99
MS Money 99 allows the CAPI 2.0 interface to be used directly, so that the virtual
modem of the CAPI Port device driver is no longer necessary. For more
information, see the MS Money 99 documentation.
Faxing with MS Exchange/Outlook and other Fax Group 3
applications (e.g. WinFax PRO 8.x/9.x)
With the virtual modem ISDN FAX (G3), the fax function of MS
Exchange/Outlook and other Fax Group 3 applications can be used. Fax polling
is not supported.
Note:
To use this modem a CAPI device driver software supporting T.30 (Fax
Group 3) is required.
The hardware requirements for Fax G3 are higher than for other CAPI
applications, as the analog/digital conversion is performed by the computer's
CPU. A Pentium computer with 133 MHz and at least 32 MB RAM will provide
optimal performance.
The maximum fax speed depends on the CAPI device driver software, the fax
machine/software on the other side, the line quality and the hardware standard
of your computer. The CAPI Port Device Driver supports a speed of up to 14,400
Bit/s for receiving and sending faxes.
MS Exchange/Outlook: When you install MS Exchange/Outlook, specify the
modem ISDN FAX (G3). No additional settings are required (modem’s default
13. ISDN CAPI Port Device Driver
183
ISDNmst.fm Page 184 Wednesday, January 15, 2003 9:22 AM
setting: AT S31=3). For more information about the configuration of MS
Exchange/Outlook, see the documentation of Windows 95, or contact your dealer
or Microsoft.
In Windows 98, MS Exchange is no longer automatically installed with the
operating system. You can install it manually, however, as the software is
available in the \TOOLS\OLDWIN95\MESSAGE directory on the Windows 98
CD-ROM.
WinFax PRO: If you want to use the software WinFax Pro 8.x/9.x by Symantec,
please do not select the virtual modem ISDN FAX G3 in the configuration
window. Select instead the direct use of the CAPI 2.0 interface.
Setting: Generic ISDN or Generic ISDN (CAPI 2.0).
Data communications software
Thanks to support for Windows 95/98’s UNIMODEM architecture, the CAPI Port
Device Driver also can be used with 32-bit data communications applications
such as "HyperTerminal". The following virtual modems can be used for this
purpose:
•
ISDN Mailbox (X.75)
•
ISDN Analog Modem (V.32bis)
•
ISDN - ISDN (X.75)
•
Custom Config
The registers available for custom configuration are described in Appendix A.
Please note the default values for the various registers.
Data transfer with transfer protocols (ZModem, Xmodem, etc.) with
Hyperterminal in Windows 95 is possible only to a limited degree, due to a
software error. With the new version of this software included in the Windows 98
package, this error has been resolved. Should problems arise in exchanging data
in command mode (+++) in Windows 95, change the time interval for the escape
sequence (e.g. ATS12=1000).
The ISDN - ISDN (X.75) modem can be used to establish point-to-point
connections over secured data link (X.75).
Data communications software and analog modems at the
remote site
As long as your CAPI 2.0 device driver software supports analog connections, the
virtual modem ISDN Analog Modem (V.32bis) can be used to access analog
remote sites like BBSs. The maximum speed possible is 14,400 Bit/s (V.32bis).
This virtual modem also will support any higher speeds offered by future
versions of the CAPI 2.0 device driver software.
The required protocols (V.32bis and asynchronous PPP) are set by default on the
ISDN Analog Modem (V.32bis) virtual modem.
184
IBM ISDN PC Card:User’s Guide
ISDNmst.fm Page 185 Wednesday, January 15, 2003 9:22 AM
Using data communications software with an emulated COM
port
If the ISDN CAPI Port Device Driver is installed with its default settings, all
virtual modems are assigned to the virtual port ISDN1. Thus any software using
the UNIMODEM interface (TAPI modems) of Windows 95/98 can work with the
virtual modems. No changes to the virtual ports are necessary. Such software
includes, for instance, Windows 95/98 Dial-Up Networking and Hyperterminal.
However, using data communications software which does not support the
UNIMODEM architecture of Windows 95/98 and requires COM ports, a COM
port must be assigned to each virtual port. (Such data communications programs
include older versions for Windows 3.x).
The assignment of COM ports to the virtual ports ISDN1 and ISDN2 is only
possible during installation of the ISDN CAPI Port Device Driver (see "Installing
the ISDN CAPI Port Device Driver"). During installation, COM ports can be
assigned on the Ports page. The settings are implemented upon completion of the
installation routine.
Note:
Before assigning COM ports, check which COM ports are already being
used by other hardware components such as serial interfaces.
The COM ports assigned now can be used in Windows 3.x, 95 and 98.
The following protocols are set by default:
•
ISDN B2 protocol: X.75
•
PPP variants: PPP over ISDN (synchronous PPP).
To configure other protocol settings, use AT commands (see Appendix A).
Example: To set up a connection to an analog BBS using 16-bit Windows 3.x
software such as Procomm Plus 3.0 and a passive ISDN-Controller over COM 3,
the modem initialization commands must be set to AT S31=8 and S51=0 (analog
modem and asynchronous PPP) in your communications software.
The modem "ISDN SoftCompression X.75/V.42bis": Using data
compression according to V.42bis for X.75 connections
Using the virtual modem ISDN SoftCompression X.75/V.42bis connections can be
established with activated data compression. This allows data to be transmitted
at a rate up to four times higher per B channel, depending on the type of data to
be transmitted. Some basic conditions must be met, however:
•
The latest CAPI 2.0 device drivers are required:
The CAPI 2.0 device drivers for your ISDN-Controller must support V.42bis.
If this is not the case, the virtual modem ISDN SoftCompression X75/V42bis
is not available for selection in the installation window.
13. ISDN CAPI Port Device Driver
185
ISDNmst.fm Page 186 Wednesday, January 15, 2003 9:22 AM
•
Only for X.75 connections:
Data compression according to V.42bis can be used only for X.75 connections.
Possible applications include ISDN Point-to-Point connections and
connections to ISDN BBSs. According to CAPI 2.0, a secured data link is
imperative for V.42bis connections. As only the X.75 protocol guarantees this
feature, V.42bis can be used only with this protocol. As HDLC is nearly
always used as an ISDN B2 protocol in connections to Internet providers, it is
not possible to establish connections with data compression on ISDN protocol
level.
•
Automatic negotiation:
When a connection to an X.75 remote site is established, the system
automatically tries to negotiate V.42bis. If this does not succeed, e.g. because
the remote site does not support V.42bis, a connection without data
compression is made automatically.
•
Cannot yet be applied to connections to AOL or CompuServe:
The PoPs (points of presence) of AOL and CompuServe do support the X.75
protocol, but, at the time this document was printed, did not yet allow the use
of V.42bis. Should problems arise in dialing up these services, select the
virtual modem AVM ISDN Mailbox (X.75) rather than the modem ISDN
SoftCompression X.75/V.42bis.
Keep in mind that the V.42bis data compression algorithm of passive ISDNControllers is processed on the host's CPU and thus demands more powerful
hardware. In the case of active controllers of the B1 family, the algorithm is
processed completely on the Controller.
Note:
With the command ATS42=8, V.42bis can be activated manually for X.75
connections as well.
Remote access service (RAS)
The ISDN CAPI Port Device Driver can be used for RAS connections to Windows
95/98 and Windows NT 3.51/4.0 computers. The virtual modem ISDN RAS (PPP
over ISDN) is provided for this purpose.
In Windows 95/98, Dial-Up Networking requires an additional server module to
serve as a remote site. Windows NT 3.51/4.0 computers can use the NDIS WAN
CAPI Device Driver for Windows NT or the ISDN CAPI Port Device Driver for
Windows NT to make WAN connections over ISDN.
Connections and caller authentication are managed by the PPP protocol (PPP over
ISDN, RFC 1618) for both operating systems. HDLC is the specified ISDN B2
protocol. The remote computer is then accessible over ISDN using network
protocols such as TCP/IP, SPX/IPX or NetBEUI.
Remote access service (RAS) with Windows 95/98
See the Windows 95/98 documentation for instructions about how to configure
Remote Access Service (RAS). Should any problems with RAS arise, contact your
186
IBM ISDN PC Card:User’s Guide
ISDNmst.fm Page 187 Wednesday, January 15, 2003 9:22 AM
dealer or Microsoft. In order to use Windows 95/98 RAS over ISDN, the
following components must be installed:
•
ISDN-Controller
•
CAPI device drivers (installed during the ISDN-Controller Setup)
•
ISDN CAPI Port Device Driver
•
Dial-Up Networking (and Dial-up Server module, if desired)
•
·Network protocol with appropriate client software (such as NetBEUI), bound
to the Dial-up Adapter.
Make sure that all of these components are installed.
Note that Windows 95/98 can use only one Dial-up Networking connection at a
time.
In the following example configuration, the Microsoft NetBEUI protocol is used to
”map” a drive on the remote computer to the local computer, so that the remote
drive can be addressed as a local drive over ISDN.
Example RAS configuration (Windows 95/98 computer to Windows 95/98
computer using ISDN controllers): Preparations (client and server)
1. Install Dial-Up Networking server module (server computer only)
2. In order to provide RAS services from a Windows 95 computer, the file
RNASERV.DLL must be contained in the Windows\System folder. This file
can be installed from the Windows 95 Plus Pack. It is already included in
certain Windows 95 release versions, and can be extracted from the
compressed installation files on the original Windows 95 disk using the
command EXTRACT /E WIN95_06.CAB RNASERV.DLL.
3. Windows 98 users must install the Dial-Up Networking server module
via:Start -> Settings -> Control Panel -> Software -> Windows Setup ->
Communications -> Details... -> Dial-Up Networking
4. Install the NetBEUI protocol: Start -> Settings -> Control Panel -> Network > Add... -> Protocol -> Add... -> Microsoft -> NetBEUI -> OK
5. Verify protocol binding: Start -> Settings -> Control Panel -> Network ->
Dial-Up Adapter -> Properties -> Bindings. NetBEUI must be selected.
6. Install client: Start -> Settings -> Control Panel -> Network -> Add... ->
Client -> Add... -> Microsoft -> Client for Microsoft networks -> OK.
7. Install File and Print Sharing (server only): Start -> Settings -> Control Panel
-> Network -> Add... -> Service -> Add... Microsoft -> File and print sharing
for Microsoft networks -> OK.
Configuring the Windows 95/98 client:
1. Create a new Dial-Up Networking connection: My Computer -> Dial-Up
Networking -> Make New Connection. Enter a name for the connection.
Select modem ISDN RAS (PPP over ISDN) and click Continue. Enter the
phone number (when dialing from a PBX extension, remember to include the
outside line prefix). Click Continue and then Finish.
13. ISDN CAPI Port Device Driver
187
ISDNmst.fm Page 188 Wednesday, January 15, 2003 9:22 AM
2. Configure Dial-Up Networking connection. Select the newly created Dial-Up
Networking connection. Right-click and select Properties. Deactivate Use
country code and area code. Click Server type..." -> Type of Dial-Up Server:
"PPP: Windows 95/98, Windows NT 3.5, Internet" -> Advanced options:
activate "Log on to network" and "enable software compression" -> Allowed
network protocols: select NetBEUI. Click OK and OK again.
3. Activate Dial-Up Networking connection: Double-click the new connection in
Dial-up Networking. Verify that the number to dial is correct, then click
Connect.
4. Map a folder on the remote computer's drive: Start Explorer . Click on Tools
and select Map network drive…. Select an available drive. Enter a path with
the following notation: "\\<computer name>\<server's shared folder>".
Click OK.
Note:
Please make sure you enter the path name with the correct notation!
Example:\\SERVER\TEST
Configuring the Windows 95/98 server:
1. Enter a name for the computer: Control Panel -> Network -> Identification
and type a name.
Example: SERVER
2. Activate File and Print Sharing:
Control Panel -> Network -> Control Panel -> Network -> File and Print
Sharing. Activate the option I want to be able to give others access to my
files.
3. Share a folder:
Start Explorer. Select the folder to be shared, e.g. TEST. Right-click and select
Share... -> Share as... Enter a name for the shared folder, e.g. TEST. Go to
Access type and select Activate Read/Write Access . Click OK.
4. Activate Server Mode:
My Computer -> Dial-Up Networking -> Connections -> Dial-Up Server... .
Select ISDN RAS (PPP over ISDN) modem . Activate Caller Access
Setting the ISDN number for incoming calls: In the default configuration,
incoming data calls are accepted for all MSNs.
To accept data calls for only one MSN of your ISDN line, enter ATS 42=1;
S50=<MSN> for the virtual modem ISDN RAS (PPP over ISDN).
For more information on RAS configuration, see the Windows 95/98
documentation or contact your dealer or Microsoft.
Remote access service (RAS) with Windows NT
To use Windows NT RAS, the NDIS WAN CAPI Device Driver for Windows NT
or the ISDN CAPI Port Device Driver for Windows NT must be installed. These
device drivers can be used in Windows NT 3.51 and 4.0. The documentation
188
IBM ISDN PC Card:User’s Guide
ISDNmst.fm Page 189 Wednesday, January 15, 2003 9:22 AM
accompanying the device driver contains complete installation instructions. The
Windows 95/98 RAS server can use the CAPI Port modem ISDN RAS (PPP over
ISDN) in the Dial-up Server. Please make sure of the following:
•
the same network protocols are installed and configured for RAS connections
on both computers;
•
you have configured the necessary user rights (RAS caller access, resource
sharing, etc.).
See the Windows NT documentation for a description of the necessary steps.
If you use a third-party product as RAS server, inquire about the exact
configuration of the PPP protocol used (synchronous or asynchronous) and the
ISDN B-channel protocol.
Legal notice
The ISDN CAPI Port Device Driver is commercial software owned by AVM
GmbH, Berlin.
The ISDN CAPI Port Device Driver and accompanying documentation may not
be offered, used, altered, or marketed, nor may any of its identifying
characteristics be altered, as part of offerings of third parties, such as hardware
and software manufacturers, unless written permission is obtained from AVM
GmbH Berlin.
Appendix A:
Description of the registry commands
The ISDN CAPI Port Device Driver can be configured for individual requirements
using the AT commands described in this section. To change the configuration of
any of the virtual modems, proceed as follows:
1. Click Start -> Settings -> Control Panel -> Modems.
2. Select the desired modem.
3. Click the Properties button.
4. On the Settings page, click the Advanced... button.
5. Enter the AT command in the Extra Settings field.
To set more than one register, separate each individual register with
semicolons followed by a space. Only the first command entered requires the
prefix ”AT”.
Example: AT S31=2; S35=38400; S51=0
6. Confirm your entries by clicking OK and close the modem window.
13. ISDN CAPI Port Device Driver
189
ISDNmst.fm Page 190 Wednesday, January 15, 2003 9:22 AM
AT Command
ATS0=
Value
Parameter
0
0=AUTOANSWER off
(default)
1
1=AUTOANSWER on
ATS2=
43
ASCII code for escape
sequence character
ATS3=
13
Code for CR
ATS4=
10
Code for LF
ATS5=
8
Code for BS
ATS12=
100
Time interval for escape
sequence
ATS30=
Error Level:
0
No AT command; syntax,
illegal register value,
command not executed
1
Unknown command
parameter
2
Unknown command
0
Protocol: X.75 (default)
1
Protocol: HDLC
2
Protocol: V.110
3
Fax Group 3
4
Protocol: TEL
5
Protocol: X.25
7
Protocol: V.120
8
Protocol: Analog Modem
(V.32bis)
ATS35=
14400
Baud rate
ATS36=
0
Parity: none (default)
1
odd
2
even
0
Stopbits: 1 bit (default)
1
2 bits
0
Data bits: 8 (default)
1
Data bits: 7
ATS31=
ATS37=
ATS38=
190
IBM ISDN PC Card:User’s Guide
ISDNmst.fm Page 191 Wednesday, January 15, 2003 9:22 AM
AT Command
Value
Parameter
ATS41=
0
B1 protocol: sets X.75
(default)*
ATS42=
0
B2 protocol: sets X.75
(default)*
8
B2 protocol: sets
X.75/V.42bis data
compression*
ATS43=
0
B3 protocol: sets X.75
(default)*
ATS44=
2
CIP value: sets X.75
(default)*
ATS45=
2048
Frame size
ATS48=
1
For multiple active ISDNControllers (like the AVM
Controller B1), sets the
number of the CAPI 2.0
controller used, or (for the
AVM Controller C4) the
number of the So port.
ATS49=
<number>
Sets number for outgoing
calls***
ATS50=
<number>
Sets number for incoming
calls***
ATS51=
0
Asynchronous PPP
("modem style", RFC 1162
1
Synchronous PPP ("PPP
over ISDN", RFC 1618)
(default)
0
No caller ID suppression
(default)
1
Caller ID suppression
active***
ATS54=
ATA
ATD
ATE
Accept an incoming call
0...9
Dial specified number
L
Dial previous number
P
Ignored
T
Ignored
0
Echo in command mode off
1
Echo in command mode on
(default)
13. ISDN CAPI Port Device Driver
191
ISDNmst.fm Page 192 Wednesday, January 15, 2003 9:22 AM
AT Command
Value
ATH
Parameter
Terminate existing
connection
ATQ
ATV
0
Display messages in
command mode (quiet)
1
Suppress messages in
command mode (quiet)
0
Display results as numeric
codes
1
Display results as text
("verbose") (default)
ATZ
Reset
+++
Switch from on-line to
command mode
* For a detailed description of these parameters, see the "COMMON-ISDN-API
Version 2.0" specification.
** see also Section 4.3.2 "Suppressing Caller ID Display"
*** Generally, the number is the MSN given by the network provider (e.g. British
Telecom) without the dialing code. If your ISDN-Controller is connected to the
internal S0 bus of a PBX, use the MSN of the respective extension. For more
information, please refer to your PBX manual.
More detailed information about the application interface CAPI is available on the
Internet at http://www.capi.org.
Version 01.02.00 for Windows NT and 2000
The ISDN CAPI Port Device Driver is a universal ISDN connectivity solution for
the Microsoft Windows NT 4.0 and Windows 2000 operating systems. It facilitates
the use of Remote Access Services (RAS) and Dial-Up Networking connections to
the Internet and to on-line services.
Technically, the ISDN CAPI Port Device Driver mediates between the
UNIMODEM architecture of Windows NT/2000 and the applications interface
COMMON-ISDN-API 2.0 (CAPI). The CAPI 2.0 interface, a manufacturerindependent standard, is provided with all ISDN-Controllers and loaded by each
Controller's installation program.
Virtual modems
After simple installation in Windows NT/2000, the ISDN CAPI Port Device
Driver supplies up to eight virtual modems which are immediately available for
192
IBM ISDN PC Card:User’s Guide
ISDNmst.fm Page 193 Wednesday, January 15, 2003 9:22 AM
use. These modems allow the ISDN-Controller in your computer to be used even
by programs that expect an analog modem.
Each of the virtual modems is available for a different application. For instance,
the ISDN FAX (G3) modem is configured for fax applications, while ISDN RAS
can be used for remote-access connections to remote computers.
The default configurations of the virtual modems allow them to be used
immediately in most conventional implementations without any further
configuration required. However, it is also possible to adapt the ISDN CAPI Port
Device Driver for special cases such as the configuration of the Internet
connection and RAS (see ” Modem Settings Using Registry Commands”).
Programs that use the CAPI interface directly can exploit the CAPI Port modem to
use the second B channel for their own use, parallel to an existing Dial-Up
Networking connection. This is possible because the B-channel assignments are
performed by CAPI automatically.
The fax functions of MS Exchange/Outlook and other Fax Group 3 applications
can be used through the virtual CAPI Port modem "ISDN FAX (G3)".
Installing and removing the ISDN CAPI Port device driver
Please note the following before starting the ISDN CAPI Port Device Driver
installation:
Note:
Only users with system access rights as an administrator can perform
installation.
•
During installation, up to eight virtual modems are installed, each of which is
designed to perform a different function.
•
The virtual modems ISDN FAX (G3) and ISDN Analog Modem (V.32bis) can
only be used with passive ISDN-Controllers if the ISDN-Controller's device
driver software supports these services. Contact the distributor or
manufacturer of your ISDN-Controller for more information.
•
The virtual modem ISDN Analog Modem (V.32bis) can only be used with
passive ISDN-Controllers. The analog/digital conversion is performed by the
computer's CPU. A Pentium computer with 133 MHz and at least 32 MB RAM
will provide optimal performance.
•
It might be necessary to assign COM ports to the virtual modems. This is the
case when using Dial-Up Networking software which can access only COM
ports (such as older versions for Windows 3.x). See the instructions in the
section ” Using Data Communications Software with an Emulated COM
Port”. Before making any assignments, check which COM ports are already
in use by other hardware devices like serial interfaces.
Start installation
1. Insert the disk or CD with the ISDN CAPI Port Device Driver in the
appropriate drive.
13. ISDN CAPI Port Device Driver
193
ISDNmst.fm Page 194 Wednesday, January 15, 2003 9:22 AM
2. Switch to the folder <disk/CD
drive>:\PROGRAMS\CAPIPORT.NT\ENGLISH\ or
\PROGRAMS\CAPIPORT.W2K\ENGLISH\, respectively.
3. Start installation by double-clicking the file SETUP.EXE.
4. The Modems page lists eight virtual modems which can be selected for
installation:
•
ISDN - ISDN (X.75)
•
ISDN Analog Modem (V.32bis)
•
ISDN Custom Config
•
ISDN FAX (G3)
•
ISDN Internet (PPP over ISDN)
•
ISDN Mailbox (X.75)
•
ISDN RAS (PPP over ISDN)
•
ISDN SoftCompression X.75-V.42bis
Select the desired modems from the list.
5. To learn more about the different virtual modems, click the question mark in
the title bar and then the modem type. A small window with information
about the modem opens.
6. On the Ports page, the virtual modems can be assigned to COM ports. If no
Dial-Up Software requiring COM ports is used, accept the default settings.
7. Confirm the selected configuration by clicking OK.
8. Once installation is completed, you will be prompted to restart Windows.
9. To view the list of installed modems and have the opportunity to change any
modem settings, select Start -> Settings -> Control Panel -> Modems
(Windows NT) or Start -> Settings -> Control Panel -> Phone and Modem
Options (Windows 2000).
Removing the ISDN CAPI Port device driver
To remove the ISDN CAPI Port Device Driver completely from your system,
proceed as follows:
1. Open the Windows Control Panel (Start -> Settings) and double-click the
Add/Remove Programs icon.
2. Select the entry ISDN CAPI Port.
3. Click Add/Remove Programs (Windows NT) or Change or Remove
Programs (Windows 2000). The uninstallation routine will be started and the
modem entries will be removed from your system.
4. Once uninstallation is complete you will be prompted to restart Windows.
Modem settings using registry commands
Using registry commands the user can control all modems universally.
194
IBM ISDN PC Card:User’s Guide
ISDNmst.fm Page 195 Wednesday, January 15, 2003 9:22 AM
During installation of the ISDN CAPI Port Device Driver, the virtual modems
initially are installed with a default configuration. It is generally not necessary to
change these default settings. If a change should become necessary, however,
modem settings can be adapted to your needs using registry commands.
Such a configuration is essentially the same for all virtual modems. The general
procedure is described below. The individual registry commands are listed in the
corresponding sections as well as in Appendix A.
1. Click Start -> Settings -> Control Panel -> Modems (Windows NT) or Start > Settings -> Control Panel -> Phone and Modem Options (Windows 2000).
2. Select the desired modem (Windows 2000: on the Modems page).
3. Click the Properties button.
4. Click the Advanced... button on the Connection page (Windows 2000: on the
Advanced page).
5. Enter the registry command in the Extra Settings input field (Windows 2000:
Extra initialization commands).
To enter multiple registry commands, separate commands with a semicolon
and a space. Only the first command entered should begin with the characters
AT.
Example: ATS31=2; S35=38400; S51=0
6. Confirm your entries by clicking OK and close the modem window.
Connections to internet service providers (ISPs)
There is no binding standard for ISDN dial-in access to the Internet via Internet
providers. PPP/SLIP protocol variants, fixed or dynamically assigned IP
addresses, static or dynamic DNS and a variety of authentication techniques
make it impossible to set a universally valid Internet access configuration for the
ISDN CAPI Port Device Driver.
For TCP/IP connections using the ISDN CAPI Port Device Driver, you must also
use 32-bit client software (i.e., WWW browsers, FTP clients, etc.) rather than 16-bit
applications for Windows 3.x. Otherwise, no connection to the 32-bit TCP/IP
protocol stack integrated in Windows NT/2000 is possible.
ISDN B-channel protocols and PPP variants
Many providers use the ”HDLC” or ”X.75” protocol on the ISDN B channel. Two
protocol variants are used for PPP connections: "PPP over ISDN" in accordance
with RFC 1618 (also known as synchronous PPP), and "PPP modem style" in
accordance with RFC 1162 (also called asynchronous PPP.
Note:
Please ask your Internet provider which combination of protocols and
authentication procedures are required for ISDN dial-in access.
13. ISDN CAPI Port Device Driver
195
ISDNmst.fm Page 196 Wednesday, January 15, 2003 9:22 AM
Incorrect protocol settings either result in an immediate termination of the
connection or prevent the ISDN connection from being established in the first
place (error message: "The computer you are dialing in to is not answering.").
Setting modem registers for ISDN B-channel protocols and
PPP
The virtual modem ISDN Internet (PPP over ISDN) is set by default to HDLC and
PPP over ISDN according to RFC 1618. If a different configuration is required by
your Internet provider, you can change the B-channel ISDN protocol by setting
the register S31:
•
S31=0X.75 protocol
•
S31=1HDLC protocol (default)
•
S31=2V.110 protocol
•
S31=7V.120 protocol
The registers ”S41”, ”S42” and ”S43” can also be used to set the B1, B2 and B3
protocol layers individually. However, this is not necessary in most cases.
The PPP protocol variant used can be configured using register "S51":
•
S51=0asynchronous PPP ("modem style", RFC 1162)
•
S51=1synchronous PPP ("PPP over ISDN", RFC 1618)
Authentication
For PPP connections, the dial-in user is authenticated by a user ID and password
(PAP/CHAP standards). This information, entered in the configuration of a DialUp Networking connection, is transmitted automatically to the remote dial-up
server upon connection. More user information generally is not required.
Some Internet providers (including many universities, etc.) use the calling line
identification transmitted over the ISDN D channel in addition to or instead of the
user name and password. The next section explains how the virtual modem must
be configured to transmit the ISDN D-channel number.
ISDN D-channel
Entering the ISDN D-channel number: Note: The ISDN D-channel number can
be transmitted only if you did not expressly request that your network
provider deactivate transmission of this number.
Using the registry command S49=<multiple subscriber number>any multiple
subscriber number (MSN) from the block assigned can be specified for
transmission in the D channel. The block of numbers for your line is assigned by
the network provider.
196
IBM ISDN PC Card:User’s Guide
ISDNmst.fm Page 197 Wednesday, January 15, 2003 9:22 AM
An invalid number entry is automatically replaced with the first MSN in the
assigned block.
If no number is set in register "S49", the first subscriber number assigned to your
DSS1 (Euro ISDN) line is sent.
Suppressing caller ID display (CLIR): Use the registry command S54=1 to
suppress the display of the ISDN D-channel number. This allows anonymity for
ISDN connections, for instance, in Dial-Up Networking. At a number of ISDN
connections, the ISDN feature Case-by-case suppression of Caller ID (CLIR)
must be explicitly requested. The network provider generally activates this
feature free of charge.
If your ISDN-Controller is connected to an internal S0 access "behind" an ISDN
telecommunication system (internal S0 bus), some ISDN telecommunications
systems require that the connected device signal an MSN when the connection is
established (please see also the documentation of your ISDN telecommunication
system). In cases where caller ID of the outgoing MSN is to be suppressed at the
remote site enter the registry command ATS49=<MSN>; S54=1 .
Summary of charge information: To record the on-line charges accrued, specify
an MSN for outgoing calls to which all charges then will be billed.
For ISDN PBX systems with an internal S0 bus, the on-line charges for the
specified MSN can be calculated using the telecommunication system’s software.
Specify the MSN for outgoing calls using the registry command ATS49=<MSN>.
Multi-link PPP connections
In Multi-link PPP connections, both ISDN B-channels are used to connect to the
one call destination. This doubles the available transmission capacity.
Before establishing a multi-link PPP connection, please note the following:
•
Charges will be incurred for both ISDN B channels.
•
The remote site, e.g. your Internet service provider (ISP), must support this
operating mode.
•
RAS connections (see "Remote Access Service") also are possible with multilink PPP.
To establish a multi-link PPP connection in Windows NT, proceed as follows:
1. Create a new connection to your Internet Service Provider (ISP) in Dial-Up
Networking or select an already existing connection to your ISP.
2. Select the telephone book entry created in Dial-Up Networking and click the
More button. Select the entry Edit entry and modem properties....
3. On the Basic page, enter the setting Multiple Lines for Dial using.
4. Click the Configure... button to prompt a special window in which the virtual
modems to be used for the multi-link PPP can be selected.
13. ISDN CAPI Port Device Driver
197
ISDNmst.fm Page 198 Wednesday, January 15, 2003 9:22 AM
5. Select ISDN Internet (PPP over ISDN) and ISDN RAS (PPP over ISDN) and
identify identical dial-up numbers for your ISP using the button Phone
numbers.....
6. Close the window by clicking OK.
To establish a multi-link PPP connection in Windows 2000, proceed as follows:
1. Create a new connection to your Internet Service Provider (ISP) in Dial-Up
Networking or select an already existing connection to your ISP.
2. Select the telephone book entry created in Dial-Up Networking and click the
Properties button.
3. From the Basic page, enter ISDN Internet (PPP over ISDN) Modem and the
virtual modem ISDN RAS (PPP over ISDN) under Dial using.
4. Above the button All devices call the same numbers..., define the same dial-in
node for the ISP for both virtual modems.
5. Close the window by clicking OK.
Now the system automatically will attempt to connect to the destination ISDN
number using both ISDN B channels whenever this dial-up connection is
activated. Which kind of connection actually has been established (PPP or multilink PPP) is displayed in the Dial-up icon. Activate the Dial-up icon in the
Windows NT task bar. Then click the Details button. If the entry PPP multi-link
is displayed under Frames on the Network Registry page, you are connected to
the Internet at the maximum transfer rate of 2*64kBit.
Using the Summary page in Dial-up networking, you connect and disconnect the
second B channel manually as required. This technique allows you to increase the
transmission capacity to download large files from the Internet and to reduce it
again afterwards to avoid excessive charges (
Windows NT).
Users of Windows 2000 find these entries on the Details page instead.
Clearing internet connections automatically
Some Internet browsers offer you the option of clearing a connection
automatically when the connection is idle for a certain amount of time.
To activate this option in the MS Internet Explorer 4.x/5.x, click on Start ->
Settings -> Control Panel -> Internet -> Connections -> Select modem... ->
Settings... -> Advanced... -> Disconnect if idle for ... minutes”
Faxing with MS Money 98/99 and MS Exchange/Outlook and
other Fax Group 3 applications (e.g. WinFax PRO 8.x/9.x)
With the virtual modem ISDN FAX (G3) the fax function of MS
Exchange/Outlook and other Fax Group 3 applications can be used. Fax polling is
not supported.
198
IBM ISDN PC Card:User’s Guide
ISDNmst.fm Page 199 Wednesday, January 15, 2003 9:22 AM
Note:
To use this modem a CAPI device driver software supporting T.30 (Fax
Group 3) is required.
The hardware requirements for Fax G3 are higher than for other CAPI
applications, as the analog/digital conversion is performed by the computer's
CPU. A Pentium computer with 133 MHz and at least 32 MB RAM will provide
optimal performance.
The maximum fax speed depends on the CAPI device driver software, the fax
machine/software on the other side, the line quality and the hardware standard
of your computer. The ISDN CAPI 2.0 device driver software and the ISDN CAPI
Port device driver support a speed of up to 14,400 Bit/s for receiving and sending
faxes.
MS Exchange/Outlook
If you install MS Exchange/Outlook, specify the modem ISDN FAX (G3). No
additional settings are required (modem’s default setting: AT S31=3). For more
information about the configuration of MS Exchange/Outlook, see the
documentation of your operating system, or contact your dealer or Microsoft.
WinFax PRO
If you want to use the software WinFax PRO 8.x/9.x by Symantec, do not select
the virtual modem ISDN FAX G3 in the configuration window. Select instead the
direct use of the CAPI 2.0 interface.
Setting: Generic ISDN or Generic ISDN (CAPI 2.0).
Alternatively, select the ISDN-Controller installed if implemented in your WinFax
version.
Data communications software
Thanks to support for the UNIMODEM architecture of Windows NT/2000, the
CAPI Port Device Driver also can be used with 32-bit data communications
applications such as "HyperTerminal". The virtual modems
•
ISDN Mailbox (X.75)
•
ISDN Analog Modem (V.32bis)
•
ISDN - ISDN (X.75)
•
Custom Config
can be used for this purpose. The registers available for custom configuration are
described in Appendix A. Please note the default values for the various registers.
Should problems in changing to command mode (+++) arise, adjust the time
interval for the escape sequence (e.g., ATS12=1000).
The "ISDN - ISDN (X.75)" modem can be used to establish point-to-point
connections over secured data link (X.75).
13. ISDN CAPI Port Device Driver
199
ISDNmst.fm Page 200 Wednesday, January 15, 2003 9:22 AM
Data communications software and analog modems at the remote
site
As long as your CAPI 2.0 device driver software supports analog connections, the
virtual modem ISDN Analog Modem (V.32bis) can be used to access analog
remote sites like BBSs. The maximum speed possible is 14,400 Bit/s (V.32bis). This
virtual modem also will support any higher speeds offered by future versions of
the CAPI 2.0 device driver software.
The required protocols ("V.32bis" and "asynchronous PPP") are set by default on
the ISDN Analog Modem (V.32bis) virtual modem.
Using data communications software with an emulated COM port
© AVM Vertriebs KG, 2000
If the ISDN CAPI Port Device Driver is installed with its default settings, one port
(ISDNx) is assigned to each virtual modem. Thus any software using the
UNIMODEM interface (TAPI modems) of Windows NT/2000 can work with the
virtual modems. No changes to the virtual ports are necessary. Such software
includes, for instance, Windows NT/2000 Dial-Up Networking and
Hyperterminal.
However, using data communications software which does not support the
UNIMODEM architecture of Windows NT/2000 and requires COM ports, a COM
port must be assigned to each virtual port. (Such data communications programs
include older versions for Windows 3.x).
The assignment of COM ports to the virtual ports "ISDN1” and ”ISDN2" is only
possible during installation of the ISDN CAPI Port Device Driver (see "Installing
the ISDN CAPI Port Device Driver"). During installation, COM ports can be
assigned on the Ports page. The settings are implemented upon completion of the
installation routine.
Note:
Before assigning COM ports, check which COM ports are already being
used by other hardware components such as serial interfaces!
The COM ports assigned now are available to Windows NT/2000 with 32-bit or
16-bit applications.
The following protocols are set by default::
•
ISDN B2 protocol: X.75
•
PPP variants: PPP over ISDN (synchronous PPP).
To configure other protocol settings, use AT commands (see Appendix A).
Example: To set up a connection to an analog BBS using 16-bit Windows 3.x
software such as Procomm Plus 3.0 and a passive ISDN-Controller over COM 3,
the modem initialization commands must be set to AT S31=8 and S51=0 (analog
modem and asynchronous PPP) in your communications software.
200
IBM ISDN PC Card:User’s Guide
ISDNmst.fm Page 201 Wednesday, January 15, 2003 9:22 AM
The modem "ISDN SoftCompression X.75/V.42bis":
Using data compression according to V.42bis for X.75 connections
Using the virtual modem ISDN SoftCompression X.75/V.42bis connections can be
established with activated data compression. This allows data to be transmitted at
a rate up to four times higher, depending on the type of data to be transmitted.
Some basic conditions must be met, however:
•
The latest CAPI 2.0 device drivers are required:
The CAPI 2.0 device drivers for your ISDN-Controller must support V.42bis. If
this is not the case, the virtual modem ISDN SoftCompression X75/V42bis is
not available for selection in the installation window.
•
Only for X.75 connections:
Data compression according to V.42bis can be used only for X.75 connections.
Possible applications include ISDN Point-to-Point connections and
connections to ISDN BBSs. According to CAPI 2.0, a secured data link is
imperative for V.42bis connections. As only the X.75 protocol guarantees this
feature, V.42bis can be used only with this protocol. For connections to ISPs,
HDLC is (nearly always) used as an ISDN B2 protocol. For this reason, a
connection with data compression is not possible on ISDN protocol level.
•
Automatic negotiation
When a connection to an X.75 remote site is established, the system
automatically tries to negotiate V.42bis. If this does not succeed, e.g. because
the remote site does not support V.42bis, a connection without data
compression is made automatically.
Keep in mind that the V.42bis data compression algorithm of passive ISDNControllers is processed on the host's CPU and thus demands more powerful
hardware. In the case of active controllers of the B1 family, the algorithm is
processed completely on the Controller.
Note: With the command ATS42=8, V.42bis can be activated manually for X.75
connections as well.
Remote access service (RAS)
The ISDN CAPI Port Device Driver can be used for RAS connections to Windows
95/98/NT and Windows 2000 computers. The virtual modem ISDN RAS (PPP
over ISDN) is provided for this purpose.
In Windows 95/98 Dial-Up Networking requires an additional server module to
serve as a remote site. Windows NT computers can use the "NDIS WAN CAPI
Device Driver for Windows NT" or the ISDN CAPI Port Device Driver for
Windows NT to make WAN connections over ISDN.
Windows 2000 users can use the ISDN CAPI Port Device Driver or the NDIS
WAN CAPI Device Driver installed with the CAPI 2.0 device drivers
13. ISDN CAPI Port Device Driver
201
ISDNmst.fm Page 202 Wednesday, January 15, 2003 9:22 AM
Connections and caller authentication are managed by the PPP protocol (PPP over
ISDN, RFC 1618) for both operating systems. HDLC is the specified ISDN B2
protocol. The remote computer is then accessible over ISDN using network
protocols such as TCP/IP, SPX/IPX or NetBEUI.
Remote access service (RAS) with Windows 95/98
See the documentation of your operating system for instructions about how to
configure Remote Access Service (RAS). Should any problems with RAS arise,
contact your dealer or Microsoft. In order to use Windows 95/98 RAS over ISDN,
the following components must be installed:
•
an ISDN-Controller
•
CAPI device drivers (installed during the ISDN-Controller Setup)
•
ISDN CAPI Port Device Driver
•
Dial-Up Networking (and Dial-up Server module, if desired)
•
network protocol with appropriate client software (such as NetBEUI), bound
to the Dial-up Adapter.
Make sure that all of these components are installed.
Note that Windows 95/98 can use only one Dial-up Networking connection at a
time.
Setting the ISDN number for incoming calls
In the default configuration, incoming data calls are accepted for all MSNs.
To accept data calls for only one MSN of your ISDN line, enter for the virtual
modem ISDN RAS (PPP over ISDN) the AT command ATS 42=1;
S50=<MSN>.For more information on RAS configuration, see the documentation
of your operating system or contact your dealer or Microsoft.
Legal notice and support
The ISDN CAPI Port Device Driver is commercial software owned by AVM
GmbH, Berlin, which provides the software free of charge for use by its
customers.
The AVM ISDN CAPI Port Device Driver and accompanying documentation may
not be offered, used, altered or marketed, nor may any of its identifying
characteristics be altered, as part of offerings of third parties, such as hardware
and software manufacturers.
Appendix A: Description of the registry commands
You can configure the ISDN CAPI Port Device Driver for individual requirements
using the AT commands described in this section. To change the configuration of
any of the virtual modems, proceed as follows:
202
IBM ISDN PC Card:User’s Guide
ISDNmst.fm Page 203 Wednesday, January 15, 2003 9:22 AM
1. Open Start -> Settings -> Control Panel -> Modems (Windows NT) or Start > Settings -> Control Panel -> Telephone and Modem Options (Windows
2000).
2. Select the desired modem (Windows 2000: on the "Modems" page).
3. Click the Properties button.
4. On the Settings page, click the Advanced... button (Windows 2000: Advanced
Options page).
5. Enter the AT command in the Extra Settings field.
If you want to set more than one register, separate each individual register
with semicolons followed by a space. Only the first command entered
requires the prefix ”AT”.
Example: AT S31=2; S35=38400; S51=0
6. Confirm your entries by clicking OK and close the modem window.
AT Command
ATS0=
Value
Parameter
0
0=AUTOANSWER off
(default)
1
1=AUTOANSWER on
ATS2=
43
ASCII code for escape
sequence character
ATS3=
13
Code for CR
ATS4=
10
Code for LF
ATS5=
8
Code for BS
ATS12=
100
Time interval for escape
sequence
ATS30=
ATS31=
Error Level:
0
No AT command; syntax,
illegal register value,
command not executed
1
Unknown command
parameter
2
Unknown command
0
Protocol: X.75 (default)
1
Protocol: HDLC
2
Protocol: V.110
3
Fax Group 3
4
Protocol: TEL
5
Protocol: X.25
13. ISDN CAPI Port Device Driver
203
ISDNmst.fm Page 204 Wednesday, January 15, 2003 9:22 AM
AT Command
Value
Parameter
7
Protocol: V.120
8
Protocol: Analog Modem
(V.32bis)
ATS35=
14400
Baud rate
ATS36=
0
Parity: none (default)
1
odd
2
even
0
Stopbits: 1 bit (default)
1
2 bits
0
Data bits: 8 (default)
1
Data bits: 7
ATS41=
0
B1 protocol: sets X.75
(default)*
ATS42=
0
B2 protocol: sets X.75
(default)*
8
B2 protocol: sets
X.75/V.42bis data
compression*
ATS43=
0
B3 protocol: sets X.75
(default)*
ATS44=
2
CIP value: sets X.75
(default)*
ATS45=
2048
Frame size
ATS48=
1
For multiple active ISDNControllers (like the AVM
Controller B1), sets the
number of the CAPI 2.0
controller used, or (for the
AVM Controller C4) the
number of the So port.
ATS49=
<number>
Sets number for outgoing
calls***
ATS50=
<number>
Sets number for incoming
calls***
ATS51=
0
Asynchronous PPP
("modem style", RFC 1162
1
Synchronous PPP ("PPP
over ISDN", RFC 1618)
(default)
ATS37=
ATS38=
204
IBM ISDN PC Card:User’s Guide
ISDNmst.fm Page 205 Wednesday, January 15, 2003 9:22 AM
AT Command
ATS54=
Value
0
No caller ID suppression
(default)
1
Caller ID suppression
active***
ATA
ATD
ATE
Accept an incoming call
0...9
Dial specified number
L
Dial previous number
P
Ignored
T
Ignored
0
Echo in command mode off
1
Echo in command mode on
(default)
ATH
ATQ
ATV
Parameter
Terminate existing
connection
0
Display messages in
command mode (quiet)
1
Suppress messages in
command mode (quiet)
0
Display results as numeric
codes
1
Display results as text
("verbose") (default)
ATZ
Reset
+++
Switch from on-line to
command mode
* For a detailed description of these parameters, see the "COMMON-ISDN-API
Version 2.0" specification. The CAPI 2.0 specification can be obtained free over the
Internet (http://www.capi.org).
** see also Section 4.3.2 "Suppressing Caller ID Display"
*** Generally, the number is the MSN given by the network provider (e.g. British
Telecom) without the dialing code. If your ISDN-Controller is connected to the
internal S0 bus of a PBX, use the MSN of the respective extension. For more
information, please refer to your PBX manual.
More detailed information about the application interface CAPI is available under
http://www.capi.org.
13. ISDN CAPI Port Device Driver
205
ISDNmst.fm Page 206 Wednesday, January 15, 2003 9:22 AM
206
IBM ISDN PC Card:User’s Guide
ISDNmst.fm Page 207 Wednesday, January 15, 2003 9:22 AM
14. Removing the IBM International ISDN PC Card
The IBM International ISDN PC Card is removed in two steps from your
Windowsbased computer:
•
Remove any NDIS WAN CAPI Device Drivers installed
•
Remove the CAPI 2.0-compliant device drivers
Removing the IBM ISDN PC Card from Windows 95, Windows
98, and Windows Me
To remove the IBM ISDN PC Card from Windows 95, Windows 98, and Windows
Me, do the following:
1. Leave the IBM International ISDN PC Card in the PCMCIA slot. Disconnect
the card’s ISDN cable from the ISDN Line.
2. Click Start -> Settings -> Control Panel to open the Control Panel.
3. Double-click the Network icon.
4. On the Configuration window page, select the NDIS WAN CAPI Driver in
the list of network components.
5. Click Remove button, then OK. Confirm that you want to restart your
computer.
© Copyright IBM Corp. 2002
207
ISDNmst.fm Page 208 Wednesday, January 15, 2003 9:22 AM
In Windows Me, the following window prompts you to confirm that you want
to remove the device driver from all hardware profiles. Click OK to confirm
that you want to remove the NDIS WAN CAPI device driver.
6. After your computer has restarted, open the Control Panel again. Double-click
the Add/Remove Programs icon.
7. In the Install/Uninstall window, select IBM International ISDN PC Card in
the list of programs.
208
IBM ISDN PC Card:User’s Guide
ISDNmst.fm Page 209 Wednesday, January 15, 2003 9:22 AM
8. In the IBM International ISDN PC Card window, click Continue.
9. When the card has been completely removed, click OK. When prompted to
restart the computer, click No.
10. Shut down Windows and turn off the computer if necessary.
11. Remove the IBM International ISDN PC Card from the PCMCIA slot.
This completes the removal of the adapter.
14. Removing the IBM International ISDN PC Card
209
ISDNmst.fm Page 210 Wednesday, January 15, 2003 9:22 AM
Removing the IBM ISDN PC Card from Windows NT
The following section assumes that you are logged on to a Windows NT 4.0
system as Administrator. If you are not logged on as Administrator, you might
not be able to perform all the steps outlined in this chapter.
To remove the IBM ISDN PC Card from Windows NT, do the following:
1. Leave the IBM International ISDN PC Card in the PCMCIA slot. Disconnect
the card’s ISDN cable from the ISDN line.
2. Click Start -> Settings -> Control Panel to open the Control Panel. Doubleclick the Network icon.
Click the Adapters tab and then NDIS WAN CAPI Device Driver.
3. Click the Remove button and confirm that you want to remove this device.
4. Click Close. After Windows NT 4.0 has finished updating the network
configuration, restart your system.
5. When your computer has restarted, open the Control Panel again. Doubleclick the Add/Remove Programs icon.
6. In the Install/Uninstall window, select ISDN CAPI Port in the list of
programs.
210
IBM ISDN PC Card:User’s Guide
ISDNmst.fm Page 211 Wednesday, January 15, 2003 9:22 AM
7. In the IBM International ISDN PC Card window, click Continue.
8. When prompted to restart the computer, click No. Shut down Windows and
turn off the computer if necessary. Remove the IBM International ISDN PC
Card from the PCMCIA slot.
This completes the removal of the adapter.
14. Removing the IBM International ISDN PC Card
211
ISDNmst.fm Page 212 Wednesday, January 15, 2003 9:22 AM
Removing the IBM ISDN PC Card from Windows 2000
The following section assumes that you are logged on to a Windows 2000 system
as Administrator. If you are not logged on as Administrator, you might not be able
to perform all the steps outlined in this chapter.
To remove the IBM ISDN PC Card from Windows 2000, do the following:
1. Leave the IBM International ISDN PC Card in the PCMCIA slot. Disconnect
the card’s ISDN cable from the ISDN line.
2. Click Start -> Settings -> Control Panel to open the Control Panel.
3. Double-click the Add/Remove Hardware icon.
4. When the Add/Remove Hardware Wizard starts, click Next.
5. In the Choose a Hardware Task window, select the option Uninstall/Unplug a
device, then click Next.
In the subsequent window click Uninstall a device and then Next.
6. In the device list, select IBM International ISDN PC Card, then click Next.
7. In the Uninstall a Device window, confirm that you want to remove the IBM
International ISDN PC Card. Click Next.
8. Click Finish and then shut down Windows. Switch off your computer if
necessary.
9. Remove the IBM International ISDN PC Card from the PCMCIA slot.
212
IBM ISDN PC Card:User’s Guide
ISDNmst.fm Page 213 Wednesday, January 15, 2003 9:22 AM
This completes the removal of the adapter.
Removing the IBM ISDN PC Card from Windows XP
To remove the IBM ISDN PC Card from Windows XP, do the following:
1. Leave the IBM International ISDN PC Card in the PCMCIA slot. Disconnect
the card's ISDN cable from the ISDN line.
2. Click Start -> Control Panel to open the Control Panel.
3. Double-click the Performance and Maintenance icon.
4. In the System Properties window, click the Hardware tab, then the Device
Manager button. In the Device Manager, scroll down to Network adapters in
the device list and click the plus beside it to expand the node. Select IBM
International ISDN PC Card. Right-click it and select the command Uninstall
in the context menu.
5. The next window prompts you to confirm that you want to remove the IBM
International ISDN PC Card. Click OK.
When windows announces that the IBM International ISDN PC Card has been
removed, close all the remaining windows. This completes the removal
procedure.
14. Removing the IBM International ISDN PC Card
213
ISDNmst.fm Page 214 Wednesday, January 15, 2003 9:22 AM
214
IBM ISDN PC Card:User’s Guide
ISDNmst.fm Page 215 Wednesday, January 15, 2003 9:22 AM
15. The FRITZ! and EXTRAS folders
This CD contains two sub directories \FRITZ! and \EXTRAS.
The Fritz! folder
This directory contains the AVM Fritz! software package v3.00 in English,
German, French, Italian, and Spanish. The software can be installed via the
Autorun menu of the CD for each corresponding language.
Note:
The AVM Fritz! software in this folder is supplied by IBM "as is". IBM
cannot held be responsible for any damages to your system incurred
through the use of it, and provides no support for this software. If you
encounter any kind of problems with this software please contact AVM for
further assistance or software updates.
The EXTRAS folder
The Extras folder contains additional Windows software. These tools and utilities
are to assist you in the operation of the IBM International ISDN PC Card.
Note:
The tools in this folder are supplied by IBM "as is". IBM cannot held be
responsible for any damages to your system incurred through their use,
and provides no support for these components.
Adobe
Contains the Adobe Acrobat Reader 5.0x
for Windows 95, Windows 98, Windows
ME, Windows NT 4.0, Windows 2000, and
Windows XP
cFos
Contains the cFos software v4.14 for
Windows 95, Windows 98, Windows ME,
Windows NT 4.0, Windows 2000, and
Windows XP
cFos\nt4wk2
Contains the cFos software v4.14 Windows
NT 4.0, Windows 2000, and Windows XP
cFos\Win9X
Contains the cFos software v4.14 for
Windows 95, Windows 98, and Windows
ME
CW52NT
Contains SystemSofts CardWizard 5.20.06
for Windows NT 4.0 try and buy version
CW52NT\DE
Contains SystemSofts CardWizard 5.20.06
for Windows NT 4.0 try and buy version in
German
© Copyright IBM Corp. 2002
215
ISDNmst.fm Page 216 Wednesday, January 15, 2003 9:22 AM
CW52NT\DOCS
Contains the documentation for
SystemSofts CardWizard 5.20.06 for
Windows NT 4.0 in Adobe Acrobat PDF
format
CW52NT\EN
Contains SystemSofts CardWizard 5.20.06
for Windows NT 4.0 try and buy version in
English
CW52NT\FR
Contains SystemSofts CardWizard 5.20.06
for Windows NT 4.0 try and buy version in
French
CW52NT\IT
Contains SystemSofts CardWizard 5.20.06
for Windows NT 4.0 try and buy version in
Italian
CW52NT\REGTOOL
Contains the Windows NT 4.0 Registry Tool
v5.20.04 for SystemSofts CardWizard for
Windows NT 4.0
CW52NT\REGUPD
Contains a Windows NT 4.0 Registry
update for enabling SystemSofts
CardWizard 5.10.xx to SystemSofts
CardWizard 5.20.01 for Windows NT 4.0 to
recognize the IBM International ISDN PC
Card
CW52NT\SP
Contains SystemSofts CardWizard 5.20.06
for Windows NT 4.0 try and buy version in
Spanish
ISDNW
Contains ISDN Watch
Notes
Contains the CAPI device driver interfaces
for Lotus Notes 4.6, 4.65a, 5.0, and 5.01. For
more details please read the file
lotuscapi.txt
PORT
Contains the CAPI-Port device drivers for
Windows 95, Windows 98, Windows ME,
Windows NT 4.0, Windows 2000, and
Windows XP
WIN95
Windows 95 software and updates
WIN95\DIALS
Contains the IBM Dials Client v5.03 Patch 2
for Windows 95 and Windows 98 for
dialing into the following IBM routers:
•
8235 DIALs Server
•
2210 Nways Multiprotocol Router and
Multiprotocol Routing Services (MRS)
•
2212 Access Utility (AIS)
2216 Nways Multiaccess Connector
WIN95\DUN
216
IBM ISDN PC Card:User’s Guide
Windows 95 Dial-Up Networking updates
ISDNmst.fm Page 217 Wednesday, January 15, 2003 9:22 AM
WIN95\DUN\DUN13Y2K
Windows 95 Dial-Up Networking Update
1.3 Year 2000 fix. For more details please
read the files _info.txt and _y2kdun13.txt.
WIN95\DUN\MSDUN13
Windows 95 Dial-Up Networking Update
1.3, multi language. For more details please
read the files _info.txt and _msdun13.txt
WIN95\DUN\MSDUN14
Windows 95 Dial-Up Networking Update
1.4. Available in English only. For more
details please read the file msdun14.txt.
WIN95\DUN\VPNUPD
Windows 95 Virtual Private Networking
Update. For more details please read the
file vpnupd.txt. Requires Dial-Up
Networking Update 1.3.
WIN95\SCRIPTSLIP
Windows 95 SLIP and Scripting support for
use with Dial-Up Networking. For more
details please read the file readme.txt.
WIN95\SP1
Windows 95 Service Pack 1 multi language.
This is for the initial Windows 95 release of
August 1995 only! For more information
please read the file _info.txt.
WIN95\Y2K
Windows 95 Year 2000 update, multi
language. For more information please read
the files _info.txt and _readme.1st.
WIN98
Windows 98 software and updates
WIN98\DIALS
Contains the IBM Dials Client v5.03 Patch 2
for Windows 95 and Windows 98 for
dialing into the following IBM routers:
•
8235 DIALs Server
•
2210 Nways Multiprotocol Router and
Multiprotocol
•
2212 Access Utility (AIS)
•
2216 Nways Multiaccess Connector
WIN98\DUN14
Windows 98 Dial-Up Networking Update
1.4 multi language. For more information
please read the file dun14.txt and _info.txt
files in the directories FE (Windows 98 First
Edition) and SE (Windows 98 Second
Edition)
WIN98\SHUTSE
Windows 98 Second Edition shutdown
supplement, multi language. For more
details please read _info.txt and _shutse.txt.
15. The FRITZ! and EXTRAS folders
217
ISDNmst.fm Page 218 Wednesday, January 15, 2003 9:22 AM
218
IBM ISDN PC Card:User’s Guide
ISDNmst.fm Page 219 Wednesday, January 15, 2003 9:22 AM
Appendix A. Package contents
The IBM International ISDN PC Card is a passive ISDN adapter in PCMCIA
(credit card size) format that works with any basic-rate ISDN line. The card can be
used with one B channel at 64 kbit/s, or for multilink connections with two B
channels simultaneously at 128 kbit/s.
In addition to this manual, your option package includes:
•
1 IBM Warranty Statement (multilingual)
•
1 International Program License Agreement (multilingual)
•
1 Safety Information manual (multilingual)
•
1 CE approval flyer (English only)
•
1 Product Support Guide (PSG) (English only)
•
1 International ISDN PC Card Installation Software CD
•
1 ISDN cable for the PC Card - 4 m (13 ft)
If any of these items is missing or damaged, contact your vendor.
Replacement Information
Replacements can be ordered in case any of the following parts breaks. Use the
FRU numbers listed in the following table to refer to the part that needs replacing.
Hardware Item
FRU p/n
ISDN PC Card
09N3607
ISDN cable
09N9823
© Copyright IBM Corp. 2002
219
ISDNmst.fm Page 220 Wednesday, January 15, 2003 9:22 AM
220
IBM ISDN PC Card:User’s Guide
ISDNmst.fm Page 221 Wednesday, January 15, 2003 9:22 AM
Appendix B. Product features
The current device driver software supports all ISDN services.
The following B-channel protocols are provided:
•
X.75
•
HDLC transparent
•
X.25
•
ISO 8208 (X.25 DTE-DTE)
•
X.31 case a/b
•
T.70
•
T.90
•
Fax G3/G4
•
V.110
•
V.120
•
V.32bis
Fax protocols:
•
V.17
•
V.29
•
V.27ter
Additional features:
•
Fully CAPI 2.0-compliant
•
CAPI SoftFax G3: analog fax emulation in accordance with G3/T.30 at up to
14,400 baud
•
Half-duplex fax communication
•
Auto-dial, auto-answer
•
Automatic call detection
•
CAPI SoftModem V.32bis: connections to analog modems at up to 14,400 baud
•
Hayes AT command set when cFos and/or the CAPI Port Device Driver are
installed
•
CAPI SoftCompression X.75/V.42bis: data compression in accordance with
the CAPI 2.0 standard
•
Support for dial-in and call-back with the IBM DIALs client for IBM 8235,
2210, 2212, and 2216 hubs
•
Multilink PPP
Operating system support:
© Copyright IBM Corp. 2002
221
ISDNmst.fm Page 222 Wednesday, January 15, 2003 9:22 AM
•
Microsoft® Windows® 95
•
Microsoft® Windows® 98
•
Microsoft® Windows® Millennium Edition
•
Microsoft® Windows® NT 4.0 Workstation
•
Microsoft® Windows® 2000
D-channel protocols:
•
Windows 95, Windows 98, Windows Millennium Edition, Windows NT 4.0
Workstation: DSS1 (Euro ISDN), 1TR6, NI-1 and AT&T 5ESS
•
Windows 2000 Professional: DSS1 (Euro-ISDN), NI-1 and AT&T 5ESS
Device Driver version and limitations
This CD contains the device driver version 3.09.02 for all supported Windows
platforms.
The following D-channel protocols are supported for all Windows operating
systems using the 3.09.02 device driver:
•
DSS1 - Euro ISDN
•
5ESS
•
NI-1
Windows 95, Windows 98, Windows Me, and Windows NT 4.0:
•
1TR6 - older national D-channel protocol, only used in Germany
The diagnostics software for the IBM International ISDN PC Card is only
available in Windows 95, Windows 98, Windows Me, and Windows NT 4.0.
Physical specifications:
•
Approximate length: 85.6 mm (3.37 in)
•
Approximate width: 54.0 mm (2.30 in)
•
Approximate height: 5.0 mm (0.20 in)
Operating environment:
•
Temperature: 0° C to 70° C (32° F to 155° F)
•
Relative humidity: 80 % (non-condensing)
Agency approvals:
•
CE Mark
•
EN41003
222
IBM ISDN PC Card:User’s Guide
ISDNmst.fm Page 223 Wednesday, January 15, 2003 9:22 AM
Appendix C. A brief ISDN glossary
Note:
Some of the information provided in this chapter has been retrieved from
http://whatis.techtarget.com. IBM fully recognizes and acknowledges
that these articles are copyrighted by TechTarget.com, Inc.
This chapter gives a brief overview of technical terms used in the world of ISDN
as well as a few computer-related terms.
Historical survey
The first steps in the development of ISDN –the Integrated Services Digital
Network– took place in the early 1980s in France. Many other European countries
soon joined in the development work, however. ISDN was considered the logical
successor to the analog telephony technology commonly used in Europe at that
time. ISDN offered the potential for high speed bi-directional data
communications at 64 kbit/s or 128 kbit/s. The ISDN specifications were
submitted to the ITU and have since been standardized. However, ITU standards
are only recommendations, and some countries have implemented their own
versions of ISDN. Thus ISDN protocols are not exactly the same in every country.
However, the IBM International ISDN PC Card supports all major D-channel
switching protocols, so that this adapter can be used in a great number of
countries throughout the world.
Today ISDN is very easily implemented, since telephone companies in most
countries use only digital interfaces within their networks. The difference
between an analog telephone line and an ISDN line today lies in the wire used
from the telephone company's exchange to the subscriber's access interface, the
type of signals traveling on these lines, and the voltage. Hence you cannot
connect an analog device to an ISDN line, nor vice versa.
Glossary
•
a/b interface - Copper interface of the analog telephone network for use of
analog telephones or other equipment such as modems or fax machines. The
term a/b interface is derived from the designation of the two wires in the
analog subscriber line.
•
Adapter types - There are three categories of ISDN adapters available for use
in computers:
— Passive adapters are the cheapest and generally the best choice among
today's ISDN adapters. Passive ISDN adapters work primarily on OSI
Layer 1. The IBM International ISDN PC Card is a passive ISDN device.
semi-active These adapters support protocols on OSI Layer 2.
— Semi-active adapters have a DSP (digital signal processor) on board that is
primarily used to provide fax capabilities over ISDN. However, in most
© Copyright IBM Corp. 2002
223
ISDNmst.fm Page 224 Wednesday, January 15, 2003 9:22 AM
cases this capability can also be implemented in the device drivers of
passive ISDN adapters. active Active ISDN adapters are top-of-the-line
ISDN cards, and the most expensive.
— Active ISDN adapters handle all ISDN protocols on OSI Layers 1, 2 and 3.
These cards have one or more on-board microprocessors and a certain
amount of RAM. Active ISDN adapters relieve the host system's CPU of
all ISDN communication processing. Their primary area of application is
in RAS servers, for which many manufacturers offer a special line of active
adapters.
Note:
ISDN adapters cover OSI Layer 1, but differ in the higher-layer
protocols that they provide!
•
AO/DI - Always On/Dynamic ISDN. This is an ISDN technology that was
originally developed by IBM and is now an open ISDN standard. This
technology is currently only used in the United States of America and Canada.
AO/DI allows the user to connect to an ISP (Internet Service Provider) for
example, then drop the idle B-channel connection after a delay. A D-channel
connection is maintained, however, and permits a quicker reconnection when
data is queued.
•
B channel - One of the two channel types available in ISDN. The B channel is
primarily used for data transfer at 64 kbit/s in each direction.
•
Basic-rate interface - One of the two channel types available in ISDN. The B
channel is primarily used for data transfer at 64 kbit/s in each direction.
•
BRI - See basic-rate interface.
•
CAPI - Common ISDN API. This is a programming interface for ISDN that
has been developed in Germany and is today a de facto standard for
European ISDN cards. CAPI allows software developers to write ISDNcapable applications without having to deal with specific ISDN adapter
implementations– as long as the adapter is equipped with CAPI device
drivers. Thus any CAPI-compliant application software works out of the box
on any CAPI-compliant ISDN device. The CAPI interface is independent both
from the telephone company's implementation of ISDN and from the
hardware manufacturer's implementation of the ISDN adapter. CAPI is thus
universal. The CAPI interface has been defined for a broad range of operating
systems, including DOS, Windows 3.x, Windows 95, Windows NT, Linux, etc.
More information can be obtained from http://www.capi.org.
— CAPI 1.1 was the original CAPI specification for the German ISDN
implementation.
— CAPI 2.0 is the current CAPI specification for Euro-ISDN.
The IBM International ISDN PC Card is fully CAPI 2.0-compliant.
•
224
cFos - CAPI Fossil device driver. This device driver package emulates an
analog modem over a CAPI-compliant ISDN adapter. Many communications
applications today still expect to talk to an analog modem through a COM
port. cFos gives such software the impression of talking to an analog modem,
even though the underlying hardware is in fact an ISDN adapter. cFos only
works with CAPI-compliant devices such as the IBM International ISDN PC
Card.
IBM ISDN PC Card:User’s Guide
ISDNmst.fm Page 225 Wednesday, January 15, 2003 9:22 AM
•
Cold insertion/removal - Denotes the installation or removal of a peripheral
device when the computer system is powered off and/or disconnected from
the wall sockets.
•
D channel - The second type of channel in ISDN BRI line. It carries 16 kbit/s
and is mainly limited to signaling functions to control the B channels.
•
D-channel switching protocol - Describes the telephone company's particular
implementation of ISDN. The switching protocol is one of the key elements
that determines whether a given ISDN adapter can be used in a given country.
D channel switching protocols in use include:
— DSS1: Digital Subscriber System No. 1, commonly used in Europe where it
is also called E-DSS1 or Euro ISDN
— NI-1: National ISDN 1, used in the United States of America and Canada
— 5ESS: AT&T switching protocol, used in the United States of America and
Canada
— G3 PBX Custom: AT&T switching protocol, used in the United States of
America and Canada
— DMS-100 Custom: Nortel protocol, used in the United States of America
and Canada
— NTT INS Net 64: NTT Docomo, used in Japan
— TPH 1962: obsolete D-channel switching protocol used in Australia;
replaced by DSS1
— 1TR6: obsolete D-channel switching protocol used in Germany; replaced
by DSS1.
•
DCE - Data communication equipment
•
dpi - Dots per inch: a measurement unit for image resolution.
•
DTE - Data terminal equipment
•
E carrier system - E1 (or E-1) is a European digital transmission format
devised by the ITU-TS and given its name by the Conference of European
Postal and Telecommunication Administrations (CEPT). It is the European
equivalent of the North American T carrier system format. E2 through E5 are
carrier signals in increasing multiples of the E1 format..
The E1 signal format carries data at a rate of 2,048 Mbit/s and thus can carry
32 channels of 64 kbit/s each. E1 carries at a somewhat higher data rate than
T1 (1.544 Mbit/s) because, unlike T1, it does not use bit-robbing, so that all
eight bits per channel are used for signal encoding. E1 and T1 can be
interconnected for international use.
•
ETSI - European Telecommunications Standards Institute.
•
Euro ISDN - The D-channel switching protocol adopted throughout Europe.
In 1989, 18 telephone companies from different European states signed a
Appendix C. A brief ISDN glossary
225
ISDNmst.fm Page 226 Wednesday, January 15, 2003 9:22 AM
“Memorandum of Understanding” which led to the implementation of Euro
ISDN in 1993. Euro ISDN is documented in the ETSI Net-3 standard.
•
Fax standards - There are two important fax standards for ISDN:
— G3 (Group 3, ITU standard T.4) which comes from the analog telephony
world and allows a maximum resolution of 200 dpi by 200 dpi. Transfer
speeds usually are 2,400 bps, 4,800 bps, 7,200 bps, 9,600 bps, and 14.4 kbps.
The IBM International ISDN PC Card supports the fax G3 standard.
— G4 (Group 4, ITU standard T.6) is a digital fax standard which is available
only in ISDN. It allows a maximum resolution of 400 dpi by 400 dpi.
Transfer speeds are 2,400 bps, 4,800 bps, 9,600 bps, 48 kbps, and 64 kbps.
However there are hardly any G4 fax devices on the market, and they are
prohibitively expensive. G4 stands for Group 4 (ITU standard T.6).
•
Fossil - Fido Opus Seadog Standard Interface Layer. This is a modem
emulation standard developed for analog BBS communications. A FOSSIL
device driver supports most of the AT commands set used by analog modems.
•
Hot insertion/removal - Denotes the installation or removal of a peripheral
device when the system is powered on and running.
•
ISDN voltage - The ISDN network voltage at the subscriber interface, where
the ISDN terminal equipment is connected, is 40 VDC.
•
ITU - International Telecommunication Union. A United Nations body which
develops recommendations for international telecommunication standards.
•
kbps, kbit/s - megabits per seconds One Mbit/s is 1,000,000 bits per second,
or 125,000 bytes per second, or roughly 122 kilobytes per second.
•
Mbps, Mbit/s - megabits per seconds One Mbit/s is 1,000,000 bits per second,
or 125,000 bytes per second, or roughly 122 kilobytes per second.
•
MSN - Multiple Subscriber Number. A feature that is available only in Euro
ISDN. SOme telephone companies assign multiple numbers to each ISDN
subscriber line ordered. These MSNs are usually (but not necessarily) in
sequence starting with ISDN line’s primary number. Each MSN is an
independent telephone number. Each ISDN terminal device connected to the
line can be assigned one of the line’s MSNs to permit internal call routing. Ask
your ISDN service provider if your line will be equipped with MSNs and, if
so, how many.
Note:
MSNs can be assigned to terminal equipment without regard to
sepcific ISDN services.
•
Multilink - A multilink connection is one that uses two or more B channels as
a single communication link. The two B channels of a BRI can be bundled to
yield a data rate of 2x64 kbit/s. Multilink connections generally result in
higher connection charges.
•
NT-1 - Network Terminator 1. This is the endpoint of the ISDN network at the
customer premises. The term also denotes a device which is connected to the
U interface and provides the S/T interface to subscriber equipment.
•
OSI reference model - The Open Systems Interconnection model is a standard
description or "reference model" of data transmission between any two points
in a communication network. Its purpose is to guide product developers and
maximize interoperability among different products. The reference model
226
IBM ISDN PC Card:User’s Guide
ISDNmst.fm Page 227 Wednesday, January 15, 2003 9:22 AM
defines seven layers of communication functions that take place at each end of
a communication link. Although the OSI model is not always clearly
organized in the same well-defined layers, many if not most products
involved in telecommunication can be described in relation to the OSI model.
It is also valuable as a uniform reference that furnishes a common ground for
education and discussion in the communications field. Its seven layers are:
— Layer 7: The application layer. This is the layer at which communication
partners are identified, quality of service is identified, user authentication
and privacy are considered, and any constraints on data syntax are
identified. (This layer is not the application itself, although some
applications can perform layer functions.)
— Layer 6: The presentation layer. This is a layer, usually part of an operating
system, that converts incoming and outgoing data from one presentation
format to another (for example, from a text stream into a popup window
with the newly arrived text). Sometimes called the syntax layer.
— Layer 5: The session layer. This layer sets up, coordinates, and terminates
conversations, exchanges, and dialogs between the applications at each
end. It deals with session and connection coordination.
— Layer 4: The transport layer. This layer manages the end-to-end control
(for example, determining if all packets have arrived) and error checking.
It ensures complete data transfer.
— Layer 3: The network layer. This layer handles the routing of the data
(sending outgoing transmissions in the right direction to the right
destination and receiving transmissions at the packet level). The network
layer performs routing and forwarding.
— Layer 2: The data link layer. This layer provides synchronization for the
lower physical layer, performing bit-stuffing for strings of 1s in excess of 5,
for example. It furnishes transmission protocol knowledge and
management.
— Layer 1: The physical layer. This layer conveys a bit stream through the
network at the electrical and mechanical level. It provides the hardware a
means of sending and receiving data on a carrier.
•
PPP - The Point-to-Point Protocol. A TCP/IP protocol used in the dial-up
networking environment. PPP works on the OSI layers 1 and 2. It is a fullduples protocol that can be used on various physical media, including twisted
pair or fiber optic lines, or satellite links. It uses a variant of High Speed Data
Link Control (HDLC) for packet encapsulation.
•
PPTP - POint-to-Point Tunneling Protocol. A variation of the PPP protocol. It
is a protocol (set of communication rules) that allows corporations to extend
their own corporate network through private "tunnels" over the public
Internet. In effect, a corporation uses a wide-area network as a single large
local-area network. Companies no longer need to lease their own lines for
wide-area communication, but can securely use the public Internet. This kind
of interconnection is known as a virtual private network (VPN).
•
PRI - See Primary rate interface.
•
Primary rate interface - Access to the ISDN network comes in two different
flavors, known as basic-rate and primary-rate access. The primary-rate
Appendix C. A brief ISDN glossary
227
ISDNmst.fm Page 228 Wednesday, January 15, 2003 9:22 AM
interface is similar to an E1 line. The total data rate is 2.048 Mbit/s. However,
the PRI provides 30 ISDN B channels and one D channel, all operating at 64
kbit/s. PRIs can be used in large RAS environments.
•
S0 interface - Another name for the BRI interface in Europe, where the
telephone company generally provides the NT device. For BRIs in point-tomultipoint configuration, the S0 interface is a four-wire data bus.
•
S2M interface - Another name for the PRI in Europe.
•
S/T interface - The European reference point for connecting ISDN terminal
equipment to the ISDN network. This interface is provided by the NT-1,
which in Europe is furnished by the telephone company.
•
SLIP - Serial Line Internet Protocol. A TCP/IP protocol used for
communication between two machines that have been previously configured
for communication with each other. Your Internet service provider can
provide you with an SLIP connection, for example, so the provider’s server
can respond to your requests, pass them on to the Internet, and forward your
responses from the Internet back to you. Your dial-up connection server is
typically on a slower serial line, rather than on the parallel or multiplex lines,
such as those of a provider’s network. SLIP only works with staticIP
addresses and is considered obsolete. SLIP works on OSI layer 2.
•
SPID - The Service Profile Identifier (SPID) is a number assigned by the
telephone company to a terminal on an ISDB B channel. A SPID tells
equipment at the phone company’s central office about the capabilities of each
terminal (computer, phone etc.) on the B channels. A basic-rate home or
business user can divide service on the two B channels using one for normal
telephone service and the other for data. The SPID tells the phone company
whether the terminal accepts voice or data information. Technically, the SPID
is a numeric string from 3 to 20 digits in length. One or more SPIDs are
assigned when you order the ISDN basic-rate interface (BRI) from the phone
company. Beginning in 1998, most phone companies began to use a generic
SPID format. In this format, the SPID is a 14-digit number that includes your
10-digit telephone number (which in turn includes the 3-digit Numbering
Plan Area [NPA] or area code), a 2-digit Sharing Terminal Identifier, and a 2digit Terminal Identifier (TID). The generic SPID format makes it easier to tell
users what to specify when installing ISDN equipment, and simplifies
corporate installation procedures. SPIDs are used only in the United States of
America and Canada.
•
Supplementary Service - Additional ISDN capabilities that are available only
in Euro ISDN. Some of them are standard convenience features, others are
only are available upon request. Supplementary Services include Calling Line
Identification (CLI), Call Forwarding (CF), Closed User Group (CUG), etc.
Your telephone company can provide more information on Supplementary
Services.
•
T carrier system - The T carrier system, introduced by the Bell System in the
U.S. in the 1960s, was the first successful system that supported digitized
voice transmission. The original transmission rate (1,544 Mbit/s) of the T1 line
is in widespread use today in enterprise connections to the Internet. A higher
multiplex level, the T-3 line, providing 44,736 Mbit/s, is also commonly used
by Internet service providers. Another commonly installed service is
fractional T1, which is the rental of some portion of the 24 channels in a T1
228
IBM ISDN PC Card:User’s Guide
ISDNmst.fm Page 229 Wednesday, January 15, 2003 9:22 AM
line, with the other channels going unused. The T carrier system is entirely
digital. The T1 (or T-1) carrier is the most commonly used digital line in the
United States, Canada, and Japan. The T1 digital stream consists of twentyfour 64-kbit/s channels. The T1 system also uses 8,000 framing bits.
•
U interface - The reference point for connecting ISDN subscriber equipment
to the ISDN network in the United States of America, Canada, Australia, and
New Zealand. In these countries, users might have to buy an NT-1 and supply
it with power. The NT-1 is necessary in order to connect European ISDN
terminal equipment, such as the IBM International ISDN PC Card, in these
countries. Note: Although the U interface also exists in Europe, it is not
available to the subscriber. The U interface has not been standardized in
Europe and varies from one telephone company to another. Thus North
American ISDN devices cannot be connected to the S/T interface of European
ISDN lines. Furthermore, European ISDN terminal equipment cannot be
directly connected to the U interface, only to an NT-1.
•
Warm insertion/removal - Denotes the installation or removal of a peripheral
device when the system is in suspend or hibernation mode (also called “sleep
mode”).
Appendix C. A brief ISDN glossary
229
ISDNmst.fm Page 230 Wednesday, January 15, 2003 9:22 AM
230
IBM ISDN PC Card:User’s Guide
ISDNmst.fm Page 231 Wednesday, January 15, 2003 9:22 AM
Appendix D. Troubleshooting and frequently asked
questions
General
What device driver version is supplied on the CD?
The device driver level on the IBM International ISDN PC Card Installation
Software CD for all Windows operating systems is 3.09.02.
Where on the Internet is the IBM International ISDN PC Card support Web
page located?
For device driver updates, tips, etc. please consult the PCD support Web page at:
http://www.pc.ibm.com/support
In the drop-down list labeled Browse the support siteî, select Options . In the
Category list, select Communication Adapters . In the Subcategory list, choose
ISDN, then select the option 09N3606 International ISDN PC Card.
How do I determine which version of the Installation Software CD I am using?
Insert the Installation Software CD for the IBM International ISDN PC Card.
Double click on the "My Computer" icon on the desktop and read the CD name
underneath the CD-ROM drive icon:
•
CD version 1: The CD name is IBM_ISDN
•
CD version 2: The CD name is IBMISDN_02
•
CD version 3: The CD name is IBMISDN_03
Starting with version 2 of the Installation Software CD an autorun menu has been
implemented.
No connection to ISDN
If a problem is reported in the connection to ISDN (when using Dial-Up
Networking or any other software), make sure the ISDN connection cable is
connected correctly to both the IBM International ISDN PC Card and the ISDN
line socket. Then try the dial or connect command again.
No connection to an internet service provider
If the IBM International ISDN PC Card fails to connect to your Internet Service
Provider (ISP), verify the following:
1. Your ISP supports ISDN connections.
2. The telephone number that you are dialing is correct for dial-in access to your
service provider over ISDN.
© Copyright IBM Corp. 2002
231
ISDNmst.fm Page 232 Wednesday, January 15, 2003 9:22 AM
3. You are using the correct Dial-Up Networking connection that configured for
use with with the PC Card.
4. Your ISP supports the appropriate protocols. The ISP might conceivably
recommend any protocol, such as V.120, asynchronous PPP, X.75, or any other
protocol. Contact your ISP and find out the protocol to use. Install cFos and
create a Dial-Up Networking connection according to the procedures in this
guide and your ISP's instructions.
No connection to your ISP at 128 kbit/s
If you suspect that the IBM International ISDN PC Card is only operating using
one ISDN B channel (64 kbit/s) although you have configured the system to use
both B channels, please verify the following:
1. Your ISP supports multilink connections, a 128 kbit/s connection over two
ISDN B channels simultaneously.
2. If you are using Windows 95, make sure you have installed the Microsoft DialUp Networking Update 1.3. Various language versions are available on the
CD. Installation instructions can be found in Section “Upgrading Dial-Up
Networking for Windows 95” on page 18.
3. You have followed the instructions in Section “Setting Up Internet Access” on
page 106.
cFos was installed with all COM ports selected. Now my modem takes COM port
10 or higher. How can this be solved?
If you select all available COM ports during the cFos installation, then cFos will
occupy all COM ports, up to COM9. This might cause problems later when you
install an analog modem. There are two ways to circumvent this problem:
1. Try to use as few COM ports as possible. Three to four COM ports should be
enough for day-to-day use of cFos with the IBM International ISDN PC Card.
2. If possible, install the analog modem before you install the IBM International
ISDN PC Card and cFos.
3. If you have already installed the IBM International ISDN PC Card, then click
Start -> Programs -> cFos ISDN & DSL Driver and select Configure cFos. In
the cFos configuration program, select the menu command Configure COM
ports. In the list of available COM ports, deactivate the one you want to use
for your analog modem. Click OK, then Exit. When asked whether you want
to save the changes, click Yes. In the last window, click OK. Restart your
computer if necessary.
CAUTION:
When following the instructions above to make a certain COM port available
for your analog modem, make sure that the COM port you release is not
currently used by one of cFos's emulated modems. You can verify this by
clicking “Start / Settings / Control Panel / Modems”. Furthermore, make sure
that your Dial-Up Network connections are not using this COM port.
Windows 9x, Windows Me
232
IBM ISDN PC Card:User’s Guide
ISDNmst.fm Page 233 Wednesday, January 15, 2003 9:22 AM
After I installed the IBM International ISDN PC Card in Windows 95, I reinstalled
CardWizard for Windows 95. Now the adapter is not properly recognized any
more. What can I do?
The device driver installation instructions for Windows 95 state:
Some notebook computer manufacturers install PCMCIA support software such
as SystemSoft's CardWizard as part of the Windows 95 package. IBM includes this
program with its ThinkPad notebook computer series. This section briefly
describes how to remove CardWizard from the system. This software must be
removed to ensure correct operation of the IBM International ISDN PC Card.
When you reinstall CardWizard for Windows 95 –even the latest version
available– you might see a message from CardWizard like the one illustrated
below:
You can get the adapter to work by stopping it in CardWizard, removing the
adapter from the PCMCIA slot, and then reinserting it. However, you might have
to do this every time you want to use the IBM International ISDN PC Card,
regardless of whether you hot-insert the card or cold-start your system. The best
solution is to completely remove SystemSoft's CardWizard software from
Windows 95 and use the adapter without it.
I have followed the instructions for installing the IBM International ISDN PC
Card in Windows 95. I am using Windows 95 OSR 2.x. Whenever I try to hotplug the adapter, the system freezes. What can be done to solve this?
It appears that there is a problem with the PCMCIA support in Windows 95 OSR
2.x. This problem was not seen in the initial release of Windows 95 and Service
Pack 1. If you experience this problem, then the only solution is to cold-insert or
cold-remove the adapter, i. e. shut down and turn off your notebook computer,
insert or remove the IBM International ISDN PC Card in any PCMCIA slot, and
then restart your computer.
How do I install the English Microsoft Windows 95 Dial-Up Networking 1.4
update onto a non-English Windows 95 version?
Appendix D. Troubleshooting and frequently asked questions
233
ISDNmst.fm Page 234 Wednesday, January 15, 2003 9:22 AM
Note:
The screen shots in this tip are taken from a German Windows 95
installation. They are provided for demonstration purposes only. The
windows and menus may look different in your language version of
Windows 95.
Before you launch the msdun14.exe file, backup the following files from your
C:\WINDOWS\SYSTEM directory:
•
SETUPX.DLL
•
MSSHRUI.DLL
If you decide not to keep a backup, this will not influence the usability or stability
of your Windows 95 installation. To install:
1. Launch msdun14.exe, click Yes to accept the installation of this upgrade. Click
Yesto accept EULA. The installation may inform you that no TCP/IP protocol
has been installed. Click OK to install TCP/IP.
2. When the installation program tells you it encountered a different language
version or code conflict with an existing file, you must click No to replace the
file. Follow the onscreen instructions to complete the installation.
Note:
If you do not click No when you see this message, the installation of
the Dial-Up Networking update fails. This may lead to a Windows
system that is unstable or cannot use the dial-up anymore.
Furthermore, you may not be able to uninstall and reinstall the DialUp Networking update. You must always click No when this message
appears.
3. When the installation is complete, you will see a new entry in the Start menu
called Accessories. This contains all necessary programs for your dial-up
networking.
234
IBM ISDN PC Card:User’s Guide
ISDNmst.fm Page 235 Wednesday, January 15, 2003 9:22 AM
How do I install the English Microsoft Windows 98 Dial-Up Networking 1.4
update onto a non-English Windows 98 version?
Note:
Before you follow the instructions of this tip, please read“Installing the
Dial-Up Networking 1.4 Update for Windows 98” on page 19 .
The screen shots in this tip are taken from a German Windows 98
installation. They are provided for demonstration purposes only. The
dialog boxes and menus may look different in your language version of
Windows 98.
1.
Launch the appropriate Microsoft Dial-Up Networking 1.4 Update program,
e. g. dun14-98de.exe for Windows 98 First Edition in German or dun14SEde.exe for Windows 98 Second Edition in German.
2.
Click on Yes to accept the installation of this upgrade. Click on Yes in order
to accept the EULA.
3. When the installation program prompts you that it encountered a different
language version or a code page conflict of an already existing file you MUST
click on No in order to replace the file. Follow the onscreen instructions in
order to complete the installation.
Note: If you do not click on "No" when you see this message the installion of
the Dial-Up Networking 1.4 Update fails.
This may lead to a Windows system that either becomes instable or you
cannot use the dial-up networking any more. Further more you may
not be able to uninstall and reinstall the Dial-Up Networking update!
4. When the installtaion is complete, you will see a new entry on your Start Up
menu called Accessories. This contains all necessary programs for your dialup networking.
Appendix D. Troubleshooting and frequently asked questions
235
ISDNmst.fm Page 236 Wednesday, January 15, 2003 9:22 AM
When the Microsoft Dial-Up Networking 1.4 update is installed, these are the files
that may be changed or updated:
•
Windows 98 First Edition
Directory
File Name
C:\WINDOWS\SYSTEM
rnanp.dll
C:\WINDOWS\SYSTEM
rnathunk.dll
C:\WINDOWS\SYSTEM
rnaui.dll
C:\WINDOWS\SYSTEM
smmscrpt.dll
•
Windows 98 Second Edition
Directory
File name
C:\WINDOWS\SYSTEM
pppmac.vxd
C:\WINDOWS\SYSTEM
rasapi32.dll
C:\WINDOWS\SYSTEM
rnanp.dll
C:\WINDOWS\SYSTEM
rnaui.dll
C:\WINDOWS\SYSTEM
smmscrpt.dll
C:\WINDOWS\SYSTEM
rnaapp.exe
236
IBM ISDN PC Card:User’s Guide
ISDNmst.fm Page 237 Wednesday, January 15, 2003 9:22 AM
I have installed the IBM International ISDN PC Card under Windows 98
Second Edition. When I try to shut down or restart the system, it hangs.
This is a known problem in Windows 98 Second Edition and is independent from
of PC Card or other hardware device in use. Microsoft has confirmed this to be a
problem with Windows 98 Second Edition. In the directory
\EXTRAS\WIN98\SHUTSE on the CD you will find the official Microsoft patch
for this problem in various languages. For more information, see the file
01INFO.TXT. Install this patch. If this problem still persists after you have done
so, then contact Microsoft support for further assistance.
Windows NT
SystemSoft's CardWizard 5.10 for Windows NT is installed and the IBM
International ISDN PC Card is still not recognized.
In order to get the IBM International ISDN PC Card to work in Windows NT 4.0
with SystemSoft's CardWizard 5.10, you must add an entry to the Windows NT
4.0 Registry. This Registry patch is provided on the CD in the directory
\EXTRAS\CW52NT\REG. Open this directory in the Windows NT 4.0 Explorer
and double-click the file IBMISDN.REG to merge it into the Windows NT 4.0
Registry. Shut down and restart your computer. The card will then be recognized
by SystemSoft's CardWizard and will function properly.
SystemSoft's CardWizard has been installed in Windows NT 4.0, and after the
installation of a Windows NT 4.0 Service Pack the CardWizard does not work
anymore.
When installing a Service Pack for Windows NT 4.0 you might see the message
that a different PCMCIA.SYS exists in your Windows NT 4.0 software. The
Service Pack installation program might ask you whether it should replace this
OEM version of the file. In this case, you should click “No”. However, if the
PCMCIA.SYS from SystemSoft's CardWizard has already been replaced with the
version from the Service Pack then CardWizard might no longer work. In this
case, remove CardWizard, restart your system, and reinstall CardWizard.
What features are supported by CardWizard for Windows NT 4.0?
The IBM International ISDN PC Card is fully supported out of the box by
SystemSoft's CardWizard 5.20 and higher for Windows NT 4.0. This means that
after you have installed CardWizard 5.20 or higher, the IBM International ISDN
Appendix D. Troubleshooting and frequently asked questions
237
ISDNmst.fm Page 238 Wednesday, January 15, 2003 9:22 AM
PC Card will work properly with CardWizard. The IBM International ISDN PC
Card will be supported with hot insertion, but only with cold removal. These
features are also available with SystemSoft's CardWizard 5.10 for Windows NT 4.0
after you apply the Windows NT 4.0 Registry patch described above.
Windows 2000
When connecting to CompuServe the message “?? LOGINE - Invalid entry - try
again” appears in the After Dial Terminal window, even though the password
entered is correct.
This seems to be due to a bug in Microsoft Windows 2000. Windows 2000 does not
properly store the password that is entered in Dial-Up Networking. For further
assistance, please contact either your local CompuServe help desk or the
Microsoft support desk.
Windows 2000 and XP
I have installed the device drivers for the IBM International ISDN PC Card in the
operating system but I only can create a connection with one B channel.
Please refer to chapter 11.2.4.2 (Windows 2000) or 11.2.5.2 (Windows XP) which is
titeled "Creating a Connection Using Both B Channels" for more details. If you
have not installed cFos or the CAPI port device drivers you might notice during
the set up of the internet connection that you only can select an entry called IBM
NDIS WAN CAPI. This entry is twice in the system, as each entry represents one B
channel. If you follow the instructions in the quoted chapters you can create a
multilinked connection by selecting the second IBM ISDN WAN CAPI entry. The
picture below shows how the settings should be looking like if you use the IBM
NDIS WAN CAPI device drivers.
238
IBM ISDN PC Card:User’s Guide
ISDNmst.fm Page 239 Wednesday, January 15, 2003 9:22 AM
Windows XP
Windows XP bandwidth issue
Note:
This information is provided "as is". IBM does not take any responsibility
for the accuracy of this tip. Furthermore IBM does not accept any liability
for any damages that might arise for using this tip. This tip has been
retrieved from http://www.tweakxp.com. The article can be found here.
When installing Windows XP it will take away up to 20 % from the bandwidth
when using Dial-Up Networking. This will help increase your bandwidth for any
network connection in Windows XP.
1. Make sure your logged on as actually Administrator. Do not log on with any
account that just has administrator privileges. To log in as an administrator:
•
Click on Start -> Logoff-> Logoff
•
In the logon screen hold Ctrl+Alt+Del
•
In the user field type 'Administrator' (case sensitive).
•
In the password field type the password for the administrator (if you don't
have one leave this field blank)
•
Click OK.
2. Click on Start -> Run -> Type gpedit.msc
3. Expand the Computer configuration branch
4. Expand the Administrative templates branch
5. Expand the Network branch
6. Highlight the QoS Packet Scheduler in the left window
7. In the right window, double click the limit reservable bandwidth setting.
8. On the setting tab, check the enabled item.
9. In the Bandwidth limit % field, enter 0. Click on Apply, OK, Exit gpedit.msc .
10. Go to your Network connections (Start->My Computer->My Network
Connection-> View Network Connections). Right click on your connection,
choose properties then under the General or the Networking tab (where it lists
your protocols) make sure QoS packet scheduler is enabled
11. Reboot your computer.
This is largely a way to "counter what XP does". In other words, XP seems to
want to reserve 20% of the bandwidth for itself even with QoS disabled. So you
can use this to your advantage. To demonstrate the problem, start up a large
download from a server with an FTP client. Try to find a server that doesn't max
out your bandwidth. In this case you want a slow to medium speed server to
demonstrate this. Let it run for a couple of minutes stablize. Then start up another
download from the same server with another instance of your FTP client. You will
notice that the available bandwidth is now being fought over and one of the
downloads will be very slow or both will slow down when they should both be
using the available bandwidth. Using this "tweak" gives both clients a fair share of
the bandwidth.
Appendix D. Troubleshooting and frequently asked questions
239
ISDNmst.fm Page 240 Wednesday, January 15, 2003 9:22 AM
240
IBM ISDN PC Card:User’s Guide
ISDNmst.fm Page 241 Wednesday, January 15, 2003 9:22 AM
Appendix E. Help and service information
This section contains information on how to obtain technical support on-line and
by telephone .
Technical support
Technical support is available during the life of your product. Assistance can be
obtained through the Personal Computing Support Web site. During the warranty
period, assistance is available for the replacement or exchange of defective
components. In addition, if your IBM option is installed in an IBM computer, you
might be entitled to service at your location. Your technical support representative
can help you determine the best alternative.
Technical Support Web Pages:
IBM Personal Computing Support Web
Site
URL
English
http://www.ibm.com/pc/support
German
http://www.ibm.com/pc/support/de
French
http://www.ibm.com/pc/support/fr
Italian
http://www.ibm.com/pc/support/it
Spanish
http://www.ibm.com/pc/support/es
Note:
If the national language version of the IBM Personal Computing Web Site
is not available or not working, you can use the English language version
at http://www.ibm.com/pc/support.
Type of support
Marketing, installation, and configuration support through the HelpCentre will
be withdrawn or made available for a fee, at IBM's discretion, 90 days after the
option has been withdrawn from marketing. Additional support offerings,
including step-by-step installation assistance, are available for a nominal fee.
Telephone technical support
To assist the technical support representative, have available as much of the
following information as possible:
1. Option name
© Copyright IBM Corp. 2002
241
ISDNmst.fm Page 242 Wednesday, January 15, 2003 9:22 AM
2. Option Number
3. Proof of Purchase
4. Computer manufacturer, model, serial number (if IBM), and manual
5. Exact wording of the error message (if any)
6. Description of the problem
7. Hardware and software configuration information for your system
If possible, call from your computer. Your technical support representative might
want to walk you through the problem during the call.
For the support telephone number and support hours by country, refer to the
following table or to the enclosed technical support insert. If the number is not
provided, contact your IBM reseller or IBM marketing representative. Response
time might vary depending on the number and nature of the calls received.
Country
Phone Number
Language
Austria
01-24592-5901
Deutsch
Belgium
02-210 9800
Français
Belgium
02-210 9820
Vlaams
Denmark
03-525-0291
Dansk
Finland
9-22-931840
Suomi
France
02-3855-7450
Français
Germany
07032-1549 201
Deutsch
Ireland
01-815 9200
English
Italy
02-482-75040
Italiano
Luxembourg
298-977-5063
Français
Netherlands
020-514-5770
Nederlands
Portugal
02-791 5147
Portogues
Spain
91-662-4916
Español
Sweden
08-751-5227
Svenska
Switzerland
0848-805252
Deutsch, Français, Italiano
United Kingdom
01475-555 055
English
Note:
242
The above table was correct at the time of writing of this manual.
Alternatively, you can consult IBM's website at
http://www.ibm.com/pc/qtechinfo/MIGR-4HWSE3.html for the correct
phone number. The URL for the phone number is case-sensitive.
IBM ISDN PC Card:User’s Guide
ISDNmst.fm Page 243 Wednesday, January 15, 2003 9:22 AM
Note:
The support phone number is available Monday through Friday during
normal business hours. However, IBM reserves the right to change the
availability of this service and its telephone numbers without notice.
Appendix E. Help and service information
243
ISDNmst.fm Page 244 Wednesday, January 15, 2003 9:22 AM
244
IBM ISDN PC Card:User’s Guide
ISDNmst.fm Page 245 Wednesday, January 15, 2003 9:22 AM
Appendix F. Product warranties and notices
The following section provides product warranty information and legal notices.
Warranty statements
The warranty statements consist of two parts: Part 1 and Part 2. Part 1 varies by
country. Part 2 is the same for both statements. Be sure to read both the Part 1 that
applies to your country and Part 2.
•
United States, Puerto Rico, and Canada (Z125-4753-05 11/97) “IBM Statement
of Limited Warranty for United States, Puerto Rico, and Canada (Part 1:
General Terms)”
•
Worldwide except Canada, Puerto Rico, Turkey, and United States (Z1255697-01 11/97) “IBM Statement of Warranty Worldwide except Canada,
Puerto Rico, Turkey, United States (Part 1: General Terms)”
•
Worldwide Country-Unique Terms “Part 2 - Worldwide Country-unique
Terms”
IBM Statement of Limited Warranty for United States, Puerto Rico, and Canada
(Part 1: General Terms)
This Statement of Warranty includes Part 1: General Terms and Part 2 - Country-unique
Terms. The terms of Part 2 may replace or modify those of Part 1. The warranties provided
by IBM in this Statement of Warranty apply only to Machines you purchase for your use,
and not for resale, from IBM or your reseller. The term “Machine” means an IBM
Machine, its features, conversions, upgrades, elements, or accessories, or any combination
of them. The term “Machine” does not include any software programs, whether pre-loaded
with the Machine, installed subsequently or otherwise. Unless IBM specifies otherwise,
the following warranties apply only in the country where you acquire the Machine.
Nothing in this Statement of Warranty affects any statutory rights of consumers that
cannot be waived or limited by contract. If you have any questions, contact IBM or your
reseller.
The IBM warranty for machines
Warranty period
Service delivery method
Parts - 1 year, labor - 1 year
*** On-site *** Courier or depot ***
Customer carry-in or mail-in ***
© Copyright IBM Corp. 2002
245
ISDNmst.fm Page 246 Wednesday, January 15, 2003 9:22 AM
Warranty service and support
With the original purchase of an IBM computer, you have access to extensive
support. During the IBM Machine warranty period, you may call IBM or your
reseller for problem-determination assistance under the terms of the IBM
Statement of Limited Warranty.
The IBM Machine Warranties Web site at
http://www.ibm.com/servers/support/machine_warranties/ contains a
worldwide overview of the IBM Limited Warranty for IBM Machines, a glossary
of terms used in the Statement of Limited Warranty, Frequently Asked Questions
(FAQ), and links to Product Support Web pages. The IBM Statement of Limited
Warranty is available from this Web site in 29 languages in Portable Document
Format (PDF).
The following services are available during the warranty period:
•
Problem determination - Trained personnel are available to assist you with
determining if you have a hardware problem and deciding what action is
necessary to fix the problem.
•
IBM hardware repair - If the problem is determined to be caused by IBM
hardware under warranty, trained service personnel are available to provide
the applicable level of service, either on-site or at an IBM service center as
determined by IBM.
•
Engineering Change management - Occasionally, there might be changes that
are required after a product has been shipped from IBM. In those instances,
IBM will make Engineering Changes (ECs) available that apply to your
hardware.
The following items are not covered under warranty service:
•
Replacement or use of non-IBM parts. All IBM parts contain a 7-character
identification in the format IBM FRU XXXXXXX.
•
Identification of non-IBM software problem sources.
•
Installation of customer replaceable units (CRUs).
•
Installation and configuration of machine code or licensed internal code that
is designated as customer installable.
If you do not register your computer with IBM, you might be required to present
proof of purchase to obtain warranty service.
Before you call for service
You can solve many computer problems without outside assistance by following
the troubleshooting procedures that IBM provides in the online help or in the
publications that are provided with your computer and software.
Most computers, operating systems, and application programs come with
information that contains troubleshooting procedures and explanations of error
246
IBM ISDN PC Card:User’s Guide
ISDNmst.fm Page 247 Wednesday, January 15, 2003 9:22 AM
messages and error codes. The information that comes with your computer also
describes the diagnostic tests that you can perform.
If you suspect a software problem, refer to the information for the operating
system or application program.
Calling for service
If possible, be at your computer when you call. Please have the following
information ready:
•
Machine type, model, and serial number
•
Description of the problem
•
Exact wording of any error messages
•
Hardware and software configuration information
To find the telephone number for the HelpCenter nearest you, see “Telephone
numbers” in the “Getting information, help, and service” chapter.
Appendix F. Product warranties and notices
247
ISDNmst.fm Page 248 Wednesday, January 15, 2003 9:22 AM
IBM Statement of Limited Warranty
Z125-4753-06 8/2000
Part 1 - General Terms
This Statement of Limited Warranty includes Part 1 - General Terms and Part 2 Country-unique Terms. The terms of Part 2 replace or modify those of Part 1. The
warranties provided by IBM in this Statement of Limited Warranty apply only to
Machines you purchase for your use, and not for resale, from IBM or your reseller.
The term “Machine” means an IBM machine, its features, conversions, upgrades,
elements, or accessories, or any combination of them. The term “Machine” does
not include any software programs, whether pre-loaded with the Machine,
installed subsequently or otherwise. Unless IBM specifies otherwise, the
following warranties apply only in the country where you acquire the Machine.
Nothing in this Statement of Limited Warranty affects any statutory rights of
consumers that cannot be waived or limited by contract. If you have any
questions, contact IBM or your reseller.
The IBM Warranty for Machines: IBM warrants that each Machine 1) is free from
defects in materials and workmanship and 2) conforms to IBM's Official
Published Specifications (“Specifications”). The warranty period for a Machine is
a specified, fixed period commencing on its Date of Installation. The date on your
sales receipt is the Date of Installation unless IBM or your reseller informs you
otherwise.
If a Machine does not function as warranted during the warranty period, and IBM
or your reseller are unable to either 1) make it do so or 2) replace it with one that is
at least functionally equivalent, you may return it to your place of purchase and
your money will be refunded.
Extent of Warranty: The warranty does not cover the repair or exchange of a
Machine resulting from misuse, accident, modification, unsuitable physical or
operating environment, improper maintenance by you, or failure caused by a
product for which IBM is not responsible. The warranty is voided by removal or
alteration of Machine or parts identification labels.
THESE WARRANTIES ARE YOUR EXCLUSIVE WARRANTIES AND
REPLACE ALL OTHER WARRANTIES OR CONDITIONS, EXPRESS OR
IMPLIED, INCLUDING, BUT NOT LIMITED TO, THE IMPLIED
WARRANTIES OR CONDITIONS OF MERCHANTABILITY AND FITNESS
FOR A PARTICULAR PURPOSE. THESE WARRANTIES GIVE YOU
SPECIFIC LEGAL RIGHTS AND YOU MAY ALSO HAVE OTHER RIGHTS
WHICH VARY FROM JURISDICTION TO JURISDICTION. SOME
JURISDICTIONS DO NOT ALLOW THE EXCLUSION OR LIMITATION OF
EXPRESS OR IMPLIED WARRANTIES, SO THE ABOVE EXCLUSION OR
LIMITATION MAY NOT APPLY TO YOU. IN THAT EVENT, SUCH
WARRANTIES ARE LIMITED IN DURATION TO THE WARRANTY
PERIOD. NO WARRANTIES APPLY AFTER THAT PERIOD.
Items Not Covered by Warranty: IBM does not warrant uninterrupted or errorfree operation of a Machine. Any technical or other support provided for a
Machine under warranty, such as assistance via telephone with “how-to”
248
IBM ISDN PC Card:User’s Guide
ISDNmst.fm Page 249 Wednesday, January 15, 2003 9:22 AM
questions and those regarding Machine set-up and installation, will be provided
WITHOUT WARRANTIES OF ANY KIND.
Warranty Service: To obtain warranty service for a Machine, contact IBM or your
reseller. If you do not register your Machine with IBM, you may be required to
present proof of purchase.
During the warranty period, IBM or your reseller, if approved by IBM to provide
warranty service, provides without charge certain types of repair and exchange
service to keep Machines in, or restore them to, conformance with their
Specifications. IBM or your reseller will inform you of the available types of
service for a Machine based on its country of installation. At its discretion, IBM or
your reseller will 1) either repair or exchange the failing Machine and 2) provide
the service either at your location or a service center. IBM or your reseller will also
manage and install selected engineering changes that apply to the Machine.
Some parts of IBM Machines are designated as Customer Replaceable Units
(called “CRUs”), e.g., keyboards, memory, or hard disk drives. IBM ships CRUs to
you for replacement by you. You must return all defective CRUs to IBM within 30
days of your receipt of the replacement CRU. You are responsible for
downloading designated Machine Code and Licensed Internal Code updates
from an IBM Internet Web site or from other electronic media, and following the
instructions that IBM provides.
When warranty service involves the exchange of a Machine or part, the item IBM
or your reseller replaces becomes its property and the replacement becomes
yours. You represent that all removed items are genuine and unaltered. The
replacement may not be new, but will be in good working order and at least
functionally equivalent to the item replaced. The replacement assumes the
warranty service status of the replaced item. Many features, conversions, or
upgrades involve the removal of parts and their return to IBM. A part that
replaces a removed part will assume the warranty service status of the removed
part.
Before IBM or your reseller exchanges a Machine or part, you agree to remove all
features, parts, options, alterations, and attachments not under warranty service.
You also agree to
1. ensure that the Machine is free of any legal obligations or restrictions that
prevent its exchange;
2. obtain authorization from the owner to have IBM or your reseller service a
Machine that you do not own; and
3. where applicable, before service is provided:
a. follow the problem determination, problem analysis, and service request
procedures that IBM or your reseller provides;
b. secure all programs, data, and funds contained in a Machine;
c. provide IBM or your reseller with sufficient, free, and safe access to your
facilities to permit them to fulfill their obligations; and
d. inform IBM or your reseller of changes in a Machine's location.
Appendix F. Product warranties and notices
249
ISDNmst.fm Page 250 Wednesday, January 15, 2003 9:22 AM
IBM is responsible for loss of, or damage to, your Machine while it is 1) in IBM's
possession or 2) in transit in those cases where IBM is responsible for the
transportation charges.
Neither IBM nor your reseller is responsible for any of your confidential,
proprietary or personal information contained in a Machine which you return to
IBM or your reseller for any reason. You should remove all such information from
the Machine prior to its return.
Limitation of Liability: Circumstances may arise where, because of a default on
IBM's part or other liability, you are entitled to recover damages from IBM. In
each such instance, regardless of the basis on which you are entitled to claim
damages from IBM (including fundamental breach, negligence,
misrepresentation, or other contract or tort claim), except for any liability that
cannot be waived or limited by applicable laws, IBM is liable for no more than
1. damages for bodily injury (including death) and damage to real property and
tangible personal property; and
2. the amount of any other actual direct damages, up to the charges (if recurring,
12 months' charges apply) for the Machine that is subject of the claim. For
purposes of this item, the term “Machine” includes Machine Code and
Licensed Internal Code.
This limit also applies to IBM's suppliers and your reseller. It is the maximum
for which IBM, its suppliers, and your reseller are collectively responsible.
UNDER NO CIRCUMSTANCES IS IBM LIABLE FOR ANY OF THE
FOLLOWING: 1) THIRD-PARTY CLAIMS AGAINST YOU FOR DAMAGES
(OTHER THAN THOSE UNDER THE FIRST ITEM LISTED ABOVE); 2) LOSS
OF, OR DAMAGE TO, YOUR RECORDS OR DATA; OR 3) SPECIAL,
INCIDENTAL, OR INDIRECT DAMAGES OR FOR ANY ECONOMIC
CONSEQUENTIAL DAMAGES, LOST PROFITS OR LOST SAVINGS, EVEN
IF IBM, ITS SUPPLIERS OR YOUR RESELLER IS INFORMED OF THEIR
POSSIBILITY. SOME JURISDICTIONS DO NOT ALLOW THE EXCLUSION
OR LIMITATION OF INCIDENTAL OR CONSEQUENTIAL DAMAGES, SO
THE ABOVE LIMITATION OR EXCLUSION MAY NOT APPLY TO YOU.
Governing Law: Both you and IBM consent to the application of the laws of the
country in which you acquired the Machine to govern, interpret, and enforce all of
your and IBM’s rights, duties, and obligations arising from, or relating in any
manner to, the subject matter of this Agreement, without regard to conflict of law
principles.
Part 2 - Country-unique Terms
AMERICAS
BRAZIL
Governing Law: The following is added after the first sentence:
Any litigation arising from this Agreement will be settled exclusively by the court
of Rio de Janeiro.
250
IBM ISDN PC Card:User’s Guide
ISDNmst.fm Page 251 Wednesday, January 15, 2003 9:22 AM
NORTH AMERICA
Warranty Service: The following is added to this Section:
To obtain warranty service from IBM in Canada or the United States, call 1-800IBM-SERV (426-7378).
CANADA
Governing Law: The following replaces “laws of the country in which you acquired the
Machine” in the first sentence:
laws in the Province of Ontario.
UNITED STATES
Governing Law: The following replaces “laws of the country in which you acquired the
Machine” in the first sentence:
laws of the State of New York.
ASIA PACIFIC
AUSTRALIA
The IBM Warranty for Machines: The following paragraph is added to this Section:
The warranties specified in this Section are in addition to any rights you may have
under the Trade Practices Act 1974 or other similar legislation and are only
limited to the extent permitted by the applicable legislation.
Limitation of Liability: The following is added to this Section:
Where IBM is in breach of a condition or warranty implied by the Trade Practices
Act 1974 or other similar legislation, IBM's liability is limited to the repair or
replacement of the goods or the supply of equivalent goods. Where that condition
or warranty relates to right to sell, quiet possession or clear title, or the goods are
of a kind ordinarily acquired for personal, domestic or household use or
consumption, then none of the limitations in this paragraph apply.
Governing Law: The following replaces “laws of the country in which you acquired the
Machine” in the first sentence:
laws of the State or Territory.
CAMBODIA, LAOS, AND VIETNAM
Governing Law: The following replaces “laws of the country in which you acquired the
Machine” in the first sentence:
laws of the State of New York.
The following is added to this Section:
Disputes and differences arising out of or in connection with this Agreement shall
be finally settled by arbitration which shall be held in Singapore in accordance
with the rules of the International Chamber of Commerce (ICC). The arbitrator or
arbitrators designated in conformity with those rules shall have the power to rule
on their own competence and on the validity of the Agreement to submit to
arbitration. The arbitration award shall be final and binding for the parties
Appendix F. Product warranties and notices
251
ISDNmst.fm Page 252 Wednesday, January 15, 2003 9:22 AM
without appeal and the arbitral award shall be in writing and set forth the
findings of fact and the conclusions of law.
All proceedings shall be conducted, including all documents presented in such
proceedings, in the English language. The number of arbitrators shall be three,
with each side to the dispute being entitled to appoint one arbitrator.
The two arbitrators appointed by the parties shall appoint a third arbitrator before
proceeding upon the reference. The third arbitrator shall act as chairman of the
proceedings. Vacancies in the post of chairman shall be filled by the president of
the ICC. Other vacancies shall be filled by the respective nominating party.
Proceedings shall continue from the stage they were at when the vacancy
occurred.
If one of the parties refuses or otherwise fails to appoint an arbitrator within 30
days of the date the other party appoints its, the first appointed arbitrator shall be
the sole arbitrator, provided that the arbitrator was validly and properly
appointed.
The English language version of this Agreement prevails over any other language
version.
HONG KONG AND MACAU
Governing Law: The following replaces “laws of the country in which you acquired the
Machine” in the first sentence:
laws of Hong Kong Special Administrative Region.
INDIA
Limitation of Liability: The following replaces items 1 and 2 of this Section:
1. liability for bodily injury (including death) or damage to real property and
tangible personal property will be limited to that caused by IBM's negligence;
2. as to any other actual damage arising in any situation involving
nonperformance by IBM pursuant to, or in any way related to the subject of
this Statement of Limited Warranty, IBM's liability will be limited to the
charge paid by you for the individual Machine that is the subject of the claim.
JAPAN
Governing Law: The following sentence is added to this Section:
Any doubts concerning this Agreement will be initially resolved between us in
good faith and in accordance with the principle of mutual trust.
NEW ZEALAND
The IBM Warranty for Machines: The following paragraph is added to this Section:
The warranties specified in this Section are in addition to any rights you may have
under the Consumer Guarantees Act 1993 or other legislation which cannot be
excluded or limited. The Consumer Guarantees Act 1993 will not apply in respect
of any goods which IBM provides, if you require the goods for the purposes of a
business as defined in that Act.
252
IBM ISDN PC Card:User’s Guide
ISDNmst.fm Page 253 Wednesday, January 15, 2003 9:22 AM
Limitation of Liability: The following is added to this Section:
Where Machines are not acquired for the purposes of a business as defined in the
Consumer Guarantees Act 1993, the limitations in this Section are subject to the
limitations in that Act.
PEOPLE'S REPUBLIC OF CHINA (PRC)
Governing Law: The following replaces this Section:
Both you and IBM consent to the application of the laws of the State of New York
(except when local law requires otherwise) to govern, interpret, and enforce all
your and IBM’s rights, duties, and obligations arising from, or relating in any
manner to, the subject matter of this Agreement, without regard to conflict of law
principles.
Any disputes arising from or in connection with this Agreement will first be
resolved by friendly negotiations, failing which either of us has the right to
submit the dispute to the China International Economic and Trade Arbitration
Commission in Beijing, the PRC, for arbitration in accordance with its arbitration
rules in force at the time. The arbitration tribunal will consist of three arbitrators.
The language to be used therein will be English and Chinese. An arbitral award
will be final and binding on all the parties, and will be enforceable under the
Convention on the Recognition and Enforcement of Foreign Arbitral Awards
(1958).
The arbitration fee will be borne by the losing party unless otherwise determined
by the arbitral award.
During the course of arbitration, this Agreement will continue to be performed
except for the part which the parties are disputing and which is undergoing
arbitration.
EUROPE, MIDDLE EAST, AFRICA (EMEA)
THE FOLLOWING TERMS APPLY TO ALL EMEA COUNTRIES:
The terms of this Statement of Limited Warranty apply to Machines purchased
from IBM or an IBM reseller.
Warranty Service: If you purchase an IBM Machine in Austria, Belgium,
Denmark, Estonia, Finland, France, Germany, Greece, Iceland, Ireland, Italy,
Latvia, Lithuania, Luxembourg, Netherlands, Norway, Portugal, Spain, Sweden,
Switzerland or United Kingdom, you may obtain warranty service for that
Machine in any of those countries from either (1) an IBM reseller approved to
perform warranty service or (2) from IBM. If you purchase an IBM Personal
Computer Machine in Albania, Armenia, Belarus, Bosnia and Herzegovina,
Bulgaria, Croatia, Czech Republic, Georgia, Hungary, Kazakhstan, Kirghizia,
Federal Republic of Yugoslavia, Former Yugoslav Republic of Macedonia
(FYROM), Moldova, Poland, Romania, Russia, Slovak Republic, Slovenia, or
Ukraine, you may obtain warranty service for that Machine in any of those
countries from either (1) an IBM reseller approved to perform warranty service or
(2) from IBM.
Appendix F. Product warranties and notices
253
ISDNmst.fm Page 254 Wednesday, January 15, 2003 9:22 AM
If you purchase an IBM Machine in a Middle Eastern or African country, you may
obtain warranty service for that Machine from the IBM entity within the country
of purchase, if that IBM entity provides warranty service in that country, or from
an IBM reseller, approved by IBM to perform warranty service on that Machine in
that country. Warranty service in Africa is available within 50 kilometers of an
IBM authorized service provider. You are responsible for transportation costs for
Machines located outside 50 kilometers of an IBM authorized service provider.
Governing Law: The applicable laws that govern, interpret and enforce rights,
duties, and obligations of each of us arising from, or relating in any manner to, the
subject matter of this Statement, without regard to conflict of laws principles, as
well as Country-unique terms and competent court for this Statement are those of
the country in which the warranty service is being provided, except that in 1)
Albania, Bosnia-Herzegovina, Bulgaria, Croatia, Hungary, Former Yugoslav
Republic of Macedonia, Romania, Slovakia, Slovenia, Armenia, Azerbaijan,
Belarus, Georgia, Kazakhstan, Kyrgyzstan, Moldova, Russia, Tajikistan,
Turkmenistan, Ukraine, and Uzbekistan, the laws of Austria apply; 2) Estonia,
Latvia, and Lithuania, the laws of Finland apply; 3) Algeria, Benin, Burkina Faso,
Cameroon, Cape Verde, Central African Republic, Chad, Congo, Djibouti,
Democratic Republic of Congo, Equatorial Guinea, France, Gabon, Gambia,
Guinea, Guinea-Bissau, Ivory Coast, Lebanon, Mali, Mauritania, Morocco, Niger,
Senegal, Togo, and Tunisia, this Agreement will be construed and the legal
relations between the parties will be determined in accordance with the French
laws and all disputes arising out of this Agreement or related to its violation or
execution, including summary proceedings, will be settled exclusively by the
Commercial Court of Paris; 4) Angola, Bahrain, Botswana, Burundi, Egypt,
Eritrea, Ethiopia, Ghana, Jordan, Kenya, Kuwait, Liberia, Malawi, Malta,
Mozambique, Nigeria, Oman, Pakistan, Qatar, Rwanda, Sao Tome, Saudi Arabia,
Sierra Leone, Somalia, Tanzania, Uganda, United Arab Emirates, United
Kingdom, West Bank/Gaza, Yemen, Zambia, and Zimbabwe, this Agreement will
be governed by English Law and disputes relating to it will be submitted to the
exclusive jurisdiction of the English courts; and 5) in Greece, Israel, Italy, Portugal,
and Spain any legal claim arising out of this Statement will be brought before, and
finally settled by, the competent court of Athens, Tel Aviv, Milan, Lisbon, and
Madrid, respectively.
THE FOLLOWING TERMS APPLY TO THE COUNTRY SPECIFIED:
AUSTRIA AND GERMANY
The IBM Warranty for Machines: The following replaces the first sentence of the first
paragraph of this Section:
The warranty for an IBM Machine covers the functionality of the Machine for its
normal use and the Machine's conformity to its Specifications.
The following paragraphs are added to this Section:
The minimum warranty period for Machines is six months. In case IBM or your
reseller is unable to repair an IBM Machine, you can alternatively ask for a partial
refund as far as justified by the reduced value of the unrepaired Machine or ask
for a cancellation of the respective agreement for such Machine and get your
money refunded.
254
IBM ISDN PC Card:User’s Guide
ISDNmst.fm Page 255 Wednesday, January 15, 2003 9:22 AM
Extent of Warranty: The second paragraph does not apply.
Warranty Service: The following is added to this Section:
During the warranty period, transportation for delivery of the failing Machine to
IBM will be at IBM's expense.
Limitation of Liability: The following paragraph is added to this Section:
The limitations and exclusions specified in the Statement of Limited Warranty
will not apply to damages caused by IBM with fraud or gross negligence and for
express warranty.
The following sentence is added to the end of item 2:
IBM’s liability under this item is limited to the violation of essential contractual
terms in cases of ordinary negligence.
EGYPT
Limitation of Liability: The following replaces item 2 in this Section:
as to any other actual direct damages, IBM's liability will be limited to the total
amount you paid for the Machine that is the subject of the claim. For purposes of
this item, the term “Machine” includes Machine Code and Licensed Internal
Code.
Applicability of suppliers and resellers (unchanged).
FRANCE
Limitation of Liability: The following replaces the second sentence of the first
paragraph of this Section:
In such instances, regardless of the basis on which you are entitled to claim
damages from IBM, IBM is liable for no more than: (items 1 and 2 unchanged).
IRELAND
Extent of Warranty: The following is added to this Section:
Except as expressly provided in these terms and conditions, all statutory
conditions, including all warranties implied, but without prejudice to the
generality of the foregoing all warranties implied by the Sale of Goods Act 1893 or
the Sale of Goods and Supply of Services Act 1980 are hereby excluded.
Limitation of Liability: The following replaces items one and two of the first paragraph
of this Section:
1. death or personal injury or physical damage to your real property solely caused
by IBM's negligence; and
2. the amount of any other actual direct damages, up to 125 percent of the charges
(if recurring, the 12 months' charges apply) for the Machine that is the subject of
the claim or which otherwise gives rise to the claim.
Applicability of suppliers and resellers (unchanged).
The following paragraph is added at the end of this Section:
IBM's entire liability and your sole remedy, whether in contract or in tort, in
respect of any default shall be limited to damages.
Appendix F. Product warranties and notices
255
ISDNmst.fm Page 256 Wednesday, January 15, 2003 9:22 AM
ITALY
Limitation of Liability: The following replaces the second sentence in the first
paragraph:
In each such instance unless otherwise provided by mandatory law, IBM is liable
for no more than:
1. (unchanged)
2. as to any other actual damage arising in all situations involving
nonperformance by IBM pursuant to, or in any way related to the subject matter
of this Statement of Warranty, IBM's liability, will be limited to the total amount
you paid for the Machine that is the subject of the claim.
Applicability of suppliers and resellers (unchanged).
The following replaces the third paragraph of this Section:
Unless otherwise provided by mandatory law, IBM and your reseller are not liable
for any of the following: (items 1 and 2 unchanged) 3) indirect damages, even if IBM
or your reseller is informed of their possibility.
SOUTH AFRICA, NAMIBIA, BOTSWANA, LESOTHO AND SWAZILAND
Limitation of Liability: The following is added to this Section:
IBM's entire liability to you for actual damages arising in all situations involving
nonperformance by IBM in respect of the subject matter of this Statement of
Warranty will be limited to the charge paid by you for the individual Machine
that is the subject of your claim from IBM.
UNITED KINGDOM
Limitation of Liability: The following replaces items 1 and 2 of the first paragraph of
this Section:
1. death or personal injury or physical damage to your real property solely
caused by IBM's negligence;
2. the amount of any other actual direct damages or loss, up to 125 percent of the
charges (if recurring, the 12 months' charges apply) for the Machine that is the
subject of the claim or which otherwise gives rise to the claim;
The following item is added to this paragraph:
3. breach of IBM's obligations implied by Section 12 of the Sale of Goods Act 1979
or Section 2 of the Supply of Goods and Services Act 1982.
Applicability of suppliers and resellers (unchanged).
The following is added to the end of this Section:
IBM's entire liability and your sole remedy, whether in contract or in tort, in
respect of any default shall be limited to damages.
256
IBM ISDN PC Card:User’s Guide
ISDNmst.fm Page 257 Wednesday, January 15, 2003 9:22 AM
ISDNmst.fm Page 258 Wednesday, January 15, 2003 9:22 AM
IBM@
Part Number:
19K5716
19K5716
*1P0419K5716*
ISDNmst.fm Page 259 Wednesday, January 15, 2003 9:22 AM
IBM@
ISDNmst.fm Page 260 Wednesday, January 15, 2003 9:22 AM
IBM@