1
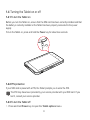
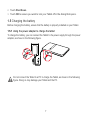
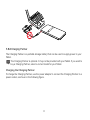
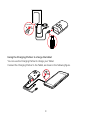
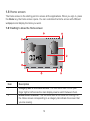
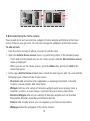
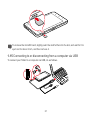
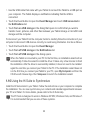
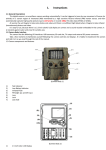
IDEOS S7 Slim User Guide Contents 1 Getting started ...........................................................................................1 1.1 About your Tablet ............................................................................................... 1 1.2 Getting to know your Tablet ............................................................................... 1 1.3 Installation ......................................................................................................... 3 1.3.1 To remove the back cover ....................................................................... 3 1.3.2 To install or remove the SIM card ............................................................ 3 1.3.3 To install or remove the battery ............................................................... 4 1.3.4 To install the back cover .......................................................................... 5 1.4 Turning the Tablet on or off ................................................................................ 6 1.4.1 To turn the Tablet on ............................................................................... 6 1.4.2 PIN protection ......................................................................................... 6 1.4.3 To turn the Tablet off ............................................................................... 6 1.5 Charging the battery .......................................................................................... 7 1.5.1 Using the power adapter to charge the tablet ......................................... 7 1.5.2 Charging Partner .................................................................................... 8 1.6 Working with the keys ...................................................................................... 10 1.7 Using the touchscreen ..................................................................................... 11 i 1.8 Home screen ................................................................................................... 12 1.8.1 Getting to know the Home screen ......................................................... 12 1.8.2 Extensions to the Home screen ............................................................ 13 1.8.3 Customizing the Home screen .............................................................. 14 1.9 Locking and unlocking the screen ................................................................... 16 1.9.1 To lock the screen ................................................................................. 16 1.9.2 To set screen timeout period ................................................................. 16 1.9.3 To unlock the screen ............................................................................. 16 1.9.4 To set unlock pattern ............................................................................. 17 1.10 Text input ....................................................................................................... 17 1.10.1 Using onscreen keyboard to enter text ............................................... 17 1.10.2 Cutting or copying text ........................................................................ 18 1.11 Opening and switching applications .............................................................. 19 1.12 Opening the Settings list .............................................................................. 19 1.13 Setting date and time..................................................................................... 20 1.14 Installing or removing the microSD card ........................................................ 20 1.15 Connecting to or disconnecting from a computer via USB ............................ 21 1.16 Using the Hi Suite to Synchronize ................................................................. 22 2 Wireless networks ................................................................................... 23 ii 2.1 Wi-Fi ................................................................................................................ 23 2.1.1 Opening Wi-Fi settings.......................................................................... 23 2.1.2 Turning Wi-Fi on or off .......................................................................... 24 2.1.3 Connecting to a Wi-Fi network .............................................................. 24 2.1.4 Turning open network notification on or off ........................................... 25 2.1.5 Adding a Wi-Fi Network ........................................................................ 25 2.1.6 Forgetting a Wi-Fi network .................................................................... 25 2.2 Bluetooth ......................................................................................................... 26 2.2.1 Opening Bluetooth settings ................................................................... 26 2.2.2 Turning Bluetooth on or off .................................................................... 26 2.2.3 Renaming the Bluetooth of your Tablet ................................................. 26 2.2.4 Connecting to Bluetooth devices .......................................................... 27 2.2.5 Disconnecting from or unpairing a Bluetooth device ............................. 27 2.2.6 Configuring the Bluetooth features ....................................................... 28 2.3 Mobile networks .............................................................................................. 28 2.3.1 Opening Mobile network settings .......................................................... 28 2.3.2 Turn Data roaming on or off .................................................................. 29 2.3.3 Setting GSM/UMTS options .................................................................. 29 2.4 Sharing Your Tablet's Data Connection ........................................................... 29 iii 2.4.1 Sharing Your Tablet's Data Connection via USB ................................... 29 2.4.2 Sharing Your Tablet's Data Connection as a Portable Wi-Fi Hotspot .... 30 2.5 Turning airplane mode on or off ....................................................................... 30 3 Google Services...................................................................................... 31 3.1 Creating a Google Account .............................................................................. 31 3.2 Using Market ................................................................................................... 31 3.2.1 Searching for Applications .................................................................... 32 3.2.2 Installing an Application ........................................................................ 32 3.2.3 Uninstalling an Application .................................................................... 32 4 Browser ................................................................................................... 33 4.1 Browsing webpages ........................................................................................ 33 4.1.1 To open Browser ................................................................................... 33 4.1.2 To navigate within a webpage ............................................................... 33 4.1.3 To navigate among webpages .............................................................. 34 4.2 Working with the bookmarks............................................................................ 35 4.2.1 To add a webpage to the bookmarks list ............................................... 35 4.2.2 To open the bookmarks list ................................................................... 35 4.2.3 To open a bookmark ............................................................................. 35 4.2.4 To edit a bookmark................................................................................ 35 iv 4.2.5 To share a bookmark ............................................................................ 36 4.2.6 To delete a bookmark............................................................................ 36 4.3 Downloading files ............................................................................................ 36 4.3.1 To download and install only trusted applications ................................. 36 4.3.2 To download a file ................................................................................. 36 5 Email .......................................................................................................37 5.1 Opening Email ................................................................................................. 37 5.2 Adding and deleting email accounts ................................................................ 37 5.2.1 To add an email account ....................................................................... 37 5.2.2 To delete an email account ................................................................... 37 5.3 Sending and responding to email messages ................................................... 38 5.3.1 To compose and send email messages ................................................ 38 5.3.2 To receive email messages ................................................................... 38 5.3.3 To read an email message .................................................................... 39 5.3.4 To reply to or forward an email message .............................................. 39 5.3.5 To delete an email message ................................................................. 39 6 Calls ........................................................................................................40 6.1 Making calls by dialing..................................................................................... 40 6.2 Answering, rejecting or ending calls ................................................................ 40 v 6.3 Working with the Call log ................................................................................. 41 6.3.1 To open the Call log .............................................................................. 41 6.3.2 To make calls from the Call log ............................................................. 41 6.3.3 To add numbers to the Contacts ........................................................... 41 6.3.4 To clear the Call log .............................................................................. 41 6.4 Calling listed contacts ...................................................................................... 42 6.5 Calling favorite contacts .................................................................................. 42 7 Messaging............................................................................................... 43 7.1 Opening Messaging......................................................................................... 43 7.2 Exchanging messages .................................................................................... 43 7.2.1 To create and send a text message ...................................................... 43 7.2.2 To create and send a multimedia message ........................................... 43 7.2.3 To view and respond to a message ....................................................... 44 7.2.4 To view details about a message .......................................................... 44 7.2.5 To forward or delete a message ............................................................ 44 8 Contacts .................................................................................................. 45 8.1 Opening Contacts ............................................................................................ 45 8.2 Creating a contact ........................................................................................... 45 8.3 Searching for contacts ..................................................................................... 46 vi 8.4 Editing contacts ............................................................................................... 46 8.4.1 To edit contact details............................................................................ 46 8.4.2 To set default phone number ................................................................ 46 8.4.3 To delete a contact ................................................................................ 47 8.4.4 To set contact group to display.............................................................. 47 8.5 Editing favorite contacts .................................................................................. 47 8.5.1 To add a contact to favorites ................................................................. 47 8.5.2 To remove a contact from favourites ..................................................... 48 9 Multimedia applications ...........................................................................49 9.1 Sound Recorder .............................................................................................. 49 9.2 Camera and Camcorder .................................................................................. 49 9.3 Music ............................................................................................................... 49 9.4 Video ............................................................................................................... 50 9.5 Photo ............................................................................................................... 50 9.5.1 Opening Photo ...................................................................................... 50 9.5.2 Viewing a Picture .................................................................................. 50 9.5.3 Sharing a Picture .................................................................................. 51 9.5.4 Rotating a Picture ................................................................................. 51 10 Handy applications ................................................................................52 vii 10.1 Calendar ........................................................................................................ 52 10.2 Weather ......................................................................................................... 52 10.3 RSS Reader .................................................................................................. 52 10.4 Memo ............................................................................................................ 52 10.5 Alarm Clock ................................................................................................... 52 10.6 Calculator ...................................................................................................... 53 10.7 Documents .................................................................................................... 53 10.8 File Manager ................................................................................................. 53 10.8.1 Creating a Folder ................................................................................ 53 10.8.2 Deleting files and folders ..................................................................... 53 10.8.3 Searching a File .................................................................................. 54 11 Security settings .................................................................................... 55 11.1 Enabling the SIM card PIN ............................................................................ 55 11.2 Changing the SIM card PIN ........................................................................... 55 viii 1 Getting started 1.1 About your Tablet Thanks for choosing IDEOS S7 Slim as assistant and partner of your daily life. IDEOS S7 Slim (Tablet for short) is an information terminal that provides convenient and quality services such as picture, audio, video, network, and information base on the Android open source operating system and supports classification and dragging of elements on the home screen. With a full touchscreen, an ultra-thin design, it presents a stylish and technically appealing appearance and portable design that fully conforms to operational conventions of users. Figures in this document are only for reference. 1.2 Getting to know your Tablet 1 2 3 Front camera lens Ambient light sensor HDMI interface 1 4 5 6 7 8 9 10 11 12 Micro USB interface Speaker Microphone microSD card slot Dock interface LCD screen Back key Menu key Home key 13 14 15 16 17 18 Power interface Rear camera lens Power key Headset jack Speaker Volume Up/Down key 2 1.3 Installation 1.3.1 To remove the back cover To remove the back cover, refer to the following figure. 1.3.2 To install or remove the SIM card Before installing or removing the SIM card, power off the Tablet. Insert your SIM card into the SIM card slot as shown in the following figure until the SIM card is completely in position. 3 To remove the SIM card, do as the following figure. 1.3.3 To install or remove the battery To install the battery, refer to the following figure. 4 To remove the battery, do as the following figure. 1.3.4 To install the back cover To install the back cover, refer to the following figure. 5 1.4 Turning the Tablet on or off 1.4.1 To turn the Tablet on Before you turn the Tablet on, ensure that the SIM card has been correctly installed and that the battery is correctly installed or the Tablet has been properly connected to the power supply. To turn the Tablet on, press and hold the Power key for about two seconds. 1.4.2 PIN protection If your SIM card is preset with a PIN, the Tablet prompts you to enter the PIN. The PIN may have been provided by your service provider with your SIM card. If you lost it, consult your service provider. 1.4.3 To turn the Tablet off 1. Press and hold Power key to open the Tablet options menu. 6 2. Touch Shut Down. 3. Touch OK to assure you want to turn your Tablet off in the dialog that opens. 1.5 Charging the battery Before charging the battery, ensure that the battery is properly installed on your Tablet. 1.5.1 Using the power adapter to charge the tablet To charge the battery, you can connect the Tablet to the power supply through the power adapter, as shown in the following figure. Do not connect the Tablet to a PC to charge the Tablet, as shown in the following figure. Doing so may damage your Tablet and the PC. 7 1.5.2 Charging Partner The Charging Partner is a portable storage battery that can be used to supply power to your Tablet. The Charging Partner is optional. It may not be provided with your Tablet. If you want to buy a Charging Partner, select a correct model for your Tablet. Charging the Charging Partner To charge the Charging Partner, use the power adapter to connect the Charging Partner to a power socket, as shown in the following figure. 8 Using the Charging Partner to charge the tablet You can use the Charging Partner to charge your Tablet. Connect the Charging Partner to the Tablet, as shown in the following figure. 9 1.6 Working with the keys You can enjoy a variety of functions and shortcuts by using the physical keys in addition to the soft buttons. Power − Press to turn on the Tablet when it is off. − Press to turn off and lock the screen when the Tablet is on. And press again to turn on the screen. − Press and hold to open a menu with options for Silent mode, Airplane mode, and for powering off the Tablet. Home − Press to open the Home screen. If you are viewing the extensions to the Home screen, it returns to the first panel of the Home screen. − Press and hold to open the most recently used applications screen. Menu − Press to open an option menu with items that affect the current screen or application. − Press and hold to open the keyboard to perform quick search on some screens. − While you are on the locked screen and the unlock pattern is not set, press to unlock the screen. Back − Press to return to the previous screen. − Press to exit from the running application. − If the onscreen keyboard is open, press to close the keyboard. Volume Up/Down − When a call is in progress, press to increase or decrease the call volume. 10 − When the Tablet is ringing, press to silence the ringer. − On the Home screen when no call is in progress, press to increase or decrease the ringtone volume, or set the Tablet to be silent instead of ringing. − In other applications, press to control the volume of music, spoken directions, and other audio. − Press and hold to quickly increase the ringtone volume to maximum or minimum. 1.7 Using the touchscreen By using your finger, you can manipulate target items such as applications and controls, and enjoy the touchscreen at your fingertips. The Tablet supports the following actions. Action Description Touch Simply touch items on the screen, such as applications and controls. For example, you can type letters and symbols using the onscreen keyboard. Touch and hold an item on the screen until an action occurs. For example, you can usually touch and hold the screen to open the context menu of the active item. Touch and hold an item, and then move your finger on the screen until you reach the target position. For example, you can drag a shortcut to the trash to delete it. Flick your finger vertically or horizontally across the screen. For example, you can flick up and down to manipulate a scroll bar and flick left and right to switch between pictures. Touch and hold Drag Flick 11 1.8 Home screen The Home screen is the starting point to access all the applications. When you sign in, press the Home key, the Home screen opens. You can customize the Home screen with different wallpapers and display the items you want. 1.8.1 Getting to know the Home screen Item Description 1 Category tabs of the Home screen. You can touch them or flick your finger right or left across the main display area to switch between them. Home screen indicator. The two small dots at the lower left and right of the Home screen corresponding to a category tab indicate the screen that you are viewing. 2 12 Item Description 3 Main display area. Main display area displays application shortcuts, widgets and other items that can be opened by touching them. Status bar. The status bar is at the top of the Home screen, it shows the system status and event notification prompts. System status indicators. It shows the system status such as time, signal type and strength, Wi-Fi connection status and signal strength, battery status, and other information. You can touch some of them for more details. Event button. It winks when there are event notifications such as the current call, missed calls, new messages, and when actions such as playing and uploading are performed. You can touch the event button to open the event manager to view and manage the notifications and tasks. Widgets. Widgets such as picture widget, weather widget, and memo widget are applications that you can use directly on the Home screen. Application button. Touch to open the Applications screen and view the applications installed on your Tablet, and you can touch an application shortcut to run it. 4 5 6 7 8 The pictures are provided only for reference. Your Home screen and Applications screen might look a little different. For details, see the actual product. 1.8.2 Extensions to the Home screen Flick your finger across the Home screen to go to the extensions to the Home screen. The right extensions to the Home screen provide more space for shortcuts, widgets, and other items. The two small dots above the category tab of the screen indicate the screen that you are viewing. 13 1.8.3 Customizing the Home screen You can add items such as shortcuts, widgets, Emotion widgets and folders to the Home screen if there is enough room. You can also change the wallpaper of the Home screen. To add an item 1. Flick the Home screen to where you want to add the item. 2. Open the Add to Home screen menu, by performing either of the following ways: − Touch and hold the blank area on the Home screen until the Add to Home screen menu is displayed. − When you are on the Home screen, press the Menu key, and touch Add in the menu that opens. 3. In the open Add to Home screen menu, touch the item type to add. You can add the following types of items to the Home screen: − Shortcuts Add a shortcut of an application, a webpage bookmark, a favorite contact, a music playlist, and other items. − Widgets Add any of a variety of miniature widgets such as an analog clock, a calendar, a memo, a music player, a picture frame and many other items. − Emotion Widgets Add any of a variety of Emotion widgets such as Emotion Bookmarks, Emotion Calendar and Emotion Events. − Folders Add a folder where you can organize your Home screen items. − Wallpapers Set the wallpaper of the Home screen. 14 For example, you can touch Folders > New folder to add a folder to the Home screen, and drag items on the screen to your folder. If there are not enough room on the Home screen, the add action will be neglected with prompt such as This group has no room. You must move or delete other items to make room, or switch to another spacious pane of the Home screen. To move an item 1. Touch and hold an item's icon on the Home screen until the icon magnifies. 2. Without lifting your finger, drag the icon to the target position on the screen. Pause at the bottom of the screen to drag the item onto the corresponding Home screen panel. 3. Release the item by lifting your finger. To remove an item 1. Touch and hold an item icon on the Home screen until the item icon magnifies and the trash pops up from the right side of the screen. 2. Without lifting your finger, drag the item icon to the trash. 3. When both the item and the trash are focused, release the item by lifting your finger. To change the wallpaper You can change the wallpaper by adding a wallpaper, or do as follows. 1. When you are on the Home screen, press the Menu key and touch Wallpaper at the bottom menu. 2. Do as one of the following steps. − Touch Live wallpapers to select a picture and set it as the wallpaper. − Touch Photo to select a picture and set it as the wallpaper. − Touch Wallpaper gallery to select a picture and set it as the wallpaper. 15 To rename a folder 1. Open a folder. Then touch and hold the title bar of the folder window until the Rename folder dialog appears. 2. Enter a new name, and then touch OK. 1.9 Locking and unlocking the screen 1.9.1 To lock the screen When the Tablet is on, press the Power key to turn off and lock the screen. When the Tablet remains idle for a time period that you have set, the screen will automatically lock. To save your battery or prevent accidental taps when not in use, or when you want to wipe smudges off your touchscreen, turn off and lock the screen. 1.9.2 To set screen timeout period To set how long your screen waits before it goes to turn off automatically, you can press the Home key to go to the Home screen and press the Menu key, and then touch Settings > Display > Screen timeout. 1.9.3 To unlock the screen When the screen is off, you can press the Power key to turn on it, and then unlock the screen through the following steps. 1. If you have not set up a screen unlock pattern, press the Menu key to unlock the screen, or follow the instructions displayed on the screen and flick upwards to unlock the screen. 2. If you have set up a screen unlock pattern, the Tablet prompts you to draw the pattern on the screen to unlock it. 16 1.9.4 To set unlock pattern To set the unlock pattern, you can press the Home key to go to the Home screen and press the Menu key, and then touch Settings > Location & security > Set up screen lock > Pattern, and then follow the instructions on the screen . 1.10 Text input You can enter and edit text in text fields and use menu commands to cut, copy, and paste text, within or across applications. 1.10.1 Using onscreen keyboard to enter text Touch a text field where you want to enter text to open the onscreen keyboard, and the following steps and tips help you to make it easier to enter the required information. 1. Touch and hold the text field to switch the input method if necessary. 2. Touch the keys on the keyboard to start typing. The following section takes the Android keyboard as an example. − When you are typing, the characters you have entered appear in a line above the keyboard, and some with suggestions for the word you are typing to the right. Press space or a punctuation mark to enter the suggestion by default, or touch another suggestion to enter it. You can touch and hold the leftmost word to save it to the dictionary. − Touch the up arrowhead key once to capitalize the next letter you type. Or touch and hold the up arrowhead key for all caps. − When you touch a key, a larger version displays briefly over the keyboard. Keys with alternate characters display an ellipsis (...) below the character. − Touch and hold a vowel or the C, N, S, or Y key to open a small window where you can touch an accented vowel or other alternate letter. − Touch and hold the Period key ( . ) to open a small window with a set of common symbol keys. 17 − Touch the DEL key to erase a character to the left of the cursor. Touch and hold the DEL key to erase all characters to the left of the cursor. − Touch the Symbols key (?123) to switch to the numbers and symbols keyboard, and touch the alphabet key (ABC) to switch back. − On the numbers and symbols keyboard, touch the ALT key to view additional symbols, and touch it again to switch back. − Touch and hold almost any of the number and symbol keys to open a window of additional symbols. 3. When you want to edit the text you have entered, touch to move the cursor to the location where you want to add or delete text. The cursor is a vertical bar that indicates where text you type or paste is inserted. 4. When you finished typing, touch the button to the right of the text field or the same button on the keyboard or press the Back key to close the keyboard. 1.10.2 Cutting or copying text To quickly cut or copy all the text in a text field, do as follows. 1. Touch the text field that contains the text to cut or copy to open it. 2. Touch and hold the text field to display the Edit text menu. 3. Touch Cut all or Copy all. To cut or copy selected text in a text field, do as follows. 1. Touch the text field that contains the text to cut or copy. 2. Touch to move the cursor to the beginning or end of the text to be selected. 3. Touch and hold the text field to display the Edit text menu. 4. Touch Select text and touch to move the cursor to the end or beginning of the text to be selected. Or touch Select all to select all the text in the text field. The selected text is highlighted. 5. Touch and hold the text field again to display the Edit text menu. 18 6. Touch Cut or Copy. After you cut or copy text, the text is stored in a temporary area so that you can paste it into other text field. Before you can paste, you must have cut or copied text at least for once. Once you cut or copy text, you can paste multiple times. To paste the most recently text you have cut or copied in another text field, do as follows. 1. Touch the text field where you want to paste the text. 2. Touch to move the cursor to the location where you want to paste the text. 3. Touch and hold the text field to display the Edit text menu. 4. Touch Paste. 1.11 Opening and switching applications To open an application, you can touch its shortcut on the Home screen, or on the Applications screen which can be opened by touching the Application button on the Home screen. To switch to a recently used application, you can press and hold the Home key, and touch the application icon in the small window that opens with shortcuts to applications that you have used recently. Or you can touch the Event button to open the Event Manager and touch to open a recently used application in the Tasks list. 1.12 Opening the Settings list You can open the settings list to view or change the settings of wireless and networks, call, sound and display, location and security, applications, language and keyboard, date and time, and more other items. To open the settings list, do as one of the following steps. When you are on the Home screen, press the Menu key, and touch Settings in the menu that opens. When you are on the home screen, touch the Application button and touch Settings to open the scroll list. 19 If you recently opened the settings list, you can touch the Event button on the status bar to display Event Manager, and touch Settings in the Tasks scroll list that opens. 1.13 Setting date and time By default, the Tablet automatically uses the network provided date, time zone, and time. When the time provided by the network is automatically used, you cannot set the date, time, and time zone by yourself. To manually set date and time, do as the following steps. 1. Open the Settings list. 2. Touch Date & time. 3. Touch Automatic to make it unchecked. 4. Touch Set date. Then touch the plus button or the minus button to adjust the date, month, and year, or touch the text field of date, month, and year to enter them. Touch Set when finished. 5. Touch Select time zone, then select the time zone in the list. Scroll down the list to view more time zones. 6. Touch Set time. Then touch the plus button or minus button to adjust the hour and minute, or touch the text field of hour and minute to enter them. Touch Set when finished. 1.14 Installing or removing the microSD card Insert your microSD card into the microSD card slot as shown in the following figure until the microSD card clicks into position. 20 To remove the microSD card, slightly push the card further into the slot, and wait for it to eject out for about 2 mm, and then remove it. 1.15 Connecting to or disconnecting from a computer via USB To connect your Tablet to a computer via USB, do as follows. 21 1. Use the USB cable that came with your Tablet to connect the Tablet to a USB port on your computer. The Tablet displays a notification indicating that the USB is connected. 2. Touch the Event button to open the Event Manager and touch USB connected in the Notifications list. 3. Touch Turn on USB storage in the dialog that opens to confirm that you want to transfer music, pictures, and other files between your Tablet storage or microSD card storage and the computer. To disconnect your Tablet from the computer, better to carefully follow the instructions of your computer to disconnect USB devices correctly, to avoid losing information. And do as follows. 1. Touch the Event button to open the Event Manager. 2. Touch Turn off USB storage in the Notifications list. 3. Touch Turn off USB storage in the dialog opens. When the Tablet is connected to your PC for the first time, an installation wizard will run automatically. Follow the wizard to install the driver. It takes only a few minutes to finish the installation. After the driver is successfully installed, it does not need to be installed again the next time you connect your Tablet to the PC. If the installation wizard does not run the first time you connect your Tablet to your PC, open My Computer and then the CD drive with Huawei logo. Run Setup.exe to launch the installation wizard. 1.16 Using the Hi Suite to Synchronize Install the Hi Suite stored in your Tablet. Follow the instructions on your computer to complete the installation. You can now synchronize your contacts and calendar appointments between your PC and Tablet. For more details, please refer to the Hi Suite help. The PC Suite is designed to work on Windows XP SP2, Windows Vista, and Windows 7. It is recommended that you use one of these systems. 22 2 Wireless networks Your Tablet can connect to a variety of wireless networks and devices, including Wi-Fi data networks, and Bluetooth devices such as headsets and mobile networks for voice and data transmission. Using a wireless device or accessory while driving may cause distraction and may be illegal. Always obey the laws and drive safely. 2.1 Wi-Fi Wi-Fi is a wireless networking technology that can provide wireless Internet access over distances of up to 300 feet (100 meters). The capability of your Wi-Fi connections depends on the Wi-Fi router and the surroundings it works. To use Wi-Fi on your Tablet, you need to access a wireless access point or "hotspot". You can simply connect to some open access points, and you have to configure your Tablet to connect to the access points that are hidden or with security protections such as authentication and encryption. 2.1.1 Opening Wi-Fi settings You can turn Wi-Fi on or off, turn the open network notification on or off, connect to a Wi-Fi network and add Wi-Fi networks in Wi-Fi settings list. To open Wi-Fi settings list, do as follows. 1. Open the Settings list. 2. Touch Wireless & networks, and then touch Wi-Fi settings. When you are viewing the Wi-Fi settings list, you can press the Menu key and touch Advanced in the menu that opens to see your IP settings or other Wi-Fi details. 23 2.1.2 Turning Wi-Fi on or off To turn Wi-Fi on or off, you can open Wi-Fi settings and touch Wi-Fi to make it checked or unchecked. To extend your battery life, turn Wi-Fi off when you are not using it. 2.1.3 Connecting to a Wi-Fi network When you turn Wi-Fi on, the available Wi-Fi networks found within range are listed with the names and security scheme information, and secured networks are indicated with a lock icon. You can view the Wi-Fi networks list by opening Wi-Fi settings. To connect to a Wi-Fi network, touch a network you want to connect to it in the Wi-Fi networks list on the Wi-Fi settings screen. If the network is open, you are prompted to confirm that you want to connect to that network by touching Connect. If the network is secured, you are prompted to enter a password or other credentials. (Contact your service provider for details.) When you are in range and Wi-Fi is on, you will automatically reconnect to available networks that you have connected to previously. When you are connected to a network, you can touch its name in the Wi-Fi networks list for details about the speed, security, address, and related settings. If "The network password you typed is not correct, please try again" or "unable to connect to the network" is displayed after you enter a password and connect the Tablet to a network, check whether the encryption method, password type, password, and certificate are correct. When the encryption mode is set to WEP, if "Obtaining address..." is displayed after you enter a password and connect the Tablet to a network, check whether the password is correct. For a solution, Please touch the network, touch Forget, enter the correct WEP password and try again. 24 2.1.4 Turning open network notification on or off When Wi-Fi is on, you can touch Network notification to make it checked or unchecked to turn open network notification on or off in the Wi-Fi settings list, and you receive or stop receiving notifications in the status bar when open networks in range are detected. 2.1.5 Adding a Wi-Fi Network When a Wi-Fi network with any security credentials does not broadcast its name (SSID), or it is not in range, you can add and connect to it when Wi-Fi is on. You need to contact the service provider for details about the security scheme that is deployed on it and to obtain the password or other required security credentials. The name (SSID) and credentials are saved and you are automatically connected to this network if it is in range and Wi-Fi is on. When Wi-Fi is on, do as the following steps to add a Wi-Fi Network. 1. In the Wi-Fi settings list, flick down and touch Add Wi-Fi network. 2. Enter the name (SSID) of the network in the Network SSID text field. If the network is secured, touch the Security: button and then touch to select the security scheme in the menu that opens. 3. Enter any required security credentials. 4. Touch Save. 2.1.6 Forgetting a Wi-Fi network To forget a Wi-Fi network that you do not want to connect to automatically or you no longer use when Wi-Fi is on, do as follows. 1. Touch and hold a Wi-Fi network you have connected to previously in the Wi-Fi networks list on the Wi-Fi settings screen. 2. Touch Forget network in the menu that opens. 25 2.2 Bluetooth Bluetooth is a short-range wireless communication technology for exchanging information between Bluetooth devices such as headphones and mobile phones over a distance of about 10 meters. The capability of your Bluetooth connection depends on your surroundings and may be interfered by obstacles such as a wall or other electronic devices. 2.2.1 Opening Bluetooth settings You can turn Bluetooth on or off, rename the Bluetooth name of your Tablet, connect to a Bluetooth device and scan to view Bluetooth devices in the Bluetooth settings list. To open Bluetooth settings list, do as follows. 1. Open the Settings list. 2. Touch Wireless & networks, and touch Bluetooth settings. When you are viewing the Bluetooth settings list, you can touch Scan for devices in the menu that opens to scan the Bluetooth devices. 2.2.2 Turning Bluetooth on or off To turn Bluetooth on or off, you can open the Bluetooth settings and touch Bluetooth to make it checked or unchecked. To extend your battery life, turn Bluetooth off when you are not using it. 2.2.3 Renaming the Bluetooth of your Tablet The Bluetooth name of your Tablet is visible to other Bluetooth devices when you connect to them. When Bluetooth is on, do as the following steps to rename the Bluetooth of your Tablet. 1. Touch Device name in the Bluetooth settings list. 2. Enter a name and touch OK in the dialog that opens. 26 2.2.4 Connecting to Bluetooth devices The first time you connect to a Bluetooth device, you must pair the Bluetooth of your Tablet with the Bluetooth device to make sure they connect securely to each other. And you can simply connect to a paired device when Bluetooth is on. To pair with a Bluetooth device 1. When Bluetooth is on, all the available Bluetooth devices in range are list in the Bluetooth devices list on the Bluetooth settings screen. 2. Touch Discoverable to make the Bluetooth of your Tablet discoverable. 3. If the device you want to pair with is not in the list, follow the instruction documentation that came with the device to make it discoverable and touch Scan for devices to display it. 4. Touch the device entry in the Bluetooth devices list to pair them. The devices pair with each other. 5. If you are prompted to enter a passkey (like 0000), refer to the documentation that came with the device to learn its passkey. If the pairing is successful, your Tablet connects to the device. To connect to a paired Bluetooth device When you switch off Bluetooth devices or the paired Bluetooth device come back into range, you can connect to it again. To automatically reconnect your Tablet with the paired device, simply turn on the device. To manually reconnect your Tablet with a paired device, touch the device name in the Bluetooth devices list. 2.2.5 Disconnecting from or unpairing a Bluetooth device To automatically disconnect your Tablet from a paired device, simply turn off the device. To manually disconnect your Tablet from a paired device or unpair this device to erase all the pairing information about it, do as the following steps. 27 1. Touch and hold the device in the Bluetooth devices list on the Bluetooth settings screen. 2. Touch Unpair to confirm that you want to disconnect or unpair. 2.2.6 Configuring the Bluetooth features Some Bluetooth devices have multiple profiles. Profiles can include the ability to transmit conversations, or to play music in stereo. You can select which profiles you want to use with your Tablet to configure the Bluetooth features. 1. Touch and hold the device in the Bluetooth devices list on the Bluetooth settings screen. 2. Touch Options… in the menu that opens. 3. A screen opens with a list of profiles of the device. 4. Touch a profile to make it checked or checked to use it or not. 5. When you are finished, press the Back key. 2.3 Mobile networks Your Tablet with a SIM card is configured to use the mobile networks of your wireless service provider for voice calls and for transmitting data. If your Tablet does not connect to a network when you insert a SIM card and turn it on, contact your service provider to obtain the details of its access point. 2.3.1 Opening Mobile network settings 1. Open the Settings list. 2. Touch Wireless & networks, and then touch Mobile networks. 28 2.3.2 Turn Data roaming on or off When Data roaming is on, your Tablet transmit data over mobile networks of other carriers when you leave the service area of mobile networks of your carriers. To turn Data roaming on or off, do as the following steps. 1. Open the Mobile networks settings screen. 2. Turn Data roaming on or off by touch Data roaming to make it checked or unchecked. With Data roaming off, you can still transmit data with a Wi-Fi connection. 2.3.3 Setting GSM/UMTS options If you and your wireless service provider determine that you need to change the settings of your current access point name (APN) or to create a new one, you must obtain the APN and detailed settings from your provider. 1. Open the Mobile networks settings screen, and touch GSM/UMTS Options > Access Point Names. 2. Touch an existing APN to edit it. Or press the Menu key and touch New APN. Enter the APN settings offered by your service provider by touching each setting that you need to edit. 3. When you are finished, press the Menu key and touch Save. If you created a new APN, touch it in the APNs screen to start using it. 2.4 Sharing Your Tablet's Data Connection You can share your Tablet's data connection with a single computer via a USB cable: USB tethering. Or you can share your Tablet's data connection with devices at the same time, by turning your Tablet into a portable Wi-Fi hotspot. 2.4.1 Sharing Your Tablet's Data Connection via USB To use USB tethering in different operating systems, you may need to prepare your computer 29 to establish a network connection via USB. You can not share your Tablet„s data connection and access SD card via USB at the same time. 1. Use the USB cable that came with your Tablet to connect the Tablet to a USB port on your computer. 2. Open the Settings list. 3. Touch Wireless & networks, and then touch Tethering & portable hotspot. 4. Select the USB tethering check box to share your data connection. 2.4.2 Sharing Your Tablet's Data Connection as a Portable Wi-Fi Hotspot 1. Open the Settings list. 2. Touch Wireless & networks, and then touch Tethering & portable hotspot 3. Select the Portable Wi-Fi hotspot check box to share your data connection. When Portable Wi-Fi hotspot is selected, you can touch Portable Wi-Fi hotspot settings to change its network name or secure it. 2.5 Turning airplane mode on or off In airplane mode, all wireless radios such as the mobile networks service, Bluetooth, and Wi-Fi are checked to be turned off. Using a mobile device or accessory with wireless radios while on board an aircraft may cause interference and may be illegal in many countries. Always obey the laws that are applicable and turn the airplane mode on. To turn Airplane mode on or off , you can press and hold the Power key and touch Airplane mode in the menu that opens. You can also do as follows. 1. Open the Settings list. 2. Touch Wireless & networks, and touch Airplane mode to make it checked or unchecked. 30 3 Google Services 3.1 Creating a Google Account When you turn on your mobile phone for the first time, touch a Google services such as Market, and you will be prompted to sign in to your Google account. When creating a Google account, ensure that your Tablet is connected to a network. If you already have a Google account, touch Sign in and enter your username and password. If you do not have a Google account, you can create one: 1. After reading the setup information, touch Next. 2. Touch Create. 3. Enter a first name, last name, and user name for your Google account, and then touch Next. The tablet will connect to the Google server to check whether the username is available. If the username you entered is already in use, you will be prompted to choose another one or select one from a list. 4. Enter and confirm your Google account password. 5. Select a security question from the drop down menu, and then enter the answer. 6. Touch Create. 7. When Google Terms of Service screen appears, touch I agree, Next. 8. Enter the characters that appear on the screen, and then touch Next. To use another account, go to the Accounts & sync settings screen, and touch Add account to select which type of accounts you want to add. 3.2 Using Market Android Market provides direct access to applications and games which you can download 31 and install on your Tablet. 3.2.1 Searching for Applications There are a few different ways to find applications on the Market screen, including: 1. Featured applications. 2. List of games. 3. Search function. 4. Your downloads. 3.2.2 Installing an Application 1. On the Market screen, touch Apps. 2. Touch a category, and then touch the item you want to download. 3. To install the item, touch FREE (if the item is free) or Buy, whichever is displayed. 4. To check the progress of a download, open the notification panel. Most applications are installed within seconds. To stop an item from downloading, touch Cancel. 5. After the application has been downloaded and installed on your tablet, the content download icon appears in the notification bar. If you want to install a non-Market application, press the Menu key and touch Settings > Applications, and then select the Unknown sources to allow installation of the non-Market application. 3.2.3 Uninstalling an Application 1. On the Market screen, touch My apps. 2. Touch the application you want to uninstall, and then touch Uninstall. 3. When prompted, touch OK to remove the application from your mobile phone. 4. Choose the reason for removing the application, and then touch OK. 32 4 Browser Use Browser to view webpages and to search for information on the web. Your Tablet may not support Flash. If you want to browse Flash on some Web pages, please download Flash Player from Market. For detailed information about how to download Flash Player, refer to the section Market. 4.1 Browsing webpages 4.1.1 To open Browser Touch Browser on the Home screen or on the Applications screen to open the Browser and start surfing the web. To enter a webpage address When you are on a Browser screen, touch the address bar to enter the address (URL) of a new webpage. When you are entering the address, the web search makes suggestions of webpages and queries. You can touch a suggestion or continue to enter the address and touch to open a webpage. To refresh a webpage When you are on a Browser screen, Touch content. to reload the webpage and view the updated To stop loading a webpage If a webpage is taking a long time to open, or if you change your mind, you can Touch stop it from loading. 4.1.2 To navigate within a webpage The following tips help you to navigate within a webpage. Flick your finger on the screen to scroll up and down. 33 to Touch the plus or minus side of the zoom control to zoom in or out. To find text on a webpage. Touch and then touch Find on page. Enter the text you are looking for. As you type, the first word with matching characters is highlighted on the screen, and subsequent matches are boxed. Touch the left arrowhead or right arrowhead to jump to and highlight the previous or next matching word. 4.1.3 To navigate among webpages You can open links on a webpage, navigate back and forth, and review your browsing history, just as in any web browser. You can also take advantage of some shortcuts for working with links and other kinds of information. The following tips help you to navigate among webpages. Touch a link to open it. Links that you touch are highlighted until the webpage they refer to opens in the window. To go back and forward among the pages you have opened, Touch bottom of the webpag. As you browse the web, Browser keeps track of the pages you visit, to help you find your way back later. You can touch the at the bottom of the webpag and touch the History tab. The pages you have visited are grouped chronologically. Touch a time period to view the pages you have visited. Touch a page in the history tab to reopen it. To view your most frequently visited pages, touch at the bottom of the webpag and touch the Most visited tab. The pages you have visited most frequently are listed in order. Touch a page to open it. Browser recognizes links, as well as some phone numbers, addresses, and similar information that you may want to act on directly. To follow shortcuts for links, phone numbers, and addresses, touch and hold a link to open a menu with shortcuts for opening, adding to the bookmark, saving, and sending the link via email. Touch a phone number to open the Phone application with the number entered. 34 or at the You can open up to Multi Browser windows at a time and switch among them. To open a new Browser window, Touch 1 . In the screen that opens, touch New window. New windows open with your home page. To switch Browser windows, Touch window to open it. To close a Browser window. Touch 1 . All open windows are displayed in a scrolling list of thumbnails. Touch the close box on the window to close it. Or you can touch at the bottom of the webpage to close a Browser window. 1 . Your open windows are displayed. Touch a 4.2 Working with the bookmarks You can add webpages to the bookmarks list so that you can quickly return to them. 4.2.1 To add a webpage to the bookmarks list 1. Open a webpage to add to the bookmarks list. 2. Touch at the bottom of the webpage. 3. Touch Add bookmark at the bottom of the Bookmarks screen. 4. Edit the name and the folder if necessary and touch OK. The bookmark is added to the top of your bookmarks list. 4.2.2 To open the bookmarks list Touch of the browser screen. Touch History and then touch Bookmarks. 4.2.3 To open a bookmark In the bookmarks list, touch a bookmark to open it. The bookmark opens in the current window. If you prefer to open it in a new window, touch and hold the bookmark and touch Open in new window in the menu that opens. 4.2.4 To edit a bookmark 35 1. In the bookmarks list, touch and hold the bookmark to edit. 2. Touch Edit bookmark in the menu that opens. 3. Edit the name or folder in the dialog that opens and touch OK. 4.2.5 To share a bookmark 1. In the bookmarks list, touch and hold the bookmark to share. 2. Touch Share link in the menu. 3. Touch the application you want to use to send the bookmark. The application opens with the bookmark address. 4.2.6 To delete a bookmark 1. In the bookmarks list, touch and hold a bookmark to delete it. 2. Touch Delete bookmark in the menu, and touch OK. 4.3 Downloading files You can download files, webpages, and even applications from webpages. The files that you download are stored on your Tablet or microSD card. 4.3.1 To download and install only trusted applications You can download and install applications from the web or receive with an email message. Applications downloaded from the web can be from unknown sources. To protect your Tablet and personal data, and download applications only from trusted sources, open the settings list and touch Applications > Unknown sources > OK to make it unchecked. 4.3.2 To download a file You can touch and hold an image and touch Save image in the menu that opens to download the image file. Or touch and hold a link to a file or to another webpage, and touch Save link in the menu that opens to download the linked file. 36 5 Email 5.1 Opening Email Touch Email on the Home screen or on the Applications screen to open Email. 5.2 Adding and deleting email accounts 5.2.1 To add an email account The first time you open Email, you are prompted to set up an email account. Or if you have created an email account, you can touch Add account to create another email account. Do as the following steps to add your email account in the Set up email screen. 1. Touch New account. 2. Select an account type (Gmail or Other). − If you already have a Gmail account, touch New account and enter your email address and password. Then touch Sign in. − If you want to add another email account, touch Other and enter an email account and password. Select the mailbox type and enter other email account details. For details about your email account, contact your email service provider. 3. Touch Back key to select your email service type and enter other email account details. You can contact your email service provider for the values required for your account. 4. Touch Done, and then touch Sign in Email starts downloading your email messages and you can send and receive email messages with this new account. 5.2.2 To delete an email account 1. Open the Email screen. 2. Touch and hold the account to delete. 37 3. Touch Delete in the menu that opens. 4. Touch OK in the dialog to confirm your delete action. 5.3 Sending and responding to email messages 5.3.1 To compose and send email messages 1. Open Email, touch the email account you want to use. 2. Touch New email at the bottom of the screen. 3. Enter the names or email addresses of the desired recipients in the To field. As you enter, matching addresses are offered from your Contacts. You can touch a suggested address or enter a new one. Separate multiple addresses with commas. You can also enter names or email addresses of recipients in the Cc field to send a copy of the email to those recipients. 4. Enter a subject for the email message. 5. Enter the text of the email message. 6. Press the Back key and touch Attachment to send a photo with the message. 7. Touch Send If you are not ready to send the message, you can touch Cancel to abandon the message, or touch Save as draft to save it in a drafts folder. Your message is also saved as a draft if you press the Back key before sending it. 5.3.2 To receive email messages To receive emails, touch the desired email account and then touch Check at the bottom of the screen. You can also touch Settings > Email check frequency to set the frequency for automatically checking new emails. 38 5.3.3 To read an email message To read an email message, you can open the Email screen, touch to select an account inbox, then touch the message to read. you can also touch and hold the message, and then touch View details in the menu. 5.3.4 To reply to or forward an email message While reading an email message, you can touch Reply or Reply all to reply to the message. A Compose Message window opens with the addresses, subject, and a copy of the message you are responding to filled in. You can also press the Menu key and touch Reply, Reply all, or Forward to reply to or forward the message. 5.3.5 To delete an email message You can delete an email message from its folder by touching Delete, touching Delete and touching OK. when you are reading it. For most kinds of accounts, deleted messages are moved to a trash folder, so you can retrieve them if you deleted them in error. 39 6 Calls 6.1 Making calls by dialing 1. To display the phone panel, you can touch Dialer on the home screen or on the Applications screen. Or if you have the Call log, Contacts or Favorites tab open, you can touch to switch to the Dialer tab. 2. Touch the digital keys to enter the phone number. To dial an international number, touch and hold the 0 key to enter the plus ( + ) symbol. Then enter the international prefix for the country and the national full phone number followed closely. Touch the key on the screen to erase subsequent digits of the number one by one. Touch and hold it to erase the entire number. 3. Touch the on the screen. Your Tablet supports smart dialing. You can enter a contact's name or number to find the contact. For example, if you want to search for Jack, touch the number keys corresponding to the letters of the name (5225 in sequence); if you want to search for numbers that contain 123, touch 123 in sequence, and all numbers containing 123 will be displayed below the search box. If no contact is matched with your entered information, the phone will not display any result. 6.2 Answering, rejecting or ending calls When you receive phone calls, the Incoming call screen opens. 1. To silence the ringer before answering calls, press the Volume Down key. 2. Touch the 3. Touch the to answer calls. to reject incoming calls or to end answered ongoing calls. 40 6.3 Working with the Call log The Call log tab lists entries of all dialed calls, answered calls, and missed calls. All received calls are recorded in the Call log. If you miss a call, you receive a notification. Touch an entry in the Call log to open a screen that gives you options on what you can do with the contact. Or touch and hold an entry to open the context menu. 6.3.1 To open the Call log To open the Call log, you can touch Call log on the Applications screen. You can also touch the Call log when you have the Dialer, Contacts or Favorites tab open. Calls are listed with the most recent at the top. Flick up and down to view all entries in the log. 6.3.2 To make calls from the Call log 1. Touch the entry of your target contact in the Call log. 2. Touch the to dial the number of the contact. 6.3.3 To add numbers to the Contacts 1. Touch and hold the target entry in the Call log to display the context menu. 2. Touch Add to Contacts. 6.3.4 To clear the Call log While viewing the Call log, touch Clear call log. You can also touch and hold an entry in the log to display the context menu, then touch Remove from call log to remove just that entry from the Call log. 41 6.4 Calling listed contacts 1. You can open the Contacts on the Home screen or on the Applications screen by touching Contacts. You can also touch to switch to the Contacts tab if you have the Dialer, Call log or Favorites tab open. 2. Touch the contact to call. You can flick up and down to find a contact that listed in Contacts. 3. Touch the to dial the number of the contact. Touch a contact to open the contact details screen. Touch and hold a contact to open the context menu. 6.5 Calling favorite contacts The favorite contacts list is followed by a list of the numbers that you call most often. You can add and remove favorites by touching the star next to the contact names, while you are viewing information about the contacts. To call a favorite contact, do as follows. 1. Open Dialer, Call log, or Contacts, then touch the Favorites tab to display the favorite contacts list. 2. Touch a favorite contact to call. 3. Touch a number of the contact to call. 4. Touch the to dial the number of the contact. 42 7 Messaging Use Messaging to exchange text messages (SMS) and multimedia messages (MMS) with your friends 7.1 Opening Messaging Touch Messaging on the Applications screen to open the Messaging screen. The Messaging window opens, where you can create a new message or open an ongoing message thread. 7.2 Exchanging messages You can send text messages (SMS) and Multimedia messages (MMS) to other mobile devices with this feature and service. Messaging automatically converts a message into a multimedia message if you send it to an email address instead of a phone number, add a subject, or attach a media file. 7.2.1 To create and send a text message 1. On the Messaging screen, touch New message. 2. Enter the name of a contact with a mobile number in the To field. As you enter, matching contacts appear. You can touch a suggested contact or continue your entering. 3. Touch the composition text field to enter your message text. If you press the Back key while composing a message, it is saved as a draft in your Messaging window. Touch the message to resume composing it. 4. Touch Send. 7.2.2 To create and send a multimedia message 1. On the Messaging screen, touch New message. 43 2. Enter a mobile phone number, or the name of a contact with a mobile number in the To field. As you type, matching contacts appear. You can touch a suggested contact or continue your entering. 3. Touch the composition text field to enter your message text. 4. Touch the Back key and then touch Add subject to add a message subject. 5. Touch the Back key and then touch Insert to open a menu where you can touch the kind of media file and add an attachment to the message. Use the buttons in the Compose Message screen to preview or remove the media attachment. 6. Touch Send. 7.2.3 To view and respond to a message If you are working in the Messaging window, messages that you receive are displayed in it. Otherwise, you receive a new message notification and a new message icon appears in the notification list. When you touch the new message notification, the Messaging window opens, where you can reply to the message. If Auto-retrieve is unchecked, you must touch Download to view the multimedia message (MMS). If the message contains a media file, touch to view, watch, or listen to it. Touch and hold the media file to open a menu with an option for saving the message on your Tablet. 7.2.4 To view details about a message Touch and hold a message in a message thread, and then touch View message details in the menu that opens. 7.2.5 To forward or delete a message 1. Touch and hold the message thread to forward or to delete. 2. Touch Delete message or Forward in the menu that opens. 44 8 Contacts Contacts enables you to save and manage information such as phone numbers, email addresses and chat addresses of your contacts, and provides quick and easy access to communicate with the people you want. 8.1 Opening Contacts You can open your contacts by touching Contacts on the Home screen or on the Applications screen. Or if you have Dialer, Call log or Favorites tab open, touch the Contacts tab. You can touch the Favorites tab to open your favorite contacts. In the contact tab pages, you can touch a contact to open the contact details screen, or touch and hold a contact to open the context menu. 8.2 Creating a contact 1. Open the Contacts screen. 2. Touch Create. 3. Enter the information of the contact, refer to the following tips. − Enter the contact name, and touch the picture frame to select a picture to display next to the name in the contacts list and in other applications. − Touch a category of contact information, such as phone numbers and email addresses, to enter that kind of information about your contact. Flick up and down to view all categories. − Touch the plus button to the right of a category to add more than one entry for that category. Touch the minus button to the right of an entry to remove the entry. − Touch the label button to the left of the items of contact information such as Phone and Email to open a menu with preset labels for a phone number. You can touch to select a preset label or touch Custom in the menu to create your own label. 45 4. When your entering is finished, flick the page to the bottom and touch Done to save the contact details to your Tablet. 8.3 Searching for contacts 1. Open the Contacts screen. 2. Touch Search. 3. Enter the name of the contact you are searching for. As you type, contacts with matching names appear below the search box. 4. Touch the Next to open a screen with a list of matching contacts. Touch a matching contact in the list to open its Details screen. 8.4 Editing contacts 8.4.1 To edit contact details To change or add details for your contacts, do as follows. 1. Open Contacts. 2. Touch and hold the contact whose details you want to edit, and touch Edit contact in the menu that opens. You can also touch Edit contact while viewing details of the contact. 3. Edit the contact information, using the same controls as when you create a contact. 8.4.2 To set default phone number A default phone number appears below the name of the contact in the Contacts list, and this number can be used when you initiate a call or send a text message from the list by touching and holding a contact. To set one of the phone numbers of a contact as the default phone number, do as follows. 1. Open Contacts. 2. Touch the contact entry in the list to view the details. 46 3. Touch and hold the phone number to use as the default phone number. 4. Touch Make default number in the menu that opens. The default phone number is marked with a checkmark. 8.4.3 To delete a contact 1. Open Contacts. 2. Touch and hold the contact to delete, and touch Delete contact in the menu that opens to delete the contact from your Tablet. You can also touch Delete while viewing details of the contact. 3. Touch OK to confirm that your want to delete the contact. To delete multiple contacts, touch Delete at the bottom of the Contacts tab to access the Delete contact screen. Select the contacts you want to delete. Touch Delete and then OK to delete the selected contacts. 8.4.4 To set contact group to display To set the contact group to display, do as follows: 1. Open Contacts. 2. Touch Display options. 3. Touch Only contacts with phones to make it checked or unchecked to display only contacts with phones or display all the contacts. 4. Touch Done to confirm that you want to display the contact group. 8.5 Editing favorite contacts 8.5.1 To add a contact to favorites 1. Open Contacts. 47 2. Touch and hold a contact to open the contexts menu, and touch Add to favorites. You can also touch the gray star to the right of the contact name while viewing details of the contact. The star turns to red and the contact is added to your favorites. 8.5.2 To remove a contact from favourites On the Favorites tab, touch and hold the contact, and touch Remove from favorites in the menu that opens to remove the contact from the tab. You can also touch the red star to the right of the contact name while viewing details of the contact. The star turns to gray and the contact is removed from your Favorites. To remove multiple contacts from Favorites, touch Remove favourites to access the Remove favourites screen. Select the contacts you want to remove from Favorites. Then touch Remove favourites at the bottom of the screen to remove the selected contacts. 48 9 Multimedia applications 9.1 Sound Recorder Touch Sound Recorder on the Applications screen to open the Sound Recorder screen, and the following tips are helpful for you to ease working with it. Touch the round button to start to record your message. Touch the triangle button to play back the recording. Touch the square button to stop recording or playing. View the recording or playing duration and the volume of the captured audio signals on the Record your message screen. 9.2 Camera and Camcorder Touch Camera or Camcorder on the Home screen or on the Applications screen to open the camera or camcorder to take pictures or shoot videos. Be sure to clean the protective lens cover with a microfiber cloth before taking pictures and shooting videos. A lens cover with smudges from fingers can cause blurry pictures with a “halo” effect. On the Camera screen, press the Menu key and you can do the following: touch Secondary camera to switch to the secondary camera; touch Switch to video to switch to Camcorder; or touch Photo to access the Photo screen. One the Camcorder screen, you can press the Menu key and perform similar actions. 9.3 Music Touch Music on the Home screen or on the Applications screen to open the music player and display the music library that organized by Artist, Genre, Album, Release, Songs, or Playlist. You can select what you want to play. 49 To add a song to a playlist, touch and hold the desired song to access the shortcut menu and select Add to playlist. 9.4 Video On the Applications screen, touch Video to open the Video screen and display the video files. On the Video screen, touch a file to play the video. 9.5 Photo Photo can automatically search for the pictures stored on your Tablet and microSD card. In addition, Photo sorts these pictures in folders. you can use Photo to view and edit pictures, set a picture as the wallpaper or a contact image stored on your Tablet and microSD card. On the Photo screen, you can share, star, sort, and delete pictures by touching relevant options at the bottom of the screen. After you touch Share, Starring, or Delete, select the pictures you want to process and touch the desired option. You can also touch Setting to set the playback mode and add background music. 9.5.1 Opening Photo Touch Photo on the Applications screen to open it. By default, pictures are sorted by date. You can touch a picture to display it in full screen mode. If you have a great many pictures on your Tablet or microSD card, it may take a few minutes to discover and organize them when you open the Photo. 9.5.2 Viewing a Picture 1. Touch a picture to view it in full-screen mode. When viewing a picture in full screen, flick left or right across the screen to view the previous or next picture. 2. Touch the screen to display the zoom control appears, and then you can zoom in or zoom out the picture. 50 9.5.3 Sharing a Picture When you are viewing a picture, Touch a picture, and then touch on the screen, Touch the application you want to use to share a picture with your friends. 9.5.4 Rotating a Picture Touch a picture, and then touch on the screen. 51 10 Handy applications 10.1 Calendar You can use the Calendar to create and manage events such as meetings and appointments. Touch Calendar on the Applications screen to open it. The events about the current day and the day after current day are shown on the event widget on the Home screen. 10.2 Weather The Weather application offers weather forecast of a location that your specified. The weather information is summarized in the Weather widget on the Home screen and you can touch it to view more details. And you can touch the temperature scale icon to switch between the Celsius or Fahrenheit temperature scale as you want. 10.3 RSS Reader The RSS Reader lists top news stories about common topics. The RSS Reader widget on your Home screen lists a category of top headlines, you can touch it to open a list of the top stories in the news and scroll to touch the category of news you are interested in. 10.4 Memo Touch Memo on the Home screen or on the Applications screen to make text notes or drawing notes. 10.5 Alarm Clock You can touch Clock on the Home screen or on the Applications screen to open a screen where you can set the alarm time and other attributes. 52 You can set an alarm by modifying an existing alarm or by adding a new one. Touch an existing alarm to set its time and other attributes. Or press the Menu key and touch Add alarm to add a new one. Touch to make the check box to the left of an alarm checked or unchecked to turn the alarm on or off. Touch and hold an alarm to delete it. 10.6 Calculator Touch Calculator on the Home screen or on the Applications screen to open the calculator to solve math problems. You can drag to switch between basic and advanced panels, or press the Menu key and touch Advanced panel. 10.7 Documents Touch Documents To Go on the Applications screen to view documents with the format such as Word, Excel, Power Point and PDF. 10.8 File Manager 10.8.1 Creating a Folder 1. Touch File Manager on the Applications screen. 2. Press the Menu key on the File Manager screen, and then touch New folder. 3. Enter the new folder name in the text box. 4. Touch Save to confirm that you want to create the folder. 10.8.2 Deleting files and folders You can delete a file or a folder by touching and holding it and touch Delete in the menu that opens. You can also delete files and folders referring to the following steps. 1. Press the Menu key on the File Manager screen. 53 2. Touch Delete, and touch files or folders you want to delete to make them checked. 3. Press the Menu key, and touch Done. 4. Touch OK on the dialog that opens to confirm your want to delete the files or folders. 10.8.3 Searching a File 1. Press the Menu key on the File Manager screen, and then touch Search. 2. Enter the name or keyword of the name of the target file or folder in the search text box. 3. Touch Search. Your Tablet starts to search for the file or folder in all folders and subfolders. 4. The search result is shown in a list. Touch to open your target file or folder. 54 11 Security settings 11.1 Enabling the SIM card PIN 1. Open the Settings list. 2. Touch Location & security > Set up SIM/USIM card lock. 3. Touch Lock SIM/USIM card, and enter the default SIM card PIN using the onscreen keyboard. 4. Touch OK. Emergency calls can be placed at any time, without entering a PIN. 11.2 Changing the SIM card PIN 1. Open the Settings list. 2. Touch Location & security > Set up SIM/USIM card lock. 3. Touch Change SIM/USIM PIN, and enter the old SIM card PIN using the onscreen keyboard. 4. Enter the new SIM card PIN, and then touch OK. 55 Copyright © Huawei Technologies Co., Ltd. 2011. All rights reserved. No part of this document may be reproduced or transmitted in any form or by any means without prior written consent of Huawei Technologies Co., Ltd. The product described in this manual may include copyrighted software of Huawei Technologies Co., Ltd and possible licensors. Customers shall not in any manner reproduce, distribute, modify, decompile, disassemble, decrypt, extract, reverse engineer, lease, assign, or sublicense the said software, unless such restrictions are prohibited by applicable laws or such actions are approved by respective copyright holders under licenses. Trademarks and Permissions , , and Technologies Co., Ltd. are trademarks or registered trademarks of Huawei HDMI, the HDMI Logo, and High-Definition Multimedia Interface are trademarks or registered trademarks of HDMI Licensing LLC in the United States and other countries. Other trademarks, product, service and company names mentioned are the property of their respective owners. Notice Some features of the product and its accessories described herein rely on the software installed, capacities and settings of local network, and may not be activated or may be limited by local network operators or network service providers. Thus the descriptions herein may not exactly match the product or its accessories you purchase. Huawei Technologies Co., Ltd reserves the right to change or modify any information or specifications contained in this manual without prior notice or obligation. NO WARRANTY THE CONTENTS OF THIS MANUAL ARE PROVIDED “AS IS”. EXCEPT AS REQUIRED BY APPLICABLE LAWS, NO WARRANTIES OF ANY KIND, EITHER EXPRESS OR IMPLIED, 56 INCLUDING BUT NOT LIMITED TO, THE IMPLIED WARRANTIES OF MERCHANTABILITY AND FITNESS FOR A PARTICULAR PURPOSE, ARE MADE IN RELATION TO THE ACCURACY, RELIABILITY OR CONTENTS OF THIS MANUAL. TO THE MAXIMUM EXTENT PERMITTED BY APPLICABLE LAW, IN NO CASE SHALL HUAWEI TECHNOLOGIES CO., LTD BE LIABLE FOR ANY SPECIAL, INCIDENTAL, INDIRECT, OR CONSEQUENTIAL DAMAGES, OR LOST PROFITS, BUSINESS, REVENUE, DATA, GOODWILL OR ANTICIPATED SAVINGS. Import and Export Regulations Customers shall comply with all applicable export or import laws and regulations and will obtain all necessary governmental permits and licenses in order to export, re-export or import the product mentioned in this manual including the software and technical data therein. Issue: 01 (2011–03–22) Part Number: 903065 57 for Android™ Android is a trademark of Google Inc. Use of this trademark is subject to Google Permissions.