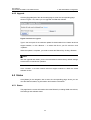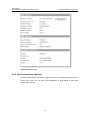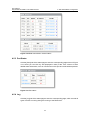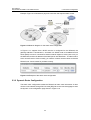
1
HUAWEI
Aolynk DR814Q ADSL2+ Broadband Router
User Manual
Aolynk DR814Q ADSL2+ Broadband Router
User Manual
Manual Version
T2-UM-20060225-3.10
Huawei Technologies Co., Ltd. provides customers with comprehensive technical support
and service. If you purchase the products from the sales agent of Huawei Technologies Co.,
Ltd., please contact our sales agent. If you purchase the products from Huawei
Technologies Co., Ltd. directly, please feel free to contact our local office, customer care
center or company headquarters.
Huawei Technologies Co., Ltd.
Technical Support:
Address: Hangzhou Base of Huawei Technologies Co., Ltd.
East of Liuhe Road, Zhijiang Science Park,
Hangzhou, Zhejiang Province, P. R. China
Postal Code: 310053
Website: http://www.huawei-3com.com
E-mail: [email protected]
Copyright © 2006 Huawei Technologies Co., Ltd.
All Rights Reserved
No part of this manual may be reproduced or transmitted in any form or by any
means without prior written consent of Huawei Technologies Co., Ltd.
Trademarks
Aolynk is a trademark of Hangzhou Huawei-3Com Technology Co., Ltd.
, HUAWEI, C&C08, EAST8000, HONET,
, ViewPoint, INtess, ETS, DMC,
TELLIN, InfoLink, Netkey, Quidway, SYNLOCK, Radium,
M900/M1800,
TELESIGHT, Quidview, Musa, Airbridge, Tellwin, Inmedia, VRP, DOPRA, iTELLIN,
HUAWEI OptiX, C&C08 iNET, NETENGINE, OptiX, iSite, U-SYS, iMUSE, OpenEye,
Lansway, SmartAX, infoX, TopEng are trademarks of Huawei Technologies Co.,
Ltd.
All other trademarks mentioned in this manual are the property of their respective
holders.
Notice
The information in this manual is subject to change without notice. Every effort has
been made in the preparation of this manual to ensure accuracy of the contents, but
all statements, information, and recommendations in this manual do not constitute
the warranty of any kind, express or implied.
Environmental Protection
This product has been designed to comply with the requirements on environmental
protection. For the proper storage, use and disposal of this product, national laws
and regulations must be observed.
User Manual
Aolynk DR814Q ADSL2+ Broadband Router
Table of Contents
Table of Contents
1 Product Overview .......................................................................................................................... 1
1.1 Introduction ........................................................................................................................... 1
1.2 Appearance........................................................................................................................... 2
1.2.1 Front Panel................................................................................................................. 2
1.2.2 Rear Panel ................................................................................................................. 3
1.3 Features................................................................................................................................ 3
2 Installation...................................................................................................................................... 5
2.1 Packing List........................................................................................................................... 5
2.2 Precautions ........................................................................................................................... 5
2.3 Device Connection................................................................................................................ 6
3 Getting Started............................................................................................................................... 8
3.1 Prerequisite Tasks for Configuration .................................................................................... 8
3.2 Login ..................................................................................................................................... 9
3.3 Web Page Layout ............................................................................................................... 10
3.4 Description of the Factory Default Settings ........................................................................ 12
4 Web-based Basic Configuration ................................................................................................ 14
4.1 Quick Setup ........................................................................................................................ 14
4.2 WAN Setup ......................................................................................................................... 15
4.2.1 WAN ......................................................................................................................... 16
4.2.2 DNS Relay................................................................................................................ 20
4.2.3 DDNS ....................................................................................................................... 21
4.2.4 Scan PVC................................................................................................................. 22
4.3 LAN Setup........................................................................................................................... 23
4.3.1 LAN .......................................................................................................................... 23
4.3.2 DHCP Server............................................................................................................ 25
4.3.3 DHCP client.............................................................................................................. 26
4.4 Device ................................................................................................................................. 26
4.4.1 Restarting/Restoring Factory Default Settings......................................................... 27
4.4.2 Password.................................................................................................................. 27
4.4.3 Remote Access ........................................................................................................ 28
4.4.4 Backing Up/Restoring Configuration ........................................................................ 29
4.4.5 Upgrade.................................................................................................................... 32
4.5 Status.................................................................................................................................. 32
4.5.1 Status ....................................................................................................................... 32
4.5.2 Data Transmission Channels ................................................................................... 33
4.5.3 Port Status................................................................................................................ 34
4.5.4 Log ........................................................................................................................... 34
i
User Manual
Aolynk DR814Q ADSL2+ Broadband Router
Table of Contents
4.6 Saving the Configuration .................................................................................................... 35
5 Advanced Configuration............................................................................................................. 36
5.1 Attaching LAN Ports to PVCs ............................................................................................. 36
5.2 Security ............................................................................................................................... 42
5.2.1 Virtual Server............................................................................................................ 42
5.2.2 Firewall ..................................................................................................................... 44
5.2.3 Trigger ...................................................................................................................... 46
5.2.4 NAT .......................................................................................................................... 47
5.2.5 IDS ........................................................................................................................... 48
5.3 Route Configuration............................................................................................................ 48
5.3.1 Static Route Configuration ....................................................................................... 48
5.3.2 Dynamic Route Configuration .................................................................................. 50
5.4 Service ................................................................................................................................ 51
5.4.1 SNTP........................................................................................................................ 51
5.4.2 SNMP ....................................................................................................................... 52
5.4.3 IGMP Proxy .............................................................................................................. 54
6 Troubleshooting .......................................................................................................................... 55
6.1 DR814Q Troubleshooting ................................................................................................... 55
6.2 Diagnosis Tools .................................................................................................................. 57
6.2.1 Ping .......................................................................................................................... 57
6.2.2 Nslookup .................................................................................................................. 58
7 Appendix – TCP/IP Protocol....................................................................................................... 60
7.1 Installing TCP/IP ................................................................................................................. 60
7.2 Configuring TCP/IP ............................................................................................................. 62
7.2.1 Specifying to Obtain an IP Address Automatically................................................... 62
7.2.2 Specifying a Static IP Address ................................................................................. 64
8 Appendix – USB Configuration.................................................................................................. 66
8.1 Installing USB Driver........................................................................................................... 66
8.2 Configuring IP Properties.................................................................................................... 68
9 Appendix – IP Address and Subnet Mask ................................................................................ 70
9.1 IP Address .......................................................................................................................... 70
9.1.1 Structure of the IP Address ...................................................................................... 70
9.1.2 Classes of IP Addresses .......................................................................................... 71
9.2 Subnet Mask ....................................................................................................................... 72
10 Appendix – Technical Specifications ...................................................................................... 73
11 Appendix – Glossary................................................................................................................. 74
ii
User Manual
Aolynk DR814Q ADSL2+ Broadband Router
1 Product Overview
1
Product Overview
This chapter focuses on the appearance and functionality of Aolynk DR814Q ADSL2+
Broadband Router for you to get familiar with this product.
1.1 Introduction
Aolynk DR814Q ADSL2+ Broadband Router (hereinafter referred to as the DR814Q)
provides four 10/100 Mbps Ethernet ports, and one USB port, making it easy to
establish a LAN without additional expenses on switches.
The DR814Q, an ideal tool for SOHO (small office, home office) users, features built-in
ADSL2+ technology, high-speed Internet access, and remote connectivity. It enables
LAN users to share high-speed broadband connection through the built-in NAT
(network address translation) and DHCP (dynamic host configuration protocol) server
and provides complete network security solutions to prevent hackers and invasions
from outside. In addition, it meets the network requirements as it supports multiple
connections such as DHCP/static IP address, IPoA (IP over ATM), PPPoE (PPP over
Ethernet) and PPPoA (PPP over ATM).
The DR814Q offers the Web-based configuration pages as the way to configure it via
common Web browsers. Friendly built-in graphical user interface eases the
configuration and management.
This user manual introduces how to install and configure the DR814Q. After guiding
you through the device connection and basic configuration, it focuses on the advanced
configurations so that you can best facilitate the DR814Q.
1
User Manual
Aolynk DR814Q ADSL2+ Broadband Router
1 Product Overview
1.2 Appearance
1.2.1 Front Panel
The LEDs on the front panel indicate the state of the DR814Q.
Figure 1-1 Front view
Table 1-1 LED state description of the DR814Q
LED
State
Description
ON
The power is ON and the operation is normal.
OFF
The power is OFF or a fault occurs.
ON
The ADSL link is up.
Blinking
The ADSL link is starting up.
OFF
The ADSL link is down.
Blinking
Data is being transmitted and/or received on
the ADSL link.
OFF
No data transmission is present on the link.
ON
The USB connection is established.
Blinking
Data is being transmitted and/or received on
the USB port.
OFF
No USB connection is present.
ON
The Ethernet link is established.
Blinking
Data is being transmitted and/or received on
the Ethernet port.
OFF
No link is present.
—
For manufactory test only.
Power
Link
Act
USB
LAN1/2/3/4
Diag
2
User Manual
Aolynk DR814Q ADSL2+ Broadband Router
1 Product Overview
1.2.2 Rear Panel
All ports of the DR814Q, a power port, four Ethernet ports, a USB port, a Reset button
and an ADSL port, are located on the rear panel. Refer to Table 1-2 for details.
Figure 1-2 Rear view
Table 1-2 Description of the ports and reset button
Item
Power
port
Quantity
1
Port
Description
—
—
Usage
Connect with the
power adapter.
10/100 Base-TX
Ethernet
port
4
10/100
Mbps
auto-negotiation
RJ-45
auto-MDI/MDIX
IEEE
802.3/802.3u
compatible
USB port
Reset
button
1
1
Series-B
Receptacle
—
LAN port. Connect
with the Ethernet
port of a PC, Hub
or switch.
USB 1.1
Connect with the
USB port of a PC.
—
Restore
factory
default
settings
(press and hold
down the button
for
about five
seconds).
ANSI T1.413 Issue 2
ITU G.992.1 AnnexA
G.dmt
ADSL port
1
RJ11
ITU G.992.2 G.lite
ITU G.992.3 ADSL2
Connect with the
telephone jack on
the wall or the
ADSL port of a
splitter.
ITU G.992.5 ADSL2+
1.3 Features
DR814Q performs excellent network connection, featuring:
z
Asymmetrical data transmission technology with downstream speed of 24 Mbps
and upstream speed of 1.2 Mbps.
z
Attachment of a LAN port to a PVC (permanent virtual channel), which allows you
to access Internet services through different LAN ports.
3
User Manual
Aolynk DR814Q ADSL2+ Broadband Router
z
1 Product Overview
NAT technology that allows all PCs on a network to access the Internet sharing a
single IP address.
z
DHCP/static IP address, IPoA, PPPoE and PPPoA connection types, which make
the DR814Q applicable to different networks and satisfy varied demands.
z
Capability of a DHCP client to obtain an IP address from a DHCP server of an ISP.
z
Capability of a DHCP server to assign IP addresses to hosts in a LAN.
z
DNS (domain name system) relay that allows you to specify the IP address of an
Ethernet port on the DR814Q as a DNS server IP address of a PC.
z
DHCP relay that allows one DHCP server available for multiple DHCP clients in
different network segments.
z
Firewall, IDS (intrusion detection system) and IP filtering that secure your LAN.
z
UPnP (Universal plug-and-play) for LAN users to use all the functions provided by
UPnP-supported software (such as MSN) without any further configuration.
z
IP routing, DNS configuration, and the services such as the IP and DSL
performance monitoring.
z
Friendly built-in Web-based graphical user interface for ease of configuration and
management through common Web browsers.
4
User Manual
Aolynk DR814Q ADSL2+ Broadband Router
2 Installation
2
Installation
On the assumption that you have acquired DSL services from your ISP, the following
sections describe how to set up the DR814Q and configure your PC.
2.1 Packing List
Unpack the shipping carton carefully and check the following items listed in Table 2-1.
Table 2-1 Packing list
Item
Quantity
Aolynk DR814Q ADSL2+ Broadband Router
1
Power adapter
1
Telephone cable
1
Straight-through cable
1
USB cable
1
Set of screw and anchor
2
Aolynk DR814Q ADSL2+ Broadband Router Quick Start
1
CD including manuals and a driver
1
Warranty Card
1
Certificate of Quality
1
If anything is broken or missing, contact your agent for help.
2.2 Precautions
To guarantee normal operation and longevity of the DR814Q, its installation site should
meet the requirements described below:
z
Use the DR814Q indoors and keep it far away from the heat sources and
water/liquid.
5
User Manual
Aolynk DR814Q ADSL2+ Broadband Router
z
2 Installation
Keep the cabinet or desk stable enough to hold the DR814Q. Fix the DR814Q and
power adapter well on the wall when wall-mounting it.
z
Reserve more than 10 cm (4 in.) of clearance around the DR814Q chassis for heat
dissipation.
z
Keep the operation environment clean. Dust buildup on the chassis may result in
static absorption, reducing the life span and causing communication failure.
z
Use an earthing system or lightning protection grounding different from that for the
power supply equipment and keep them as far as possible.
z
Wire the port cable indoors. Outdoor cabling is prohibited, to prevent the signal
port from damages that may be caused by overvoltage and overcurrent from
lightning strike.
2.3 Device Connection
LAN
USB
Telephone jack
ADSL
DR814Q
Line
Splitter
ADSL
Phone
PC
Telephone
Figure 2-1 Connect the DR814Q
I. Connect to an ADSL line
To connect the DR814Q to an ADSL line, two options are available:
z
Connect one end of the telephone cable to the ADSL port (similar to a common
telephone port) on the DR814Q rear panel, and the other end to the telephone jack
on the wall.
z
As shown in Figure 2-1, connect both the ADSL port on the DR814Q and the
telephone to a splitter, and then connect the splitter to the telephone jack on the
wall. It allows you to use the telephone when you access the network.
II. Connect to a PC or Ethernet
To connect the DR814Q to a PC or Ethernet, two options are available:
6
User Manual
Aolynk DR814Q ADSL2+ Broadband Router
2 Installation
The Ethernet ports of the DR814Q are auto-MDI/MDIX, so you can use the
z
crossover or straight-through cable to connect your PC, Hub, or switch to the
Ethernet port (one among LAN1 through LAN4) of the DR814Q.
Connect your PC to the DR814Q through the USB ports with a USB cable. It is
z
suitable for the PC without NIC to access the Internet.
Caution:
To use the USB port on the DR814Q, you must install the USB driver and configure
your PC (refer to section 8 “Appendix – USB Configuration” for detailed information).
III. Connect to the power adapter
Attach one end of the power adapter to the DR814Q and the other end to the power
outlet. Approximately one minute later, the states of the LEDs on the front panel should
be those listed in Table 2-2.
Table 2-2 Description of the LED states
LED
State
Description
Power
ON
The power is ON and the operation is normal.
Link
ON
The ADSL link is normal.
Act
Blinking
Data is being transmitted and/or received on the
ADSL link.
ON/Blinking
LAN
(when a LAN
connection
is
present)
The Ethernet link is normal.
ON/blinking
USB
(when a USB
connection
is
present)
The USB connection is normal.
Diag
OFF
Contact the agent for help if this LED is ON.
7
User Manual
Aolynk DR814Q ADSL2+ Broadband Router
3 Getting Started
3
Getting Started
The DR814Q offers a series of Web-based configuration pages for configurations and
management. You can configure the DR814Q as needed. This chapter guides you to
be familiar with the Web-based configuration pages.
3.1 Prerequisite Tasks for Configuration
To configure the DR814Q through its built-in Web pages, you must configure your PC
as the following.
I. System requirements on your PC
z
A Web browser (Microsoft Internet Explorer 5.5, Netscape 6.0 or later)
z
TCP/IP protocol employed
II. IP address of your PC
Before accessing Web-based configuration pages of the DR814Q, you need to
configure your PC as obtaining IP address and DNS server address automatically. If
you assign a static IP address for the PC instead, note to assign an IP address in the
same network segment as the DR814Q. The default IP address and subnet mask of the
DR814Q Ethernet port are 192.168.1.1 and 255.255.255.0 respectively. Refer to
section 7 “Appendix – TCP/IP Protocol”.
III. No proxy server
If your PC uses the proxy server to access the Internet, you must disable the proxy
service.
1)
Choose [Tool/Internet options] to open the [Internet options] window.
2)
Click the [Connections] tab and click <LAN settings…>.
3)
Make sure the Use a proxy server option is not selected.
IV. Important
1)
The DR814Q provides the automatic dialing function, thus the dialing software
(PPPoE dialing software, for example) provided by the operation system or other
client dialing software is not needed and can be uninstalled.
8
User Manual
Aolynk DR814Q ADSL2+ Broadband Router
2)
3 Getting Started
Only English input is supported by the DR814Q.
3.2 Login
Run your Web browser and enter http://192.168.1.1 in the address bar. The login
dialog box appears, as shown in Figure 3-1.
Figure 3-1 Login dialog box
Type in the default username (admin) and the default password (admin). Click <OK>
to enter the Web-based configuration page shown in Figure 3-2.
The Web-based configuration page contains the navigation bar, title bar and parameter
setting section. In the left pane is the navigation bar, where you can click a navigation
link to display corresponding parameters in the right pane to make configurations.
9
User Manual
Aolynk DR814Q ADSL2+ Broadband Router
3 Getting Started
Figure 3-2 Welcome page
Note:
z
The DR814Q supports two user levels, namely, administrator and user.
z
An administrator, whose login username and password are both admin, enjoys
higher authorities than a common user, whose login username and password are
both user. An administrator can use all functions in Figure 3-2, while for a common
user, the [WAN Setup], [LAN/PVC] and [Service] navigation links are unavailable.
z
The following sections use the administrator view for description.
z
To change the login password, refer to section 4.4.2
“Password” for detailed
information.
z
If you receive an error message or the configuration page cannot be displayed, refer
to section 6.1 “DR814Q Troubleshooting” for detailed instructions.
3.3 Web Page Layout
Links to detail setting pages are listed in the navigation bar (see Figure 3-3) on the left
pane of the Web-based configuration page. Click any link to display the corresponding
page in the right pane.
10
User Manual
Aolynk DR814Q ADSL2+ Broadband Router
3 Getting Started
Figure 3-3 Navigation bar
Table 3-1 describes the commonly used controls in Web configuration pages.
Table 3-1 Description of the commonly used Web page controls
Control
Description
Click these buttons to confirm and
apply the settings or changes you have
made. If you want to restart the
DR814Q, be sure to first click [Save
Config] and save your configurations
on the corresponding page, otherwise
the configurations will be lost.
Click this button to return to the
upper-level configuration page.
Click this button to cancel the settings
you have made on the current page.
Click such blue links to enter the
corresponding configuration pages.
For instance, you can click <Delete…>
to open the corresponding dialog box
and confirm a deletion.
11
User Manual
Aolynk DR814Q ADSL2+ Broadband Router
3 Getting Started
Control
Description
Such option buttons are provided in
groups, and within each group
containing multiple options for a
parameter, you can select only one
button.
To enable a corresponding function,
select the Enabled option.
To disable a corresponding function,
select the Disabled option.
Drop-down list box – Click the down
arrow button to open the drop-down list
and select the desired option from the
list.
3.4 Description of the Factory Default Settings
The DR814Q is configured with factory default settings that satisfies most common
SOHO user demands.
The table below lists some of the most important default settings and the subsequent
chapters will cover all the features in detail. If you are familiar with network
configuration, review these settings to verify that they meet the requirements of your
network and follow the instructions to change them if necessary. If not, use the DR814Q
with the default settings.
Table 3-2 Description of the factory default settings
Item
Default
username/pass
word
Default settings
Administrator:
admin/admin
Common
user/user
user:
Assigned static IP
address:
IP address of
the LAN port
192.168.1.1
Subnet mask:
255.255.255.0
DHCP
DHCP
server
enabled with the
following pool of
addresses:
192.168.1.2
192.168.1.51
to
12
Description
You can log into the Web-based
configuration page as an administrator or
a common user. Different operation rights
are available for different login users.
Refer to 4.4.2 “Password” for detailed
information.
This is the IP address of the DR814Q LAN
port, and LAN users can maintain the
DR814Q through this IP address.
Generally, there is no need to change this
address.
The DR814Q provides a pool of private IP
addresses for dynamic assignment to
PCs in the LAN. To use this service, you
must configure your PC to obtain an IP
address dynamically. Refer to section
7.2.1 “Specifying to Obtain an IP Address
Automatically”.
User Manual
Aolynk DR814Q ADSL2+ Broadband Router
Item
3 Getting Started
Default settings
Description
NAT
NAT enabled
Your PC’s private IP address is translated
to the public IP address whenever it
accesses the Internet. Refer to section
5.2.4 “NAT” for detailed information.
DSL mode
Multimode
Applicable to multiple standard DSL line
modes.
13
User Manual
Aolynk DR814Q ADSL2+ Broadband Router
4
4 Web-based Basic Configuration
Web-based Basic Configuration
This chapter describes the basic configuration pages of the DR814Q for SOHO users
to implement its basic functions. For details of advanced configuration, refer to section
5 “Advanced Configuration”.
4.1 Quick Setup
Click [Quick Setup] in the navigation bar to enter the [Quick Start] page on which you
can perform some simple settings to access the Internet quickly. Here, two common
login types are available: PPPoE and DHCP.
I. PPPoE
Figure 4-1 Quick Setup – PPPoE
The default login type on the page is PPPoE. This type requires you to type in the VPI
and VCI values, PPPoE username and PPPoE password, and service name (optional)
14
User Manual
Aolynk DR814Q ADSL2+ Broadband Router
4 Web-based Basic Configuration
specified by your ISP, and repeat the password for confirmation in the [PPPoE
Password (confirm)] text box.
If your ISP provides the service name, you can specify it in the [Service Name] text box.
If the service name is not needed, keep the box null.
Click <Apply> after the configuration is complete.
II. DHCP
Figure 4-2 Quick Setup – DHCP
If you use DHCP for network access, select the DHCP option on the [Quick Start] page
(see Figure 4-1) and type in the VPI and VCI values specified by your ISP on the page
(see Figure 4-2).
Click <Apply> after the configuration is complete.
Caution:
Do not set the same VPI and VCI values for the DHCP or PPPoE login type.
4.2 WAN Setup
Click [WAN Setup] in the navigation bar to enter the corresponding page show in Figure
4-3, where you can configure WAN services, DNS relay and DDNS (dynamic DNS)
functions, and PVC scan settings.
15
User Manual
Aolynk DR814Q ADSL2+ Broadband Router
4 Web-based Basic Configuration
Figure 4-3 WAN setup page
4.2.1 WAN
This page allows you to configure WAN services in detail, or to modify attributes of
services that you configured in the quick setup page. You can access the Internet
normally only when these attributes are set correctly.
I. WAN service list
Figure 4-4 WAN service list
The WAN service list contains configuration about each WAN connection service
created on the DR814Q. For service modification and advanced configuration, refer to
section 4.2.1 II. “Create a new service”. To delete an existing WAN service, click the
corresponding <Delete…> button.
16
User Manual
Aolynk DR814Q ADSL2+ Broadband Router
4 Web-based Basic Configuration
Caution:
The first two items in the WAN service list are default services and cannot be deleted.
You can only delete those you have created.
II. Create a new service
Below the [WAN Services] section, the [Create New Service] section is for creating
WAN connection services. You can select one from the four options of the [Connection]
drop-down list: DHCP/StaticIP, IPoA, PPPoA and PPPoE, and the corresponding
settings will be listed in the lower part of the page. The four options are described
below.
1)
DHCP/Static IP
The IP address in this mode can be manually specified (Use the following IP Address)
or automatically assigned by your ISP (Obtain an IP Address Automatically). The
former requires you to manually specify the DNS server address on the [DNS Relay]
page. For details, refer to section 4.2.2 “DNS Relay”.
Figure 4-5 DHCP/Static IP
17
User Manual
Aolynk DR814Q ADSL2+ Broadband Router
4 Web-based Basic Configuration
Table 4-1 Description of DHCP/Static IP items
Item
Description
Name
Type in the distinctive description on this service.
Default route
Specify (true/false) whether to generate a default route for
this service.
VPI
Type in the VPI value provided by your ISP.
VCI
Type in the VCI value provided by your ISP.
Encapsulation
method
Select the packet encapsulation method, LlcBridged or
VcMuxBridged, from the drop-down list according to your
ISP. LlcBridged is usually selected.
Obtain an IP Address
Automatically
Select this option to obtain an IP address from your ISP’s
DHCP server automatically.
Use the following IP
Address
Select this option if you have the static IP address provided
by your ISP. You need also provide the IP address, subnet
mask and gateway address.
WAN IP Address
Type in the static IP address provided by your ISP.
Subnet Mask
Type in the subnet mask provided by your ISP.
Gateway
Type in the IP address of the next-hop gateway device.
2)
IPoA
IPoA allows IP packets directly over the ADSL physical link at high transmission rate.
Figure 4-6 IPoA
18
User Manual
Aolynk DR814Q ADSL2+ Broadband Router
4 Web-based Basic Configuration
Table 4-2 Description of IPoA items
Item
Description
Name
Type in the distinctive description on this service.
VPI
Type in the VPI value provided by your ISP.
VCI
Type in the VCI value provided by your ISP.
Encapsulation
method
Select the packet encapsulation method,, LlcRouted or
VcMuxRouted, from the drop-down according to your ISP.
LlcRouted is usually selected.
WAN IP Address
Type in the static IP address provided by your ISP.
Subnet Mask
Type in the subnet mask provided by your ISP.
Gateway
Type in the IP address of the net-hop gateway device.
3)
PPPoA
Figure 4-7 PPPoA
Table 4-3 Description of PPPoA items
Item
Description
Name
Type in the distinctive description on this service.
Default route
Specify (true/false) whether to generate a default route for this
service.
VPI
Type in the VPI value provided by your ISP.
VCI
Type in the VCI value provided by your ISP.
User name
Type in the username provided by your ISP.
Password
Type in the password provided by your ISP.
19
User Manual
Aolynk DR814Q ADSL2+ Broadband Router
4 Web-based Basic Configuration
Item
Description
User Idle Timeout
Type in the auto-disconnect idle time. Network connection is
disconnected automatically in the case of no data transmission
within the set time. This is suitable for time-based network
accounting. If the time is set to 0, it indicates that the
connection is never disconnected.
4)
PPPoE
PPPoE configuration is similar to PPPoA configuration, and therefore you can refer to
Table 4-3 for related description. Generally, ATM-related parameters can adopt default
values. Refer to section 5.1 II. “QoS configuration” for parameter description.
Caution:
z
Do not set the same VPI and VCI values for different services.
z
Two WAN services can be created at most.
4.2.2 DNS Relay
The DR814Q has the DNS relay function. When the DNS server address on your PC is
the IP address of the LAN port, the DR814Q forwards the DNS query from your PC to
the DNS server set on the DR814Q.
When your ISP changes the DNS server or you modify the connected ISP, there is no
need to modify the IP address of the DNS server on your PC.
Click the [DNS] tab of the WAN setup page and the DNS relay setting page shown in
Figure 4-8 appears. Type in the DNS server IP address(es) provided by your ISP.
Generally, the IP address of the primary DNS server is used, and the secondary is
adopted in case the primary one becomes unavailable.
Figure 4-8 DNS relay settings
20
User Manual
Aolynk DR814Q ADSL2+ Broadband Router
4 Web-based Basic Configuration
4.2.3 DDNS
By way of PPPoE or dynamic IP, the IP address that the WAN port obtained is unfixed,
making it inconvenient for the Internet users to access the LAN server. DDNS solves
this problem. After you set the DDNS function, the DR814Q update the mapping
between the domain name and the IP address automatically, ensuring the Internet
users to access the LAN through the domain name.
Click the [DDNS] tab of the WAN setup page to enter the page shown in Figure 4-9.
Figure 4-9 DDNS settings
Table 4-4 Description of DDNS items
Item
Description
DDNS
Select Enable or Disable to enable or disable the DDNS
function.
IP interface
Select the interface on which you want to enable the DDNS
function.
Service Name
Select the web site where to obtain the DDNS service.
User Name
Type in the username you register with the DDNS server.
Password
Type in the password you register with the DDNS server.
Host Name
Type in the domain name you apply from the DDNS server.
Status
Display the status of the DDNS function.
21
User Manual
Aolynk DR814Q ADSL2+ Broadband Router
4 Web-based Basic Configuration
Note:
As the client tool of the DDNS service, the DDNS function must cooperate with the
DDNS server. Visit www.3322.org, www.dyndns.org or www.tzo.com to apply for a
domain name before you enable the DDNS function. After you complete the DDNS
settings on the DR814Q, the mapping between the domain name and the IP address of
the WAN port is established.
Example: If you have applied for the domain name lullaby from www.3322.org, see
Figure 4-9 for the settings to make the mapping between the domain name and the IP
address of the WAN port on the DR814Q.
4.2.4 Scan PVC
The PVC scan function allows you to search the currently unused PVC settings. If your
ISP has configured PVC services within the scannable range, after the scan, these
PVC services will be automatically configured to the service list on the [WAN
Connections] page.
Click the [Scan PVC] tab of the WAN setup page to enter the [Scan PVC] page shown
in Figure 4-10.
Figure 4-10 Scan PVC
Click <Start Scan> to start the scan, which may take about five minutes.
22
User Manual
Aolynk DR814Q ADSL2+ Broadband Router
4 Web-based Basic Configuration
Figure 4-11 Scan PVC
As shown in Figure 4-11, one PVC is found. Click [WAN Setup] in the navigation bar,
you will find that one service found by the DR814Q is automatically added to the WAN
service list, as shown in Figure 4-12.
Figure 4-12 Add the found services automatically
If the PPPoE or PPPoA service is found and it needs confirmation by username and
password, you need to edit this automatically added service by typing in a username
and a password.
4.3 LAN Setup
Click [LAN Setup] in the navigation bar to enter the corresponding page, where you can
make LAN port and DHCP configurations, and view DHCP client information.
4.3.1 LAN
This page allows you to set IP address for the LAN port and to configure virtual
interfaces.
23
User Manual
Aolynk DR814Q ADSL2+ Broadband Router
4 Web-based Basic Configuration
Figure 4-13 LAN connections
I. Set a LAN port
To change the IP address of the LAN port, type in the new IP address and subnet mask
directly in the corresponding fields of the [LAN Interface] section, and then click
<Apply>. By default, the IP address of the LAN port and subnet mask for the DR814Q
are 192.168.1.1 and 255.255.255.0 respectively.
Caution:
After modifying the IP address of the LAN port, the new address is needed for logging
into the Web-based configuration page. For example, the IP address of the LAN port is
changed to 192.168.2.1, and then you need to input http://192.168.2.1 to log into the
Web-based configuration page. Before logging in, be sure to update your PC’s IP
address to make it in the same network segment with the DR814Q according to
instructions on the [LAN Connection] page.
II. Create a virtual interface
You can create a virtual interface for the DR814Q, and manage the DR814Q through
the IP address of the network segment where the virtual interface is located. This IP
address, in a different network segment with the LAN Interface of the DR814Q, can
also be used by the DMZ (demilitary zone) server and virtual server. In this way, the
virtual interface enables better network security.
To create a virtual interface, type the IP address and subnet mask for the virtual
interface in the fields of the [Virtual Interface] section, and click <Apply>. Note that the
24
User Manual
Aolynk DR814Q ADSL2+ Broadband Router
4 Web-based Basic Configuration
IP address of the virtual interface cannot be within the same subnet with that of the LAN
port.
4.3.2 DHCP Server
The DR814Q can act as a DHCP server to automatically assign IP addresses within a
certain range to any PC running in the LAN.
Click the [DHCP] tab of the LAN setup page to enter the corresponding page shown in
Figure 4-14, where you can configure DHCP server and DHCP relay.
Figure 4-14 DHCP settings
I. DHCP status
z
Enable: Enable the DHCP server (default).
z
Disable: Disable the DHCP server.
z
DHCP Relay: Enable the DHCP relay.
II. DHCP server
The DR814Q can act as a DHCP server and automatically assign IP addresses,
according to the range defined in this page, to running PCs in the LAN.
To make the DR814Q assign IP address to the DHCP client sending a request, select
the Enable option in the [DHCP] status section, type in the start IP address and end IP
address in the proper fields, and then click <Apply>.
If necessary, you can type in commonly used DNS suffixes such as local.lan in the
[Local Domain Name] text box. Thus, you can access the Web server whose host name
is qqq by entering http://qqq in the Web browser instead of http://qqq.local.lan. Small
and medium–sized enterprises can also set their own DNS suffixes here while home
users need not.
25
User Manual
Aolynk DR814Q ADSL2+ Broadband Router
4 Web-based Basic Configuration
III. DHCP relay
The DR814Q offers the DHCP relay function to forward packets between a DHCP client
and a DHCP server that are in different network segments, thereby making DHCP
clients on multiple networks use the DHCP server across network segments.
To allow communications between DHCP clients with a DHCP server through the relay
function of the DR814Q, select the DHCP Relay option in the [DHCP] status section,
and then type the IP address of the DHCP server in the corresponding field.
Caution:
To make DHCP relay work properly, note to disable NAT and the firewall on the
corresponding service interface, that is, the service interface set for the DHCP server in
route configuration.
z
To disable NAT, click the [NAT] tab on the security setup page, and then set [NAT
Setting] as Disable for the corresponding interface.
z
To disable the firewall, click the [Firewall] tab on the security setup page, and then
set [Security Setting] as Disable.
4.3.3 DHCP client
Click the [DHCP Clients] tab of the LAN setup page to enter the DHCP client setting
page shown in Figure 4-15. This page provides the current IP address assignment
information of the DHCP server, including the host name, IP address and MAC address.
You can click <Refresh> to get the latest data.
Figure 4-15 DHCP client information
4.4 Device
Click [Device] in the navigation bar to enter the corresponding page, where you can
change the Web page login password, configure remote management, backup/restore
configuration or reboot/update the DR814Q..
26
User Manual
Aolynk DR814Q ADSL2+ Broadband Router
4 Web-based Basic Configuration
4.4.1 Restarting/Restoring Factory Default Settings
This page allows you to restart the DR814Q, or reset all configurations to factory default
settings.
Figure 4-16 Restart page
To restart the DR814Q, click <Restart>.
To reset all configurations to the factory default settings, select the [Reset to factory
default settings] check box and click <Restart>.
Note:
Another method to restore the factory default settings is to press the Reset button on
the rear panel of the DR814Q and hold it down for about five seconds.
4.4.2 Password
Click the [Password] tab of the device setup page to enter the corresponding page. You
can access the Web-based configuration page of DR814Q via two usernames: admin
and user. The administrator has the maximum rights while the common user can only
access part of the configuration pages. Only the administrator can enter the password
setting page to change the login passwords for the two users. The common user can
only change its own password.
27
User Manual
Aolynk DR814Q ADSL2+ Broadband Router
4 Web-based Basic Configuration
Figure 4-17 Change the password
By default, admin and user are the passwords for administrator and common user
respectively.
To change the password, type in the related information in the [Old Password], [New
Password] and [Confirm Password] text boxes, and then click <Apply>.
4.4.3 Remote Access
If remote access is enabled, you can view the current configuration page and manage
the DR814Q remotely.
Click the [Remote] tab of the device setup page to enter the corresponding page shown
in Figure 4-18.
Figure 4-18 Remote access – disabled
By default, the remote access is disabled. You can set the timeout value in the textbox.
Thus, when remote access is enabled, if no remote operation is made, the DR814Q
tracks the elapsed idle time. When the elapsed idle time exceeds the timeout value set
here, the DR814Q will terminate the remote connection to avoid remote attacks. The
idle timeout value is set to 0 by default, that is, not to terminate the remote connection.
28
User Manual
Aolynk DR814Q ADSL2+ Broadband Router
4 Web-based Basic Configuration
You can click <Enable> to enable remote access, as shown in Figure 4-19.
Figure 4-19 Remote access – enabled
Figure 4-19 indicates the port for remote management is 8000, so you can manage the
DR814Q remotely by entering http://xxx.xxx.xxx.xxx:8000 in your Web browser. The
xxx.xxx.xxx.xxx is the IP address of the WAN port on the DR814Q. If multiple WAN
services are configured and all of them obtain the IP addresses, the IP address of any
service can be used for remote access.
To disable the remote access, click <Disable> on the page.
Caution:
A remote connection is maintained only when the idle timeout time is set to 0. If you set
another value and save the configuration, remote access will begin a new timing circle
after the DR814Q restarts.
4.4.4 Backing Up/Restoring Configuration
Click the [Backup] tab of the device setup page to enter the corresponding page. This
page allows you to back up the current configuration to your PC, or restore the
configuration from a previously saved file.
I. Back up the current configuration
Click <Backup> to open the [File Download] dialog box as below.
29
User Manual
Aolynk DR814Q ADSL2+ Broadband Router
4 Web-based Basic Configuration
Figure 4-20 File Download dialog box
Click <Save> to open the [Save As] window as below.
Figure 4-21 Save the configuration file
Select a directory to save the file and type in a valid file name (with the .icf suffix), and
then click <Save> to back up the current configuration to the file.
II. Use the file to restore the configuration
To use the previously saved file to restore the configuration, click <Browse…> to open
the [Choose file] window shown in Figure 4-22.
30
User Manual
Aolynk DR814Q ADSL2+ Broadband Router
4 Web-based Basic Configuration
Figure 4-22 Choose the backup file
Find the configuration file and then click <Open> to open the page as below. Click
<Restore> to use the file to restore the configuration.
Figure 4-23 Restore the configuration
Caution:
Make sure the correct configuration file is adopted for your restoration. Wrong
configuration files may cause abnormal operation of the device.
31
User Manual
Aolynk DR814Q ADSL2+ Broadband Router
4 Web-based Basic Configuration
4.4.5 Upgrade
Click the [Upgrade] tab of the device setup page to enter the corresponding page
shown in Figure 4-24, where you can upgrade the DR814Q software.
Figure 4-24 Software upgrade
Type in the local path of the software update file downloaded from Huawei technical
support website, or click <Browse…> to select this file on your PC and then click
<Update>.
When the update is complete, you need to restart the DR814Q by clicking <Restart>.
Note:
After the upgrade and restart, you are recommended to restore factory default settings
to ensure the normal device operation.
Click <Huawei> to access Huawei technical support website to obtain the latest
software version.
4.5 Status
Click [Status] in the navigation bar to enter the corresponding page, where you can
view the DR814Q status, log information and interface information.
4.5.1 Status
This page lists the current information about the DR814Q, including WAN connections,
LAN settings and software status.
32
User Manual
Aolynk DR814Q ADSL2+ Broadband Router
4 Web-based Basic Configuration
Figure 4-25 Status page
4.5.2 Data Transmission Channels
Click the [Channels] tab of the status page to enter the corresponding page shown in
Figure 4-26, where you can click <Show Statistics> to view details of each data
transmission channel.
33
User Manual
Aolynk DR814Q ADSL2+ Broadband Router
4 Web-based Basic Configuration
Figure 4-26 Data transmission channel status
4.5.3 Port Status
Click the [Ports] tab of the status page to enter the corresponding page shown in Figure
4-27, where you can click any link (displayed in blue) of the “Port” column to show
related status information, such as connections on this port and received/sent packets.
Figure 4-27 Port status
4.5.4 Log
Click the [Log] tab of the status page to enter the corresponding page, which records all
types of events occurring during the running of the DR811/814.
34
User Manual
Aolynk DR814Q ADSL2+ Broadband Router
4 Web-based Basic Configuration
Figure 4-28 Log
Click <Refresh> to show the latest information.
Click <Clear these entries> to clear the currently displayed events.
4.6 Saving the Configuration
After all the configurations are complete, click [Save Config] in the navigation bar to
enter the [Save configuration] page. Click <Save> to save your configurations so that
they take effect when the DR814Q restarts.
Figure 4-29 Save the configuration
Caution:
Do save your configurations, otherwise, they will be lost after the DR814Q restarts.
35
User Manual
Aolynk DR814Q ADSL2+ Broadband Router
5
5 Advanced Configuration
Advanced Configuration
After you complete the proceeding configuration correctly, the DR814Q can access all
Internet services. This chapter introduces how to configure the advanced functions of
the DR814Q to enhance the performances, thereby satisfying various demands on
network configuration.
5.1 Attaching LAN Ports to PVCs
Click [LAN/PVC] to enter the PVC attachment page. You can attach the Ethernet port to
a PVC and set the corresponding QoS parameters for PVC.
I. PVC attachment settings
With the PVC attachment function, you can attach any one or ones of the four LAN
ports to any of the four upstream PVCs, while each port can be attached to only one
PVC. Each PVC bridges data through the bound LAN port(s) to the broadband access
server (BAS) to accommodate different Internet services through different LAN ports.
Services such as the Internet accessing, video-on-demand (VOD), and IPTV carried
out by different access servers separate services effectively and can ensure enough
bandwidth for services with high priorities.
You can also configure an Ethernet port as a management port to manage devices. You
can access the configuration management page of your DR814Q through a host that is
connected to the management port. By default, the four LAN ports of the DR814Q are
all the management ports (Attach to Router).
36
User Manual
Aolynk DR814Q ADSL2+ Broadband Router
5 Advanced Configuration
Figure 5-1 PVC attachment settings
As Figure 5-1 shows, there are five options for each Ethernet port (LAN1 to LAN4) in
the drop-down list: Attached to PVC1/2/3/4 and Attached to Router (Default).
Upon the configuration of these LAN ports, you need to click <Apply> to save your
configuration and have it take effect. Then in the [PVC Setting] section set VPIs/VCIs
for the corresponding PVCs. Values of VPI/VCI are provided by your ISP. Click <Apply>
in this section to save your configuration.
Caution:
z
You can manage your DR814Q only through the PC connected to the management
port or the USB port.
z
It is recommended to configure at least one Ethernet port as management port. If all
the four Ethernet ports are configured to be bound to PVCs, you can still access the
configuration management page through the USB port. Refer to Chapter 8
“Appendix – USB Configuration” for more information about the USB port.
z
The VPI/VCI values of different PVCs cannot be identical with each other or the
same as those on the other configuration pages.
The following example illustrates the configuration upon the assumption:
37
User Manual
Aolynk DR814Q ADSL2+ Broadband Router
z
5 Advanced Configuration
Attach a LAN port to PVC 16/35 to access the IPTV Website that your ISP set up.
The Website uses DHCP to assign IP addresses dynamically.
z
Attach other two LAN ports to PVC 16/100, and the PCs connecting to these ports
access the Internet through PPPoE dial-up connections.
z
Set the last LAN port as the management interface and apply NAT-enabled
PPPoE service on it. Attach it to PVC 8/35. The username and password your ISP
assigns are userName and myPassword respectively.
Follow these steps to achieve the settings on your DR814Q.
1)
On the [Ethernet Port Attachment Setting] page (see Figure 5-2), select the
Attached to PVC1 option from the LAN1 drop-down list to attach LAN1 to PVC1
and attach LAN2 and LAN3 to PVC2 in the same way. Leave the LAN4 default
setting Attached to Router untouched. Click the <Apply> to save your
configuration.
2)
In the [PVC Setting] section, set 16/35 as the VPI/VCI value of PVC1, 16/100 as
that of PVC2. Click <Apply> in the [PVC Setting] section to save your settings.
Since you do not use PVC3 and PVC4 here, there is no need to specify VPI/VCI
values for them.
Figure 5-2 Actual configuration on the Attachment Setting page
3)
Verify the attachment of the LAN ports to the PVCs. Connect a PC that is
configured to obtain an IP address automatically to port LAN1. Wait for a while and
the PC can obtain an IP address, and then you can access the IPTV website of
38
User Manual
Aolynk DR814Q ADSL2+ Broadband Router
5 Advanced Configuration
your ISP. Similarly, connect PCs to ports LAN2 and LAN3 and access the Internet
by PPPoE connection. After you enter the username and password, the PC can
obtain an IP address quickly and set up a connection with the website.
4)
Access the Internet on a PC through the management port (LAN4). Click [Quick
Setup] in the navigation bar and select the PPPoE option on the [Quick Setup]
page. Set the values of VPI and VCI to 8 and 35 respectively, type userName,
myPassword, and myPassword in the PPPoE Username, PPPoE Password,
and PPPoE Password (confirm) text boxes respectively and then click <Apply> to
save your settings.
Figure 5-3 Set the PPPoE authentication information
5)
It takes about two minutes for your settings to take effect. Figure 5-4 depicts these
settings. Actual configuration on the WAN connections page Click [Status] in the
navigation bar to bring up the [Status] page as shown in Figure 4-25. You can find
that the WAN IP Address item is a public IP address instead of the original one
0.0.0.0. Then you can access the Internet through a PC connected to the LAN4
port.
39
User Manual
Aolynk DR814Q ADSL2+ Broadband Router
5 Advanced Configuration
Figure 5-4 Actual settings on the Status page
II. QoS configuration
For the upstream packets over an ADSL line, your DR814Q supports multiple
asynchronous transfer mode (ATM) services, such as CBR, VBR-rt, VBR, UBR, and
ABR. DR814Q provides different measures, caching space, scheduling priorities, and
service shaping to allocate appropriate bandwidth to ATM services of different types.
This ensures high-performance QoS.
Click <QoS Setting…> in the [PVC Setting] section as shown in Figure 5-1 to enter the
[QoS Config] page of a corresponding PVC as below.
Figure 5-5 QoS Config page
You can set different ATM service types for specified PVCs from the ATM Traffic Class
drop-down list and configure QoS parameters for the selected service type. For more
information, refer to Table 5-1.
40
User Manual
Aolynk DR814Q ADSL2+ Broadband Router
5 Advanced Configuration
Table 5-1 Description of commonly used ATM service types
Service type
Description
UBR
(unspecified
bit rate)
Suitable for services that are not real-time-critical and with large
burst traffic. UBR demands best-effect services on the network
side. When applying for services, you are not required to set QoS
parameters except for PCR, which limits the upper rate. The
network side does not guarantee QoS for UBR services. UBR cells
will be discarded first in a network congestion. Error correction is
carried out by upper-layer protocols. Typical applications are FTP
and E-mail.
CBR
(constant
rate)
bit
Suitable for services that require static bandwidth and demand the
highest priority. This type of service can provide stable traffic with
the minimum burst. Only PCR parameter is needed for CBR
service application. The source can transmit cells at a negotiated
PCR or a rate lower than it. Typical applications are circuit and
emulated voice.
VBR-rt
(real-time
variable
bit
rate)
Sensitive to delay and jitter of data flow. Similar to CBR except that
they are delay- and jitter-sensitive. VBR-rt services allow limited
burst. The transmission rate on source side can be different at
different time. The parameters required for VBR-rt service
application include PCR, SCR, and MBS or BT. Typical VBR-rt
applications are voice, interactive video services and IPTV.
VBR
(non-real-time
variable
bit
rate)
Suitable for bursting non-real-time services. Compared to VBR-rt,
a distinct feature of VBR services is that demands of real-time are
not so crucial, and the priority for service data processed on the
network side is also lower than that of VBR-tithe parameters
required by VBR services include PCR, SCR, and MBS (or BT), the
same as that of VBR-rt.
Keep the default value unchanged for those options unrelated to the configuration. As
shown in Figure 5-5, if the VBR-rt option is selected from the ATM Traffic Class
drop-down list, you need to set values for Peak Cell Rate, Max Burst Size, and
Sustainable Cell Rate and leave 0 in the Burst Tolerance and Minimum Cell Rate text
boxes.
An example is taken to explain how to configure ATM QoS parameters.
Suppose that:
The actual upstream rate of ADSL is 896 Kbps, and two PVCs (PVC1 and PVC2) are
configured on a single ADSL line. PVC1 is used for network access, with not much
real-time requirement. PVC2 is used for real-time video conferencing, requiring a least
upstream/downstream rate of 384 Kbps.
Analysis:
A total upstream rate of 896 Kbps is configured for PVC1 and PVC2. Audio and video
services carried out over them may be interfered. For example, an uploading service,
which consumes a bandwidth larger than 500 Kbps, bursts on PVC1 when a video
41
User Manual
Aolynk DR814Q ADSL2+ Broadband Router
5 Advanced Configuration
conference is carried out over PVC2. This results in the available bandwidth for PVC2
less than 384 Kbps, thus causing the audio and video service interrupted.
To avoid the above problem. configure QoS parameters for PVC2 as shown in Figure
5-5. For PVC1, keep the default UBR settings. Thus, PVC1 can occupy all the
upstream bandwidth when there is no traffic on PVC2, and PVC2 can always be
guaranteed with sufficient bandwidth for audio and video services over it. This ensures
normal upload over PVC1 and non-interrupted real-time communication over PVC2.
Note:
QoS parameters for WAN services mean the same as those for LAN/PVC attachment.
5.2 Security
Click [Security] in the navigation bar to enter the corresponding page, where you can
configure the virtual server, firewall policy, trigger and IDS function.
5.2.1 Virtual Server
Figure 5-6 Virtual server settings
I. Set the interface
Before configuring the virtual server, you need to select a service interface in the [IP
Interface] drop-down list. The virtual server and DMZ host will run on this interface.
42
User Manual
Aolynk DR814Q ADSL2+ Broadband Router
5 Advanced Configuration
II. Set the virtual server
When NAT (network address translation) is enabled on an internal network device,
access to it from the Internet will be forbidden. In this case, a virtual server is needed if
you want to provide public services (Web services, E-mail, FTP, for example) to outside.
Although the internal address is still inaccessible for external users, the DR814Q can
identify service requests and forward them to the virtual server.
Table 5-2 Description of virtual server setting items
Item
Description
Internal Address
Type in the IP address of the internal PC that will provide the
application service.
Protocol
Select the protocol of the application service.
External
Range
Port
Internal Port Range
Type in the range of ports that the application provides for
access from outside.
Type in the range of ports that the application actually uses.
After the configuration, click <Add>. The virtual server is added to the virtual server list.
You can click <Delete> to delete the corresponding virtual server.
Example: To configure the PC with the address 192.168.1.100 as a virtual server to
provide an FTP service for the outside (with the port number 21), refer to the
configuration in Figure 5-6. Thus, all FTP requests from the Internet users will be
forwarded to the PC (server) with the fixed IP address 192.168.1.100.
Caution:
The values for [Internal Port Range] and [External Port Range] should be set as the
same, or the configuration will fail.
III. Set the DMZ host
The Demilitarized Zones (DMZ) host is actually a default virtual server. When the
DR814Q receives a connection request from the external network, it first searches the
virtual service list for a matching item. If a corresponding item is found, the DR814Q
forwards the request message to the corresponding virtual server. Otherwise, it
forwards the message to the DMZ host.
Type the IP address of the PC to be used as the DMZ host in the [DMZ Host IP Address]
field.
43
User Manual
Aolynk DR814Q ADSL2+ Broadband Router
5 Advanced Configuration
Caution:
Be sure to configure a LAN static IP address for each PC that acts as the virtual server
or DMZ host.
5.2.2 Firewall
With the firewall function, you can configure limit on outgoing and/or incoming data,
thus securing the network effectively. Click the [Firewall] tab of the security setup page
to enter the corresponding page shown in Figure 5-7.
Figure 5-7 Firewall settings
I. Enable/disable the firewall
To enable/disable the firewall, select the corresponding Enable/Disable option, and
then click <Apply>. The firewall is disabled by default.
II. Set the firewall level
You can choose one from the firewall levels, each corresponding to a port filtering
policy that limits outgoing and/or incoming data of a specific protocol. The proper policy
is displayed as you set one of the following firewall level in the drop-down list:
z
high: Indicates that the internal users have some access rights and the external
users have no access right.
z
medium: Indicates that the external and internal users have more access rights
than “high”.
44
User Manual
Aolynk DR814Q ADSL2+ Broadband Router
z
5 Advanced Configuration
low: Indicates that the external and internal users have more access rights than
“medium”.
z
default: Indicates that the internal users can access all the Internet services, while
the external users are prevented to access the internal network.
III. Configure port filtering policies
You can configure port filtering policies manually to meet the actual demands.
Table 5-3 Description of port filtering policy setting items
Item
Description
Type in a description of the port filtering policy to identify
it.
Description
Address
Type in the source IP address. The default address
0.0.0.0 indicates any node on the network.
Mask
Type in the subnet mask of the source. The default mask
0.0.0.0 indicates any node on the network.
Address
Type in the destination IP address. The default address
0.0.0.0 indicates any node on the network and is usually
adopted.
Mask
Type in the subnet mask of the destination. The default
mask 0.0.0.0 indicates any node on the network and is
usually adopted.
Source
Destination
IP Protocol
Destination Port
Range
Select a protocol type (TCP, UDP or ICMP) from the
drop-down list and apply the filtering policy to the packets
of this type.
Type in the port range of the destination. Generally, this
parameter needs to be set. For example, to control Web
services, type in the corresponding port number 80. To
control FTP services, type in the port number 21.
Inbound
The direction of inbound data. Select the Allow option to
permit external hosts to access internal hosts. Select the
Block option to forbid external hosts to access internal
hosts.
Outbound
The direction of outbound data. Select the Allow option to
permit internal hosts to access external hosts. Select the
Block option to forbid internal hosts to access external
hosts.
Click <Add> after the configuration. This policy will be added to the list of port filtering
policies. You can click <Delete> to delete the corresponding policy.
Example: External hosts are not allowed to ping the WAN port of the DR814Q when the
security level is set to “low”. To allow the internal hosts and external hosts to ping each
other, you can perform the configuration as shown in Figure 5-8 and Figure 5-9.
45
User Manual
Aolynk DR814Q ADSL2+ Broadband Router
5 Advanced Configuration
Delete the settings that forbid external hosts to ping the WAN port of the DR814Q. Note
that the protocol type of ping is ICMP.
Figure 5-8 Configure port filtering policy – delete the settings
Add settings that permit external hosts to ping the WAN port of the DR814Q.
Figure 5-9 Configure port filtering policy – add new settings
Caution:
Any request mismatching no filtering policy will be blocked by the firewall.
5.2.3 Trigger
A trigger is used to deal with application protocols that set up separate sessions. Some
application protocols, such as NetMeeting, open the primary sessions and secondary
connections at the same time during the normal operations. The trigger tells the
security mechanism to handle these secondary sessions and instruct it how to handle
them. The trigger handles the situation dynamically, allowing the secondary sessions
only when appropriate. These newly triggered sessions are not restricted by the
firewall.
Click the [Trigger] tab in the security setup page to enter the corresponding page shown
in Figure 5-10.
Figure 5-10 Trigger settings
46
User Manual
Aolynk DR814Q ADSL2+ Broadband Router
5 Advanced Configuration
Table 5-4 Description of trigger setting items
Item
Description
Transport Type
Transport type of the trigger port. From the drop-down list,
select a transport type (TCP or UDP) to which the newly added
trigger is specified.
Port Range
Port range of the trigger port. (1 – 65535)
Triggered
Range
Port
Port range of the triggered port. (1024 – 65535)
5.2.4 NAT
The NAT technology can translate the internal private address of a PC in the LAN into a
valid public IP address, and thus the PC can communicate with the WAN. Click the
[NAT] tab of the security setup page to enter the corresponding page shown in Figure
5-11.
Figure 5-11 NAT settings
I. Configure NAT
Before configure NAT, select a service interface from the [IP Interface] drop-down list so
that NAT and static NAT run on this interface.
Select the Enable/Disable option behind “NAT” to enable/disable NAT.
II. Configure static NAT
The [Static NAT] section is used to configure NAT conversion items. Public IP
addresses correspond to private IP addresses in a one-by-one way.
47
User Manual
Aolynk DR814Q ADSL2+ Broadband Router
5 Advanced Configuration
Table 5-5 Description on static NAT setting items
Item
Description
Global Address
Type in the public IP address.
Internal
Address
Type in the corresponding private IP address.
5.2.5 IDS
IDS can protect the network from external attacks. Click the [IDS] tab of the security
setup page to enter the corresponding page shown in Figure 5-12.
Figure 5-12 IDS settings
z
Intrusion Detection: Select the Enabled/Disabled option to enable/disable IDS .
z
Intrusion Logging: When this function is enabled, intrusion detection information
will be recorded in the log.
5.3 Route Configuration
Click [Route] in the navigation bar to enter the corresponding page, where you can
configure static and dynamic routes.
5.3.1 Static Route Configuration
The static route configuration makes the DR814Q to communicate with PCs on
different network segments. This option allows you to create static IP routes to
destination addresses by an IP interface name or a gateway address.
48
User Manual
Aolynk DR814Q ADSL2+ Broadband Router
5 Advanced Configuration
Figure 5-13 Route configuration
The route list displays details of all active routes on the DR814Q.
You can configure static routes manually. The setting items are listed in Table 5-6.
Table 5-6 Description of static route setting items
Item
Description
Destination
Type in the destination IP address, that is, the IP address of the
termination (target network or host that data to be sent to) for the
static route.
Netmask
Type in the subnet mask, which determines the network address
and host address parts of the IP address.
Gateway
Type in the IP address of the gateway device through which the
DR814Q communicates with the destination network or host.
Interface
Select the service interface that runs this route. The default
option none indicates that no interface is needed.
Cost
Type in the hop count from the DR814Q to the destination.
Advertise
Set whether to advertise (true/false) the route through RIP.
Caution:
For DHCP or Static IP services, you must type in the next hop address in the [Gateway]
filed (you cannot leave it blank), while for the [Interface] drop-down list, you can keep
the default value (none) or select the corresponding interface.
For other services (IPoA, PPPoA, and PPPoE), you can specify a value of either the
interface or the gateway. If both of them are specified, only the interface value takes
effect.
49
User Manual
Aolynk DR814Q ADSL2+ Broadband Router
5 Advanced Configuration
Example: Figure 5-14 illustrates a physical connection that requires static routes.
Figure 5-14 Network diagram for the static route configuration
In Figure 5-14, suppose that a DHCP service is configured for the DR814Q, the
gateway address is 192.200.200.1, and there is a default route to broadband access
server (BAS).A router is connected to another network segment, LAN2 (16.0.0.0/4), on
the WAN side, and the IP address of the WAN port is 192.200.200.81. To make hosts in
LAN1 access hosts in LAN2 normally, you need to create a route as below so that the
DR814Q can choose routes for packets correctly.
Figure 5-15 Example of the static route configuration
5.3.2 Dynamic Route Configuration
The static route configuration makes the DR814Q to learn route information of other
routers on the network through RIP. Click the [RIP] tab on the route setup page to enter
the dynamic route configuration page shown in Figure 5-16.
50
User Manual
Aolynk DR814Q ADSL2+ Broadband Router
5 Advanced Configuration
Figure 5-16 Dynamic route settings
Table 5-7 Description of dynamic route setting items
Item
Description
IP Interface
Select the interface to be configured with RIP.
RIP Send
Select the protocol version (RIP1/RIP2) used to send RIP route
information. “None” indicates not to send route information. It is
recommended to set this parameter the same as the neighboring
router.
RIP Accept
Select the protocol version used to receive RIP route information.
“Both” indicates to receive both RIP1 and RIP2 route information,
and “None” indicates not to receive route information. It is
recommended to set this parameter the same as the neighboring
router.
Send
Multicast
If RIP2 is selected to send RIP route information, this parameter is
required to specify whether to send (true/false) multicast packets.
5.4 Service
Click [Service] in the navigation bar to enter the corresponding page, where you can
configure the DR814Q as an SNTP (simple network time protocol) client, SNMP
(simple network management protocol) proxy or IGMP (Internet group management
protocol) proxy.
5.4.1 SNTP
Configure the DR814Q as an SNTP client and thus you can obtain accurate time/date
information from the corresponding SNTP server.
51
User Manual
Aolynk DR814Q ADSL2+ Broadband Router
5 Advanced Configuration
Figure 5-17 SNTP configuration
Table 5-8 Description of SNTP setting items
Item
Description
Primary/
Secondary /
Tertiary SNTP
Server
Type in the IP address or domain name of the SNTP server. Up to
three SNTP server can be configured. Generally, the DR814Q
obtains time information from the primary SNTP server. It will
switch to the secondary SNTP server if the primary SNTP server
fails, and switch to the tertiary SNTP server if the secondary SNTP
server fails.
Select a Local
Timezone
Select the local time zone from the drop-down list.
5.4.2 SNMP
The DR814Q supports simple network management protocol (SNMP) proxy function,
exchanging SNMP information with the network management sites through SNMP.
Click the [SNMP] tab of the service setup page to enter the corresponding page shown
in Figure 5-18.
52
User Manual
Aolynk DR814Q ADSL2+ Broadband Router
5 Advanced Configuration
Figure 5-18 SNMP Client Setting page
By default, SNMP is enabled. You can click <Disable> to disable it.
You can create an SNMP community in Figure 5-18 and this community will be
displayed in the community list. The DR814Q authenticates the SNMP packets
according to the defined information in the list.
Table 5-9 Description of SNMP setting items
Item
Description
Community Name
Type in the community name, which uniquely identifies an
SNMP community. SNMP packets that mismatch this
community name will be discarded.
Write Enable
Specify the access right for the community. If the Read-Only
option is selected, this community can only view the DR814Q
information; if the Read-Write option is selected, this
community can view or modify the DR814Q information.
Server IP Address
Specify the IP address of the management site sending SNMP
packets. It is recommended that you keep the default setting
0.0.0.0, which indicates the source IP address sending the
SNMP packets is not restricted.
53
User Manual
Aolynk DR814Q ADSL2+ Broadband Router
5 Advanced Configuration
5.4.3 IGMP Proxy
When the LAN host needs a multicast service outside the WAN, you need to enable the
IGMP proxy function. Click the [IGMP] tab of the service setup page to enter the
corresponding page shown in Figure 5-19.
Figure 5-19 IGMP proxy settings
Select a WAN service interface in the [Upstream interface] drop-down list and select
the Enable option to enable the IGMP proxy, so as to provide services for multicast
clients in the LAN.
54
User Manual
Aolynk DR814Q ADSL2+ Broadband Router
6 Troubleshooting
6
Troubleshooting
This chapter gives solutions to problems you may encounter when installing or using
the DR814Q, and provides instructions for using several IP utilities to diagnose
problems. Contact Customer Support if these suggestions do not resolve the problems.
6.1 DR814Q Troubleshooting
Symptom 1: The power LED does not illuminate.
Solution: Check whether:
z
The power adapter that comes with the DR814Q is used.
z
The power adapter is securely connected to the DR814Q and the power socket.
Symptom 2: The ADSL2+ Link LED does not illuminate after the telephone cable is
connected.
Solution: Check whether the telephone cable is securely connected to the ADSL port
and the telephone port.
Symptom 3: The LAN LED does not illuminate after the Ethernet cable is connected.
Solution: Check whether:
z
The power connection is good.
z
The Ethernet cable is securely connected to the port.
z
The correct cable is used. To check this, connect two ends of the cable to the LAN
ports of the DR814Q, observe whether the corresponding LED illuminates. If not,
change the cable and follow the steps described in section 2.3
“Device
Connection” to set up the connection.
z
The PC has an Ethernet NIC installed correctly.
Symptom 4: You forget your password.
Solution: If you have not changed the password, use the default username (admin)
and password (admin).Press the Reset button for about five seconds to restore the
default settings on the DR814Q. Then you can use the default username and
password.
55
User Manual
Aolynk DR814Q ADSL2+ Broadband Router
6 Troubleshooting
Caution:
Resetting the DR814Q removes all the customized settings and restores the default
ones.
Symptom 5: Fail to access the Web-based configuration page.
Solution: Follow the procedures to check whether:
1)
The version of the Internet Explorer is Microsoft Internet Explorer 5.5 or Netscape
6.0 or later.
2)
PC and the DR814Q are in the same network segment.
3)
Use the ping command in an MS-DOS window to check the network connectivity:
z
Ping 127.0.0.1 to see if the TCP/IP protocol is installed.
z
Ping 192.168.1.1 (the default IP address of the gateway) to check for the
connection between the PC and DR814Q in the LAN.
4)
If the physical connections are normal, but you still cannot access the Web-based
configuration pages of the DR814Q, make sure the proxy server and the dialup
connection are disabled.
Symptom 6: Fail to access the Internet with your PC.
Solution: Follow the procedure:
1)
Check whether the ADSL2+ Link LED is solid ON. If not, check the ADSL line
connection.
2)
Check whether the IP address is obtained and you can ping the IP address of the
DR814Q’s LAN port if you configure the PC to obtain the IP addresses of the host
and the DNS server automatically (recommended). Refer to section 6.2.1 “Ping”
for instructions on how to use the ping utility. If you cannot ping the port, check if
the Ethernet cable is correct.
3)
When the current PC is specified with a private IP address, make sure that: The
PC resides in the same segment as that of the DR814Q’s LAN port. The IP
address of the gateway is specified as that of the DR814Q’s LAN port. The IP
address of the DNS is specified as that of the DR814Q’s LAN port or the DNS
Server the ISP allocates. The host is able to ping the IP address of the DR814Q’s
LAN port.
4)
When the host can communicate with the DR814Q normally, but cannot connect
to the Internet, log into the [Status] page of the DR814Q (refer to section 4.5
“Status”) first, and check to see if the WAN port of the DR814Q has obtained the
Internet IP address and if the default route exists.
Symptom 7: You cannot access the Web pages through the PC in the LAN.
Solution: Follow the procedure to check:
56
User Manual
Aolynk DR814Q ADSL2+ Broadband Router
1)
6 Troubleshooting
The DNS server IP address specified on the PC is correct. If you specify the PC to
obtain the DNS server address dynamically, verify with your ISP that the address
configured on the DR814Q is correct, and then you can use the ping utility to test
the connectivity with your ISP’s DNS server.
2)
Generally, if a host can ping the Internet IP address, but cannot open the Web
pages, the DNS server of the ISP is experiencing a failure temporarily. In this case,
you can choose either of the following to solve the problem: Manually change your
PC’s DNS IP address to the address of a normally functioning DNS server. Log
into the Web page of the DR814Q and manually modify the configuration for DNS
Relay (refer to section 4.2.2 “DNS Relay"), and then check by the nslookup
command as instructed in section 6.2.2 “Nslookup”.
Symptom 8: Fail to save the changes made on the Web-based configuration pages.
Solution: Make sure that you click <Apply> to confirm every change you have made.
After completing all the settings, enter the [Save Configuration] page to save them, thus
making them take effect when the DR814Q is powered on next time.
Symptom 9: You can visit most websites successfully, while access to some websites
fails due to timeout. Configuring the DR814Q to operate in the bridge mode and your
PC to establish a dialup connection can solve this problem.
Solution: This may be caused by an over-high MTU value set on the router between
the user end and the website. Usually you can set a small MTU value (1440, for
example) on the detail setting page of the WAN service to avoid this problem. Refer to
section 4.2.1 “WAN” for detailed operations.
Symptom 10: Some services are unavailable once the firewall is enabled.
Solution: As the firewall rules of the DR814Q are very strict, it is recommended
someone familiar with the WAN services and router configuration enable the firewall
and configure the firewall rules. Before the creation of firewall rules, you must be clear
about the Internet service deployment. It is recommended that you disable the firewall.
6.2 Diagnosis Tools
6.2.1 Ping
Use the ping command to check whether your PC can recognize other computers on
the network. A ping command sends messages to the specified computer. If the
computer receives the messages, it replies with the response message. Before using
the command, you must know the IP address of the destination host with which your PC
is trying to communicate.
At the DOS prompt, enter the following command:
ping 192.168.1.1
If the destination host receives the packet, the command prompt window displays the
contents as shown in Figure 6-1.
57
User Manual
Aolynk DR814Q ADSL2+ Broadband Router
6 Troubleshooting
Figure 6-1 Use the ping command – the ping succeeds
If the destination PC is not reachable, the Request timed out message is displayed as
follows:
Figure 6-2 Use the ping command – the ping fails
To check the connectivity with the DR814Q, use the ping command with the default IP
address of the LAN port (192.168.1.1) or the address you assign.
To check the connectivity with the Internet, enter an Internet domain name, such as
www.yahoo.com (216.115.108.243).If you want to look up the IP address of a website,
use the nslookup command as instructed in section 6.2.2 “Nslookup” for details.
For other operating systems running the IP protocol, you can enter the same ping
command at a command prompt or through a system administration utility.
6.2.2 Nslookup
The nslookup command is used to query the IP address associated with a domain
name. You can specify the common domain name and use the nslookup command to
look up in the DNS server (usually located though your ISP).If that name is not in your
ISP’s DNS table, the request is then sent to a higher-level server until the name is found.
The server then returns the associated IP address.
On Windows-based computer, you can execute the nslookup command from the [Start]
menu. Choose [Start/Run] and in the open text box type the following:
58
User Manual
Aolynk DR814Q ADSL2+ Broadband Router
6 Troubleshooting
nslookup
Click <OK> and a command prompt window appears. The [Command Prompt –
nslookup] window is displayed with a bracket prompt (>).At the prompt, type the domain
name of the desired Website, for example www.microsoft.com.
The window displays the associated IP address as shown below.
Figure 6-3 Use the nslookup command
Some websites with heavy traffic use multiple servers to carry the same information. So
it is common to have several IP addresses associated with one Internet domain name.
To exit from the nslookup utility, enter exit.
59
User Manual
Aolynk DR814Q ADSL2+ Broadband Router
7
7 Appendix – TCP/IP Protocol
Appendix – TCP/IP Protocol
7.1 Installing TCP/IP
The PC through which you configure your DR814Q must have the TCP/IP installed. If
you are not sure whether TCP/IP is installed, follow these steps.
Caution:
By default, TCP/IP is installed on Windows 2000/XP. The following steps are described
for the Windows 98/ME/NT.
1)
Choose [Start/Settings/Control Panel].
2)
Double-click the Network Connection icon to open the [Network] dialog box and
click the [Configuration] tab (see Figure 7-1).
3)
Check the list on the [Configuration] tab page to see if the item that contains both
the TCP/IP and the name of the NIC you are currently using exists. If not, click
<Add> to open the [Select Network Component Type] dialog box (see Figure 7-1).
60
User Manual
Aolynk DR814Q ADSL2+ Broadband Router
7 Appendix – TCP/IP Protocol
Figure 7-1 Network dialog box
4)
Double-click “Protocol” from the list of [Select Network Component Type] dialog
box (or click “Protocol” and then click <Add…>) to open the [Select Network
Protocol] dialog box (see Figure 7-2).
Figure 7-2 Select Network Component Type dialog box
5)
Select “Microsoft” from the Manufacturers list in the [Select Network Protocol]
dialog box, double-click “TCP/IP” in the Network Protocols list (or click “TCP/IP”,
and then click <OK>) to return to the [Network] dialog box. Then you can see the
TCP/IP item in the section listing the installed network components.
61
User Manual
Aolynk DR814Q ADSL2+ Broadband Router
7 Appendix – TCP/IP Protocol
Figure 7-3 Select Network Protocol dialog box
6)
Click <Properties> in the [Network] dialog box to open the [TCP/IP Properties]
dialog box (see Figure 7-4). Click the [IP address] tab and select the Obtain an IP
address automatically option. Click <OK> and restart your PC to complete the
TCP/IP installation.
Figure 7-4 TCP/IP Properties dialog box
7.2 Configuring TCP/IP
7.2.1 Specifying to Obtain an IP Address Automatically
If you are running Windows 98/ME/NT, refer to those described in section Figure 7-3 to
specify to obtain an IP address automatically. If you are running Windows 2000/XP,
perform the following operation.
62
User Manual
Aolynk DR814Q ADSL2+ Broadband Router
1)
7 Appendix – TCP/IP Protocol
Choose [Start/Settings/Control Panel] to open the [Control Panel] dialog box.
Double-click the Network Connection icon to open the [Network Connection]
dialog box and then double-click the Local Connection icon to open the [Local
Area Connection Status] dialog box (see Figure 7-5).
Figure 7-5 Local Area Connection Status dialog box
2)
Click <Properties> to open the [Local Area Connection Properties] dialog box (see
Figure 7-6). Click the [General] tab and select Internet Protocol (TCP/IP) in the
[This connection uses the following items:] section, and then click <Properties> to
open the [Internet Protocol (TCP/IP) Properties] dialog box as shown in Figure
7-7.
63
User Manual
Aolynk DR814Q ADSL2+ Broadband Router
7 Appendix – TCP/IP Protocol
Figure 7-6 Local Area Connection Properties
3)
On the [General] tab page of the [Internet Protocol (TCP/IP) Properties] dialog box
select the Obtain an IP address automatically option and click <OK>.
Figure 7-7 Internet Protocol (TCP/IP) Properties dialog box
7.2.2 Specifying a Static IP Address
Since the DR814Q enables the DHCP by default, the PCs in the LAN can obtain related
information dynamically, thus there is no need to assign static IP addresses for PCs in
64
User Manual
Aolynk DR814Q ADSL2+ Broadband Router
7 Appendix – TCP/IP Protocol
the LAN. But in some cases you still need to configure network settings for some or
even all the PCs on a network.
By default, the IP address of the Ethernet port of DR814Q is 192.168.1.1, and the
subnet mask is 255.255.255.0. Generally, you can choose any from 192.168.1.2 to
192.168.1.254 to make your PC in the same segment with 192.168.1.1/24. Follow the
procedure suitable for your operating system to specify IP addresses.
1)
Specify the IP address of your PC.
z
Windows 98/ME/NT: In the [TCP/IP Properties] dialog box (see Figure 7-4), click
the [IP Address] tab and select the Specify an IP address option.
z
Windows 2000/XP: In the [Internet Protocol (TCP/IP) Properties] dialog box (see
Figure 7-7) select the [General] tab, and then the Use the following IP address
option. Type in the IP address and subnet mask in the corresponding fields and
click <OK>.
2)
Specify the IP address of the gateway.
z
Windows 98/ME/NT: In the [TCP/IP Properties] dialog box (see Figure 7-4) select
the [Gateway] tab. Type in the default IP address of your DR814Q (192.168.1.1) in
the [New gateway] text box and click <Add>.
z
Windows 2000/XP: In the [Internet Protocol (TCP/IP) Properties] dialog box (see
Figure 7-7), select the [General] tab. Type in the default IP address of your
DR814Q (192.168.1.1) in the [Default gateway] text box and click <OK>.
3)
Specify the IP address of the DNS server.
z
Windows 98/ME/NT: In the [TCP/IP Properties] dialog box (see Figure 7-4), click
the [DNS configuration] tab and type in the default IP address of your DR814Q
(192.168.1.1) as the DNS server IP address in the corresponding field.
z
Windows 2000/XP: In the [Internet Protocol (TCP/IP) Properties] dialog box (see
Figure 7-7) click <Advanced…> to open the [Advanced TCP/IP Configuration]
dialog box. Click the [DNS] tab and click <Add…>. Type in the default IP address
of the DR814Q (192.168.1.1) in the [DNS server] field and click <Add>.
4)
Making the settings take effect.
z
Windows 98/ME/NT: Click <OK> and restart your PC for the above settings to take
effect.
z
Windows 2000/XP: Click <OK> to make the above settings to take effect.
65
User Manual
Aolynk DR814Q ADSL2+ Broadband Router
8
8 Appendix – USB Configuration
Appendix – USB Configuration
8.1 Installing USB Driver
Make sure the USB function of your PC operates properly.
The Microsoft Windows 98/98 SE/ME/2000/XP supports USB driver. The following
installation procedure is based on Windows XP. Use it for reference when running any
other operating system.
I. Insert the driver CD into the CD-ROM of your PC.
The CD that comes with the DR814Q contains the USB driver.
II. Plug one end of the USB cable into the USB port of the DR814Q, and the
other into the USB port of your PC.
The USB cable has a rectangular Type A connector on one end and a square Type B
connector on the other end. Connect the Type A to your PC and the Type B to the
DR814Q.
To PC
To ADSLEthernet router
Figure 8-1 USB cable connector
66
User Manual
Aolynk DR814Q ADSL2+ Broadband Router
8 Appendix – USB Configuration
III. The [Found New Hardware Wizard] dialog box appears (see Figure 8-2).
Select the Install the software automatically (Recommended) option and
click <Next> to proceed.
Figure 8-2 Find new hardware
IV. The PC searches the CD for the driver configuration file. When this file is
found, the PC begins to install the driver.
Figure 8-3 Install software
67
User Manual
Aolynk DR814Q ADSL2+ Broadband Router
8 Appendix – USB Configuration
The dialog box (see Figure 8-4) appears during installation, warning that the device is
not compatible with Windows XP. Just click <Continue Anyway> to proceed. Microsoft
logo test
Figure 8-4 Microsoft logo test
V. The dialog box (see Figure 8-5) indicates the installation is complete. Click
<Finish> to exit the installation.
Figure 8-5 Complete the installation
8.2 Configuring IP Properties
After the USB driver installation is complete, you need to configure the PC to place it in
the same subnet as the DR814Q USB port. Two options are available to configure the
IP properties:
68
User Manual
Aolynk DR814Q ADSL2+ Broadband Router
z
8 Appendix – USB Configuration
Your DR814Q can be a DHCP server to assign IP addresses to PCs in the LAN, so
you can specify your PC to obtain IP address automatically. Refer to section 7.2.1
“Specifying to Obtain an IP Address Automatically” for detailed information.
z
If you want to specify a static IP address to the PC, follow the instructions in
section 7.2.2 “Specifying a Static IP Address” and use the following information..
The USB port on the DR814Q is preconfigured with these properties:
IP address: 192.168.1.1
Subnet mask: 255.255.255.0
Therefore, your PC should be configured as the following:
IP address: 192.168.1.n (n is an integer ranging from 2 to 254)
Subnet mask: 255.255.255.0
69
User Manual
Aolynk DR814Q ADSL2+ Broadband Router
9
9 Appendix – IP Address and Subnet Mask
Appendix – IP Address and
Subnet Mask
9.1 IP Address
Note:
z
This section refers to the IP address of IPv4 (version 4 of the Internet Protocol) only
and the IP address of IPv6 is not covered.
z
This section describes the basic knowledge of binary numbers, bits, and bytes.
An IP address, like the telephone number on the Internet, is used to identify the
individual node (a PC or network device) on the Internet. Every IP address contains
four sets of numbers, each from 0 to 255 and separated by dots, for example
20.56.0.211. These numbers are called, from left to right, field 1, field 2, field 3, and field
4.
The representation of four sets of digits separated by dots for IP address is called
dotted decimal notation.
9.1.1 Structure of the IP Address
Like a telephone number, the IP address contains two components. For instance, the
first three digits of a seven-digit telephone number identify a group with thousands of
telephone lines, while the last four digits identify a specific line in this group.
Similarly, an IP address contains two components:
z
Network ID
Identify a specific network segment on the Internet or the intranet.
z
Host ID
Identify a specific PC or device on the segment.
70
User Manual
Aolynk DR814Q ADSL2+ Broadband Router
9 Appendix – IP Address and Subnet Mask
The starting part of every IP address is the network ID and the rest is the host Dither
length of the network ID depends on the class of the network (refer to section 9.1.2
“Classes of IP Addresses”). Table 9-1 describes the structure of the IP address.
Table 9-1 Structure of the IP address
Class
Field 1
Class A
Network ID
Class B
Network ID
Class C
Network ID
Field 2
Field 3
Field 4
Host ID
Host ID
Host ID
The following are some valid IP address examples:
Class A: 10.30.6.125 (network ID = 10, host ID= 30.6.125)
Class B: 129.88.16.49 (network ID = 129.88, host ID = 16.49)
Class C: 192.60.201.11 (network ID = 192.60.201, host ID = 11)
9.1.2 Classes of IP Addresses
Three common IP addresses are of Cass A, B, and C. (Class D is for special use and is
beyond the scope of this discussion.) These classes have different uses and
characteristics.
The class A network is the largest on the Internet. This allows at least 16 million hosts
per network. Such 126 class A networks can hold at least two billion PCs. These
enormous networks are quite suitable for the LAN or Internet fundamental
organizations such as Internet service provider (ISP).
The class B network is relatively smaller than the class A network, but it still allows
16,384 class B networks and 65,000 hosts in each class B network. This kind of
network is suitable for the large organizations such as enterprises and governments.
The class C network is the smallest one. It allows over two million (2,097,152 exactly)
class C networks and 254 hosts in each class C network. The LANs connecting to the
Internet are usually of this class networks.
Following are the key points about the IP address:
z
The easiest way to determine the class of an IP address is to look at its number in
the field 1:
Class A: The number is from 1 to 126.
Class B: The number is from 128 to 191.
Class C: The number is from 192 to 223.
(The numbers for special use are not given here.)
71
User Manual
Aolynk DR814Q ADSL2+ Broadband Router
z
9 Appendix – IP Address and Subnet Mask
Not all the fields of a host ID can be 0s or 255s as these numbers are reserved for
special use.
9.2 Subnet Mask
Note:
A network mask looks like a regular IP address and a subnet mask can tell the division
of the network ID and the host ID: A bit set to 1 means this bit is part of the network ID
and a bit set to 0 means this bit is part of the host ID.
Subnet masks are used to define subnets For example, to divide a Class C address
192.168.1.0 into two subnets, you need to set the subnet mask as follows:
255.255.255.128
It is much more straightforward to define the address in binary notation.
11111111. 11111111. 11111111.10000000
For any Class C address, all the bits in the filed 1 through field 3 are part of the network
ID, but note how the mask specifies that the first bit in field 4 is also included. Since this
extra bit has only two values (0 and 1), this means there are two subnets. Each subnet
uses the remaining 7 bits in field 4 for its host IDs, which range from 1 to 126 hosts
(instead of the usual 0 to 255 for a Class C address).
Similarly, to divide a class C network into four subnets, set the mask as follows:
255.255.255.192 or 11111111. 11111111. 11111111.11000000
The two extra bits in field4 can have four values (00, 01, 10, and 11), so there are four
subnets. Each subnet uses the remaining six bits in field 4 for its host IDs, ranging from
1 to 62.
Note:
Sometimes a subnet mask does not specify any additional network ID bits, and thus no
subnets exist. Such a mask is called a default subnet mask. These masks are:
z
Class A: 255.0.0.0
z
Class B: 255.255.0.0
z
Class C: 255.255.255.0
They are so called because they are used for an initially configured network without
subnets.
72
User Manual
Aolynk DR814Q ADSL2+ Broadband Router
10
10 Appendix – Technical Specifications
Appendix – Technical
Specifications
Table 10-1 Technical specifications
Item
Description
Four 10/100M Base-TX Ethernet ports
Ports and buttons
One ADSL port
One USB port
One Reset button to restore the factory default settings
Power consumption
< 12 W
Power supply (external)
12 VDC, 1 A
Physical dimensions (H
x W x D)
30 × 193 × 123 mm (1.2 × 7.6 × 4.8 in.)
Weight
Approximately 510g (11 oz )
Operating temperature
0°C to 40°C (32°F to 104°F)
Storage temperature
–10°C to +70°C (14°F to 158°F)
Operating
humidity
(noncondensing)
20% to 85%
Storage
humidity
(noncondensing)
10% to 90%
Certification
FCC Class B
CE
73
User Manual
Aolynk DR814Q ADSL2+ Broadband Router
11
11 Appendix – Glossary
Appendix – Glossary
I. 100Base-TX
Category 5 twisted pair cable with the maximum transmission distance of 100 meters
(328 ft) and maximum transmission rate of 100 Mbps.
II. 10Base-T
Category 3/4/5 twisted pair cable with the maximum transmission distance of 150
meters (492 ft) and the maximum transmission rate of 10 Mbps.
III. ADSL
Asymmetric digital subscriber line. The most popular flavor of DSL for home users. The
term asymmetrical refers to its unequal data rates for download and upload (the
download rate is higher than the upload rate).The asymmetrical rate benefits home
users because they typically download much more data from the Internet than they
upload.
IV. ATM
Asynchronous transfer mode. A technology that uses fixed length packets, called cells,
for the packet-switched network. The cell, consisting of a cell header and the text, are
switched over a public or private ATM network.
V. Bridging
The data is sent from your network to your ISP and in return your ISP sends the data to
the devices on the network by the physical addresses. Compared with routing, bridging
makes it more intelligent to transfer data by using network addresses. DR814Q can
perform both routing and bridging. When both functions are enabled, the DR814Q
routes IP data and bridges all the other types of data.
VI. Broadcast
A technology used to send data to all the computers on a network.
74
User Manual
Aolynk DR814Q ADSL2+ Broadband Router
11 Appendix – Glossary
VII. DHCP
Dynamic host configuration protocol. DHCP automates IP address assignment and
management. When a PC connects to the LAN, DHCP assigns it an IP address from a
shared address pool, and after a specified period, DHCP returns the address to the
pool.
VIII. DHCP server
Dynamic host configuration protocol server. A DHCP server is a computer responsible
for assigning IP addresses to the computers in a LAN.
IX. DNS
Domain name system. The DNS translates domain names into IP addresses. DNS
information is distributed hierarchically throughout the Internet among the computers
called DNS servers. For example, www.yahoo.com is the domain name associated
with the IP address 216.115.108.243. When you start to access a website, a DNS
server looks up the requested domain name and searches for its corresponding IP
address. If the DNS server cannot find the IP address, it communicates with
higher-level DNS servers to determine the IP address.
X. Domain name
A domain name is a user-friendly name in place of its associated IP address. A domain
name must be unique and is controlled by the Internet Corporation for Assigned Names
and Numbers (ICANN).A domain name is a key element of a URL which identifies a
specific file at a website.
XI. DSL
Digital subscriber line. A technology that allows both digital data and analog voice
signals to travel over the existing copper telephone lines.
XII. Ethernet
The most commonly installed computer network technology, usually using the twisted
pair cables. The Ethernet data rates are 10 Mbps and 100 Mbps.
XIII. Firewall
A firewall can protect your computer or LAN from malicious attacks and other
unexpected accesses. Unauthorized users may attempt to attack your network in order
to prevent you or others on your LAN from the services.
Using the firewall, you can block certain types of IP traffic commonly used by hackers to
protect your network. You can also restrict the types of IP traffic sent from your network
to the outside. Some firewall protection can be provided by packet filtering and network
address translation services.
75
User Manual
Aolynk DR814Q ADSL2+ Broadband Router
11 Appendix – Glossary
XIV. FTP
File transfer protocol. A program used to transfer files between computers connected to
the Internet. Common uses include uploading new or updated files to a Web server,
and downloading files from a Web server.
XV. HTTP
Hypertext transfer protocol. It is the main protocol used to transfer data between
websites so that it can be displayed by Web browser.
XVI. Hub
A hub receives the data from devices and forwards them. It usually performs the
switching function by connecting a device such as an Ethernet bridge or a router to a
group of computers in a LAN and allowing communication between those devices.
XVII. ICMP
Internet control message protocol. An Internet protocol used to report errors and other
network-related information. The ping command makes use of ICMP.
XVIII. IEEE
Institute of Electrical and Electronics Engineers. It is a technical professional society
that fosters the development of standards that often become national and international
standards.
XIX. ISP
Internet service provider. A company that provides Internet services and charges the
customers for services.
XX. LAN
Local area network. A network limited to a small geographic area, such as a home,
office, or small building.
XXI. MAC
Media access control address. It is the permanent hardware address of a device,
assigned by its manufacturer. MAC addresses are expressed as six pairs of two
hexadecimal digits, separated by hyphens, such as 00-0F-1F-80-65-25.
XXII. NAT
Network address translation. This enables computers in a LAN to access the Internet
by sharing the same IP address. When a computer accesses the Internet, its private IP
address is translated into a public address of the WAN port.
76
User Manual
Aolynk DR814Q ADSL2+ Broadband Router
11 Appendix – Glossary
XXIII. NIC
Network interface card. An adapter provides the physical interface for your network
cabling. The Ethernet NIC usually has an RJ-45 connector.
XXIV. Packet
Data that consists of units transmitted on a network are called packets. Each packet
consists of a header, which contains the information about the source and destination
addresses of the packet, and a data field.
XXV. Ping
A program used to check whether the host associated with an IP address can connect
to the network. It can also be used to reveal the IP address for a given domain name.
XXVI. Port
A physical access point on a device such as a computer or router, through which data
flows into and out of the device.
XXVII. PPP
Point-to-point protocol. It is a communication protocol for data transmission between
devices over the standard telephone line. The WAN port on the DR814Q uses two
types of the PPP, that is, PPPoA and PPPoE.
XXVIII. PPPoA
Point-to-point protocol over ATM. One of the two PPP service types. The other type is
PPPoE. You can specify only one PPPoA service for each VC.
XXIX. PPPoE
Point-to-point protocol over Ethernet. One of the two PPP service types. The other type
is PPPoA. You can specify multiple PPPoE services for each VC.
XXX. Protocol
A set of rules to govern the data transmission. The two connected ends must obey
these rules to transmit data.
XXXI. Remote
A geographically separated location. For example, an employee on travel who logs into
the company’s intranet is a remote user.
XXXII. RJ-11
The standard connector used to connect telephones, fax machines, and Modems to a
telephone port. It is a 6-pin connector usually holding four wires.
77
User Manual
Aolynk DR814Q ADSL2+ Broadband Router
11 Appendix – Glossary
XXXIII. RJ-45
The 8-pin connector used for connecting Ethernet switches, hubs and routers.
Straight-through cables are usually the connector of this type.
XXXIV. Routing
Forwarding data between the local network and the Internet through the most efficient
path, based on the data’s destination IP address and current network conditions. A
device that performs routing is called a router.
XXXV. SNMP
Simple network management protocol (SNMP), a network management standard, is
widely used in the TCP/IP network. SNMP provides a way to manage the network
nodes from the host located in the center of the network, such as the server, work
station, router, bridge, and hub. It usually performs the management through the
distributed structure administration and proxy.
XXXVI. TCP/IP
Transmission control protocol/internet protocol.
It defines a suite of the basic protocols, not just the TCP/IP protocol, for the network
communication.
XXXVII. Telnet
An interactive, character-based program used to access a remote computer. The HTTP
and FTP only allow you to download files from a remote computer, while Telnet allows
you to log into and use a computer from a remote location.
XXXVIII. Twisted pair
A common copper cable used for the telephony application. It contains one or more
cable pairs twisted together to minimize the interference and the noise. In an Ethernet
LAN, category 3 cable is used for the 10Base-T network while the category 5 cable, the
higher level, is used for the 100Base-T network.
XXXIX. Upstream
The upstream flows from users to the Internet.
XL. USB
Universal serial bus. A serial interface that attaches the devices such as printers and
scanners to the computer. The DR814Q provides a USB port to connect a host.
XLI. VC
Virtual circuit. A connection from the DSL router to the ISP.
78
User Manual
Aolynk DR814Q ADSL2+ Broadband Router
11 Appendix – Glossary
XLII. VCI
Virtual channel identifier. Together with the virtual path identifier (VPI), the VCI uniquely
identifies a virtual circuit (VC).The ISP provides the VCI value for each VC.
XLIII. VPI
Virtual channel identifier. Together with the virtual path identifier (VPI), the VCI uniquely
identifies a virtual circuit (VC).The ISP provides the VPI value for each VC.
XLIV. WAN
Wide area network. A network covering a large area such as a country or a continent is
called a WAN. With respect to the ADSL router, WAN refers to the Internet.
XLV. Web page
A website file typically containing text, graphic images and hyperlinks to the other
pages. When you access a website, the first displayed page is called the home page.
79