1
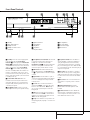
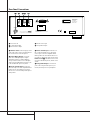
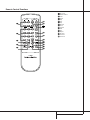
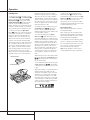
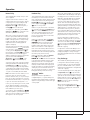
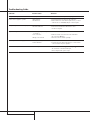
FL 8380 Compact Disc Changer
OWNER’S MANUAL
FL 8380
Standby
Phones
Phones Level
®®
Power for the Digital Revolution™
Table of Contents
3
4
5
6
7
9
10
10
10
11
11
11
11
11
12
12
12
13
13
13
13
13
14
15
Introduction
Information
Front Panel Controls
Rear Panel Connections
Remote Control Functions
Installation and Connections
Operation
Loading Discs
Normal Play
Random Play
HDCD®
Play Exchange
Time Display
Headphone Listening
Search
Skip
Intro Search
Programmed-Play Operation
Programmed Play
Checking Program Contents
Clearing Programs
Repeat Play
Troubleshooting Guide
Technical Specifications
Declaration of Conformity
We, Harman Consumer International
2, route de Tours
72500 Chateau-du-Loir
FRANCE
declare in own responsibility, that the product described
in this owner’s manual is in compliance with technical
standards:
EN 60065:1993
EN 55013/A12/8.1994
EN 55022/5.1995
EN 55020/12.1994
EN 61000-3-2/4.1995
EN 61000-3-3/1.1995
Carsten Olesen
Harman Consumer International
Chateau-du-Loir, FRANCE. 09/00
Typographic Conventions
In order to help you use this manual with the remote control, front panel controls, rear panel
connections and front panel displays, certain conventions have been used.
EXAMPLE – (bold type) indicates a specific remote control or front panel button, or rear panel
connection jack
EXAMPLE – (OCR type) indicates a message that is visible on the front panel information
display
EXAMPLE – (bold type) indicates a lit indicator in the front panel information display
– (number in a square) indicates a specific front-panel control
0 – (number in an oval) indicates a button or indicator on the remote
– (number in a circle) indicates a rear-panel connection
®
, HDCD
, High Definition Compatible Digital® and Pacific Microsonics™ are either registered trademarks or
®
trademarks of Pacific Microsonics, Inc., in the United States and/or other countries. HDCD system manufactured under license
from Pacific Microsonics, Inc.
2 TABLE OF CONTENTS
Introduction
Thank you for choosing Harman Kardon.
The FL 8380 CD changer is an exceptionally
well-engineered product that offers high performance and ease of use.
We ask that you take a few minutes to read
through this Owner’s Manual to familiarize yourself with its controls and functions. This brief
investment of time will yield dividends in the
form of years of listening pleasure.
If you have any questions about this product –
its installation or operation – please contact
your dealer, who is your best local source of
information.
Description and Features
■ Five-Disc CD Changer with Advanced
Programming Features That Create Play
Lists of Selected Tracks, or Play Discs
and Tracks in Random Order, for Hours
of Uninterrupted Play
■ Plays CD, CD-R and CD-RW Discs
■ HDCD® Decoding Provides Superior
Reproduction of All CDs, Whether
HDCD-Encoded or Not. When HDCDEncoded Discs Are Played, Special
Circuitry Reveals Detail and Fidelity Not
Possible in Ordinary CDs
■ Coax Output for Direct Connection to
Outboard Digital-to-Analog Converters
or Digital Receivers
■ Intro Search to Automatically Scan a
Brief Portion of Each Track to Quickly
Locate Your Favorite Selections
■ Play-Exchange Feature Allows Discs to
Be Changed While Another Disc is
Playing
■ Discrete Power On and Off Buttons on
the Remote Control Facilitate
Compatibility With Custom Home
Control Systems
CLASS 1 LASER PRODUCT
INTRODUCTION 3
Information
Important Safety Information
Verify Line Voltage Before Use
Your FL 8380 has been designed for use with
230-volt AC current. Connection to a line voltage other than that for which it is intended
can create a safety and fire hazard, and may
damage the unit.
If you have any questions about the voltage
requirements for your specific model, or about
the line voltage in your area, contact your dealer
before plugging the unit into a wall outlet.
Do Not Use Extension Cords
We do not recommend that extension cords be
used with this product. As with all electrical
devices, do not run power cords under rugs or
carpets or place heavy objects on them. Damaged power cords should be replaced immediately by an authorized service depot with cords
meeting factory specifications.
Handle the AC Power Cord Gently
When disconnecting the power cord from an AC
outlet, always pull the plug, never pull the cord.
If you do not intend to use the unit for any considerable length of time, disconnect the plug
from the AC outlet.
Do Not Open the Cabinet
There are no user-serviceable components inside
this product. Opening the cabinet may present a
shock hazard, and any modification to the product will void your guarantee. If water or any
metal object such as a paper clip, wire or a
staple accidentally falls inside the unit, disconnect it from the AC power source immediately,
and consult an authorized service station.
CAUTION: The FL 8380 uses a laser system. To
prevent direct exposure to the laser beam, do
not open the cabinet enclosure or defeat any of
the safety mechanisms provided for your protection. DO NOT STARE INTO THE LASER BEAM. To
ensure proper use of this product, please read
this owner’s manual carefully and retain it for
future use. Should the unit require maintenance
or repair, please contact your local Harman Kardon service station. Refer servicing to qualified
personnel only.
4 INFORMATION
Installation Location
■ To assure proper operation and to avoid the
potential for safety hazards, place the unit on
a firm and level surface. When placing the
unit on a shelf, be certain that the shelf and
any mounting hardware can support the
weight of the product.
■ Make certain that proper space is provided
both above and below the unit for ventilation.
If this product will be installed in a cabinet or
other enclosed area, make certain that there
is sufficient air movement within the cabinet.
■ Do not place the unit directly on a carpeted
surface.
■ Avoid installation in extremely hot or cold
locations, or an area that is exposed to direct
sunlight or heating equipment.
■ Avoid moist or humid locations.
Cleaning
When the unit gets dirty, wipe it with a clean,
soft dry cloth. If necessary, wipe it with a soft
cloth dampened with mild soapy water, then a
fresh cloth with clean water. Wipe dry immediately with a dry cloth. NEVER use benzene,
aerosol cleaners, thinner, alcohol or any other
volatile cleaning agent. Do not use abrasive
cleaners, as they may damage the finish of metal
parts. Avoid spraying insecticide near
the unit.
Moving the Unit
Before moving the unit, be certain to disconnect
any interconnection cords with other components, and make certain that you disconnect the
unit from the AC outlet.
IMPORTANT NOTE: To avoid damage to the FL
8380 which may not be covered by the warranty, be certain that all discs are removed from the
unit before it is moved. Once the FL 8380 is
installed, discs may be left in the unit when it is
turned off, but the unit should NEVER be moved
with discs left in either deck.
Important Information for the User
This equipment generates, uses and can radiate
radio frequency energy and, if not installed and
used in accordance with the instructions, may
cause harmful interference to radio communication. However, there is no guarantee that harmful interference will not occur in a particular
installation. If this equipment does cause harmful interference to radio or television reception,
which can be determined by turning the equipment off and on, the user is encouraged to try to
correct the interference by one or more of the
following measures:
■ Reorient or relocate the receiving antenna.
■ Increase the distance between the equipment
and receiver.
■ Connect the equipment to an outlet on a
circuit different from that to which the receiver is connected.
■ Consult the dealer or an experienced radio/TV
technician for help.
Unpacking
The carton and shipping materials used to protect your new CD changer during shipment were
specially designed to cushion it from shock and
vibration. We suggest that you save the carton
and packing materials for use in shipping if you
move, or should the unit ever need repair.
To minimize the size of the carton in storage,
you may wish to flatten it. This is done by carefully slitting the tape seams on the bottom and
collapsing the carton down to a more twodimensional appearance. Other cardboard
inserts may be stored in the same manner. Packing materials that cannot be collapsed should be
saved along with the carton in a plastic bag.
If you do not wish to save the packaging materials, please note that the carton and other sections of the shipping protection are recyclable.
Please respect the environment and discard
those materials at a local recycling center.
Front Panel Controls
#
$
FL 8380
Standby
1 2
1
2
3
4
Phones
9
! )
@
1
2
3
4
5
DISK SKIP
PLAY/PAUSE
‹‹
SEARCH
››
STOP
Í‹‹
SKIP
››Í
8
7
Phones Level
3 4
Standby
Status Mode Indicator
Headphones Jack
Headphones Level Control
CD Drawer
Standby: Press this switch to apply power
to the FL 8380. Then the Status-Mode
Indicator 1 will turn green, the Information
Display C will illuminate and all trays will be
checked automatically for discs. Press the switch
again to turn the unit off; the Status-Mode
Indicator 1 will turn amber, indicating that
the unit is in Standby. When the FL 8380 is connected to a switched AC outlet, such as those
found on the back of many audio products, and
the AC outlet will be turned on, the unit will turn
to Standby mode only.
1 Status-Mode Indicator: When the
FL 8380 is in the On mode, this indicator will
glow green. When the unit is off, the indicator
will glow amber, indicating that the unit is still
connected to AC power.
2 Headphones Jack: Connect a set of standard headphones to this jack for private listening.
5
6
5 Open/Close Button
6 Search Button
7 Skip Button
8 Stop Button
9 Play/Pause Button
A Disc Skip Button
B Disc Select Button
C Information Display
D Remote Sensor
3 Headphones Level Control: Turn this knob
to increase or decrease the volume level for
headphones connected to the FL 8380’s
Headphones Jack 2. Note that changing this
level will not change the sound level for the
unit’s main output, as that remains constant.
9 Play/Pause Button: Press this button to
start the playback of a CD. If the CD drawer is
open, pressing this button will automatically
close the drawer. Press this button once during
play to momentarily pause a disc. When the button is pressed again, the disc will resume play at
the point it was paused.
4 CD Drawer: This drawer holds the discs
that will be played. Press the Open/Close button 5 to open the drawer so that discs may be
inserted.
5 Open/Close: Press this button to open or
close the disc drawer. DO NOT push the drawer
to close it or damage to the transport mechanism may result.
6 Search: Press one side of this button to
search forward — or the other side of the
button to search backwards ‚ through a
disc to locate a particular portion of the disc
being played.
7 Skip: Press the right side of this button to
move to the next track fl· or the left side of
the button to move back to the previous track
‡fi on the disc being played.
A Disc-Skip: Press this button to change to
the next disc. If a disc position is empty, the FL
8380 will automatically search for the next position that contains a disc unless the disc drawer
is open.
B Disc-Select: Press one of these buttons to
select the disc in a specific position in the CD
drawer.
C Information Display: This display
provides details about the operation of the
FL 8380.
D Remote Sensor: The sensor behind this
window receives commands from the remote
control. Keep this area clear if you wish to use
the FL 8380 with a remote control.
8 Stop: Press this button to stop the disc currently being played. (See page 11 for more information.)
FRONT PANEL CONTROLS 5
Rear Panel Connections
¡ ™
£¢ ∞
LEFT
OUT
CAUTION
RISK OF ELECTRIC SHOCK
DO NOT OPEN
IN
RIGHT
DIGITAL
OUTPUT
REMOTE
SHOCK HAZARD: DO NOT OPEN
AVIS: RISQUE DE CHOC ELECTRIQUE - NE PAS OUVRIR
MODEL NO.: FL 8380
HARMAN KARDON
NORTHRIDGE
CALIFORNIA, U.S.A.
MADE IN CHINA
AUDIO
OUTPUT
SERIAL NO.
AC INPUT
AC 230V ~ 50Hz
20W
®
HDCD® and High Definition Compatible Digital®
are registered trademarks of Pacific Microsonics, Inc.
WARNING: TO REDUCE THE RISK OF FIRE OR
ELECTRIC SHOCK, DO NOT EXPOSE THIS APPLIANCE
TO RAIN OR MOISTURE.
AC Power Cord
Coaxial Digital Output
Remote Control Output
Remote Control Input
Analog Audio Outputs
AC Power Cord: Connect this plug to an AC
outlet. If the outlet is switch controlled, make certain that the switch is in the ON position.
Remote Control Input: Connect the output of a remote infrared sensor or the remote
control output of another compatible Harman
Kardon product. This will enable the remote control system to operate even when the front panel
Remote Sensor D is blocked. It will also allow
use of the FL 8380 with optional, external control
systems.
Coaxial-Digital Output: Connect this
jack to the coaxial-digital input of a digital
audio/video receiver or an external digital-toanalog converter for direct access to the digital
signals of the FL 8380. DO NOT connect this jack
to the standard audio inputs of any device.
Remote Control Output: Connect this
jack to the input of another compatible Harman
Kardon remote controlled device to have the
remote sensor on the FL 8380 provide signals to
other products.
6 REAR PANEL CONNECTIONS
CLASS 1 LASER PRODUCT
Analog Audio Outputs: Connect these
jacks to the analog CD audio inputs of your
receiver, surround processor or preamplifier.
Remote Control Functions
DISC NO.
1
a
POWER
2
ON
OFF
3
4
5
+
1
TRACK NO.
2
3
DISC
SKIP
4
5
6
REPEAT
p
o
n
–
m
b
7
8
9
INTRO
l
CLEAR
0
c
d
SEARCH
PROGRAM
RANDOM
SKIP
e
0 Disc-Select
1 Numeric Buttons
2 Clear
3 Search
4 Skip
5 Stop
6 Play
7 Random
8 Pause
9 Program
A Time
B Intro
C Repeat
D Disc-Skip
E Power On
F Power Off
TIME
k
j
i
h
g
f
FL 8380
REMOTE CONTROL FUNCTIONS 7
Remote Control Functions
0 Disc-Select: Press one of these buttons to
select the disc in a specific position in the CD
drawer.
6 Play: Press this button to start the playback of a CD. If the CD drawer is open, pressing
this button will automatically close the drawer.
1 Numeric Buttons: Press these buttons to
select a specific track on a disc. The FL 8380 will
immediately go to the track and begin to play it.
These buttons are also used to enter track numbers into the memory for preprogrammed-play
lists. (See page 13 for complete information on
programming the FL 8380.)
7 Random: Press this button to play all
tracks on one or more CD’s in random order.
(See page 11 for more information.)
2 Clear: Press this button to remove tracks
from a programmed sequence. Each press of the
button will remove one track, starting with the
last track programmed to play. (See page 13 for
complete information on programming the
FL 8380.)
3 Search: Press these buttons to search forward — or backwards ‚ through a disc to
locate a particular portion of the selection being
played.
4 Skip: Press one of these buttons to move to
the next track fl· or to move back to the previous track ‡fi on the disc being played.
5 Stop: Press this button to stop the disc currently being played.
8 REMOTE CONTROL FUNCTIONS
8 Pause: Press this button once to momentarily pause a disc. When the button is pressed
again, the disc will resume play from the point
at which it was paused.
9 Program: This button is used to program
the playback of discs and tracks in a particular
order. (See page 13 for complete instructions on
programming the FL 8380.)
A Time: In normal operation, the display will
show the running time of the track being played.
Press the button once to check the time remaining for the track in play. Press the button again
to view the total play time remaining for the disc
in play.
B Intro: Press this button to put the FL 8380
into the Intro Scan mode. When you press this
button, the unit will play the first 10 seconds of
each track on the disc, and then move to the
next track. Press the button again to defeat the
function and continue full play of the current
track. (See page 12 for more information.)
C Repeat: Press this button once to continuously repeat the track currently being played.
Press it a second time to repeat the entire disc
and a third time to repeat all discs. (See page 13
for more information).
D Disc-Skip: Press these buttons to change
to the next or former disc. If a disc position is
empty, the FL 8380 will automatically search for
the next position that contains a disc unless the
disc drawer is open.
E Power On Button: When the FL 8380 is
plugged into an active AC outlet, press this button
to turn the unit on. The Status Mode Indicator
1 will turn green. If the unit is plugged into a
switched outlet, power must be applied to the
switched outlet in order for the Power On button
E to be effective.
F Power Off Button: Press this button to
turn the unit off; the Status Mode Indicator 1
will turn amber, indicating that the unit is in a
Standby mode.
Installation and Connections
NOTE: When replacing batteries, always replace
both at the same time. When the unit will not be
used for an extended period of time, it is also a
good idea to remove the batteries so that the
potential for corrosion or damage is avoided.
To prevent possible damage to your speakers
and other components in your audio system, it is
important that ALL components, including the
FL 8380 and your receiver or preamp and amplifiers, are turned off and unplugged from their
AC power source when installing any new component.
If the FL 8380 is installed behind a cabinet or
other obstruction that may block the path
between the front-panel Remote Sensor D
and the location of the remote, an optional
external IR sensor may be used. Connect the
sensor to the Remote IR-In Jack on the
rear panel. This jack may also be connected to
the IR-Output jack of another compatible
Harman Kardon component or a compatible IRsystem- remote product.
Connecting the FL 8380 to your audio system is
simple. Using standard RCA-to-RCA interconnect
cords, connect the left and right Audio Output
jacks on the rear panel to the CD input jacks
on your receiver, surround processor or preamplifier.
If your system includes an optional external
digital-to-analog converter, or if you are using a
receiver or other processor that has the capability to decode PCM digital input signals, connect
the Coaxial Digital Output jack to the
Coaxial Digital input on the decoder. Make certain to use a coaxial-style interconnect cable, as
standard audio cables will not perform as well.
➞
Install two AA batteries by turning the remote
over so that you are holding the bottom side up.
Press lightly on the embossed arrow on the
cover and gently slide the cover towards you in
the direction of the arrow. Insert the batteries
inside the compartment, being careful to follow
the + and – polarity indications at the bottom of
the compartment. Replace the cover by placing it
on the remote and sliding it back towards the
top of the remote.
You may also use the IR Sensor in the FL 8380
to send commands to other compatible remote
controlled products. Connect the Remote IROut jack to the input of the other product
or system.
Connect the power to a nonswitched AC wall
outlet or to the accessory outlet on the rear of
another audio device in your system and you are
ready to go!
NOTE: When using the accessory outlet on
another product to power the FL 8380 make certain that it has the compatibility to power a
device that draws at least 20 watts of current in
addition to being able to handle the requirements of the other devices that may be plugged
into the accessory outlets. If you use a
“switched” outlet, it is important to remember
that the host product must be turned on in order
for the FL 8380 to operate.
INSTALLATION AND CONNECTIONS 9
Operation
Loading Discs
To load a disc, first turn the FL 8380 on, using
the Standby Switch . or the Power On E
button on the remote. Note that the StatusMode Indicator 1 will turn green and the
Information Display C will illuminate. The
word d i s c will flash in the Information
Display, and the disc tray will automatically turn
clockwise so that the FL 8380 can sense which,
if any, of the disc positions already have a disc.
To load a disc, first press the Open/Close
button 5, taking care to make certain that the
space in front of the drawer is not obstructed.
Note that if the drawer is blocked when you
attempt to open it, it will automatically close
within five seconds to protect the mechanism.
Load discs in the tray with the printed (label)
side facing up toward you. Make certain that the
disc is centered in the tray. Either 12cm (5") or
8cm (3") discs may be used. When a 8cm (3")
disc is played, it should be carefully centered
within the smaller ridges on the tray. Only one
CD can be placed in any position at a time.
When a 8cm (3") disc is played, DO NOT place a
standard 12cm (5") disc over the smaller disc.
Labeled surface
Recorded surface
Note that each disc position has a number
embossed in the plastic tray. This corresponds to
the position this disc will occupy for playback
and programming. To make it easier to identify
each disc’s position, the disc position number for
the holder space that is in the center of the disc
tray will also appear in the Information Display
when the disc drawer is open.
To rotate the disc tray to another position, press
the Disc-Skip button A D. The tray will
revolve to the next slot and the Information
Display will indicate the position number for the
slot in the middle of the tray.
To close the disc drawer, press the Open/
Close button 5. When the drawer closes all
trays will be checked for discs and the disc that
was last in the center position on the tray will be
readied for play. Its number will appear in the
Information Display and a red icon will light to
the right of the disc number. The numbers for all
other tray positions that have a disc will also
light in the upper part of the display. If the center disc position is empty when the drawer is
closed, the unit will search for the next position
with a loaded disc, and place it in the ready
mode.
The drawer may also be closed and the FL 8380
put into play by pressing the Play/Pause button
9 6. This will put the disc in the center position into the Play mode.
To close the drawer and play a specific disc, press
the Disc Select button B 0 corresponding
to the tray position number for the disc you wish
to play.
When the disc drawer is closed, the Information
Display will display the number of the disc
selected, the total number of tracks on the disc
and the disc’s total running time. In the upper
area of the display the numbers of all loaded
trays will be shown, with a red icon to the right
of the selected disc´s number. The total number
of tracks on the disc selected will illuminate at
the far right side of the display.
10 OPERATION
To remove a disc from the player, press the
Open/Close button 5. The drawer will open,
allowing the disc to be removed. Press the DiscSkip button A D to rotate the disc carousel
tray to reach discs that may be covered.
Upon placing a disc in a tray, the disc number
will appear when detected by the sensor mechanism after the drawer has closed.
Disc Handling Notes
When loading or unloading discs, it is best to
hold them by the edges.
While compact discs are very reliable, rough
handling may damage them. Avoid scratching
the bottom (nonprinted) side of discs, and any
handling that will leave fingerprints.
To avoid damage to the disc and player, always
seat discs so that they are centered in the tray.
Do not lift the player while the disc tray is opening or closing, as this may cause the discs to
unseat from the tray and possibly jam.
Note: Always remember to remove all discs
from the player before moving or repacking it.
Operation
Normal Play
Random Play
The FL 8380 provides a variety of ways to select
discs for playback.
The FL 8380 includes three random play modes
that enable you to let the machine select the
tracks to be played in random order. The random
modes may be started at any time by pressing
Random 7 when the unit is already in Play
mode or by pressing Play 9 after Random
7 when it is in Stop mode.
To play all of the tracks on each disc in order,
starting with the first track on the disc currently
in the play position, and proceeding through
each disc that has been loaded, press the
Play/Pause button 9 on the front panel, or
the Play 6 button on the remote.
To start play on a specific disc, press the DiscSelect button B 0 that corresponds to the
desired disc’s position in the disc tray.
When a disc is in play, the Information Display
will show a play indication fl. The track being
played will show both as a large number in the
middle of the display and as a smaller, flashing
number at the right side of the display. The
elapsed time of the track being played will
appear in the display.
As the disc plays, the track numbers will change,
and the time will reset to
at the start of
each new track. To momentarily pause the play
of a disc, press the Play/Pause button 9 on
the front panel, or the Pause 8 button on the
remote. Note that a Pause indication ± will
appear in the display to remind you that the disc
is paused. Press either the Play button
(Play/Pause on front panel) 96 or the
Pause button 8 to resume normal play.
You may also select a track on the disc in play by
entering the desired track number directly using
the Numeric buttons 1. You can always
select a track by pressing the two-digit number
corresponding to the number of the track. Both
digits must be pressed within 5 seconds. For track
1-9, press "0" followed by the track number.
Note: If the CD has less than 10 tracks, it is not
necessary to press "0" first. If the CD has
between 10 and 19 tracks, it is only necessary to
press "0" first when selecting track 1. If the CD
has between 20 and 29 tracks, it is only necessary
to press "0" first when selecting track 1 or 2.
In short, you only need to press "0" first, if there
are two-digit track numbers on the CD which
begin with the same number as the single-digit
track number that you wish to play.
Random 1: To play all the tracks on the current
disc in random order, press the Random button
7 once so that the RANDOM indicator illuminates. The FL 8380 will play the tracks on the
disc in an order selected by the unit’s microprocessor and stop play when all of the tracks
have been played once.
Random, All, Sequential: When the Random
button 7 is pressed twice, the RANDOM and
SEQUENTIAL indicators will illuminate. In this
mode, all tracks on the current disc will be
played in random order, and then the unit will
advance to the next disc in order and play all
tracks on that disc randomly. When each disc is
finished the next disc will play its tracks in random order until all discs have been played. After
the last disc plays, the unit will stop.
Random, All Tracks/Discs: When the Random
button 7 is pressed three times, the
RANDOM, ALL and DISC indicators will illuminate.
In this mode, the FL 8380 will select two tracks
randomly from the disc in use and play them.
After these two tracks play, another disc will be
randomly selected and two tracks will play from
that disc. This pattern of a randomly selected disc,
and the play of two random tracks from each
disc, will continue until all tracks on all discs have
been played. At that point the unit will stop.
®
, HDCD®
HDCD, which stands for High Definition
Compatible Digital®, is a sophisticated process
that enables the FL 8380 to deliver outstanding
digital-to-analog decoding no matter what type
of CD is played.
When a disc with the HDCD logo is played, the
FL 8380 is able to take advantage of the special
recording process that is used in the creation of
HDCD discs. Although HDCD discs are playable
on any CD player, when they are played on a
unit such as the FL 8380, the special circuitry
delivers audio with extraordinary fidelity, stunning resolution and the highest possible overall
quality. The HDCD process effectively cancels the
additive distortions, caused by artifacts of the
A/D and D/A conversion processes, and simultanously provides additional data to reduce the
subtractive distortions resulting from insufficient
data present in the 44.1 kHz, 16-bit PCM sampling standard of the compact disc format.
No special adjustment is required to play an
HDCD disc. Simply play the disc as you would
any other CD, and the FL 8380 will automatically
sense that it is an HDCD recording. The HDCD
indicator will light in the Information Display
C on the front panel to remind you that an
HDCD disc is playing.
It is important to note that the HDCD process is
completely compatible with standard recordings.
Its high-quality digital-to-analog circuitry provides enhanced playback even from all standard
CD audio discs
Play Exchange
The FL 8380’s Play Exchange feature allows you
to change discs while the machine is playing.
Using this feature, you can have uninterrupted
play of an unlimited number of discs, since the
drawer may be opened and discs changed while
another disc is playing.
To use the Play Exchange function, simply press
the Open/Close button 5 at any time while
the unit is in the Play mode. The disc drawer will
open and two discs will be available for change.
Replace either disc, or both, as desired. To reach
the other two discs, press the Disc-Skip button
A D. You may now remove and change
either of these two discs.
When you have finished making any disc
changes, press the Open/Close button 5. The
drawer will close and play will continue with
normal functions.
To stop the disc, press the Stop button 8 5.
When the stop button is pressed the display will
again show the total number of tracks and total
running time of the last disc played.
OPERATION 11
Operation
Time Display
Search
Intro Search
The FL 8380’s time display is capable of showing
a wide range of information about a CD.
If you wish to quickly scan through a disc to
locate a particular passage or program, press the
Search buttons 6 3. The Forward-Search
button — plays the disc forward at high
speed, while the Reverse-Search button ‚
plays the disc backwards at high speed. The
front panel features a single Search button 6;
press the right side for forward search —, or
the left side for reverse search ‚. The forward
and reverse search functions may also be performed using the separate Search buttons 3
on the remote. When the desired part of the disc
is heard, release the Search button to resume
normal play speed.
This feature lets you locate a track by playing the
first 10 seconds of each track. When the Intro
button B on the remote control is pressed, the
unit will play only 10 seconds of each track and
then automatically move to the next track. When
you have reached a track that you wish to listen
to in its entirety, press the Intro button B
again to resume normal operation. When the
Intro feature is activated, the INTRO indicator
will illuminate in the Information Display C
to remind you that Intro Search is in use.
In normal operation the display will show the
running time of the track that is currently being
played. Each time the track changes, the time
display will reset to
and begin to
increase again as the disc plays.
To view the time remaining on an individual
track, press the Time button A on the remote
control ONCE. The display will now show the
time left in the track currently playing.
To view the total playing time remaining on a
disc, press the Time button A on the remote
control TWICE. In this Time Display mode the
TRACK indicator will show the tracks remaining,
differing from the usual display of the track
being played.
Headphone Listening
You may listen to the output of the FL 8380
through headphones by plugging any headphones with a 6,3 mm standard plug or adapter
into the front-panel Headphones Jack 2. The
volume of the headphone output can be adjusted with the Headphones Level Control 3.
Note that changing the headphone level will not
change the volume for the main audio output.
This is a fixed output and it is changed using the
volume control on your receiver, preamplifier or
surround processor.
Skip
To move from one track on a disc to another,
press one of the Skip buttons 7 4. Pressing
the Forward-Skip button fl· will move you
forwards through the disc one track at a time,
while pressing the Reverse-Skip button ‡fi
will move you back to the start of the current
track and, if pressed again within two seconds,
back one track at a time. Holding any of the
buttons pressed, will fastly skip through all
tracks. The front panel features a single
Skip button 7; press the right side for
Forward Skip —Í, or the left side for
Reverse Skip Í‚. The forward and reverse
skip functions can be performed using separate
Skip buttons 4 on the remote.
The Skip buttons may be used when the FL 8380
is either playing or stopped. If the unit is
stopped, the Skip buttons may be used to locate
the first track to be played. The Play button 6
(Play/Pause on the front panel 9) must be
pressed to begin play. If the Skip buttons are
used while the unit is already playing, the audio
output will stop while the new track is located,
and play will automatically resume after the Skip
button is released.
12 OPERATION
When the Intro button is pressed, the FL 8380
will first play through the disc that is currently in
the play position and then move on to each disc
position that is loaded.
Programmed-Play Operation
The FL 8380’s advanced programming capability
enables you to preset specific tracks of any CD
and the order in which tracks play, repeat specific
discs or tracks or repeat all discs and tracks.
Programmed Play
Programmed play allows you to program up to
32 tracks (from one or more CD’s) or completedisc play-through into the FL 8380’s memory. To
begin programming the FL 8380, press the
Program button 9 on the remote control.
The PROGRAM indicator will light in the
Information Display C.
You may now begin to enter the discs and tracks
in the order in which you wish to have them
play. Once the PROGRAM indicator is lit,
P - 0 1 will appear in the Information Display,
replacing the track time. This indicates that you
are about to program the first track.
Press the Disc-Select button B 0 to choose
the first disc to be programmed (unless you
choose the current disc), and note that AL will
flash in the Information Display. To have all
tracks on the disc play in order as the first program step, press the Program button 9
again. To select a single track on the disc, press
the Numeric buttons 1 corresponding to the
desired track (see page 10 how track numbers
must be entered). You may also use the Skip
buttons 7 4 to select a track. When the disc
and track are selected, press the Program button 9. Note that the program-step indication
on the right side of the Information Display will
change to P - 0 2.
You may now select another disc and/or track
for the next program step, following the instruction shown above. When the program step is
selected, press the Program button 9.
Repeat this procedure for each program step
until you have completed the desired programming. Press the Stop button 8 5 once to
complete a program sequence, or press Play
6 (Play/Pause 9 on the front panel) to
begin immediate play of a program sequence. If
the maximum of 32 program steps is reached,
the program-step indication at the right side of
the Information Display will go out, and the disc
and track that have been programmed as the
first program step will be shown.
Once a program list has been entered, press the
Play button 6 (Play/Pause 9 on the front
panel) to begin listening to the sequence. After
the entire program has been played, the FL 8380
will stop. As long as the Stop button 8 5
has not been pressed twice and the PROGRAM
indicator remains lit, you may repeat the programmed-play sequence again by pressing the
Play button 6 (Play/Pause 9 on the front
panel).
Pressing Stop button 8 5 twice will return
to normal mode and the PROGRAM indicator will
delete, but the program will stay in memory and
can be recalled easily by pressing the Program
9 button. But pressing the Clear button 2
(see below), opening the disc drawer by pressing
Open/Close 5, or turning the FL 8380 off will
erase the program information from the unit’s
memory.
Checking Program Contents
To check the contents of a program while the
unit is stopped at first note that the PROGRAM
indicator is lit (otherwise press Program 9)
and the program step indication P - 0 1 is
not lit (otherwise press Stop 5 once).
Each time you press the Skip buttons 7 4
the Information Display will step through each of
the programmed discs and tracks.
Clearing Programs
To clear a single track from the program list, press
the Program button 9 on the remote until the
track to be deleted from the program sequence
appears in the Information Display C.When the
track number appears, press the Clear 2 on the
remote once, then Stop 5, the track selected
will be deleted from the title calendar at the
right of the display. Now you can press the
Program 9 to select other items to be deleted.
When the unit is stopped and the program step
indication P - 0 1 is not lit (otherwise press
Stop 5 once), but the PROGRAM indicator is
still lit, you may clear the entire contents of a program by pressing the Clear button 2.
Repeat Play
The FL 8380’s programming system enables you
to repeat all of the tracks on all of the discs, a
complete single disc, or a single track.
Repeat Track Play
To repeat a single track, press the Repeat button C on the remote control while the desired
track is playing so that the REPEAT and 1 indicators are lit. The Repeat Track mode may also be
activated while the unit is stopped by selecting
the desired track using the Disc-Select buttons
B 0 and then the Skip buttons 7 4 or
the Numeric buttons 1 as outlined on page
11. When the track is chosen, press the Repeat
button C on the remote control and the Play
button 6 (Play/Pause 9 on the front
panel). The track will play until the Stop button
8 5 is pressed.
Repeat Disc Play
To repeat an entire disc, press the Repeat button C twice so that the REPEAT and DISC indicators are lit. Press the appropriate Disc Select
button B0, the desired disc’s icon lights and
the disc number appears in the Information
Display C. The selected disc will play through
to the end and then continue to repeat until the
Stop button 8 5 is pressed.
Repeat All Discs
To repeat all of the discs that have been loaded
into the FL 8380, press the Repeat button C
three times so that the REPEAT, ALL and DISC
indicators are lit. Press the Play button 6,
(Play/Pause 9 on the front panel) and the
unit will play all tracks on all discs, starting with
the disc that has been loaded in the play position. When all discs have played through, the
sequence will repeat and the discs will continue
to play until the Stop button 8 5 is pressed.
NOTE: You may cancel a repeat function any
time by pressing the Repeat button C until
the REPEAT indicators go out. The player will
continue with normal play.
IMPORTANT Note: Tracks programmed as
described above in chapter ”Programmed Play”
can be repeated too: When you press Repeat
C once after a program is created (the PROGRAM indicator must be lit, (otherwise press
Program 9) and the program step indication
P - 0 1 is not lit (otherwise press Stop 5
once), the REPEAT 1 indicator will light and the
track currently selected or playing will be repeated continuously. If Repeat is pressed twice
REPEAT ALL will be displayed, all programmed
tracks on all discs will be played subsequently
and the sequence will be repeated continuously
until Stop 5 is pressed.
PROGRAMMED-PLAY OPERATION 13
Troubleshooting Guide
SYMPTOM
POSSIBLE CAUSE
SOLUTION
No lights on front panel
• No AC power
• Make certain that the AC power cord is plugged into a live outlet
Remote does not appear to operate
• Weak batteries
• Blocked sensor
• Install fresh batteries, observing polarity indications
• Remove obstructions from the front-panel sensor, or connect
a remote sensor to the Remote-In jack on the rear panel
Front panel lights but CD does not play
• Disc upside down
• Moisture inside unit
• Turn CD over so that label side faces up
• Leave the unit turned ON for 30 minutes to allow
moisture to evaporate
Play indicator lights but no sound is heard
• Receiver or preamp and amp
not turned on
• Poor connections
• Turn on all necessary equipment
• Wrong source selected
• Make sure certain connections are secure and made to
the correct (e.g., CD) input
• Select CD source on receiver or preamp
Sound skips or stutters during play
• Disc may be damaged
• Surface vibrations
• Try another disc
• Isolate the unit from vibration by placing it on a firm surface
or move it further away from speakers
Sound is continually distorted
• Incorrect input
• Make certain that the Analog Audio Outputs of the FL 8380
are connected to a line-level audio input,
NOT to a digital audio or phono input
14 TROUBLESHOOTING GUIDE
Technical Specifications
Signal Format
Sampling Frequency
HDCD Processing
D/A Conversion
Oversampling
44.1kHz
Burr Brown PCM1732
up to 24 Bit/96 kHz
8 Times
Discrete Analog Output Section
Error Correction
Frequency Response
Total Harmonic Distortion (THD)
Dynamic Range
Signal-to-Noise Ratio
Channel Separation
Line-Output Level
Digital Output
CIRC System
20 Hz – 20 kHz +0/-1dB
<0.008% @1kHz
>97 dB
>100 dB
80 dB
2.0V RMS
Coax
General
Power Requirement
Power Consumption
Dimensions
Height
Width
Depth
Weight
AC 230/50 Hz
14 Watts (max)
129mm (5.1")
440mm (17.3")
386mm (15.2")
7.6 kg (16.7 lbs.)
Depth measurement includes knobs and buttons.
Height measurement includes feet and chassis.
All features and specifications are subject to change without notice.
Harman Kardon is a registered trademark, and Power for the digital revolution is a trademark, of Harman Kardon, Inc.
HDCD®, High Definition Compatible Digital® and Pacific Microsonics™ are either registered trademarks or
trademarks of Pacific Microsonics, Inc., in the United States and/or other countries. HDCD system manufactured under license
from Pacific Microsonics, Inc. This product is covered by one or more of the following: In the USA: 5,479,168; 5,638,074;
5,640,161; 5,808,574; 5,838,274; 5,854,600; 5,864,311; 5,872,531; and in Australia: 669114. Other patents pending.
SPECIFICATIONS 15
250 Crossways Park Drive, Woodbury, New York 11797
www.harmankardon.com
Harman Consumer International:
2, route de Tours, 72500 Château-du-Loir, France
© 2000 Harman Kardon, Incorporated
Part No. 5100-837000-100