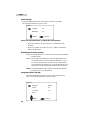
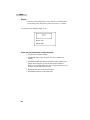
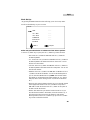
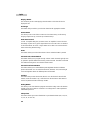
1
®
What The World Comes Home To
TM
Flat Screen
Television
Télévision à
Écran Plat
AV/TV MENU
VOL
CH
For illustration only
Dessin à titre d'illustration uniquement
Para ilustración únicamente
Televisor de
Pantalla Plana
User Manual-
Model #’s
HTF27R11
Manuel d'utilisation-
Modèles #’s
HTF24R21
Manual del Usuario-
Modelos #’s
HTF20R21
English
Table Of Contents
PAGE
Important Safety Instructions ............................................................3
INSTALLATION INSTRUCTIONS............................................................6
Unpacking the Television..............................................................................6
Television Location ......................................................................................6
Start Up......................................................................................................6
Cable/Antenna Connections........................................................................7
Connections to Other Equipment ..................................................................8
Power Interruptions....................................................................................12
FEATURES AND OPERATION ..............................................................13
TV Features ..............................................................................................16
Remote Features........................................................................................17
Menu Features..........................................................................................24
Care and Cleaning ..............................................................................30
Troubleshooting ..................................................................................31
Glossary Terms....................................................................................33
Warranty ..............................................................................................37
1
English
CAUTION
RISK OF ELECTRIC SHOCK
DO NOT OPEN
Warning: To reduce the risk of fire or electric shock, do not expose
this appliance to rain or moisture.
CAUTION: TO REDUCE THE RISK OF ELECTRIC SHOCK. DO NOT
REMOVE COVER (OR BACK). NO USER-SERVICEABLE PARTS INSIDE.
REFER SERVICING TO QUALIFIED SERVICE PERSONNEL.
THIS SYMBOL INDICATES THAT HIGH VOLTAGE IS PRESENT
INSIDE. IT IS DANGEROUS TO MAKE ANY KIND OF
CONTACT WITH ANY INSIDE PART OF THIS PRODUCT.
THIS SYMBOL INDICATES THAT THERE ARE IMPORTANT
OPERATING AND MAINTENANCE INSTRUCTIONS IN THE
LITERATURE ACCOMPANYING THE APPLIANCE.
This Important note is located on the rear of the cabinet.
"Note to CATV system Installer: This reminder is provided to call the
CATV system installer’s attention to section 820-40 of the NEC which
provided guidelines for proper grounding and, in particular,
specifies that the cable ground shall be connected to the grounding
system of the building, as close to the point of cable entry as
practical."
2
English
IMPORTANT SAFETY INSTRUCTIONS
Read all of the instructions before using this television. When
using this television, always exercise basic safety
precautions, including the following:
1)
Save these Instructions — the safety and operating instructions should be
retained for future reference.
2)
All warnings on the television and in the operating instructions should be
followed.
3)
Cleaning — Unplug TV from the wall outlet before cleaning. Do not use liquid
cleaners or aerosol cleaners. Use only a damp cloth for cleaning. Exceptions:
Some products are designed for uninterrupted service, eg. Cable TV
converters, unplugging such accessories may result in loss of authorization
codes. In such cases, please follow instructions for unplugging such devices as
provided by the accessories manufacturer.
4)
Attachments — do not use attachments not recommended by the TV
manufacturer as they may cause hazards.
5)
Water and moisture — do not place this TV near water, for example, near a
bathtub, wash bowl, kitchen sink, or laundry tub, in a wet basement, or near a
swimming pool.
6)
Accessories — do not place this TV on an unstable cart, stand, tripod, bracket,
or table. The TV may fall, causing serious injury to someone, and serious
damage to the appliance. Use only with a cart, stand, tripod, bracket, or table
recommended by the manufacturer, or sold with the TV. Any mounting of the
appliance should follow the manufacturer’s instructions and should use a
mounting accessory recommended by the manufacturer. An appliance and
cart combination should be moved with care. Quick stops, excessive force,
and uneven surfaces may cause the appliance and cart combination to
overturn.
7)
Ventilation — Slots and openings in the cabinet and the back or bottom are
provided for ventilation and to ensure overheating. These openings must not
be blocked in a built in installation such a bookcase or rack unless proper
ventilation is provided or the manufacturer instructions have been adhered to.
8)
POWER Sources — this TV should be operated only from the type of power
sources indicated on the electrical nameplate. If you are not sure of the type of
power supply to your home, consult your appliance dealer or local power
company. For TV’s intended to operate from battery power or other source,
refer to the operation instructions.
9)
Grounding or polarization — This TV is equipped with a polarized alternating
current line plug (a plug having one blade wider than the other is). This plug
will fit into the power outlet only one way. This is a safety feature. If you are
3
English
unable to inset the plug fully into the outlet, try reversing the plug. If the plug
should still fail to fit, contact your electrician to replace your outlet. Don’t
defeat the safety purpose of the polarized plug.
10) Power cord protection — Power supply cords should be routed so that they are
not likely to be walked on or pinched by items placed upon or against them,
paying particular attention to cords or plugs, convenience receptacle, and the
point where they exit from the appliance.
11) Outdoor antenna grounding — If an outside antenna or cable system is
grounded so as to provide some protection against voltage surges and built up
static charges. Article 810 of the National Electrical Code, ANSI/NFPA
No.70, provided information with respect to proper grounding of the mast and
supporting structure, grounding of the lead in wire to an antenna discharge
unit, size of grounding conductors, location of antenna discharge unit,
connection to grounding electrodes, and requirement for the
grounding electrode. (Fig. A)
12) Lighting precaution — for added protection
for this TV receiver during a lighting storm
or when it is left unattended for long period
of time, unplug it from the wall outlet and
disconnect the antenna or cable system. This
will prevent damage to the TV due to
lighting and power line surges.
EXAMPLE OF
ANTENNA GROUNDING
GROUND CLAMP
ANTENNA
LEAK IN WIRE
ANTENNA
DISCHARGE UNIT
ELECTRIC
SERVICE
EQUIPMENT
GROUNDING
CONDUCTORS
GROUND GLAMPS
POWER SER VICE GRONDING
13) Object and liquid entry — never push
ELECTROOE SYSTEM
(Fig. A)
objects of any kind into this TV through
openings as they may touch dangerous voltage point or short out parts that
could result in a fire or electric shock. Avoid spilling liquid of any kind on the
TV.
14) Servicing — do not attempt to service the TV by yourself, as opening or
removing covers may expose you to dangerous voltage or other hazards.
Refer all servicing to qualified service personnel.
15) Damage Requiring Service — Unplug this TV from the wall outlet and refer
servicing to qualified service personnel under the following conditions:
a. When the power supply cord or plug is damaged or frayed.
b. If liquid has been spilled, or objects have been fallen into the TV.
c. If the TV has been exposed to rain or water.
d. If the TV does not operate normally by following the operating
instructions. Adjust only those controls that are covered by the operating
instructions, as improper adjustment of other controls may result in
damage and will often require extensive work by a qualified technician
to restore the TV to its normal operation.
e. If the TV has been dropped or damaged in any way.
f. When the TV exhibits a distinct change in performance; this indicates a
need for service.
4
English
16) Replacement parts — when replacement parts a required, be sure the service
technician uses replacement parts specified by the manufacturer that have the
same characteristics as the original part. Unauthorized substitutions may result
in fire, electric shock, injury to persons or other hazards.
17) Safety check — Upon completion of any service of repairs to this TV, ask the
service technician to perform routine safety checks to determine that the TV is
in proper operation condition.
18) Heat — This TV product should be situated away from heat sources such as
radiators, heat registers, stoves, or other products (Including amplifiers) that
produce heat.
19) Modifications — Any changes or modifications not expressly approved by the
Federal Communications Commission on this product could void the users
authority to operate the equipment.
20) Carts - An appliance and cart combination should be removed with care.
Quick stops, excessive force, and uneven surfaces may cause the appliance
and cart combination to overturn.
21) Power lines – An outside antenna system should not be located in the vicinity
of overhead power lines or other electric light or power circuits, or where it
can fall into such power lines or circuits. When installing an outside antenna
system, extreme care should be taken to keep from touching such power lines
or circuits as contact with them might be fatal.
22) Overloading – Do not overload wall outlets and extension cord as this can
result in a risk of fire or electric shock.
SAVE THESE INSTRUCTIONS
Thank you for purchasing our Haier
product. This easy-to-use manual will
guide you in getting the best use of
your TV.
Remember to record the model and
serial number. They are on a label in
back of the TV.
Model number
Serial number
Date of purchase
Staple your receipt to your manual. You will need it to obtain
warranty service.
5
English
Installation Instructions
Unpacking your TV
• Remove all packing materials. This includes the styrofoam and all adhesive tape
holding the TV accessories. Inspect and remove any remains of packing, tape or
printed materials before using the TV.
Television Location
• The TV must not be placed in sunlight or bright lights, including
reflections.
• The TV must be kept away from excessive heat or moisture.
• The TV must be kept away from magnetic equipment such as external
speakers, motors and fans.
Start Up
Follow the steps below to get your TV connected and ready for
watching.
1. Plug in your TV . Plug the cord
into the two-prong outlet.
2. Hook up your TV. Connect cable
or antenna to the provided
connection on the back of the TV.
Note: TV antenna or cable wire is
not included with the television set.
You need to purchase an antenna if
you are not going to hook up cable
service. If you have a cable service
then you must have an existing cable
wire that your local cable company
had provided at the time of your
cable installation that needs to be
connected.
3. Put batteries in the remote
control. Place two AAA size
batteries (batteries supplied) into the
remote control compartment by
matching its + and – end of each
battery.
batteries
4. Turn on the TV. You can turn
on the TV by pressing the power
button on the TV set or Remote
Control.
power button
6
English
5. Place all available channels in
memory. By pressing menu button
five times, you will see the preset set
up. By selecting Auto Program it will
set up all available channels into
memory. If you want to add or delete
channels from memory, you can do it
by going into add/delete mode.
(refer to preset setup menu on p.29)
6. Set the Time. To set the time go to
clock set up and set as previously
explained. (refer to clock setup menu
on p.28)
Cable/Antenna Connections
• In order to get clear reception you must connect antenna or cable to your
television set.
Cable Connection:
• Connect your local company’s cable to ANT
on back of your television.
• Select the cable mode in SET UP menu.
(refer to preset menu)
Note: You may need a converter box in order to get a
proper reception and for special cable channels
broadcasting. You must check with your local
cable company for compatibility requirements.
Incoming Cable
From Cable Company
ANT
75 Ohm VHF/UHF
on back of TV
Antenna Connection:
• You will need an external antenna for proper
reception of VHF/UHF channels. An outdoor
antenna is recommended for best reception.
• Connect your home antenna to ANT connection
on back of television.
• Select Air mode in the set up menu.
(refer to preset menu)
Note: The cable mode is preset from the factory.
If you are using an antenna then you must
change to Air mode in the Set Up menu.
(refer to preset setup menu on p.29)
7
Incoming Cable
From Home Antenna
ANT
English
Connecting to Other Equipment
Connecting to DVD Player:
This connection allows you to watch DVD movies and play music CDs.
For normal hook up, you will need the following:
• One pair of audio cables
• One video cable
Note: For better picture quality: If your equipment has S-video connection, use
S-video cable instead of a regular video cable.
Follow the steps below to hook up the DVD player.
1) Hook up one pair of audio cables to the TV input and DVD output.
2) Hook up one video cable to the TV input and DVD output.
Back of TV
ANT
AUDIO
VIDEO
R
L
AV - IN
S - VHS
AV - OUT
DVD Player
COAXIAL VIDEO OUT AUDIO OUT
1
L
2
R
S
S -VIDEO
(For a specific installation with home theater system, refer to DVD player’s and
Home Theater’s instructions.)
8
English
Connecting to VCR:
This connection allows you to watch local channels and video programs, play or
record on the VCR while watching TV. You can also record from one channel while
watching another channel.
For normal hook up, you will need the following.
• One coaxial cable
• One pair of audio cables
• One video cable
• An S-video cable is usually included with an S-VHS VCR. If it is not included then
you may have to purchase it from local electronics retail store.
Note: If you have a mono VCR, connect one single audio cable to VCR audio out.
If you have stereo VCR with S-Video output, use S-Video cable instead of a
regular video cable. This type of connection delivers a better picture
compared to a standard VHS VCR. Do not connect a regular video cable
and S-Video cable to Video 1 or (Video 2) at the same time because it will
distort the picture.
Follow the steps below to hook up the VCR.
1) Hook up one pair of audio cables to the TV input and VCR output.
2) Hook up one video cable to the TV input and VCR output.
3) Connect coaxial cable wire to TV antenna on back of the TV and to “Out to TV”
on back of the VCR.
4) Connect coaxial cable wire that is coming out from cable box or antenna to “In
from ANT” on back of the VCR.
Back of TV
ANT
AUDIO
VIDEO
R
L
AV - IN
S - VHS
AV - OUT
From Cable, or Antenna
Stereo VCR
VIDEO
AUDIO
R
L
IN IN from ANTOut to TV
OUT
CH3
CH4
(When recording a program from TV, refer to your VCR’s instructions.)
9
English
Connecting to Camcorder:
This connection allows you to watch videos recorded on a Camcorder.
For normal hook up, you will need the following.
• One pair of audio cables
• One video cable
Note: If your Camcorder has S-video connection, use S-video cable instead of a
regular video cable. This will provide better picture performance than a
regular video cable.
Follow the steps below to hook up the Camcorder.
1) Hook up one pair of audio cables to the TV input and Camcorder output.
2) Hook up one video cable to the TV input and Camcorder output.
Note: Do not connect a regular video cable and S-Video cable to Video 1 or
(Video 2) at the same time because it will distort the picture.
S - VHS Camcorder
S – VIDEO
Camcorder
VIDEO
VIDEO
L
R
L
R
ANT
AUDIO
VIDEO
R
AV - IN
L
VIDEO
S-VHS
L
R
AUDIO
AV - OUT
Back of TV
Front or Side of TV
10
English
Connecting to an Audio Amplifier:
This connection allows you to have sound from external speakers for surround
sound.
For normal hook up you will need the following.
• One pair of audio cables
Follow the steps below to hook up an Audio Amplifier.
1) Hook up one pair of audio cables to the TV input and Audio Amplifier output.
Audio Amplifier
Audio
L
R
IN
OUT
To Cable, Cable
Box, or Antenna
Back of TV
ANT
AUDIO
VIDEO
R
L
AV - IN
S-VHS
AV - OUT
(For a specific hook up installation, refer to an audio amplifier’s instructions.)
11
English
Connecting to a Cable Box:
This connection allows you to receive stereo broadcasts only and watch
cable channels.
Note: You must subscribe cable service from your local cable company in order to
watch cable channels.
For normal hook up, you will need the following.
• One coaxial cable
Follow the steps below to hook up the Cable Box.
1) Locate the cable that is connected to the "ANTENNA OUT" terminal on your
cable box. (Some cable boxes may have "ANT OUT", "VHF OUT" or "OUT"
printed on.)
2) Connect the other end of this cable to the VHF/UHF antenna terminal on
the back of the TV.
Cable Box
ANTENNA
IN
ANTENNA
OUT
Back of TV
ANT
AUDIO
VIDEO
R
L
AV - IN
S - VHS
AV - OUT
VHF/UHV
(For a specific hook up installation, refer to Cable Box’s instructions.)
Power Interruptions
• Occasionally there may be power interruptions due to thunderstorms or other
causes. Remove the power cord from AC outlet when a power outage occurs.
When power has been restored re-plug power cord to AC outlet.
12
English
Features and Operation
HTF27R11 – 27” TV
1
11
2
3
4
5
7
6
8
1.
Picture Tube
7.
Channel Control Button
2.
Left Speaker
8.
Power-On Light
3.
Front Audio/Video Hookup Jacks
9.
Remote Sensor
4.
AV/TV Input Button
10. Power Button
5.
Menu Button
11. Right Speaker
6.
Volume Control Button
9
10
TV Rear Panel
3
1
AV2
4
2
1.
Super VHS Hookup Jack
3.
Cable TV Antenna Hookup
2.
Rear Audio/Video Hookup Jacks
V-video output
4.
Rear Audio/Video Hookup Jacks
V-video input
L-left channel output
R-right channel output
13
L-left channel input
R-right channel input
English
Features and Operation
HTF24R21 – 24” TV
10
AV1-IN
VIDEO
1
L
AUDIO
9
R
2
8
7
TV/AV
MENU
3
1.
–
4
+
–
+
6
5
Picture Tube
P
7.
Remote Sensor
2.
Left Speaker
8.
Power Button
3.
TV/AV Input Button
9.
Right Speaker
4.
Menu Button
10. Side Audio/Video Hookup Jacks
5.
Channel Control Button
6.
Volume Control Button
TV Rear Panel
3
1
AV2
4
2
1.
Super VHS Hookup Jack
3.
Cable TV Antenna Hookup
2.
Rear Audio/Video Hookup Jacks
V-video output
4.
Rear Audio/Video Hookup Jacks
V-video input
L-left channel output
R-right channel output
L-left channel input
R-right channel input
14
English
Features and Operation
HTF20R21 – 20” TV
1
11
2
3
4
6
5
7
1.
Picture Tube
7.
Channel Control Button
2.
Left Speaker
8.
Power-On Light
3.
Front Audio/Video Hookup Jacks
9.
Remote Sensor
4.
TV/AV Input Button
10. Power Button
5.
Menu Button
11. Right Speaker
6.
Volume Control Button
8
9
TV Rear Panel
3
1
AV2
4
2
1.
Super VHS Hookup Jack
3.
Cable TV Antenna Hookup
2.
Rear Audio/Video Hookup Jacks
V-video output
L-left channel output
R-right channel output
4.
Rear Audio/Video Hookup Jacks
V-video input
L-left channel input
R-right channel input
15
10
English
TV Features
Power Button: (10)
To turn power ON or OFF, press the power button on your TV set. Your TV
has "curtain effect" to give you theater view. You will see when you turn
power ON, the curtain will open to the sides on your screen. When you
turn power OFF, the curtain will come to the center and screen will be closed.
Channel Control Button: (7)
Press CH (+) button to go up and CH (–) button to go down on
your TV set.
Volume Control Button: (6)
Press button VOL (+) to increase the volume and VOL (-) button to
decrease the volume.
AV/TV Input Button: (4)
Press TV/AV button to select the video input (VIDEO 1, VIDEO 2 or TV
input)
Menu Button: (5)
Press menu button to set up the TV channels, picture, audio, clock/alarm,
V-Chip and other options. (refer to remote menu operations)
Front Audio/Video Hook Up Jack: (3)
This allows you to hook up other components such as Camcorder,
Game System, etc. for your convenience.
Rear Audio/Video Inputs: (2)
Rear A/V inputs are used for components you normally leave
connected to your TV. This provides improved picture and sound
quality compared to using the “everything on one wire RF antenna
input.”
Rear S-VHS Input: (1)
This input gives you high-resolution video picture when hooked up with
components such as DVD players, DIRECT TV systems, S-VHS/HI-8 VCRs,
Camcorders, or Internet set-top devices.
16
English
Remote Features
13
1
12
2
11
3
10
4
9
8
5
7
6
1.
Power Button
8.
Menu Select Button
2.
Time & Channel Display Button
9.
Audio Select Button
3.
Rating Button
TV Program (V-Chip Setup)
10. Direct Access Channel Select
4.
Last Channel Recall Button
5.
Volume (+ / -) Select Button
6.
Personal Preference Slect
7.
Channel (+ / -) Select Button
17
11. TV/AV Input Button
12. Mute Button
13. Sleep Timer
English
Remote Features
Power Button: (1)
To turn power ON or OFF, press power button on remote control.
Time and Channel Display Button: (2)
This will show you the current playing channel number.
Clock time will also be displayed if set.
Sleep Timer Button: (13)
This feature allows you to turn off television in pre-selected
minutes (120, 105, 90, 75, 60, 45, 30 and 15).
To cancel, keep pressing button until you exit out.
TV/AV Input Button: (11)
This button has three setting. A) Video1, B) Video 2, C) TV Pressing this
button will take you to the appropriate setting.
Mute Button: (12)
Press mute button to turn off the TV volume.
MUTE
Direct Access Channel Select: (10)
Follow the procedure below to select the channel.
One Digit Channel Select:
When you want to select one digit channel, press 0 and
other digit.
Two Digit Channel Select:
When you want to select two-digit channel, press one digit
after the other continuously.
Three Digit Channel Select:
When you want to select three digit channel, press and hold
#"1" until you see "1_ _" displayed on the screen then press other two digits.
Audio Button: (9)
You can select Stereo, Mono or SAP (Second Audio Programming) choice
by pressing audio button. Whenever you change the channel, you will see
the text message on the bottom left corner such as "Stereo Received",
"Stereo SAP Received" or "Mono Received". This message depends on the
broadcast format of the TV program.
18
English
Note: Some TV programs are broadcast in another sound channel; that is called
SAP (Second Audio Programming). Here the program is also broadcasts in
another language such as Spanish or French.
Channel (+ / -) Select Button: (7)
You can go up and down the channels by pressing CH (+)
button and CH (-) button.
Volume (+ / -) Select Button: (5)
You can increase the volume by pressing VOL (+) button and
decrease VOL (–) button.
Last Channel Recall Button: (4)
This feature automatically puts the last channel into the memory so when
you press the recall button that channel comes right back to watch.
Personal Preference Select Button: (6)
By pressing this exclusive personal preference button, you can select
different preset brightness shades for different picture environment. You
can select from Personal, Standard, Vivid, Soft and Light choice of
brightness shades for different picture environment.
Rating Button: (3)
Press this button to view television programs and movie rating codes. This
function enables you to block certain TV channels in according to the
V-CHIP requirement established by the FCC.
19
English
V–Chip Technology:
The "V-Chip Technology" allow you to use U.S. and Canada MOVIES and TV
PROGRAMS Guide ratings to block certain types of TV programs and movies.
To understand clearly about TV programs rating codes, read the following list:
U.S. TV Program Ratings
NR: Not Rated – this means that programs are not rated or rating does not apply.
TV-Y: For all children – this type of rated programs are designed for a very young
audience, including children from ages 2-6.
TV-Y7: Directed for older children –this type of rated programs may includecomedic
violence or mild physical, or may frighten children under the age of 7.
TV-G: General Audience – this type of rated programs contains little or no
violence, no strong language, and little or no sexual dialogue and situations.
TV-PG: Parental Guidance Suggested – this type of rated programs may contain
limited violence, some suggestive sexual dialogue and situations, and rare
language.
TV-14: Parents strongly cautioned – this type of rated programs may contain sexual
content, strong language and more intense violence.
TV-MA: Mature audience only – this type of rated programs may contain graphic
violence, explicit sexual content and profane language.
FV: this type of rated programs contain Fantasy and cartoon violence.
Violence: this type of rated programs contain violence.
S: this type of rated programs contain sex.
L: this type of rated programs contain offensive language.
D: this type of rated programs contain dialogue with sexual content.
20
English
To understand clearly about movies rating codes, read the following list:
U.S. Movies Rating Char t
NR: This means movie is not rated yet. It is pending government rating approval.
G: General Audience – this type of movie rating means all ages admitted to see the
movie.
PG: Parental Guidance Suggested – this type of movie rating means some material
may not be suitable for children.
PG-13: Parents Strongly Cautioned – this type of movie rating means some material
may not be appropriate for children under 13.
R: Restricted – This type of movie rating means children under 17 of age requires to
be with parent or guardian.
NC-17: This type of movie rating means no one 17 and under admitted.
X: This type of movie rating means adults only.
To understand clearly about Canadian programs rating codes, read the
following list:
Canadian English Rating Chart
E: Exempt – this type of rated programs contain news, sports, documentaries, talk
shows, music video’s, and variety of other programs.
C: This type of rated programs are intended for children under age 8. There is no
offensive language, nudity or sexual content.
C8+: This type of rated programs generally considered acceptable for children 8
years and over. There is no profanity, nudity or sexual content.
G: This type of rated programs generally suitable for all audiences.
PG: Parental Guidance Suggested – in this type of rated programs, some material
may not be suitable for children.
14+: In this type of rated programs, some content may not be suitable for viewers
under the age of 14. Parents are strongly cautioned not to have their children
view 14+ rated programs by pre-teens and early teens.
18: Adults Only – this type of rated programs are only for adult viewers only.
21
English
V-CHIP Set Up:
Pressing “Rating Button” on your remote control will bring V–Chip set up display on
TV. You will see the following on your TV screen.
V–CHIP MENU
Block
TV Rating
MPAA Rating
Select
Adjust
This function enables you to block certain TV channels in according to the V-CHIP
requirement established by the FCC.
Follow the procedure below to set the V-CHIP:
Press the Rating button. You will see the V-CHIP menu on your TV screen:
1. Press CH (+) button and CH (-) button to go up and
down the menu:
2. Press VOL (+) button and VOL (-) button to go into TV Rating and Movie Rating
menu.
3. Press MENU button to set the BLOCK ON and BLOCK OFF.
When TV rating is selected, you will see the following rating table on your TV
screen.
Rating FV
D
L
S
V
TV-PGU
U
U
U
U
TV-14U
U
U
U
U
U
U
U
TV-YU
TV-Y7U U
TV-GU
TV-MAU
Age Based Rating
Note: When block "ON" is selected, you will see "B" instead of "U". When block
"OFF" is selected, you will see "U" instead of "B".
22
English
When Movie rating is selected, you will see the following rating table on your TV
screen.
Movie Rating
NR
U
G
U
PG
U
PG13 U
R
U
NC17 U
X
U
Age Based Rating
Note: When block "ON" is selected, you will see "B" instead of "U". When block
"OFF" is selected, you will see "U" instead of "B".
• BLOCK OFF means block function is turned off. If the BLOCK is on "OFF"
mode then V-CHIP function will not be active to input V-CHIP signal.
• BLOCK ON means block function is turned on. If the block
is on "ON" mode then V-CHIP function is activated
to input V-CHIP signal.
Password
The "Default Password" preset by manufacturer is "0000". If you want to
change the preset password to your own password, just choose any four
digits that you can easily remember and set it. Once you set password for
the particular channel, that channel will be blocked. This way you are the
only one who can access that channel.
23
English
Menu Features
Picture Set up:
• Pressing MENU button once will bring Picture Set Up display on TV.
You will see the following on your TV screen.
PICTURE
BRIGHT
00
CONTRAST
00
COLOR
00
SHARP
00
TINT
+ 50
: SELECT
: ADJUST
Follow the procedure below to adjust the picture quality of your
choice:
1. Press CH (+) button to go up and press CH (–) button to go down
the menu.
2. Press VOL (+) button to increase and VOL (–) button to decrease the
level to your preference for each item.
Adjustment of Picture Quality:
To adjust the picture quality from the factory preset read the following:
BRIGHT: 00 being the lowest and 100 being the highest level of adjustment.
CONTRAST: 00 being the lowest and 100 being the highest level of adjustment.
COLOR: 00 being the lowest and 100 being the highest level of adjustment.
SHARP: 00 being the lowest and 100 being the highest level of adjustment.
TINT: - 50 being the lowest and + 50 being the highest level of adjustment.
• Bright (Brightness): By increasing the level, it will add more light to dark parts of
the picture and by decreasing the level, it will add more dark to light parts of the
picture.
• Contrast: By increasing the level, it will adjust white areas of picture and by
decreasing the level,it will adjust black areas of picture.
• Color: By increasing the level, it will increase color richness and by decreasing
the level, it will lower color to black and white.
• Sharp (Sharpness): By increasing the level, it will show cleaner and clearer
images and by decreasing the level, it will make picture smoother.
• Tint: By increasing the level, it will give red tint to skin color and by decreasing
the color, it will give green tint to skin color.
24
English
Audio Set Up:
• By pressing MENU button twice will bring you to Audio Set Up display.
You will see the following on your TV screen.
AUDIO
VOLUME
00
BALANCE
00
: SELECT
: ADJUST
Follow the procedure below to adjust the sound quality:
1. Press CH (+) button to go up and press CH (–) button to go down
the menu.
2. Press VOL (+) button to increase and VOL (–) button to decrease the
level to your preference.
Adjustment of Audio Quality:
Audio: 00 being the lowest or no volume at all and 100 being the highest
or loudest volume.
Balance: 00 being the even distribution of sound for both speakers and
you must keep at this level. The range of distribution is – 50 to +
50. If you increase the level, you will here more sound coming
out of right hand side speaker only. If you decrease the level, you
will here more sound coming out of left hand side speaker only.
Note: You must distribute the volume evenly to both speakers otherwise
you may blow up one of the speakers.
Language Option Set Up:
By pressing the MENU three times will bring you to Language set up
menu. You will see the following on your TV display:
OPTION
Language
English
Coring
On
C. Caption
CC1
Game
: SELECT
25
: ADJUST
English
Follow the procedure below to select one of the above options:
1. Press CH (+) button to go up and press CH (–) button to go down
the menu.
2. Press VOL (+) button or VOL (–) button to select your preference.
• Language: Use VOL (+/-) to select from English, Spanish, French or
Portuguese.
• Coring: Press VOL (+) to have Coring On or Press VOL (–) to have
Coring OFF. Coring is a term for video noise reduction. A built-in device
in the TV set to reduce video noise interference so the viewer is always
assured a clear, noise free picture.
• C. Captions: Press VOL (+) button or VOL (–) button to select Closed
Caption options. Closed Caption helps the hearing-impaired and
children learn read. It also aids in the teaching of English as a second
language. A built-in decoder displays the audio portion of a program as
text on the TV screen when this option is selected.
OFF:
When OFF displays on TV means C. Caption is set off.
CC1:
When C1displays on TV means C. Caption is set active.
CC2 to CC4: For other modes of video related information to be displayed by
broadcasters.
TT1:
For program guide and other information to be displayed by
broadcasters. (This blocks large portion of the picture on your TV).
TT2 to TT4:
For other modes of information to be displayed by broadcasters.
(This blocks large portion of the picture on your TV).
Note: Select C1 for full translation of the primary language such as English in your
area. Select C2 for secondary language translation such as Spanish or
whatever is being broadcast in our area.
26
English
Game:
• Your TV has been designed with a video game for your entertainment.
To play video game, select game on menu and press VOL (+) button.
You will then see the following display on TV:
777
RECALL: PLAY
DISPLAY: EXIT
Follow the procedure below to play the game:
1. First pick three numbers at random.
2. Press RECALL button to play the game. You will see numbers are
scrolling.
3. Press RECALL button three times to select three random numbers. This
will stop the scrolling and you will see three random numbers on
display. If your number matches the one you have picked then you win
the game. If not then start the new game.
4. Repeat first three steps to play the game again.
5. Press DISPLAY button to exit the game mode.
27
English
Clock Set Up:
• By pressing the MENU button four times will bring you to Clock set up menu.
You will see the following on your TV screen:
CLOCK
TIME
-- : --
ON –TIME
-- : --
OFF –TIME
-- : --
ATTENTION
-- : --
EXCHANGE
-- : --
POSITION
: SELECT
: ADJUST
Follow the procedure below to select one of the above options:
1. Press CH (+) button to go up and press CH (–) button to go down the menu.
• Time: Press VOL (+) button for MINUTES and VOL (–) button for
HOURS adjustment.
• On – Time: Press VOL (+) button for MINUTES and VOL (–) button for
HOURS adjustment. This feature works like an alarm clock. Your TV
will turn on at the set time.
• Off -Time: Press VOL (+) button for MINUTES and VOL (–) button for
HOURS adjustment. This feature works like a sleep timer. Your TV will
turn off at the set time.
• Attention: Press VOL (+) button to set MINUTES of attention and VOL
(–) button to set HOUR of attention. You will see the flashing time on
your TV when the attention time is up. Note: This exclusive feature
will remind you of important chores while watching TV. (e.g. time to
take pills, time to check cooking, time to call, time to do homework
etc..)
• Exchange: This exclusive feature switches you to your favorite channel
at the appropriate set time. Press VOL (+) button to set up time in
MINUTES to switch the channel and VOL (–) button to set up time in
HOURS to switch the channel.
• Position: This feature lets you store the favorite channel. Once you
store the channel number in this function, when the set time is up, it
will switch over to the set channel. This feature is used with the
Exchange feature. Press VOL (+) button to go up and VOL (–) button
to go down to select the channel.
28
English
Preset Set Up:
• By pressing MENU button five times it will bring you to preset set up.
You will see the following display on TV screen.
PRESET
Position
2
Add/Delete
Add
Antenna
Air
Auto-Search
: SELECT
: ADJUST
Follow the procedure below to select above options:
Press CH (+) button and CH (–) button to go up and down the menu.
• Position: Press VOL (+) button to go up and VOL (–) button to go down
to set the channel position.
The display will show the current playing channel.
• Add/Delete: Press VOL (+) button or VOL (–) button to add or delete
the channel from the stored memory.
• Antenna: Press VOL (+) button or VOL (–) button to select Air or Cable.
Channel Coverage by Antenna:
Antenna Type
Channel Range
VHF
2-13
UHF
14-69
CATV
1-125
• Auto -Search: Press VOL (+) button or VOL (–) button to do auto search.
In this process, the search automatically adds only the active channels in
your area to the TV’s memory. It deletes any channels on which
there is no broadcast.
29
English
Care and Cleaning
Warning: Always unplug your television to avoid electric shock before
cleaning. Ignoring this warning may result in death or injury.
Caution: Before using any cleaning products, always read and follow
manufacturer’s instructions and warnings to avoid personal
injury or product damage.
• When cleaning the television, turn off the TV and unplug it.
• Use a mild soap solution or window cleaner with a soft clean cloth.
• Do not use any abrasive, harsh chemicals, ammonia, chlorine bleach,
concentrated detergent, solvents, benzene, and other petroleum based
products. Some of these chemicals may dissolve, damage and/or
discolor your screen and the cabinet.
• Use a soft cloth dampened with water or a mild detergent solution for
cabinet and remote control cleaning.
• Do not use excessive moisture and wipe dry.
Warning: Do not spray any type of cleaning fluid directly on the screen.
30
English
Troubleshooting
Before you call for service, your television problems can be fixed with a few minor
adjustments. Identify the type of problem you are having and then try some
suggestions below to get your television going on again.
Power
TV is not turning on:
• Check the plug to see if it is plugged in properly. If the plug is plugged
in properly but TV is still not turning on then plug something else into to
outlet to make sure it is working. If outlet is dead then you will have to
use another working outlet. Make sure that you are aiming the remote
control directly at the TV where the sensor is located and stay with in the
proper range; that may be required in order to receive the signal from
remote. Replace new batteries into the remote control and try turning it
on. If TV still not turning on after replacing remote batteries then there
could be a sensor problem. Try turning it on by pressing power button
on your TV.
TV has power but no sound and no picture:
• Switch to another channel. Possibly inactive channel may be tuned in.
Check the hook up of other components such as cable box, receiver and
set-top box. Check if you need to have any one of above components
turn on in order to have your TV on. Check if you have pressed
TV/Video button on your remote by mistake. This can bring your
monitor screen on. Press TV/Video button again to go to channel. Make
sure TV/VCR button on VCR is in correct position when using VCR.
Make sure that TV is tuned to the same channel as the switch on back of
VCR if you are watching a VCR.
Picture
Snowey Video:
• Check antenna connections. Adjust antenna location.
Multiple Images:
• Check your cable wire connection. Adjust antenna connection and
location.
31
English
No picture and No video (blank screen)
• Make sure the plug is in active outlet. Check cable connections.
Check second video source operation e.g. receiver. You may need to
change to TV mode to go to channel.
TV turns Off/On by itself
• This is due to power surge. Check sleep timer. Check alarm On/Off
Time and see if you have set up alarm properly. Check Clock Time
Remote
Some buttons on remote do not work
• This may occur due to not cleaning remote properly. You may have
dropped remote couple of times and damaged some buttons on your
remote. May need to replace remote.
Sometimes remote works and sometimes does not work
• Make sure batteries are not dead. May need to replace new batteries.
Not able to select certain channels
• You may need to add channels into memory. Check auto program set
up. Check your cable box setting.
Sound
Noisy audio
• Broadcasting reception may not be clear. Adjust Antenna location and
connection.
No audio but picture is on
• Check mute and increase volume button. Change to different channel to
see if the volume is on. Check if you need to turn on other component
such as receiver. Check if it is on TV mode.
Poor audio quality
• Check audio setting such as Stereo verses Mono on receiver.
32
English
Glossary
Antenna
An external device connected to a TV to receive the electromagnetic signal it needs
to produce the picture. They can be mounted on the roof, in the attic, or on top of
the set itself.
Attention
This feature reminds you of important chores while watching TV.
Audio
You can select Stereo, Mono or SAP choice by pressing audio button on the remote
control. Whenever you change the channel, you will see the text message on the
bottom left corner such as "Stereo Received", "Stereo SAP Received", "Mono
Received". This message depends on the broadcast format of the TV program.
Audio/Video Inputs
This allows you to hook up components such as VCR, DVD Player, Camcorder,
Game System, Set Top Boxes, Home Theater System, Cable Boxes and Internet
Set-Top devices etc.
Auto Closed Caption on Mute
In this feature, text appears on screen when mute button is pressed. When you have
to mute the TV, you will not miss a word of dialogue.
Auto Search
A feature on TVs and VCRs that automatically searches for active channel signals
and inputs them into its system, while locking out inactive signals.
Bilingual Broadcasts
The simultaneous transmission of television programs in more than one language,
using SAP (Second Audio Programming) technology.
Bright (Brightness)
You can adjust brightness of the picture by going into picture set up menu. By
increasing the level, it will add more light to dark parts of the picture and by
decreasing the level, it will add more dark to light parts of the picture.
Cable Ready/Compatible
Terms used for TV or VCR that is capable of receiving all channels offered by cable
television. This includes mid-band and super channels, without the converter box
that is supplied by the Cable Company.
33
English
Cathode Ray Tube (CRT)
A color picture tube used in television system. Electro guns generate beams that are
guided to illuminating small red, green and blue phosphor targets on the surface.
This produces colors and images on the screen.
Channel Button
This button allows you to go up and down the channels by pressing CH (+) and CH
(-) button.
Channel Recall
This feature automatically puts the last channel into the memory so when you press
the recall button that channel comes right back to watch.
Closed Caption
Closed Caption helps the hearing-impaired and children learn to read. It also aids
in the teaching of English as a second language. A built-in decoder displays the
audio portion of a program as text on the TV screen when this option is selected.
Color
You can adjust the color of the picture by going into picture set up menu. By
increasing the level, it will increase color richness and by decreasing the level, it will
lower color to black and white.
Contrast
You can adjust the contrast of the picture by going into picture set up menu. By
increasing the level, it will adjust white areas of picture and by decreasing the level,
it will adjust black areas of picture.
Coring (Video Noise Reduction)
The term coring is used for video noise reduction to reduce video noise interference
so the viewer is always assured a clear, noise free picture.
Curtain Effect
Exclusive "Theater Curtain" On/Off Digital Circuitry eliminates "Screen Flash" while
prolonging the life of the picture tube.
Direct Access Channel Select
By directly entering channel number from 0 to 9 on your remote will give you quick
and easy access to switch from one channel to another. If you want to select a two
or three digit channel number, by pressing (- -) button twice will give you access to
enter your desired channel numbers form 10-99. By pressing (- -) three times will
give you access to enter your desired channel numbers from 100 and up.
34
English
Display Button
This will show you the current playing channel number. Clock time will also be
displayed is set.
Exchange
This feature lets you switch to your favorite channel at the appropriate set time.
Menu Button
This allows you to access all the TV menus such as Picture Set Up, Audio Set Up,
Language Option Set Up, Clock Set Up and Preset Set Up.
MTS Stereo Sound
A built - in amplifier that gives you stereo sound. An amplifier is used to increase
the voltage of power of any power signal that is fed to it. MTS is the U.S. standard
for broadcast stereo TV sound. A large number of TV shows are now broadcast in
stereo sound using this technology.
Mute
This feature allows you to block the volume of the TV when the button is pressed.
Parental Lock/Channel Block
This feature allows you to program security codes to certain channels; typically used
by parents to prevent children from viewing "adult" channels. Channels are blocked
and unblocked using the TV set’s wireless remote control.
Personal Preference Button
This feature allows you to select different preset brightness shades for different
picture environment. You can select from Personal, Standard, Vivid, Soft and Light
choice of brightness shades for different picture environment.
Position
This feature lets you store the favorite channel. Once the channel is stored in this
function, when the set time is up, it will switch over the set channel. This feature is
used in conjunction with the "Exchange" feature.
Rating Button
This allows you to view Television programs and movies rating codes. This function
enables you to block certain TV channels in according to the V-CHIP requirement
established by the FCC.
Sleep Timer
This feature allows you to turn off television in pre-selected minutes (120, 105, 90,
75, 60, 45, 30 and 15).
35
English
Sharp (Sharpness)
You can adjust the sharpness of the picture by going into picture set up menu. By
increasing the level, it will show cleaner and clearer images and by decreasing the
level, it will make picture smoother.
Super VHS Input
This input gives you "High Resolution" video picture when hooked up with
components such as DVD players, Direct TV systems, S-VHS/HI-8 VCRs,
Camcorders, or Internet Set-Top devices.
Tint
You can adjust the tint of the picture by going into picture set up menu. By
increasing the level, it will give red tint to skin color and by decreasing the color it
will give green tint to skin color.
Volume Button
This allows you to increase and decrease the volume of the TV by pressing VOL (+)
and VOL (-) button.
V-Chip Technology
The "V-Chip Technology" allow you to use U.S. and Canada Movies ad TV
Programs Guide ratings to block certain types of TV programs and movies.
36
Warranty
This Haier brand product, when shipped in
its original container, will be free from
defective workmanship and materials, and
agrees that it will, at its option, either repair
the defect or replace the defective product
with a new or re-manufactured equivalent at
no change to the purchaser, for parts or
labor for the periods set forth below:
This warranty does not apply to the
appearance of the product or the exterior of
the product, which has been damaged or
defaced, altered or modified in design or
construction. It does not apply to the
additional excluded items set forth below:
The warranty commences on the date the
item was purchased and the original
purchase receipt must be presented to the
authorized service center before warranty
repairs are rendered.
The limited warranty described herein is in
addition to whatever implied warranties may
be granted to purchasers by law. ALL
IMPLIED WARRANTIES INCLUDING THE
WARRANTIES OF MERCHANTABILITY AND
FITNESS FOR USE ARE LIMITED TO THE
PERIOD(S) FROM THE DATE OF PURCHASE
SET FORTH BELOW. Some states do not
allow limitations on how long an implied
warranty lasts, so the above limitation may
not apply to you.
Neither the sales personnel of the seller nor
any other person is authorized to make any
warranties other than those described herein,
or to extend the duration of any warranties
beyond the time period described herein on
behalf of Haier.
The warranties described herein shall be the
sole and exclusive warranties granted by
Haier and shall be the sole and exclusive
remedy available to the purchaser. Correction
of defects in the manner and for the period
of time described herein, shall constitute
complete fulfillment of all abilities and
37
responsibility of Haier to the purchaser with
respect to the product, and shall
constitute full satisfaction of all claims,
whether based on contract, negligence, strict
duality or otherwise. In no event shall Haier
be liable, or in any way responsible for any
damages or defects in the product which
were caused by repairs or attempted repairs
performed by anyone other than an
authorized service center or dealer; nor shall
Haier be liable, or in any way responsible
for incidental or consequential economic or
property damage. Some states do not allow
the exclusion of incidental or consequential
damages, so that above exclusion may not
apply to you.
THIS WARRANTY GIVES YOU
SPECIFIC LEGAL RIGHTS. YOU MAY
ALSO HAVE OTHER RIGHTS WHICH
VARY FROM STATE TO STATE.
Warranty period for this product: 90 days for
Labor, one year for parts, and 2 years for
picture tube.
Additional items excluded from warranty
coverage: non-rechargeable batteries.
Where to obtain service: For the location of
the nearest Haier authorized service center or
to obtain product literature, accessories,
supplies or customer assistance,
please call 1-877-337-3639.
What to do to obtain service: ship or carry in
your product to an authorized service dealer
or center. Be sure to have proof of purchase.
If you ship the product, be sure it is
packaged carefully.
Haier America
New York, NY 10018
IMPORTANT
Do Not Return This Product To The Store
If you have a problem with this product, please contact the "Haier Customer
Satisfaction Center" at 1-877-337-3639.
DATED PROOF OF PURCHASE REQUIRED FOR WARRANTY SERVICE
IMPORTANT
Ne pas Réexpédier ce Produit au Magasin
Pour tout problème concernant ce produit, veuillez contacter le service des
consommateurs ‘Haier Customer Satisfaction Center’ au 1-877-337-3639.
UNE PREUVE D’ACHAT DATEE EST REQUISE POUR BENEFICIER DE LA GARANTIE.
IMPORTANTE
No regrese este producto a la tienda
Si tiene algún problema con este producto, por favor contacte el "Centro de Servicio al
Consumidor de Haier" al 1-877-337-3639 (Válido solo en E.U.A).
NECESITA UNA PRUEBA DE COMPRA FECHADA PARA EL SERVICIO DE LA GARANTIA
Made in China
Fabriqué en Chine
Hecho en China
®
What The World Comes Home To
HTF27R11-2
Issued: September-01
Haier America
New York, NY 10018
Printed in China
TM
Part # TV-9999-01