1
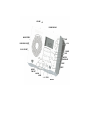
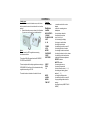
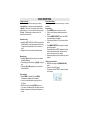
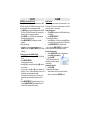
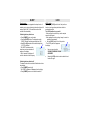
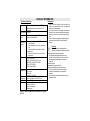
VOLUME
FM MW SW1 SW2
MONO/STEREO
LIGHT
EARPHONE SOCKET
H/M
DC 4.5V SOCKET
POWER
LOCK
METER
RADIO/BUZZ
SLEEP
RESET
MEMO/
TIME SET
ALARM
MODE
1… 0
FREQ
Batteries
CONTROLS
Leather cover
Your G2000A comes with a leather cover, which is use
both to protect the set and to use the radio in an inclines
position.
•
Rotate the leather cover as shown in the illustration.
You can now use the set in an inclined position.
Notes
The unit meets the CEE regulations concerning
interference radiation.
This product fulfills European directives 89/336/EEC,
73/23/EEC and 93/68/EEC.
This set complies with the safety regulations according to
VDE 0860/BS 415 and thus with the international safety
regulations according to IEC 65.
Controls _
DC 4.5 socket
Earphone
socket
MONO/STEREO
VOLUME
FM MW SW1 SW2
LIGHT
H /M
POWER
LOCK
METER
RADIO/BUZZ
SLEEP
BATTERIES
RESET
FREQ
1...0
The model number is located on the back of the set.
MODE
ALARM
MEMO/
TIME SET
- connection socket for a mains
adapter
-socket for connecting stereo
headphones
-for mono/stereo selection
-for adjusting the volume
-band selector switch
-for illuminating the display
-for tuning to a radio station
for setting hours/minutes
-for switching the radio on and off
-for blocking all button functions
-for selecting the short-wave band
-for setting the alarm to radio or buzzer
-for switching on the sleep function
-inside the batteries compartment:
SW FREQ. selector
AM STEP selector
-for erasing the memory
-for entering frequencies
-for direct numeric entries (1 .. .0)
for selecting and storing preset
stations (1 .. .5)
-to change the display mode
-for switching the alarm on and off
-for programming stations into the
memory
for setting the time (HOME / DUAL /
ALARM)
Display
Display
The display provides information about the functioning of
your world receiver:
•
•
•
While the radio is switched off, the current time will be
indicated. The first time it is used, or if the memory is
erased, ‘0:00’will appear on the display.
When the radio is switched on, the frequency in kHz
or MHz and the wave band FM, MW, SW1 or SW2 will
be indicated.
When the alarm is switched on, the alarm mode
(Alarm and
indicated.
radio or
Switch the display mode
You can change the information that appears on the
display of the G-2000A with the MODE button.
When the radio is off:
-The display shows the current time mode (HOME or DUAL
).
• If you wish to check the other settings, press MODE
briefly.
-The display changes each time you press the button.
-The display will return to the current time automatically
after five seconds (or press MODE briefly).
buzzer) will be
•
this indicator lights up when a certain station is
correctly turn to.
•
•
•
indicates stereo reception for FM.
SLEEP indicates that the sleep time function is active.
LOCK indicates that all buttons are locked.
•
•
indicates that batteries should be replace.
MEMO lights up when you are storing stations.
When the radio is on:
- The display shows the frequency.
• If you wish to check the other settings, press MODE
briefly.
- The display changes each time you press the button.
- The display will return to the frequency indication
automatically after five seconds (or press MODE briefly).
POWER SUPPLY
Batteries
• Open the battery compartment and insert 3 alkaline
batteries of the type R6, UM 3 or AA.
• Remove the batteries when they are exhausted or if they
are not going to be used for a long period of time.
Note: If the DC 4.5 V socket is in use, the battery supply
will switch off automatically.
Note on Environmental Protection
Do not throw exhausted batteries in the household refuse.
Hand over the old batteries to you deader or public
collecting when buying new ones.
Warning for weak batteries:
When the batteries run low, the sound volume declines
gradually. The indication
appears on the display.
Continued operations with low batteries cause the radio to
turn off automatically, other malfunctioning and losing
programmed time settings and preset radio stations. In this
case, remove the batteries and press a paper clip through
the RESET hole.
Readjust the time settings and the present radio stations.
To prevent that the radio is switched on accidentally, use
the LOCK-switch when packing the radio or putting it away.
AC Main Adapter (not included)
You can connect the set to the mains using
a mains adapter.
Only use a mains adapter, which supplies
4.5V DC with the negative pole at the
center pin of the plug.
Before connecting the mains adapter
• Check that the mains voltage indicated on the type
plate of the adapter matches your local mains voltage.
• If the mains adapter equipped with a voltage selector,
set this to the local voltage.
• Connect the mains adapter to the DC 4.5V socket of
the set and to the wall socket.
Power failure
• If the power supply is interrupted, the programmed time
settings and preset radio stations will be kept in the
memory for 10 min. or more.
• If the AC power is disconnected from the 4.5 DC
socket, the batteries (if present) will take over the
supply.
GENERAL
Time zones
Short Wave (SW)
The earth rotates around its axis in 24 hours and around
the sun In one year.
These movements are responsible for the time differences
and the seasons on earth. Due to the direction of rotation
of the earth it is always earlier in the day to the west of
where you are and later in the day to the east of where you
are.
The earth is divided into 24 time zones with a difference of
one hour between adjacent zones. The system is based on
one standard time zone, namely UTC (Coordinated
Universal Time), previously GMT (Greenwich Mean Time).
Generally speaking, short-wave stations announce their
broadcasts in UTC.
To check which time zone you are now at, use the world
map on the back of the set.
Your world receiver can receive a number of wavebands.
Most of these are known and tuning for the required station
will soon become a matter of routine, as the stations are
always to be found at the same place on the dial and are
thus tied to a fixed wavelength and frequency. With short
wave this is unfortunately not always the case. Short wave
transmitters have to change their wavelengths fairly often.
In the short-wave range between 10 and 100-metre
wavelength (frequencies of 30-3 MHz resp.) nine bands
between 10 and 50 metres are allocated to short-wave
broadcasting, with another four bands between 60 and 120
metres for broadcasting in the earth’s tropical areas. The
latter are roughly located between the latitudes of 30° north
and 30° south, i.e. around the equator. Most short-wave
broadcasting bands, indicated in the shortwave table, are
allocated for the whole world and can be used for
international broadcasting. They are so far the only
wavelengths which allow direct radio reception over long
distances. So in addition to the broadcasting services,
there are a large number of other users of short wave, for
example radio amateurs, shipping and aviation, radio
navigation etc.
SW Tuning mode (meter band/continuous).
Your G-2000A has a built-in SW frequency (SW
FREQ.) tuning mode selection switch inside the battery
compartment.
• Select A, if you only want to get reception for the
stations with the frequency within the meter-bands.
• Select B, in case you wish to obtain the frequencies
in between the gaps of the meter bands.
RADIO RECEPTION
AM STEP selector (MW)
The minimum 'frequency distance' (span division) between
adjacent radio stations (measured in kHz) is standardized
all over the world.
However, North and South America use another standard
than the rest of the world.
This means that the radio should use a tuning step
according to the standard concerned in order to obtain
accurate radio tuning.
The AM STEP switch (in the battery compartment) allows
accurate tuning for both standards.
Position 10kHz for the Americas
- MW tuning step 10kHz;
Position 9 kHz for the rest of the
world
- MW tuning step 9 kHz;
Aerials
• For FM reception extends the telescopic aerial fully. To
improve the reception you can incline and rotate the
aerial. If the FM signal received is too strong (in the
direct vicinity of the transmitter) you can retract the
aerial.
• For the medium wave (MW), the set has a built-in aerial,
so the telescopic aerial is not needed. You can direct the
aerial by turning the set itself.
• For short wave reception (SW) extend the telescopic
aerial and position it vertically.
Radio reception
• Ensure that the LOCK-switch is off.
• Press POWER to switch the radio on.
- The frequency and the wave band will appear on the
display.
• Adjust the volume with the VOLUME control.
• You can connect headphones to the earphone socket
- The loudspeaker will then be switched off.
• Set the wave range with the FM MW SW1 SW2 switch
• If you select SW with the FM MW SW1 SW2 switch,
press METER to select the required meter band of short
wave (see the SW Tuning Table
on page 2).
- The chosen short-wave band and
the frequency will appear on the
display.
• Tune to a radio station either manually, automatically,
directly or with the PRESET buttons, see Next page.
FM MONO/STEREO
- When '
' appears on the display, you are receiving an
FM stereo transmitter. If you are listening with headphones,
you will hear the FM station in stereo.
• A disturbing noise, due to a weak FM stereo signal, can
be suppressed by setting MONO/STEREO to MONO.
' indication goes out and you will hear the FM
- The '
station in mono.
• Press POWER once again to switch the radio off.
- The display will now indicate the current time.
RADIO RECEPTION
Tuning to a station
There are three possibilities for tuning in to a station:
- Automatically - the stations are sought automatically.
- Manually - This is easy if the frequency of the station is
already known (e.g. from your radio and television guide).
- Directly - The easiest way to obtain a station if its
frequency is already known.
Automatic tuning
• Keep [H] or [M] (TUNING UP or DOWN) pressed down
until thefrequency on the display changes continuously.
Tuning will stop automatically as soon as a station is
found.
• Repeat this until you have found the desired station.
Manual tuning
• Keep [H] or [M] pressed down until you come close to
the desired frequency.
• Then briefly press the other button ([H] /[M]); tuning will
stop.
• Then press [H]] or [M] repeatedly until you reach the
desired frequency.
Direct selection
• When POWER is switched ON, press [FREQ.].
- The frequency disappears from the display.
• You can now enter the station’s frequency with the
[1...0] keys.
• Confirm the entry by pressing [FREQ.] once more.
- If you insert an invalid frequency, the display shows ‘Err ‘
• Repeat the steps above, making sure the frequency is
correct.
Preset radio stations
You can program 20 stations into the memory, 5 on each
waveband.
Programming
• Press [POWER] button to switch on the radio.
• Tune to a radio station automatically, manually or
directly.
• Press the [MEMO/TIME SET] button. The 'MEMO'
sign starts flashing on the display.
• Press the preset button (1...5) to store the selected
station.
• Press [MEMO/TIME SET] button again to complete
the storing procedure.
- The program indicator "MEMO" disappears from the
display, and the preset number that was stored is
shown in the right corner of the display.
• Repeat these steps for the other stations you wish to
program.
Calling up preset stations
• Select the wave range with [FM MW SW1 SW2]
switch.
• Press one of the [1...5] buttons.
- The frequency and the PRESET number will appear
on the display:
CLOCK
ALARM
HOME/DUAL time display Priority
Your G-2000A allows you to set two different times: HOME
and DUAL. Normally, the HOME time has priority. You can
also set the DUAL time to be displayed constantly.
• The [MODE] button toggles the display between HOME,
DUAL and ALARM time indication. After 5 seconds, the
display will return to the previous indication.
• Press [MODE] once. The DUAL time appears and the
DUAL indication starts flashing.
• Press [MEMO/TIME SET] to display the dual time
constantly.
- DUAL stops flashing.
• To display the home time constantly again, press
[MODE] twice and then [MEMO/TIME SET] while HOME
is flashing.
Alarm function
You can use your world receiver as an alarm clock. To use
this function you first have to set the alarm time. You will be
woken with a bleep, or by the radio.
Setting the alarm time
•
Press [MODE] repeatedly until ALARM starts flashing
on the display.
•
Press [MEMO/TIME SET].
- The time digits start flashing.
•
Use the [H] button to set the hours and the [M] button
to set the minutes (in the same way as the clock time).
•
Press [MEMO/TIME SET] to store the setting
- If you do not press [MEMO/TIME] SET, the display will
return to the previous time setting after 5 seconds.
Selecting the alarm mode
•
Use the [RADIO/BUZZ] switch to select the alarm
mode. Switching the alarm on
•
Press [ALARM].
- ‘ALARM’and the symbol for the
selected alarm mode will appear
on the display:
Switching the alarm off
•
Press [ALARM].
- The alarm signs will disappear.
•
When the alarm sounds, you can also switch the
alarm off by pressing the [POWER] button.
Setting the current time (HOME or DUAL)
• Press [MODE] to set the display in HOME or DUAL time
mode.
• Press [MEMO/TIME SET].
- The time digits start flashing.
• Use the [H] button to set the hours and the [M] button to
set the minutes.
- A single press of the [H] or [M] button advances the
setting by 1 hour or 1 minute respectively. If the button is
held pressed, the setting advances rapidly.
- The minutes will not be carried over to the hours if, for
example, the minutes indication changes from ‘59’to
’00’.
• Press [MEMO/TIME SET] to store the setting - If you do
not press [MEMO/TIME SET], the display will return to
the previous time setting after 5 seconds.
SLEEP
Sleep function
Your world receiver is equipped with a sleep function. It
enables you to continue listening to the radio while you fall
asleep. After 90, 80, 70 10 minutes the radio will be
switched off automatically.
Switching the sleep function on
• Press [POWER] to turn on the radio.
• Press the [SLEEP] button. The display shows the
‘SLEEP’indication and the preset sleep time (‘60’).
• Keep [H] or [M] pressed until the desired sleep time
(10… 90) is reached.
- The ‘SLEEP’ indication and the
sleep time you have selected will
appear on the display.
- After 5 seconds, the display will
switch to indication of the frequency.
Switching the sleep function off
The sleep function can be switched off before the set time
has elapsed:
• Press [POWER] once briefly.
- The 'SLEEP' indication will disappear from the display.
• Press [POWER] once more to switch the radio off.
LOCK
LOCK switch
By setting the [LOCK] switch to the ‘lock’position, a
function is no longer interrupted when a button is
accidentally touched.
The LOCK-position is very useful:
- When carrying the radio with you, radio reception
cannot be interrupted;
- When packing the radio or putting it away, it cannot be
switched on accidentally.
• Set the [LOCK] switch in the ‘lock’position.
- The ’LOCK’-symbol will appear on
the display:
•
•
Now you can only adjust
VOLUME, FM MW SW1 SW2, MONO/STEREO and
ADIO/BUZZ.
Reset the [LOCK] switch in order to switch the lock
function off again.
GENERAL INFORMATION
Technical specifications
Power supply
Output power
Batteries: By 3x 1.5 V batteries (lEC LR 6)
External supply: By a commercial 4.5 V DC
mains unit
250 mW
Built-in
aerials
Telescopic aerial for FM and SW
Ferrite rod aerial for MW
Connecting
sockets
Wavebands:
Tuning steps:
Dimensions
Weight:
Accessories:
For external voltage supply DC 4.5V:
Coaxial socket
Outer diameter 5.5 mm, inner diameter 2.1
mm
Neutral conductor connected to chassis.
For earphone:
Socket for jack plug of 3.5 mm, 32 Ohm
impedance
FM: 87.5-108 MHz
MW (10 kHz steps): 520-1710 kHz
MW (9 kHz steps): 522-1620 kHz
SW1: 2.30-7.40 MHz
SW2: 9.40-26.10 MHz
FM: 50 kHz
AM: 5 kHz
resp. MW: / 9 / 10kHz
(w x h x d):approx. 142 x 92 x 35 mm
approx. 330 g
ldent card
Instructions for use
stereo in-earphones
leather cover
Subject to technical alterations and alterations in styling E.
and O.E.
Maintenance
• Only a soft cloth which picks up dust should be
used to clean the cabinet. Do not use aggressive
polishes or cleaning agents.
• Do not leave the set for any length of time in direct
sunlight or other places where high temperatures
can occur, such as in a car which is parked in the
sun.
• Rain, moisture (e.g. dripping and splashing) and
excessive heat are bad for the radio and the
batteries.
Recycling
Please observe the local regulations
regarding the disposal of packing materials,
exhausted batteries and old equipment.
• All redundant packaging material has been
omitted. We have done our utmost to make the
packaging easily separable into three monomaterials:
- cardboard (box),
- expandable polystyrene (buffer)
- polyethylene (bags, protective foam sheet)
• Your set consists of materials which can be
recycled if disassembled by a specialized
company.
• Do not dispose of exhausted batteries with your
household waste.
TROUBLESHOOTING
If a fault occurs, first check the points listed below before taking the set for repair
If you are unable to remedy a problem by following these hints, consult your dealer or service center.
WARNING: Under no circumstances should you try to repair the set yourself, as this would invalidate the guarantee.
Problem
Possible cause
Solution
Power button does not work
[LOCK] switch is activated
Switch off the [LOCK] function
Adjust the VOLUME
No sound
VOLUME is not adjusted
Disconnect headphones
Headphones are connected
Insert fresh batteries
Batteries are exhausted
Insert the batteries correctly
Batteries are incorrectly inserted
Connect the mains lead properly
Mains lead is not securely
connected
Poor sound quality
Poor radio reception
Alarm does not function
Set does not react to operation
of any button
Malfunctioning and losing time
settings and preset radio
stations
Batteries are nearly exhausted
Weak radio aerial signal
Interference by the vicinity of
electrical equipment like TVs,
video recorders, computers,
thermostats, fluorescent lamps
(TL) engines, etc.
Alarm time is not adjusted
Headphones are connected
Electrostatic discharge
[LOCK] switch is activated
Continued operation with weak
batteries
Insert fresh batteries or use a mains adapter
Aim the aerial for best reception:
FM: incline and rotate telescopic aerial
MW: rotate the entire set
SW: extend telescopic aerial vertically
Keep the set away from electrical equipment
Adjust the alarm time
Disconnect the headphones
Switch off the set, disconnect the mains plug,
reconnect after a few seconds.
Switch off the [LOCK] function
1 Remove the batteries
2 Press a paper clip through the [RESET] hole.
3 Insert fresh batteries
4 Readjust the time settings and the preset
stations
Advice: Set the [LOCK] switch to ON when
packing the set or putting it away.