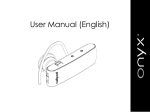
1
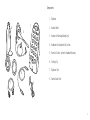
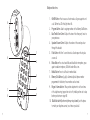
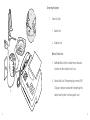
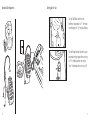
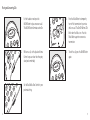
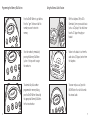
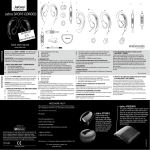
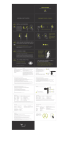
For more information and technical specifications:
GN 4170
headset telephone
Hands-free ease with sleek, space-saving phone
www.gnnetcom.com
CORPORATE HEADQUARTERS
77 Northeastern Blvd.
Nashua, NH • 03062
1-800-826-4656
1-603-598-1100
Fax: 1-603-598-1122
© 2002 GN Netcom, Inc. • All rights reserved.
54-0374A • Printed in China.
User Guide
Components
1. Telephone
1
4
ff
c
1
b
pgm
ab c
2
def
3
ghi
tuv
9
pe
0
#
ial
tco
flash
m
4. Headband with Leatherette Ear Cushion
x
w y
z
o
8
red
Ne
6
qr
7
r
*
mn
o
6
3. Headset with Earwrap Wearing Style
tone
jkl
5
s
p
4
5
2. Headset Holder
on/o
a
3
vol
5. Foam Ear Cushion - option for Headband Wearing
6. Clothing Clip
7. Telephone Cord
8
8. External Audio Cord
7
2
3
Earwrap Use & Wearing
Headband Use & Wearing
Proper Positioning
Attach Clothing Clip
Converting from Earwrap to Headband
Left Ear Wearing
Left Ear Wearing
Proper Positioning
Attach Clothing Clip
Converting from Headband to Earwrap
4
5
Telephone Functions
1.
9
1
8
2
3
6
7
4
6
5
On/Off Button: Press to access a line to make a call; press again to end
a call. Button has LEDs that light when On.
2. Program Button: Used in assigning numbers to the Memory Dial Buttons.
3. Bass/Treble Tone Control: Adjusts the tone of the other party’s voice to
your preference.
4. Speaker Volume Control: Adjusts the volume of the sound you hear
through the headset.
5. Flash Button: Hold for 1 second to end a call and reopen line to place
a new call.
6. Mute Button: Press to activate Mute and disable the microphone, press
again to enable microphone; LEDs blink when Mute is on.
7. Redial Button: Press to call the last number dialed.
8. Memory Dial Buttons (a, b, c): Automatically dials phone number
programmed to the button; three numbers can be stored.
9. Ringer Volume Selector: Three position adjustment to set the volume
of the telephone ring; top position sets to Hi, middle position sets to Low,
bottom position turns ringer Off.
10. Dial Mode Switch (bottom of phone, not pictured): sets the phone
to match your telephone service, touch tone or pulse dial.
7
Connecting the System
1
1.
1
Connect all Cords.
1.
Headset Cord
2.
Telephone Cord
Optional Connections
4
3.
Fax/Modem/Data Cord (not included): transmit data across
the phone line when the phone is not in use.
3
4.
2
External Audio Cord: 3.5mm phono plugs to connect MP3,
CD player or computer soundcard for listening through the
headset when the phone is not being used for a call.
8
9
Standard Configuration
Setting Up for Use
on/off
c
b
a
pgm
jk l
t
4
qrs
7
uv
8
o
no
6
xyz
9
vol
per
*
tone
w
5
gh i
f
3
2
1
p
de
bc
m
a
0
#
1.
Set the Dial Mode Switch on the
bottom of your phone to “t” for touch
tone dialing or to “p” for pulse dialing.
2.
Set the Ringer Volume Selector to your
preferred setting: top position sets ring
to “hi”, middle position sets ring to
“low”, bottom position sets ring “off”.
flash
redial
Netcom
on/off
c
b
jk l
5
gh i
p
t
4
qr s
f
3
2
m
a
pgm
de
bc
1
7
uv
8
o
6
xyz
9
vol
pe r
*
tone
no
w
a
0
#
flash
redial
Netcom
10
11
Placing and Answering Calls
12
1.
Put the headset on and press the
On/Off Button to place or answer a call.
The On/Off Button illuminates when On.
4.
Press the Mute Button to temporarily
turn off the transmission of your voice
while on a call. The On/Off Button LEDs
blink when the Mute is on. Press the
Mute Button again to resume voice
transmission.
2.
While on a call, set the Speaker Volume
Control so you can hear the other party
clearly and comfortably.
5.
To end the call, press the On/Off Button
again.
3.
Set the Bass/Treble Tone Control to your
preferred setting.
13
1.
With the telephone Off (no LEDs
illuminated), turn on your audio device
(such as a CD player). You should now
hear the CD player through your
headset.
on/off
c
b
a
pgm
de
2
jk l
5
gh i
4
qrs
f
3
bc
1
m
a
7
uv
8
o
6
xyz
9
vol
per
*
tone
no
w
Press the On/Off Button to get dialtone.
Press the “pgm” button and dial the
number you want to store into
memory.
t
1.
Using the External Audio Feature
p
Programming the Memory Dial Buttons
0
#
flash
redial
Netcom
14
2.
Store the number by immediately
pressing the Memory Dial Button
(a, b or c) that you wish to assign
the number to.
2.
Volume to the headset is set from the
audio device (CD player) and not from
the telephone.
3.
To automatically dial a number
programmed for memory dialing,
press the On/Off Button followed by
the appropriate Memory Dial Button
for the stored number.
3.
To answer or place a call, press the
On/Off Button. Your call will override
the external audio.
15
FCC Notice to Users
Upon request only, you must notify your telephone utility company (telco) of your intention to
install or permanently remove an FCC Part 68 registered device or system. Include the FCC
Registration Number and the Ringer Equivalence Number (REN) located on the amplifier label.
The REN is the number of recommended devices that may be connected to the telephone
line. An excessive REN may cause the equipment not to ring in response to an incoming call.
In most areas, the sum of the RENs of all equipment on a line should not exceed 5. This
equipment uses FCC compliant RJ-11 modular jacks for network connection. Use FCC Part 68
compatible modular plugs and cabling to connect the equipment to your network. In the
unlikely event that this equipment causes harm to the telephone network, the telephone
company can temporarily disconnect your service. The telco may attempt advance warning,
but can disconnect the service and notify you afterwards. In the event a disconnection is necessary, you will be advised of your right to file a complaint with the FCC. The telco has the
right to make changes to their network, which may affect the operation of your equipment,
provided you are given adequate advance written notice to permit correct operation.
Industry Canada Notice to Users:
The Industry Canada label identifies certified equipment. This certification means that
the equipment meets telecommunications network protective, operational and safety
requirement as prescribed in the appropriate Terminal Equipment Technical Resource
Document(s). The department does not guarantee the equipment will operate to the
user’s satisfaction.
Before installing this equipment, users should ensure that it is permissible to be connected to
the facilities of the local telecommunications company. The equipment must also be installed
using an acceptable method of connection. The customer should be aware that compliance
with the above conditions may not prevent degradation of service in some situations.
16
Repairs to certified equipment should be coordinated by a representative designated by
the supplier. Any repairs or alterations made by the user to this equipment, or equipment
malfunctions, may give the telecommunications company cause to request the user to
disconnect the equipment.
Users should ensure for their own protection that the electrical ground connections of
the power utility, telephone lines and internal metallic water pipe system, if present, are
connected together. This precaution may be particularly important in rural areas. Caution:
Users should NOT attempt to make such connections themselves, but should contact the
appropriate electric inspection authority, or electrician, as appropriate.
NOTICE: The Ringer Equivalence Number (REN) assigned to each terminal device provides an
indication of the maximum number of terminals allowed to be connected to a telephone
interface. The termination of an interface may consist of any combination of devices subject
only to the requirement that the sum of the ringer equivalence numbers of all the devices
does not exceed 5.
Limited Warranty
GN Netcom, Inc. warrants to the original consumer purchaser that, except for the
limitations and exclusions set forth below, the product shall be free from defects in
materials and workmanship for a period of one (1) year from the date of original retail
purchase (“Warranty Period”). The obligation of GN Netcom, Inc. under this warranty shall
be limited to repair or replacement, at GN Netcom, Inc.’s option, without charge, of any
part or unit that proves to be defective in material or workmanship during the Warranty
Period, provided the product is returned to GN Netcom, Inc. at the address listed under
“How to Obtain Warranty Repairs.” Except as modified by applicable State Law, this
warranty sets forth the extent and limit of GN Netcom, Inc.’s obligation to the purchaser
and or user of the product.
17
Exclusions from Warranty
This warranty applies only to defective factory material and factory workmanship.
Any conditions caused by accident, abuse, misuse or improper operation in violation of
instructions furnished by GN Netcom, Inc., destruction or alteration, improper electrical
voltages or currents, or repair or maintenance attempted by anyone other than GN Netcom,
Inc., is not a “defect” covered by this Warranty. In such cases, GN Netcom, Inc. may charge
you for materials and labor, even during the Warranty Period. It is the owner’s responsibility
to operate and care for this product in accordance with the operating instructions and
specifications supplied with the product; and repairs resulting from failure to do so are not
covered by the Warranty.
The following parts are considered to be subject to wear and tear in normal usage and are
not covered by the Warranty: earhooks, decorative finishes and all foam products (earpads,
microphone covers).
Implied Warranty
Under state law, you may be entitled to the benefit of certain implied warranties. These
implied Warranties will continue in force only during the Warranty Period. Some states do
not allow limitations on how long an implied warranty lasts, so the above limitation may
not apply to you.
Incidental or Consequential Damages
Neither GN Netcom, Inc. nor your retail dealer or selling distributor has any responsibility for
any incident or consequential damages including, without limitation, commercial loss, or for
any incidental expenses, loss of time, or inconvenience. Some states do not allow the
exclusion or limitation of incidental or consequential damages, so the above limitation or
exclusion may not apply to you.
18
Other Legal Rights
This warranty gives you specific legal rights, and you may also have other rights which vary
from state to state.
How to Obtain Warranty Repairs
To obtain Warranty repairs, return your unit, shipping prepaid, direct to:
GN Netcom, Inc.
77 Northeastern Blvd.
Nashua, NH 03062 USA
Please use the original container, if possible, or pack the unit in a sturdy carton with
sufficient packing material to prevent shipping damage. Include the following information:
1. A copy of your purchase receipt indicating the model number and date of purchase.
2. Your return address.
3. Reason for return.
During the Warranty Period, shipping charges for return to you will be paid by GN Netcom,
Inc. for a unit requiring any repair covered by the Warranty. Return shipping will be charged
to the customer during the Warranty Period for a unit requiring no Warranty repair. These
shipping charges will be prepaid by GN Netcom, Inc. and billed to the customer. Damage
occurring during shipment is deemed the responsibility of the carrier, and any claim should
be made directly to such carrier.
19