1
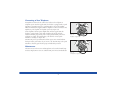
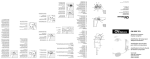
STRATUS
ULTRA-G
User Guide
Table of Contents
Introduction . . . . . . . . . . . . . . . . . . . . . . . . . . . . . . . . . . . . . . . . . . . . . . . . . . . . . . . . . . . . . . . . . .1
Stratus Ultra-G Components . . . . . . . . . . . . . . . . . . . . . . . . . . . . . . . . . . . . . . . . . . . . . . . . . . . . . .1
Ear Capsule . . . . . . . . . . . . . . . . . . . . . . . . . . . . . . . . . . . . . . . . . . . . . . . . . . . . . . . . . . . . . . . . . . .2
Headband . . . . . . . . . . . . . . . . . . . . . . . . . . . . . . . . . . . . . . . . . . . . . . . . . . . . . . . . . . . . . . . . . . . .4
Microphone Positioning . . . . . . . . . . . . . . . . . . . . . . . . . . . . . . . . . . . . . . . . . . . . . . . . . . . . . . . . .6
Clothing Clip . . . . . . . . . . . . . . . . . . . . . . . . . . . . . . . . . . . . . . . . . . . . . . . . . . . . . . . . . . . . . . . . .6
Connecting To Your Telephone . . . . . . . . . . . . . . . . . . . . . . . . . . . . . . . . . . . . . . . . . . . . . . . . . . . .7
Maintenance . . . . . . . . . . . . . . . . . . . . . . . . . . . . . . . . . . . . . . . . . . . . . . . . . . . . . . . . . . . . . . . . . .7
Cautionary Notes to Computer Users . . . . . . . . . . . . . . . . . . . . . . . . . . . . . . . . . . . . . . . . . . . . . . .8
FCC Notice to Users . . . . . . . . . . . . . . . . . . . . . . . . . . . . . . . . . . . . . . . . . . . . . . . . . . . . . . . . . . . .8
Warranty . . . . . . . . . . . . . . . . . . . . . . . . . . . . . . . . . . . . . . . . . . . . . . . . . . . . . . . . . . . . . . . . . . . . .8
To Obtain Service . . . . . . . . . . . . . . . . . . . . . . . . . . . . . . . . . . . . . . . . . . . . . . . . . . . . . . . . . . . . . .9
Copyright ®1999 GN Netcom, Inc., all rights reserved.
Introduction
Congratulations on your purchase of the GN Netcom Stratus Ultra-G headset. This guide contains instructions for the
Stratus Ultra-G ST-I headset. To derive maximum benefit from this versatile product, please take a few minutes to review
this user’s guide.
If after reviewing this guide you have any questions concerning the Stratus Ultra-G headset, please call your distributor or
contact GN Netcom, Inc. Customer Service at 800-826-4656.
Stratus Ultra-G Components
Figure 1
1. Noise Canceling Microphone
6.
2. Flexible Microphone Boom Arm
5.
3. Receiver
4. Adjustable Lobe Hinge™
7.
4.
3.
8.
5. Ear Capsule
6. Flexible Wire Headband
2.
1.
7. Ear Cushion (for Headband Wearing)
8. Foam Windscreen
9.
9. Clothing Clip
10.
10. Quick Disconnect
1
Ear Capsule
The Stratus Ultra-G headset comes out of the box with the ear capsule installed
in the right ear wearing style (see Figure 2). The ear capsule is worn on the ear
and features an Adjustable Lobe Hinge™ for a custom fit.
Ear Capsule Wearing
To put on your new Stratus Ultra-G ear capsule (see Figure 3):
1. Straighten out the Adjustable Lobe Hinge
2. Swing the ear capsule away from the receiver and slide the ear capsule
behind your ear until the saddle of the hook rests on the uppermost part
of your ear.
3. With your thumb, close the ear lobe hinge until it is snug, secure and
comfortable to wear, but not tight on your ear.
4. Lightly press the speaker against the ear for proper positioning.
To remove, simply lift the Stratus Ultra-G off your ear.
Figure 2
Stratus Ultra-G Ear Capsule
Figure 3
Ear Capsule Wearing
2
Changing Ears
1. Hold the receiver assembly in your left hand with the microphone boom
perpendicular to the floor.
2. With your right hand, flip the ear capsule down (see Figure 4).
3. Rotate 180° clockwise if you are going from right ear to left ear,
counterclockwise if you are going from left ear to right ear.
Figure 4
Changing Ears
Removal
1. Remove the ear cushion.
2. In the right ear wearing style with the speaker facing you, hold the
headset in your left hand between your thumb and index finger.
3. With your right thumb and index finger, firmly grasp the top of the ear
capsule at the saddle (see Figure 5).
4. Pull down and out with your right hand, releasing the C-ring from the
receiver housing.
Figure 5
Removing Ear Capsule
Installation
1. Remove the headband.
2. With the speaker side of the receiver facing you hold the headset
in your left hand between your thumb and index finger.
3. With your right hand, hold the ear capsule so that the C-ring
opening is facing the receiver.
4. Push the C-ring onto the receiver housing until it springs into place
in the groove (see Figure 6).
Figure 6
Installing Ear Capsule
3
Headband
The Stratus Ultra-G headset can also be equipped with a lightweight
flexible headband.
Installation
1. Remove the ear capsule.
2. With the corded side of the receiver facing you, hold the headset in your
left hand between your thumb and index finger with the boom pointing
to the right.
3. With your right hand, hold the headband so that the C-ring opening is
facing towards the receiver (see Figure 7).
4. Push the C-ring of the headband onto the receiver housing until it springs
into place in the groove.
5. Snap the large cushion onto the speaker housing until it clicks into place.
Figure 7
Installing Headband
Removal
1. Remove the ear cushion.
2. In the left ear wearing style, with the corded side of the receiver facing
you, hold the headset in your left hand between your thumb and index
finger with the boom pointing to the left.
3. With your right hand, hold the headband between your thumb and
index finger.
4. Pull up on the receiver and push down on the headband until the C-ring
snaps off of the receiver housing (see Figure 8).
4
Figure 8
Removing Headband
Changing Ears
To accommodate left or right ear wearing styles, rotate the entire speaker
housing under the headband 180° (see Figure 9).
Figure 9
Changing Ears
Headband Wearing
Position the headset lightly on your head (see Figure 10). The Stratus Ultra-G
headband is extremely lightweight, ensuring a comfortable fit that lasts all day.
The stabilizer cushion rests just above the ear on the side of your head
opposite the receiver.
Refer to the Microphone Positioning section for additional information.
Figure 10
Headband Wearing
5
Microphone Positioning
To take advantage of the noise canceling qualities of the microphone, position
the Stratus Ultra-G headset with the flat side of the microphone, marked with
an F, facing you. The microphone boom should be adjusted so that the
microphone is approximately one finger width away from your lower lip
(see Figure 11).
The Stratus Ultra-G has a flexible boom that can be reshaped until the
microphone is correctly positioned in front of your mouth. One hand should
grasp and steady the receiver end of the boom. The other hand can then flex
the boom (see Figure 12).
1 Finger
Width
Figure 11
Microphone Positioning
CAUTION: Never forcefully rotate the microphone boom past its stop point in
the receiver assembly!
Figure 12
Clothing Clip
The clothing clip should be fastened for comfortable wearing (see Figure 13).
It is designed to prevent the weight of the cord from dislodging the headset.
Position the clip conveniently on your clothing. To reduce excess slack,
reposition the clip by sliding it up and down the cord.
Figure 13
Clothing Clip
6
Connecting to Your Telephone
An amplifier is often needed to connect the headset to the telephone or
telephone system. For these applications, the headset is equipped with a Quick
Disconnect plug which mates to a Quick Disconnect jack on the amplifier.
Follow the instructions supplied with the amplifier to connect the headset and
amplifier to your telephone or telephone system (see Figure 14).
Some telephones do not require amplification. For these applications the
headset is equipped with a cable with a modular plug on the end. The
modular connector plugs directly into a headset port (modular jack) on the
telephone or console. The modular plug cable also has a mated Quick
Disconnect assembly (see Figure 15).
Disconnecting at the Quick Disconnect allows you to move around without
having to remove your headset. If you are on a call, disconnecting at the Quick
Disconnect effectively puts the other party on hold until you return.
Netc
om
e
mut
t
dse
hea
off
on
high
off
on
Figure 14
Amplified Configuration
low
me
volu
Maintenance
The foam covers on the receiver and microphone can be washed in mild soap
and water. Replacement covers are available from your GN Netcom distributor.
Figure 15
Unamplified Configuration
7
Cautionary Notes to Computer Users
When using any headset with a computer, care should be taken in dry or low humidity environments to protect the user from
electrostatic discharge from the monitor (CRT). Computer monitors can induce a substantial electrostatic charge when turned on or off, or
when there is a power failure, and the resulting electrostatic discharge can be passed through the headset to ground.
A user in close proximity to or touching the computer may feel a common “shock” sensation, similar to touching a doorknob after
walking across a carpet, causing no harm to the user. This discharge is entirely due to the computer monitor; the headset is merely the
shortest path to ground.
To minimize the possibility of electrostatic discharge through the headset, you can:
• Use a grounded screen in front of the monitor.
• Use static dissipative wrist straps.
• Increase the relative humidity in the room to 60% or more.
• Install static dissipative carpets or floor coverings (anti-static sprays can be helpful).
• Remove the headset before turning the computer on or off.
GN Netcom, Inc. Profile headsets meet all OSHA, UL, FCC and CSA standards.
FCC Notice to Users
Upon request only, you must notify your telephone utility company (telco) of your intention to install or permanently remove an FCC
Part 68 registered device or system. Include the FCC Registration Number and the Ringer Equivalence Number (REN) located on the
amplifier label.
The telco has the right to make changes to their network, which may affect the operation of your equipment, provided you are given
adequate advance written notice to permit correct operation.
Warranty
GN Netcom, Inc. warrants these products against all defects in material and workmanship for a period of two years from the date of
original purchase. The conditions of this warranty and our responsibilities under this warranty are as follows:
• The warranty is limited to the original purchaser.
• The warranty is void if the serial number, date code label or product label is removed, or if the product has been subject to physical
abuse, improper installation, modification, or repair by unauthorized third parties.
8
• The responsibility of GN Netcom, Inc. under this warranty shall be limited to the repair or replacement of the product at the sole
discretion of GN Netcom, Inc.
• Any implied warranty on GN Netcom, Inc. products is limited to two years from the date of purchase on all parts, including the
cords and connectors. Specifically exempt from warranty are limited-life consumable components subject to normal wear and tear,
such as microphone windscreens, ear cushions, ear tips, decorative finishes, batteries, and other accessories. GN Netcom, Inc. is not
liable for any incidental or consequential damages arising from the use or misuse of any GN Netcom, Inc. product.
• A copy of your receipt or other proof of purchase is required. Without proof of purchase, your warranty is defined as beginning on
the date of manufacture as labeled on the product.
• This warranty gives you specific legal rights and you may have other rights which vary from state to state.
Unless otherwise instructed in the User Guide, the user may not, under any circumstances, attempt any service, adjustments or repairs on
this unit, whether in or out of warranty. It must be returned to the factory or authorized service agency for all such work.
To Obtain Service
For customer service and technical support, call GN Netcom, Inc. at 1-800-826-4656.
If it becomes necessary to send a unit in for repair, it is not necessary to call for a Return Material Authorization (RMA) number, as one
will be assigned upon receipt of the package at the factory.
Ship the product in a suitable shipping container, fully insured and with the shipping charges prepaid. Include the following with the
product:
• Your name, company name, address and telephone number.
• A description of the problem.
• A copy of the receipt or other proof of purchase (without proof of purchase, your warranty will be defined as beginning on the date
of manufacture as labeled on the product).
Or, for out of warranty products:
• A purchase order which authorizes repair.
In warranty products are warranted for one year from the repair date or for the remainder of the original warranty period, whichever is
longer. Out of warranty products will be repaired or replaced at the prevailing charge and carry a one year warranty from repair date.
GN Netcom, Inc. will not assume any responsibility for any loss or damage incurred in shipping. Any repair work on GN Netcom, Inc.
products by unauthorized third parties voids any existing GN Netcom, Inc. warranty.
Ship To:
GN Netcom, Inc. • 77 Northeastern Boulevard • Nashua, NH 03062 • 1-800-826-4656
9
77 Northeastern Blvd. • Nashua, NH 03062 USA
1-800-826-4656 • www.gnnetcom.com
10
181-1460-A
Printed in USA March 1999