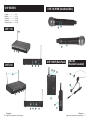
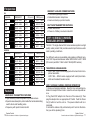
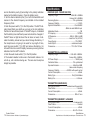
1
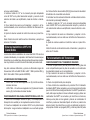
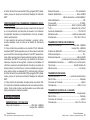
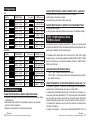
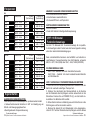
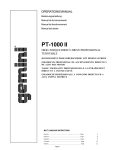
Parts of the design of this product may be protected by worldwide patents
Information in this manual is subject to change without notice and does
not represent a commitment on the part of the vendor. GCI-Technologies
shall not be liable for any loss or damage whatsoever arising from the use
of information or any error contained in this manual.
No part of this manual may be reproduced, stored in a retrieval system or
transmitted, in any form or by any means, electronic, electrical, mechanical,
optical, chemical, including photocopying and recording, for any purpose
without the express written permission of GCI-Technologies.
It is recommended that all maintenance and service on the product should be
carried out by GCI-Technologies or it’s authorized agents. GCI-Technologies
cannot accept any liability whatsoever for any loss or damage caused by service,
maintenance or repair by unauthorized personnel.
In the U.S.A., if you have any problems with this unit,
call 1-732-346-0061 for customer service. Do not
return equipment to your dealer.
UHF-116/216
SERIES
UHF-116M
UHF-116HL
UHF-216M
UHF-216HL
WWW.GEMINIDJ.COM
Worldwide Headquarters • 1 Mayfield Ave, NJ 08837 • USA
Tel: (732) 346-0061 • Fax (732) 346-0065
France • GCI-Technologies
2 BIS RUE LEON BLUM, 91120 PALAISEAU, France
Tel: +33 (0) 1-69-79-97-70 • Fax +33 (0) 1-69- 79-97-80
Germany • GCI Technologies GmbH
Lerchenstraße 14 • 80995 München, Munich, Germany
Tel: +49 (0) 89 319 019 80 • Fax: +49 (0) 89 319 019 819
Spain • GCI-Technologies S.A. • Caspe 172, 1A 08013 Barcelona, Spain
Tel: +34-93-436-37-00 • Fax +34-93-347-69-61
UK • GCI-Technologies • Unit 44 The Brambles Enterprise Center, Waterberry Drive,
Waterlooville P07 7TH, UK. Tel: 011-44-87-087-00880 Fax: 011-44-87-087-00990
© GCI-Technologies 2009
All Rights Reserved
OPERATIONS MANUAL
MANUAL DE INSTRUCCIONES
MANUEL D’INSTRUCTIONS
BEDIENUNGSHANDBUCH
2
Warning
Advertencia • Avertissement • Warnungen
Warning
Advertencia • Avertissement • Warnungen
3
4
Warning
Advertencia • Avertissement • Warnungen
Warning
Advertencia • Avertissement • Warnungen
5
UHF SERIES
UHF-16-HHM (Handheld Mic)
English........................ 4-8
Español....................... 9-14
Francais...................... 15-20
Deutsch...................... 21-26
Warranty Card............ 27-28
10
UHF-116
8
1
7
2
3
9
4
UHF-16BP (Belt Pack)
UHF-216
7
5
6
10
12
11
1
HSL-08
(Headset/Lavalier)
14
15
2
3
4
3
4
9
13
7
6
Diagrams
Diagramas • Diagrammes • Darstellungen
5
7
6
7
Diagrams
Diagramas • Diagrammes • Darstellungen
7
Functions
1
2
3
4
5
6
7
8
9
10
11
12
13
14
15
Base receiver antennas
Power ON & LED indicator
Channel ON LED indicator
Volume Rotary Dial Control
AF OUT
DC INPUT
Channel Selector
Microphone MUTE & ON/OFF switch
Battery cavity
Power on / Battery Low dual mode LED
Belt Pack MUTE & ON/OFF switch
Screw in 1/8” (3.5mm) TRS (Jack)
Belt clip
Padded head rest
Snap-off Lavalier Microphone
Introduction
Congratulations on your purchasing a Gemini wireless system. This system includes the
latest features and is backed by a one year limited warranty. Prior to use we suggest that
you carefully read all the instructions.
This book includes instructions for both the UHF-116 and the UHF-216 systems.
Caution
1. All operating instructions should be read before using this equipment.
2. To reduce risk of electrical shock, do not open the unit. There are NO USER OR
SERVICEABLE PARTS INSIDE. Please refer servicing to a qualified service technician.
3. Do not expose this unit to direct sunlight or a heat source such as a radiator or
stove.
4. Dust, dirt and debris can interfere with the performance of this unit. Make an effort
to keep the unit away from dusty, dirty environments, and cover the unit when it is not
in use. Dust it regularly with a soft clean brush.
5. When moving this equipment, it should be placed in its original carton and packaging. This will reduce the risk of damage during transit.
6. DO NOT EXPOSE THIS UNIT TO RAIN OR MOISTURE.
7. DO NOT USE ANY SPRAY CLEANER OR LUBRICANT ON ANY CONTROLS
OR SWITCHES.
8
Introduction
Presentación • Introduction • Einleitung
Microhone
1. Do not drop the microphone onto a hard surface.
2. Do not strike the microphone head front with fist or fingers, and do not blow strongly
into the microphone head front.
3. Do not use the microphone in areas of high humidity and /or high temperature as this
could lead to damage of the microphone.
FCC Rules and Regulations
Gemini wireless systems are the type accepted under FCC rules parts 74 and 15. Licensing of Gemini equipment is the user’s responsibility and licensability depends on the
user’s classification and application.
This equipment has been tested and found to comply with the limits set forth under part
15 and 74 of FCC rules.
Note
This equipment operates at a frequency that has been authorized by the FCC. However,
there is no guarantee that interference will not occur in a particular installation. If this
equipment does cause interference to radio or television reception, try one or more of
the following suggestions:
1. Repoint or relocate the receiving antenna.
2. Plug the equipment into a socket or a different circuit.
3. Call your dealer to arrange to exchange the unit for one with a different frequency.
Remember, any changes made to the unit without authorization from Gemini will void
your warranty.
European Compliance
0678
!
R & TTed countries
BE, DE, ES, FR, NL, UK
Hereby, GCI Technologies Corp., declares that this PROFESSIONAL UHF WIRELESS
SYSTEM is in compliance with the essential requirements and other relevant provisions
of Directive 1999/5/EC.The Declaration of Conformity may be consulted at:
http://www.geminidj.com/uhf_DoC.pdf
IMPORTANT NOTE: (For European countries only)
A license may be required when using this UHF wireless microphone system in your
country. It is your responsibility to ensure that you have the correct license for the frequencies used. Please check the frequency table on Page 10 of this manual.
A license is not required for wireless microphones on UHF frequencies from 863 MHz to
865 MHz, but please visit the following website for more information regarding licensing
in you country:
http://www.ero.dk/rtte then follow the “National Frequency Tables” link.
Introduction
Presentación • Introduction • Einleitung
9
Frequencies
US:
CHANNEL
FREQUENCY
CH (cont.)
FREQ (cont.)
CH1
682.35 MHz
CH9
690.1
CH2
683.25 MHz
CH10
690.75 MHz
CH3
683.85 MHz
CH11
691.5
MHz
CH4
684.85 MHz
CH12
692.5
MHz
CH5
685.75 MHz
CH13
693.6
MHz
CH6
686.6
MHz
CH14
694.85 MHz
CH7
687.5
MHz
CH15
695.7
MHz
CH8
688.75 MHz
CH16
697.1
MHz
MHz
EUROPE:
CHANNEL
FREQUENCY
CH1
854.1
CH2
MHz
CH (cont.)
FREQ (cont.)
CH9
860.2
MHz
855.75 MHz
CH10
861.3
MHz
CH3
856.5
MHz
CH11
861.65 MHz
CH4
857.35 MHz
CH12
862.25 MHz
CH5
857.9
MHz
CH13
863.05 MHz
CH6
858.55 MHz
CH14
863.6
CH7
859.05 MHz
CH15
864.15 MHz
CH8
859.75 MHz
CH16
864.7
MHz
MHz
Features
HAND HELD TRANSMITTER FEATURES
• High sensitivity cardioid capsule for professional use
• Special noise absorption parts inside the barrels eliminating
switch shock and handling noise
• Frequency with quartz locked control
10
System Control
Control de sistema • Utilisation • Systemeinstellungen
HEADSET/ LAVALIER COMBO FEATURES
• Convertible lightweight headset
• Detachable lavalier microphone
• Foam wind and pop control inserts
BELT PACK TRANSMITTER FEATURES
• Audio mute switch
• Power on / Battery Low dual mode LED
UHF-116 SINGLE CHANNEL
WIRELESS SYSTEM
The UHF-116 single channel UHF series wireless system is a high
quality audio product that provides excellent performance under
most operating conditions.
Two different versions are available and operate on different ranges of UHF frequencies between either 682.35 MHz to 697.1 MHz
(US version) and 854.1 MHz to 864.7 MHz (EURO version).
THE MODELS AVAILABLE ARE:
UHF-116M - Which comes equipped with a hand held microphone transmitter.
UHF-116HL - Which comes equipped with a belt pack transmitter and Headset/ lavalier combo.
UHF-116 SINGLE CHANNEL RECEIVER OPERATION:
1. Remove all packing materials. Save the box and packing materials to transport the unit and in case the unit ever requires service.
2. Plug the AC/DC adaptor into the rear of the receiver (6). Then
plug the adaptor into an appropriate AC Outlet. Push the Power
On (2) button to turn the unit on. The power indicator will be illuminated.
3. Extend the antenna fully vertical and point it out into the direction you will be speaking from.
System Control
Control de sistema • Utilisation • Systemeinstellungen
11
4. Insert the 1/4” cable into the jack labeled AF OUT (5) on the
rear of the receiver and connect the other end of the cable to your
amp, effects or mixer jack.
5. Set the channel selector pins (7) on both the transmitter and
receiver to the desired frequency as indicated on the included
Frequency Chart.
6. Adjust the volume using the level control (4) on the front panel.
Note: Effective range between the transmitter and receiver is up
to 250 feet.
UHF-216 DUAL CHANNEL
WIRELESS SYSTEM
The UHF-216 dual channel UHF series wireless system is two separate single channel transmitters of different frequencies transmitting to one unit that houses both frequency receivers. There is
also individual level control for each channel.
Two different versions are available and operate on different ranges of UHF frequencies between either 682.35 MHz to 697.1 MHz
(US version) and 854.1 MHz to 864.7 MHz (EUROPE version).
THE MODELS AVAILABLE ARE:
UHF-216M - Which comes equipped with (2) hand held microphone transmitters.
UHF-216HL -Which comes equipped with (2) belt pack transmitters and (2) Headset/ lavalier combos.
UHF-216 DUAL CHANNEL RECEIVER OPERATION:
1. Remove all packing materials. Save the box and packing materials to transport the unit and in case the unit ever requires service.
2. Plug the AC/DC adaptor into the rear of the receiver (6) and an
appropriate AC Outlet. Push the Power On (2) button to turn the
unit on. The power indicator will be illuminated.
3. Extend the two antennas fully vertical and point them towards
System Control
12 Control de sistema • Utilisation • Systemeinstellungen
the direction the performer(s) will be speaking from.
4. Insert the 1/4” cable into the jack labeled AUDIO OUT (5) on the
rear of the receiver and connect the other end of the cable to your
amp, effects or mixer jack.
5. Set the channel selector pins (7) on both the transmitter and
receiver to the desired frequency as indicated on the included
Frequency Chart.
6. Adjust the volume using the level control on the front panel.
Note: Effective range between the transmitter and receiver is up
to 250 feet.
Transmitter Operation
HAND HELD TRANSMITTER OPERATION
1. Slide the battery cavity (9) to open. Insert two (2) AA batteries into the battery cavity (9) according to the polarity indication
marked on the battery housing.
2. Set the channel selector pins (7) on both the transmitter and
receiver to the desired frequency as indicated on the included
Frequency Chart.
3. Close the battery cavity (9).
4. Push the power switch (8) to the ON position. The BATT indicator (10) should flash once briefly as you turn on the mic indicating
that the mic has sufficient power. If the BATT stays on, it indicates
that the battery has insufficient power and should be changed. If
the BATT does not light at all and the mic does not work, it indicates the battery is dead and you should change the battery. The
microphone can be muted by setting the switch (8) to the mute
position. If the microphone is not going to be used for any length
of time, push the power switch (8) to OFF and remove the battery.
Do not switch the mic on and off rapidly, because you wont get a
true indication from the BATT indicator.
HEADSET/LAVALIER COMBO AND TRANSMITTER OPERATION
1. Slide the battery cavity (9) to open. Insert two 2 AA batterSystem Control
Control de sistema • Utilisation • Systemeinstellungen
13
Specifications
ies into the battery cavity (9) according to the polarity indication
marked on the battery housing. Close the battery cavity.
2. Set the channel selector pins (7) on both the transmitter and
receiver to the desired frequency as indicated on the included
Frequency Chart.
3. Push the power switch (11) to the ON position. The BATT indicator should flash once briefly as you turn on the mic indicating
that the mic has sufficient power. If the BATT stays on, it indicates
that the battery has insufficient power and should be changed. If
the BATT does not light at all and the mic does not work, it indicates the battery is dead and you should change the battery. If
the microphone is not going to be used for any length of time,
push the power switch (11) to OFF and remove the battery. Do
not switch the mic on and off rapidly, because you wont get a true
indication from the BATT indicator.
4. Push the audio mute switch (11) to the ON position.
5. The lavalier/ Headset combo wire is the transmit antenna. Do
not roll up, coil or shorten during use. This wire must be kept as
straight as possible.
RECEIVER (UHF-116 AND UHF-216)
Frequency range...................................... USA: 682 – 698MHz
Europe: 854 – 865MHz
Receiving System.......................................... PLL synthesized
Frequency Stability.................................................. +/- 0.05%
Signal-to-Noise Ratio..........................................Over 94dB @
48kHz dev and 60dBuV input
Modulation Mode............................................................... FM
IF Frequency...............................................................10.7MHz
AF Response........................................ 50Hz to 15KHz (±3dB)
T.H.D....................................................Less than 1% (at 1Khz)
Power Supply........................................................12V-18VDC
Audio Output............................................. unbalanced output
Dimensions............................................... 170 x 30 x 103 mm
TRANSMITTER (ALL MODELS):
Frequency range..................................... USA: 682 – 698MHz
Europe: 854 – 865MHz
RF Power Output................................................. 10mW (max)
Oscillation Mode............................................ PLL synthesized
Spurious Emission......................................... More than 50dB
below carrier frequency
Frequency Stability..................... ±0.005% with quartz control
Current Consumption.................................................. <80mA
Battery Type............................................... Two (2) AA Alkaline
Battery Life............................................................... 6-8 hours
TRANSMITTER (HAND HELD):
Microphone Element.................... Unidirectional Dynamic Mic
Polar Pattern...............................................................Cardioid
Current Consumption.................................................. <80mA
Dimensions......................................................... 260 x 51 mm
TRANSMITTER (HEADSET / LAVALIER)
Microphone Element........................................Condenser Mic
Polar Pattern.............................................................. Cardioid
Current Consumption.................................................. <80mA
Dimensions................................................... 66 x 97 x 25 mm
14
System Control
Control de sistema • Utilisation • Systemeinstellungen
Specifications
Especificaciones • Caractéristiques techniques • Technische Daten
15
Funciones
1
2
3
4
5
6
7
8
9
10
11
12
13
14
15
Base de antenas receptoras
Indicador de luz LED de encendido (Power ON)
Indicador de luz LED para canal ON
Control de Volumen Rotatorio
SALIDA AF
ENTRADA DC
Selector de canal
Botón silenciador MUTE y ON/OFF
Compartimento para pilas
Luz LED dual de Encendido (Power on) / Batería Baja
Botón en petaca para silenciador y ON/OFF
Clavija (Jack) con rosca de 1/8” (3.5mm)
Clip para petaca
Auricular con almohadilla para micrófono
Complemento para micrófono Lavalier
Introducción
Le felicitamos por adquirir un sistema de micrófono inalámbrico de Gemini. Este sistema
incluye las más nuevas características y está amparado por una garantía limitada de un
año. Antes de usar le sugerimos que lea detenidamente todas las instrucciones.
Este libro incluye instrucciones de los sistemas UHF-116 y UHF-216.
Precauciones
1. Antes de utilizar este equipo, deben ser leídas todas las instrucciones de funcionamiento.
2. Para reducir el riesgo de descarga eléctrica, no abra la unidad. No hay ACCESORIOS
O PIEZAS REEMPLAZABLES EN SU INTERIOR. Por favor, en referencia a las reparaciones consulte con un servicio técnico cualificado.
3. No exponga esta unidad directamente a la luz solar o a una fuente de calor como un
radiador o estufa.
4. El polvo y la suciedad pueden interferir en el funcionamiento de esta unidad. Haga
el esfuerzo de mantener la unidad lejos del polvo y ambientes sucios y cubra la unidad
cuando no esté en uso. Quite el polvo regularmente con un cepillo suave y limpio.
5. Cuando desplace el equipo debería ser colocado en su caja original y embalarlo .
Esto reducirá el riesgo de daño durante el transporte.
6. NO EXPONGA ESTA UNIDAD A LA LLUVIA O HUMEDAD.
7. NO USE NINGÚN SPRAY LIMPIADOR O LUBRICANTE SOBRE NINGUN CONTROL
O BOTON.
16
Presentación
Introduction • Introduction • Einleitung
Micrófono
1. No dejar caer el micrófono sobre una superficie dura.
2. No golpear la cabeza del micrófono con el puño o dedos y no sople con fuerza en la
cabeza del micrófono.
3. No use el micrófono en areas de humedad alta y/o altas temperaturas esto podría
dañar el micrófono.
Normas FCC y Reglamentos
El sistema de micrófono inalámbrico de Gemini está aceptado en virtud de las normas
FCC partes 74 y 15. La concesión de licencias del equipo Gemini es responsabilidad del
usuario y la licencia depende de la clasificación de usuario y su aplicación.
Este equipo ha sido testado y cumple con los límites establecidos en virtud de la sección 15 y 74 de las normas FCC.
Este equipo funciona con una frecuencia que ha sido autorizada por la FCC. Sin embargo, no hay garantías de que no se produzcan interferencias en una instalación particular. Si este equipo causa interferencias en la recepción de la radio o la televisión,
pruebe con alguna de estas sugerencias:
Notas
1. Reoriente o reubique la antena receptora.
2. Conecte el equipo a un enchufe o circuito diferente.
3. Llame a su vendedor para acordar un cambio de unidad por una de diferente frecuencia.
Recuerde, que cualquier cambio de unidad hecho sin la autorización de Gemini puede
anular su garantía.
Conformidad Europea
0678
!
Paises
BE, DE, ES, FR, NL, UK
Por la presente, GCI Technologies Corp., declara que este SISTEMA PROFESIONAL
INALAMBRICO UHF está en conformidad con los requerimientos esenciales y otras provisiones relevantes de la Directiva 1999/5/EC. La Declaración de Conformidad puede
ser consultada en: http://www.geminidj.com/uhf_DoC.pdf
NOTA IMPORTANTE: (Solamente para paises Europeos)
Una licencia puede ser necesaria cuando se utiliza este sistema de micrófono inalámbrico UHF en su país. Es su responsabilidad asegurarse de que tiene la licencia para
las frecuencias usadas. Por favor, revise la tabla de frecuencias en la página 18 de este
manual.
No es necesaria una licencia para micrófonos inalámbricos UHF con frecuencias desde
863 MHz a 865 MHz, pero por favor visite el siguiente sitio web para más información
en referencia a las licencias en su pais:
http://www.ero.dk/rtte luego entre en el link “Tablas de Frecuencia Nacionales”.
Presentación
Introduction • Introduction • Einleitung
17
US:
CANAL
FRECUENCIA
CH (cont.)
FREC (cont.)
CH1
682.35 MHz
CH9
690.1
CH2
683.25 MHz
CH10
690.75 MHz
CH3
683.85 MHz
CH11
691.5
MHz
CH4
684.85 MHz
CH12
692.5
MHz
CH5
685.75 MHz
CH13
693.6
MHz
CH6
686.6
MHz
CH14
694.85 MHz
CH7
687.5
MHz
CH15
695.7
MHz
CH8
688.75 MHz
CH16
697.1
MHz
MHz
EUROPA:
CANAL
FRECUENCIA
CH1
854.1
CH2
MHz
CH (cont.)
FREC (cont.)
CH9
860.2
MHz
855.75 MHz
CH10
861.3
MHz
CH3
856.5
MHz
CH11
861.65 MHz
CH4
857.35 MHz
CH12
862.25 MHz
CH5
857.9
MHz
CH13
863.05 MHz
CH6
858.55 MHz
CH14
863.6
CH7
859.05 MHz
CH15
864.15 MHz
CH8
859.75 MHz
CH16
864.7
MHz
MHz
Características
CARACTERISTICAS DEL MICROFONO TRANSMISOR DE
MANO
• Cápsula cardiode de alta sensibilidad para uso profesional
• Elementos internos especiales para la absorción de ruido que
eliminan ruidos de alimentación y manipulación
• Frecuencia con control de cuarzo
18
Control de sistema
System Control • Utilisation • Systemeinstellungen
CARACTERISTICAS DEL COMBINADO AURICULAR/ LAVALIER
• Auricular ligero convertible
• Micrófono lavalier desmontable
• Espuma para-viento
CARACTERISTICAS DE LA PETACA TRANSMISORA
• Botón silenciador de audio
• Luz LED dual Encendido / Batería Baja
Sistema Inalámbrico UHF-116
Canal Single
La serie de sistema inalámbrico de un solo canal UHF-116 es un
producto de audio de alta calidad que proporciona un excelente
rendimiento en la mayoría de las condiciones de funcionamiento.
Están disponibles dos versiones que operan en diferentes rangos
de frecuencias UHF entre 682.35 MHz a 697.1 MHz (versión USA)
y 854.1 MHz a 864.7 MHz (versión EUROPA).
LOS MODELOS DISPONIBLES SON:
UHF-116M - El cuál viene equipado con un transmisor de
mano.
UHF-116HL - El cuál viene equipado con una petaca transmisora y un combinado Auricular/ lavalier.
FUNCIONAMIENTO DEL RECEPTOR UHF-116 DE UN SOLO
CANAL:
1. Quite todo el embalaje. Guarde la caja y el embalaje para el
transporte de la unidad por si requiriera de servicio técnico.
2. Conecte el adaptador de corriente AC/DC en la parte trasera
del receptor. Luego conecte el adaptador en un enchufe apropiado. Pulse el botón de encendido (ON) (2) para encender la unidad.
El indicador de encendido se iluminará.
3. Extienda la antena totalmente vertical y diríjala en la dirección
Control de sistema
System Control • Utilisation • Systemeinstellungen
19
en la que usted hablará.
4. Inserte el cable de 1/4” en la conexión para jack etiquetada
como AF OUT en la parte trasera del receptor y conecte el otro
extremo del cable a su amplificador, mesa de efectos o mezclador.
5. Fije el selector de canal en el transmisor y receptor a la frecuencia deseada, como se indica en el Gráfico de Frecuencia incluido.
6. Ajuste el volumen usando el control de nivel en el panel frontal.
Nota: El radio de acción efectivo entre el transmisor y receptor es
sobre los 75 metros.
Sistema Inalámbrico UHF-216
Canal Doble
La serie del sistema inalámbrico de canal dual UHF-216 son dos
canales individuales por separado de diferentes frecuencias que
transmiten a una unidad que alberga ambas frecuencias receptoras. Hay también un control de nivel individual para cada canal.
Hay dos versiones diferentes y operan en diferentes rangos de
frecuencias UHF entre 682.35 MHz a 697.1 MHz (versión USA) y
854.1 MHz a 864.7 MHz (versión EUROPA).
LOS MODELOS DISPONIBLES SON:
UHF-216M - El cuál viene equipado con (2) micrófonos transmisores de mano.
UHF-216HL - El cuál viene equipado con (2) petacas transmisoras y (2) combinados Auricular/ lavalier.
FUNCIONAMIENTO DEL CANAL RECEPTOR DUAL UHF-216:
1. Quite todo el embalaje. Guarde la caja y el embalaje para el
transporte de la unidad por si requiriera de servicio técnico.
2. Conecte el adaptador de corriente AC/DC en la parte trasera
del receptor. Luego conecte el adaptador en un enchufe apropia20
Control de sistema
System Control • Utilisation • Systemeinstellungen
do. Pulse el botón de encendido (ON) (2) para encender la unidad.
El indicador de encendido se iluminará.
3. Extender las dos antenas totalmente verticales hacia la dirección donde la persona(s) hablará(n).
4. Inserte el cable de 1/4” en la conexión para jack etiquetada
como AUDIO OUT en la parte trasera del receptor y conecte el
otro extremo del cable a su amplificador, mesa de efectos o mezclador.
5. Fije el selector de canal en el transmisor y receptor a la frecuencia deseada, como se indica en el Gráfico de Frecuencia incluido.
6. Ajuste el volumen usando el control de nivel en el panel frontal.
Nota: El radio de acción efectivo entre el transmisor y receptor es
sobre los 75 metros.
Funcionamiento del Transmisor
FUNCIONAMIENTO DEL TRANSMISOR DE MANO
1. Abra el compartimento para las pilas. Inserte dos (2) pilas AA
en el compartimento para las pilas de acuerdo con la indicación
de polaridad marcado en el compartimento.
2. Fije el selector de canal en el transmisor y receptor a la frecuencia deseada, como se indica en el Gráfico de Frecuencia incluido.
3. Cierre el compartimento para las pilas.
4. Pulse el botón de encendido en la posición ON. El indicador
de batería (BATT) debe parpadear una vez brevemente indicando
que el micrófono tiene energía suficiente. Si el BATT queda iluminado, indica que las pilas no tienen suficiente energía y deben ser
cambiadas. Si el BATT no se ilumina y el micrófono no funciona,
indica que las pilas se han agotado y deben ser cambiadas. El
micrófono puede ser silenciado fijando el botón en posición de
silencio (mute). Si el micrófono no va ha ser utilizado por algún tiempo pulse el botón en apagado (OFF) y retire las pilas. No pulse
Control de sistema
System Control • Utilisation • Systemeinstellungen
21
el botón del micrófono a encendido (ON) y apagado (OFF) rápidamente, porque no tendrá una indicación fidedigna del indicador
BATT.
FUNCIONAMIENTO DEL TRANSMISOR COMBINADO AURICULAR/LAVALIER
1. Abra el compartimento para las pilas. Inserte dos (2) pilas AA
en el compartimento para las pilas de acuerdo a la indicación
de polaridad marcada en el compartimento. Cerrar el compartimento paras las pilas.
2. Fije el selector de canal en el transmisor y receptor a la frecuencia deseada, como se indica en el Gráfico de Frecuencia
incluido.
3. Pulse el botón de encendido en la posición ON. El indicador
de batería (BATT) debe parpadear una vez brevemente indicando
que el micrófono tiene energía suficiente. Si el BATT queda iluminado, indica que las pilas no tienen suficiente energía y deben ser
cambiadas. Si el BATT no se ilumina y el micrófono no funciona,
indica que las pilas se han agotado y deben ser cambiadas. El
micrófono puede ser silenciado fijando el botón en posición de
silencio (mute). Si el micrófono no va ha ser utilizado por algún tiempo pulse el botón en apagado (OFF) y retire las pilas. No pulse
el botón del micrófono a encendido (ON) y apagado (OFF) rápidamente, porque no tendrá una indicación fidedigna del indicador
BATT.
4. Pulse el botón de silenciador de audio (mute) en posición ON.
5. El cable del combinado lavalier/auricular es la antena de transmisión. No lo enrolle, bobine o acorte durante su uso. Este cable
debe permanecer lo más recto posible.
Especificaciones
RECEPTOR (UHF-116 Y UHF-216)
Rango de Frecuencia............................... USA: 682 – 698MHz
Europa: 854 – 865MHz
22
Especificaciones
Specifications • Caractéristiques techniques • Technische Daten
Sistema Receptor............................................ PLL sintetizado
Relación Señal/Ruido........................................ Sobre 94dB @
48kHz desviación y entrada 60dBuV
Modo Modulación.............................................................. FM
FrecuenciaIF….......................................................... 10.7MHz
Respuesta AF ...................................... 50Hz to 15KHz (±3dB)
T.H.D.................................................... Menos de 1% (a 1Khz)
Fuente de Alimentación........................................ 12V-18V DC
Salida de Audio...................................... salida no balanceada
Dimensiones.............................................. 170 x 30 x 103 mm
TRANSMISOR (TODOS LOS MODELOS):
Rango de Frecuencia............................... USA: 682 – 698MHz
Europa: 854 – 865MHz
Potencia de Salida RF.......................................... 10mW (max)
Modo de oscilación........................................................... PLL
Emisiones Espurias ........................................... Más de 50dB
por debajo de la frecuencia porteadora
Estabilidad de frecuencia........... ±0.005% con control cuarzo
Tipo de pila .............................................. Dos (2) Alcalina AA
Vida de la pila........................................................... 6-8 horas
TRANSMISOR (DE MANO):
Tipo de micrófono.............……......... Unidireccional Dinámico
Patrón Polar............................................................... Cardiode
Consumo de Corriente................................................. <80mA
Dimensiones........................................................ 260 x 51 mm
TRANSMISOR (AURICULAR / LAVALIER)
Tipo de micrófono.................................….…..... Condensador
Patrón Polar............................................................... Cardiode
Consumo de Corriente................................................. <80mA
Dimensiones.................................................. 66 x 97 x 25 mm
Control de sistema
System Control • Utilisation • Systemeinstellungen
23
Fonctions
1
2
3
4
5
6
7
8
9
10
11
12
13
14
15
Antennes de réception
Indicateur à LED de mise sous tension (Power ON)
Indicateur à LED de réception (Channel ON)
Réglage du volume
Sortie audio Jack 6.35mm
Embase DC pour alimentation externe (Transformateur)
Sélection de canal
Commutateur MUTE ON/OFF pour microphone
Compartiment pile avec capot amovible
LED à double indication (Mise sous tension ou Batterie faible)
Commutateur ON/OFF MUTE pour boitier ceinture.
Embase Mini-Jack 3.5mm à visser
Clip ceinture
Serre-tête avec mousse pour maintien optimal
Microphone lavalier amovible
Introduction
Nos félicitations à l’occasion de l’achat d’un microphone sans fil Gemini. Cet appareil
- ultra moderne - possède les dernières caractéristiques et bénéficie d’une garantie
durant 1 an. Avant tout utilisation, nous vous recommandons de lire soigneusement
l’ensemble des instructions qui suivent.
Ce manuel d’utilisation concerne les ensembles des Séries UHF-116 & UHF-216.
Mises en garde
1. Nous vous recommandons de lire l’ensemble des instructions avant toute utilisation
de l’appareil.
2. Afin d’éliminer tout risque d’électrocution nous vous recommandons de ne pas dé
monter l’appareil. Il n’y a pas de pièce détachée REMPLACABLE PAR
L’UTILISATEUR dans l’appareil. En cas de problème veuillez contacter votre
revendeur.
3. Ne pas exposer l’appareil à la lumière directe du soleil et à toute source de chaleur
telle qu’un radiateur. Veillez à la bonne ventilation de l’appareil.
4. Cet appareil doit être nettoyé à l’aide d’un chiffon légèrement humide. Ne pas
utiliser de détergent. Conservez l’appareil à l’abri de la poussière.
5. Lorsque vous déplacez l’appareil, veillez à le remettre dans son emballage d’origine.
\Ceci afin d’éviter tout risque de dommage durant le transport.
6. NE PAS EXPOSER L’APPAREIL A LA PLUIE & A L’HUMIDITE.
7. NE PAS UTILISER DE VAPORISATEUR ET DE LUBRIFIANT SUR LES BOUTONS &
INTERRUPTEURS DE CONTROLE.
24
Introduction
Introduction • Presentación • Einleitung
Microphone
1. Ne laissez pas tomber le micro émetteur sur une surface dure.
2. Ne tapez pas avec les doigts sur la capsule et ne soufflez pas fortement dessus.
3. N’utilisez pas le micro émetteur dans des endroits exposés à une humidité élevée
et/ou à des températures élevées car cela pourrait l’endommager.
Réglementations FCC
Cet appareil a fait l’objet de test et se conforme aux articles 15 & 74 de la réglementation FCC.
Cet appareil fonctionne dans une gamme de fréquences autorisée par la FCC. Toutefois, il n’y a pas de certitude qu’un parasitage ou brouillage ne se produise lors d’une
installation/configuration particulière. Si cet appareil est amené à générer des bruits
parasites lors de réception radio ou TV, essayez l’une des préconisations suivantes:
Note
1. Repositionnez l’antenne de réception ou positionnez le récepteur dans un autre endroit.
2. Branchez l’appareil sur une autre prise électrique.
3. Contactez votre revendeur afin de l’échanger pour une autre fréquence.
Attention: toute modification de l’appareil, sans autorisation écrite de Gemini, entraîne
irrémédiablement l’annulation de la garantie.
Conformité Européenne
0678 !
Pays R & TTed
BE, DE, ES, FR, NL, UK
Par la présente, GCI Technologies Corporation, déclare que ce système professionnel
de microphone sans fil UHF est conforme aux exigences essentielles et autres dispositions pertinentes de la Directive 1999/5/EC. Cette déclaration de conformité peut être
consultée à l’adresse suivante: http://www.geminidj.com/uhf_DoC.pdf
NOTE IMPORTANTE: (Pour les pays européens seulement)
Une licence peut être nécessaire pour utiliser ce système de microphone sans fil UHF
dans votre pays. Il est de votre responsabilité de veiller à ce que vous possédiez la licence correcte pour les fréquences utilisées. Merci de consulter le tableau de fréquences présent dans ce manuel.
Une licence n’est pas requise pour les microphones sans fil fonctionnant sur la bande
de fréquences UHF de 863 MHz à 865 MHz, mais nous vous recommandons de consulter le site à l’adresse qui suit pour plus d’information concernant les licences dans
votre pays:
http://www.ero.dk/rtte puis suivez le lien “tableaux des fréquences disponibles par
pays” lien.
Introduction
Introduction • Presentación • Einleitung
25
Fréquences
US:
CANAL
FREQUENCE
CH (cont.)
FREQ (cont.)
CH1
682.35 MHz
CH9
690.1
CH2
683.25 MHz
CH10
690.75 MHz
CH3
683.85 MHz
CH11
691.5
MHz
CH4
684.85 MHz
CH12
692.5
MHz
CH5
685.75 MHz
CH13
693.6
MHz
CH6
686.6
MHz
CH14
694.85 MHz
CH7
687.5
MHz
CH15
695.7
MHz
CH8
688.75 MHz
CH16
697.1
MHz
MHz
EUROPE:
CANAL
FREQUENCE
CH1
854.1
CH2
MHz
CH (cont.)
FREQ (cont.)
CH9
860.2
MHz
855.75 MHz
CH10
861.3
MHz
CH3
856.5
MHz
CH11
861.65 MHz
CH4
857.35 MHz
CH12
862.25 MHz
CH5
857.9
MHz
CH13
863.05 MHz
CH6
858.55 MHz
CH14
863.6
CH7
859.05 MHz
CH15
864.15 MHz
CH8
859.75 MHz
CH16
864.7
MHz
MHz
Caractéristiques
CARACTERISTIQUES DU MICRO EMETTEUR MAIN
• Capsule cardioïde professionnelle haute sensibilité pour usage
professionnel.
• Absorption des bruits de manipulation grâce à un système
antichoc dans l’émetteur.
• Fréquence d’émission verrouillée par quartz.
26
Utilisation
System Control • Control de sistema • Systemeinstellungen
CARACTERISTIQUES DU MICRO SERRE-TETE / LAVALIER
• Convertible en microphone serre-tête très léger
• Microphone lavalier amovible
• Bonnette de protection & filtre anti-pop
CARACTERISTIQUES DU BOITIER CEINTURE EMETTEUR
• Commutateur Mute
• LED à double indication (Mise sous tension ou Batterie faible)
UHF-116 Microphone Sans
Fil Mono Canal
Le système sans fil simple canal UHF-116 est un produit audio
de haute qualité qui offre d’excellentes performances dans la majorité des conditions de fonctionnement.
2 modèles sont disponibles et fonctionnent en UHF (Ultra High
Frequency) sur une bande passante de 682.35 MHZ à 697.1 MHZ
pour les USA & sur une bande passante de 854.1 MHZ à 864.7
MHZ pour l’Europe.
LES MODELES DISPONIBLES SONT:
UHF-116M - Version émetteur micro main.
UHF-116HL - Version serre-tête convertible lavalier avec émetteur boîtier ceinture.
FONCTIONNEMENT DU SYSTEME SIMPLE CANAL UHF-116
1. Déballez l’appareil. Conservez l’emballage afin de transporter
correctement votre appareil, ainsi qu’en cas de SAV.
2. Branchez l’alimentation secteur AC à l’arrière du récepteur au
niveau de l’embase identifiée DC 12V. Puis branchez l’alimentation
sur une prise de courant. Appuyez sur la touche Power (2) afin de
mettre l’appareil sous tension. La led Power doit alors s’allumer.
3. Positionnez l’antenne vers le haut et pointez là en direction de
l’endroit d’émission.
4. Reliez le récepteur - via la sortie identifiée AUDIO/AF OUT - à
Utilisation
System Control • Control de sistema • Systemeinstellungen
27
l’entrée micro de votre console de mixage ou de votre multi-effet
en utilisant le cordon Jack 6.35mm.
5. Réglez de façon strictement identique la fréquence (Canal) de
l’émetteur & du récepteur à l’aide des micro-interrupteurs.
6. Ajustez le volume à l’aide du potentiomètre situé en face
avant.
Remarque: La portée effective entre l’émetteur et le récepteur est
de 80 M.
UHF-216 Double Microphone
Sans Fil Mono Canal
Le système sans fil double canal UHF-216 est un produit audio
de haute qualité qui offre d’excellentes performances dans la majorité des conditions de fonctionnement.
2 modèles sont disponibles et fonctionnent en UHF (Ultra High
Frequency) sur une bande passante de 682.35 MHZ à 697.1 MHZ
pour les USA & sur une bande passante de 854.1 MHZ à 864.7
MHZ pour l’Europe.
LES MODELES DISPONIBLES SONT:
UHF-216M - Version émetteur micro main.
UHF-216HL - Version serre-tête convertible lavalier avec émetteur boîtier ceinture.
FONCTIONNEMENT DU SYSTEME DOUBLE CANAL UHF-216
1. Déballez l’appareil. Conservez l’emballage afin de transporter
correctement votre appareil, ainsi qu’en cas de SAV.
2. Branchez l’alimentation secteur AC à l’arrière du récepteur au
niveau de l’embase identifiée DC 12V. Puis branchez l’alimentation
sur une prise de courant. Appuyez sur la touche Power (13) afin de
mettre l’appareil sous tension. La led Power doit alors s’allumer.
3. Diriger les deux antennes de réception en direction de l’endroit
ou les émetteurs sont utilisés.
4. Reliez le récepteur - via la sortie identifiée AUDIO/AF OUT - à
28
Utilisation
System Control • Control de sistema • Systemeinstellungen
Utilisation du Emetteur
l’entrée micro de votre console de mixage ou de votre multi-effet
en utilisant le cordon Jack 6.35mm.
5. Réglez de façon strictement identique la fréquence (Canal) de
l’émetteur & du récepteur à l’aide des micro-interrupteurs.
6. Ajustez le volume à l’aide du potentiomètre situé en face
avant.
Remarque: La portée effective entre l’émetteur et le récepteur est
de 80 M.
UTILISATION DU MICRO EMETTEUR MAIN
1. Ouvrez le compartiment porte-pile en faisant glisser le capot.
Insérez 2 piles/batteries LR6 (AA) de 1.5V en prenant soin de respecter la polarité.
2. Réglez de façon strictement identique la fréquence (Canal) de
l’émetteur & du récepteur à l’aide des micro-interrupteurs. Pour
cela, nous vous recommandons de vous aider du tableau de
fréquences.
3. Remettez le capot du compartiment pile/batterie.
4. Mettez le commutateur power en position ON. Le témoin BATT
doit alors s’allumer durant une fraction de seconde indiquant ainsi
une charge suffisante de la pile/batterie. Si le témoin BATT reste
allumé, cela signifie qu’il faut remplacer la pile/batterie. Si le témoin BATT ne s’allume pas du tout & que le micro ne fonctionne
pas il faut remplacer la pile/batterie. Vous pouvez commuter le microphone en position mute. Si vous ne comptez pas utiliser le micro durant un certain temps, nous vous recommandons de mettre
le commutateur en position OFF & d’enlever les piles/batteries.
Ne pas éteindre & allumer rapidement le micro car cela vous procurerait une information erronée sur la charge de la pile/batterie.
UTILISATION DU BOITIER CEINTURE EMETTEUR SERRETETE/ LAVALIER
1. Ouvrez le compartiment destiné à recevoir la pile/batterie en
faisant glisser le cache dans le sens de la flèche. Puis insérez 2
Utilisation
System Control • Control de sistema • Systemeinstellungen
29
piles/batteries LR6 (AA) de 1.5V en prenant soin de respecter la
polarité et remettez le cache en place.
2. Réglez de façon strictement identique la fréquence (Canal) de
l’émetteur & du récepteur à l’aide des micro-interrupteurs. Pour
cela, nous vous recommandons de vous aider du tableau de
fréquences.
3. Mettez le commutateur power en position ON. Le témoin BATT
doit alors s’allumer durant une fraction de seconde indiquant
ainsi une charge suffisante de la pile/batterie. Si le témoin BATT
reste allumé, cela signifie qu’il faut remplacer la pile/batterie. Si
le témoin BATT ne s’allume pas du tout & que le micro ne fonctionne pas il faut remplacer la pile/batterie. Si vous ne comptez
pas utiliser le micro durant un certain temps, nous vous recommandons de mettre le commutateur en position OFF & d’enlever
la batterie/pile. Ne pas éteindre & allumer rapidement le micro car
cela vous procurerait une information erronée sur la charge de la
pile/batterie.
4. Mettre le commutateur Mute en position ON.
5. Le cordon du micro combo serre-tête/ lavalier sert aussi
d’antenne de transmission. Veillez à ne pas l’enrouler, ni à en réduire la longueur au risque de modifier les performances d’émission
de l’appareil. Ce cordon doit rester droit autant que possible.
CARACTERISTIQUES
TECHNIQUES
RECEPTEUR (UHF-116 & UHF-216)
Fréquences d’utilisation .......................... USA: 682 – 698MHz
Europe: 854 – 865MHz
Type de réception…................................................ Circuit PLL
Rapport Signal/Bruit........................................ >94dB à 48kHz
déviation & sensibilité d’entrée 60dBuV
Mode Modulation ............................................................... FM
Fréquence IF............................................................... 10.7MHz
Réponse AF............................................ 50Hz - 15KHz, (±3dB)
30
Caractéristiques techniques
Specifications • Especificaciones • Technische Daten
Distorsion Harmonique Totale.............................< 1% (@1Khz)
Alimentation.......................................................... 12V-18V DC
Sortie Audio…………………………………………. Asymétrique
Dimensions................................................. 170 x 30 x 103mm
EMETTEUR (TOUT MODELE):
Fréquences d’utilisation .......................... USA: 682 – 698MHz
Europe: 854 – 865MHz
Type de réception…................................................ Circuit PLL
Puissance RF (Emission)....................................... 10mW (max)
Emission de Bruit Parasite.........................> 50dB en dessous
de la fréquence porteuse
Stabilité de la Fréquence................................... ±0.005% avec
verrouillage par quartz
Type pile/batterie................................... 2 x pile LR6 (AA) 1.5V
Autonomie............................................................... 6-8 heures
MICRO EMETTEUR MAIN:
Type de Microphone............................. Micro à unidirectionnel
dynamique
Polarité (Type de capsule)………………………......... Cardioïde
Consommation électrique……………………………..... <80mA
Dimensions.......................................................... 260 x 51 mm
MICRO LAVALIER:
Type de Microphone.............................. Micro à condensateur
Polarité capsule………………………………….....…. Cardioïde
Consommation électrique……………………………..... <80mA
Dimensions.................................................... 66 x 97 x 25 mm
Caractéristiques techniques
Specifications • Especificaciones • Technische Daten
31
Funktionen
1
2
3
4
5
6
7
8
9
10
11
12
13
14
15
Receiver Antennen
Betriebs LED-Leuchte
Kanal LED-Leuchte
Lautstärkeregler
AF Ausgang
Netzteileingang
Kanalauswahl
Mikrofon MUTE & EIN/AUS-Schalter
Batteriemulde
Betrieb/Batterie Dual-LED
Gürtelsender MUTE & EIN/AUS-Schalter
3,5 mm Klinkeneingang mit Gewindebuchse
Gürtelclip
Gepolsterter Kopfhalter
Abnehmbares Lavalier-Mikrofon
Einleitung
Herzlichen Glückwunsch zum Erwerb eines Gemini Funkmikrofons. Dieses Produkt
basiert auf dem aktuellen Stand der Technik und ist mit einer 1 Jahres Garantie versehen. Wir empfehlen Ihnen, sich vor der Verwendung mit der Bedienungsanleitung vertraut
zu machen.
Diese Anleitung enthält Beschreibungen für das UHF-110 und UHF-216 System.
Warnhinweise
1. Alle Bedienhinweise sollten vor Gebrauch gelesen werden.
2. Um einem Stromschlag vorzubeugen öffnen Sie niemals das Gehäuse des Gerätes.
Im Gerät befinden sich KEINE VOM BENUTZER AUSZUTAUSCHENDEN TEILE.
Bitte wenden Sie sich an einen qualifizierten Techniker.
3. Setzen Sie das Gerät keiner direkten Sonneneinstrahlung oder einer Hitzequelle wie
einer Heizung oder einem Ofen aus.
4. Staub, Schmutz und Ablagerungen können die Funktion dieses Gerätes beein
trächtigen. Halten Sie es also fern von staubigen Umgebungen und decken Sie es
ab, wenn es nicht verwendet wird. Entstauben Sie es regelmäßig mit einem weichen
sauberen Pinsel.
5. Transportieren Sie das Gerät in der Originalverpackung um Beschädigungen zu
vermeiden.
6. SETZEN SIE DAS GERÄT KEINEM REGEN ODER FEUCHTIGKEIT AUS.
7. WENDEN SIE KEINEN SPRÜHREINIGER ODER REINIGUNGSFLÜSSIGKEIT AN
REGLERN ODER SCHALTERN AN.
32
Einleitung
Introduction • Presentación • Introduction
Mikrofon
1. Lassen sie das Mikrofon nicht auf eine harte Oberfläche fallen.
2. Klopfen Sie nicht auf die Mikrofonkapsel und pusten Sie nicht direkt in das Mikrofon.
3. Verwenden Sie das Mikrofon nicht in Gebieten mit hoher Luftfeuchtigkeit und/oder
Temperatur da dies das Mikrofon beschädigen könnte.
FCC Vorschriften
Gemini Funkmikrofonanlagen entsprechen den Bestimmungen gemäß FCC Regelwerk
Teil 74 und 15. Die Lizenzierung der Gerätschaften obliegt dem Anwender und die Lizensierungspflicht richtet sich nach der Benutzerklasse und dem Anwendungsbereich.
Dieses System wurde getestet und hält die Grenzen gemäß FCC Regeln Teil 15 und 74
ein.
Dieses System arbeitet in einem Frequenzbereich, welcher durch die FCC freigegeben
ist. Jedoch kann nicht garantiert werden, dass nicht in bestimmten Installationen Empfangsstörungen auftreten können. Sollte dieses System Störungen im Radio- oder TVEmpfang verursachen versuchen Sie eine der folgenden Maßnahmen:
Notizen
1. Richten Sie die Empfangsantenne erneut aus.
2. Stecken Sie das Netzteil in eine andere Steckdose oder einen anderen Stromkreis.
3. Kontaktieren Sie Ihren Fachhändler, um ein System mit einem anderen Frequenzbereich zu erhalten.
Denken Sie daran, dass jegliche Modifikation der Anlage den Verlust Ihres Garantieanspruchs zur Folge hat.
Europäische Richtlinien
0678
!
R &TTED Länder
BE, DE, ES, FR, NL, UK
GCI Technologies Corp. erklärt hiermit, dass diese PROFESSIONELLE UHF FUNKMIKROFONANLAGE den wesentlichen Anforderungen und anderen relevanten Bestimmungen der Direktive 199/5/EC gerecht wird. Die Erklärung kann unter diesem Link eingesehen werden: http://www.geminidj.com/uhf_DoC.pdf
WICHTIGER HINWEIS: (nur für Europäische Länder)
Möglicherweise wird in Ihrem Land eine Lizenz zum Betrieb dieser UHF Funkmikrofonanlage benötigt. Es ist Ihre Verantwortung zu prüfen ob Sie die entsprechende Lizenz
zur Verwendung der jeweiligen Frequenzen haben. Bitte beachten Sie die Frequenztabelle auf Seite 34 dieser Bedienungsanleitung.
Eine Lizenz zum Betrieb von UHF Funkmikrofonanlagen wird im Frequenzbereich 863 865 MHz nicht benötigt, aber prüfen Sie bitte die Freigaben in Ihrem Land unter:
http://www.ero.dk/rtte und folgen Sie dem Link “National Frequency Tables”.
Einleitung
Introduction • Presentación • Introduction
33
Frequenzen
US:
KANAL
FREQUENZ
KANAL
(Fortsetzung)
FREQUENZ
(Fortsetzung)
CH1
682.35 MHz
CH9
690.1
CH2
683.25 MHz
CH10
690.75 MHz
CH3
683.85 MHz
CH11
691.5
MHz
CH4
684.85 MHz
CH12
692.5
MHz
CH5
685.75 MHz
CH13
693.6
MHz
CH6
686.6
MHz
CH14
694.85 MHz
CH7
687.5
MHz
CH15
695.7
MHz
CH8
688.75 MHz
CH16
697.1
MHz
MHz
EUROPE:
KANAL
FREQUENZ
CH1
854.1
CH2
MHz
KANAL
(Fortsetzung)
FREQUENZ
(Fortsetzung)
CH9
860.2
MHz
855.75 MHz
CH10
861.3
MHz
CH3
856.5
MHz
CH11
861.65 MHz
CH4
857.35 MHz
CH12
862.25 MHz
CH5
857.9
MHz
CH13
863.05 MHz
CH6
858.55 MHz
CH14
863.6
CH7
859.05 MHz
CH15
864.15 MHz
CH8
859.75 MHz
CH16
864.7
MHz
MHz
Eigenschaften
HANDSENDER EIGENSCHAFTEN
• Hochempfindliche Kardioidkapsel für professionellen Einsatz
• Geräuschschluckende Einsätze im Griff zur Beseitigung von
Schalt- und Bewegungsgeräuschen
• Quartzgesteuerte Frequenzsteuerung
34
Systemeinstellungen
System Control • Control de sistema • Utilisation
HEADSET/ LAVALIER KOMBO EIGENSCHAFTEN
• Konvertierbares leichtes Headset
• Abnehmbares Lavalier-Mikrofon
• Schaumstoff Wind- und Popschutz
GÜRTELSENDER EIGENSCHAFTEN
• MUTE-Schalter
• Dual LED: Betrieb & Niedrige Batteriespannung
UHF-116 Einkanal
Funkmikrofonanlage
Die UHF-116 Einkanal UHF Funkmikrofonanlage ist ein qualitativ hochwertiges Audio-Produkt, welches hervorragende Leistung
unter den meisten Betriebsbedingungen.
Zwei unterschiedliche Versionen sind erhältlich und arbeiten in
verschiedenen Frequenzbereichen des UHF-Bandes, entweder
682,35 - 697,1 MHz (USA) oder 854,1 - 864,7 MHz (EUROPA).
DIE ZWEI MODELLE SIND:
UHF-116M - Geliefert mit einem Handmikrofonsender.
UHF-116HL - Geliefert mit einem Headset/Lavalier-Mikrofon
und Gürtelsender.
UHF-116 EINKANAL FUNKMIKROFONANLAGE BETRIEB:
1. Entfernen Sie alle Verpackungsmaterialien. Bewahren Sie den
Karton für eventuell zukünftigen Transport auf.
2. Stecken Sie das Kabel des Steckernetzteils in die Buchse
auf der Rückseite des Empfängers und die andere Seite in ihre
Steckdose. Drücken Sie auf POWER ON (2), um das Gerät einzuschalten. Die Betriebs-LED leuchtet.
3. Ziehen Sie die Antenne vollständig aus und richten Sie sie in die
Richtung aus welcher sie senden werden.
4. Stecken Sie dass 6,35 mm Klinkenkabel in die Ausgangsbuchse AF OUT auf der Rückseite des Empfängers und die andere
Systemeinstellungen
System Control • Control de sistema • Utilisation
35
Seite mit Ihrem Mischpult, Verstärker oder Effektgerät.
5. Stellen Sie die Kanalwahlschalter an Mikrofon und Empfänger
auf die Frequenz Ihrer Wahl (sehen Sie die Frequenztabelle) gleichermaßen ein.
6. Stellen Sie die Lautstärke mit dem Regler auf der Vorderseite
ein.
Achtung: Die maximale effektive Reichweite zwischen Sender und
Empfänger beträgt etwa 75 Meter.
UHF-216 Zweikanal
Funkmikrofonanlage
Die UHF-216 Zweikanal UHF Funkmikrofonanlage behaust zwei
Einkanal-Systeme in einem Gehäuse mit zwei separaten Mikrofonsendern und separaten Lautstärkereglern.
Zwei unterschiedliche Versionen sind erhältlich und arbeiten in
verschiedenen Frequenzbereichen des UHF-Bandes, entweder
682,35 - 697,1 MHz (USA) oder 854,1 - 864,7 MHz (EUROPA).
DIE ZWEI MODELLE SIND:
UHF-216M - Geliefert mit zwei Handmikrofonsendern.
UHF-216HL - Geliefert mit zwei Headset/Lavalier-Mikrofonen
und Gürtelsendern.
UHF-216 ZWEIKANAL FUNKMIKROFONANLAGE BETRIEB:
1. Entfernen Sie alle Verpackungsmaterialien. Bewahren Sie den
Karton für eventuell zukünftigen Transport auf.
2. Stecken Sie das Kabel des Steckernetzteils in die Buchse
auf der Rückseite des Empfängers und die andere Seite in ihre
Steckdose. Drücken Sie auf POWER ON (13), um das Gerät einzuschalten. Die Betriebs-LED leuchtet.
3. Ziehen Sie beide Antennen vollständig vertikal aus und richten
Sie sie in die ungefähre Richtung, aus welcher gesendet werden
soll.
4. Stecken Sie dass 6,35 mm Klinkenkabel in die Ausgangsbu36
Systemeinstellungen
System Control • Control de sistema • Utilisation
chse AF OUT auf der Rückseite des Empfängers und die andere
Seite mit Ihrem Mischpult, Verstärker oder Effektgerät.
5. Stellen Sie die Kanalwahlschalter an dem entsprechenden Mikrofon und dem gewünschten Empfänger auf die Frequenz Ihrer
Wahl (sehen Sie die Frequenztabelle) gleichermaßen ein.
6. Stellen Sie die Lautstärke des jeweiligen Mikrofons mit den Reglern auf der Vorderseite ein.
Achtung: Die maximale effektive Reichweite zwischen Sender und
Empfänger beträgt etwa 75 Meter
Betrieb des Senders
BETRIEB DES HANDSENDERS
1. Schieben Sie den Batteriefachdeckel auf. Setzen Sie 2 AA Mignon Batterien ein und beachten Sie die Polarisationsskizze im
Batteriefach. Schließen Sie das Batteriefach wieder.
2. Stellen Sie mit den Kanalwahlschaltern an Sender und Empfänger die gleiche Frequenz ein. Sehen Sie dazu die Frequenztabelle.
3. Schieben Sie den EIN/AUS-Schalter auf die ON-Position. Die
BATT-LED sollte einmal kurz aufleuchten und zeigt damit, dass
ausreichend Batteriespannung bereits steht. Bleibt die BATT LED
an so geht die Batteriespannung zu Neige, bleibt die LED aus so
sind die Batterien leer. Wenn Sie das Mikrofon für längere Zeit nicht
verwenden sollten Sie es ausschalten und die Batterie entfernen.
Schalten Sie das Mikrofon nicht schnell mehrfach hintereinander
ein und aus. Die Anzeige der BATT-LED wird falsch sein.
BETRIEB MIT HEADSET/LAVALIER-MIKROFON UND GÜRTELSENDER
1. Schieben Sie den Batteriefachdeckel auf. Setzen Sie 2 AA Mignon Batterien ein und beachten Sie die Polarisationsskizze im
Batteriefach. Schließen Sie das Batteriefach wieder.
2. Stellen Sie mit den Kanalwahlschaltern an Sender und Empfänger die gleiche Frequenz ein. Sehen Sie dazu die Frequenztabelle.
Systemeinstellungen
System Control • Control de sistema • Utilisation
37
3. Schieben Sie den EIN/AUS-Schalter auf die ON-Position. Die
BATT-LED sollte einmal kurz aufleuchten und zeigt damit, dass
ausreichend Batteriespannung bereits steht. Bleibt die BATT LED
an so geht die Batteriespannung zu Neige, bleibt die LED aus so
ist die Batterie leer. Wenn Sie das Mikrofon für längere Zeit nicht
verwenden sollten Sie es ausschalten und die Batterie entfernen.
Schalten Sie das Mikrofon nicht schnell mehrfach hintereinander
ein und aus. Die Anzeige der BATT-LED wird falsch sein.
4. Schieben Sie den MUTE-Schalter auf die ON-Position.
5. Das Kabel des Headset/Lavalier-Mikrofons ist die Antenne des
Senders. Rollen Sie es nicht auf, schirmen Sie es nicht ab und
kürzen Sie es nicht. Das Kabel muss so gerade wie möglich hängen.
Technische Daten
RECEIVER (UHF-116 UND UHF-216)
Frequenzbereich..................................... USA: 682 – 698MHz
Europa: 854 – 865MHz
Empfangstechnik.............................................. PLL-Synthese
Rauschabstand.................................................über 94dB bei
48kHz Abw. und 60dBuV Eingang
Modulation......................................................................... FM
IF Frequenz................................................................10,7MHz
AF Frequenzgang.............................. 50Hz bis 15KHz, (±3dB)
Klirrfaktor (T.H.D.).......................... geringer als 1% (bei 1Khz)
Spannungsversorgung........................................ 12V-18V DC
Audio Output............................................. unbalanced output
Abmessungen........................................... 170 x 30 x 103 mm
Nebenschwingung............................................ mehr als 50dB
Unter der Trägerfrequenz
Frequenzstabilität.................... ±0,005% mit Quartzsteuerung
Batterietyp................................................ Zwei (2) AA Alkaline
Batterielebensdauer............................................. 6-8 Stunden
SENDER (HANDMIKROFON):
Mikrofonelement.................................................... dynamisch
Charakteristik............................................................. Kardioid
Stromverbrauch........................................................... <80mA
Abmessungen..................................................... 260 x 51 mm
SENDER (HEADSET / LAVALIER)
Mikrofonelement................................................. Kondensator
Charakteristik............................................................. Kardioid
Stromverbrauch........................................................... <80mA
Abmessungen............................................... 66 x 97 x 25 mm
SENDER (ALLE MODELLE):
Frequenzbereich...................................... USA: 682 – 698MHz
Europa: 854 – 865MHz
Übertragungstechnik......................................... PLL-Synthese
RF Sendeleistung................................................. 10mW (max)
38
Technische Daten
Specifications • Especificaciones • Caractéristiques techniques
Technische Daten
Specifications • Especificaciones • Caractéristiques techniques
39
Warranty and Repair:
All GCI products are designed and manufactured to the highest standards in the industry. With proper care and maintenance,
your product will provide years of reliable service.
LIMITED WARRANTY
A. GCI warrants its products to be free from defects in materials and workmanship for One (1) year from the original purchase
date. Exceptions: Laser assemblies on CD Players, cartridges, and crossfaders are covered for 90 days.
B. This limited warranty does not cover damage or failure caused by abuse, misuse, abnormal use, faulty installation, improper
maintenance or any repairs other than those provided by an authorized GCI Service Center.
C. There are no obligations of liability on the part of GCI for consequential damages arising out of or in connection with the
use or performance of the product or other indirect damages with respect to loss of property, revenues, of profit, or costs of
removal, installation, or reinstallation. All implied warranties for GCI, including implied warranties for fitness, are limited in duration
to One (1) year from the original date of purchase, unless otherwise mandated by local statutes.
GCI TECHNOLOGIES
2 bis, rue Léon Blum
91120 Palaiseau, France
Tél: + 33 1 69 79 97 70
Fax: + 33 1 69 79 97 80
IN DEUTSCHLAND
Die allgemeinen gesetzlichen Gewährleistungen bleiben von den Herstellergarantien unberührt. Der Garantieanspruch erlischt
bei Eingriffen durch den Käufer oder durch Dritte sowie bei unsachgemässer Behandlung. Gewährleistungsansprüche sind ausschließlich gegenüber Ihrem Fachhändler geltend zu machen.
GCI Technologies GmbH
RETURN/REPAIR
A. In the U.S.A., please call our helpful Customer Service Representatives at (732)738-9003, and they will be happy to give you
a Return Authorization Number (RA#) and the address of an authorized service center closest to you.
B. After receiving an RA#, include a copy of the original sales receipt, with defective product and a description of the defect. Send
by insured freight to: GCI Sound Products Corp, and use the address provided by your customer service representative. Your
RA# must be written on the outside of the package, or processing will be delayed indefinitely!
C. Service covered under warranty will be paid for by GCI and returned to you. For non-warrantied products, GCI will repair
your unit after payment is received. Repair charges do not include return freight. Freight charges will be added to the repair
charges.
D. On warranty service, you pay for shipping to GCI, we pay for return shipping within the continental United States. Alaska,
Hawaii, Puerto Rico, Canada, Bahamas, and the Virgin Islands will be charged for freight.
E. Please allow 2-4 weeks for return of your product. Under normal circumstances your product will spend no more than 10
working days at Gemini. We are not responsible for shipping times.
Page 15 please write:
GCI Technologies GmbH
Lerchenstrasse 14
80995 München, Munich, Germany
T: +49 (0) 89 319 019 80
F: +49 (0) 89 319 019 819
GCI Technologies Corp.
Worldwide Headquarters
1 Mayfield Ave
Edison, NJ 08837 USA
Tel: (732) 346-0061
Fax: (732) 346-0065
First and Last Name
IN THE UNITED KINGDOM
In the event that you need service on your GCI product under warranty, simply write a letter describing the problem, along with
your contact information. Make sure to enclose a copy of your receipt for proof of warranty information. A return number is
not required. You will be responsible for shipping charges to Gemini UK, and Gemini UK will pay to return the unit to you if it
is considered under warranty.
City and State or Province
GCI Technologies Ltd
Unit 44 Brambles Enterprise Centre
Waterberry Drive
Waterlooville
Hampshire, P07, 7TH, UK
Tel: +44 (0) 87 087 00880
Fax: +44 (0) 87 087 00990
EN ESPAÑA
En caso de mal funcionamiento de esta unidad, por favor contacte con el Servicio de Atención al Cliente en el teléfono 93 436
37 00 que le asesorará sobre el procedimiento correcto para solucionarlo. En caso de ser necesario enviar la unidad para su
reparación, el Servicio de Atención al Cliente le proveerá de un número de incidencia, así como de la dirección del Servicio de
Asistencia Técnica más cercano a su residencia.
Zip Code or Postal Code
GCI Technologies S.A.
Caspe, 172 - 1º A
08013 Barcelona, Spain
Tel: 34 93 436 37 00
Fax: 34 93 347 69 61
Model Number (Example: CDT-05)
EN FRANCE
En cas de panne, merci de contacter votre revendeur. Tout appareil en panne doit y être retourné, accompagné de sa facture
d’achat, de son emballage d’origine et d’un descriptif de panne. L’appareil sera expédié au SAV de GCI Technologies France. Tout
produit reçu sans facture sera réparé hors garantie. L’appareil sera ensuite ré-expédié au revendeur.
Register your product online at www.ikey-audio.com to be eligible for great prize giveaways! If you do not have Internet access,
fill out the form included and mail it to the appropriate address listed previously.
------------------------------------------------------------------------------------------------------------------------------
Address (Number and Street)
Apartment Number
Country
Email Address
Date of Birth
Purchase Price (Excluding Tax)
Serial Number (back of unit)
Telephone Number
Date of Purchase
City of Purchase