1
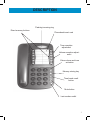
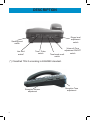
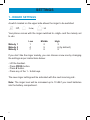
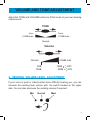
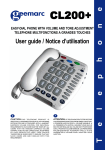
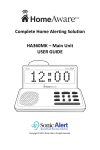
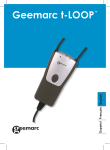
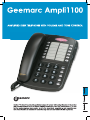
CONTENTS
DESCRIPTION
Introduction
Important safety information
Connecting the telephone
3
5
5
5
SETTING UP
Ringer settings
Tone / Pulse switch
Time break recall switch
6
7
7
VOLUME AND TONE ADJUSTMENT
Receiving volume and tone
8
Sending volume level adjustment
9
USING THE PHONE
Answering incoming call
Making a call
Last number redial
Recall, * & # buttons
Mute button
Storing telephone numbers
Dialling stored number
10
10
10
10
10
11
11
REGULATORY COMPLIANCE
12
GUARANTEE
14
2
DESCRIPTION
Flashing incoming ring
Direct memory buttons
Phonebook insert card
Tone reception
adjustment
Volume reception adjustment
Extra volume and tone
activation
Memory storing key
Time break recall
button
Mute button
Last number redial
3
DESCRIPTION
Ringer level
adjustment
switch
Sending level
switch
Line cord
socket*
Tone / Pulse
switch
Time break recall
switch
Volume & Tone
adjustment ON/OFF
switch
(*) Classified TNV-3 according to EN60950 standard.
Reception volume
adjustment
4
Reception Tone
adjustment
INTRODUCTION
IMPORTANT SAFETY INSTRUCTIONS
When using your telephone equipment, basic safety precautions should
always be followed to reduce the risk of fire, electric shock and injury to
persons, including the following:
1. Do not use this product near water, for example, near a bath tub, wash
bowl,kitchen sink or laundry tub, in a wet basement or near a swimming
pool.
2. Avoid using a telephone (other than a cordless type) during an electrical
storm. There may be a remote risk of electric shock from lightning.
3. Do not use the telephone to report a gas leak in the vicinity of the leak.
4. Use batteries indicated in this manual. Do not dispose of batteries in a
fire. They may explode. Check with local codes for possible special disposal
instructions.
SAVE THESE INSTRUCTIONS!
1 - CONNECTING THE TELEPHONE
1 - Connect the handset cord.
2 - Open the battery compartment by pulling back the latch.
3 - Insert correctly 4 x AAA 1.5V alkaline batteries (not supplied) in
the battery compartment (*). Batteries are required if you wish to
increase the ringer level up to 10 dB.
4 - Snap the battery door back in place.
5 - Connect the line cord to the socket (*).
(*) Classified TNV-3 according to EN60950 standard.
5
SETTINGS
1 - RINGER SETTINGS
A switch located on the upper side allows the ringer to be switched
: Off,
: Low,
: Hi
Your phone comes with the ringer switched to «High» and the melody set
to «6»:
Melody 1
Melody 2
Melody 3
Low
1
4
7
Middle
2
5
8
High
3
6 (by default)
9
If you don’t like the ringer melody, you can choose a new one by changing
the settings as per instructions below:
- Lift the handset.
- Press PROG button.
- Press # button.
- Press any of the 1 - 9 dial keys.
The new ringer settings will be activated with the next incoming call..
Note: The ringer level will be increased up to 10 dB if you insert batteries
into the battery compartment.
6
SETTING UP
2 - TONE/PULSE SWITCH (T/P)
The Tone/Pulse switch is factory pre-set to Tone position (T). In the US,all
telephone exchanges now use Tone dialling.If your phone does not dial out,
it is probably being used from an older private switch- board (PBX). In this
case,theTone/Pulse switch must be moved to Pulse.
3 - TIME BREAK RECALL SWITCH (600/100)
Check the Time Break Recall setting of your Ampli1100. For the US, the
Time Break Recall should be set to 600 mS. It can be switched to 100 mS
for other locations or PBX’s.
7
VOLUME AND TONE ADJUSTMENT
1- RECEIVING VOLUME AND TONE ADJUSTMENT
You can adjust the receiving volume and tone according to your own hearing requirements.
The button AMPLIFY allows extra volume and tone functions to be activated
or deactivated during the conversation.
Tone and volume adjustment (15dB to 30dB) is only activated when the
located at the rear side of your phone is set to ON. When this
switch
button is set to OFF only the volume can be adjusted from 0dB to 15dB.
When the function is activated, the red light of extra receiving and tone
function button AMPLIFY is lit.
Note: When the tone (treble), earpiece volume and sending levels
are set to the maximum, whistling may occur. If whistling occurs the
sending level settings should be decreased with the switch
If you are using your Ampli1100 with a hearing aid, set your hearing
aid to “T” position.
8
VOLUME AND TONE ADJUSTMENT
Adjust the TONE and VOLUME buttons to fit the levels to your own hearing
requirements.
TONE
Treble
Bass
+10dB max
+10dB max
Normal
Volume
+20dB max
Normal
15dB
35dB
0dB
15dB
OFF
ON
2 - SENDING VOLUME LEVEL ADJUSTMENT
If your voice is quiet or called parties have difficulty hearing you, you can
increase the sending level volume with the switch located on the upper
side. You can also decrease the sending volume if required.
Min
Normal
Maxi
9
USING THE TELEPHONE
1 - ANSWERING INCOMING CALLS
- When an incoming call is received the phone will ring and the incoming
call indicator will flash. To answer the call lift the handset and speak.
- On completion of the call, carefully replace the handset in the cradle to
release the line.
2 - MAKING A CALL
- Lift the handset.
- Await the dial tone and dial required number.
- On completion of the call, carefully replace the handset in the cradle.
3 - LAST NUMBER REDIAL
- Lift the handset.
- Await the dial tone and press REDIAL button.
- A previously dialled number will be automaticaly redialled (not in use for
memory numbers).
4 - RECALL, * & # BUTTONS
These are used with the new services provided on digital exchanges. For
details please contact your network operator.
5 - MUTE BUTTON
If you wish to speak privately to someone else in the room without your
caller overhearing,press and hold the MUTE button.You will still be able
to hear the callers but they cannot hear you during the mute operation.To
resume normal conversation, release the MUTE button.
10
USING THE TELEPHONE
6 - STORING TELEPHONE NUMBERS
Your telephone Ampli1100 can store 12 direct memories. To store a number
please follow instructions below:
- Lift the handset.
- Press PROG button.
- Press M1, M2, ... M12 to locate the number.
- Dial the number.
- Press PROG again Button.
Numbers will be lost after few hours if you disconnect your phone. Entering
a new number in the same location will automatically erase the previous
number.
7 - DIALING STORED NUMBERS
- Lift the handset and await the dial tone
- Press the appropriate location button M1, M2... M12 and the number
stored in this location will be dialed automatically.
To register your stored phone numbers, use the index located on the front
of your phone.
11
REGULATORY COMPLIANCE
- This equipment complies with Part 68 of the FCC rules and the requirements adopted by the ACTA. On the bottom of this equipment is a label
that contains, among other information, a product identifier in the format
US:AAAEQ##TXXXX. If requested, this number must be provided to the
telephone company.
- All applicable certification jacks Universal Service Order Codes (USOC)
for the equipment is provided (i.e. RJ11C) in the package with each piece
of approved terminal equipment.
- A plug and jack used to connect this equipment to the premises wiring and
telephone network must comply with the applicable FCC Part 68 rules and requirement adopted by the ACTA. A compliant telephone cord and modular plug
is provided with this product. It is designed to be connected to a compatible
modular jack that is also compliant. See installation instructions for details.
- The REN is useful to determine the quantity of devices you may connect
to your telephone line and still have all of those devices ring when your telephone number is called. In most, but not all areas, the sum of the REN’s of
all devices connected to one line should not exceed five (5.0). To be certain
of the number of devices you may connect to your line, as determined by
the REN, you should contact your local telephone company to determine
the maximum REN for your calling area.
- If this equipment causes harm to the telephone network, the telephone
company will notify you in advance that temporary discontinuance of service
may be required. But if advance notice isn’t practical, the telephone company
will notify the customer as soon as possible. Also, you will be advised of your
rights to file a complaint with the FCC if you believe it is necessary.
- The telephone company may make changes in its facilities, equipment,
operation or procedures that could affect the operation of the equipment. If
this happens the telephone company will provide advance notice in order for
you to make necessary modifications to maintain uninterrupted service.
- This equipment may not be used on coin service provided by the telephone company. Connection to party lines is subject to state tariffs. This
equipment is hearing aid compatible.
Warning: Changes or modifications to this unit not expressly approved by
the party responsible for compliance could void the user’s authority to operate the equipment.
12
REGULATORY COMPLIANCE
NOTE: This equipment has been tested and found to comply with the limits
for a Class B digital device, pursuant to Part 15 of the FCC Rules. These limits
are designed to provide reasonable protection against harmful interference
in a residential installation. Some cordless telephones operate at frequencies
that may cause interference to nearby TV’s and VCR’s; to minimize or prevent
such interference, the base of the cordless telephone should not be placed
near or on top of a TV or VCR; and, if interference is experienced, moving
the cordless telephone farther away from the TV or VCR will often reduce or
eliminate the interference. However, there is no guarantee that interference
will not occur in a particular installation. If this equipment does cause harmful
interference to radio or television reception, which can be determined by
turning the equipment off and on, the user is encouraged to try to correct the
interference by one or more of the following measures:
• Reorient or relocate the receiving antenna.
• Increase the separation between the equipment and receiver.
• Connect the equipment into an outlet on a circuit different from that
to which the receiver is connected.
• Consult the dealer or an experienced radio TV technician for help.
- If trouble is experienced with this equipment, for repair or warranty information, please contact our customer service staff at: 248-577-5400
If the equipment is causing harm to the telephone network, the telephone
company may request that you disconnect the equipment until the problem
is resolved.
- Please follow instructions for repairing if any; otherwise do not alter or
repair any part of device except as specified.
Opening the equipment or any attempt to perform repairs will void the
warranty. For service or repairs, call 248-577-5400
- Connection to party line service is subject to state tariffs. Contact the
state public utility commission, public service commission or corporation
for information.
- If your home has specially wired alarm equipment connected to the telephone line, ensure the installation of this telephone equipment does not
disable your alarm equipment. If you have questions about what will disable
alarm equipment, consult your telephone company or a qualified installer.
- This equipment is hearing aid compatible.
13
GUARANTEE
Sonic Alert warrants the phone against any defect in materials or workmanship for the period of one year from the date of purchase.
Should you experience a problem, contact our customer service department.
Be sure to save your sales receipt as proof of purchase date should you
need warranty service. Within a period of one year from purchase date,
Sonic Alert will repair or replace (our discretion) your phone at no cost, if
a defect in materials or workmanship is found. If we elect to replace your
phone, we may replace it with a new or reconditioned product of the same
or similar design. Repair or replacement will be warranted for a period of 90
days or the original time on the original warranty, whichever is longer.
The warranty does not cover accidents, negligence or breakage to any
parts. This includes shipping damage, failure to follow instructions, misuse,
fire, floods, use of incompatible accessories, Acts of God or failure in your
phone service carrier’s line service. The product must not be tampered with
or taken apart by anyone who is not an authorized Sonic Alert representative. Tampering with the phone will void ant written or implied warranties
Sonic Alert shall not be responsible for loss of time, inconvenience, property
damage caused by your phone or any other accidental or consequential
damages. Warranty service is available only with proof of purchase
Simply send the Ampli1100 (postpaid) and a copy of your sales slip as proof
of purchase to:
Sonic Alert Inc., 1050 E. Maple Road, Troy MI 48083
IMPORTANT : YOUR RECEIPT IS PART OF YOUR WARRANTY AND
MUST BE RETAINED AND PRODUCED IN THE EVENT OF A WARRANTY
CLAIM.
1050 East Maple Rd.
Troy, MI 48083
Ph: 248577 5400
Fax: 248-577-5433
www.sonicalert.com
UgAmpli1100_En _Ed01
14