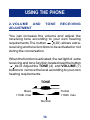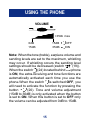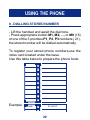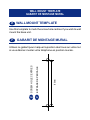
1
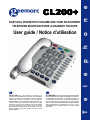
e
l
e
p
h
User guide / Notice d’utilisation
o
EASY-DIAL PHONE WITH VOLUME AND TONE ADJUSTMENT
TELEPHONE MULTIFONCTIONS A GRANDES TOUCHES
n
CL200+
ATTENTION: CE TELEPHONE PEUT ETRE DESTINE
AUX PERSONNES AYANT DES PROBLEMES D’AUDITION.
IL POSSEDE UN ECOUTEUR A VOLUME VARIABLE. A
LA PREMIERE UTILISATION, ASSUREZ VOUS QUE LE
BOUTON DE REGLAGE DU VOLUME SOIT POSITIONNE
SUR LA POSITION VOLUME MINIMUM. LES PERSONNES
MALENTENDANTES POURRONT PAR LA SUITE
AUGMENTER LE VOLUME POUR L’ADAPTER A LEUR
AUDITION.
e
CAUTION :THIS TELEPHONE PRODUCT IS
SPECIFICALLY DESIGNED FOR PEOPLE WITH HEARING
DIFFICULTIES AND IS PROVIDED WITH A HANDSET
EARPIECE VOLUME CONTROL FOR INDIVIDUAL
REQUIREMENTS. DUE CARE MUST BE TAKEN BY ALL
USERS THAT THE HANDSET EARPIECE VOLUME
CONTROL IS SET TO THE LOWEST LEVEL ACCEPTABLE
BY EACH RESPECTIVE USER. CARE SHOULD
THEREFORE BE EXERCISED TO ENSURE THAT ANY
NAIVE USERS ARE ARE FAMILIAR WITH THIS
REQUIREMENT.
F
T
E
INDEX
E
Description
6
Setting up
- Connecting the telephone
8
- Alarm and ring options
9
- Ring only
- Ring and shaker
- Ring and strobe flash
- Ringer settings
10
- Tone/Pulse switch (T/P)
10
- Time break recall switch
(300/100) 11
- Hotel message waiting switch
11
- Wall mounting
12
Using the phone
- Answering incoming calls
- Without headset
- With headset (option)
- In handsfree mode
- Volume and tone receiving
2
13
14
- Making a call
- Without headset
- With headset (option)
- In handsfree mode
- Last number redial
- Recall, * & # buttons
- Mute button
- Storing telephone numbers
- Dialling stored numbers
16
18
18
18
19
20
Options:
R
- Direct Vibe handset
- Shaker
- Headset with microphone
Guarantee
22
23
23
24
For product support and help visit our website at
www.geemarc.com
telephone 01707 384438
or fax 01707 372529
3
SOMMAIRE
F
Descriptif
26
Installation
- Raccordements
- Options d’alarme et de sonnerie
- Sonnerie seule
- Sonnerie et vibreur
- Sonnerie et flash
- Réglage de la sonnerie
- Fréquence vocale/décimale
(interrupteur T/P)
- Interrupteur 300ms/100ms
- Service messagerie d’hôtel
- Position murale
28
29
29
30
31
31
32
Utilsation
- Répondre à un appel
33
- Sans le casque
- Avec le casque (option)
- En mode mains libres
- Réglage du volume et de la tonalité
de réception
34
4
- Appeler
- Sans le casque
- Avec le casque (option)
- En mode mains libres
- Rappel du dernier numéro (bis)
- Touches R, * & #
- Fonction secret
- Mémoriser un numéro de téléphone
- Appel d’un numéro en mémoire
36
38
38
38
39
40
Options
R
- Combiné Direct Vibe
- Vibreur
- Casque avec microphone
Garantie
41
42
42
44
TEL. SERVICE APRES VENTE :
03 28 58 75 99
Pour tout renseignement technique ou toute
commande visitez notre site web sur
www.geemarc.com.
Parc d’Activités du Basroch
2, rue Galilée
59760 Grande Synthe
5
DESCRIPTION
Hotel message switch (1)
* Only Geemarc references
can be connected to the
sockets
* Shaker socket (2)
Only ref: SHAKCL_WH
* Headset socket (3)
Only ref: HEADSCL_WH
Tone reception
adjustment (4)
Clip for wall mounting (5)
P
Speaker volume adjustment (6)
Volume reception
adjustment (7)
Speaker (8)
Last number redial (9)
Time break recall button (10)
Flashing incoming ring indicator (strobe light) (11)
Memory storing key (
6
P1
12)
Tone and volume adjustment automatically activated
each time you hang-up the phone (24)
*12 V DC adaptor socket (23)
Line socket (22)
3 priority numbers (21)
Key to activate tone and volume
adjustment function (20)
DC12V
P2
P3
Ringer level
adjustment (18)
Ringer select mode (17)
Direct memory buttons (16)
Handsfree / Headset button (15)
Micro
Mute button (13) Hotel message waiting LED (14)
7
SETTING UP
Headset cord (33)
(*)Rear sockets Headset
Line cord (25)
(option)
(*) PTT socket
Adaptor(26)
Wall mounting
screw holes
(32)
(**)Wall socket
230V
Adaptor cord (27)
Index card (28)
Switch T/P (30)
Shaker cord (29)
Shaker (option)
Switch 300/100 (34)
(*) Classified TNV-3 according to EN60950 standard.
(**) Classified “hazardous voltage” according to EN60950 standard.
1 - CONNECTING THE TELEPHONE
1 - Connect the handset cord (31).
2 - Open the battery door by unscrewing the
retaining screw. Insert 4 x AAA alkaline batteries. Snap the battery door in place.
8
Handset
cord (31)
SETTING UP
In case of power failure, batteries are required
for the ring.
2 - Connect the line cord (25).
3 - Connect the shaker cord (optional).
4 - Connect the headset cord (optional).
5 - Connect the PTT plug to the wall socket.
6 - Connect the 12V DC adaptor cord (27) to the
telephone.
7 - Connect the 12V DC adaptor (26) to your
wall socket (**).
(**) Classified “hazardous voltage” according to EN60950 standard.
2 - ALARM AND RINGER OPTIONS
A 3 position switch (17) located on the right side
of the phone allows the settings below:
-
0
: Only the ringer is activated.
: Ringer and shaker are activated.
: Ringer and strobe flash are activated.
9
SETTING UP
3 - RINGER SETTINGS
A switch (18) located on right side allows the
ringer to be switched HI,LOW,OFF:
: Off,
: Low,
: Hi
Your phone comes with the ringer switched to
«High» and the melody set to «6».
Melody 1
Melody 2
Melody 3
Low
1
4
7
Mid
2
5
8
High
3
6(by default)
9
If you don’t like the ringer melody,you can choose
a new one by changing the settings as follow:
- Lift the handset.
- Press
(12) button.
- Press # button.
- Press any button 1 to 9.
Ringer will be activated on next call.
4 - TONE/PULSE SWITCH (T/P)
The Tone/Pulse switch (30) is factory pre-set to
10
SETTING UP
Tone position (T). In the UK,all telephone exchanges
now use Tone dialling.If your phone does not dial
out, it is probably being used from an older private
switch- board (PBX). In this case,theTone/Pulse
switch must be moved to Pulse.
5 - TIME BREAK RECALL SWITCH (300/100)
For the UK, the TBR switch (34) is factory pre-set to
100ms. It can be switched to 300ms for other
locations or PBX’s.
6 - HOTEL MESSAGE WAITING SWITCH
These are used with the new services provided on
hotel network.
A switch
(1) located behind your phone allows
to set ON the hotel message waiting function.
When the switch is setting ON and when you receive a message, the red light
(14) is lit to inform you that you have a message on phone .
11
SETTINGS
7 - WALL MOUNTING
To wall-mount your telephone,slide out the clip (5),
turn around and slide back into the wall mounting
position (located in the base unit, just below the
ear piece).This will ensure that the handset stays
firmly in position. Make 2 holes in the wall 80mm
apart (use the wall mount template) , insert the wall
plugs and the wall mounting screws. The screws
should protrude from the wall by 6-7 mm. Place
the phone onto the screw-heads (32) and slide
down to secure.
If you are using this telephone with a
hearing aid, set your hearing aid to
the “T” setting.
12
USING THE PHONE
1 - ANSWERING INCOMING CALL
Without headset:
- When an incoming call is received, the phone
will ring, to answer the call lift the handset and
speak.
- On completion of the call, carefully replace the
handset in the cradle to release the line.
With headset (option):
- When an incoming call is received, and if you
wish to answer the call with the headset, press the
/
(15) button and speak.
- On completion of the call, press the /
button again to release the line.
In handsfree mode:
- When an incoming call is received, the phone will
ring, to answer the call press the /
button.
- On completion of the call, press the /
button
to release the line.
13
USING THE PHONE
2-VOLUME AND
ADJUSTMENT
TONE
RECEIVING
You can increase the volume and adjust the
receiving tone according to your own hearing
requirements.The button
(20) allows extrareceiving and tone functions to be activated or not
during the conversation.
When the function is activated, the red light of extra
receiving and tone function located near the button
Is lit. Adjust the TONE (4) and VOLUME (7)
buttons to remove the level according to your own
hearing requirements.
TONE
Bass
+10db max
Treble
+10db max
Normal
14
USING THE PHONE
VOLUME
+35db max
0dB
15dB
15dB
OFF
35dB
ON
Note: When the tone (treble), earpiece volume and
sending levels are set to the maximum, whistling
may occur. If whistling occurs the sending level
settings should be decreased (switch
(19)).
When the switch (24) located behind the phone
is ON, the extra-receiving and tone functions are
automatically activated each time you use the
phone.When the switch is switched OFF, you
will need to activate the function by pressing the
button
(20). Tone and volume adjustment
(15dB to 30dB) is only activated when the button
is set to ON. When this button is set to OFF only
the volume can be adjusted from 0dB to 15dB.
15
USING THE PHONE
3 - MAKING A CALL
Without headset:
- Lift the handset.
- Await the dial tone and dial required number.
- On completion of the call,carefully replace the
handset in the cradle.
With headset (option):
- Press the /
(15) button.
- Await the dial tone and dial required number.
- On completion of the call, press the /
button
again to clear the line.
In handsfree mode
(15) button.
- Press the /
- Await the dial tone and dial required number.
- On completion of the call, press the /
button
to release the line.
- If your correspondent doesn’t answer your call,
press the /
button again to release the line.
16
USING THE PHONE
Note:
- To deactivate the handsfree function during a call,
lift the handset.
To activate the handsfree function during a call,
press the /
button and place the handset on
the cradle.
- During a call in handsfree, you can adjust the
speaker volume to a desirable level.
Simply use the slide control VOLUME (6) located
on the left of the unit.
17
USING THE PHONE
4 - LAST NUMBER REDIAL
- Lift the handset.
- Await the dial tone and press
(9) button.
-The previously dialled number will be automatically
redialled (not in use for memory numbers).
5 - RECALL, * & # BUTTONS
These are used with the new services provided on
digital exchanges.For details please contact your
network operator.
6 - MUTE BUTTON
If you wish to speak privately to someone else in
the room without your caller overhearing, press
and hold the
button (13).You will still be able to
hear the callers but they cannot hear you during
the mute operation.To resume normal conversation, release the
button.
18
USING THE PHONE
7 - STORING TELEPHONE NUMBER
Your phone can store12 direct memories including
3 priorities numbers (21 digits maximum for each
memory).
For example, the 3 priority P1, P2, P3 memories
(21) allow you to store the 3 numbers below:
- Local,Police station,
- Your doctor
- 1471
It is recommended to
store these numbers
during installation
To store a number please follow instructions below:
- Lift the handset.
button (12).
- Press
- Press M1, M2, ..., or M9 (16) or one of 3 priorities
numbers (21) to store your number.
- Dial the number.
- Press
button again.
Numbers will be lost after a few hours if you
disconnect your phone. Entering a new number in
memory will automatically erase the previous
number.
19
USING THE PHONE
8 - DIALLING STORED NUMBER
- Lift the handset and await the dial tone.
- Press appropriate button M1, M2, ..., or M9 (16)
or one of the 3 priorities P1, P2, P3 numbers ( 21),
the stored number will be dialled automatically.
To register your stored phone numbers,use the
index card located under the base.
Use this table below to prepare the phone book:
1
2
3
4
5
6
7
8
9
Example :
Bruce
1
01 64 57 .. ..
20
USING THE PHONE
For product support and help visit our website at
www.geemarc.com
telephone 01707 384438
or fax 01707 372529
21
OPTIONS
1- DIRECT VIBE
R
HANDSET (OPTIONAL)
If you have conductive hearing loss you can use a
Direct Vibe Handset, try placing the Direct Vibe
handset on your temple,in front and slightly below
your ear or behind your ear to see which position
works best for you.
If you don’t have hearing loss you can use your
phone normally and put the receiver on your ear.
If you require a Direct Vibe Handset ref:
HSDVCL_WH you may purchase it from your
retailer or audiologist.
In case of difficulty please visit our website
(www.geemarc.com) or phone our HELPLINE
01707 384 438 .
To set up the Direct Vibe handset only disconnect
the standard handset on the handset socket (31)
then replace it with the Direct Vibe Handset.
22
OPTIONS
2- SHAKER (OPTIONAL)
If you wish to complement you phone by using a
SHAKER ref: SHAKCL_WH connect the shaker
plug in the socket
(2) located behind your
phone.When an incoming call is received, the shaker will be activated during ringing.
Note: This option must be set in the ALARM AND
RINGER OPTIONS item (page 9) to be activated.
To purchase a SHAKER see item 1 above.
3- HEADSET WITH MICROPHONE (OPTIONAL)
If you wish to answer or make calls by using a
Geemarc headset ref: HEADSCL_BLK, connect
the headset plug in the headset socket
(3)
located behind your phone.
Note:When using a headset, the speaker will be
activated and it’s recommended to adjust the speaker (6) to the low position.
23
GUARANTEE
GUARANTEE
From the moment your Geemarc product is purchased, Geemarc
guarantee it for the period of one year. During this time, all repairs
or replacements (at our option) are free of charge.Should you
experience a problem then contact our helpline or visit our website
at www.geemarc.com.The guarantee does not cover accidents,
negligence or breakages to any parts. The product must not be
tampered with or taken apart by anyone who is not an authorised
Geemarc representative.The Geemarc guarantee in no way limits
your legal rights.
IMPORTANT: YOUR RECEIPT IS PART OF YOUR GUARANTEE
AND MUST BE RETAINED AND PRODUCED IN THE EVENT
OF A WARRANTY CLAIM
Please note: The guarantee applies to the United
Kingdom only.
DECLARATION: Hereby Geemarc Telecom SA declares that this
product is in compliance with the essential requirements and other
relevant provisions of the Radio and Telecommunications Terminal Equipment Directive 1999/5/EEC and in particular article 3
section 1a, 1b and section 3. The telephone does not operate if
the line current is lower than 18 mA.
24
Electrical connection : The apparatus is designed to operate from a 230V
50Hz supply only. (Classified as «hazardous voltage» according to EN60950 standard).
The apparatus does not incorporate an integral power on/off switch. To disconnect
the power, either switch off supply at the mains power socket or unplug the AC
adaptor. When installing the apparatus, ensure that the mains power socket is
readily accessible.
Telephone connection : Voltages present on the telecommunication network
are classified TNV-3 (Telecommunication Network Voltage) according to the
EN60950 standard.
Recycling directives
The WEEE (Waste Electrical and Electronic Equipment) has been put in place
for the products at the end of their useful life are recycled in the best way.
When this product is finished with, please do not put it in your domestic waste
bin.
Please use one of the following disposal options:
- Remove the batteries and deposit them in an appropriate WEEE skip. Deposit
the product in an appropriate WEEE skip.
- Or, hand the old product to the retailer. If you purchase a new one, they should
accept it.
Thus if you respect these instructions you ensure human health and
environmental protection.
For product support and help visit our website at
www.geemarc.com
telephone 01707 384438
or fax 01707 372529
25
DESCRIPTIF
Service messagerie hôtel (1)
* Ne connecter que les
références Geemarc
* Connecteur de vibreur (2)
Ref: SHAKCL_WH seulement
* Connecteur de casque (3)
Ref: HEADSCL_BLK seulement
Réglage de la tonalité
de réception (4)
P1
Ergot à retourner pour
maintenir le téléphone en
position murale (5)
Réglage du volume du haut
parleur (6)
Réglage du volume
de réception (7)
Haut-parleur (8)
Rappel du dernier
Touche R (10)
numéro composé (9)
Flash lumineux de sonnerie (11)
Mise en mémoire (12)
26
1
Activation automatique de la
correction d’écoute au décroché (24)
* Connecteur d’adaptateur secteur 12V DC (23)
Connecteur de ligne (22)
3 mémoires prioritaires (21)
Activation de la correction de tonalité
et de volume de réception (20)
DC12V
P2
P3
Réglage du niveau
de sonnerie (18)
Sélection du type de
sonnerie (17)
Mémoires directes (16)
Mains libres / Casque (15)
Micro
Indicateur message hôtel (14)
Secret d’appel (13)
27
INSTALLATION
Cordon de ligne (25)
(*) Conjoncteur
téléphonique
Cordon de
casque (33)
(**) Adaptateur secteur
230V
Cordon d’adaptateur
secteur (27)
Répertoire (28)
Cordon de vibreur (29)
(*)Prises arrière Casque
(option)
Ouvertures
pour vis de
position
murale
(32)
InterT/P(30)
Vibreur (option)
Inter 300/100 (34)
(*)Classée TNT-3 selon la norme EN60950
(**) Classé “tension dangereuse” selon la norme EN60950.
1 - RACCORDEMENTS
Cordon de
combiné (31)
- Branchez le cordon du combiné (31).
- Inserez 4 piles (AAA) dans le compartiment
situé en dessous de l’appareil.
En cas de coupure secteur, les piles sont
necessaires au fonctionnement de la sonnerie.
- Branchez le cordon de ligne (25).
28
)
INSTALLATION
- Branchez le cordon du vibreur si besoin.
- Branchez le cordon du casque si besoin.
- Branchez le conjoncteur téléphonique dans
votre prise téléphonique murale.
- Branchez le cordon d’adaptateur secteur (27).
- Branchez l’adaptateur secteur au réseau
électrique (26).
(**) Classé “tension dangereuse” selon la norme EN60950.
2 - OPTIONS D’ALARME ET DE SONNERIE
Un commutateur 3 positions (17) situé sur le côté
droit de l’appareil vous permet de choisir le type
d’alarme:
- 0
: seule la sonnerie est activée.
: la sonnerie et le vibreur sont activés.
-
: la sonnerie et le flash sont activés.
3 - REGLAGE DE LA SONNERIE
Un commutateur (18) situé sur le côté droit de
l’appareil permet de régler la sonnerie:
: désactivée, : faible, : forte
Votre téléphone est positionné sur «Forte» et la
mélodie est positionnée sur «6».
29
INSTALLATION
Si la sonnerie ne vous convient pas,sélectionnez
un nouveau réglage parmi les 9 proposés ci-dessous:
Melodie 1
Melodie 2
Melodie 3
Faible
1
4
7
Moyen
2
5
8
Fort
3
6(par défault)
9
Suivez la procédure décrite ci-dessous pour changer le réglage :
- Décrochez le combiné.
- Appuyez sur la touche
(12).
- Appuyez sur la touche #.
- Appuyez sur un chiffre de 1 à 9.
4 - FREQUENCE VOCALE OU DECIMALE?(T/P)
Au moment de sa livraison, votre téléphone est en
mode fréquence vocale (T). Si le central téléphonique dont vous dépendez fonctionne en mode fréquence décimale (P), vos appels n’aboutiront pas,
il vous suffira alors de commuter l’interrupteur T/P
(30) situé en dessous du téléphone sur la position
P pour remédier à ce problème.
30
INSTALLATION
5 - INTERRUPTEUR 300/100ms
Cet interrupteur (34) doit être positionné sur 300
pour la France, il peut être positionné sur 100 pour
d’autres pays ou utilisation avec un PABX.
6 - SERVICE MESSAGERIE D’HOTEL
Ce service, uniquement utilisé sur certains
autocommutateurs privés (hôtel par exemple),
permet de prévenir de l’arrivée d’un message, fax,
(14) qui
colis ... par l’intermédiaire du voyant
s’allume.
Un interrupteur (1) situé derrière votre téléphone
permet d’activer cette fonction (ON).
Lorsque cette fonction est activée et que vous
avez un message, le voyant rouge
sera allumé
pour vous informer du message.
31
INSTALLATION
7 - POSITION MURALE
Pour maintenir votre combiné en position verticale,
retirez l’ergot situé sur la base (voir descriptif page
26) le tourner et le réinsérer.Percez 2 trous verticaux
distants de 80 mm dans votre mur pour y insérer 2
chevilles avec leurs vis (utilisez le gabarit de montage
mural fourni) . Laissez dépasser les vis de 6-7mm.
Placez votre téléphone sur les têtes de vis et faites
glisser ensuite votre téléphone dans les ouvertures
(32).
32
UTILISATION
1 - REPONDRE A UN APPEL
Sans casque:
- Lorsque le téléphone sonne, décrochez le combiné pour parler à votre correspondant.
- Raccrochez le combiné pour libérer la ligne.
Avec casque (option):
- Lorsque le téléphone sonne et si vous avez choisi
de répondre aux appels avec votre casque, appuyez sur la touche /
(15) pour parler à votre
correspondant.
- La conversation terminée, appuyez sur la touche
/
pour libérer la ligne.
En mode mains libres:
- Lorsque le téléphone sonne, appuyez sur la touche / .
- La conversation terminée, appuyez sur la touche
/
pour libérer la ligne.
33
UTILISATION
2 - REGLAGE DU VOLUME ET DE LA TONALITE DE RECEPTION
Vous pouvez amplifier le volume et la tonalité de
réception de votre combiné.
La touche
(20) permet d’activer ou de désactiver le correcteur de réception durant la conversation.
Lorsque la fonction est activée, le voyant rouge
du réglage de volume et de tonalité situé près de
la touche
est allumé. Les touches, TONE (4)
et VOLUME (7), vous permettent de corriger la
tonalité ou le volume de réception.
TONE
Graves
+10db max
Aigus
+10db max
Normal
34
UTILISATION
VOLUME
+35db max
0dB
15dB
15dB
OFF
35dB
ON
Note:Des sifflements dans l’écouteur peuvent
apparaître dans certaines configurations de
réglage (tonalité des aigus, volume de réception
et volume d’émission au max),dans ce cas diminuez
le niveau d’émission (interrupteur
(19)).
Lorsque l’interrupteur (24) situé à l’arrière de
l’appareil est sur ON , la fonction est automatiquement activée à chaque décroché de votre
combiné.Si l’interrupteur est sur la position OFF, il
faudra activer la fonction en appuyant sur la touche . Le réglage de la tonalité et du volume (de
15dB à 30 dB) n’est activé que lorsque la touche
est sur ON. Lorsque cette touche est sur OFF seul
le volume peut être réglé de 0dB à 15dB.
35
UTILISATION
3 - APPELER
Sans casque:
- Décrochez le combiné.
- Composez le numéro de votre correspondant.
- La conversation terminée, raccrochez le combiné pour libérer la ligne.
Avec casque:
- Appuyez sur la touche / ( 15).
- Composez le numéro de votre correspondant.
- La conversation terminée, appuyez sur la touche
/
pour libérer la ligne.
- En mode mains libres
- Appuyez sur la touche /
(15), vous entendez
la tonalité à travers le haut parleur.
- Composez le numéro de votre correspondant.
- La conversation terminée, appuyez sur la touche
/
pour libérer la ligne.
- Si votre correspondant ne répond pas, libérez la
ligne en appuyant sur la touche / .
36
UTILISATION
Note:
- Pour désactiver le mode mains libres durant une
conversation, décrochez le combiné.
Pour activer le mode mains libres durant une conversation, appuyez sur la touche /
puis raccrochez le combiné
- En mode mains libres, vous pouvez ajuster le
volume du haut-parleur à l’aide du bouton VOLUME
(6) situé sur le côté gauche de votre appareil.
37
UTILISATION
4 - RAPPEL DU DERNIER NUMERO (BIS)
- Décrochez le combiné.
- Appuyez sur la touche
(9), le numéro de votre correspondant se recompose automatiquement
(ne fonctionne pas pour les n° en mémoire).
5 - TOUCHES R, * & #
Touches d’accès aux Services de France Télécom
(Rappel d’enregistreur, Signal d’Appel, Conversation à Trois ).
6 - FONCTION SECRET
Cette touche (13) permet de couper ponctuellement le microphone en cours de communication.
- Appuyez et maintenez la touche . Votre correspondant ne vous entend plus.
- Relâchez la touche pour rétablir la conversation.
38
UTILISATION
7 - MEMORISER UN NUMERO DE TELEPHONE
Votre téléphone possède 12 mémoires directes
dont 3 prioritaires (21 chiffres maximum par
mémoire).Les 3 mémoires prioritaires P1, P2, P3
(21) permettent de mémoriser par exemple les 3
numéros suivants:
- POMPIER : 18P
Pensez à enregistrer
ces numéros
- POLICE : 17
lors de l’installation
- VOTRE MEDECIN
Suivez la procédure décrite ci-dessous pour mémoriser vos numéros:
- Décrochez le combiné.
- Appuyez sur la touche
(12).
- Appuyez sur une des touches M1, M2, ..., ou M9
(16) ou sur une des trois touches prioritaires (21)
pour enregistrer votre numéro.
- Composez le numéro à mémoriser.
- Appuyez de nouveau sur la touche
.
Les numéros seront perdus après quelques heures si vous déconnectez votre téléphone.
Un nouvel enregistrement dans une mémoire efface la précédente.
39
UTILISATION
8 - APPEL D’UN NUMERO EN MEMOIRE
- Décrochez le combiné.
- Appuyez sur une des touches M1, M2, ..., ou M9
ou sur une des trois touches P1, P2, P3 le numéro
en mémoire se recompose automatiquement.
Pour repérer vos numéros enregistrés, utilisez le
répertoire situé en dessous de la base.
Aidez vous du tableau ci-dessous pour le préparer:
1
2
3
4
5
6
7
8
9
Exemple :
Pierre
1
01 64 57 .. ..
40
OPTIONS
1- COMBINE DIRECT VIBE
R
Si vous avez des problèmes auditifs, placez votre
combiné Direct Vibe sur votre boîte crânienne (sur
la tampe, autour ou derrière l’oreille) et essayez
de trouver la position qui vous semblera la
meilleure. En plaçant l’écouteur à un de ces
endroits,les vibrations émises par le transducteur
stimule votre nerf auditif par conduction osseuse
et vous permet d’entendre.
Si vous n’avez pas de problèmes auditif utilisez
votre téléphone de façon normale, c’est à dire en
plaçant l’écouteur à l’oreille.
Pour installer le combiné Direct Vibe ref:
HSDVCL_WH, déconnectez simplement le combiné standard et remplacez le par le combiné Direct Vibe (31). En cas de problèmes fonctionnels
et avant de nous retourner votre téléphone contactez notre service après vente au numéro suivant:
TEL. SERVICE APRES VENTE :
03 28 58 75 99
41
OPTIONS
2- VIBREUR
Le vibreur ref: SHAKCL_WH a été conçu pour
les personnes ayant des problèmes auditifs ou
souhaitant se faire avertir en toute discrétion d’un
appel téléphonique, sans déranger leur partenaire
endormi par exemple.
Si vous désirez utiliser le vibreur, connectez le sur
la prise
(2) située derrière votre téléphone.
Lorsque vous recevrez un appel, le vibreur sera
actif pendant la sonnerie.
Note: Cette option doit être sélectionnée dans le
paragraphe OPTION D’ALARME ET DE SONNERIE (page 29) pour être activée.
3- CASQUE AVEC MICROPHONE
Le casque Geemarc ref: HEADSCL_BLK vous
permettra de recevoir ou d’effectuer un appel les
mains libres. Si vous désirez passez ou répondre
à un appel avec le casque, connectez le dans la
prise casque (3) située derrière votre téléphone.
42
OPTIONS
Note:Pendant un appel le haut parleur sera actif
même avec le casque connecté. pour un un bon
confort d’écoute ou simplement si vous ne désirez
pas que quelqu’un entende votre conversation,
vous pouvez diminuer le volume du haut parleur
(6).
Parc d’Activités du Basroch
2, rue Galilée
59760 Grande Synthe
Pour tout renseignement technique ou toute
commande visitez notre site web sur
www.geemarc.com.
TEL. SERVICE APRES VENTE :
03 28 58 75 99
43
GARANTIE
GARANTIE
Cet appareil est garanti 1 an pièces et main-d'oeuvre. La date d'achat
figurant sur le ticket de caisse fera foi. Cette garantie s'exerce sous réserve
d'une utilisation normale de l'appareil. Les dommages occasionnés par les
surtensions électriques, la foudre ou par un choc sur l'appareil ne peuvent en
aucun cas être couverts par la garantie. En cas de problème fonctionnel et
avant de nous retourner votre appareil, contactez notre service après vente
de : 8h30 à 12h30 et de 14h00 à 17h00 du Lundi au Jeudi et de 8h30 à
12h30 et de 14h00 à 16h30 le Vendredi.
TEL. SERVICE APRES VENTE :
03 28 58 75 99
Parc d’Activités du Basroch
2, rue Galilée
59760 Grande Synthe
Pour tout renseignement technique ou toute commande visitez notre site web sur
www.geemarc.com.
Raccordement électrique : l’appareil est prévu pour fonctionner
uniquement avec l’adaptateur secteur 230V 50Hz fourni. (Tension classée
“dangereuse” selon les critères de la norme EN60950).Par précaution en cas
de danger, le bloc alimentation secteur sert de dispositif de sectionnement de
l’alimentation 230V. Il doit être installé à proximité du matériel et être aisément
accessible.
Raccordement téléphonique : les tensions présentes sur ce réseau
sont classées TRT-3 (Tension de Réseau de Télécommunication) au sens de
la norme EN60950.
Ce produit respecte les exigences de compatibilité électro-magnétique et de
sécurité électrique demandées par la directive européenne RTTE.Par ailleurs,
il est compatible avec les différents réseaux téléphoniques européens (normes TBR21/37/38).Le fonctionnement de l’appareil n’est pas garanti si le courant de ligne est inférieur à 18 mA.
44
Recommandations pour le recyclage :
La directive DEEE (Déchet d'Equipement Electrique et Electronique) a été
mise en place dans le but d'assurer la collecte sélective en vue de la valorisation, réutilisation ou recyclage des produits en fin de vie.
Lorsque votre produit ne fonctionne plus, ne le jetez pas dans votre poubelle
ménagère.
Suivez l'une des procédures décrites ci-dessous:
- Déposez les batteries et votre ancien appareil dans un lieu de collecte
approprié.
- Ou rapportez votre ancien appareil au magasin ou vous acheterez le
nouveau. Il devra l'accepter.
Ainsi, si vous respectez ces instructions vous faites un geste pour l'environnement et vous contribuez à la préservation des ressources naturelles et à
la protection de la santé humaine.
UGCL200PLUS ED02
WALL MOUNT TEMPLATE
GABARIT DE MONTAGE MURAL
E
WALL MOUNT TEMPLATE
Use this template to mark the screw hole centres if you wish to wall
mount the base unit.
F
GABARIT DE MONTAGE MURAL
ENTRAXE DE PERCAGE
F
80mm
SCREW HOLE CENTRES
E
Utilisez ce gabarit pour marquer la position des trous sur votre mur
si vous désirez monter votre téléphone en position murale.