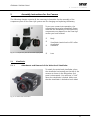
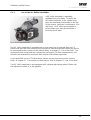
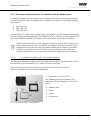
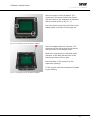
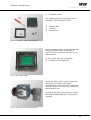
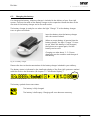
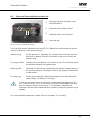
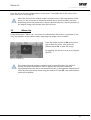
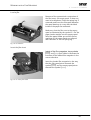
1
Sinar Hy6
Medium Format Camera System
Operating Manual
LEGAL INFORMATION
Copyright
Copyright © 2007 - 2008 Sinar AG. All rights reserved.
No part of this manual may be reproduced in any form (print, photocopy, micro film or
any other procedure) without a prior written permission of Sinar AG, nor may contents be
used, reproduced, processed or distributed using electronic systems. This manual was
produced with the appropriate care. No liability will be accepted for damages resulting
from a non-compliance with the advice contained herein.
We reserve the right to modify the document following technical advancements.
Intellectual Property Rights Regarding Photography
Pictures taken with a photographic camera are subject to the intellectual property rights
and the personal rights of the respective country. Any use other than personal / private
use is only allowed in accordance with the intellectual property rights laws of the
respective country. In some cases, taking and using photographic images is restricted even
for private use. Please be careful and make sure that you take images only in accordance
with the laws effective in the country where the pictures are taken.
Trademarks
The Sinar wordmark is a trademark of the Sinar AG. All other trademarks referred to in
this manual are the property of their proprietors.
Sinar AG
Stadtweg 24
CH 8245 Switzerland
Phone: +41/52 647 0707
Fax: +41/52 647 0606
[email protected]
www.sinarcameras.com
Manual_Sinar_Hy6_e_080409
Photos: Sinar AG
Printed in Switzerland
08/04/09.11 e – 02.10802
Sinar AG, Switzerland
I
ADVICE FOR USING THIS MANUAL
Advice for Using This Manual
General Advice and Structure of the Manual
The manual is intended for professional photographers or sophisticated amateur
photographers working with the Sinar Hy6 system.
The manual contains all the necessary information for the safe and efficient operation, the
cleaning, maintenance and storage of your Sinar Hy6 medium format camera system as
well as the contact details in case of service incidents.
Read the safety advice contained in this manual carefully before you start working with
the Sinar Hy6 system, and make sure to observe the safety advice and all other
information contained in this manual.
No liability will be assumed for any damages or injuries arising from the non-observance
of any information contained in this manual.
Warning signs and symbols
Warning against possible dangers to personal safety or health
Warning against the occurrence of an electric shock
Warning against the risk of stumbling
Warning against risks that might arise from possibly damaged batteries
Warning against the danger of explosion
Warning against optical radiation
Warning against the possible risk of burns due to hot surfaces.
Warning against the occurrence of fire
Warning against possible damage to the device or its component parts
Refers to important advice.
Refers to advice or guidelines to be observed when disposing of the camera or its
component parts.
II
ADVICE FOR USING THIS MANUAL
References
Shutter Release
Refers to an operational element that permits to call up a function. All
operational elements will be written in capital letters.
|-Options | GUI-|
Refers to the menu path to be followed when selecting a function from
the menu.
Æ
Refers to a chapter or section to be read for further information.
•
Enumeration
Abbreviations
s
Seconds
ms
Milliseconds
°
Degree (angular measure)
°C
Degree Celsius
CCD
Charged Coupled Device
GUI
Graphical User Interface
EMC
Electromagnetic Compatibility
III
ADVICE FOR USING THIS MANUAL
Structure of the manual
The manual is structured into the following chapters; each providing detailed information
about a specific field of using the Sinar Hy6 system.
Chapter 1
Introduction
This chapter provides a short introduction to the features and the
operation of your Sinar Hy6 system.
Chapter 2
Safety information
This chapter provides the necessary safety advice and warnings that have
to be observed in order to operate the system safely.
It is important to read this chapter carefully before starting to
operate the Sinar Hy6 system!
Chapter 3
Scope of delivery
In this chapter, the items included in your delivery are listed.
Chapter 4
The camera and its component parts
In this chapter, you find an overview over the component parts and
operating elements of the camera.
Chapter 5
Assembly instructions
In this chapter, the assembly and the commissioning of the camera is
described.
Chapter 6
Battery
In this chapter, the replacement and charging of the battery is described.
Chapter 7
First use
In this chapter, a short introduction into starting the camera operation is
provided.
Chapter 8
The operating elements - the camera functions at a glance
In this chapter, the operational elements at the camera body and at the
hand grip are described.
The chapter provides a quick overview over the functions available that
will be described in more detail in the respective chapters.
Chapter 9
The display of the camera
Here, the display settings at the hand grip and in the viewfinder of the
camera are described.
IV
ADVICE FOR USING THIS MANUAL
Chapter 10
Focusing
The focusing functions of the Sinar Hy6 camera are described.
Chapter 11
Exposure
All functions concerning exposure of the photographic image are
described here. These functions include light metering, selecting the
exposure program and setting of the ISO-number.
Chapter 12
Shooting modes
Here, the shutter release modes are described.
Chapter 13
Mirror up
Here, the mirror up function is described.
Chapter 14
Use of the flash
In this chapter, the flash operation is described.
Chapter 15
Options
Here, the options for the user-defined camera settings are described.
Chapter 16
Cleaning and maintenance
In this chapter you will find useful information about the cleaning and
maintenance of the camera to guarantee the longevity of the camera
and its component parts.
Chapter 17
Technical data sheet
Here, the detailed technical information about the camera can be found.
V
CONTENTS
Advice for Using This Manual
General Advice and Structure of the Manual.........................................................II
Warning signs and symbols...................................................................................II
References ...........................................................................................................III
Abbreviations.......................................................................................................III
Structure of the manual ...................................................................................... IV
1
INTRODUCTION ..............................................................................................1
2
SAFETY INFORMATION ..................................................................................2
2.1
General Advice ............................................................................................2
2.2
Advice Concerning the Camera ...................................................................3
2.2.1
Advice for the Prevention of Injuries............................................................... 3
2.2.2
Advice for the Prevention of Damages to the Camera .................................... 4
2.2.3
Advice for the Storage, Maintenance and Disposal of the Camera.................. 5
2.3
Safety Advice Concerning the Battery and the Cables .................................6
2.4
Norms and Standards .................................................................................7
2.5
Environmental Conditions ...........................................................................7
3
SCOPE OF DELIVERY.......................................................................................8
3.1
Sinar Hy6-e75 .............................................................................................8
3.2
Sinar Hy6-e54 .............................................................................................9
3.3
Sinar Hy6 - m54 ........................................................................................10
3.4
Sinar Hy6 ..................................................................................................11
4
THE CAMERA AND ITS COMPONENT PARTS................................................12
VI
CONTENTS
5
ASSEMBLY INSTRUCTIONS FOR THE CAMERA .............................................15
5.1
Viewfinder ................................................................................................15
5.1.1
Attachment and Removal of the Waist-level Viewfinder ............................... 15
5.1.2
Opening and Closing the Waist-level Viewfinder .......................................... 16
5.1.3
Opening and Closing the Magnifying Glass .................................................. 17
5.1.4
Replacing the Magnifying Glass.................................................................... 17
5.1.5
Use of the 90° Reflex Viewfinder.................................................................. 18
5.2
Attachment and Removal of the Lens .......................................................19
5.3
Attachment and Removal of the Sinarback ...............................................20
5.3.1
Attachment and Removal of the Protective Cover ........................................ 20
5.3.2
Assembly and Attachment of the Sinarback and the Adapter Plate .............. 21
5.3.2.1
Assembly and Attachment of a Sinarback eMotion ............................... 21
5.3.2.2 Attachment and Removal of a Sinarback 54 MC....................................... 23
5.4
Adjusting the hand grip ............................................................................25
5.5
Connecting the camera to a computer ......................................................25
5.6
Attaching a flash device............................................................................26
5.7
Replacing the focusing screen...................................................................26
5.8
Inserting and replacing the format mask ..................................................28
5.9
Adjusting the Shoulder Strap and the Hand Strap.....................................29
5.9.1
Attaching and Removing the Shoulder Strap ................................................ 29
5.9.2
Adjusting the Hand Strap ............................................................................ 30
6
BATTERY ......................................................................................................32
6.1
Inserting and removing the battery...........................................................32
6.2
Charging the battery .................................................................................33
7
FIRST USE OF THE SINAR HY6 SYSTEM ........................................................34
VII
CONTENTS
8
OPERATIONAL ELEMENTS – THE CAMERA FUNCTIONS AT A GLANCE ........36
8.1
Operational Elements at the Hand Grip.....................................................36
8.2
Operational Elements at the Camera Body................................................38
8.2.1
Shooting Mode ............................................................................................ 38
8.2.2
Exposure Mode ............................................................................................ 39
8.2.3
Light Metering Mode ................................................................................... 41
8.2.4
Auto Focus Mode......................................................................................... 42
8.2.5
Flash Options ............................................................................................... 43
8.2.6
Factory Reset................................................................................................ 43
8.3
9
Focus and Focus Indication at the Lens.....................................................44
THE DISPLAYS AT THE HAND GRIP AND IN THE VIEWFINDER .....................45
9.1.1
Easy Mode ................................................................................................... 45
9.1.2
Enhanced Mode ........................................................................................... 46
9.2
Viewfinder Display ....................................................................................47
10
FOCUSING .................................................................................................48
10.1 Auto Focus Single and Auto Focus Continuous .........................................48
10.2 Manual Focus............................................................................................49
10.2.1 Manual Focusing.......................................................................................... 49
10.2.2
Focus Indication at the Camera Lens ........................................................... 49
10.2.3
Manual Focus Override................................................................................ 50
10.3
AF-Lock....................................................................................................50
10.4 Focus Indication in the Viewfinder Display................................................50
10.5 Stop Down (Working Aperture).................................................................51
11
EXPOSURE ................................................................................................51
11.1 Introduction ..............................................................................................51
11.2 Light Metering Modes...............................................................................52
11.2.1 Introduction ................................................................................................. 52
11.2.2 Spot Light Metering ..................................................................................... 53
11.2.3 Centre-weighted Light Metering .................................................................. 54
11.2.4 Integral Light Metering................................................................................. 54
VIII
CONTENTS
11.3 Exposure Modes .......................................................................................55
11.3.1 Automatic Exposure Modes.......................................................................... 55
11.3.1.1 P – Programmed Auto Exposure ........................................................... 55
11.3.1.2 S - Shutter Priority................................................................................. 56
11.3.1.3 A - Aperture Priority.............................................................................. 56
11.3.2 Manual Exposure Functions.......................................................................... 57
11.3.2.1 M - Manual Mode................................................................................. 57
11.3.2.2 B - Bulb................................................................................................. 57
11.3.3.2 Toggle .................................................................................................. 58
11.3.4 AE-Lock........................................................................................................ 59
11.3.5 Exposure Compensation............................................................................... 60
11.3.6 Setting the ISO-speed................................................................................... 61
12
SHOOTING MODES ...................................................................................62
12.1 Camera Wake-up and Shutter Release ......................................................62
12.2 Single and Continuous Release Mode .......................................................63
12.3 Self-Timer .................................................................................................64
12.4 Focus Trap ................................................................................................65
12.5 Multishot ..................................................................................................66
12.6 Ultra-fast...................................................................................................66
12.7 Bracketing.................................................................................................67
12.8 Focus Bracketing.......................................................................................68
13
MIRROR UP ...............................................................................................70
14
USE OF THE FLASH ...................................................................................71
14.1 Flash Operation with the Sinar Hy6 System ..............................................71
14.2 The Hot Shoe – TTL-Flash Measurement and SCA-interface ......................71
14.3 The X-Contact – Manual Flash Control ......................................................72
14.4 The 90° Reflex Viewfinder ........................................................................73
14.5 Flash Options and Flash Compensation.....................................................73
14.6 Flash Compensation ..................................................................................74
IX
CONTENTS
15
OPTIONS ...................................................................................................75
15.1 Controls ....................................................................................................76
15.2 LCD-Backlight ...........................................................................................76
15.3 Power save ...............................................................................................76
15.4 Graphical user interface ............................................................................77
15.5 LCD contrast .............................................................................................77
15.6 AE-activation.............................................................................................77
15.7 Firmware version ......................................................................................78
15.8 Soft key function.......................................................................................78
15.9 Display of the firmware versions...............................................................78
15.9 Status........................................................................................................79
16
WORKING WITH A FILM MAGAZINE.........................................................80
17
CLEANING AND MAINTENANCE ...............................................................84
18
TECHNICAL DATA .....................................................................................85
X
INTRODUCTION
1
Introduction
Congratulations to your new Sinar Hy6 system. You have purchased a reliable state of the
art professional medium format camera system enabling you to take pictures at highest
quality. The broad variety of the functions and the easy and intuitive operation of the
camera make it the ideal instrument for each application field of professional
photography.
Designed and developed in cooperation with Franke & Heidecke, the Sinar Hy6 system
sets new standards in medium format photography. Sinar Hy6 is a digital-analogue hybrid
system, and is presently the only medium format camera that does not only cover the
usual 6 x 4.5 cm format, but also the classic 6 x 6 cm format. With its central shutter and
a shutter speed of only 1 1000 s, it is also the fastest camera in its class.
An outstanding feature of the camera is its versatility and ease of use. Using the 6 x 4.5
cm format, portrait or landscape format can be chosen without altering the camera
position, simply by changing the orientation of the back. As light metering with the Sinar
Hy6 system is performed independent of the viewfinder, the Sinar Hy6 system can be
operated with a 90° reflex viewfinder or with a waist-level viewfinder.
The ergonomic design and the position of the operational elements guarantee quick
access to all functions. There are no nested menus and no toggle key functions; in this
way you will be able to call up all camera functions intuitively after you have been
working with the camera for a while.
The following operating manual provides you with a description of the camera functions,
and the instructions about the camera operation. Please read the safety advice and
observe the assembly instructions before starting to work with the camera.
A detailed description of the Sinarback and its functions can be found in a separate
documentation. Please refer also to this documentation in order to benefit from all
functions of your Sinar Hy6 system, and to take optimum pictures.
1
SAFETY INFORMATION
2
2.1
Safety Information
General Advice
Read the manual.
Before starting to operate your camera, please read this manual to become
familiar with all functions of the camera. In this way, you will be able to make
optimum use of the camera functions, and to operate the device safely and
without any problems. No liability will be accepted for damages and injuries
resulting from the non-observance of the information contained in this manual.
Operate the camera as intended.
Any other use than intended will not be covered by the warranty claims.
Spare parts and accessories
Only use such spare parts and accessories that are included in your delivery and /
or recommended by the manufacturer for the use with the camera. No liability
will be accepted by the manufacturer for injuries or damages caused by the use of
non-authorized parts. Please contact the manufacturer or your expert dealer for
questions regarding spare parts and accessories.
Observe the safety advice and manuals of third party suppliers.
The Sinar Hy6 system is a hybrid instrument that can be operated with a digital
camera back or a film magazine. When using this camera with component parts
and accessories of third party suppliers, please observe the safety advice
contained in the manuals supplied with these component parts. No liability will be
accepted by the manufacturer for injuries or damages resulting from the nonobservance of the safety information contained in the manuals of third party
suppliers.
Observe the legal regulations for taking and using photographic images.
Make sure to use the camera only in accordance with the laws effective in your
country (e.g. copyright, intellectual property right). Images that are not taken for
private use only must not be used without permission. In some cases, the
capturing of images can also be restricted if these images are intended for private
use.
Test the camera before first use.
Before you start to operate your camera for the first time, take some test
photographs to check whether the camera works flawlessly, and whether the
photographs are recorded on your film or digital storage medium and can be read
from there by your computer. The manufacturer will not accept any liability for
the loss of images or any other inconvenience.
We also recommend testing the camera functions always before taking
photographs at special events (e.g. weddings) to prevent any inconvenience
caused by a loss of images.
2
SAFETY INFORMATION
Do not open the camera case.
Any opening of the camera case is explicitly reserved to customer service. An
arbitrary opening of the case leads to the expiry of the warranty claims. No
liability will be assumed for personal injuries or damages caused by the arbitrary
opening of the camera case.
Handle the camera with care.
The Sinar Hy6 is a sensitive, high precision optical instrument. Please handle it
with the appropriate care. Avoid any agitation of the instrument and any soiling
of the optical surfaces, and observe the advice for the care and the maintenance
of the camera.
Do not insert any metal pieces into the electric contacts of the camera, of any
accessory parts or into the cable connections. There is the danger of an electric
shock or of damage to the camera and its component parts.
In the area of the operational elements at the camera body, the camera is
equipped with a magnet. Please observe that magnetic fields may cause damage
to watches, data carriers and magnet strips of cards etc. Please make sure not to
place these devices nearby the camera.
2.2
2.2.1
Advice Concerning the Camera
Advice for the Prevention of Injuries
Do not open the camera case and do not disassemble the camera.
There is the danger of an electric shock. If the camera is open due to damage of
the casing, do not touch the internal parts. Contact customer service.
To prevent the danger of explosion, do not use the camera nearby easily
inflammable liquids or gas.
To prevent injuries to the eyes, do not focus the camera lens onto the sun or
extremely hot light sources. In rare cases, the focusing of the camera onto
extremely hot light sources can lead to an impairment of your vision capability.
If the camera has been dropped into water, or if the internal parts have got in
contact with water, please remove the battery to prevent the danger of an
electric shock. Do not use the camera any more. Contact customer service.
If any abnormal behaviour of the camera (e.g. smoke, noise, smell) occurs during
operation, do not use the camera any more. Disconnect it from the power supply
and / or remove the battery. Contact customer service before you use the camera
again. In this way, injuries or damages can be prevented.
3
SAFETY INFORMATION
2.2.2
Advice for the Prevention of Damages to the Camera
Avoid strong magnetic fields.
Strong magnetic fields can damage the camera functions or destroy the
recorded data. Do not use the camera nearby devices that produce high electromagnetic fields (e.g. magnets or electric motors).
Avoid contact with sand, dust, toxic gas, water etc.
This can lead to a failure of the camera. If water is on the surface of the camera
or the lens, please wipe it away with a dry and soft, wood free tissue. When the
camera has been exposed to saline air, the casing has to be wiped with a slightly
moistened tissue.
If extension rings are used with the camera, please do not establish or release
the connection between the ring and the lens as long as the intermediate ring is
attached to the camera. Always remove the ring from the camera first, and then
remove the lens from the ring.
Do not touch the internal parts of the camera.
The camera contains highly sensitive electronic component parts and circuits.
Please do not touch the internal parts of the camera while the lens is removed.
Especially, do not touch the mirror and the light-absorbing coating.
When the film magazine or the digital back are removed from the camera,
please make sure that the auxiliary shutter lying exposed is not subject to any
mechanical pressure. Please use the protective cover when the camera back or
film magazine is detached from the camera.
Do not touch the sensor in the digital back. Please use the protective cover
when the back is detached from the camera.
Do not use the camera under water.
The camera is not waterproof, and therefore may not be used for submarine
photography.
Prevent the occurrence of condensation water.
Do not expose the camera to rapidly changing environment temperatures. In
this way, the occurrence of condensation water outside and inside of the
camera can be prevented. Condensation water can lead to damage of the
camera components, and can impair the camera operation. When
condensation is caused due to rapidly changing environment temperatures,
the lens has to be detached from the camera body and the battery, and the
camera back or film magazine have to be removed. Do not use the camera
until the condensation water has evaporated completely.
To prevent the occurrence of condensation water, place the camera in a
sealed plastic bag. Do not take the camera out until it has accommodated to
the new environment temperature.
4
SAFETY INFORMATION
2.2.3
Advice for the Storage, Maintenance and Disposal of the Camera
Do not store the camera at high temperatures and high air humidity.
High temperatures and air humidity can lead to the appearance of mildew. Do
not leave the camera in a car where temperatures can get very high. Observe
the description of the permitted operational conditions. Store the camera
outside of the bag in a dry and well-ventilated location.
Shut the waist-level viewfinder when the camera is not in use.
In this way, soiling or damage to the focusing screen can be avoided.
Use the lens protection cap.
When the camera is not in use, please use the lens protection cap. In this way,
scratches or any other damage of the lens surface can be avoided.
Do not leave the camera in the sun without the protection cap, otherwise fire
can be caused by light that gets focussed in the lens.
Do not store the camera together with preserving agents or chemicals.
To prevent the occurrence of fire, do not store the camera in humid or dusty
environments.
Do not store the camera near heat sources.
The cables or the instruments can be deformed and damaged. Damaged cables
can cause fire or electric shock.
Store the camera out of the reach of children.
Carrying belt, broken camera parts and electric components may cause injuries.
Cleaning of the camera
Use a soft and dry or slightly moistened piece of cloth. Do not use substances
containing organic solvents, benzyl or diluting agents.
Cleaning of the lens
Use a dry and soft wood-free tissue, or a soft brush to clean the lens. Do not
use substances containing organic solvents, benzyl or diluting agents. In case
of heavy soiling, contact customer service.
Disposal
The camera must be disposed of in accordance with special WEEE guidelines.
The supplier offers to take back the product at the end of the product life
cycle, and to take care of a disposal according to the effective environmental
protection guidelines.
5
SAFETY INFORMATION
2.3
Safety Advice Concerning the Battery and the Cables
Use only batteries that are recommended for the use with the Sinar Hy6 system.
No liability will be assumed for any damages or injuries caused by the use of
non-authorized batteries.
Operate the battery and the battery charger only as intended.
•
•
•
•
Do not open or disassemble the battery or alter it in any way.
Do not expose the battery to high temperatures.
Do not insert the batteries in converse polarity.
Do only use and charge the battery at the permitted operating
temperatures.
Use only the batteries, battery chargers and other accessories that are explicitly
recommended by the manufacturer.
Keep the battery and the battery charger out of the reach of children.
Batteries can be damaged or swallowed, and can cause severe injuries. When
charging the battery, make sure that the battery charger and the battery are out
of the reach of children to avoid the danger of a life-threatening electric shock.
Keep the battery and the battery charger away from fire.
There is the danger of an explosion and of an electric shock.
Keep the battery and the battery charger away from water.
If the battery or the battery charger has become wet, do not use them until
they are completely dried.
Do not use damaged batteries. If battery liquid is leaking from the battery, do
not touch the battery liquid. A contact of the battery liquid with the eyes can
lead to a loss of your vision capability!
If a battery shows visible damage, or if battery liquid is leaking from a battery,
do not use this battery anymore. Avoid any contact of the liquid with the eyes,
skin or clothes. If skin or eyes have been in contact with battery liquid, wash off
the liquid with water and without rubbing, and consult a doctor immediately.
If a battery is changing color or form, or if smoke is emitting from the battery,
take the battery out of the camera. Be careful not to burn your hands.
If a battery is changing color or form, if extreme heat occurs or if smoke is
emitting from the battery during battery charging, disconnect the charger from
the power supply to prevent the occurrence of fire.
To prevent the occurrence of fire, do not use the battery charger near
inflammable gas or liquids.
6
SAFETY INFORMATION
Do not store the batteries and the battery charger nearby heat sources. The
cables or the instruments can be deformed and suffer damage. There is the
danger of fire or electric shock.
Do not use damaged cables and accessories.
Damaged cables imply the danger of a life-threatening electric shock. Do not
cut, damage, extremely bend or twist cables.
Do not let cables trail across the floor.
Make sure to position the cables safely to prevent the danger of accidental
stumbling.
The battery has to be disposed of in compliance with the WEEE-guidelines. Do
not dispose of the battery together with the usual domestic refuse. Use the
containers provided at the collection points.
2.4
Norms and Standards
The product complies with the following norms and standards:
EMC:
Europe:
Electro-magnetic compatibility
EN61000-6-3:2001 Emission
EN55022 Class B
USA / Canada:
ROHs
WEEE:
FCC part 15 class B
2.5
Disposal
Environmental Conditions
Operational temperature:
Storage temperature:
Humidity for storage and operation:
0 °C … +45 °C
-10 °C … +60 °C
5 % … 80 %, non-condensing
7
THE CAMERA AND ITS COMPONENT PARTS
3
Scope of Delivery
The Sinar Hy6 medium format camera system is currently available in 4 different versions:
Sinar Hy6-e75
Sinar Hy6-e54
Sinar Hy6-m54
Sinar Hy6 (camera body)
The scope of delivery varies according to the delivered camera version. In the following
chapter, the delivery scope of each version will be described.
When receiving your ordered Sinar Hy6 system, please check immediately
whether your delivery is complete and undamaged, and whether all parts
work flawlessly and without any problems. Take some sample images to test
the camera functions. In case of incompleteness or damage of the delivery, the
manufacturer has to be notified immediately.
3.1
Sinar Hy6-e75
The scope of delivery of the Sinar Hy6-e75 includes the following component parts:
475.45.032
Sturdy Sinar Hy6-transportation case in which all items listed below are
delivered
711.14.041
Sinar Hy6 camera body including hand grip, rear and front camera
protection covers, hand strap and neck strap
711.54.018
Waist-level viewfinder Sinar Hy6
711.14.002
Schneider AFD 2.8/80mm lens including rear and front protection covers
Sinarback eMotion 75 LV (including protection cover)
552.36.086
Adapter kit for adapting the Sinarback to the camera including
• Adapter plate
• M3 screws
• Screwdriver
• Format mask (on the camera screen)
551.63.054
FireWire cable IEEE 1394 a, 4.5 m
CD-tray with 2 CDs:
• Capturing software Sinar CaptureShopTM or Sinar eXposureTM
• Sinarback reference data
552.36.096
Two lithium-ion 7.2 V batteries
552.36.093
Battery charger including one universal mains adapter 100-240 VAC with
8
THE CAMERA AND ITS COMPONENT PARTS
four exchangeable inserts (alternatively: two mains adapters for 230 VAC
and 120 VAC), and a VDC car cigarette lighter cable
551.32.090
Sinarback cleaning kit
• One bottle of ethanol
• One bottle of Agent Blue
• Two packages of lint-free cleaning tissues
• Cleaning tool
• Cleaning instruction sheet
551.43.097
White shading diffusor 100
751.43.003
Gray card
Sinar Hy6 user manual (print or CD).
3.2
Sinar Hy6-e54
The scope of delivery of the Sinar Hy6-e54 includes the following component parts:
475.45.032
Sturdy Sinar Hy6 transportation case in which all items listed below are
delivered
711.14.041
Sinar Hy6 camera body including hand grip, rear and front camera
protection covers, hand strap and neck strap
711.54.018
Waist-level viewfinder Sinar Hy6
711.14.002
Schneider AFD 2.8/80mm lens including rear and front protection covers
Sinarback eMotion 54 LV (including protection cover)
552.36.086
Adapter kit for adapting the Sinar back to the camera including
• Adapter plate
• M3 screws
• Screwdriver
• Format mask
551.63.054
FireWire cable IEEE 1394 a, 4.5 m
CD-tray with 2 CDs:
• Capturing software Sinar CaptureShopTM or Sinar eXposureTM
• Sinarback reference data
552.36.096
Two lithium-ion 7.2 V batteries
552.36.093
Battery charger including one universal mains adapter 100-240 VAC with
four exchangeable inserts (alternatively: two mains adapters for 230 VAC
and 120 VAC), and a VDC car cigarette lighter cable
9
THE CAMERA AND ITS COMPONENT PARTS
551.32.090
Sinarback cleaning kit
• One bottle of ethanol
• One bottle of Agent Blue
• Two packages of lint-free cleaning tissues
• Cleaning tool
• Cleaning instruction sheet
551.43.097
White shading diffusor 100
751.43.003
Gray card
Sinar Hy6 user instructions (print or CD)
3.3
Sinar Hy6 - m54
The scope of delivery of the Sinar Hy6-m54 includes the following component parts:
475.45.032
Sturdy Sinar Hy6-transportation case in which all items listed below are
delivered
711.14.041
Sinar Hy6 camera body including hand grip, rear and front camera
protection covers, hand strap and neck strap
711.54.018
Waist-level viewfinder Sinar Hy6
711.14.002
Schneider AFD 2.8/80mm lens including rear and front protection covers
Sinarback 54 MC (including protection cover)
552.36.086
Adapter kit adapting the Sinar back to the camera including
• Adapter plate
• M3 screws
• Screwdriver
551.63.050
FireWire cable IEEE 1394 a, 10 m
CD-tray with 2 CDs:
• Capturing software Sinar CaptureShopTM or Sinar eXposureTM
• Sinar back reference data
221.552.36.096 One lithium-ion 7.2 V battery
552.36.093
Battery charger including one universal mains adapter 100-240 VAC
with four exchangeable inserts (alternatively: two mains adapters for
230 VAC and 120 VAC), and a VDC car cigarette lighter cable
551.32.090
Sinarback cleaning kit
• One bottle of ethanol
• One bottle of Agent Blue
• Two packages of lint-free cleaning tissues
• Cleaning tool
10
THE CAMERA AND ITS COMPONENT PARTS
•
Cleaning instruction sheet
551.43.097
White shading diffusor 100
751.43.003
Gray card
Sinar Hy6 user instructions (print or CD)
3.4
Sinar Hy6
The scope of delivery of the Sinar Hy6- includes the following component parts:
711.14.041
Sinar Hy6 camera body including hand grip, rear and front camera
protection covers, hand strap and neck strap
711.54.018
Waist-level viewfinder Sinar Hy6
552.36.096
One lithium-ion 7.2 V battery
552.36.093
Battery charger including one universal mains adapter 100-240 VAC with
four exchangeable inserts (alternatively: two mains adapters for 230 VAC
and 120 VAC), and a VDC car cigarette lighter cable
Sinar Hy6 user instructions (print or CD)
11
THE CAMERA AND ITS COMPONENT PARTS
4
The camera and its component parts
Shooting Mode Selector Switch S1
Viewfinder Release Button
Shooting Options / B7
AutoExposure Selector Switch S2
Exposure Options / AE-Lock B8
Light Metering Selector Switch / S3
Exposure Compensation / B9
Back Release Button
Focus Options / AF-Lock / B11
Auto Focus Selector Switch / S4
Flash Options / B10
Flash Connection Socket (SCA and
TTL-compatible)
Lens Release Button
12
THE CAMERA AND ITS COMPONENT PARTS
Stop Down / B2
Mirror Up / B3
Options / B6
Soft Key / B5
Rear Control Wheel / W2
USB-Socket
Release Button / B1
Front Control Wheel / W1
Battery Cover
Lens Release Button
Aperture ring
Focus indication window
Focusing ring
Hand grip display
Hand grip
Lever to lift the magnifying glass
Focusing screen
Battery cover release
button
Viewfinder Release Buttons
13
THE CAMERA AND ITS COMPONENT PARTS
Aperture wheel release button
Hand grip adjustment button
3/8´´ Thread
1/4´´ Thread
Battery cover
Socket for firmware
updates
Hand grip release
button
Flash connection socket
(SCA-compatible
14
ASSEMBLY INSTRUCTIONS
5
Assembly Instructions for the Camera
The following chapter contains all the necessary information for the assembly of the
component parts of the Sinar Hy6 system and for charging and replacing the battery.
To put your camera into operation, the
components have to be assembled. Please
note that the availability of the mentioned
components may depend on the Sinar Hy6
version you have ordered.
2
3
4
1
Fig. 5 / 1 Component parts of the Sinar Hy6 system
5.1
5.1.1
1
Body
2
3
Viewfinder (waist-level or 90° reflex
viewfinder)
Sinarback
4
Lens
Viewfinder
Attachment and Removal of the Waist-level Viewfinder
To attach the waist-level viewfinder, place
the viewfinder horizontally on the top of the
camera as shown in the illustration, and
press it downwards. You will hear a “click”
when the viewfinder is locked. Make sure
that the viewfinder is locked on both sides!
Fig. 5 / 2 Waist-level viewfinder
15
ASSEMBLY INSTRUCTIONS
To remove the waist-level viewfinder, press
the buttons 1 on each side of the camera
body inwards and pull the viewfinder off the
camera body.
1
1
Fig. 5 / 3 Remove waist-level viewfinder
5.1.2
Opening and Closing the Waist-level Viewfinder
The viewfinder is equipped with a hinge
joint on each side and can be folded and
shut. To shut the waist-level viewfinder,
press the hinge joints on both sides of the
viewfinder inwards.
Fig. 5 / 4 Shut the waist-level viewfinder
To open the waist-level viewfinder, pull it
upwards.
Fig. 5 / 5 Open the waist-level viewfinder
16
ASSEMBLY INSTRUCTIONS
5.1.3
Opening and Closing the Magnifying Glass
1
Fig. 5 / 6 Lever of the magnifying glass
Fig. 5 / 7 Magnifying glass
The viewfinder is equipped with a magnifying glass of –0.5 dioptres that can be opened and
closed. Pull the lever 1 upwards. The frame with the magnifying glass becomes visible.
To shut the magnifying glass, slightly push the frame downwards. The magnifying glass will
snap back into its original position.
5.1.4
Replacing the Magnifying Glass
Additional magnifying glasses with other dioptres are optionally available. Please contact
your dealer for further information.
To replace the magnifying glass, hold the two
small lugs 1 on each side of the lens. Turn the
mounting of the magnifying glass anti-clockwise
so that the two latches become visible 2.
1
2
2
1
Fig. 4 / 8 Replacement of magnifying glass
Take the lens out of the frame.
Replace the lens by inserting it into the frame in
a way that the two latches´2 are inserted into
the corresponding gaps. Hold the small lugs 1
again and turn the mounting with the
magnifying glass clockwise. You will hear a click
when the mounting with the magnifying glass is
inserted correctly.
17
ASSEMBLY INSTRUCTIONS
5.1.5
Use of the 90° Reflex Viewfinder
1
2
A 90° reflex viewfinder is optionally
available from your dealer. To attach the
90° reflex viewfinder to the camera body,
place the viewfinder horizontally on the top
of the camera, and press it downwards. You
will hear a “click” when the viewfinder is
locked. Make sure that the viewfinder is
locked on both sides!
Fig. 5 / 9 90° reflex viewfinder
The 90° reflex viewfinder is equipped with a shoe mount for an external flash unit 1.
Please note that this shoe mount is only mechanical, therefore the flash device also has to
be connected to the x-contact at the camera body, Æ chapter 12 “Use of the Flash”. The
mechanical shoe mount and the x-contact do not support TTL-flash measurement, and
therefore are intended for automatic flash units or manual flash operation.
If you would like to use a TTL-flash device, please use the shoe mount at the camera
body, Æ chapter 5.7 “Connection of a flash device” and Æ chapter 13 “Use of the flash”.
The 90° reflex viewfinder is also equipped with a dioptre adjustment wheel. Please turn
the adjustment wheel 2 at the eyepiece.
18
ASSEMBLY INSTRUCTIONS
5.2
Attachment and Removal of the Lens
4
3
1
Fig. 5 / 10 Attachment of the lens
5
2
Fig. 5 / 11 Lens
To attach the lens to the camera body, lock the lens contacts 2 with the contacts at the
camera body 1. The red dot marking 3 at the camera body indicates where the lens
bayonet 4 has to be placed. The same red marking can also be found at the lens 4.
- Place the camera in front of you with the back facing you, and press the Lens Release
Button 5.
- The red mark at the lens 4 has to contact the red mark at the camera body 3.
- Turn the lens left (anti-clockwise) until it is locked. You will hear a click when the lens is
locked properly.
- To remove the lens, place the camera in front of you with the back facing you. Press the
Lens Release Button 5 and hold the lens above of the focusing ring. Turn the lens right
(clockwise) and remove the lens.
To check that the lens is locked correctly, please turn the attached lens left (anticlockwise) without pressing the Lens Release Button 5.
19
ASSEMBLY INSTRUCTIONS
Lens replacement has to be carried out in a clean and dust-free environment.
Avoid the soiling of the internal parts of the camera. Do not touch the internal
parts of the camera while the lens is removed.
If extension rings are used, please do not connect or disconnect the lens from
the ring as long as the extension ring is attached to the camera.
Always remove the extension ring from the camera first, and then
remove the lens from the ring.
5.3
Attachment and Removal of the Sinarback
When your Sinar Hy6 camera is delivered, the back is already attached to the camera. The
following descriptions should be observed if a back has to be removed or attached.
With the following Sinar Hy6 systems, a back is delivered:
•
•
•
Sinar Hy6-e75 – delivered with a Sinarback e75 LV
Sinar Hy6-e54 – delivered with a Sinarback e54 LV
Sinar Hy6-m54 – delivered with a Sinarback 54 MC
5.3.1
Attachment and Removal of the Protective Cover
If you have ordered only a Sinar Hy6 camera body, the back has to be attached before
you start to operate the camera.
1
When a Sinar Hy6 system is transported or
stored without an attached Sinarback, the
protection cap has to be attached to the
camera body to protect the internal parts of
the camera.
Before you attach the Sinarback, please
remove this protection cap from the camera
body. Press the Adapter Release Button 1
and push it upwards. To replace the
protective cover, insert the four pins into
the respective holes and attach the
protective cover.
Fig. 5 / 11 Protection cover
20
ASSEMBLY INSTRUCTIONS
5.3.2 Assembly and Attachment of the Sinarback and the Adapter Plate
To attach a Sinarback to the camera body, an adapter kit with the necessary accessories
and tools has to be used. The adapter kit is included in the delivery of the following Sinar
Hy6 systems:
•
•
•
Sinar Hy6-e75
Sinar Hy6-e54
Sinar Hy6-m54
If a Sinar Hy6 711.14.041 (only camera body), an adapter kit is not included in the delivery
and has to be purchased separately. The Sinarbacks e75 LV / e54 LV and the Sinarback 54
MC require different adapter kits. Please contact your dealer for further information
When attaching a back or a film magazine, make sure that all four of the pins are
locked simultaneously. When not all four of the pins are locked, the back or film
magazine has to be removed from the camera body and re-attached, otherwise
the back or magazine can fall off. Please make sure that the back is attached
safely to the camera body to prevent any damage by falling off of the magazine.
5.3.2.1
Assembly and Attachment of a Sinarback eMotion
The following description applies to the Sinar Hy6 systems Hy6-e75 and Hy6-e54, and to
the assembly of the Sinarbacks e75 LV and e54 LV to a Sinar Hy6.
First, remove the protective cover that is fixed with two screws from the back.
Follow the assembly instructions described below.
1 Sinarback e75 LV or e54 LV
1
2
The following parts are included in the
adapter kits for the Sinarbacks e75 LV and
e54 LV:
2 Adapter plate
4
5
3 Spacer
3
4 Screws
5 Screwdriver
Fig. 5 / 12 Sinarback eMotion and adapter kit
21
ASSEMBLY INSTRUCTIONS
Place the spacer on the Sinarback. The
openings of the spacer have to be placed
over the holes of the Sinarback as indicated
with the white circles in Fig. 5 / 13.
Insert the three screws into the holes in the
adapter plate as shown in the image left.
Fig. 5 / 13 Assembly of the Sinarback eMotion
Place the adapter plate on the back. The
openings for the screws have to be placed
over the holes in the adapter plate.
Make sure that the pins in the plate point
upwards, as the back will be fixed to the
camera by means of those pins.
Insert all three of the screws into the
respective openings.
Fix the screws with the screwdriver included
in your delivery.
Fig. 5 / 14 Assembly of the Sinarback eMotion
22
ASSEMBLY INSTRUCTIONS
Attach the Sinarback to the camera. Insert
the pins at the Sinarback into the holes at
the rear end of the camera. Hold the
Sinarback parallel to the body and make
sure that all four of the pins are locked
simultaneously.
1
Fig. 5 / 15 Attachment of the Sinarback eMotion
5.3.2.2
When the Sinarback is detached from the
camera and not in use, please use the
protection cap.
To detach the Sinarback from the camera,
press the Adapter Release Button 1 and
push it upwards.
Attachment and Removal of a Sinarback 54 MC
The following description applies to the Sinar Hy6 system Hy6-m54, and to the assembly
of the Sinarback 54 MC to a Sinar Hy6 camera body.
The Sinarback 54MC is delivered with a
protective cover.
First, remove the protective cover from the
camera back using the screwdriver included
in the delivery.
The protective cover is fixed with two
screws that cannot be removed from the
back.
Fig. 5 / 16 Sinarback 54MC with protective cover
23
ASSEMBLY INSTRUCTIONS
1 Sinarback 54 MC
4
1
The following parts are necessary for the
assembly of the Sinarback 54 MC:
2 Adapter plate
3 4 screws
4 Screwdriver
3
2
Fig. 5 / 17 Sinarback 54MC with adapter kit
Place the adapter plate 2 with the four pins
facing upwards on the camera back 1.
Insert the four screws into the holes in the
adapter plate.
Fix the screws using the screwdriver
4 included in the adapter kit.
Fig. 5 / 18 Sinarback 54MC
Attach the back to the camera. Make sure
that all four of the pins are locked
simultaneously. When the back is detached
from the camera and not in use, please use
the protection cap.
1
To detach the back from the camera, press
the Adapter Release Button 1 and push it
upwards.
Fig. 5 / 19 Attachment of Sinarback 54MC
24
ASSEMBLY INSTRUCTIONS
When attaching a back or a film magazine, make sure that all four of the pins
are locked simultaneously. When not all four of the pins are locked, the
Sinarback or the film magazine has to be removed from the camera body and
re-attached, otherwise the Sinarback or film magazine can fall off. Please make
sure that the back is attached safely to the camera body to prevent any damage
by falling off.
5.4
Adjusting the hand grip
The hand grip cannot be detached from the
camera, however it can be adjusted.
1
To unlock the hand grip, the Hand Grip
Adjustment Button 1 under the hand grip
has to be pressed while turning the hand
grip simultaneously. When the button is
released, the hand grip is fixed and remains
in that position.
Fig. 5 / 21 Adjustment of the hand grip
5.5
Connecting the camera to a computer
The Sinar Hy6 system is remote-controlled from a computer by means of the capturing
software Sinar CaptureShop™ or Sinar eXposure™.
The following Sinar Hy6 camera types can be operated both untethered and tethered:
•
•
Sinar Hy6-e75
Sinar Hy6-e54
The following type is operated only in tethered mode:
•
Sinar Hy6-m54
25
ASSEMBLY INSTRUCTIONS
Connect the FireWire cable to the
corresponding socket at the back 1 and to
the IEEE-1394 socket at your computer or at
your PCMCIA-card.
For a more detailed description of the
operation of the Sinar Hy6 system in
tethered mode, refer also to the operating
manual of your Sinarback.
1
Fig. 5 / 25 IEEE-1394 socket at the back
5.6
Attaching a flash device
The Sinar Hy6 system is equipped with a hot
shoe for the connection of TTL-compatible
flash devices and of an SCA-adapter.
The flash device or the SCA-adapter is
connected to the hot shoe 1 at the camera
body, Æ chapter 12 “Use of the Flash”.
1
Refer also to the user instructions of your
flash device or SCA-adapter.
Fig. 5 / 26 Hot shoe
The inappropriate use of the flash device may cause injuries to the eyes. Please
refer to the operation instructions and to the safety advice in the technical
documentation of the manufacturer of your flash device.
5.7
Replacing the focusing screen
Place the camera in front of you and remove the viewfinder from the camera body. The
focusing screen is now visible.
26
ASSEMBLY INSTRUCTIONS
1
1
On each side of the frame holding the
focusing screen, two release pins 1 are
located.
Pull the two release pins 1 with your
fingernails towards the rear side of the
camera and lift the frame simultaneously.
Fig. 5 / 27 Focusing screen
Pull the focusing screen out of the metal
frame.
Insert the new focusing screen into the
metal frame behind two metal brackets on
each side of the frame 2.
2
2
Reposition the frame with the focusing
screen into its original position. You will
hear a click when the focusing screen is
locked.
Fig. 5 / 28 Replacement of the focusing screen
Make sure not to touch the surfaces of the focusing screen, therefore hold the focusing
screen at the borders. Store focusing screens not in use in a dust-free dry repository.
27
ASSEMBLY INSTRUCTIONS
5.8
Inserting and replacing the format mask
Use the format mask to adapt the size of the image in the focusing screen to the size of
the image actually captured. The format mask is placed on the focusing screen, and is
already inserted when the camera is delivered.
Background information: The focusing screen of the Sinar Hy6 has a size of 6 x 6 cm,
while the dimensions of the CCD-sensor are smaller. In this way, the size of the image in
the focusing screen does not correspond to the size of the image finally captured. By
using the format mask, the size of the image in the focusing screen is adapted, and the
loss of image areas can be prevented.
The format mask is inserted between the
focusing screen and the metal frame.
Remove the focusing screen from the metal
frame. Place the format mask exactly onto
the focusing screen, then re-insert the
focusing screen into the frame.
Make sure that both the format mask and
the focusing screen are placed exactly one
over another, and that the focusing screen
is inserted into the frame as far as possible.
Fig. 5 / 29 Replace format mask
Replace the frame with the focusing screen
into its original position. You will hear a
click when the focusing screen is locked.
The image crop that visible in the focusing screen now corresponds to the image that is
finally captured. Depending on the image orientation, landscape or portrait format is
shown.
28
ASSEMBLY INSTRUCTIONS
5.9
5.9.1
Adjusting the Shoulder Strap and the Hand Strap
Attaching and Removing the Shoulder Strap
A shoulder strap is included in the delivery
of your Sinar Hy6 system.
To attach the shoulder strap, two slots 1
are located on each side of the camera
body.
1 2
To fix the shoulder strap to the camera,
insert the metal lugs 2 into the slot.
Fig 5 / 30 Fixing of the neck strap
1
2
Press the metal lug downwards 1 to break
the resilient locking force, then move the
lug sideways 2. You will hear a “click”
when the metal lug is locked.
Make sure to lock the metal lugs safely on
each side to prevent any accidental
dropping of the camera.
Pull the neck strap to check whether the lug
is locked safely.
Fig. 5 / 31 Fix shoulder strap
29
ASSEMBLY INSTRUCTIONS
To remove the shoulder strap, press the
metal lug downwards 1 and move it
sideways 2.
1
2
To facilitate the removal of the shoulder
strap, remove the viewfinder in advance.
Fig. 5 / 32 Remove shoulder strap
The shoulder strap is equipped with two buckles and lugs enabling the adjustment of the
length.
5.9.2
Adjusting the Hand Strap
The camera is delivered with the hand strap fixed to the camera hand grip. This hand
strap can be removed or adjusted if necessary.
To adjust the hand strap, remove the hand
strap 1 from the buckle 2. Adjust the hand
strap and re-attach it to the buckle.
Make sure that the hand strap is properly
fixed.
1
2
Fig 5 / 33 Adjust hand strap
30
ASSEMBLY INSTRUCTIONS
Detach the hand strap from the camera
body by removing the metal lugs 1 from
the hand grip.
1
2
2
Fig. 5 / 34 Adjust hand strap
Two pins 2 are located on each side of the
hand grip. With a needle-shaped object
(e.g. a paperclip), push the pins inside.
Simultaneously, pull the metal lugs out of
the slots.
To re-attach the metal lugs, push the pins
inside again and insert the lugs into the
slots. You will hear a click when they are
locked.
Check whether the hand strap is properly fixed by pulling it without pushing the pins
inside.
5.10 Working with a tripod
On the reverse side, the Sinar Hy6 system is
equipped with a quick-clamp tripod plate
accepting a quick-release camera platform
“Novoflex Q-Base”.
Two threads are in the quick-clamp-adapter
plate with the following standard sizes:
12
1 1/4 ‘’ thread
2 3/8 ’’ thread
A reducer for the 3/8’’ thread is included in
the delivery.
Fig. 5 / 35 Tripod threads
31
BATTERY
6
Battery
6.1
Inserting and removing the battery
1
3
The battery of the Sinar Hy6 is inserted in
the hand grip. To replace the battery, open
the case of the hand grip by pressing the
Battery Cover Release Button 1 and
simultaneously pulling the cover of the hand
grip 2.
The battery case opens and the battery
becomes visible. Pull the battery casing as
far as possible, and then swing it
backwards.
2
Fig. 6 / 1 Open hand grip
To replace the battery, insert it into the
casing with the contacts ahead.
Close the battery casing. You will hear a
click when the battery casing is locked.
Fig. 6 / 2 Replace battery
32
BATTERY
6.2
Charging the battery
For charging the battery, a battery charger is included in the delivery of your Sinar Hy6
system. Connect the cable of the battery charger to the respective connection box at the
rear side of the battery charger and to the wall socket.
The battery charger is ready for use when the light “Charge” 2 at the battery charger
turns to green and blinks.
Insert the battery into the battery charger
with the contacts ahead.
When an empty battery is inserted into the
battery charger, the light “Charge” 2 turns
to red. When the battery is fully charged,
the light turns to green again, and the
battery can be used.
1
2
Charging can take about 2 - 3.5 hours
depending on the condition and the age of
the battery.
Fig. 6 / 3 Battery charger
Please refer also to the documentation of the battery charger included in your delivery.
The battery status is indicated in the viewfinder display of the Sinar Hy6 system as marked
with the circle in the illustration (Æ chapter 7.2 “Viewfinder Display”).
Fig. 4 / 24 Battery status in the viewfinder display
The battery symbol shows two states:
The battery is fully charged.
The battery is half-empty. Charging will soon become necessary.
33
FIRST USE
7
First Use of the Sinar Hy6 System
Before you start using your Sinar Hy6 system, make sure that it is properly assembled, and
that a charged battery is inserted.
S1
2
1
To put the camera into operation, select a shutter release mode
using the selector switch S1, Æ chapter 8.2.1 “Shooting Mode”.
The shutting-down of the camera by setting the selector switch S1
to “Off” is only necessary when the camera is transported, or when
it will not be in use for a longer time.
Fig. 5 / 1 Release mode
5
4
3
To wake up the camera, press the Release Button B1 2 to the
first pressure point.
When the Release Button B1 is pressed to switch on the
camera, no image will be captured.
Fig. 5 / 2 Hand grip
After a period of inactivity of about 10 seconds, the camera will be set to the sleep mode
(depending on the selected power save mode). To wake up the camera, press the Release
Button B1 again.
When working with a Sinarback eMotion, switch on the Sinarback. Press the button
“Power” at the Sinarback.
The Sinarback 54 MC can only be operated in tethered mode, and has to be switched on
from the computer. Make sure that the suitable capturing software (Sinar CaptureShop™
or Sinar eXposure™) is ready for operation.
Camera functions can be selected by using the selector switches, and by selecting the
functions from the menu. The most frequently used functions are available with the
selector switches at the camera body, and will be mentioned as Direct Functions in the
following.
To select a function from the menu, set the selector switch to the red dot 1 and press the
control button 2 in the respective operational area to open the menu. Further functions
can be selected from the menu using the Front 4 and the Rear Control Wheel 5 W1 and
W2 at the hand grip, and will be mentioned as Options in the following.
The menu structure of the Sinar Hy6 system is designed to provide easy and intuitive
access to the functions. Functions are not nested and do not include toggle key functions,
which means that the control wheel will block at the end of a selection row. In this way,
you will be able to find all functions intuitively after working with your camera for a while.
34
FIRST USE
From the menu, both the Direct Functions and the Options are available to provide access
to all functions, also when operating the camera in tethered mode. When operating the
Sinar Hy6 system from a computer, set all selector switches to “Options / Remote
Control”, i.e. to the red dot in the operational area. For a more detailed description of the
camera operation from your computer, refer to the respective software manual.
35
OPERATING ELEMENTS
8
8.1
Operational Elements – the Camera Functions at a Glance
Operational Elements at the Hand Grip
This chapter provides a short overview over the operating elements at the hand grip, and
over their main functions.
Release Button
Front Control Wheel
Rear Control Wheel
Stop Down
Mirror Up
Open Menu
Soft Key
Fig. 6 / 1 Operational elements at the hand grip
USB-connection (e.g. firmwareupload
Release Button B1 First pressure point – the Release Button is half pressed
•
•
•
Camera wake up
Exposure adaptation: calculation and application of aperture
and / or shutter time to the current image scene
Focusing (for “Single AF” and “Continuous AF”; Æ chapter
6.2.4 ”Auto Focus Mode”)
Exposure adaptation with the Release Button can be deactivated in
the menu “Options”, Æ chapter 13 “Options”.
Please note: Exposure adaptation and focusing with the Release
Button B1 are performed only if the automatic setting of these
functions has been selected in the respective operational areas.
Second pressure point – Release Button B1 is pressed entirely down
Shutter activation; several shooting modes can be selected,
Æ chapter 6.2.1 “Shooting Mode
When camera is switched off, the message “Camera switched off"
appears in the display.
36
OPERATING ELEMENTS
Front Control
Wheel W1
- Setting of the aperture value
- Navigation in the camera menu
Rear Control
Wheel W2
- Setting of the exposure time
- Navigation in the menu and adjustment of the values
Stop Down B3
Activates the working aperture / depth of field control as long as the
button is pressed.
Mirror Up B4
The mirror is locked up. Pressing the button again, the mirror is
replaced to its original position.
Options B5
Opens the menu “Options“ at the hand grip display for the definition
of the camera settings.
Soft Key B6
To this key, two functions can be assigned in the menu "Options":
Lock
When the button is pressed, the control wheels W1 and
Controls W2 are locked. Pressing the button again, the locking is
cancelled. This function is set per default.
USB-Socket
Live
Image
Enabling live image transfer from the camera to the
software.
None
The key does not trigger any functions.
Connect the USB-interface for firmware updates and factory
adjustments.
37
OPERATING ELEMENTS
8.2
Operational Elements at the Camera Body
Shooting Mode Switch / Main Switch
Exposure Mode Switch
Light Metering Switch /
Exposure Compensation
Auto Focus Mode Switch
AF-Lock
<
Flash Mode
Fig. 8 / 2 Operational elements at the camera body
8.2.1
Shooting Mode
Fig. 8 / 3 Shutter Release Mode
Fig. 8 / 4 Display
Off
Single shot
Continuous
Shooting Options / Remote
Control
The selected Shooting Mode is shown in the
display on the hand grip. The selected
shutter release mode in the display is
marked with a black ellipsis in the
illustration. In Fig. 8 / 4, the continuous
shooting mode has been selected.
Enable Shooting Options
38
OPERATING ELEMENTS
Off
Switch off the camera.
Single Mode
Take one picture by pressing the Release Button B1.
Continuous Mode Take a series of pictures as long as the Release Button B1 is pressed.
Bracketing
(Option)
Take a series of images. Each image has a defined exposure deviation
from the original exposure value.
Self-Timer
(Option)
Pressing the Release Button B1 locks the mirror, and the countdown
to the shutter release is started.
Focus Trap
(Option)
The shutter is released automatically when an object appears in a
defined area of focus in the image.
The focus trap is only available with manual focusing! The
manual focus has to be set with the Auto Focus Mode
Switch Æ chapter 6.2.4 “Auto Focus Mode”.
Ultra-fast Mode
When the Release Button B1 is pressed, the mirror is locked. When
the button is released, the shutter is opened.
Focus Bracketing
A series of images is captured, each with a slight deviation of focus
from the original value. The mirror remains locked during image
capturing.
The shooting functions are described in detail in Æ chapter 11 “Shooting Modes”.
8.2.2 Exposure Mode
Fig. 8 / 5 Exposure Mode
Fig. 8 / 6 Display
P
S
A
M
The Exposure Mode is shown in the
display on the hand grip, see Fig. 8 / 6.
The selected exposure mode in the display
is marked with a black ellipsis in the
illustration. In the example in Fig. 8 / 6,
Manual Exposure has been selected.
Programmed Auto Exposure
Shutter Priority
Aperture Priority
Manual Exposure
Exposure Options / Remote Control
Enable Exposure Options / AE-Lock
39
OPERATING ELEMENTS
Please note: When working with a lens that is equipped with an aperture ring,
the aperture ring has to be set to “A” (automatic) to use the automatic exposure
modes. When aperture is set using this ring, the automatic functions are not
available, and the shutter time has to be set manually.
Programmed
Auto Exposure
The optimum combination of shutter speed and aperture value is
calculated automatically by the camera system.
Shutter Priority
The user sets the shutter time, while the camera system adapts the
corresponding aperture value automatically.
Aperture Priority The user defines the aperture, and the camera system adapts the
corresponding shutter time automatically.
Manual
Exposure
Set the exposure manually with the control wheels at the hand grip:
use the Front Control Wheel W1 to set the aperture value; use the Rear
Control Wheel W2 to set the shutter speed.
Bulb (Option)
Pressing the Release Button B1 opens the shutter. Releasing the
Release Button B1 closes the shutter.
Toggle ( Option) Pressing the Release Button B1 for the first time opens the shutter,
pressing the Release Button B1 for the second time closes the shutter.
AE-Lock (B7)
When Automatic Exposure is selected, pressing the button AE-Lock B7
blocks the automatic adaptation of the exposure values.
When Manual Exposure is selected, pressing the button AE-Lock B7
triggers the automatic adaptation of the exposure values by the system.
40
OPERATING ELEMENTS
8.2.3
Light Metering Mode
Fig. 8 / 7 Light Metering
Fig. 8 / 8 Display
Integral Metering
Centre-Weighted
Metering
The indication of the light-metering mode
in the display is marked with a black
ellipsis. In the example in Fig. 8 / 8,
average light metering has been selected.
Spot Metering
Remote Control
ISO / Exposure
Compensation
Integral Metering
The entire image area is included in light metering.
Centre-weighted
Metering
The central area contributes 50 % to the light metering; the outer
areas of the image contribute the remaining 50 %.
Spot Metering
A spot in the centre of the image determines the exposure of the
entire image.
Options / Remote
Control
Remote-controlled light metering. Select the Light Metering Mode
from the computer.
Exposure
Compensation
Pressing the button “Exposure Compensation” B8 opens the menu
for exposure compensation and for setting the ISO-speed. These
functions are always available, therefore the selector switch S3 does
not need to be set to “Options / Remote Control” to open this menu.
41
OPERATING ELEMENTS
8.2.4
Auto Focus Mode
In this area, the focus modes can be selected.
Fig. 8 / 9 Operational area “Focusing Mode”
S
Single Focus
C
Continuous Focus
M
Manual Focus
Fig. 8 / 10 Display
The indication of the focusing mode in the
display is marked with a black ellipsis in the
illustration. In the example in Fig.8 / 10, auto
focus single has been selected.
Remote control
AF-Lock
Auto Focus
Single
The focus settings are adjusted when the Release Button B1 is pressed
(first pressure point). By pressing the button again, the focus settings are
readjusted.
Auto Focus
Continuous
By pressing the button half, the focus is continuously adjusted to the
image scene.
Manual Focus
The automatic focus adjustment is locked; the focus is set manually at
the camera lens.
AF-Lock B10
The functions of this button depend on the selected focusing mode.
Set option
Function triggered by AF-lock
Options / Remote AF-Lock / Remote Control B10 opens the menu.
control
Manual focus
A-lock triggers the auto focus.
Single and
continuous focus
The automatic focusing is suppressed, and the
recently used focus values are applied when the
shutter is released.
42
OPERATING ELEMENTS
8.2.5
Flash Options
1
Fig. 8 / 11 Select flash mode / Button B8
1
Hot Shoe
Flash Options
Fig. 8 / 12 Display
The indication of the flash mode in the
display is marked with a black ellipsis in Fig.
8 / 12. In the example above, Rear Sync has
been selected.
Hot Shoe
Connect the external flash device. Via the hot shoe, SCA and TTL-flash
measurement is possible.
Flash Options
B9
Open the menu for the setting of the flash options (normal sync / rear
sync) and the flash compensation.
Please note: An inappropriate use of the flash device may be harmful to the
eyes. Please refer to the operation instructions and to the safety advice
contained in the technical documentation of manufacturer of your flash
device!
The flash operation is described in more detail in Æ chapter 13 “Use of the flash”.
8.2.6
Factory Reset
The camera is reset to the factory settings
according to the following procedure:
Switch off the camera, and then switch the
camera on.
Press the button “Factory Reset” 1 and
simultaneously press the Release Button B1
to the first pressure point.
1
Fig 8 / 13 Factory Reset
43
OPERATING ELEMENTS
8.3
Focus and Focus Indication at the Lens
1
Aperture ring with f-numbers (only
non-AFD-lenses).
2
Indication of the depth of field
3
Indication of the focal distance
4
Focusing ring
1
2
3
4
Fig. 8 / 14 Focus indication at the lens
The Sinar Hy6 system is delivered with an AFD 2.8 / 80mm lens that permits the manual
setting of the focus at the focusing ring 4.
Aperture ring
Set the aperture 1 manually. The f-number that is located over the
white bar is applied. Press the red button at the lens to unlock the
aperture ring.
Focusing window
Indicates the focal distance 3 in meters or feet. The white bar above
the window indicates the applied value.
Depth of field
The depth of field can be checked with the yellow numbers above of
the focusing window. The depth of field in the image is marked with
a white arrow.
Focusing ring
Set the focus manually. Manual focusing has to be activated at the
camera body, Æ chapter 9 “Focusing”.
To use the automatic exposure functions “Programmed Auto Exposure” (P)
and “Shutter Priority” (S), or to use the Front Control Wheel W1 at the hand
grip, the aperture ring has to be set to “A” (automatic), otherwise the
automatic functions are locked and the f-number set with the aperture ring is
applied.
For a more detailed explanation, please refer to Æ chapter 10 “Focusing”.
44
DISPLAY
9
The Displays at the Hand Grip and in the Viewfinder
The hand grip display has two different modes:
Easy Mode
The display shows aperture, shutter and light balance.
Enhanced Mode
The display shows detailed information about exposure, focus, light
metering, shutter and aperture etc.
Select the Easy Mode or the Enhanced Mode in the menu “Options”,
Æ chapter 15 “Options”.
9.1.1
Easy Mode
The Easy Mode is set by default. The following settings are shown in the Easy Mode
Display:
1
4
3
2
1
Aperture/ f-number
2
Shutter speed in seconds
3
Light balance: indication of over- or
under-exposure in EV
4
Flash Option
Fig. 9 / 1 Display in Easy Mode
The basic display is not shown if one of the selector switches at the camera body
(aperture, focus, light metering) has been set to Options / Remote, or if the
enhanced user interface is selected in the menu “Options”.
45
DISPLAY
9.1.2
Enhanced Mode
To show the Enhanced Mode display, set at least one of the selector switches to Options /
Remote Control, or set the Enhanced Display as the standard display in the menu
|-Options | GUI-| Æ Chapter 15 “Options”.
1
2
3
4
5
6
7
8
9
Fig. 9 / 2 Display in Enhanced Mode
1
2
3
4
5
6
7
8
9
Exposure mode
Shooting mode
Focus mode
Mirror Up
Aperture / f-number
Light metering mode
Flash option
Indicates the application of the currently active focus and aperture settings. Appears
when the Release Button B1 is pressed.
ISO-speed
Light balance
Shutter speed
46
DISPLAY
9.2
Viewfinder Display
1 2 3
4
5
6
7 8 9
Fig 9 / 3 Viewfinder display
1
2
Aperture / f-number
3
Exposure time in seconds.
• At exposure times < 1s (e.g. 1 s), the value will be displayed by showing
16
the denominator in integer numbers (e.g. 16).
• At exposure times > 1s (e.g. 1,2 s) the value will be displayed as a decimal
number with two inverted commas (e.g. 1,2 ”).
4
5
“A” – appears behind the shutter speed when “Aperture priority” has been selected.
6
7
8
9
“A” – appears if Programmed AutoExposure (P) or Shutter Priority (S) is selected as
an Exposure Mode.
Light balance: Under (-) or over-exposure (+) is indicated by the black bars, each
representing 1 EV.
3
Indication of the light metering method
Focus indicator
Flash ready
Indication of the use of exposure compensation
Horizontal or vertical image format
Shows remaining frames when working with a film magazine
Battery state
47
EXPOSURE – EXPOSURE MODES
10
Focusing
With the focusing selector S4, select AF-Single (S), AF-Continuous
(C) or Manual Focus (M).
When an Autofocus mode is selected, the system automatically
measures the optimum focus for the image that will be applied
when the shutter is released.
Fig 10 / 1 Operational
Area “Focusing Mode”
Manual focusing is possible in an AF-mode when the button AFLock is pressed.
The following Focus Modes can be selected:
S
C
Auto Focus Single
Auto Focus Continuous
M
Manual Focus
Remote Control
AF-Lock
10.1 Auto Focus Single and Auto Focus Continuous
In the mode Auto Focus Single, the image is focussed when the Release Button B1 is
pressed halfway. Focus the camera onto the desired image scene and press the Release
Button B1 (first pressure point). To re-adjust the focus settings (e.g. when the image
scene changes), the button has to be released and pressed halfway again. When the
Release Button B1 is pressed entirely (second pressure point), the image is captured with
the current focus settings.
In the mode Auto Focus Continuous, the focus is continuously adapted to the image
scene while the Release Button B1 is pressed (first pressure point). When the Release
Button B1 is pressed entirely, the image is captured and the current focus settings are
applied.
With the button AF-Lock B9, the focus settings can be locked, and the automatic focus
adaptation is suppressed, Æ Chapter 10.3 “AF-Lock”.
When using a non-AF-lens, the camera is operated like in the manual focusing mode,
refer to the following chapter.
48
EXPOSURE – EXPOSURE MODES
10.2 Manual Focus
10.2.1
Manual Focusing
3
4
2
1
1
Focusing ring
2
Focus indication window: focal
distance and depth of field indication
3
Aperture / f-number
4
Depth-of-field-area
Fig. 10 / 2 Manual focusing
Set the Auto Focus Selector Switch S4 to “M”, and turn the focusing ring 1 at the lens.
The focus of the image can be checked in the focusing screen and in the focus indication
in the viewfinder display (Æ chapter 8.4 “Focus indication in the viewfinder display”).
Set the Auto Focus Selector Switch S4 to “M”, and turn the focusing ring 1 at the lens.
The focus of the image can be checked in the focusing screen and in the focus indication
in the viewfinder display, Æ chapter 10.4 “Focus indication in the viewfinder display”.
10.2.2
Focus Indication at the Camera Lens
The depth of field, i.e. the area before and behind the focal plane that still appears clearly
focused is determined by the set aperture, and can be seen in the focus indication
window 2: a higher f-number means a higher depth of field. The focal plane in the
example above is set at approx. 1.3 m.
The yellow aperture numbers 3 indicate the depth-of-field-area in the image. If e.g. an
aperture of 8 and a focus of 1.3 has been set, the depth-of-field area 4 in the image lies
between approx. 1.1m (3.6 ft) and 1.4 m (4.6 ft).
49
EXPOSURE – EXPOSURE MODES
10.2.3
Manual Focus Override
The Sinar Hy6 system is equipped with a Manual Focus Override-function, which means
that manual focusing is also possible when an automatic focus mode has been set.
To use the Manual Focus Override function, turn the focusing ring 1, and press the
button AF-Lock B9 before activating the shutter. When the button AF-Lock B9 is not
pressed, the focus values will be automatically adapted by the system.
10.3
AF-Lock
The button AF-Lock B10 assumes two different functions depending on whether an Auto
Focus Mode or Manual Focus has been selected:
When an Auto Focus Mode is selected, the currently active focus values are saved, and
the automatic focus adaptation by pressing the shutter release button is locked. When the
Release Button B1 is pressed simultaneously with the button AF-Lock B10, these saved
focus values are applied to the image.
When Manual Focus is selected, pressing the button AF-Lock B10 activates the Auto
Focus.
10.4 Focus Indication in the Viewfinder Display
The focus of the image can be checked in the viewfinder display. The image is focused
correctly when both of the focus indication triangles are visible in the viewfinder display.
Fig. 10 / 3 Focus indication in the viewfinder display
The meaning of the focus indication settings is explained in the following table.
Display
Focus Setting
The focus is too close, i.e. the focal plane is in front of the measured object.
The focus is too far, i.e. the focal plane is behind the measured object.
The measured object is focussed correctly.
When working with a non-AF-lens, press the button AF-Lock B10 to update the focus
indication in the viewfinder display before checking the image focus.
50
EXPOSURE – EXPOSURE MODES
10.5 Stop Down (Working Aperture)
With Stop Down, the working aperture / depth of field can be checked in the viewfinder.
Press the button B3 on the hand grip.
The aperture is set to the selected aperture value, and the aperture actually set in the
image is visible. As long as the button B3 is pressed, the aperture remains stopped down.
Background information: The image in the viewfinder is always displayed using full
aperture to ensure a better luminance. The aperture is set to the defined value (f-number)
when the shutter is activated. With the button B3 (Stop Down / Working Aperture), the
actual image exposure can be checked before the activation of the shutter.
1
In the display, the symbol for the working
aperture 1 appears in the hand grip display.
Fig. 10 / 4 Working aperture in the display
The depth of field is also indicated in the focus window at the lens, Æ chapter 10.2.2
“Focus indication at the lens”.
11
Exposure
11.1 Introduction
The exposure is determined by the exposure time (i.e. the shutter speed) and the aperture
value, and is influenced by the light-sensitivity of the material (ISO-standard).
To set the exposure in the image, three steps have to be performed:
•
•
•
The definition of the light metering method for measuring the light conditions in
the image. The correct exposure value (EV) is the basis for the light metering
The setting of the exposure mode, i.e. the combination of the shutter speed and
the aperture value
The definition of the ISO-speed
51
EXPOSURE – EXPOSURE MODES
11.2 Light Metering Modes
11.2.1
Introduction
Select a Light Metering Mode using the Light Metering Selector
Switch S3.
The selection of the light metering method depends on the light
conditions in the image and the effects to be achieved. The light
metering methods are different with respect to the image area and
image proportion taken into account.
Fig. 11 / 1 Operational Area “Light Metering”
The following light metering methods are available:
Integral Light Metering
Centre-weighted Light Metering
Spot Light Metering
Enable Remote Control
Exposure Compensation
When the Release Button B1 is pressed (first pressure point), the light metering values and
the exposure settings are saved, and are visible in the display. If you wish to re-adjust
these values, press the Release Button B1 again.
The exposure values can be locked by pressing the button AE-Lock B2 or by pressing the
Shutter Release Button B1 to the first pressure point, Æ chapter 11.4.3 “AE-Lock”.
The focus and exposure settings are applied to the image when the Release Button B1 is
pressed to the second pressure point.
Use the manual mode to adjust the exposure in the image before pressing the Release
Button B1.
Please note that the Light Metering Modes are not available as Options from the
menu; they can only be selected with the selector switch S3 at the camera body
or by remote control from the computer. The red dot “Options / Remote
Control” is used for the activation of a computer-controlled operation of the
camera.
52
EXPOSURE – EXPOSURE MODES
With the control button “Exposure Compensation” B8, the menu can be opened
for setting exposure compensation and the ISO-value.
The Sinar Hy6 system works with TTL (“through-the-lens”) reflected light metering, i.e. the
light is measured on the basis of the light reflected by the object. Light is metered with 7
sensors arranged on the mirror. The light metering methods differ with regard to the
sensors involved in light metering.
Focussing screen
Mirror
Sensor pairs
Sensors
Fig. 11 / 2 Light Metering
11.2.2
Spot Light Metering
In Spot Light Metering, the measurement area in the centre of the image determines the
exposure of the entire image. This area has a size of 5 x 5 mm and is marked with a circle
on the focusing screen. Only the central sensor is active and contributes 100 % to the
light metering of the entire image.
Set the Light Metering Selector Switch S3 to the position “Spot Metering”. Focus the spot
measurement field in the middle of the focusing screen onto the part of the image that is
decisive for the light metering. Save the light metering values and reposition the camera if
necessary (AE-Lock or B1), and then activate the shutter.
Press the Shutter Release Button B1 while keeping the button AE-Lock B7 pressed.
Spot Light Metering is suitable for difficult light conditions such as backlight situations or
light sources in the image scene.
53
EXPOSURE – EXPOSURE MODES
11.2.3
Centre-weighted Light Metering
When Centre-weighted Light Metering is used, the image area is divided into a “center”
and a „periphery“. All 7 of the sensors are active, however their measurements are
weighted differently: the measurement of the central sensor contributes 50%, and the
measurements of the 6 outer sensors contribute the remaining 50 % with 8,33 % for
each sensor.
Set the selector switch S3 to the position “Centre-weighted Light Metering”. Focus the
camera onto the image scene that the part of the image on which the light metering is
based is in the central measuring area. Lock the exposure values and reposition the
camera (AE-Lock or B1 / first pressure point), then release the shutter.
The focus and exposure settings are applied to the image when the Release Button B1 is
pressed (second pressure point).
Centre-weighted Light Metering S3 is suitable when the exposure of the image is to be
adapted to a limited area in the centre of the image.
11.2.4
Integral Light Metering
With Integral Light Metering, the entire area of the photographic image is taken into
account for the light metering. The 6 outer sensors are active, and the measurement
results of each sensor are equally taken into consideration: the upper two sensor pairs
contribute 33,33 %; the lower sensors contribute 16,66 % each to the light metering of
the image.
Set the selector switch S3 to the position “Integral Light Metering”. If necessary, lock the
exposure values using the button AF-Lock B10 or the Release Button B1 (first pressure
point), and reposition the camera. Release the shutter.
Integral Light Metering is suitable for images with low scene contrasts and equal light
conditions over the entire image area. Integral Light Metering renders predictable results
and therefore offers a reliable basis for exposure compensation.
54
EXPOSURE – EXPOSURE MODES
11.3 Exposure Modes
The exposure mode can be set in the functional area
“AutoExposure” by setting the Exposure Mode Selector Switch S2
to the respective position.
The menu can be opened by setting the switch to “Options /
Remote Control” and by pressing the button AE-Lock B7.
Fig. 11 / 3 Operational Area “Exposure Modes”
P
- Programmed Auto Exposure
S
- Shutter Priority (Auto Exposure)
A
- Aperture Priority (Auto Exposure)
M
- Manual Exposure
Exposure Options / Remote Control
- Bulb
- Toggle
Enable AE-Lock / Exposure Options
11.3.1
Automatic Exposure Modes
Please note: When working with a lens that is equipped with an aperture ring,
the aperture ring has to be set to “A” (automatic) to use the automatic exposure
modes “P” and “S”.
11.3.1.1
P – Programmed Auto Exposure
When Programmed Auto Exposure is selected, the optimum combination of shutter time
and aperture value is set automatically by the Sinar Hy6 system.
To select Programmed Auto Exposure, set the Exposure Mode Selector Switch S2 to “P”.
To select the function from the menu, set the selector to “Options / Remote Control” and
press the button AE-Lock B7, and simultaneously use the Rear Control Wheel W2.
Focus the camera onto the image scene. Press the Release Button B1 (first pressure point)
or use the button AE-Lock B7 to save the exposure settings (shutter speed and aperture).
They are applied when the shutter is activated.
55
EXPOSURE – EXPOSURE MODES
Program Shift: Aperture and shutter speed can be manually changed using the Rear
Control Wheel W1 and the Front Control Wheel W2 at the hand grip. Both values are
interlinked in the Programmed Auto Exposure Mode, therefore the corresponding shutter
speed or aperture value will be adjusted to maintain the correct exposure of the image.
11.3.1.2
S - Shutter Priority
With Shutter Priority, the user sets the shutter speed while the camera system adapts the
corresponding aperture value.
To select Shutter Priority, set the Exposure Mode Selector Switch S2 to “S”. To select the
function from the menu, set the Exposure Mode Selector Switch S2 to “Options / Remote
Control” and press the Button AE-Lock B7, while simultaneously using the Rear Control
Wheel W2.
Set the desired shutter speed using the rear control wheel W2 at the hand grip. The
system adapts the corresponding aperture value automatically.
Focus the camera onto the image scene. Press the Release Button B1 (first pressure point)
or use the button AE-Lock B2 to save the exposure settings (shutter speed and aperture).
They are applied when the shutter is activated.
Shutter priority is useful when the exposure time is crucial, for example when taking
pictures of moving objects (short exposure times) or for long time exposure.
11.3.1.3
A - Aperture Priority
When “Aperture Priority” is selected, the user sets the aperture, and the camera system
adapts the corresponding shutter speed automatically.
To select Aperture Priority, set the Exposure Mode Selector Switch S2 to “A”. To select
the function from the menu, set the Exposure Mode Selector Switch S2 to “Options /
Remote Control” and press the button AE-Lock B7, and simultaneously use the Rear
Control Wheel W2.
Set the desired aperture using the Front Control Wheel W1 at the hand grip. The
corresponding shutter speed is adapted automatically.
Focus the camera onto the image scene. Press the Release Button B1 (first pressure point)
or use the button AE-Lock T2 to save the exposure settings (shutter speed and aperture).
They are applied when the shutter is activated.
Aperture Priority is suitable for images where the depth of field is an important
characteristic for the composition of the image.
56
EXPOSURE – EXPOSURE MODES
11.3.2
Manual Exposure Functions
11.3.2.1
M - Manual Mode
When “Manual Mode” is selected, the user sets the aperture and the shutter speed. You
can set both values independent from each other, as they are not interlocked in this
mode.
To select the Manual Mode, set the Auto Exposure Selector Switch S2 to “M”. To select
the function from the menu, set the Auto Exposure Selector Switch S2 to “Options /
Remote Control” and press AE-Lock B7, and simultaneously use the Rear Control Wheel
W2.
Use the Rear Control Wheel W2 at the hand grip to set the shutter speed. Set the
aperture value with the Front Control Wheel W1 at the hand grip.
If you use a lens with an aperture ring, the aperture value can also be set with this ring.
To use the Front Control Wheel W2 at the hand grip, set this ring to “A” (automatic).
Press the red button at the lens to unlock the aperture the aperture ring.
1
In Manual Mode, the camera-internal
exposure measurement is active, and overor underexposure is indicated in the light
balance 1 in the hand grip display and the
viewfinder display.
Fig 11 / 4 Light balance in the hand grip and the viewfinder display
Please note: The Auto Exposure functions and the Manual Mode are not active
when the mirror is locked up. Therefore it is recommended to carry out the
exposure measurement before using the function Mirror Up.
11.3.2.2
B - Bulb
This function allows for long exposure times with a shutter time completely under the
control of the user. When the Release Button B1 is pressed, the shutter is opened. When
the Release Button B1 is released, the shutter is closed.
Set the aperture manually by using the Front Control Wheel W1 or by using the aperture
ring at the lens.
“Bulb” is an optional function, and is exclusively available from the menu.” Set the AEselector switch to “Options / Remote Control” and press the button AE-Lock B7 to open
the menu “Exposure”.
57
EXPOSURE – EXPOSURE MODES
11 / 5 Menu “Exposure - Bulb”
11 / 6 Display “Exposure - Bulb”
Select “Bulb” with the Rear Control Wheel
W2.
The aperture is manually set and appears in
the display.
Press the Shutter Release Button B1 (second pressure point). The shutter opens and
remains open as long as the button is pressed. Release the button to close the shutter.
Please note that with “Bulb”, the continuous shooting mode is blocked, i.e. the
shutter is only opened and closed once, even if the continuous shooting mode
has been selected.
11.3.3.2
Toggle
This function allows for long exposure times with a shutter speed completely under the
control of the user. When the Release Button B1 is pressed for the first time, the shutter is
opened. When the Release Button B1 is pressed for the second time, the shutter is closed.
Set the aperture manually using the Front Control Wheel W1 at the hand grip or the
aperture ring at the lens.
To select “Toggle”, set the exposure selector switch to “Options / Remote Control”. Press
the button “AE-Lock” B7 to open the menu “Exposure”.
11 / 7 Menu “Exposure - Toggle”
11 / 8 Display “Exposure - Toggle”
In the menu “Exposure”, use the rear
control wheel W2 to select the function
from the menu.
The aperture is set manually and appears in
the display.
58
EXPOSURE – EXPOSURE MODES
With “Toggle”, also the function “Mirror Up” can be used. The mirror is locked, and the
shutter is opened when the Release Button B1 is pressed for the first time, and is closed
when it is pressed for the second time.
Please note that with “Toggle”, the continuous shooting mode is blocked, i.e.
the shutter is only opened and closed once, even if the continuous shooting
mode has been selected.
11.3.4
AE-Lock
The functions of the button “AE-Lock” B7 depends on the selected AE-mode:
When an Automatic Exposure Mode (Shutter Priority, Aperture Priority and Programmed
AutoExposure) is selected, pressing the button AE-Lock B7 saves the current exposure
values. The exposure values are saved as long as the button AE-Lock B7 is pressed, and
are applied when the shutter is released.
When Manual Exposure is selected, pressing the button AE-Lock B7 before the activation
of the shutter triggers the automatic adaptation of the exposure values by the system.
When the Exposure Mode “Bulb” or “Toggle” are selected, the button AE-Lock B7 has no
function.
To save and apply the exposure values, keep
the button AE-Lock B7 pressed when
releasing the shutter.
1
2
In the hand grip display, a checkmark 1
appears when AE-Lock B7 is pressed to
indicate that these exposure values are
used.
Fig. 11 / 9 Display “AE-Lock” (Enhanced Mode)
When the function AE-Lock is used, the camera-internal exposure measurement is active,
and the exposure deviation resp. the under- or overexposure of the image is indicated in
the light balance 2 in the viewfinder and the hand grip display.
59
EXPOSURE – EXPOSURE COMPENSATION
11.3.5
Exposure Compensation
With Exposure Compensation, you can manually change the exposure values of an
Automatic Exposure Mode.
To open the menu for the setting of the exposure compensation,
press the button “Exposure compensation” B8 in the functional area
“Light metering”.
The exposure compensation is available in all automatic exposure
modes.
Fig. 11 / 10 Exposure compensation
Fig. 11 / 11 Menu “ISO / PGM”
Fig. 11 / 12 Corrected exposure value with light
balance
In the menu “ISO / PGM”, set the exposure
compensation using the Rear Control Wheel
W2. The exposure can be compensated in
steps of ± 1 EV in the range from –5.0 to
3
+5.0 EV.
The changed exposure value is displayed in
EV, and is indicated in the light balance in
the hand grip display and the viewfinder
display.
When the button “Exposure Compensation” is pressed, the viewfinder display changes.
Before the exposure compensation, the
viewfinder display shows an exposure
compensation of 0.
After setting the exposure compensation,
the changed exposure value is indicated in
EV in the light balance in the viewfinder
display as long as the button B8 is pressed.
Releasing the button B8 resets the viewfinder display to the standard settings.
Pressing the Release Button B1 to the first pressure point while pressing the button
Exposure compensation B8 triggers the automatic adaptation of the exposure values.
The compensated exposure value can only be reset using Exposure Compensation B8
again.
60
EXPOSURE – SETTING THE ISO-SPEED
Exposure Compensation is suitable for special exposure situations where the value
internally measured by the camera system would lead to incorrect exposure. Also, difficult
image situations (backlight) may require exposure compensation.
Please note: Exposure Compensation is available in all automatic exposure
modes. When “Manual exposure” has been selected, exposure compensation is
not available.
11.3.6
Setting the ISO-speed
The ISO-speed defines the sensitivity of the film material of analogue cameras. It can also
be used for digital backs. The light sensitivity determines the required light quantity for
the correct exposure of the image.
To open the menu “ISO / PGM”, press the button “Exposure
Compensation” B8 in the functional area “Light metering”.
You can set the ISO-speed in all exposure modes.
Fig. 11 / 13 Exposure compensation / ISO-correction
Use the Front Control Wheel W1 to adjust
the ISO-value. When the button is released,
the standard display is reset and the
changed ISO-value appears in the display.
Fig. 11 / 14 Menu “ISO / PGM”
Please note: Currently, the ISO-value can only be adjusted when a film
magazine is used.
61
SHOOTING MODES
12
Shooting Modes
Select the Shooting Mode using the Shooting Mode Selector Switch
S1 or by navigating in the menu.
Fig. 12 / 1 Operational Area “Shutter Release Mode“
The following Shooting Modes can be selected:
Off
Single Mode
Continuous Mode
Shooting Options / Remote Control
- Bracketing
- Self-Timer
- Focus Trap
- Multishot (only available with a back eVolution
- Ultra-fast
- Bracketing / Focus
Enable Options / Remote Control
12.1 Camera Wake-up and Shutter Release
Press the Release Button B1 to the first pressure point to release the shutter. The currently
active focus and aperture settings are applied to this image.
Press the Release Button B1 to the first pressure point to save the current exposure and
focus values. To reset the values, release the button. Correct the values by repositioning
the camera and pressing the Release Button B1 again to the first pressure point.
Switch on the camera by selecting a Shooting Mode with the Shooting Mode Selector
Switch S1. With the first pressure point of the Release Button B1, the camera is ready for
operation.
62
SHOOTING MODES
By pressing the Release Button B1, you can cancel the Long Time Exposure or the SelfTimer in progress.
1
Fig. 12 / 2 Display (Enhanced Mode)
Fig. 12 / 3 Display at shutter release
A checkmark appears in the display 1
when the Release Button B1 is pressed to
the first pressure point to indicate that the
current focus and exposure values are
saved.
When the shutter is released, the display
changes.
12.2 Single and Continuous Release Mode
The Single and the Continuous Mode can be selected as direct functions.
In the Single Mode, pressing the Release Button B1 captures one image.
In continuous mode, pressing the Release Button B1 captures a series of images. When
the button is released, the image capturing is stopped.
Set the Shooting Mode Selector Switch S1 to the respective function. Press the Release
Button B1 to capture the images in the respective mode.
For the single and the continuous mode, the function “Mirror Up” is available. Press the
button “Mirror Up” B3 at the hand grip to lock the mirror.
63
SHOOTING MODES
12.3 Self-Timer
With the Self-Timer, a delay occurs between locking the mirror and releasing the shutter.
This function is available from the menu.
To select the Self-Timer, set the Shooting Mode Selector Switch S1 to “Options / Remote
Control” and press the Button B6. The menu “Shooting” is opened.
From the menu “Shooting”, select “SelfTimer” using the Rear Control Wheel W2.
With the Front Control Wheel W1, set the
delay that occurs between the mirror lockup and the activation of the shutter. A delay
between 0,25 and 32 seconds can be set.
Fig. 12 / 4 Menu “Shooting / Self-Timer”
Set the desired exposure, then activate the shutter by pressing the Release Button B1. The
process can be cancelled by repeatedly pressing the Release Button B1.
When the Release Button B1 is pressed, the
mirror is locked and the countdown until
the activation of the shutter is started.
Fig. 12 / 5 Display at the start of the self-timer
Background information: The exposure settings have to be set before pressing the
Release Button B1, as the camera-internal exposure measurement is not active as long as
the mirror is locked.
The Self-Timer is useful e.g. if the photographer would like to appear on the image, or if
any agitation of the camera has to be avoided. During the delay time, the vibration
caused by the mirror locking is absorbed.
64
SHOOTING MODES
12.4 Focus Trap
With a Focus Trap, the shutter release is triggered automatically when an object appears
in a defined focus plane in the scene.
To use the Focus Trap, the Auto Focus functions have to be inactive. If you are
working with an auto focus lens, set the Focus Mode Selector Switch S6 to “M”
to activate the manual focusing.
To select the Focus Trap, set the Shooting
Mode Selector Switch S1 to “Options /
Remote Control“ and press the button B10
to open the menu “Shooting”. Use the Rear
Control Wheel W2 to select “Focus Trap”.
Fig. 12 / 6 Menu “Shooting – Focus Trap”
Apply the focus to a specific area in the image manually using the focusing ring at the
lens. Focus the camera onto the desired image scene, and press the Release Button B1.
The camera remains in the tensioned state
until an object appears in the defined focus
plane.
As soon as the object is in focus, the shutter
is automatically released and the image is
captured.
Fig. 12 / 7 Display at the start of the Focus Trap
To cancel an activated Focus Trap, press the Release Button B1 again.
The Focus Trap can be used with all exposure modes.
The Focus Trap cannot be used when the function “Mirror Up” is used.
65
SHOOTING MODES
12.5 Multishot
The function “Multishot” is only available with a Sinarback eVolution. This back is
operated only in tethered mode, and the option “Multishot” is only visible in the camera
menu when the Sinarback is connected to the computer, and the suitable software
application is started.
To select “Multishot”, set the Shooting Mode Selector Switch S1 to “Options / Remote
Control”. The function can now be selected with the suitable software (Sinar
CaptureShop) or from the camera menu.
In the software, 1- shot or 4-shot can be selected. When “4-shot” is selected, four images
are taken, each with the sensor slightly displaced. Finally, one image is calculated from
these four shots with each pixel containing the color information of each RGB-color.
12.6 Ultra-fast
With the function “Ultra-fast”, the mirror is locked when the Release Button B1 is
pressed, however the shutter is opened only when the Release Button B1 is released.
Set the Shooting Mode Selector Switch S1
to “Options / Remote” and press the button
B10 to open the menu “Shooting”.
Use the Rear Control Wheel W2 to select
“Ultra Fast“ from the menu.
Fig. 12 / 8 Menu “Shooting – Ultra Fast”
Press the Release Button B1 to lock the
button. A symbol 1 appears in the display
to indicate that the mirror is locked.
1
When the Release Button B1 is released, the
shutter is activated.
Fig. 12 / 9 Display “Ultra Fast”
Background information: When the shutter is released, normally about 150 ms are
necessary to lock the mirror, to adjust the focus and to open the shutter. With the
function “Ultra-fast”, this time is reduced to 5 ms.
66
SHOOTING MODES
12.7 Bracketing
With Bracketing, a series of 3 or 5 images is taken, each with a defined deviation of the
exposure from the original image. Depending on the selected exposure mode, exposure
or aperture bracketing is performed.
Shutter priority
Aperture bracketing is performed, i.e. the aperture is varied while
the exposure time remains fixed.
Aperture priority
Exposure time bracketing is performed, i.e. the shutter speed is
varied and the aperture value remains fixed.
Programmed
AutoExposure
The system automatically varies the shutter speed and the
aperture.
Manual mode
Bracketing is not available.
To select “Bracketing”, open the menu
“Shooting” by setting the Shooting Mode
Selector Switch S1 to “Options / Remote”
and pressing the button B10, and select the
function with the Rear Control Wheel W2.
Select the exposure deviation and the
number of images in the bracketing series
using the Front Control Wheel W1.
Fig. 12/ 10 Menu “Shooting – Bracketing”
The following numbers of images and exposure values can be selected for Bracketing:
•
•
•
•
•
•
3 x 1 EV
3
3 x 2 EV
3
3 x 1 EV
5 x 1 EV
3
5x 2
3
5 x 1 EV
You can use bracketing in combination with exposure compensation, and you can shift
the offset of the exposure bracketing by using the front and the rear control wheels W1
and W2.
67
SHOOTING MODES
When bracketing is started, the display
settings change.
Fig. 12 / 11 Display during Bracketing
12.8 Focus Bracketing
With Focus Bracketing, a series of images (3, 5 or 9 images) is taken, each with a slight
deviation of the focal plane from the original focus. In this way, an image can be taken
with several focus variations.
Please note that this function is only available when working with an auto focus
lens and when the camera is set to an Auto Focus Mode.
Set the Shooting Mode Selector Switch S1
to “Options / Remote Control”, and select
the function “Focus Bracketing” from the
menu “Shooting Mode” using the Rear
Control Wheel W2.
With the Front Control Wheel W1, select
the number of images to be taken.
Fig. 12 / 12 Menu “Bracketing – Focus”
Set the exposure for the image.
1
The Focus Bracketing symbol 1 appears in
the display.
Now press the Release Button B1. The
defined number of images is taken. To
prevent any agitation of the camera, the
mirror remains locked during the capturing
of the image series.
Fig. 12 / 13 Display /Bracketing – Focus“
Background information: During Focus Bracketing, the optical assembly is shifted, and
no focus measurement is carried out during image capturing. In this way, focus bracketing
can also be carried out if there is not any object in the centre of the image.
68
SHOOTING MODES
3
2
1
2
3
Fig. 12 / 14 Focus Bracketing
Focus Bracketing is only possible with AF or AFD-lenses.
With focus bracketing, you can take a series of images where the focal plane is shifted
from the centre of the depth of field of the basis shot 1 to the borders and beyond.
The step sizes of the deviations of the focal plane depend on the selected aperture, and
are set automatically by the system. The step size can also depend on the lens type that is
used.
When 3-shot mode is selected, the plane of focus is shifted to the rear edge of the depth
of field of the basis shot (image 1); in this way, the rear edge of the basis shot forms the
center of the depth of field (images 2).
When 5-, 7- or 9-shot mode is selected, the plane of focus is shifted outside of the depth
of field of the basis shot (images 3).
When focus bracketing is started, the optical assembly moves to the most distant point in
the focus bracketing and starts capturing the image series. The last capture in the series is
the one with the focal plane the closest to the lens. The lens is shifted in equal distances
69
MIRROR UP
from the first to the last image capture in the series. The middle shot in the series is the
basis shot that is set (image 1).
When the focus of the original image is already close to the stop position of the
focus (i.e. the minimum or maximum possible focus of the camera), the focus
bracketing cannot be performed in the pre-defined step size, and the position of
the original image may deviate from the set focus.
13
Mirror Up
Using the function “Mirror Up”, the mirror is locked before the shutter is activated. In this
way, any agitation of the camera when capturing the image can be avoided.
Press the button Mirror Up B4 at the hand
grip to lock the mirror, then press the
Release Button B1 to take the image.
By toggling, the mirror is reset to its original
position.
Fig. 13 / 1 Mirror Up
The camera internal exposure measurement is not active when the mirror is
locked, therefore the exposure value is applied that has been measured
immediately before the mirror has been locked up. If the exposure measurement
value has been previously saved using the button AE-Lock B7, this measurement
value will be applied.
70
USE OF THE FLASH
14
Use of the Flash
14.1 Flash Operation with the Sinar Hy6 System
For flash operation with the Sinar Hy6 system, external flash units are connected to the
camera. With the Sinar Hy6 system, fixed flash units and off-camera units can be used.
The Sinar Hy6 system is equipped with a between-the-lens-shutter; therefore it offers very
short flash synchronization times (up to 1
sec). The Sinar Hy6 system is x1000
synchronized with the minimum possible shutter time of the lens. In this way, the flash is
operated independent from the exposure control of the camera, and the exposure time is
not extended when working with the flash.
The Sinar Hy6 system offers the following interfaces for the flash
Hot shoe
Connection of TTL-compatible flash devices and SCA-adapter
X-contact
Flash synchronization socket for x-synchronization of studio flash devices
Mechanical
interface
Attachment of an external flash device at the 90° reflex viewfinder
14.2 The Hot Shoe – TTL-Flash Measurement and SCA-interface
Using the hot shoe, TTL-compatible flash devices and the Rollei SCA-3562 Flash Adapter
enabling special flash functions can be attached to the camera. TTL-measurement, flash
synchronization and the transfer of the relevant camera data (e.g. aperture, ISO-standard)
are carried out via the hot shoe.
The following information is exchanged between the camera and the flash device:
•
•
•
•
•
Focal length of AF-lenses for the operation of the reflector
Aperture values
Film sensitivity values for the operation of the computer control of the flash device
Flash correction with the suitable flash devices
Control of the AF measurement flash
In case of any questions concerning recommended flash devices, please contact your
expert dealer.
71
USE OF THE FLASH
To the hot shoe with the SCA-contacts 1,
portable flash devices / the Rollei SCA-3562
Flash Adapter has to be connected.
The hot shoe is equipped with contacts
enabling the TTL-measurement, flash
synchronization and the exchange of the
flash and camera data.
1
The flash device is connected correctly
when you hear a click. Please refer also to
the documentation of your flash adapter
and your flash device.
Fig. 14 / 1 Hot shoe
Background information: When TTL-flash measurement is used, the exposure during
flash use is measured “through the lens”, i. e. the light quantity that actually falls onto the
sensor is measured. Based on this measurement, the intensity and duration of the flash is
regulated automatically.
Please refer to the documentation of your flash device and to the
documentation of your Rollei SCA-3562 Flash Adapter for further
information.
14.3 The X-Contact – Manual Flash Control
Via the x-contact, the manual flash operation is enabled.
The flash is synchronized with the camera shutter (normal sync / rear sync)
Æ chapter 14.5 ”Flash options and flash compensation”.
Flash intensity and aperture settings have to be set at the flash unit, refer to the manual of
your flash device.
72
USE OF THE FLASH
Connect the flash synchronization cable of a
studio flash unit, of a flash remote control
unit or of an automatic flash device to the
x-contact 1.
1
Fig. 14 / 2 X-contact
14.4 The 90° Reflex Viewfinder
1
When a flash device is connected to the
mechanical interface at the 90° reflex
viewfinder 1, the flash device has to be
connected to the flash synchronisation
socket at the camera body, refer to Fig.
14/2.
Fig. 14/ 3 Flash shoe mount at the 90° reflex
viewfinder
14.5 Flash Options and Flash Compensation
1
Pressing the Flash Button B10 1 at the camera body opens the
menu “Flash”, where the flash option and the flash compensation
can be selected.
Fig. 14 / 4 Flash Button
73
USE OF THE FLASH
Use the Front Control Wheel W1 to select the
flash mode. The modes “Normal Sync” and
“Rear Sync” can be selected.
Using the Rear Control Wheel W2, the flash
compensation can be set.
Fig. 14 / 5 Select flash mode
Normal
sync
The flash is synchronized towards the opening of the shutter. The flash is
activated directly after the shutter is completely opened.
Rear sync
The flash is synchronized towards the closing of the shutter. The flash is
activated about 3 ms before the shutter is closed.
14.6 Flash Compensation
Using the Rear Control Wheel W2, the flash
compensation can be set. The flash
compensation comprises a range from –3
EV to +3 EV and can be set in steps of 0,3
EV.
Fig. 14 / 6 Flash compensation
When the flash compensation is used, the
light balance appears in the hand grip
display.
74
OPTIONS
15
Options
Pressing the button “Options” B5, the menu “Options” is opened
where several camera settings can be defined by the user.
1
The menu is closed and the display is reset to the standard display
by toggling.
Fig. 15 / 1 Open menu “Options”
The menu “Options” offers the following menu items:
Controls
Lock or activate the front and the rear control wheel W1 and W2.
LCD-backlight
Set the intensity of the LCD-backlight.
Power save
Activate the automatic switching-off of the camera display after a
defined period of time.
GUI
Set the enhanced or the easy GUI as standard.
LCD-contrast
Set a high or low LCD-contrast.
AE-activation
Set the AE-activation, manually or using the shutter release button.
Firmware
version
The firmware version is displayed.
Soft key
function
Set the function for the softkey. The locking of the control wheels or
the live image transfer to the suitable software can be selected.
Status display
The status of different camera settings is displayed here.
With the Rear Control Wheel W2, the
respective option can be selected.
With the Front Control Wheel W1, the mode
or parameter of this option can be set.
Fig. 15 / 2 Menu “Options”
75
OPTIONS
15.1 Controls
Here you can lock or unlock the control
wheels. Per default, the control wheels are
unlocked.
Use the front control wheel W1 to select
whether to lock or unlock the control
wheels.
Fig. 15 / 3 Menu “Options – Controls”
15.2 LCD-Backlight
In the menu “Options - LCD-backlight”, the
settings for the behaviour of the LCDbacklight can be defined.
Use the Front Control Wheel W1 to set the
function.
Fig. 15 / 4 Menu “Options – LCD Backlight”
The following selections for the LCD-backlight can be made:
• On: the LCD-backlight is permanently switched on
• Off: the LCD backlight is permanently switched off.
• Auto: the LCD backlight is automatically switched off after a period of inactivity of the
camera.
15.3 Power save
Here, the automatic switching-off of the
camera display after a period of inactivity can
be activated or deactivated. Use the Front
Control Wheel W1 to select “On” or “Off” to
activate or deactivate the automatic power
saving function.
Fig. 15 / 5 Menu “Options – Power save”
76
OPTIONS
15.4 Graphical user interface
Here the GUI standard settings can be defined
using the rear control wheel W2:
Fig. 15 / 6 Menu “Options – GUI”
Automatic: The Easy Mode-display is shown
per default, and the Enhanced Mode-display is
shown when at least one optional function is
selected.
Enhanced: The Enhanced Mode-display is
shown per default.
15.5 LCD contrast
With the Front Control Wheel W1, the
contrast of the hand grip display can be set.
A high contrast is set between 0 and 16
A low contrast is set between 63 and 48.
Fig. 15 /7 Menu “Options – LCD contrast”
15.6 AE-activation
Here the automatic exposure adaptation
with the Release Button or the button AELock can be configured. Use the Front
Control Wheel W1 to select the function.
Fig. 15 / 8 Menu “Options – AE-activation”
Manual
Exposure adaptation is carried out by pressing the button AE-Lock. If the
button AE-Lock is not pressed before activating the shutter, the last-used
exposure values will be applied to the image.
Release
button
Exposure adaptation is carried out when the Release Button B1 is pressed
(first pressure point). This function is set by default. With the button “AELock”, the last-used exposure values are saved and applied to the image
when the Release Button B1 is pressed.
77
OPTIONS
15.7 Firmware version
Here the Sinar Logo is displayed.
Fig. 15 / 9 Menu “Options – Firmware version”
15.8 Soft key function
Here the function of the soft key at the
hand grip can be set.
Use the front control wheel W1 to select
the function. The following functions are
available:
Fig. 15 / 10 Menu “Options – Soft key functions”
•
•
•
None
Key lock
Live image
None
Pressing the button does not trigger any function.
Key lock
The front and the rear control wheel at the hand grip are locked when
this button is pressed. The locking of the hand grip is cancelled when
the button is pressed again (toggle key function).
This function is set per default.
Live image
By pressing the soft key, the live image transfer from the camera to the
respective software (for example Sinar eXposure) is activated.
15.9 Display of the firmware versions
Here, the firmware versions of the camera
and the camera back are displayed.
78
OPTIONS
15.9 Status
The status settings display camera and firmware information, and image parameters.
In normal use of the Sinar Hy6 system, the status information will not be necessary. You
may need the status information in case of service or technical support.
In Status I, the voltage of the battery and
the buffer is displayed here.
Fig. 15 / 11 Menu “Options – Voltage status”
In Status II, the image parameters and the
information about the communication of
the back with the camera body are
displayed.
Fig. 15 / 12 Menu “Options – Status II ”
79
WORKING WITH A FILM MAGAZINE
16
Working with a film magazine
You can optionally order the film magazine and the adapter from Sinar:
711.64.088
711.64.010
Adapter frame
Film magazine
In the following, you will find the instructions for the attachment of the film magazine
and for inserting the film. For further details about working with the film magazine, refer
to the user manual of the manufacturer of the film magazine.
Remove the cover
Firstly, remove the protective cover from the
camera body. Push the back release button
upwards.
Fig. 16 / 1 Remove protective cover
Attach the magazine frame
Place the magazine frame into the four
openings. You will hear a click when the
magazine is locked. If using a 4,5 x 6 cm
magazine, the format symbol has to be
visible.
Fig. 16 / 2 Attach magazine frame
80
WORKING WITH A FILM MAGAZINE
Open the magazine
To open the magazine, move the draw slide
bar 1 as far as possible into the arrow
direction “magazine change / turn”. The
multi-disk blind closes.
2
2
1
To open the magazine, press the two
opening buttons 2 inwards and pull of the
back plane off the magazine.
1
Fig. 16 / 3 Open magazine
Take out film insert
To take out the film insert, press the film
upwards against the light resistance of the
magnetic fixing and take the film out of the
magazine back.
Fig. 16 / 4 Take out film insert
81
WORKING WITH A FILM MAGAZINE
Load a film
Because of the symmetrical construction of
the film insert, the empty spool 2 does not
need to be displaced. Press the spring lug 1
outwards and insert the film spool between
the spool bearings in a way that the black
inside of the paper lies outwards.
2
1
3
Make sure that the film runs to the empty
spool as illustrated by the symbol 3. Put the
paper leader straight into the empty spool.
Wind the paper leader up until the arrow
markings on the paper leader are aligned
with the index on the spring lug.
Fig. 16 / 5 Load film
Insert the film insert
Inside of the film magazine, two symbols
and
are visible to illustrate the
insertion of the loaded film magazine in the
correct direction.
Insert the loaded film magazine in the way
that the film spool points towards the
and the empty spool points
symbol
towards the symbol
.
Fig. 16 / 6 Insert film insert
82
WORKING WITH A FILM MAGAZINE
Close the film magazine
Close the magazine. You will hear a click
when the magazine is locked. When
inserting the film, the image count is set to
00. After switching on the display, the
basic display of the magazine appears.
You need to enter the film type and the
film sensitivity that you can find on the box
of the film. If the multi-disk blind is not
opened, the camera shutter cannot be
released and SLIdE is displayed in the LCD
of the magazine.
Fig. 16 / 7 Close fílm magazine
For further information, refer to the documentation of the supplier of your film magazine.
83
CLEANING AND MAINTENANCE
17
Cleaning and Maintenance
Occasionally, the cleaning of the Sinar Hy6 system may be necessary. Please observe the
following cleaning instructions to prevent any damage to the camera.
To clean the camera body, use a lint-free, soft, slightly moistened tissue, e.g. cotton. Do
not use substances containing organic solvents, benzyl or diluting agents. Make sure to
moisten the piece of cloth only slightly to prevent that any moisture enters the camera.
Any contact of the internal parts of the camera with water can lead to severe
damages of the Sinar Hy6 system or even to an electric shock.
Prevent the occurrence of condensation water. If any condensation occurs, detach the
lens and the back / film magazine from the camera body. Do not use the camera any
more until the condensation water has evaporated completely.
Use a dry and soft wood-free tissue, or a soft brush to clean the lens. Do not use
substances containing organic solvents, benzyl or diluting agents. In case of heavy soiling,
please contact customer service.
When the camera is not in use, use the lens protection cap. Also, when the back is
detached from the body, use the protection cover to prevent any soiling of the inner
component parts of the camera.
Shut the waist-level viewfinder when the camera is not in use.
For further information, please refer to the safety instructions in Æ chapter 2.
84
TECHNICAL DATA
18
Technical Data
Camera Type
Single-lens autofocus reflex camera with multi-mode automatic
exposure control, variable metering pattern, TTL automatic flash (SCA
3000), and motor-driven film transport.
AFD lenses: 35, 50, 80; macro 120, 150, 180; and zoom 60-140 mm
Applicable lenses
AF lenses: 50, 80, 150, 180; and zoom 60-140 mm
Non-AF lenses 40, 50, 80, 90, 110; macro 120, 150, 250, 300; and
zoom 140-250 mm
Autofocus cross sensor (multi-zone)
Autofocus
Integrated auxiliary red-light beam for AF metering in low-light
conditions
Use of Rolleiflex 6008 compatible non-AF lenses with focus indicator
is possible
Shutter
Electronically controlled leaf shutter from 1/1000 (with PQS lenses) to 32
seconds, B, and T
Reflex Mirror
Pre-releasable and direct motor-driven instant return mirror with
partially transmitting multi-coating. Setting can also be changed after
pre-release.
Camera supplied with waist-level finder with swing-out magnifier
Waist-level finder can be exchanged for a 90° high-eyepoint finder
Viewfinder System with adjustable diopter.
Interchangeable focusing screen. Super-bright high-D screen focusing
screen included
Illuminated LC finder display for:
Focusing status, shutter speed, aperture (1/3 f-stops increments), light
balance for manual exposure metering and exposure compensation,
Viewfinder Display
spot- and multi-spot mode, flash ready display, TTL flash exposure
control, frame counter, landscape- or portrait format with 4.5x6 cm,
battery status
Hand Grip
Clicks in four positions (for use with waist-level finder and 90° viewer.
Removable leather hand strap
Tripod
Quick-clamping tripod plate with ¼"- and 3/8" tripod thread
85
TECHNICAL DATA
Interface to digital camera backs
Connections
Versatile 8-pin screw-lock socket for cable release, and other auxiliary
devices like GPS encoder, etc.
USB-socket
Power Supply
With rechargeable Lithium ion batteries 7.2V, 2200 mAh
Center-weighted multi-zone metering
Exposure Metering
Spot metering by photodiode in center of frame (approx. 1% of
frame area 6x6 cm)
Automatic stray-light compensation during metering
Integrated RGB sensor for automatic white-balance for digital
photography
Shutter Priority AE
Aperture Priority AE
Exposure Modes
Programmed AE with fastest shutter speed priority
Metered manually in steps of 1 f-stops
3
Exposure metering: EV 0 to EV 19 at ISO 100/21°, with 2.8/80 mm
lens
Metering Ranges
AF range: EV 1 to EV 19 at ISO 100/21°, with 2.8/80 mm lens
TTL flash 25 to 1600 ISO
Exposure Lock
Works with all automatic programs
Stores exposure time and aperture as exposure values (EV)
Exposure
Correction
Multiple Exposures
Manually in steps of 1/3 f-stops from -42/3 to +2 EV
Auto-bracketing (S± position) in steps of 1/3, 2/3, and 1 EV
With film transport disengaged electronically, without screen image
(e.g. for digital backs
86
TECHNICAL DATA
TTL flash metering on the film plane
Flash-ready and exposure control is displayed in the finder
Automatic Flash
Automatic flash switch-on with Metz flash units is possible in lowlight condition
Additional fill-in flash
TTL Studio preflash Exposure
Metering
Possible in conjunction with studio flash packs
With all shutter speeds from 1/1000 to 32 seconds
Flash
Synchronization
Hot shoe with flash terminal and contacts for flash units from Metz
SCA interface via Rollei SCA 3562 adapter
Sinar Hy6-e75
Sinar Hy6 Systems
Sinar Hy6-e54
Sinar Hy6-m54
Sinarback eMotion 22 / 54 / 75
Applicable
Sinarbacks
Sinarback eVolution 75 H
Sinarback 54 MC / M
Frame Size on Film 4.5x6 cm and 6x6 cm (in evaluation)
Film Types
120 and 220 rollfilm for 16 and 32 exposures, respectively, in 4.5x6
cm format
Film Speeds
ISO 25/15° to 6400/39° adjustable in steps of 1/3 f-stops on the film
magazine
Automatic film transport with built-in high-speed motor in the
film magazine
Film Transport
Single and continuous exposures with up to 1.5 frames/second
Automatic film advance to frame #1
Automatic film rewind after exposure of last frame
87
TECHNICAL DATA
Film Magazines
4.5x6 cm Film magazine 4560 with integrated laminar drawslide,
frame counter, film speed input, film type reminder and preloadable
film insert spool
6x6 cm film magazine in evaluation
Hardware Options
90° high-point view finder
Revolving digital back adapter plates
Camera Control
Option Settings
Dimensions
The Sinar Hy6 can be controlled in two modes:
Locally by means of the camera's own controls and dials
Fully remote access and control from the computer by means of
the Sinar CaptureShop™ capturing software and the connected
Sinarback
Via MODE switch:
Early or late flash, pre-flash metering, self-timer, focus, bracketing,
focus trap, ultra-fast mode, autofocus characteristics, automatic
bracketing in steps of ±1/3, ±2/3, ±1 EV, display of frame counter
Length x width x height
Sinar Hy6-e75 with 2.8/80 lens: approx. 210x157x112 mm
Sinar Hy6-e54 with 2.8/80 lens: approx. 210x157x112 mm
Sinar Hy6-m54 with 2.8/80 lens: approx. 190x157x112 mm
Camera body: 78x157x112 mm
Weight
Sinar Hy6-e75 with 2.8/80 lens: approx. 2.1 kg
Sinar Hy6-e54 with 2.8/80 lens: approx. 2.1 kg
Sinar Hy6-m54 with 2.8/80 lens: approx. 1.9 kg
Camera body incl. battery: 990 g
Sensor
This sensor can be used by the digital back for the support of an
automatic white balance (AWB) function.
88