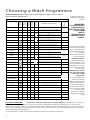
1
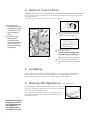
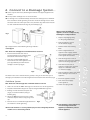
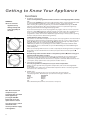
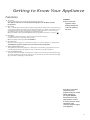
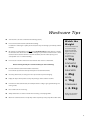
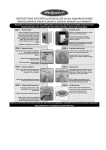
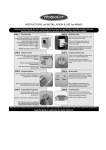
Congratulations on the purchase of your new
Top Loader Washing Machine.
IMPORTANT INFORMATION
Please read this Instruction Manual
thoroughly before installing and using
your appliance for the first time.
Instruction Manual
For Model WMTL80
Safety First
This instruction manual contains important details on using your machine safely.
Please keep it safe for your future reference.
If you pass the machine onto someone else, please make sure that you give them this
manual so that the new owner can read these safety warnings.
✓
✗
● Dispose of packaging materials
carefully and keep them well
away from children.
● Do not plug your machine into
a socket when your hands are
wet.
● When disposing of your old
machine, to minimise risk of
injury to children, isolate from
the electrical supply, remove
the door, the plug and cut the
mains cable off flush with the
appliance. Dispose of them
separately to make sure that
the appliance can no longer be
plugged into a mains socket.
● Do not connect the washing
machine to a single outlet
instantaneous water heater.
● This washing machine is
designed for domestic use
only.
● Before using your machine
remove the transit fixing bolts
complete with spacers, from
the back of the machine.
Keep the parts you remove for
future transportation.
● Any electrical work necessary
to install this machine should
be carried out by a qualified
electrician.
2
● Do not try to modify this
machine in any way.
● Do not connect the washing
machine directly to an artificial
water softening unit. Use the
recommended amount of
detergent for the water
hardness in your area.
● Do not let children play with
the machine or its controls.
● Do not stand on the machine
or in the door opening.
● Do not lean on the door or use
the door to lift or move the
machine.
● Do not wash garments that
have previously been treated
with solvents.
Contents
Safety First ......................................
Recycling & Disposal Information ..............
Electricity Supply ......................................
2
3
4
Washcare Tips...................................
13
Automatic Safety Features.........
14
The Dispenser ................................
15
Cleaning..........................................
16
Troubleshooting
General Maintenance...................
17
Hotpoint Guarantee.....................
18
Hotpoint After Sales Service...
19
Installation Instructions
1. Choose a Location................................
2. Remove Transit Bolts
3. Levelling
4. Moving the Appliance.........................
5. Connect to the Water Supply ................
6. Connect to a Drainage System...................
5
6
7
8
When you have installed your appliance, ensure
it is ready to use by following the 10 Step Check
List on page 8
Getting to know your
Appliance.........................................
9-11
Key Contacts ................................. Back Page
Choosing a Wash
Programme ........................................
12
Retention of this
Instruction Manual
Recycling & Disposal Information
As part of Hotpoint’s continued commitment to helping the environment, Hotpoint reserves the right to use
quality recycled components to keep down customer costs and minimise material wastage.
Please dispose of packaging and old appliances carefully. To minimise risk of injury to children,
remove the door, plug and cut mains cable off flush with the appliance. Dispose of separately to
ensure that the appliance can no longer be plugged into a mains socket.
Keep this instruction manual in a
handy place for reference.
It contains important details on
the safe and proper use of your
appliance. If you sell the
appliance, pass it on to someone
else, move house or leave it
behind, make sure that you
provide this manual so that the
new owner can become familiar
with the appliance and safety
warnings.
3
Electricity Supply
Make sure that the electrical socket is accessible. Take the mains lead from the back of
the machine and plug it into the socket. We do not recommend wiring your machine
directly into the mains supply.
Changing the Mains Lead
If you have damaged the existing lead and need a new one, contact Hotpoint Service UK
on 08709 066066 or www.theservicecentre.co.uk (or in the Republic of Ireland on 1850
302 200). A charge will be made. We strongly advise that fitting a new lead is carried out
by a qualified electrician.
Changing the Plug
WARNING
● This machine must be
earthed.
● Do not use the plug
unless the fuse cover is
fitted.
● To avoid a shock hazard,
when changing a plug,
always safely discard the
cut off plug. Do not
insert into any other
socket.
● Seek professional advice
if you need to use an
extension lead.
If you need to change your plug if it does not fit your socket; isolate the machine from
the mains supply. Cut off the supplied plug and safely dispose of the discarded plug.
Note: If you change the plug, the colour of wires in the mains lead may not match the
colour of the markings which show different terminals in the plug. You must wire it as
shown below.
Green and Yellow (Earth)
Wire this to the terminal marked ‘E’,
symbol or coloured green and
yellow.
Blue (Neutral)
Wire this to the terminal marked ‘N’,
or coloured black.
13A ASTA
approved fuse to
BS1363/A.
Brown (Live)
Wire this to the terminal marked ‘L’,
or coloured red.
Fuses
Your machine comes fitted with a plug and a 13amp (13A) fuse. If you need to replace
the fuse, use only those rated at 13amp (13A) and ASTA approved to BS1362. To change
the fuse, lift the holder to vertical position and lift the fuse out. To replace the fuse, insert
the fuse and push the fuse holder down into the locked position. Correct replacement is
identified by colour coding or the marking on the base of plug.
WARNING: Do not use plug unless the fuse holder is in the locked position and the top cover
firmly replaced.
CE marking certifies that this appliance conforms to the following
EEC directives:Low Voltage Equipment - 73/23/EEC
Electromagnetic compatibility - 89/336/EEC amended by 93/68/EEC
4
Installation Instructions
IMPORTANT INFORMATION:
● Do not plug in and switch appliance on at the mains until installation is complete.
● You may be charged for a service call if a problem with your appliance is caused
by incorrect installation or misuse.
Follow these 5 steps for a trouble free installation:
1.
2.
3.
4.
5.
6.
Choose a Location...
Remove Transit Bolts...
Levelling...
Moving the Appliance...
Connect to the Water Supply...
Connect to a Drainage System...
1. Choose a Location...
The choice of location for your appliance will influence its performance.
● Position where possible on a solid floor. Vibration may occur with a wooden floor.
● Take care with vinyl floor coverings. The weight of the appliance may cause indentations in
some vinyl floor coverings.
● You should not install your appliance on a carpeted floor, but if this is unavoidable, ensure
that air can circulate around its base.
● If locating next to another appliance or an item of furniture, leave space between them to
allow air to circulate.
● For your safety and to comply with IEE regulations, you should not install your appliance in a
bath or shower room. Seek professional advice if you wish to do so.
● Ensure sufficient space is allowed for the appliance - minimum requirement for dimensions
(H) 850mm x (W) 400mm x (D) 600mm
● Ensure the electrical socket and water taps are easily accessible and that the water
supply can be isolated if necessary.
5
2. Remove Transit Bolts...
BEFORE ATTEMPTING TO USE THE MACHINE, YOU MUST FOLLOW THE PROCEDURE DESCRIBED BELOW.
These operations involve removing four transit fixing bolts that immobilise the tub of your machine
during transportation.
These “unpacking” operations are compulsory for safety reasons.
1
● Please retain all
packaging components
as they must be replaced
if the machine is to be
transported in the
future.
1.
● Your machine was
inspected before
leaving the factory.
You may therefore find
traces of water in the
tub or in the detergent
compartment.
Remove ALL four transit fixing bolts
(A) using a 10mm spanner. Unscrew
until three threads can be seen.
2
Example transit fixing bolt
complete with spacer.
Hold the end of the bolt and pull,
firmly but carefully.
2. Ensure each transit fixing bolt is
removed complete with spacer.
3.
When all four transit fixing bolts have
been removed, blank off the holes
left using the plastic covers provided
(B).
3. Levelling...
To guarantee correct functioning the appliance must be standing firm and level.
The four feet can be turned to level the appliance. Ensuring your machine is
level will help prevent vibration and risk of damage to the appliance.
4. Moving the Appliance... using the wheels.
If your appliance is fitted with folding castor's, it is easy to
move. To extend the wheels, move the lever at the bottom
of the machine from left to right.
Do not forget to return the lever to its original position.
The machine should not be used while standing on its
two ‘front’ castor's.
Remember you may be
charged for a service
call if a problem with
your appliance is
caused by incorrect
installation or misuse.
6
5. Connect to the Water Supply...
● Water inlet: Minimum water pressure: 0.05 MPa or 0.5 bars
Maximum water pressure: 1MPa or 10 bars
● The temperature of the incoming household hot water supply should ideally be 60°C and no
higher than 70°C as this could cause damage to both your laundry and appliance.
● The water supply taps must be easily accessible when the appliance is installed.
WARNING
● Do not connect
appliance to a single
outlet instantaneous
water heater.
● The appliance must be connected to the appliance water supply using the new hose set
supplied, old hose sets should not be used.
Hot and Cold Water Supply
Cold Water Adaptor
Both hot and cold fill hoses are supplied with your machine - packed in the drum for
transit:
1. Connect the angled end of the RED marked hose to the RED plastic inlet valve at the
back of the appliance. Connect the straight end to your HOT water supply.
2. Repeat the procedure connecting the angled end of hose without a mark to the
WHITE inlet valve at the back of the appliance and the straight end to your COLD
water supply.
3. Hand tighten connectors sufficiently to ensure water does not leak from the hose
connections.
4. Turn on water supply taps and check for leaks from the connectors. In the event of a
leak, turn off supply tap, remove connector and check sealing washer is in place.
Refit connector and tighten. Turn on water supply taps.
If you have no hot water
supply or your hot water
pressure is low... you can use
a cold fill adaptor.
Remember you may be
charged for a service
call if a problem with
your appliance is
caused by incorrect
installation or misuse.
7
6. Connect to a Drainage System...
● Connect up the drain hose, after fitting the hooked end support supplied in the
machine.
● For drainage into a standard worktop sink ensure the outlet pipe has a minimum
bore of 32mm. To avoid syphoning ensure the end of the drainage hose is above
the water level in the sink. If your sink is inset, the front edge of the basin must be
less than 75mm from the front edge of your worktop (Fig 1).
When you have installed your
appliance, ensure it is ready to use by
following this 10 Step Check List
Fig 1
1. Dispose of packaging safely,
see ‘Recycling Information’.
2. Position appliance close to
electrical/water supply.
We recommend one of the following drainage methods:-
Standpipe
Note: Ensure the standpipe has a minimum diameter of 38 mm.
1. Ensure hooked end of drain hose is
positioned between 90 and 65cm above
the bottom of the machine (Fig 2).
3. Remove all four Transit Fixing
Bolts.
4. Connect supplied hoses to
appliance water supply, confirm
water is flowing before connecting
to the appliance inlet valves.
5. Untie drainage hose at rear of
appliance and connect to a drainage
system see ‘Drainage’ opposite.
2. Untie the end of the GREY drainage
hose from the rear of the appliance and
place approximately 100 mm into the
standpipe or sink trap spigot.
6. Untie mains lead at rear of
appliance and plug into electrical
supply via a switched socket,
see ‘Electrical Supply’.
Fig 2
The waste water can be drained onto the ground, so long as the drain hose passes
through a point between 90 and 65cm higher than the bottom of the machine (Fig 2).
7. Position appliance, taking care not to
kink or damage hoses at rear of
appliance.
8. Ensure the appliance is level.
9. Turn on the water supply
to the appliance.
Sink Waste System
Note: Ensure the sink outlet pipe has a minimum diameter of 32 mm.
10. Switch on at plug socket.
1. Untie the end of the GREY drainage hose from the rear of the appliance.
2. Reposition ‘Hooked End Support’ as required along the GREY drainage hose.
3. If fitting an under sink waste disposal unit
(Fig 3), cut out the membrane, bung or
blanking plug.
4. Attach the GREY drainage hose to the under
sink waste disposal unit securely, using a hose
clip.
5. Raise the hose to a minimum height of between
90 and 65cm to avoid syphoning.
Fig 3
● Ensure the drain hose is securely attached, to prevent it coming away while the
machine is in use and causing a flood.
8
● Your appliance is now ready for use,
refer to ‘Getting to Know Your
Appliance’, to familiarise yourself
with the appliance.
10 Step Check List
● Do not position standpipe near an electrical outlet.
Getting to Know Your Appliance
3
1
2
4
8
5
7
6
9
The Controls
WARNINGS
1.
Programme Selection Knob and
Programme Start
2.
Temperature Control Knob
3.
Variable Spin
4.
Time Saver
5.
Rinse Hold
6.
Extra Rinse
7.
On / Off Button
8.
Mains On / Off Indicator Light
9.
Lid Locked Indicator Light
● Do not allow children to
play with the appliance
or tamper with the
controls.
How to open and close the drum
1
2
3
WARNINGS
● The two drum flaps are
fitted with strong
springs - you MUST
release them slowly and
carefully.
Lift the external lid and
open it completely.
Open the drum, using both hands.
Rest one hand firmly on the two
flaps to prevent them springing
open suddenly and hurting your
fingers.
Press the button indicated by the
arrow.
Once the hooks have released,
open out the flaps fully.
Close the door by firstly folding
down the front flap, followed by
the rear flap.
Ensure hooks on the front flap are
housed correctly within the seat of
the rear flap.
Press both doors gently to check
they have closed correctly.
Then close down the external lid.
9
Getting to Know Your Appliance
Functions
WARNINGS
● Do not overload
appliance! It may
damage laundry and
reduce the quality of
the wash.
Fig.1
1. Programme Selection knob...
Use to set all required programmes and also to Cancel or Interrupt programmes already
set:
Turn the knob, clockwise only, until the symbol/number of the required programme (refer
to Choosing a Wash Programme) is in line with the pointer on the control panel.
After selecting the required programme, press the Mains On/Off button (7), the On/Off
Indicator Light (8) will flash. Once the programme has been accepted, this light stops
flashing and will remain lit throughout the programme.
If you want to interrupt or cancel the programme in progress and set a new one, turn the
dial to one of the ● (Stop/Reset) symbols, and wait 5 seconds. Once the cancellation has
been accepted, the On/Off Indicator light (8) will flash - You can then set a different
programme or switch the machine off (NB. wait approximately 2 minutes, before opening
the lid, should you wish to add/remove garments).
Setting the time delays: (see Fig.1)
You can also use this knob to delay the start of your selected programme. Turn the knob to
align with one of the four delay programme positions (after 12, 9, 3 or 1 hours). Press the
Mains On/Off button (7) and wait until the On/Off Indicator light (8) stops flashing. Once
the light is static you can select the programme you require.
NOTE: Lamp (8) flashes in a special way (2 seconds on and 4 seconds off) to indicate that a
delayed start has been set. You are able to open the lid and change the wash load during the
selected delay time.
After any wash programme has been set and accepted by the washing machine, turning the
Programme Selection knob will have no effect (except for when turned to position ●
Stop/Reset).
Fig.2
Reset the Programme Selection knob to a Stop/Reset position (●) before using your
machine for the first time: (see Fig.2)
Before you use your machine for the first time we recommend you carry out the ‘Reset’
operation, just align the pointer to one of the ● symbols and wait at least 5 seconds.
If you have any doubts that the machine has accepted a command different from the one
you require, always perform the reset operation and then reselect.
2. Temperature control knob...
For each programme it is always necessary to select a temperature.
Used to set the required wash programme temperature (refer to the Choosing a Wash
Programme).
It also allows you to reduce the recommended temperature for the selected programme
and even to set a cold wash cycle.
3. Variable Spin...
This is used to exclude the spin cycle or to reduce the spin speed of the
selected programme. Maximum spin speeds for the four types of fabric are:
Fabric
Spin Speed
Cotton
1000rpm
Synthetics
800rpm
Wool
600rpm
Silk
n/a
Note: distribution phase will be carried out at a low speed.
Note: We recommend on
completion of your
programme that you switch
off the appliance by
pressing the ‘ON/OFF’
button and release any
option buttons selected.
As a safety measure, switch
off both the mains
electricity and water supply
to the appliance.
10
Getting to Know Your Appliance
Functions
4. Time Saver...
Pressing this button reduces the length of wash by up to 30%.
This option cannot be used on the Special Programmes or the Wool and Silk
Programmes.
5. Rinse Hold...
This is a useful option which prevents delicate and synthetic items from creasing when you
are unable to remove the washing at the end of the wash cycle. When selected the cycle is
interrupted before the final spin and the laundry is held in the water to avoid creasing.
To complete your selected programme, press button 5 again.
Option available with programmes E-F-J and the programme will come to a stop on
.
WARNINGS
● Do not overload
appliance! It may
damage laundry and
reduce the quality of
the wash.
6. Extra Rinse...
An additional function for those with sensitive skins and/or allergies.
It adds an extra rinse, improving rinsing results.
Option available with programmes A-B-C-D-E-F.
7 On / Off button...
When pressed the appliance is switched on. When it is not the appliance is switched off.
Switching the appliance off does not cancel the selected programme.
8. Mains On-Off Indicator Light...
This light flashes when the appliance is switched on and awaiting a programme to be set.
A steady light means that the appliance has accepted the selected programme.
9. Lid Locked Indicator Light...
The lid locked indicator light shows that the machine lid is locked to prevent it from being
opened accidentally. To avoid any damage to the mechanism you must wait until this light
goes out before attempting to open the lid.
Note: We recommend on
completion of your
programme that you switch
off the appliance by
pressing the ‘ON/OFF’
button and release any
option buttons selected.
As a safety measure, switch
off both the mains
electricity and water supply
to the appliance.
11
Choosing a Wash Programme
IMPORTANT INFORMATION: The temperature of the incoming water supply or selection of wash
options will affect programme times.
Hotpoint recommend the
Persil range of detergent
products
Type of fabric, dirt degree - Always observe the treatment advice of the fabric manufacturer
Temperature
Control
knob ‘B’
Detergent for
pre-wash
Detergent for
main washing
Fabric
Conditioner
Description of washing cycle
A
90˚
✓
✓
✓
Prewash, Main wash 90˚, rinse cycles, intermediate and
final spin cycles
Minutes
Programme
Selection
knob ‘A’
*Duration
COTTONS
Heavily soiled whites
150
130
Heavily soiled whites
B
90˚
✓
✓
Main wash 90˚, rinse cycles, intermediate and final spin
cycles
Heavily soiled whites
C
60˚
✓
✓
Main wash 60˚, rinse cycles, intermediate and final spin
cycles
130
✓
Main wash 40˚, rinse cycles, intermediate and final spin
cycles
115
✓
Rinse cycles, intermediate and final spin cycles
Normally soiled whites
D
40˚
✓
Rinse cycles
Spin cycle
Stop / Reset
Draining and final spin cycle
Interrupts / Cancels the selected programme
●
SYNTHETICS
White Nylon
E
60˚
✓
✓
Main wash 60˚, rinse cycles, anti-crease or delicate spin
cycle
105
Heavily soiled colourfast
synthetics
F
50˚
✓
✓
Main wash 50˚, rinse cycles, anti-crease or delicate spin
cycle
85
✓
Main wash 40˚, rinse cycles, anti-crease or delicate spin
cycle
75
✓
Main wash 30˚, rinse cycles, anti-crease or delicate spin
cycle
30
✓
Rinse cycles, anti-crease or delicate spin cycle
✓
Rinse cycles with automatic introduction of softener,
anti-crease or delicate spin cycle
Acrylics
Quick Wash
G
H
40˚
30˚
✓
✓
Rinse cycles
Fabric softener
Rinse Hold
Rinse hold for silk and especially delicate items.
Spin cycle
Draining and delicate spin cycle
Stop / Reset
●
Interrupts / Cancels the selected programme
DELICATES
Wool
J
40˚
✓
✓
Main wash 40˚, rinse cycles and delicate spin cycle
55
Silk, particularly delicate
garments and fabrics
K
30˚
✓
✓
Main wash 30˚, rinse cycles, anti-crease or draining
45
✓
Rinse cycles, anti-crease or draining
Rinse cycles
Rinse Hold
Rinse hold for silk and especially delicate items.
Spin cycle
Draining and delicate spin cycle (wool)
Draining
N
Draining
Stop / Reset
●
Interrupts / Cancels the selected programme
PROGRAMMED START
Start is delayed by 12 - 9 - 3 - 1 hours
12hr - 9hr - 3hr - 1hr delay
Stop / Reset
IMPORTANT:
To cancel the wash
programme you
have just set, select
one of the ●
symbols
(Stop/Reset) and
wait for at least 5
seconds.
●
Sort the laundry according
to the wash care labels, the
degree of soiling and the
weight (maximum weight see next page)
Close all zips and remove
items from pockets
Loading the machine:
Lift the external lid and
open it completely. Press
the release button on the
front drum flap and grasp
the rear flap that lifts up to
open the drum.
WARNING: Release hold on
flaps slowly and carefully
as they are fitted with
strong springs.
Place the laundry in the
drum loosely for best
results, if possible combine
large and small items. An
overloaded drum will give
unsatisfactory wash results.
Take care that no items fall
outside the drum.
Also ensure, no items are
trapped between the two
flaps.
Interrupts / Cancels the selected programme
QUICK WASH PROGRAMME:
Programme H - a 30 minute wash at 30˚ for delicate synthetics - your machine has programme
designed to wash lightly soiled items in a short amount of time. By setting programme H at a temperature of 30˚, you can wash
different fabrics together (except for woollen and silk items), with a maximum load of 3kg. This programme allows you to save on both
time and and energy as it only lasts approximately 30 minutes. We recommend that you use liquid detergent and pour it into the wash
compartment of the detergent dispenser.
Use programme B with a temperature of 60˚C and without any buttons selected for the IEC 456 test.
12
Washcare Tips
●
Your machine can wash a maximum load of 5kg (cotton).
●
Do not overload the machine (maximum load 5kg).
In addition to reducing the quality of the wash, this may also damage your laundry and the
machine.
●
●
We strongly recommend that you do not wash underwired bras in this machine. Should
the wires become detached it could cause damage to your clothes and the machine. If the
washcare label states that the bra is machine washable, then we advise placing it in a
sealed pillow case or a similar washbag.
Do not use the machine if the item to be washed does not have a wash label.
Before washing laundry we recommend that you do the following:
Watch the
Weight
For best results do not
exceed the weight
limits stated below
(figures stated show
weight when dry).
COTTON
= 5kg
SYNTHETIC
= 2.5kg
●
Pre-treat awkward stains with washable treatments.
Do not wash any items that have previously been treated with solvents.
DELICATES
●
Close zips, fasten belts, tie strings and close press studs to prevent tangling.
= 2kg
●
Empty all objects from pockets as they may damage clothes and the machine.
●
Limit the size of absorbent loads, for example towels to 2.3kg to give good washing and
WOOL
rinsing results.
●
Place small items in a wash bag.
●
Always follow the care label on items when choosing a wash programme.
●
Wash non-colourfast items or really dirty clothes separately as they may affect other items.
= 1kg
TOWELLING
= 2.3kg
Reduce the load with
heavily soiled items.
13
Automatic Safety Features...
Programme Reset
Your machine has an electronic control, which memorises the programme is selected. This will
allow the machine to continue the selected programme from where it was interrupted, for
instance after a power cut.
Lid Open Safety Devices
Once the washing cycle starts, the Lid Locked indicator light will come on and the lid of your
machine is locked. It will stay locked throughout the selected programme.
When the cycle has finished the Mains On/Off indicator light will flash, the lid will still be locked.
Wait for approximately 2 minutes, the Lid Locked indicator light will go out and the lid can be
opened.
Spinning Safety Device
Your appliance has an electronic Auto Balance Control (ABC) which enables the
spin cycle to be run at high speed with well-distributed loads.
Before each spin cycle the ABC system sets the drum to revolve in both clockwise
and anti-clockwsie directions in order to distribute the load evenly and start the
spin cycle off gently.
With some loads the ABC system may detect an unbalanced load, in which case
the spin speed is automatically reduced to see if this resolves the problem - In
this case the load will come out wetter than usual.
If the load is still unable to spin at the reduced speed the ABC system will cancel
the spin cycle - In this case, open the drum, redistribute the clothes and set a
spin cycle programme.
14
The Dispenser
Opening the Machine
● Ensure that the On/Off button is in the ‘OFF’ position.
● Raise the external lid and open completely.
Adding Detergent
● (1) Pre-wash (powder) , (2) Main wash cycle (powder or liquid)
(3) Fabric conditioner and (4) Laundry Bleach
Normal washing powders
Pre-wash
Main wash
140 ml
250 ml
Liquid detergents
180ml
We recommend that you use the graduated beaker provided with most washing products for
measuring out your detergent.
The quantities recommended above refer to normal washing conditions and may be altered
according to the hardness of the water and the level of soiling on the laundry.
● Soft water, or ‘slightly soiled’ laundry or ‘quick wash’ etc. reduce the quantities by 10%
● Very hard water or ‘very soiled’ laundry increase the quantities by 10%
IMPORTANT:
Concentrated detergents: Follow the instructions printed on the packaging.
- When filling the
detergent compartments,
open the lid as far as
Detergents for woollens and delicate fabrics: It is advisable to use the appropriate
detergent for washing of those textiles (do not let it come into direct contact with the drum
as some products attack the metal). Use the quantities recommended on the packaging.
● (3) Fabric conditioner
The conditioner is designed to make your clothes soft and pleasant smelling. Pour into
compartment 3, following the manufacturers instructions. The fabric conditioner is then
automatically added to the load during the last rinse. At the end of the programme there
will be a small amount of water left in the compartment, this is normal and allows for the
dilution of thicker conditioners. Should the amount of water increase you should clean
the dispenser and clear the blockage.
possible.
- Do not exceed the
maximum level,
overdosing the amount of
detergent does not
improve the quality of the
wash and could cause
excessive amount of suds.
● (4) Laundry bleach
Bleach is NOT required when using UK washing detergents.
ONLY USE washing machine laundry bleach in compartment 4. Most UK washing
detergents do not require laundry bleach adding to the wash cycle..
The dispenser can be removed
and cleaned (see Cleaning
section).
15
Cleaning
IMPORTANT
● Disconnect from the
electricity supply
before cleaning as well
as carrying out any
type of maintenance
procedure.
WARNING
● Do not clean any part
of your appliance with
abrasive cleaners,
scouring agents, acids,
chlorine based bleach
or metal polish as they
may cause damage.
Removing and Cleaning the
Detergent Compartment
Cleaning the
Exterior
Note: It is advisable to clean the detergent compartment
regularly. To do this:
1
Open the external lid
completely. Press the
dispenser release button
and slide the dispenser
upwards to remove
the pair of
2 Remove
syphon tubes.
3
Rinse all parts under the
tap, using an old toothbrush (take care to remove
any excess water remaining
inside the compartment)
the syphon
4 Replace
tubes and relocate into
the lid, ensuring it clicks
into place.
Use only soap and water for
cleaning the surfaces.
Use only a cloth moistened with
water when cleaning plastic parts,
(control panels, plinth etc.)
Emptying the Pump Chamber
Your machine comes equipped with a self cleaning pump that does not require any cleaning or
maintenance. Small objects may accidentally fall into the pump: coins, hair clips, loose buttons and
other small items. To avoid possible damage they are held in an accessible chamber situated at the
lower end of the pump.
To access the pump chamber:
Fig. 1
the front
1 Remove
plinth at the bottom of
the washing machine.
Fig. 2
the cover, rotating it
2 Lift
anti-clockwise.
Remove any items in the
chamber.
It is usual for a little water to come out after removing the cover.
When replacing the front plinth, make sure you insert the hooks
in their slots at the bottom right hand side of the machine
before pushing it back into position.
16
Troubleshooting...
Incidents may occasionally occur when you
are using your appliance, if so, check the
following points:
My appliance does not
work Check:
● the mains on/off button has been pressed.
Is the indicator light lit?
● water and power supplies
● the fuse
● that the lid is closed
● a programme has been selected
Machine will not start
● is the mains on/off indicator light flashing?
Time delay is set.
Turn the Programme Selector knob to
a Stop/Reset position (●), wait 5
seconds before reselecting a
programme.
Machine fails to fill
Check:
● water taps are turned on
● have you got low water pressure
● water supply hoses are not trapped or
kinked
● blockage in water valve filters.
● height of drain hose - is it position too low?
It vibrates when spinning
Check:
● all four transit fixing bolts have been
removed.
● machine is level and not standing on the
two ‘front’ castor's.
● location, has enough space been allowed
for the machine?
● in the drum, has there been an unbalanced
load? Redistribute the load and set a spin
cycle programme.
I have selected the wrong
programme
● Turn the Programme Selector knob to a
Stop/Reset position (●), wait 5 seconds
before turning the Programme Selector to
the new wash programme.
There is water on the floor
near the appliance
(VERY IMPORTANT: switch off and unplug the
machine at the power socket)
Check:
● the drain hose hook fitting is properly
located in the drain.
● the washer on the water inlet hose or tap
(check that washers are present and the
hose connectors on the appliance are
tight).
There may also be water on the ground, near
● Risk of freezing:
the appliance if your appliance is producing
If there is a risk of freezing:
too much suds. In this case check:
disconnect the water inlet hose
that you have in fact used WASHING
and empty out any water
MACHINE DETERGENT.
remaining in the drain hose by
that you have not used too much
placing this as low as possible in
detergent.
the sink.
In these two cases, after mopping up the
water, plug in the power again, programme an ● Maintenance of internal parts:
emptying operation if your machine can do
In the interest of hygiene (eg.
this (if not, proceed as indicated in the next
to prevent mould):
section), then carry out several rinses.
- leaving the lid open for a time
Finally restart your programme.
after washing.
- every month or so, clean the
plastic and rubber parts around
the tub access using a slightly
chlorinated product.
Check:
Rinse thoroughly.
● is Rinse Hold selected?
- do a wash cycle at 90˚ at least
● drainage hose is not trapped or kinked.
once a month.
● the pump and clear any blockage.
General
Maintenance...
It does not empty or the
clothes are not properly
spun
● Periodic Checks:
You should check the condition
of the water inlet and the drain
● if the programme is interrupted before the
hoses. If you find any splits,
machine has completed a wash cycle, it
however minor, do not hesitate
might not be possible to open the lid, even
to replace them, call our Genuine
after the lid locked light has gone out:
Parts & Accessories Hotline, see
Select a final spin and allow the
back cover for details.
machine to complete the spin cycle,
when the dial reaches ● and the lid
locked light goes out you should be
able to open the lid.
Lid fails to open at the end
of a programme
Remember you may be
charged for a service
call if a problem with
your appliance is caused
by incorrect installation
or misuse.
17
Hotpoint guarantee
“Satisfaction guaranteed or your money back”
We give you a unique ‘satisfaction guaranteed’ promise - valid for 90 days - after
you have purchased your Hotpoint product. If there is a technical problem simply
call Hotpoint Repair service or visit our web-site at www.theservicecentre.co.uk
and where necessary, we will arrange for an engineer to call. If the technical
problem is not resolved under this guarantee, we will replace your machine or,
if you prefer, give you your money back.
All Hotpoint appliances carry a fully inclusive 12 month parts and labour
guarantee as well as free replacement parts for the first 5 years (except
microwaves, selected integrated appliances and cooker hoods, which have a one
year guarantee) provided that they are fitted by a Hotpoint engineer.
Guarantee terms and conditions
Your guarantee is only applicable in the United Kingdom or Republic of
Ireland and is subject to the following provisions that your appliance:
●
Has been installed and used correctly in accordance with this instruction
booklet.
●
Has been used solely for domestic purposes and is located on domestic
premises (ie. not for commercial or trade use).
●
Has been properly connected to a suitable electrical supply voltage as
stated on the appliance rating plate.
●
Has not been subject to misuse, accident, modified or repaired by anyone
other than one of our own service engineers.
For information on any other Hotpoint product call: 08701 50 60 70
or visit: www.hotpoint.co.uk
Recycling & Disposal Information
As part of Hotpoint’s continued commitment to helping the environment, Hotpoint reserves the right to use
quality recycled components to keep down customer costs and minimise material wastage.
Please dispose of packaging and old appliances carefully. To minimise risk of injury to children, remove the
door, plug and cut mains cable off flush with the appliance. Dispose of these parts separately to ensure that
the appliance can no longer be plugged into a mains socket.
18
After sales service
“No company is better positioned to offer an after sales service on a Hotpoint
appliance than us - the manufacturer”
As part of our commitment to you, all Hotpoint appliances have the added benefit of a fully
inclusive parts and labour guarantee for the first 12 months. In addition to this you also
have the advantage of free replacement parts for the first 5 years when fitted by a
Hotpoint engineer. When the 12 months parts and labour guarantee expires we offer the
following after sales service options:
Repair Service and Information Help Desk
UK: 08709 066066
www.theservicecentre.co.uk
Republic of Ireland: 1850 302 200
Note: Our operators will require the Model number and the Serial number of your machine,
(which can be found by removing the front plinth from the appliance).
Available 364 days a year with a fast, effective and value for money service.
We have the largest white goods repair service in the UK with over 1200 of our own fully
trained engineers. All repairs include a parts and labour guarantee for 12 months from the
date of the repair.
If you require any information or have any questions about your appliance, our operators
are on hand with help and advice.
All this ensures that you will receive the best available after sales service possible.
Extended Warranties
UK: 08709 088 088
www.theservicecentre.co.uk
Republic of Ireland: 1850 502 200
Whether you have just one or a number of Hotpoint appliances in your kitchen, we offer
two service cover plans to give you total peace of mind.
● Repair Protection Plan - FREE service repairs for a single Hotpoint appliance during the
period of cover.
● Kitchen Cover
- FREE service repairs for all your Hotpoint appliances less than
8 years old.
Genuine Parts and Accessories
UK: 08709 077 077
www.theservicecentre.co.uk
Republic of Ireland: (01) 842 6836
A wide range of genuine parts and accessories are available from our hotline or through
our web site.
Genuine parts and accessories, extended warranties and service repairs are all
available on our web-site at:
www.theservicecentre.co.uk
19
Key contacts
After Sales Service
Over 1200 trained specialists, directly employed by us, ensure that you can have complete
confidence in both the appliances and services we offer.
Repair Service and Information Help Desk
UK: 08709 066066
(Open 8 to 8 Mon - Fri, 8 to 6 Sat, 10 to 4 Sun & Bank Holidays)
www.theservicecentre.co.uk
Republic of Ireland: 1850 302 200
Note: Our operators will require the following information:
Model number
Serial number
Extended Warranties
UK: 08709 088 088
(Open 8 to 8 Mon - Sun)
www.theservicecentre.co.uk
Republic of Ireland: 1850 502 200
Genuine Parts and Accessories
UK: 08709 077 077
(Open 8-30 to 5-30 Mon - Fri & 9 to 12 Sat)
www.theservicecentre.co.uk
Republic of Ireland: (01) 842 6836
General Domestic Appliances Limited, Morley Way, Peterborough, PE2 9JB.
December 2002 Part No. FP120 - 01