1
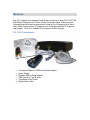
Escient Vision
CH-1 Adapter Kit User’s Guide
Version: 1.0 September 2008
Welcome
CH-1 Kit Components.........................................................................................2
What You Need to Setup the CH-1 Adapter Kit ................................................3
CH-1 at a Glance .................................................................................................4
Component to HDMI Adapter [input side]................................................................. 4
Component to HDMI Adapter [output side] .............................................................. 4
Setup
Connecting the Adapters and Cables ...............................................................5
Step 1: Power down your Vision ............................................................................... 5
Step 2: Connect the Component to HDMI Adapter .................................................. 6
Step 3: Connect the Keyspan USB to Serial Adapter .............................................. 6
Step 4: Configure the Sony Changer’s Back Panel Switches................................. 6
Step 5: Turn on your Vision ....................................................................................... 6
Step 6: Lookup Changer Discs .................................................................................. 6
Audio Configuration
Configure the Sony Changer's Digital Audio Settings ....................................6
Testing the Connection
Component to HDMI Adapter .............................................................................7
Keyspan USB to Serial Adapter.........................................................................7
Trouble Shooting
Business Hours...................................................................................................8
After Hours ..........................................................................................................8
Welcome
The CH-1 adapter kit is designed to allow the connection of Sony DVP-CX777ES
DVD Mega Changers to the Vision VS and VC media clients. Please read the
following instructions before attempting to install a Sony Changer with a Vision
client. Each Escient Vision VS supports up to 4 changers and the VC supports
one changer. One CH-1 Adapter Kit is required for each changer.
CH-1 Kit Components
•
•
•
•
•
•
Component/Digital to HDMI Audio/Video Adapter
Power Supply
Keyspan USB to Serial adapter
USB Type A to Type B cable
Component Video Cable
Digital Audio Cable
What You Need to Setup the CH-1 Adapter Kit
•
•
•
•
Vision Series VS or VC client
A Sony DVP-CX777ES Changer
Null modem female to female serial cable
HDMI cable of the appropriate length (not included)
Important:
Each Vision VS or VC client supports only one CH1- Adapter kit. If you are
installing more than one changer you will need to purchase an optional Keyspan
4 Port USB Serial Adapter and install it in place of the single Keyspan USB to
Serial adapter that is included in the CH-1 Kit. The 4 port unit retails for about
$150.00 US.
If you plan on using one or mote external changers and controlling Vision via RS232 you will also need to purchase the Keyspan 4 port USB adapter. It is always
preferable to use TCP/IP for eternal control if your control system supports it.
Keyspan USA49WG
For more information on the Keyspan USB 4 Port Serial Adapter, please visit the
Keyspan web site.
http://www.keyspan.com/products/usa49wg/
CH-1 at a Glance
Component to HDMI Adapter [input side]
•
•
•
•
Component video connectors (Pr Pb Y)
Input status LED
Optical Digital Audio Input
Coax Digital Audio Input
Component to HDMI Adapter [output side]
•
•
•
•
Output Status LED
HDMI Output
5 volt DC Power Input
Test Switch (only present on some older models – not used)
Setup
Use the information in this chapter to set up and configure the CH-1 adapter kit
for use with your Vision system.
To get started you need to:
1. Properly configure your Vision VS or VC clients on your Ethernet network.
2. Properly configure your Sony changer
Important:
Read all of the following installation instructions carefully and completely before
you begin the installation.
Connecting the Adapters and Cables
Step 1: Power down your Vision
Press and hold the power button on the front panel for 5 seconds and then
release. Wait for the Vision to completely power off at which time the power LED
will go out. This may take a few seconds to complete.
Step 2: Connect the Component to HDMI Adapter
1. Connect the included component video cable and digital audio cable
between the Sony changer’s outputs and the inputs on the video adapter.
2. Connect your HDMI cable between the video adapter HDMI output and
the first HDMI input on the Vision.
3. Insert the DC side of the power supply into the video adapter.
4. Insert the AC side of the power supply into the wall outlet.
Step 3: Connect the Keyspan USB to Serial Adapter
1. Connect the included USB cable between the top USB port on the rear of
the Vision and the Keyspan Serial adapter.
2. Connect a null modem (female to female) RS-232 cable (not included) to
the DB-9 male connector side on the Keyspan Serial adapter.
Step 4: Configure the Sony Changer’s Back Panel Switches
1. Make sure the COMMAND MODE switch is set to 1.
2. Make sure the COMPONENT VIDEO OUT switch is set to
PROGRESSIVE.
Step 5: Turn on your Vision
Press and release the power button on the front panel of the Vision and wait for it
too boot up. The boot process is complete when the power LED changes to
blue.
Step 6: Lookup Changer Discs
After Vision is fully running, you can start the disc lookup process. To initiate the
initial lookup of all of the DVDs in the changer you must open and close the
changer door using the Sony’s front panel OPEN/CLOSE button. Vision will then
begin to identify all of the changer discs. This may take up to an hour and a half
for a full changer.
Audio Configuration
Configure the Sony Changer’s Digital Audio Settings
The Sony DVP-CX777ES changer’s digital audio output must be set to output
Digital 5.1 and not PCM. Use the Sony remote and on screen menus to change
the digital audio output setting.
Follow these steps using the SONY CHANGER REMOTE to set the correct
audio settings on the changer:
1. While a movie is playing form the changer press STOP.
2. Press the DISPLAY key to show the changer’s on screen menu system.
3. Arrow down to the bottom icon in the list, a red toolbox.
4. Press ENTER to display the Quick Setup Menu.
5. Highlight “QUICK” and press ENTER. This will start the Sony DVD
Player’s Quick Setup feature.
6. Follow the instructions on-screen.
7. When you get to the 4th screen, select DIGITAL & 5.1CH OUTPUT” then
press ENTER.
8. On the next screen select “DOLBY DIGITAL” then press ENTER.
9. On the next screen select “DTS” then press ENTER.
10. Follow the remaining instructions on-screen.
11. When you complete Quick Setup, you will see the list of icons again.
Press DISPLAY 2 times to clear the screen.
Testing the Connections
You can verify the LED states on each of the adapters to make sure everything is
properly connected.
Component to HDMI Adapter
The LEDs on both sides of the adapter should be blue when playing a movie
from the changer.
If the analog (component video) side is off, the component video and digital audio
connections are not properly connected to the Sony changer or the changer is
not powered on.
If the HDMI side is off while you are playing a changer based disc, the HDMI
cable is not properly connected to the Vision or the adapter. Check the cable.
If the HDMI side is red, move the small switch on the digital side to the opposite
position using a paperclip. It should now be blue.
Keyspan USB to Serial Adapter
The LED on the USB adapter will be lit when it is connected an active. If it is not
lit, make sure that the USB cable is properly connected.
The LED will flash occasionally when there is communication with the changer.
Trouble Shooting
Make sure you have all of the appropriate connections made and that you have
connected AC power to the adapter, changers, and Vision.
If you experience any problems connecting a Sony DVP-CX777ES changer to
Vision, please contact your rep or Escient tech support. Please have your model
and serial number ready.
Business Hours
Phone: 800.372.4368
Select #3 for a support representative
8am-6pm (GMT-05:00) Eastern Time
email: [email protected]
After Hours
Phone: 800.372.4368
Follow prompts for instructions
6pm-9am (GMT-05:00) Eastern Time
email: [email protected]