1
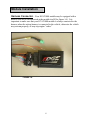
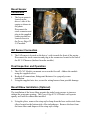
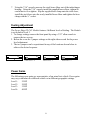
Caterpillar 3126 B & E models
Edge EZ Module
Installation Instructions & Manual
OLD P/N: ECAT1000
NEW P/N: 50200
Table of Contents
DISCLAIMER OF LIABILITY___________________________________________________ 3
LIMITATION OF WARRANTY __________________________________________________ 3
Installation Instructions_________________________________________________________ 5
Supplied Items: ____________________________________________________________________ 5
Items required: ____________________________________________________________________ 5
Module Installation ____________________________________________________________ 6
Harness Connector _________________________________________________________________ 6
Boost Sensor Connection ____________________________________________________________ 7
IAP Sensor Connection ______________________________________________________________ 7
Final Inspection and Operation _______________________________________________________ 7
Boost Elbow Installation (Optional) ___________________________________________________ 7
Fueling Adjustment_________________________________________________________________ 8
Power Gains _______________________________________________________________________ 8
Technical Support: _________________________________________________________________ 9
©2007, Edge Products
All rights reserved.
Edge Products Incorporated
1080 South Depot Dr.
Ogden, UT. 84404
888-360-3343
www.edgeproducts.com
Manual Version 3
2
THIS IS A HIGH PERFORMANCE PRODUCT. USE AT YOUR OWN RISK.
Do not use this product until you have carefully read the following agreement.
This sets forth the terms and conditions for the use of this product. The installation of this product indicates
that the BUYER has read and understands this agreement and accepts its terms and conditions
DISCLAIMER OF LIABILITY
Edge Products Inc. and its successors, distributors, jobbers, and dealers (hereafter SELLER) shall in no way be responsible for the
product's proper use and service. THE BUYER HEREBY WAIVES ALL LIABILITY CLAIMS.
The BUYER acknowledges that he/she is not relying on the SELLER’s skill or judgment to select or furnish goods suitable for any
particular purpose and that there are no liabilities which extend beyond the description on the face hereof and the BUYER hereby
waives all remedies or liabilities, expressed or implied, arising by law or otherwise, (including without any obligations of the SELLER
with respect to fitness, merchantability and consequential damages) or whether or not occasioned by the SELLER's negligence.
The SELLER disclaims any warranty and expressly disclaims any liability for personal injury or damages. The BUYER
acknowledges and agrees that the disclaimer of any liability for personal injury is a material term for this agreement and the BUYER
agrees to indemnify the SELLER and to hold the SELLER harmless from any claim related to the item of the equipment purchased.
Under no circumstances will the SELLER be liable for any damages or expenses by reason of use or sale of any such equipment.
The SELLER assumes no liability regarding the improper installation or misapplication of its products.
It is the installer's responsibility to check for proper installation and if in doubt, contact the manufacturer.
LIMITATION OF WARRANTY
Edge Products Inc. (hereafter "SELLER") gives Limited Warranty as to description, quality, merchantability, fitness for any product’s
purpose, productiveness, or any other matter of SELLER's product sold herewith. The SELLER shall be in no way responsible for
the product’s open use and service and the BUYER hereby waives all rights other than those expressly written herein. This
Warranty shall not be extended or varied except by a written instrument signed by SELLER and BUYER.
The Warranty is Limited to one (1) year from the date of sale and limited solely to the parts contained within the product's kit. All
products that are in question of Warranty must be returned shipping prepaid to the SELLER and must be accompanied by a dated
proof of purchase receipt. All Warranty claims are subject to approval by Edge Products Inc.
If the BUYER sends back a failed unit that is out of warranty and chooses to buy a refurbished unit, the refurbished unit will only
carry a 60 day warranty. If the BUYER purchases a new unit at a predetermined discounted rate, it will have the standard 1
year warranty.
Under no circumstances shall the SELLER be liable for any labor charged or travel time incurred in diagnosis for defects, removal,
or reinstallation of this product, or any other contingent expenses.
Under no circumstances will the SELLER be liable for any damage or expenses insured by reason of the use or sale of any such
equipment.
IN THE EVENT THAT THE BUYER DOES NOT AGREE WITH THIS AGREEMENT: THE BUYER MAY PROMPTLY
RETURN THIS PRODUCT, IN A NEW AND UNUSED CONDITION, WITH A DATED PROOF OF PURCHASE, TO
THE PLACE OF PURCHASE WITHIN SIXTY (60) DAYS FROM DATE OF PURCHASE FOR A FULL REFUND.
THE INSTALLATION OF THIS PRODUCT INDICATES THAT THE BUYER HAS READ AND UNDERSTANDS THIS
AGREEMENT AND ACCEPTS ITS TERMS AND CONDITIONS.
It is strongly recommended that EGT gauges and boost gauges be installed with
the use of this product.
3
THIS PRODUCT AND THE BOOST ELBOW (if installed) MUST BE REMOVED WHEN
TAKING VEHICLE TO VEHICLE DEALERSHIP OR OTHER SERVICE FACILITY!!
LEAVING PRODUCT INSTALLED MAY AFFECT DEALER DIAGNOSTIC ANALYSIS AND
SCAN TOOL FUNCTIONS!!
This warranty is void for any new products purchased through auction
websites. Warranty is valid only for new products purchased through
Authorized Dealers (proof of purchase required for all warranty claims).
All Edge modules and programmers are built to operate with OEM calibrations. When you
take your vehicle to a service center they may, by your request or otherwise, update your
vehicles calibrations. Therefore it is important that you return your vehicle to stock
before taking it in for service. Edge updates its active products (i.e. those currently being
manufactured) to work effectively with updated OEM calibrations. However, this process
can take some time as Edge is not always made aware of calibration changes made by the
OEM. In the case of discontinued products, Edge cannot ensure that your unit will work
effectively if you take your vehicle to a dealership and you are given, by your request or
otherwise, a new calibration.
4
Installation Instructions
Please read these instructions through completely and thoroughly
understand each step prior to installation.
IMPORTANT: Read all Disclaimer, Warranty, and Installation Instructions
before installing product
Supplied Items:
1.
2.
3.
4.
5.
Power Edge EZ CAT Module
Three Wire Ties
Two Velcro Strips
One hose clamp
One Brass Elbow
Items required: (for optional boost elbow installation)
1.
2.
3.
4.
Pliers
7/16” Wrench
3/8” Drive Ratchet
¼” Socket
5
Module Installation
Harness Connector – Your ECAT1000 module may be equipped with a
harness that can be disconnected at the module itself (See figure 1A). It is
important to make sure that your ECAT1000 module is always connected to the
harness when the wiring harness is connected to the vehicle, otherwise the vehicle
may not run properly, or may trip engine “codes.”
FIGURE 1A
6
Boost Sensor
Connection
1.
Boost Sensor
The boost sensor is
located on the
driver’s side of the
engine as shown in
the photo.
Disconnect the
stock connector and
plug in the supplied
connectors that are
located closest to
the Power Edge EZ
CAT module.
IAP Sensor Connectors
IAP Sensor Connection
2.
The IAP sensor is located on the driver’s side towards the front of the engine.
Disconnect the stock connector and plug in the connectors located at the end of
the EZ CAT harness (furthest from the module).
Final Inspection and Operation
3.
4.
5.
The EZ CAT Module can mount on or near the firewall. Adhere the module
using the supplied velcro.
Recheck all connections, fittings and fasteners for a properly secure
installation.
Using the supplied wire ties, secure the wiring harness from possible damage.
Boost Elbow Installation (Optional)
The installation of the brass elbow permits the turbo boost pressure to increase
without the wastegate opening. The Power Edge EZ CAT Module will operate
equally well with or without this installed.
6.
Using the pliers, remove the crimp style clamp from the hose on the stock brass
elbow located on the bottom side of the turbocharger. Remove the hose from
the brass elbow and dispose of the crimp style clamp.
7
7.
Using the 7/16” wrench, unscrew the stock brass elbow out of the turbocharger
housing. Using the 7/16” wrench, install the supplied brass elbow, tighten-be
careful not to over-tighten. Slip the supplied hose clamp onto the stock hose,
install the stock hose onto the newly installed brass elbow and tighten the hose
clamp with the ¼” socket.
Fueling Adjustment
The Power Edge EZ CAT Module features 4 different levels of fueling. The Module
is set default to level 2.
1. To change settings remove the front panel by using a 3/32” allen wrench to
remove the two screws.
2. Below the cover the 3 jumper settings on the right side are used for the power
level adjustment.
3. The two jumpers can be repositioned in any of the locations shown below to
achieve the desired response.
Power Level 1
EZ PC Board
Jumpers
Jumpers
Jumpers
Power Level 2
EZ PC Board
Power Level 3
EZ PC Board
Jumpers
Power Level 4
EZ PC Board
Power Gains
The following power gains are representative of an actual test vehicle. Power gains
may vary somewhat on a different vehicle or in different geographic settings.
Level 1:
Level 2:
Level 3:
Level 4:
25 HP
30 HP
35 HP
40 HP
8
Technical Support:
888-360-3343
To expedite your support call, please have part number (i.e.,
EAF2100A), version number, and Date of Manufacture ready prior to
calling support.
9