1
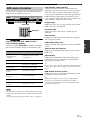
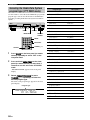
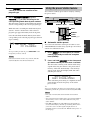
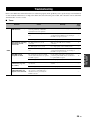
B
TX-761DAB
DAB/FM/AM Stereo Tuner
OWNER’S MANUAL
CAUTION: READ THIS BEFORE OPERATING YOUR UNIT.
Caution: Read this before operating your unit.
1 To assure the finest performance, please read this manual
carefully. Keep it in a safe place for future reference.
2
Install this sound system in a well ventilated, cool, dry, clean
place – away from direct sunlight, heat sources, vibration,
dust, moisture, and/or cold. Allow ventilation space of at
least 10 cm on the top, and 10 cm on the back of this unit.
3 Locate this unit away from other electrical appliances, motors,
or transformers to avoid humming sounds.
4 Do not expose this unit to sudden temperature changes from
cold to hot, and do not locate this unit in a environment with
high humidity (i.e. a room with a humidifier) to prevent
condensation inside this unit, which may cause an electrical
shock, fire, damage to this unit, and/or personal injury.
5 Avoid installing this unit where foreign object may fall onto
this unit and/or this unit may be exposed to liquid dripping or
splashing. On the top of this unit, do not place:
– Other components, as they may cause damage and/or
discoloration on the surface of this unit.
– Burning objects (i.e. candles), as they may cause fire,
damage to this unit, and/or personal injury.
– Containers with liquid in them, as they may fall and liquid
may cause electrical shock to the user and/or damage to
this unit.
6 Do not cover this unit with a newspaper, tablecloth, curtain,
etc. in order not to obstruct heat radiation. If the temperature
inside this unit rises, it may cause fire, damage to this unit,
and/or personal injury.
7 Do not plug in this unit to a wall outlet until all connections
are complete.
8 Do not operate this unit upside-down. It may overheat,
possibly causing damage.
9 Do not use force on switches, knobs and/or cords.
10 When disconnecting the power cable from the wall outlet,
grasp the plug; do not pull the cord.
11 Do not clean this unit with chemical solvents; this might
damage the finish. Use a clean, dry cloth.
12 Only voltage specified on this unit must be used. Using this
unit with a higher voltage than specified is dangerous and may
cause fire, damage to this unit, and/or personal injury. Yamaha
will not be held responsible for any damage resulting from use
of this unit with a voltage other than specified.
13 To prevent damage by lightning, keep the power cord and
outdoor antennas disconnected from a wall outlet or the unit
during a lightning storm.
14 Do not attempt to modify or fix this unit. Contact qualified
Yamaha service personnel when any service is needed. The
cabinet should never be opened for any reasons.
15 When not planning to use this unit for long periods of time
(i.e. vacation), disconnect the AC power plug from the wall
outlet.
16 Install this unit near the AC outlet and where the AC power
plug can be reached easily.
17 Be sure to read the “Troubleshooting” section on common
operating errors before concluding that this unit is faulty.
18 Before moving this unit, press STANDBY/ON to set this unit
in the standby mode, and disconnect the AC power plug from
the wall outlet.
19 The batteries shall not be exposed to excessive heat such as
sunshine, fire or like.
En
WARNING
TO REDUCE THE RISK OF FIRE OR ELECTRIC
SHOCK, DO NOT EXPOSE THIS UNIT TO RAIN
OR MOISTURE.
This unit is not disconnected from the AC power
source as long as it is connected to the wall outlet, even
if this unit itself is turned off by STANDBY/ON. This
state is called the standby mode.
■ For U.K. customers
If the socket outlets in the home are not suitable for the
plug supplied with this appliance, it should be cut off and
an appropriate 3 pin plug fitted. For details, refer to the
instructions described below.
Note
The plug severed from the mains lead must be destroyed, as a
plug with bared flexible cord is hazardous if engaged in a live
socket outlet.
■ Special Instructions for U.K. Model
IMPORTANT
THE WIRES IN MAINS LEAD ARE COLOURED IN
ACCORDANCE WITH THE FOLLOWING CODE:
Blue: NEUTRAL
Brown: LIVE
As the colours of the wires in the mains lead of this apparatus
may not correspond with the coloured markings identifying
the terminals in your plug, proceed as follows:
The wire which is coloured BLUE must be connected to the
terminal which is marked with the letter N or coloured
BLACK. The wire which is coloured BROWN must be
connected to the terminal which is marked with the letter L or
coloured RED.
Making sure that neither core is connected to the earth
terminal of the three pin plug.
This symbol mark is according to the
EU directive 2002/96/EC.
This symbol mark means that electrical
and electronic equipment, at their endof-life, should be disposed of separately
from your household waste.
Please act according to your local rules
and do not dispose of your old products
with your normal household waste.
Contents
Features ................................................................... 2
Getting started ........................................................ 3
Controls and functions ........................................... 4
DAB (Digital Audio Broadcasting) tuning..........10
Preparing the DAB tuning ....................................... 11
DAB tuning.............................................................. 12
Using the DAB functions ........................................ 13
Preset DAB services ................................................ 15
DAB service information......................................... 17
DAB frequency information .................................... 18
FM/AM tuning.......................................................19
PREPARATION
Connections ............................................................. 7
Connecting this unit to an amplifier .......................... 7
Connecting the FM and AM antennas ....................... 8
Connecting the DAB antenna .................................... 8
Connecting the power cable....................................... 9
Turning on and off the power .................................... 9
Automatic and manual tuning.................................. 19
Selecting the Radio Data System program type
(PTY SEEK mode) .............................................. 20
Using the preset station feature................................ 21
Tuning into the preset stations................................. 23
Displaying the Radio Data System information ...... 23
PREPARATION
Front panel ................................................................. 4
Remote control........................................................... 5
Rear panel .................................................................. 6
Front panel display .................................................... 6
TUNING
INTRODUCTION
INTRODUCTION
ADDITIONAL INFORMATION
TUNING
Troubleshooting.....................................................25
Operating with
Yamaha AV amplifier remote controls ...........28
Specifications .........................................................29
ADDITIONAL
INFORMATION
1 En
Features
Features
DAB (Digital Audio Broadcasting) tuner
Sophisticated FM/AM tuner
◆ DAB (Digital Audio Broadcasting) tuning capability
◆ DLS (Dynamic Label Segment) information display
◆ Automatic scanning function to locate all DAB services in your
area
◆ Tuning aid function to optimize DAB reception
◆ 99 DAB service preset tuning
◆ Coaxial and optical digital audio output capability for DAB
audio signals
◆
◆
◆
◆
◆
30-station (each band) FM/AM preset tuning
Automatic preset tuning
Radio Data System tuning capability
Radio Data System text information display capability
Radio Data System program type seek tuning capability
General
◆ 2-line information message display
This receiver supports DAB tuning.
About this manual
• y indicates a tip for your operation.
• Some operations can be performed by using either the buttons on the front panel or the ones on the remote control. In case the
button names differ between the front panel and the remote control, the button name on the remote control is given in
parentheses.
• This manual is printed prior to production. Design and specifications are subject to change in part as a result of improvements,
etc. In case of differences between the manual and product, the product has priority.
Limited Guarantee for European Economic Area (EEA) and Switzerland
Thank you for having chosen a Yamaha product. In the unlikely event that your Yamaha product needs guarantee service, please contact the dealer from
whom it was purchased. If you experience any difficulty, please contact Yamaha representative office in your country. You can find full details on our
website (http://www.yamaha-hifi.com/ or http://www.yamaha-uk.com/ for U.K. resident).
The product is guaranteed to be free from defects in workmanship or materials for a period of two years from the date of the original purchase. Yamaha
undertakes, subject to the conditions listed below, to have the faulty product or any part(s) repaired, or replaced at Yamaha’s discretion, without any
charge for parts or labour. Yamaha reserves the right to replace a product with that of a similar kind and/or value and condition, where a model has been
discontinued or is considered uneconomic to repair.
Conditions
1. The original invoice or sales receipt (showing date of purchase, product code and dealer’s name) MUST accompany the defective product, along
with a statement detailing the fault. In the absence of this clear proof of purchase, Yamaha reserves the right to refuse to provide free of charge
service and the product may be returned at the customer’s expense.
2. The product MUST have been purchased from an AUTHORISED Yamaha dealer within the European Economic Area (EEA) or Switzerland.
3. The product must not have been the subject of any modifications or alterations, unless authorised in writing by Yamaha.
4. The following are excluded from this guarantee:
a. Periodic maintenance and repair or replacement of parts due to normal wear and tear.
b. Damage resulting from:
(1) Repairs performed by the customer himself or by an unauthorised third party.
(2) Inadequate packaging or mishandling, when the product is in transit from the customer. Please note that it is the customer’s responsibility to
ensure the product is adequately packaged when returning the product for repair.
(3) Misuse, including but not limited to (a) failure to use the product for its normal purpose or in accordance with Yamaha’s instructions on the
proper use, maintenance and storage, and (b) installation or use of the product in a manner inconsistent with the technical or safety standards
in force in the country where it is used.
(4) Accidents, lightning, water, fire, improper ventilation, battery leakage or any cause beyond Yamaha’s control.
(5) Defects of the system into which this product is incorporated and/or incompatibility with third party products.
(6) Use of a product imported into the EEA and/or Switzerland, not by Yamaha, where that product does not conform to the technical or safety
standards of the country of use and/or to the standard specification of a product sold by Yamaha in the EEA and/or Switzerland.
(7) Non AV (Audio Visual) related products.
(Products subject to “Yamaha AV Guarantee Statement” are defined in our website at http://www.yamaha-hifi.com/ or
http://www.yamaha-uk.com/ for U.K. resident.)
5. Where the guarantee differs between the country of purchase and the country of use of the product, the guarantee of the country of use shall apply.
6. Yamaha may not be held responsible for any losses or damages, whether direct, consequential or otherwise, save for the repair or replacement of the
product.
7. Please backup any custom settings or data, as Yamaha may not be held responsible for any alteration or loss to such settings or data.
8. This guarantee does not affect the consumer’s statutory rights under applicable national laws in force or the consumer’s rights against the dealer
arising from their sales/purchase contract.
2 En
Getting started
Getting started
INTRODUCTION
■ Checking the supplied accessories
Check that you received all of the following parts.
Remote control
AM loop antenna
Audio pin cable
Digital audio pin
cable
POWER
DAB/FM/AM
1
2
3
4
5
6
7
8
9
BAND
INFO/TEXT
AUTO SCAN
MEMORY
0
ENTER
CLEAR
FUNCTION
FM MODE
TUNING
SELECT
TUNING MODE
Power cable
Indoor DAB antenna
Indoor FM antenna
Batteries (2)
(AAA, R03, UM-4)
■ Installing batteries in the remote control
2
3
1
■ Using the remote control
The remote control transmits a directional infrared ray.
Be sure to aim the remote control directly at the remote
control sensor on this unit during operation.
PRESET/TUNING
DIMMER
AUTO SCAN
MEMORY
BAND
INFO/TEXT
FUNCTION
SELECT
FM MODE
TUNING MODE
STANDBY
/ON
DAB/FM/AM
1
Press the
part and slide the battery
compartment cover.
2
Insert the two supplied batteries
(AAA, R03, UM-4) according to the polarity
markings (+ and –) on the inside of the
battery compartment.
3
Slide the battery compartment cover back
until it snaps into place.
Approximately 6 m
30º
30º
Notes
Notes
• Change all of the batteries if you notice the operation range of
the remote control decreases.
• Do not use an old battery and a new one together.
• Do not use different types of batteries (such as alkaline and
manganese batteries) together. Read the packaging carefully as
these different types of batteries may have the same shape and
color.
• If the batteries have leaked, dispose of them immediately. Avoid
touching the leaked material or letting it come into contact with
clothing, etc. Clean the battery compartment thoroughly before
installing new batteries.
• Do not throw away batteries with general house waste; dispose
of them correctly in accordance with your local regulations.
• Do not spill water or other liquids on the remote control.
• Do not drop the remote control.
• Do not leave or store the remote control in the following types
of conditions:
– places of high humidity, such as near a bath
– places of high temperature, such as near a heater or stove
– places of extremely low temperatures
– dusty places
3 En
Controls and functions
Controls and functions
Front panel
1
2
3
PRESET/TUNING
DIMMER
AUTO SCAN
MEMORY
BAND
INFO/TEXT
FUNCTION
SELECT
FM MODE
TUNING MODE
STANDBY
/ON
DAB/FM/AM
4
5
6
1 STANDBY/ON
Turns on this unit. Press this button again to set this unit to
the standby mode (see page 9).
Note
In the standby mode, this unit consumes a small amount of power
in order to receive infrared signals from the remote control.
2 Front panel display
Displays information of the currently tuned DAB, FM, or
AM radio station or the operational status (see page 6).
3 PRESET/TUNING
• Selects the preset DAB, FM, or AM stations or services
when this unit is in the preset tuning mode.
• Selects the DAB, FM, or AM stations or services when
this unit is not in the preset tuning mode.
4 DIMMER
Sets the brightness of the front panel display (see page 6).
y
Press and hold DIMMER for 3 seconds to display the firmware
version of this unit. This information is factory use only.
5 AUTO SCAN
Starts the automatic scanning function when this unit is in
the DAB tuning mode (see page 12).
6 MEMORY
Sets this unit to the preset station memory mode when this
unit is in the DAB tuning mode (see page 15) or FM/AM
tuning mode (see pages 21 and 22).
7 BAND
Selects the reception band (DAB, FM, or AM).
4 En
7
8
9
0
8 INFO/TEXT
Turns on and changes the Radio Data System (see
page 23) or DAB service information (see page 17) in the
front panel display.
9 FUNCTION/FM MODE
• Activates the DAB function setting mode when this
unit is in the DAB tuning mode (see page 13).
• Switches the FM radio wave reception mode (stereo or
monaural) when this unit is in the FM tuning mode (see
page 19).
y
Press and hold FUNCTION/FM MODE for 5 seconds to set this
unit to the initial factory settings (see page 27).
0 SELECT/TUNING MODE
Selects the tuning mode (automatic, manual, or preset
tuning) when this unit is in the FM/AM tuning mode.
Controls and functions
Remote control
4 SELECT/TUNING MODE
Selects the tuning mode (automatic, manual, or preset
tuning) when this unit is in the FM/AM tuning mode.
1
POWER
5
5 POWER
Turns on this unit. Press this button again to set this unit to
the standby mode (see page 9).
Note
DAB/FM/AM
1
2
3
4
5
6
7
8
9
0
ENTER
CLEAR
BAND
INFO/TEXT
2
AUTO SCAN
MEMORY
3
FUNCTION
FM MODE
TUNING
4
SELECT
6
7
8
9
0
A
TUNING MODE
In the standby mode, this unit consumes a small amount of power
in order to receive infrared signals from the remote control.
6 BAND
Selects the reception band (DAB, FM, or AM).
7 INFO/TEXT
Turns on and changes the Radio Data System or DAB
service information in the front panel display.
8 AUTO SCAN
Starts the automatic scanning function when this unit is in
the DAB tuning mode (see page 11).
9 MEMORY
Sets this unit to the preset station memory mode when this
unit is in the DAB tuning mode (see page 15) or FM/AM
tuning mode (see pages 21 and 22).
0 CLEAR
Deletes the preset memory of the currently selected preset
station number (see pages 16 and 22).
1 Infrared transmitter
Outputs infrared controls signals. Aim this transmitter at
the component you want to operate.
A TUNING k / n
• Selects the preset DAB, FM, or AM stations or services
when this unit is in the preset tuning mode.
• Selects the DAB, FM, or AM stations or services when
this unit is not in the preset tuning mode.
2 Numeric buttons, ENTER
Selects the desired preset DAB services (see page 15) or
FM/AM stations (see page 23).
3 FUNCTION/FM MODE
• Activates the DAB function setup mode when this unit
is in the DAB tuning mode (see page 13).
• Switches the FM radio wave reception mode (stereo or
monaural) when this unit is in the FM tuning mode (see
page 19).
5 En
INTRODUCTION
Operating with Yamaha AV amplifier remote controls
You can also operate this unit by using the remote control supplied with your Yamaha AV amplifier (such as
DSP-AX861SE). See page 28 for details.
Controls and functions
Rear panel
ANTENNA
FM
GND
OUTPUT
AM
ANALOG
L
ANTENNA
AC IN
DIGITAL (DAB)
OPTICAL
COAXIAL
DAB
R
1
2
3
1 FM/AM ANTENNA terminals
See page 8 for connection information.
3 DAB ANTENNA terminal
See page 8 for connection information.
2 OUTPUT jacks
See page 7 for connection information.
4 AC IN
See page 9 for connection information.
4
Front panel display
1
2
3
1 TUNED indicator
Lights up when this unit is tuned into a station.
2 STEREO indicator
Lights up when this unit is in the stereo playback.
3 Multi-information display
Shows tuning status messages and DAB or Radio Data
System information.
■ Adjusting the brightness of the front
panel display
Press DIMMER on the front panel repeatedly to change
the brightness of the front panel display.
6 En
4
4 SECONDARY indicator
• Lights up when this unit is in the DAB tuning mode
and receiving a secondary service.
• Flashes for 5 seconds when this unit is tuned into the
DAB service which has a secondary service.
Connections
Connections
Connecting this unit to an amplifier
Make sure that this unit and other components are unplugged from the AC wall outlets.
Connect the supplied audio pin cable to the ANALOG OUTPUT jacks of this unit and the analog audio input jacks of
your amplifier as follows.
■ DIGITAL (DAB) OUTPUT jacks
This unit is equipped with the DIGITAL (DAB) OUTPUT jacks (OPTICAL and COAXIAL). These jacks output the
digital audio signals (PCM signals) when this unit is in the DAB tuning mode. Connect the supplied digital audio pin
cable to the DIGITAL (DAB) COAXIAL OUTPUT jack of this unit and the digital coaxial input jack of your amplifier.
You can also use a digital optical audio cable (commercially available) to connect the DIGITAL (DAB) OPTICAL
OUTPUT jack of this unit and the digital OPTICAL input jack of your amplifier.
Note
DAB audio signals are also output at the ANALOG OUTPUT jack of this unit in an analog format. FM or AM audio signals are not
output at the DIGITAL (DAB) OUTPUT jacks.
y
If you want to connect this unit to a Yamaha AV amplifier (such as DSP-AX861SE) via digital audio connection (coaxial or optical), use
the input/output assignment feature of the AV amplifier to assign a coaxial or optical digital audio input jack of your AV amplifier to
“TUNER”. Refer to the owner's manual of your AV amplifier for details.
ANTENNA
FM
GND
OUTPUT
AM
ANALOG
DIGITAL (DAB)
L
OPTICAL
COAXIAL
75 Ω UNBAL.
R
R
L
O
Audio pin cable
(Supplied)
C
Digital audio pin cable
(Supplied)
Optical
cable
R
O
L
C
R
L
AUDIO
OPTICAL
COAXIAL
DIGITAL
INPUT
DIGITAL
INPUT
indicates recommended
connections
indicates alternative connections
Amplifier
7 En
PREPARATION
■ ANALOG OUTPUT jacks
Connections
Connecting the DAB antenna
Connect the supplied indoor DAB antenna to the DAB
antenna terminal on the rear panel and attach the indoor
DAB antenna vertically on the wall.
Indoor DAB antenna
(supplied)
Indoor FM
antenna
(supplied)
AM loop
antenna
(supplied)
ANTENNA
FM
GND
AM
Outdoor AM antenna
ANTENNA
Use a 5 to 10 m of vinylcovered wire extended
outdoors from a window.
AC IN
DAB
Ground
y
It is recommended that you use the tuning aid function (see
page 14) when you set up the indoor DAB antenna in order to
maximize DAB reception capability. After the automatic
scanning operation (see page 11), use “Signal Q” display to check
the signal quality of the currently received DAB service (see
page 18).
For maximum safety and minimum
interference, connect the antenna GND
terminal to a good earth ground. A good earth
ground is a metal stake driven into moist earth.
■ Assembling the supplied AM loop
antenna
Notes
• Be sure to check the DAB coverage in your area in that not all
areas are currently being covered. For a list of nationwide DAB
statuses and worldwide DAB frequencies, check WorldDAB
online at “http://www.worlddab.org/”.
• If the DAB signal is weak, use a commercially available
outdoor DAB antenna for better reception.
Connecting the FM and AM
antennas
Both FM and AM indoor antennas are supplied with this
unit. In general, these antennas should provide sufficient
signal strength. Connect each antenna correctly to the
designated terminals.
Notes
• The AM loop antenna should be placed away from this unit.
• A properly installed outdoor antenna provides clearer reception
than an indoor one. If you experience poor reception quality,
install an outdoor antenna. Consult the nearest authorized
Yamaha dealer or service center about outdoor antennas.
• The AM loop antenna should always be connected, even if an
outdoor AM antenna is connected to this unit.
• The wire of the AM loop antenna does not have any polarity.
8 En
■ Connecting the wire of the AM loop
antenna
Press and hold
Insert
Release
Connections
Connecting the power cable
Plug the supplied AC power cable into AC IN after all
other connections are complete, then plug the AC power
cable into an AC wall outlet.
Turning on and off the power
■ Turning on this unit
Press STANDBY/ON (or POWER) to turn on
this unit.
PRESET/TUNING
AC IN
DIMMER
AUTO SCAN
MEMORY
BAND
INFO/TEXT
FUNCTION
SELECT
FM MODE
TUNING MODE
STANDBY
/ON
DAB/FM/AM
PREPARATION
STANDBY/ON
POWER
POWER
To the AC wall outlet
■ Set this unit to the standby mode
Memory back-up
The memory back-up circuit prevents the stored data
from being lost even if this unit is in the standby mode.
However, the stored data will be lost in case the power
cable is disconnected from the AC wall outlet or if the
power supply is cut off for more than one week.
Press STANDBY/ON (or POWER) to set this
unit to the standby mode.
In the standby mode, this unit consumes a small amount of
power in order to receive infrared signals from the remote
control.
9 En
DAB (DIGITAL AUDIO BROADCASTING) TUNING
DAB (Digital Audio Broadcasting) tuning
DAB (Digital Audio Broadcasting), also known as digital radio, is a new way of radio broadcasting. DAB is broadcast
using digital signals instead of analog signals, resulting in near CD-quality sound. Analog signals (i.e. FM/AM) are
susceptible to interference (i.e. distorting and noise) caused by electrical equipment, weather conditions, tall buildings,
mountains, etc. whereas digital signals are not. Thus, with DAB, there is virtually interference-free reception and no hiss
or crackle.
Another advantage of DAB is that a large amount of information can be carried within the digital signal. DAB is
broadcast in blocks of data called ensembles (also known as multiplexes). Several radio programs called services can be
broadcast simultaneously in each ensemble. This means that you can choose between several radio programs within one
frequency.
In addition to the audio signal, service information is also broadcast and displayed in the front panel display of this unit.
Part of the service information is text data information called Dynamic Label Segment (DLS). For more information, see
page 17.
With DAB, there is no need to remember channel frequencies. All broadcasts are selected by simply selecting the service
name.
Notes
Ensemble
Service
Audio signal
and
service information
10 En
• Be sure to check the DAB coverage in your area in that not all
areas are currently being covered. For a list of nationwide DAB
statuses and worldwide DAB frequencies, check WorldDAB
online at “http://www.worlddab.org/”.
• The sound quality and service information are controlled by the
DAB broadcaster, not this unit. Not all DAB broadcasters
transmit service information.
• DAB signals are broadcast in Band-III (174 – 240 MHz) and
L-Band (1,452 – 1,492 MHz). This unit is able to receive both
bands.
DAB (Digital Audio Broadcasting) tuning
y
Preparing the DAB tuning
Before tuning into DAB services, you must perform the
automatic scanning.
PRESET/TUNING
DIMMER
AUTO SCAN
MEMORY
BAND
INFO/TEXT
FUNCTION
SELECT
FM MODE
TUNING MODE
STANDBY
/ON
DAB/FM/AM
AUTO SCAN
When you have already performed the automatic scanning before
you set this unit to the DAB tuning mode for the first time, “DAB
initialize” does not appear in the front panel display. See step 2 on
page 12, and proceed with the DAB tuning operation.
If the automatic scanning operation is not
successful...
“No stations Available” and then following display
appears in the front panel display.
BAND
< > or select
pTune aid
[
POWER
DAB/FM/AM
1
2
3
4
5
6
7
8
9
0
ENTER
CLEAR
BAND
BAND
INFO/TEXT
AUTO SCAN
AUTO SCAN
MEMORY
When you select DAB as the reception band for the first
time, the following message appears for 2 second.
DAB initialize
Please wait
Use the automatic scanning function to scan the DAB
service again. This feature is useful when you want to
register new DAB services or you want to register the
DAB services broadcast in another location.
You can select the scanning frequency range as follows.
Full range scanning
This unit scans the entire range of Band III and L Band
(see page 18).
This unit starts scanning for DAB services in the area and
add them to the channel list as they are found.
Autoscan Full
>
■ Using the automatic scanning function
0
The number of channels found is displayed. The number is
updates when new channels are found.
Autoscan Full 10
>>>>>>>>>>>
Once the scanning is complete, this unit is tuned into the
DAB service of the DAB service registry list.
Press and hold AUTO SCAN on the front panel
(or remote control) for 3 seconds.
This unit starts the full range scanning. “Autoscan Full”
appears in the front panel display.
Once this unit has finished scanning, this unit is tuned into
the first DAB station in the DAB service registry list.
Local range scanning
This unit scans the limited range of Band III.
Press AUTO SCAN on the front panel (or remote
control) briefly.
This unit starts the local range scanning. “Autoscan
Local” appears in the front panel display.
Once this unit has finished scanning, this unit is tuned into
the first DAB station in the DAB service registry list.
Note
If this unit cannot detect a DAB service in the DAB service
registry list when this unit performs the automatic scanning
operation, this unit deletes the service.
11 En
TUNING
Press BAND on the front panel (or remote
control) repeatedly to select DAB as the
reception band.
The DAB indicator lights up in the front panel display, and
then “DAB initialize” appears in the front panel display.
Rotate PRESET/TUNING (or press SELECT
repeatedly) to select “Tune aid” or “Autoscan”.
• Select “Tune aid” to check the signal strength of the
DAB channel that is broadcast from the nearest
station (see page 14).
• Select “Autoscan” to carry out the automatic
scanning operation again.
For further details about problems and their remedies,
refer to the “Tuner” section in “Troubleshooting” on
page 25.
DAB (Digital Audio Broadcasting) tuning
DAB tuning
2
Use this feature to select the desired DAB services by
browsing the DAB service registry list.
Rotate PRESET/TUNING (or press
TUNING k / n repeatedly) to select the
desired DAB service.
Current DAB service
Note
BBC Radio 5 Live
p BBC Lond
[
Once you have performed the automatic scanning, the registry list
of available services is updated automatically as long as this unit
is in the DAB tuning mode. To register new ensembles, use the
automatic scanning function (see pages 11).
Selected DAB service
• If the selected DAB service is listed in the top 10
services most frequently selected, “♥” appears
after the name of the service when you set “Station
order” to “Favourite” (see page 13).
• If the selected DAB service has the secondary
service, “>>” appears in the right of the name of
the service.
• If the selected DAB service is a secondary service,
“<<” appears in the left of the name of the service.
• If this unit cannot receive signals of the selected
DAB service, “?” appears in the left of the name of
the service.
PRESET/TUNING
DIMMER
AUTO SCAN
MEMORY
BAND
INFO/TEXT
FUNCTION
SELECT
FM MODE
TUNING MODE
STANDBY
/ON
DAB/FM/AM
BAND
SELECT
PRESET/
TUNING
FUNCTION
POWER
DAB/FM/AM
1
2
3
4
5
6
7
8
9
0
ENTER
CLEAR
BAND
BAND
INFO/TEXT
AUTO SCAN
AUTO SCAN
3
MEMORY
FUNCTION
FUNCTION
FM MODE
TUNING
SELECT
SELECT
TUNING k / n
Press SELECT on the front panel (or remote
control) to confirm the selection.
This unit is tuned into the selected DAB service.
TUNING MODE
Notes
1
Press BAND on the front panel (or remote
control) repeatedly to select DAB as the
reception band.
Name of the current DAB service
BBC Radio 5 Live
Five Live Track
Dynamic label segment (see page 17)
12 En
• When the selected DAB service has a secondary service, the
SECONDARY indicator flashes in the front panel for 5
seconds, and the selected DAB service is a secondary DAB
service of a DAB service, the SECONDARY indicator lights
up. This unit returns to the corresponding primary service when
the secondary service becomes timed out.
• “Off air” appears when this unit can not received specified DAB
service.
y
You can change the order of the DAB services listen in the DAB
service registry listed by using the “Station order” function (see
page 13).
DAB (Digital Audio Broadcasting) tuning
■ Station order Station order
You can change the order of the registered DAB services.
Using the DAB functions
Use this feature to set the DAB functions
1
2
Press BAND on the front panel (or remote
control) repeatedly to select DAB as the
reception band.
Press FUNCTION on the front panel (or
remote control) to activate the DAB setup
menu.
The last selected DAB function appears in the front
panel display.
1
Press BAND on the front panel (or remote
control) repeatedly to select DAB as the
reception band.
2
Press FUNCTION on the front panel (or
remote control).
The DAB function menu appears in the front panel
display.
3
Rotate PRESET/TUNING (or press
TUNING k / n repeatedly) to select “Station
order” and then press SELECT.
pStation order [
Rotate PRESET/TUNING (or press
TUNING k / n repeatedly) to select the
desired DAB function and then press
SELECT.
You can select the following functions. Refer to the
pages indicated in the following pages for details
about the operations in each function.
DAB function
4
Function
pStation order [
4
Rotate PRESET/TUNING (or press
TUNING k / n repeatedly) to select the
desired station order setting and then press
SELECT.
Current station order setting
Page
Preset
tune
Selects the preset DAB
services.
15
Station
order
Selects the order of the DAB
services in the DAB registry
list.
13
Tune aid
Displays the strength of the
selected DAB service.
14
Dynamic
range
Selects the dynamic range
control mode.
14
Prune
list
Deletes a group of inactive
DAB ensembles and services
from the DAB registry list.
14
Press FUNCTION again to exit from the
DAB setup menu.
Alphanumeric
pActive
[
Selected station order setting
Choice
Descriptions
Alphanumeric
Default setting. Select this setting to
browse through all of the registered
DAB services in the alphanumeric
order.
Active
Select this setting to browse currently
available DAB services quickly. This
unit lists the currently active DAB
services first, and then other DAB
services in the alphanumeric order.
Ensemble
Select this setting to browse through the
registered DAB services from the
lowest to the highest channel labels.
Favourite
Select this setting to browse through the
top 10 services most frequently selected
with this unit. “♥” appears after the
name of services that are listed at the
top of the channel list.
13 En
TUNING
3
The station order setting appears in the front panel display.
DAB (Digital Audio Broadcasting) tuning
■ Tuning aid
Tune aid
Use this feature to adjust the positioning of the DAB
antenna and this unit. It is recommended that you perform
this operation when setting up this unit in order to
maximize the DAB reception capability.
■ Dynamic range control Dynamic range
Use this feature to compress the dynamic range of the
DAB broadcast. This is especially useful when you listen
to a DAB service in a noisy environment or at a low
volume at night.
1
Select “Tune aid” in the DAB setup menu.
See page 13 for details. The following message
appears in the front panel display.
1
2
Rotate PRESET/TUNING (or press
TUNING k / n repeatedly) to select the
desired DAB channel and then press
SELECT.
Select a DAB channel that is broadcast from the
nearest station.
p12B
Channel label
225.64MHz[
Select “Dynamic range” in the DAB setup
menu.
See page 13 for details. The following message
appears in the front panel display.
Current dynamic range setting
D-range 0
pD-range 1/2
[
Selected dynamic range setting
2
Frequency
Rotate PRESET/TUNING (or press
TUNING k / n repeatedly) to select the
desired dynamic range control setting.
Choice
The strength of the selected DAB channel signal
appears in the front panel display. Adjust the
orientation of the DAB antenna so that the strength of
the selected DAB channel signal gets stronger.
Function
0
Default setting. This unit does not
compress the dynamic range.
1/2
Medium dynamic range compression.
1
Maximum dynamic range compression.
Signal strength indicator of the DAB channel
oooooooooo
12B BBC Nationa
Channel label
Ensemble level
y
■ Prune list
Prune list
Use this feature to delete a group of the out-of-service
DAB ensembles and services from the DAB registry list.
1
“No stations Available” when the signal of the selected DAB
channel is too weak. Adjust the orientation of the connected
DAB antenna or try tuning into another DAB service.
Select “Prune list” in the DAB setup menu.
See page 13 for details. The following message
appears in the front panel display.
Prune list
pCancel
2
Rotate PRESET/TUNING (or press
TUNING k / n repeatedly) to select select
“OK?[SELECT]” and then press SELECT.
This unit deletes all the inactive DAB ensembles and
services and exits from the DAB setup menu.
Prune list
pOK?[SELECT]
y
To cancel the operation, select “Cancel”.
14 En
[
[
DAB (Digital Audio Broadcasting) tuning
Preset DAB services
3
You can use the DAB preset tuning feature to store preset
DAB services in the memory. You can then recall any
preset service easily by selecting the preset service
number assigned to the corresponding DAB service.
You can preset up to 99 DAB services in the memory.
y
To enter numbers less than 10 (i.e. 1 to 9) by using the
numeric buttons on the remote control, press the desired
number and then ENTER or press 0 and then enter the
desired number.
PRESET/TUNING
DIMMER
AUTO SCAN
MEMORY
BAND
INFO/TEXT
FUNCTION
SELECT
FM MODE
TUNING MODE
4
STANDBY
/ON
DAB/FM/AM
MEMORY
Rotate the PRESET/TUNING (or press the
numeric buttons) to select the desired
preset number.
Press MEMORYon the front panel (or remote
control) to confirm the preset.
PRESET/TUNING
BBC Radio 5 Live
Five Live Track
POWER
Note
DAB/FM/AM
2
3
4
5
6
BAND
Any stored DAB service data existing under a preset service
number is cleared when you store a new DAB service under the
same preset service number.
INFO/TEXT
Numeric
buttons
AUTO SCAN
7
8
9
0
ENTER
CLEAR
MEMORY
MEMORY
FUNCTION
y
To clear the preset DAB service, refer to “Clearing the preset
DAB service” on page 16.
FM MODE
TUNING
SELECT
TUNING MODE
■ Storing DAB services
1
Tune into the desired DAB service.
See page 12 for tuning instructions.
2
Press MEMORY on the front panel (or
remote control).
This unit is in the preset station memory mode.
Following message appears in the front panel display.
Name of the current DAB service
BBC Radio 5 Live
Preset memory 01
Preset number
Note
Perform the next operation within 5 seconds. If you do not
perform any operations after the operation of step 2, this unit
automatically cancels the preset memory mode.
15 En
TUNING
1
DAB (Digital Audio Broadcasting) tuning
■ Recalling the preset DAB services
■ Clearing the preset DAB service
Use the feature to clear the preset DAB service.
PRESET/TUNING
DIMMER
AUTO SCAN
MEMORY
BAND
INFO/TEXT
FUNCTION
SELECT
FM MODE
TUNING MODE
1
Select the preset number you want to clear
the preset DAB service.
2
Press CLEAR on the remote control.
The selected preset number flashes in the front panel
display.
If you want to cancel the clear operation, wait 5
seconds so that this unit automatically cancels the
preset clear mode.
STANDBY
/ON
DAB/FM/AM
FUNCTION
SELECT
PRESET/
TUNING
DAB/FM/AM
1
2
3
4
5
6
BAND
INFO/TEXT
Numeric
buttons
AUTO SCAN
7
8
9
0
ENTER
CLEAR
MEMORY
FUNCTION
FUNCTION
FM MODE
TUNING
SELECT
SELECT
CLEAR
TUNING k / n
1
Press FUNCTION on the front panel (or
remote control) to select “Preset tune” and
then press SELECT.
2
Rotate PRESET/TUNING (or press
TUNING k / n repeatedly) to select the
desired preset number and then press
SELECT.
This unit is tuned into the selected preset station.
Selecting the desired preset station directly
Press the numeric buttons on the remote
control to enter the number of the desired preset
DAB service.
This unit is tuned into the selected preset station.
y
• To enter numbers less than 10 (i.e. 1 to 9) by using the
numeric buttons on the remote control, press the desired
number and then ENTER or press 0 and then enter the desired
number.
• “Preset 01 empty” (example) appears briefly when no preset
DAB service is assigned to the corresponding preset service
number. The DAB service currently being received is then
displayed in the front panel display.
• The SECONDARY indicator lights up in the front panel display
when this unit is receiving a secondary service.
• “Off air” appears when this unit cannot received specified DAB
service.
16 En
BBC Radio 5 Live
Preset clear 1
TUNING MODE
3
Press CLEAR again to confirm the clear.
“Preset 1 clear” (example) appears in the front panel
display.
DAB (Digital Audio Broadcasting) tuning
DAB service information
Use this feature to display various information about the
DAB service currently being received.
PRESET/TUNING
DIMMER
AUTO SCAN
MEMORY
BAND
INFO/TEXT
FUNCTION
SELECT
FM MODE
TUNING MODE
STANDBY
/ON
DAB/FM/AM
DLS (Dynamic Label Segment)
Displays information about the current DAB service.
Examples are the title of the current song or program, the
name of the artist or speaker, and the name of the next
song or program. This data is continuously updated by the
DAB broadcaster, thus changing often with every new
song or program. Other data, such as news, weather, and
sports headlines, may be broadcast as well.
Program type
Displays the genre (song or program type) of the current
DAB service up to 16 characters.
INFO/TEXT
DAB/FM/AM
1
2
3
4
5
6
7
8
9
ENTER
CLEAR
BAND
INFO/TEXT
INFO/TEXT
AUTO SCAN
MEMORY
0
FUNCTION
Display mode
Display contents (example)
Date and time
Displays the current date and time. This data is updated
with each passing minute.
Audio mode and bit rate
Displays the audio mode and bit rate of the current DAB
service.
Channel label and frequency
Displays the channel label and frequency of the current
DAB service.
DLS
(Dynamic label
segment)
Classic FM on the
internet...
Program type
Classic Music
Signal quality
Displays the signal quality of the current DAB service
ranging from 0 (none) to 100 (best). A higher number
means a better reception level.
Ensemble label
Digital1 Network
y
Date and time
01:30 08-07-2007
Audio mode and
bitrate
160kbps STEREO
Channel label/
frequency
11D 222.06MHz
Signal quality
Signal Q: 100
DAB module firmware
version
version 3.1.1
For the best reception, adjust the orientation of the DAB antenna
so that a value of 80 or more is displayed for the desired DAB
service.
DAB module firmware version
Displays the version of the DAB module firmware. This
information is for factory use only.
y
The front panel display can indicate up to 16 alphanumeric
characters at once. The dynamic label segment scrolls in a
continuous manner and the service label, ensemble label and
program type scroll at once.
Notes
• The information order starts from the beginning again after the
signal quality information has been displayed in the front panel
display.
• You cannot perform this operation when “Off air” is displayed.
17 En
TUNING
Press INFO/TEXTon the front panel (or remote
control) repeatedly while a DAB service is
currently being broadcast.
Each time you press INFO/TEXT, information displayed
in the front panel display changes in the following order.
Ensemble label
Displays the name of the current ensemble up to 16
characters.
DAB (Digital Audio Broadcasting) tuning
DAB frequency information
*
227.360 MHz
12C
*
229.072 MHz
12D
230.784 MHz
13A
232.496 MHz
13B
234.208 MHz
13C
235.776 MHz
13D
237.488 MHz
13E
239.200 MHz
13F
■ Band III
Note
When you perform the local range scanning, this unit scans only
within the frequencies marked with an asterisk (*) in the
following table (see page 11).
Frequency
Channel label
174.928 MHz
5A
176.640 MHz
5B
178.352 MHz
5C
180.064 MHz
5D
181.936 MHz
6A
183.648 MHz
6B
185.360 MHz
6C
187.072 MHz
6D
188.928 MHz
7A
190.640 MHz
7B
192.352 MHz
7C
194.064 MHz
7D
195.936 MHz
8A
197.648 MHz
8B
199.360 MHz
8C
201.072 MHz
8D
202.928 MHz
9A
204.640 MHz
9B
206.352 MHz
9C
208.064 MHz
9D
209.936 MHz
10A
211.648 MHz
10B
213.360 MHz
10C
215.072 MHz
10D
216.928 MHz
11A
*
218.640 MHz
11B
*
220.352 MHz
11C
*
222.064 MHz
11D
*
223.936 MHz
12A
*
225.648 MHz
12B
18 En
■ L-Band
Frequency
Channel label
1452.960 MHz
LA
1454.672 MHz
LB
1456.384 MHz
LC
1458.096 MHz
LD
1459.808 MHz
LE
1461.520 MHz
LF
1463.232 MHz
LG
1464.944 MHz
LH
1466.656 MHz
LI
1468.368 MHz
LJ
1470.080 MHz
LK
1471.792 MHz
LL
1473.504 MHz
LM
1475.216 MHz
LN
1476.928 MHz
LO
1478.640 MHz
LP
1480.352 MHz
LQ
1482.064 MHz
LR
1483.776 MHz
LS
1485.488 MHz
LT
1487.200 MHz
LU
1488.912 MHz
LV
1490.624 MHz
LW
FM/AM TUNING
FM/AM tuning
■ Manual tuning
Automatic and manual tuning
If the signal received from the station you want to select is
weak, tune into it manually.
PRESET/TUNING
DIMMER
AUTO SCAN
MEMORY
BAND
INFO/TEXT
FUNCTION
SELECT
FM MODE
TUNING MODE
1
Press BAND on the front panel (or remote
control) repeatedly to select the reception
band (FM/AM).
2
Press TUNING MODE on the front panel (or
remote control) repeatedly to select “Manual
tune”.
STANDBY
/ON
DAB/FM/AM
TUNING
MODE
FM MODE
BAND
DAB/FM/AM
1
2
3
4
5
6
7
8
9
ENTER
CLEAR
BAND
PRESET/
TUNING
BAND
p Manual tune
[
FM 87.50MHz
INFO/TEXT
AUTO SCAN
MEMORY
0
FUNCTION
FM MODE
TUNING
SELECT
TUNING k / n
TUNING MODE
TUNING MODE
■ Automatic tuning
Automatic tuning is effective when station signals are
strong and there is no interference.
1
2
Press BAND on the front panel (or remote
control) repeatedly to select the reception
band (FM/AM).
Press TUNING MODE (or remote control) to
select “Auto tune”.
p
3
Auto tune
[
FM 87.50MHz
Rotate PRESET/TUNING (or press
TUNING k / n) to begin automatic tuning.
When this unit is tuned into a station, the TUNED
indicator lights up and the frequency of the received
station is shown in the front panel display.
Program service (see page 24)
3
Rotate PRESET/TUNING on the front panel
(or press TUNING k / n on the remote
control repeatedly) to select the desired
frequency.
When this unit is tuned into a station, the TUNED
indicator lights up and the frequency of the received
station is shown in the front panel display.
■ Selecting the FM radio wave reception
mode
If the signal received from the station and the quality of
the sound is not good, set the FM radio wave reception
mode to the monaural tuning mode.
Press FM MODE on the front panel (or remote
control) repeatedly to select the stereo mode or
monaural mode when this unit is tuned into an
FM radio station.
• When this unit is in the stereo tuning mode, the
STEREO indicator lights up in the front panel display.
• When this unit is in the monaural tuning mode, the
STEREO indicator disappears.
Note
Even if this unit is in the stereo tuning mode, the STEREO
indicator does not light up when the currently received program is
monaural.
The Late Show
FM 94.90MHz
y
If the station that this unit is tuned into provides the Radio Data
System information, the program service information that this
unit currently receives appears in the front panel display.
19 En
TUNING
FM MODE
FM/AM tuning
Selecting the Radio Data System
program type (PTY SEEK mode)
Use this feature to select the desired FM radio program by
program type. You can use this feature for the FM radio
programs providing the Radio Data System information
signals.
PRESET/TUNING
DIMMER
AUTO SCAN
MEMORY
BAND
INFO/TEXT
FUNCTION
SELECT
FM MODE
TUNING MODE
STANDBY
/ON
DAB/FM/AM
BAND
SELECT
INFO/TEXT
PRESET/
TUNING
DAB/FM/AM
1
2
3
4
5
6
7
8
9
ENTER
CLEAR
BAND
Program type
Descriptions
News
News
Current Affairs
Current affairs
Information
General information
Sport
Sports
Educate
Education
Drama
Drama
Cultures
Cultures
Science
Science
Varied Speech
Varied Speech
Pop Music
Pop Music
Rock Music
Rock Music
Easy Listening
Easy Listening
Light Classics M
Light Classical Music
Serious Classics
Serious Classical Music
Other Music
Other Music
Weather & Metr
Weather & Meteorology
Finance
Finance
Children's Progs
Children’s Program
Social Affairs
Social Affairs
Religion
Religion
Phone In
Phone In
Travel & Touring
Travel & Touring
Leisure & Hobby
Leisure & Hobby
Jazz Music
Jazz Music
Country Music
Country Music
National Music
National Music
Oldies Music
Other Music
Folk Music
Folk Music
Documentary
Documentary
Alarm Test
Alarm Test
Alarm-Alarm!
Alarm-Alarm!
BAND
INFO/TEXT
AUTO SCAN
MEMORY
0
INFO/TEXT
FUNCTION
FM MODE
TUNING
SELECT
1
2
3
SELECT
TUNING k / n
TUNING MODE
Press BAND on the front panel (or remote
control) repeatedly to select “FM” as the
reception band.
Press and hold INFO/TEXT on the front
panel (or remote control) for more than 3
seconds to set this unit to the PTY SEEK
mode.
“PROGRAM TYPE” appears in the front panel
display.
Rotate PRESET/TUNING (or press
TUNING k / n repeatedly) to select the
desired program type.
The name of the program type appears in the front
panel display.
Program type
National Music
FM 87.50MHz
20 En
FM/AM tuning
4
5
Press SELECT on the front panel (or remote
control) to confirm the selection of the
program type.
Using the preset station feature
You can then recall any preset station easily by selecting
the preset station.
Rotate PRESET/TUNING (or press
TUNING k / n) to start searching for the
corresponding Radio Data System stations.
This unit starts searching for the Radio Data System
stations corresponding to the selected program type.
PRESET/TUNING
DIMMER
AUTO SCAN
MEMORY
BAND
INFO/TEXT
FUNCTION
SELECT
FM MODE
TUNING MODE
STANDBY
/ON
DAB/FM/AM
MEMORY BAND
DAB/FM/AM
While this unit is searching the Radio Data System
stations, “Search” and the name of the selected
program type appear alternately in the front panel.
1
2
3
4
5
6
BAND
PRESET/TUNING
BAND
INFO/TEXT
Numeric
buttons
AUTO SCAN
7
8
9
0
ENTER
CLEAR
MEMORY
MEMORY
Once this unit finds the Radio Data System station
corresponding to the selected program type, this unit
stops searching.
y
To stop searching for stations, press INFO/TEXT on the
front panel (or remote control).
FM MODE
TUNING
SELECT
TUNING k / n
TUNING MODE
■ Automatic station preset
You can use the automatic station preset feature to store
AM and FM stations with strong signals up to 30 of those
stations for each band in order.
1
Press BAND on the front panel (or remote
control) repeatedly to select the reception
band (FM/AM).
2
Press and hold MEMORY on the front panel
(or remote control) for more than 3 seconds.
This unit starts searching of the stations with strong
signals and storing the stations to the preset station
memory of this unit automatically. “Auto memory”
appears in the front panel display while this unit is
searching the stations.
Notes
If the station found is not the one you desire, this unit
automatically tunes into the last tuned station.
CLEAR
Auto memory
CH03 FM100.05MHz
When automatic preset tuning is completed, the front
panel display shows the frequency of the station
preset to “01”.
y
After you perform the automatic preset station memory for AM
or FM, also perform the operation for another band (AM or FM).
Notes
• If no station is found, this unit is tuned into the last tuned
station.
• Any stored station data existing under a preset station number is
cleared when you store a new station under the same preset
station number.
• Only FM and AM stations with sufficient signal strength are
stored automatically by automatic preset tuning. If the station
you want to store is weak in signal strength, tune into it
manually and store it as described in “Manual station preset” on
the next page.
21 En
TUNING
National Music
FM 99.80MHz
FUNCTION
FM/AM tuning
■ Manual station preset
■ Clearing the preset station
Use this feature to store the desired FM and AM stations
to the preset station memory manually.
1
Select the desired preset station number.
Refer to “Tuning into the preset stations” on page 23
for details.
2
Press CLEAR on the remote control.
The selected preset station number flashes in the front
panel display.
1
Tune into the desired FM/AM station.
See page 19 for tuning instructions.
2
Press MEMORY on the front panel (or
remote control).
The preset station number flashes in the front panel
display for 5 seconds.
3
Rotate PRESET/TUNING on the front panel
(or press the numeric buttons on the
remote control) to select the desired preset
station number while the preset station
number flashes.
CH01 FM 99.80MHz
Flashes
Note
Perform the next operation within 5 seconds after pressing
CLEAR. If you do not press CLEAR within 5 seconds, the
clearing is canceled.
CH01 FM 99.80MHz
3
Preset station number
Press CLEAR to confirm.
“Preset 1 clear” appears in the front panel display.
Note
Perform the next operation within 5 seconds after selecting
the preset station number. If you do not press MEMORY
within 5 seconds, the preset is canceled.
4
Press MEMORY on the front panel (or
remote control) again to confirm the preset.
Notes
• Any stored station data existing under a preset station number is
cleared when you store a new station under the same preset
station number.
• The reception mode (stereo or monaural) is stored along with
the station frequency.
22 En
Preset 1 clear
FM/AM tuning
Tuning into the preset stations
You can tune into any desired station simply by selecting
the preset station group and under which it was stored.
PRESET/TUNING
DIMMER
AUTO SCAN
MEMORY
BAND
INFO/TEXT
FUNCTION
SELECT
FM MODE
TUNING MODE
STANDBY
/ON
DAB/FM/AM
BAND
TUNING
MODE
Displaying the Radio Data System
information
Use this feature to display the five types of the Radio Data
System information: PROGRAM SERVICE, CLOCK
TIME, PROGRAM TYPE, RADIO TEXT, and TRAFFIC
ANNOUNCE.
PRESET/TUNING
PRESET/
TUNING
DIMMER
AUTO SCAN
MEMORY
BAND
INFO/TEXT
FUNCTION
SELECT
FM MODE
TUNING MODE
STANDBY
/ON
DAB/FM/AM
DAB/FM/AM
1
2
3
4
5
6
7
8
9
ENTER
CLEAR
BAND
BAND
INFO/TEXT
INFO/TEXT
Numeric
buttons
AUTO SCAN
MEMORY
0
POWER
FUNCTION
FM MODE
TUNING
MODE
TUNING
SELECT
TUNING k / n
TUNING MODE
DAB/FM/AM
1
2
3
4
5
6
BAND
INFO/TEXT
1
Press BAND on the front panel (or remote
control) repeatedly to select the reception
band (FM/AM).
2
Press TUNING MODE on the front panel (or
remote control) repeatedly to select “Preset
tune”.
3
Rotate PRESET/TUNING (or press
TUNING k / n repeatedly) to select the
desired preset station number.
■ Selecting the desired preset station
directly
INFO/TEXT
1
Tune into the desired Radio Data System
broadcasting station.
You can use PTY SEEK mode to tune into the desired
Radio Data System broadcasting station from the
preset ones.
2
Press INFO/TEXT on the front panel (or
remote control) repeatedly to select the
desired Radio Data System display mode.
PROGRAM SERVICE
(Default setting)
CLOCK TIME
PROGRAM TYPE
1
2
Press BAND on the remote control
repeatedly to select the reception band (FM/
AM).
Press the numeric buttons to enter the
desired preset station number.
RADIO TEXT
TRAFFIC ANNOUNCE
y
To enter numbers less than 10 (i.e. 1 to 9) by using the numeric
buttons on the remote control, press the desired number and
then ENTER or press 0 and then enter the desired number.
23 En
TUNING
■ Browsing the preset station list
FM/AM tuning
• Select “PROGRAM SERVICE” to display the
name of the Radio Data System program currently
being received.
• Select “PROGRAM TYPE” to display the type of
the Radio Data System program currently being
received.
• Select “RADIO TEXT” to display the information
on the Radio Data System program currently being
received.
• Select “CLOCK TIME” to display the current time.
• Select “TRAFFIC ANNOUNCE” to display the
traffic information. When you select this display
mode, this unit searches the Radio Data System
broadcasting station that provides the TRAFFIC
ANNOUNCE Radio Data System service
automatically.
Notes
• It may take a while for this unit to receive all of the Radio Data
System data from the station.
• If the signals being received are not strong enough, this unit
may not be able to utilize the Radio Data System data. In
particular, the “RADIO TEXT” mode requires a large amount
of data and may not be available even when the other Radio
Data System display modes are available.
• In case of poor reception condition, press FM MODE on the
front panel (or remote control) to select the monaural reception
mode (see page 19).
• If the signal strength is weakened by external interference while
this unit is receiving the Radio Data System data, the reception
may be cut off unexpectedly.
• When the “RADIO TEXT” mode is selected, this unit can
display the program information by a maximum of 128
alphanumeric characters, including the umlaut symbol.
Unavailable characters are displayed with the “_” (underscore).
The displayed information scrolls continuously.
24 En
Troubleshooting
Troubleshooting
Refer to the table below when this unit does not function properly. If the problem you are experiencing is not listed below
or if the instruction below does not help, turn off this unit, disconnect the power cable, and contact the nearest authorized
Yamaha dealer or service center.
■ Tuner
Problem
Cannot tune into any
DAB services.
The automatic scanning
operations are not
successful.
DAB
There is noise
interference (e.g. hiss
or crackle).
The DAB service
information does not
appear or is inaccurate.
Remedy
See
page
The automatic scanning operations
were not performed, or the DAB
registry list needs to be updated.
Perform the automatic scanning operations.
There is no DAB coverage in your
area.
Check with your dealer or WorldDAB online
at “http://www.worlddab.org” for a listing of
the DAB coverage in your area.
—
The DAB signals are too weak.
Use a high-quality outdoor DAB antenna.
—
The DAB antenna may not be
connected.
Make sure the DAB antenna is firmly
connected.
8
The DAB signals are too weak.
Use a high-quality outdoor DAB antenna.
—
There is no DAB coverage in your
area.
Check with your dealer or WorldDAB online
at “http://www.worlddab.org/” for a listing of
the DAB coverage in your area.
—
The positioning of the indoor DAB
antenna and/or this unit is not optimal
for DAB reception.
Use the tuning aid feature to locate the best
positioning of the DAB antenna and this unit
for optimal DAB reception.
14
The DAB signals are too weak.
Use a high-quality outdoor DAB antenna.
—
The indoor DAB antenna needs to be
repositioned.
Readjust the position of the indoor DAB
antenna.
—
The DAB signals are too weak.
Use a high-quality outdoor DAB antenna.
—
The DAB service may be temporarily
out of service, or the DAB service
information is not provided by the
DAB broadcaster.
Contact the DAB broadcaster.
12
—
25 En
ADDITIONAL
INFORMATION
The DAB service
reception is weak.
Cause
Troubleshooting
Problem
FM stereo reception is
noisy.
FM
AM
Cause
The characteristics of FM stereo
broadcasts may cause this problem
when the transmitter is too far away or
the antenna input is poor.
Remedy
See
page
Check the antenna connections.
8
Try using a high-quality directional FM
antenna.
—
Use the manual tuning method.
19
There is distortion, and
clear reception cannot
be obtained even with a
good FM antenna.
There is multi-path interference.
The desired station
cannot be tuned into
with the automatic
tuning method.
The signal is too weak.
Previously preset
stations can no longer
be tuned into.
This unit has been disconnected for a
long period.
The Radio Data System
information does not
appear.
The Radio Data System information is
not provided by the radio station.
The signal is too weak
Use a high-quality directional FM antenna
—
The desired station
cannot be tuned into
with the automatic
tuning method.
The signal is weak or the antenna
connections are loose.
Tighten the AM loop antenna connections
and orient it for the best reception.
—
Use the manual tuning method.
19
There are continuous
crackling and hissing
noises.
Noise can result from lightning,
fluorescent lamps, motors, thermostats
and other electrical equipment.
Use an outdoor antenna and a ground wire.
This will help somewhat, but it is difficult to
eliminate all noise.
—
There are buzzing and
whining noises.
A TV set is being used nearby.
Move this unit away from the TV set.
Adjust the antenna position to eliminate
multi-path interference.
Use a high-quality directional FM antenna.
Use the manual tuning method.
—
—
22
Set preset stations.
21
—
■ Remote control
Problem
The remote control does not
work nor function properly.
Cause
See
page
Wrong distance or angle.
The remote control functions within a
maximum range of 6 m and no more than
30 degrees off-axis from the front panel.
3
Direct sunlight or lighting (from an inverter
type of fluorescent lamp, etc.) is striking the
remote control sensor of this unit.
Reposition this unit.
—
The batteries are weak.
Replace all batteries.
3
Even if the remote control code is correctly
set, there are some models that do not
respond to the remote control.
26 En
Remedy
Troubleshooting
■ General
Problem
This unit fails to turn on
when STANDBY/ON is
pressed.
Cause
Remedy
The power cord is not connected or the plug
is not completely inserted.
Connect the power cord firmly.
This unit has been exposed to a strong
external electric shock (such as lightning or
strong static electricity).
Disconnect the power cord, plug it back in
after 30 seconds, then use it normally.
A “humming” sound can be
heard.
Incorrect cable connections.
Firmly connect the audio connection cord
plugs. If the problem persists, the cables
may be defective.
This unit does not operate
properly.
The internal microcomputer has been
frozen by an external electric shock (such
as lightning or excessive static electricity)
or by a power supply with low voltage.
Disconnect the AC power cord from the
outlet and then plug it in again after about
30 seconds.
See
page
9
—
—
9
■ Resetting the system
Use this feature to set this unit to the initial factory
settings. This unit also clears all preset stations and
services.
ADDITIONAL
INFORMATION
Press and hold FUNCTION/FM MODE on the
front panel for more than 5 seconds.
“Factory reset...” appears in the front panel display and
then this unit is set to the standby mode automatically.
27 En
Operating with Yamaha AV amplifier remote controls
Operating with Yamaha AV amplifier remote controls
You can operate this unit by using the remote control supplied with your Yamaha AV amplifier (such as DSP-AX861SE).
The remote control for the AV amplifier is designed assuming that it is used with tuners and receivers previously
released. As a result, the names printed on the remote control buttons sometimes differ from the functions of this unit
activated by them. When the remote control for the DSP-AX761 or DSP-AX861SE is used, this unit is controlled as
below.
y
POWER
POWER
TV
AV
1
2
PHONO
MULTI CH IN
V-AUX/DOCK
DTV/CBL
STANDBY
When a button is pressed, the remote control outputs the same
signal as the signal output by pressing the button having the name
printed inside the parentheses of the remote control unit supplied
with this unit.
POWER
SCENE
Set to
TUNER
3
4
TUNER
MD/CD-R
CD
DVR
VCR
DVD
TUNER
SELECT
AMP
+
+
+
SOURCE
TV VOL
CH
VOLUME
–
–
–
TV MUTE
TV INPUT
MUTE
LEVEL
PRESET/CH
TITLE
1
TV
Set the
operation
mode
selector to
SOURCE
5
6
SET MENU
MENU
1 PRESET/TUNING k / n (TUNING k / n)
• Selects the preset DAB, FM, or AM stations or services
when this unit is in the preset tuning mode.
• Selects the DAB, FM, or AM stations or services when
this unit is not in the preset tuning mode.
AUDIO
BAND
A/B/C/D/E
3
STRAIGHT
DISPLAY
RETURN
CLASSICAL
LIVE/CLUB
ENTERTAIN
MOVIE
1
2
3
4
STEREO
ENHANCER SUR. DECODE
5
6
7
9
0
+ 10
7
8
ENT
REC
FREQ/TEXT
OFF
ON
EON
MACRO
MODE- PTY SEEK- START
LEARN
CLEAR
4 FREQ/TEXT (INFO/TEXT)
Turns on and changes the Radio Data System or DAB
service information in the front panel display.
5 ENTER, h (SELECT/TUNING MODE)
Selects the tuning mode (automatic, manual, or preset
tuning) when this unit is in the FM/AM tuning mode.
NIGHT
SLEEP
4
3 Numeric buttons, ENT
(Numeric buttons, ENTER)
Selects the desired preset DAB services (see page 15) or
FM/AM stations (see page 23).
PURE DIRECT
ENTER
2
2 RETURN (MEMORY)
Sets this unit to the preset station memory mode when this
unit is in the DAB tuning mode (see page 15) or FM/AM
tuning mode (see pages 21 and 22).
RENAME
8
5
6 MENU (FUNCTION/FM MODE)
• Activates the DAB function setup mode when this unit
is in the DAB tuning mode (see page 13).
• Switches the FM radio wave reception mode (stereo or
monaural) when this unit is in the FM tuning mode (see
page 19).
7 DISPLAY (CLEAR)
Deletes the preset memory of the currently selected preset
station number (see pages 16 and 22).
8 e (AUTO SCAN)
Starts the automatic scanning function when this unit is in
the DAB tuning mode (see page 11).
Notes
• Some functions may not be available depending on the remote controls.
• If you use the remote control supplied with other Yamaha AV amplifiers than DSP-AX761 or DSP-AX861SE, refer to the owners
manuals of your AV amplifier.
28 En
Specifications
Specifications
AUDIO SECTION
• Output Level/Impedance (fixed)
DAB (0 dB, Full) ...................................................... 2.0 V/1.2 kΩ
FM (40 kHz Dev., 1kHz) .......................................... 1.0 V/1.2 kΩ
AM (30% mod., 1 kHz) .......................................... 0.36 V/1.2 kΩ
GENERAL
• Power Supply ........................................................ AC 230 V, 50 Hz
• Power Consumption .................................................................. 9 W
• Dimensions (W x H x D) .................................. 435 x 87 x 307 mm
• Weight .................................................................................... 3.2 kg
DAB SECTION
• Tuning Range
(Band III) ............................................................ 174 to 240 MHz
(L-Band) ......................................................... 1452 to 1492 MHz
* Specifications are subject to change without notice.
• Sensitivity
(Band III) ........................................................................ –98 dBm
(L-Band) ......................................................................... –93 dBm
• Selectivity (for adjacent channel)
(Band III) ............................................................................. 40 dB
(L-Band) .............................................................................. 40 dB
• Signal to Noise Ratio .............................................................. 95 dB
• Total Harmonic Distortion ..................................................... 0.01%
• Stereo Separation (1 kHz) ........................................................ 85dB
• Frequency Response .................. 20 Hz to 20 kHz, +0.5 dB/–1.0 dB
• Antenna Input (unbalanced) ..................................................... 50 Ω
FM SECTION
• Tuning Range ................................................. 87.50 to 108.00 MHz
ADDITIONAL
INFORMATION
• 50 dB Quieting Sensitivity (IHF, 100% mod.)
Mono .................................................................... 3 µV (20.2 dBf)
• Usable Sensitivity (Signal to Noise 30 dB)
Mono ...................................................................................... 1 µV
Image Response Ratio ......................................................... 80 dB
IF Response Ratio ................................................................ 70 dB
Selectivity (400 kHz) ........................................................... 70 dB
• Signal to Noise Ratio (IHF)
Mono/Stereo ............................................................. 80 dB/75 dB
• Harmonic Distortion (1 kHz)
Mono/Stereo ................................................................ 0.3%/0.5%
• Stereo Separation (40 kHz Dev.)
1 kHz .................................................................................... 43 dB
• Frequency response (20 Hz to 15 kHz) ................................... –3 dB
• Antenna Input (unbalanced) ..................................................... 75 Ω
AM SECTION
• Tuning Range ......................................................... 522 to 1620 kHz
• Usable Sensitivity ............................................................. 300 µV/m
• Selectivity ............................................................................... 30 dB
• Signal to Noise Ratio .............................................................. 50 dB
• Image Response Ratio ............................................................ 35 dB
• Harmonic Distortion ................................................................ 1.0%
29 En
© 2007
YAMAHA ELECTRONICS CORPORATION, USA 6660 ORANGETHORPE AVE., BUENA PARK, CALIF. 90620, U.S.A.
YAMAHA CANADA MUSIC LTD. 135 MILNER AVE., SCARBOROUGH, ONTARIO M1S 3R1, CANADA
YAMAHA ELECTRONIK EUROPA G.m.b.H. SIEMENSSTR. 22-34, 25462 RELLINGEN BEI HAMBURG, GERMANY
YAMAHA ELECTRONIQUE FRANCE S.A. RUE AMBROISE CROIZAT BP70 CROISSY-BEAUBOURG 77312 MARNE-LA-VALLEE CEDEX02, FRANCE
YAMAHA ELECTRONICS (UK) LTD. YAMAHA HOUSE, 200 RICKMANSWORTH ROAD WATFORD, HERTS WD18 7GQ, ENGLAND
YAMAHA SCANDINAVIA A.B. J A WETTERGRENS GATA 1, BOX 30053, 400 43 VÄSTRA FRÖLUNDA, SWEDEN
YAMAHA MUSIC AUSTRALIA PTY, LTD. 17-33 MARKET ST., SOUTH MELBOURNE, 3205 VIC., AUSTRALIA
All rights reserved.
Printed in China
CQX1A1262Y