1
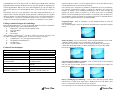
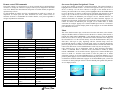
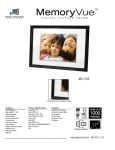
Sert à sélectionner le mode de démarrage. Quand « Mode Select » est sélectionné, le
menu principal est affiché à la mise en marche. Quand « Auto Select » est
sélectionné, un média externe est lu. S'il n'y a pas de média externe, la lecture se fait
depuis la mémoire interne.
Video Set/Réglage vidéo – Used to set the brightness, contrast, and colour saturation
of the screen to the desired level based on your lighting conditions.
Sert à régler la luminosité, le contraste et la saturation des couleurs de l'écran au
niveau choisi selon vos conditions d'éclairage.
Default Set and Version/Réglage par défaut et version – These are used to commit
default changes to memory and display the version of the unit.
Sert à effectuer des changements par défaut et affiche le contrôle de la version de
l'unité.
Specifications/Spécifications
Feature
Screen size
Aspect ratio
AC input power
DC unit power
Built-in speakers
Images
Audio
Video
Card reader
USB to PC
USB to device
Internal memory
Remote control
Fonction
Taille de l’écran
Rapport de forme
Alimentation de secteur
Alimentation c.c.
Haut-parleurs intégrés
Photos
Audio
Vidéo
Lecteur de carte
USB au PC
USB aux appareils
Mémoire interne
Télécommande
Specification/Spécifications
12.1”
4:3
100-240 V AC, 50/60 Hz
12 V DC, 1.5A
Stereo/Stéréo
JPG
MP3
MPEG
CF/MMC/SD/XD/MS
Yes/Oui
Yes/Oui
Yes/Oui
Yes/Oui
MemoryVue 1210 Plus
User Manual / Mode d’emploi
17811 Mitchell North
Irvine, Ca. 92614
www.dsicentral.com
1862-M8-P2-7
Congratulations! You are the proud owner of a MemoryVuetm Digital Frame. Boasting
high-quality image resolution, the MemoryVuetm is the perfect product for displaying your
favourite digital photos. With its ease of use and configuration, you can now display all
your favourite pictures, even with background music, or play video clips for everyone to
see!
Félicitations! Vous êtes le fier propriétaire d’un cadre numérique MemoryVue. Se
targuant d’une résolution d’image de qualité supérieure, le MemoryVue est le produit
idéal pour afficher vos photos numériques favorites. Grâce à sa facilité d’utilisation et
de configuration, vous pouvez maintenant afficher toutes vos photos favorites, y
compris avec des musiques d’ambiance, ou montrer vos vidéoclips à tout le monde!
displayed with the controls. Use the navigation buttons to access the desired control.
Use the ENTER button to select the desired control.
Cette fonction sert à configurer les paramètres d'exploitation pour les personnaliser.
Les fonctions comprennent la langue, la gestion de diaporama, des réglages de
l'horloge, de l'alarme, de la commande de démarrage et de la vidéo ainsi que des
réglages par défaut. Utiliser les boutons Up et Down pour trouver la commande
désirée et le bouton ENTER pour la sélectionner. Un deuxième écran est affiché avec
les commandes. Utiliser les boutons de navigation pour trouver la commande désirée.
Sélectionner le paramètre désiré avec le bouton ENTER.
Package contents/Contenu de l’emballage
Language/Langue – Once in “Language”, use the navigation buttons to select the
desired language.
Une fois dans language, utiliser les boutons de navigation pour sélectionner la langue
désirée.
Before using the MemoryVuetm, be sure to check that all the accessories are contained in
the package. MemoryVuetm comes with the following items:
1.
MemoryVuetm unit with removable desktop stand
2.
AC power adapter
3.
USB cable
4.
User manual
Avant d’utiliser le MemoryVuetm, vous devez vérifier que tous les accessoires sont
bien dans l’emballage. Le MemoryVuetm est livré avec les pièces suivantes :
1.
Le MemoryVuetm avec son support bureau amovible.
2.
Un adaptateur d’alimentation c.a.
3.
Un câble USB
4.
Le mode d’emploi
Features/Caractéristiques
High-resolution 12.1” TFT display
Plays images in slide show format
Plays MP3 audio
Plays MPEG video
Plays audio slide show
Built-in multi-format card reader
CF/MMC/SD/XD
Generous 128 MB internal memory
USB port for PC connection
USB port for device connection –
thumb drive, camera, etc.
Haute résolution d’affichage 12.1 po TFT
Lecture d’image en format diaporama
Lecture audio MP3
Lecture vidéo MPEG
Lecture de diaporama audio
Lecteur de carte intégré multiformat
CF/MMC/SD/XD
Une généreuse mémoire interne de
128 Mo
Port USB pour la connexion au PC
Port USB pour la connexion à d’autres
appareils - clé USB, caméra, etc.
.
Picture Set/Image – Once in “Picture Set”, use the navigation buttons to select either
“Slideshow Mode” (display rate) or “Picture Play” mode (transitions).
Une fois dans « Picture Set », utiliser les boutons de navigation pour sélectionner
« Slide show Mode [diaporama] » (Cadence d'affichage) ou « Picture Play Mode
[Lecture de photos] » (Transitions).
Clock and Alarm Set/Heure et Alarme – Once in either mode, use the navigation
buttons to change the times as desired.
Une fois dans l'un des modes, utiliser les boutons de navigation pour modifier les
heures à votre choix.
Start Up Set/Réglage au démarrage – Used to select the start up mode. When
“Mode Select” is selected, the main menu is displayed at Power On. When “Auto
Select” is selected, files from external devices are played.
If no external devices are connected, files from internal memory are played.
mémoire interne). Appuyer sur le bouton ENTER pour activer le média. Le troisième
écran montre le nom des dossiers texte sur le média sélectionné. Appuyer sur le
bouton ENTER pour lire. L’écran affichera le texte. Utiliser les flèches de défilement
Haut et Bas pour naviguer a travers les lignes, et Droit et Gauche pour naviguer a
travers les pages. Appuyer sur le bouton Menu pour y mettre fin et retourner au menu
principal.
Connections/Connexions
The diagrams below indicate how to install the desktop stand and names the frame's
ports, slots and buttons.
Utiliser le guide ci-dessous pour la connexion à l’alimentation et l’insertion de média.
Edit/Édition
This is the function used to delete files from the internal memory or to copy files from
an external device to the internal memory. To copy files, follow these steps:
1. Go to the Main menu.
2.
3.
4.
5.
6.
7.
8.
Select “EDIT”, press ENTER.
Select the device on which the file to be copied is located and press ENTER.
Use the up or down arrows to navigate through your files.
Select the files you want to copy by pressing the right arrow. (Marked by a paw.)
Press the left arrow to return to the media device menu.
Highlight the device the images are to be copied to and press ENTER.
Press the COPY/DEL button, select the copy option (briefcase) and press ENTER
You should then see a message saying “Finished!” Press ENTER once you see this
message.
Cette fonction sert à copier ou effacer des fichiers depuis la mémoire externe vers la
mémoire interne comme suit :
1. Aller au menu principal.
2.
3.
4.
5.
6.
7.
8.
Sélectionner « EDIT » , appuyer sur ENTER.
Sélectionner le support depuis lequel vous désirez copier et appuyer ensuite sur
ENTER. Utiliser les flèches Haut et Bas pour naviguer parmi vos fichiers.
Sélectionner les fichiers que vous désirez copier en appuyant sur la flèche droite
(Identifiée par une patte).
Appuyer sur la flèche gauche pour revenir au menu Media
Mettre en évidence le dispositif sur lequel les photos seront copiées et appuyer sur
ENTER.
Appuyer sur le bouton COPY/DEL, sélectionner l'option copie (porte-documents) et
appuyer sur ENTER
Vous devriez alors voir un message disant « Finished! » [Terminé] Appuyer sur
ENTER quand vous voyez ce message.
1
2
3
4
5
6
7
Setup/Configuration
This function is used to set up personalized operational parameters. Functions include
language, slide show management, clock settings, alarm settings, start-up control
settings, video settings and default settings. Use the up/down buttons to highlight the
desired control and use the ENTER button to select. A second screen will be
Plug one end of the AC adapter into the digital
photo frame and plug the other end into a
standard AC electrical outlet.
Insert a memory card into the appropriate slot.
Slide the power switch to the ON position.
If not already selected, scroll to the appropriate
memory card type on the first menu screen by
using the arrow buttons on the remote control.
Brancher une des extrémités de l’adaptateur c.a.
au cadre photo numérique et l’autre dans une
prise de courant murale standard.
Insérer la carte mémoire dans la fente appropriée.
Mettre l’interrupteur sur la position ON (marche).
Si elle n’est pas déjà sélectionnée, choisir le type
de carte mémoire approprié dans le premier écran
du menu à l’aide des flèches de défilement de la
télécommande.
Press the ENTER button to confirm the
selection.
On the next menu, scroll using the arrow
buttons to select “Photo”.
On the next menu, press SLIDESHOW on the
remote control to display images. For more
details or instructions on using the “MUSIC”,
“VIDEO”, or “FILE” menus, refer to the “On
Screen” section.
Appuyer sur le bouton ENTER pour confirmer la
sélection.
Dans le menu suivant, sélectionner “Photo” à
l’aide des flèches de défilement..
Dans le prochain menu, appuyer sur
SLIDESHOW sur la télécommande pour afficher
les images. Pour plus de détails ou d’instructions
pour utiliser les menus “MUSIC”, “VIDEO” ou
“FILE”, consulter le chapitre « À l’écran ».
Changing the frame
MemoryVuetm comes with changeable frames so you can change the look of the frame
as your décor changes. Follow these instructions to change the frame:
1. Lay the digital frame screen-down on a surface that is flat and smooth to
avoid scratches.
2. Using the illustration below as a guide and with the help of a number 6
Phillips head screwdriver, remove the 4 screws that fasten the frame to the
3.
4.
5.
unit. Lift the digital frame unit up, turn it over, and lay it down in another
area. The frame should be left on the protected surface. Note the location of
the hole in the matte.
Lift the removed frame from the surface. Replace this frame with the new
frame, making sure the orientation of the hole in the new frame is the same
as it was on the removed frame.
Lift the digital frame unit up, turn it back over, and place it over the frame.
Align the mounting holes and line up the optical sensor on the unit with the
hole on the matte.
Use the four screws that were removed to fasten the new frame. The unit is
now ready for display.
Frame mounting screw
Vis de fixation du cadre
Rear view
Vue arrière
Frame mounting screw
Vis de fixation du cadre
Comment changer le cadre
Le MemoryVuetm a des cadres modifiables afin que vous puissiez changer l’aspect du
cadre pour l'agencer au décor. Utiliser les instructions suivantes pour changer le cadre.
1.
2.
3.
4.
5.
Poser le cadre numérique sur une surface plate avec l'écran lui faisant face.
Vérifier que la surface est plate et protégée pour éviter des égratignures.
Avec un tournevis Phillips n° 6 et de l'illustration ci-dessus, enlever les
quatre vis qui fixent le cadre à l'unité. Soulever l'unité numérique du cadre,
la retourner et la reposer ailleurs. Le cadre doit rester sur la surface protégée.
Noter l'emplacement du trou dans le passe-partout.
Soulever le cadre de la surface. Remplacer ce cadre par le nouveau cadre.
Vérifier que l'orientation du trou du nouveau cadre est la même que celle du
précédent.
Soulever l'unité numérique, la retourner et la placer sur le cadre, en alignant
les trous de fixation et en vérifiant que le capteur optique de l'unité est en
face du trou du passe-partout.
Fixer le nouveau cadre avec les quatre vis retirées précédemment L'unité est
maintenant prête pour l'affichage.
Connecting to the USB ports/Connexion des ports USB
The MemoryVue 1210 Plus has both a USB port for connection to a PC and a port for
connection to other devices such as thumb drive, USB card reader, and camera. When
connected to the PC you can drag and drop content from the PC to the internal memory.
You can also delete content from the internal memory. The other USB port supports
devices such as thumb drives, card readers, and cameras. When connected you can play
directly from the device by selecting the option from the main menu.
pistes audio sélectionnées seront diffusées. Appuyer sur les boutons PLAY/PAUSE
pour suspendre le diaporama. L’audio continuera à jouer. Appuyer sur le bouton Menu
pour y mettre fin et retourner au menu principal.
Movie/Film
This is the function used to play a movie clip. From the main menu, select "Movie"
and press ENTER. On the second screen select the device or memory where the file is
located (the media named “MEMORY” is the internal memory). Press ENTER to
access the device or memory. The third screen shows the name of the clips available
on the selected device or in the selected memory. Press ENTER to Play. The clip will
begin to play. Press the PLAY/PAUSE button to pause the clip. A screen will
temporarily appear over the clip confirming the clip was paused along with the pause
time; the screen will reappear when play resumes. Press the MENU button to end the
clip and return to the main menu.
Cette fonction sert à lire des vidéoclips. Dans le menu principal, sélectionner
« Movie » et ENTER. Dans le deuxième écran, sélectionner le média (le média
nommé « MEMORY» est la mémoire interne). Appuyer sur le bouton ENTER pour
activer le média. Le troisième écran montre le nom des clips sur le média sélectionné.
Appuyer sur le bouton ENTER pour lire. La lecture du clip commencera. Appuyer sur
les boutons PLAY/PAUSE pour interrompre le clip. Un écran apparaîtra
temporairement sur le clip en confirmant que le clip a été interrompu ainsi que le
temps d’arrêt. La même chose se produit à la reprise de la lecture. Appuyer sur le
bouton Menu pour y mettre fin et retourner au menu principal.
Text/Texte
This is the function used to view text files (.txt). These are files which are readable in
ASCII format. From the main menu select "Text" and press ENTER. On the second
screen select the device or memory where the file is located. (the media named
“MEMORY” is the internal memory). Press the ENTER button to access the device
or memory. The third screen shows the name of each text file located on the selected
device or in the selected memory. Press the ENTER button to Play. This will show the
text information on the screen. Use the Up and Down buttons to navigate through
lines, and the right and left arrow buttons to navigate through pages. Press the MENU
button to close your file and return to the main menu.
Cette fonction sert à lire des dossiers texte (txt). Ce sont des fichiers compatibles avec
le format ASCII. Dans le menu principal, sélectionner « Text » et ENTER. Dans le
deuxième écran, sélectionner le média (le média nommé « MEMORY» est la
Music/Musique
This is the function used to play an MP3 audio file. From the main menu select
“Music” and press ENTER. On the second screen select the device or memory where
the file is located (the media named “MEMORY” is the internal memory). Press the
ENTER button to access the device or memory. The third screen shows the name of
the MP3 files located on the selected device or in the selected memory. Press the
ENTER button to play. The MP3 file will begin to play. Press the PLAY/PAUSE
button to pause the file. A control screen will appear identifying the file information
and controls while playing as shown below. Use the arrow buttons to navigate through
the desired controls. Press the MENU button to close the file and return to the main
menu.
Cette fonction sert à lire les dossiers audio MP3. Dans le menu principal, sélectionner
“Music“ et ENTER. Dans le deuxième écran, sélectionner le média (le média nommé
« MEMORY » est la mémoire interne). Appuyer sur le bouton ENTER pour activer le
média. Le troisième écran montre le nom des dossiers MP3 sur le média sélectionné.
Appuyer sur le bouton ENTER pour lire. Le dossier MP3 commencera sa lecture.
Appuyer sur les boutons PLAY/PAUSE pour suspendre le clip. Un écran de
commandes apparaîtra afin d’identifier les informations du dossier et contrôler
pendant la lecture comme noté ci-dessous. Utiliser les flèches de défilement pour
naviguer vers les commandes désirées. Appuyer sur le bouton MENU pour y mettre
fin et retourner au menu principal.
Combo
This is the function used to play an audio slide show. In order to do so, the MP3 file
must be located on the same device or in the same memory as the image files. In this
manner MP3 audio will be played in the background while a slide show is playing.
From the Main Menu select “Combo” and press ENTER. On the second screen select
the device or memory where the files are located (the media named “MEMORY” is
the internal memory). Press the ENTER button to access the device or memory.The
third screen shows the name of the image and MP3 located on the selected device or
in the selected memory. Press the ENTER button to play. The slide show will begin to
play along with the selected audio track. Press the PLAY/PAUSE button to pause the
slide show. The audio will continue to play. Press the MENU button to end the slide
show and return to the main menu.
Cette fonction sert à lire un diaporama audio. Un dossier MP3 doit être sur le média
avec les photos. De cette manière, l’audio MP3 sera diffusé en arrière-plan pendant la
lecture d’un diaporama. Dans le menu principal, sélectionner « Combo » et ENTER.
Dans le deuxième écran, sélectionner le média (le média nommé « MEMORY » est la
mémoire interne). Appuyer sur le bouton ENTER pour activer le média. Le troisième
écran montre le nom des dossiers MP3 sur le média sélectionné. Appuyer sur le
bouton ENTER pour lire. Le diaporama commencera à défiler en même temps que les
Le MemoryVue 1210 Plus dispose d’un port USB pour la connexion à un PC et d’un
autre pour la connexion à d’autres appareils comme une clé USB, un lecteur de carte
USB, et un appareil photo. Une fois connecté au PC, vous pouvez transférer
facilement le contenu de votre PC à la mémoire interne : Vous pouvez aussi effacer le
contenu de la mémoire interne L’autre port USB sert pour les autres appareils comme
la clé USB, la le lecteur de carte, et la caméra. Une fois branché, vous pouvez lire
directement de votre appareil en le sélectionnant dans le menu principal.
On-screen menu/Menu à l’écran
The main menu contains the major control functions. Use the navigation buttons on
the remote control to locate the desired function. Use the ENTER button to select. A
second screen appears to allow you to select a device or memory. (the media named
“MEMORY” is the internal memory). A third screen may be presented to view and
select the media files.
Le menu principal contient les principales fonctions de commande. Utiliser les
boutons de navigation de la télécommande pour localiser la fonction désirée. Utiliser
le bouton ENTER pour sélectionner. Un deuxième écran est affiché pour la
commande du média (le média nommé « MEMORY » est la mémoire interne). Un
troisième écran pourrait être affiché pour voir et sélectionner le contenu du média.
Remote control/Télécommande
On-screen Navigation/Navigation à l’écran
The remote control is a convenient way to access external devices and the different
memories or manage the content to be played. The layout is designed for maximum
ease of use. Because the menu functions all operate in a similar manner, navigation is
quick and easy to learn.
La télécommande est utilisée pour lire convenablement le média et le contenu. La
disposition est conçue pour être d’une utilisation très facile; comme toutes les
fonctions du menu se commandent de la même manière, vous pouvez apprendre à
naviguer rapidement et facilement.
Use the arrow buttons to navigate to the desired function. The selected function is
highlighted. Press ENTER to select. A second screen appears to allow you to select a
device or memory. Use the arrow buttons to navigate to the desired device or
memory; the selected device or memory will be highlighted. Press the ENTER button
to access the device or memory. A third screen will appear with the name of each
image or clip. Use the arrows to select the clip and press the ENTER button to play.
Utiliser les flèches de défilement pour naviguer vers les fonctions désirées. La
fonction sélectionnée est surlignée par rapport aux autres fonctions. Appuyer sur
ENTER pour sélectionner. Un deuxième écran apparaîtra pour sélectionner le média.
Utiliser les flèches de défilement pour naviguer vers le média désiré; le média
sélectionné est surligné. Appuyer sur le bouton ENTER pour l’activer. Un troisième
écran apparaîtra avec le nom de chaque photo ou clip. Appuyer sur le bouton ENTER
pour commencer la lecture.
Photo
Button/Bouton
Power
Mute
Photo
Music
Movie
Text
Combo
Edit
Setup
Calendar
ESC
Menu
View
Back Music
Up, Down, Left Right
ENTER
Vol +/Zoom
Rotate
Rev/Fwd/Play
Copy/Del
Prev/Next
Function
On/Off Control
Mute On/Off
Play images
Play MP3 track
Play video track
Open text file
Play slide show and audio
ENTER edit mode
Setup operational
parameters
Displays calendar
Previous command
Main menu
3x3 thumbnail view
Music during slide show
Shift direction
Select/Save
Volume up/down
Zoom by 20%
Rotate image 900
Reverse/Forward/Play
video
Copy/Delete
Previous/Next image
Fonctions
Marche/arrêt
Sourdine Marche/arrêt audio
Lecture de photos
Lecture de piste MP3
Lecture de piste vidéo
Lecture de dossier texte
Lecture de diaporama et audio
Entrer en mode d’édition
Configuration des paramètres
opérationnels
Affichage du calendrier
Commande précédente
Menu principal
Miniatures 3x3
Musique pendant les
diaporamas
Directions
Sélectionner/Sauvegarder
Volume + fort/- fort
Zoom de 20 %
Rotation de photo de 900
En arrière/En avant/Lecture de
la vidéo
Copier/ Effacer
Photo précédente/suivante
This is the function used to play a slide show. From the main menu, select "Photo"
and press ENTER. On the second screen select the device or memory where the file is
located (the media named “MEMORY” is the internal memory). Press the ENTER
button to access device or memory. The third screen shows the name of the images on
the selected device or in the selected memory. Press the ENTER button to Play. The
slide show will begin to play, beginning with the selected image. Press the
PLAY/PAUSE button to change to manual mode, where you advance through the
photos by using the arrow buttons. Press the MENU button to end the slide show and
return to the main menu. Use the ZOOM button to zoom in by 20% on each press.
Cette fonction sert à lire les diaporamas. Dans le menu principal, sélectionner
« Photo » et ENTER. Dans le deuxième écran, sélectionner le média (le média
nommé « MEMORY » est la mémoire interne). Appuyer sur le bouton ENTER pour
activer le média. Le troisième écran montre le nom des photos sur le média
sélectionné. Appuyer sur le bouton ENTER pour lire. Le diaporama débutera avec la
première photo. Appuyer sur les boutons PLAY/PAUSE pour passer au mode manuel
en utilisant les flèches de défilement. Appuyer sur le bouton MENU pour y mettre fin
et retourner au menu principal. Utiliser le bouton ZOOM pour agrandir une photo de
20 % à chaque pression.