1
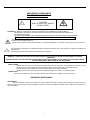
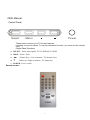
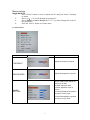
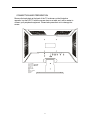
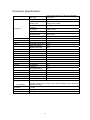
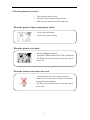
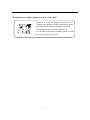
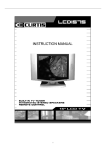
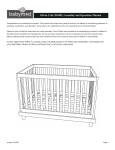
1
TABLE OF CONTENTS
SAFETY PRECAUTONS-------------------------------------------------------------------1
IMPORTANT SAFETY INSTRUCTIONS-----------------------------------------------1
OSD MANUAL -------------------------------------------------------------------------------2
REMOTE CONTROLLER -------------------------------------------------------------------2
llustration of the keys on the remote control ------------------------------------------3
Menu picture------------------------------------------------------------------------------------4
Input mode PC---- -------------------------------------------------------------------------------4
Input mode AV / S-Video---------------------------------------------------------------------6
Input mode TV----------------------------------------------------------------------------------- 10
CONNECT PERIPHERAL EQUIPMENT ---------------------------------------------------13
Production Specifications -------------------------------------------------------------------14
Maintaining your TV-----------------------------------------------------------------------------15
Troubleshooting----------------------------------------------------------------------------------16
2
IMPORTANT SAFEGUARDS
SAFETY PRECAUTIONS
△
!
CAUTION
RISK OF ELECTRIC SHOCK
DO NOT OPEN
CAUTION:TO REDUCE THE RISK OF ELECTRIC SHOCK,DO NOT REMOVE COVER(OR BACK)
TO REDUCE THE RISK OF FIRE OR ELECTRIC SHOCK,DO NOT EXPOSE THIS APPARATUS
TO RAIN OR MOISTURE.
NO USER SERVICEABLE PARTS INSIDE.REFER SERVICING TO QUALIFIED SERVICE PERSONNEL
The graphic symbols on the back cover of the set mean the following:
The lightning flash with arrowhead symbol within an equilateral triangle is intended to alert the user to the
Presence of uninsulated”dangerous
Voltage “within the product”s enclosure that may be of sufficient magnitude to constitute a risk of electric shock to persons
The exclamation point within an equilateral triangle is iintended to alert the user to the presence of important operating and
maintenance
(servicing) instructions in the literature accompanying the appliance.
WARNING: TO REDUCE THE RISK OF FIRE OR ELECTRIC SHOCK,DO NOT EXPOSE THIS APPLIANCE TO RAIN OR
MOISTURE
APPARATUS SHALL NOT BE EXPOSED TO DRIP PING OR SPLANSHING AND THAT NO OBJECTS FILLED WITH LIQUIDS
SUCH AS VASES,SHALL BE PLACED ON THE APPARATUS.
INSTALLATINO
LOCATE the receiver in the room where direct light does not srike the screen.Total darkness or a reflection on the
picture screen can cause eyestrain.soft and indirect lighting is recommended for comfortable viewing.
ALLOW enough space between the receiver and the vall to permit proper ventilation.
AVOID excessive warm locations to prevent possible damage to the cabinet or component failure.
CONNECTION
THIS TV power adapter can be connected to AC100v-240v,50/60HZ, the adapter is output DC12v/3A.
IMPORTANT SAFEGUARDS
DEGAUSSING
All colour television receivers are sensitive to magnetic influences,usually caused by either moving the receiver from one
place to another or using certain electrical appliances near the receiver.this residual magnetism as it is called,so do not place it to
near these device
1
OSD Manual
Control Panel:
Select
Menu
Power
These buttons control your TV’s basic features
including on-screen menus. To use the advanced function, you must use the remote
contr
Control Panel Functions:
•
•
•
•
SELECT - Select input signals: TV/PC-RGB/AV/S-VIDEO
MENU - Menu / Enter
-
+
- Volume down / Left orientation / TV channel down
- Volume up / Right orientation / TV channel up
• POWER - Power switch
Remote control
2
Illustration of the keys on the remote control:
1. POWER
2. INPUT
3. Esc
4. MENU
5. VOL
6. VOL
7. PRO S
8. PRO T
9. AUTO
10. 0-9
11. -/-12 RECALL
13 MUTE
14. DISPLAY
Power supply switch
Select TV / PC / AV / S-VIDEO
Exit
MENU / ENTER
Volume down / Left orientation
Volume up / Right orientation
TV channel up
TV channel down
Auto Adjust (PC MODE)
TV channel number select or teletext
page number select
One bit or two bit TV channel select
Sets the system to factory default value
Turn on/off the sound
Display current source
3
Menu picture
Input mode PC
1Press “Select” button to enter to display the PC and press”menu “to display
pc menu
23-
4-
Press “+”/ “-” to scroll through the parameters
Press “Menu” to enter ,then press “+”/“-”_to make changes the value of
the parameters.
Press the “Select” button to exit the menu
PC MAIN MENU
Name of submenu
Picture of submenu
Instructions
Adjust the contrast of picture
CONTRAST
Adjust the brightness of picture
BRIGHTNESS
AUTO CONFIG:auto adjust the
picture to set best
PHASE: adjust the ADC
CLOCK: adjust the clock of
picture
H-POSITION:adjust the position
of picture to left or right
V-POSITION:adjust the position
of picture to up or down
IMAGE
SETTING
4
Select input signal:
PC-RGB/AV/S-VIDEO/TV
INPUT
SOURCE
Input mode AV
1-
Press “Select” button to enter to display the AV, press “menu”to display AV
menu
23-
Press “+”/ “-” to scroll through the parameters
Press “Menu” to enter ,then press “+”/“-”_to make changes the value of
the parameters.
4
Press the “Select” button to exit the menu
AV MAIN MENU
6
Name of submenu
Picture of submenu
Instructions
1、Brightness : Adjust the
brightness of the picture, the
image becomes brighter as
IMAGE
SETTING
7
TREBLE:adjust the treble
sound
BASS: adjust the bass
BALANCE: Adjust the
balance of the audio output
from left to right.
MUTE: turn off/on sound
VOLUME: adjust the value of
sound
Return the value of default
SOUND
SETTING
RESET
Select input signal:
PC-RGB/AV/S-VIDEO/TV
INPUT SOURCE
Input mode s-video
1
Press”Select” button to enter to display the S-VIDEO,press “menu”to display
s-video menu
2
3
Press “+”/ “-” to scroll through the parameters
Press “Menu” to enter ,then press “+”/“-”_to make changes the value of the
parameters.
4
Press the “Select” button to exit the menu.
S-VIDEO MAIN MENU
8
Name
submenu
of
Picture of submenu
Instructions
1、Brightness : Adjust the
brightness of the picture, the
image becomes brighter as
the number increases.
2、Contrast: Adjust the
IMAGE
SETTING
contrast of the picture,the
image becomes higher as
the number increases.
3、Color :Adjust the color .
4、 TINT :Adjust the tone of
the picture.
5、Sharpness: Adjust the
amount of detail enhancement,
the image sharpness rises as
the number increases.
BLUE SCREEN: set the
background color when the no
signal,while on,it will show
blue,while off ,it will show white
NOISE REDUCE:
reduction:Reduce the noise of
the picture, provide clearer
picture.
VIDEO
ADVANCE
9
Name of submenu
Picture of submenu
Instructions
LANGUAGE:you may select
one language from English or
french
OSD .H: adjust the position of
osd menu to left or right
OSD .V: adjust the position of
OSD SETTING
osd menu to up or down
TREBLE:adjust
the
treble
sound
BASS: adjust the bass
BALANCE: Adjust the
balance of the audio output
from left to right.
MUTE: turn off/on sound
VOLUME: adjust the value of
sound
Return the value of default
SOUND
SETTING
RESET
Select input signal:
PC-RGB/AV/S-VIDEO/TV
INPUT
SOURCE
Input mode :TV
1
Press “Select” button to enter to display the TV ,press “menu”to display TV
menu
2 Press “+”/ “-” to scroll through the parameters
3 Press “Menu” to enter ,then press “+”/“-”_to make changes the value of the
parameters.
4 Press the “Select” button to exit the menu
、TV MAIN MENU:
10
Name
submenu
of
Picture of submenu
Instructions
1、Brightness : Adjust the
brightness of the picture, the
image becomes brighter as the
number increases.
2、Contrast: Adjust the contrast
IMAGE
SETTING
of the picture,the image
becomes higher as the number
increases.
3、Color :Adjust the color .
4、 TINT :Adjust the tone of the
picture.
5、Sharpness: Adjust the amount
of detail enhancement, the image
sharpness rises as the number
increases.
1:CHANNEL: select the TV chanel
2:TV MODE: Select the TV
standard.
3:SKIP THIS:if you want to skip a
channel,you may turn it on,then
this channel will be skiped next
time
TV SETTING
4:AUTO FINE:Auto adjust the tune
of picture
5:FINE TUNE: If the image
received is not very good,you can
press PRO to select Fine Tuning
item in
6: AUTO SEARCH: Auto search
and save the channel
BLUE SCREEN: set the
background color when the no
signal,while on,it will show
blue,while off ,it will show white
NOISE REDUCE:
reduction:Reduce the noise of the
picture, provide clearer picture.
VIDEO
ADVANCE
11
Name of submenu
Picture of submenu
Instructions
LANGUAGE:you may select
one language from English or
french
OSD .H: adjust the position of
osd menu to left or right
OSD .V: adjust the position of
OSD SETTING
osd menu to up or down
TREBLE:adjust
the
treble
sound
BASS: adjust the bass
BALANCE: Adjust the
balance of the audio output
from left to right.
MUTE: turn off/on sound
VOLUME: adjust the value of
sound
Return the value of default
SOUND
SETTING
RESET
Select input signal:
PC-RGB/AV/S-VIDEO/TV
INPUT
SOURCE
12
CONNECTION AND PREPARATION
Remove the back plate at the back of the TV as shown on the illustration
opposite. Lay the LCD TV with the screen down on a table, as it will be easier to
connect your peripheral equipment. Please take precaution not to damage the
screen.
1
2
3
TUNER
AUDIO
AUDIO IN PUT
4
AV / L
AV / R
VIDEO
S- VIDEO
VGA
DC
5
6
7
8
9
13
AUDIO IN P UT
1
AUDIO
TUNE R
2 3
AV/ R
AV/ L
V IDIO
S- V IDIO
4 5 6 7
V GA
DC
8
9
Production Specifications:
Color active matrix TFT (Thin-Film-Transistor)
LCD panel
19 inch
Cell Type
Active size
Display Area
Panel spec
TV System
Picture
Sound
Features
Terminal
Power Consumption
Accessories
405(h) x 255 (v) MM
1440(H)X900(V)
resolution
Pixel Pitch
Brightness / Contrast
Viewing
Angle(L/R/U/D)
Response Time
Color System
Sound System
Progressive Scanning
Color Tint Control
Digital Comb Filter
Speaker Output(RMS)
75/75/75/60
8ms
NTSC.
M
YES
YES
YES
2X3W
Blue Background
On-off Sound
STERO
Plug &Play
Remote control
TV Antenna
S-Video in
A/V(Composite) in
PC (VGA) In
PC Audio In
Audio Out
On working
Stand By
YES
YES
YES
YES
YES
YES
YES
YES
YES
YES
YES
<50W
<5W
0.285 x 0.285
300 nit/ 700:1
Remote control/ user manual /3-color cable/ adapter /power cord,/VGA
cable/Audio cable
Net weight
Gross weight
3.5kg
5kg
Original size
525(L)x195(w)x390(H)
14
Maintaining Your TV
Periodically cleaning the exterior of your TV can reduce the chance of dust being
collected which can block the ventilation holes; hence, prolonging the life of your TV.
Please refer to the instructions below for cleaning your TV:
1. Unplug the power
Unplug the LCD TV from the wall outlet before cleaning the TV.
2. Avoiding water and liquid
Never spray or pour any liquid directly onto the screen or case. Avoid allowing any water
or liquid from entering the LCD TV or accessories.
3. Cleaner
Use water or non-ammonia/non-alcohol based glass cleaner. Do not use harsh or
abrasive cleaners such as ketene(acetone), ethanol, toluene, acetic acid, methane,
chloride, or other detergents to clean the TV, these chemicals can damage the LCD TV.
4. Screen
To clean your LCD TV screen, use water or a mild cleaner, as listed above. Moisten a
soft, clean cloth. If possible, use a special screen clearner sheet or a solution suitable for
static electrical appliances. Using any cleaner other than water or a mild cleaner may
damage your TV and will not be covered under the warranty.
5. Storage of unit
If the LCD TV is not in use for a long time, please unplug it and store it in its original box
to avoid any damage.
6. Disclaimer
Any damage resulting from use of any cleaner that is not mentioned above is not
covered under the terms of the warranty on this product.
Warning: To prevent electrical shock, do not open the LCD TV casing. Leave repairing of
the TV to qualified personnel; please refer to the Warranty for tech support information.
15
Troubleshooting
When there is no picture or sound
‧ Make sure the AC adapter is properly inserted in the
Power outlet.
•
Reception other than those of broadcasting stations can
be considered.
•
Make sure the input mode is set to TV.
•
Make sure the main power switch of the main unit is
on.
When there is no picture from AV.
‧ Make sure the BLACK LEVEL is properly adjusted.
‧ The fluorescent lamp may have reached the end of
service life.
‧ Make sure the video I/P terminal is not free of
connections.
When there is no sound.
‧
‧
‧
Make sure the volume is not set to minimum.
Make sure the sound is not set to mute.
Make sure that headphones are not connected.
When the is no picture or sound, just noise.
‧
‧
‧
The reception may be weak.
The state of the broadcast may also be bad.
Make sure the antenna is not disconnected.
16
When the picture is not clear.
‧
The reception may be weak.
‧
‧
The state of the broadcast may also bad.
Make sure the antenna is not disconnected.
When the picture is light or improperly tinted.
‧
‧
Check color adjustment.
Check color system setting.
When the picture is too dark.
‧ Press the Brightness button.
‧ Check PICTURE and BLACK LEVEL adjustment.
‧ The fluorescent lamp may have reached the end of
service life.
When the remote control does not work.
‧ Check the batteries of the remote controller.
‧ Make sure the remote sensor window is not under
strong fluorescent lighting.
‧ The fluorescent lamp may have reached the end of
service life.
17
When the picture is not sharp.
‧
The reception may be weak.
‧
The state of the broadcast may also be bad.
‧
Make sure the antenna is not disconnected.
When the picture moves.
‧
The reception may be weak.
‧
The state of the broadcast may also be bad.
‧
Make sure the antenna is not disconnected.
When the picture is doubled or tripled.
‧ Make sure the antenna is facing the right direction.
‧ There may be reflected electric waves from
mountains or buildings.
The picture is spotted.
‧
There may be interference from automobiles, trains,
high voltage lines, neon light, etc.
‧ There may be interference between the antenna cable
and power cable. Try to pull them further apart.
18
When there are stripes on the screen or colors fade.
‧ Is the unit receiving interference from other devices?
‧ Transmission antennas of radio broadcasting station
and transmission antennas of amateur radio and
cellular phones may also cause interference.
‧
Use the units as far apart as possible from device that
may cause possible interference.
19