1
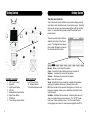
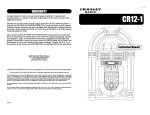
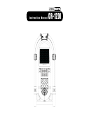
Instruction Manual
CR-12DI
IMPORTANT SAFETY INSTRUCTIONS
PLEASE READ CAR EFULLY ALL THE FOLLOWING IMPORTANT SAFEG UARDS T H AT ARE APPLICABLE TO YOUR EQUIPMENT
1.
2.
3.
4.
5.
Read Instructions - All the safety and operating instructions should be read before the product is operated.
Retain instructions - The safety and operating instructions should be retained for future reference.
Heed Warnings - All warnings on the product and in the operating Instructions should be adhered to.
Follow Instructions - All operating and use instructions should be followed.
Cleaning - Unplug this product from the wall outlet before cleaning.
Do not use liquid cleaners or aerosol cleaners. Use a damp cloth for cleaning.
6. Attachments - Do not use attachments not recommended by the product manufacturer as they may cause hazards.
7. Water and Moisture - Do not use this product near water - for example,
near a bath tub, wash bowl, kitchen sink, or laundry tub; in a wet basement; or near a swimming pool; and the like.
8. A product and cart combination should be moved with care. Quick stops, excessive force,
and uneven surfaces may cause the product and cart combination to overturn.
9. Ventilation - Slots and openings in the cabinet are provided for ventilation and to ensure reliable operation of the product and to protect it
from overheating, and these openings must not be blocked or covered, The openings should never be blocked by placing the product on
a bed, sofa, rug, or other similar surface. This product should not be placed in a built - in installation such as a bookcase or rack unless
proper ventilation is provided or the manufacturer's instructions have been adhered to.
10.Power Sources - This product should be operated only from the type of power source indicated on the marking label, if you are not sure
of the type of power supply to your home. Consult your product dealer or local power company. For products intended to operate from
battery power, or other sources, refer to the operating instructions.
11.Grounding or Polarization - This product may be equipped with a polarized alternating-current line plug (a plug having one blade wider
than the other). This plug will fit into the power outlet only one way. This is a safety feature.
If you are unable to insert the plug fully into the outlet try reversing the plug, If the plug should still fail to fit,
contact your electrician to replace your obsolete outlet. Do not defeat the safety purpose of the polarized plug.
12.Power - Cord Protection - Power - supply cords should be routed so that they are not likely to be walked on
or pinched by items placed upon or against them, paying particular attention to cords at plugs,
convenience receptacles, and the point where they exit from the product.
13.Lightning - For added protection for this product during a lightning storm, or when it is left unattended and
unused for long periods of time, unplug it from the wall outlet and disconnect the antenna or cable system. This
will prevent damage to the product due to lightning and power - line surges.
14.Power Lines - An outside antenna system should not be located in the vicinity of overhead power lines or
other electric light or power circuits, or where it can fall into such power lines or circuits. When installing an outside antenna system,
extreme care should be taken to keep from touching such power lines or circuits as contact with them might be fatal.
15.Overloading - Do not overload wall outlets, extension cords, or integral convenience receptacles as this can result
in a risk of fire or electric shock.
16.Object and Liquid Entry - Never push objects of any kind into this product through openings as they may touch dangerous voltage points
or short - out parts that could result in a fire or electric shock. Never spill liquid of any kind on the product.
17.Servicing - Do not attempt to service this product yourself as opening or removing covers may expose you to dangerous voltage or other
hazards. Refer all servicing to qualified service personnel.
18.Damage Requiring Service - Unplug this product from the wall outlet and refer servicing to qualified service personnel under the
following conditions;
a. When the power-supply cord or plug is damaged.
b. If liquid has been spilled, or objects have fallen into the product.
c. If the product has been exposed to rain or water.
d. If the product does not operate normally by following the operating instructions. Adjust only those controls that are covered by the
operating instructions as an improper adjustment of other controls may result in damage and will often require extensive work by a
qualified technician to restore the product to its normal operation.
e. If the product has been dropped or damaged in any way.
f. When the product exhibits a distinct change in performance - this indicates a need for service.
19.Replacement Parts - When replacement parts are required, be sure the service technician has used replacement parts specified by the
manufacturer or have the same characteristics as the original part. Unauthorized substitutions may result in fire, electric shock, or other hazards.
20.Safety Check - Upon completion of any service or repairs to this product, ask the service technician to perform safety checks to determine that the product is in proper operating condition.
21.Heat - The product should be situated away from heat sources such as radiators. Heat registers, stoves, or other products
(including amplifiers) that produce heat.
WARNING: Changes or modifications to this unit not expressly approved by the party responsible for compliance could void the user's
authority to operate the equipment.
NOTE: This equipment has been tested and found to comply with the limits for a Class B digital device, pursuant to Part 15 of the FCC Rules.
These limits are designed to provide reasonable protection against harmful interference in a residential installation. This equipment generates, uses, and can radiate radio frequency energy and, if not installed and used in accordance with the instructions, may cause harmful
interference to radio communications. However, there is no guarantee that interference will not occur in a particular installation. If this
equipment does cause harmful interference to radio or television reception, which can be determined by turning the equipment off and on ,
the user is encouraged to try to correct the interference by one or more of the following measures:
• Reorient or relocate the receiving antenna.
• Increase the separation between the equipment and receiver.
• Connect the equipment into a circuit different from that to which the receiver is connected.
• Consult the dealer or an experienced radio TV technician for help.
1
WARNING:
TO PREVENT FIRE OR SHOCK HAZARD, DO NOT EXPOSE THIS APPLIANCE
TO RAIN OR MOISTURE. DO NOT REMOVE COVER. PILOT LAMPS SOLDERED
IN PLACE. NO USER SERVICEABLE PA RTS INSIDE. REFER SERVICING TO
QUALIFIED SERVICE PERSONNEL.
CAUTION:
RISK OF ELECTRIC SHOCK
DO NOT OPEN
CAUTION:
TO REDUCE THE RISK OF ELECTRIC SHOCK, DO NOT REMOVE
COVER (OR BACK). NO USER - SERVICEABLE PARTS INSIDE.
REFER SERVICING TO QUALIFIED SERVICE PERSONNEL.
The lighting flash with arrowhead symbol, within an equilateral triangle, is intended to alert user to the presence of uninsulated
"dangerous voltage" within the product's enclosure that may be of
sufficient magnitude to constitute risk of electric shock to persons.
The exclamation point within an equilateral triangle is intended to
alert user to the presence of important operating and maintenance
(servicing) instruction in the literature accompanying the appliance.
Specification
POWER SOURCE
: AC120V~60HZ
POWER CONSUMPTION : 170W
SPEAKER
: Bass 6 1/2 4 Ohm x 2
: Tweeter 2 1/2 8 Ohm x 2
*DESIGN AND SPECIFICATIONS SUBJECT TO CHANGE WITHOUT NOTICE.
122 0 E ast O ak S tr eet • Loui s vi ll e, Kent uc k y 40206
w w w. c r o s l e y r a d i o . c o m
2
We l c o m e
Thank you for purchasing the Crosley Digital Jukebox (CR12-DI).
Before operating this unit, please read this manual thoroughly and
retain it for future reference.
About This Manual
Instructions in this manual describe the controls and functions of the
Crosley Digital Jukebox. Please see included iTunes User Guide
for information on operating iTunes.
Included in this package
Digital Jukebox
Remote Control
Stylus Pen
Keyboard
Mouse
Instruction manual
iTunes User Guide
Computer Box
Table of Contents
Getting Started
Unpacking ..................................4
Power Source ............................4
Touchscreen Monitor ..................4
Control Locator ..........................5
Touchscreen Controls ................6
Basic Operation
Set Up ........................................7
Powering up your jukebox ..........7
Inserting a CD ............................8
External Speaker Jacks ..............8
General
Troubleshooting ..........................9
Warranty....................................10
3
Getting Started
Unpacking
1. Remove the jukebox from the box.
2. Remove all packing material from the jukebox.
3. Untie AC Power Cord and remove its plastic safety cover.
Note: Save all packing materials in case the jukebox needs to be moved or returned.
4. Remove the jukebox stand from the box.
5. Remove all packing materials from the stand.
6. Several items are packed in the stand drawer including
the computer box. Remove all items from the stand drawer.
Important: Please call 1-800-275-2273 to register the warranty for the computer.
You will need the part number and the serial number located on the computer box.
Power Source
1. Unwind the AC Power Cord at the back of the unit and
make sure the plastic safety cover is removed.
2. Plug the AC Power Cord into and appropriate outlet
Note: This product may be equipped with a polarized alternating current line plug
(a plug having one blade wider than the other.) This plug will fit into the power
outlet only one way. This is a safety feature. If you are unable to insert the plug
fully into the outlet, try reversing the plug. If the plug should still fail to fit, contact
your electrician to replace your obsolete outlet.
Touchscreen Monitor
Using the touch screen easily allows you complete control of media
server using only the included stylus or your fingertip. Simply touching
the stylus to the monitor brings the pointer to where you need it.
Below are some things to watch out for when using the touchscreen
monitor.
1. When cleaning the monitor, use the included micro-fiber lint
free cloth to wipe it clean of dust and debris.
2. Do not apply pressure to the screen when wiping.
3. Avoid contacting the screen with liquids. Chemical cleaners
can damage the screen or the monitor.
4. When using the stylus, avoid using excess pressure.
Excess pressure could cause damage to the touchscreen.
4
Getting Started
Getting Started
Touchscreen Controls
5.
1.
3.
2.
9.
Control Locator
5
6.
7.
8.
1.
2.
3.
4.
5.
6.
7.
8.
4.
LCD Touch Screen
Speakers
Light Control Button
CD Slot
Media Server Power Button
Main Power Button
USB Ports
Touch Screen Power Button
1.11.
10. 2.
3.
4.
5.
6.
7.
Unit Controls
9. AC Power Cord
10. Speaker Switch
11. External Speaker Jacks
Your touchscreen monitor doubles as your jukebox display, and an
input device which eliminates need of a computer mouse. Selecting
items on the screen is as simple as tapping them with the included
stylus. For more information, please consult the included touchscreen manual.
There are several shortcut buttons
added to the bottom of the iTunes
screen. The diagram below shows
their location followed by a description of what each button does.
Restart - Allows you to reboot the jukebox
Close - Closes the iTunes interface and turns computer off
Volume + - Increases the volume of the jukebox
Volume - - Decreases the volume of the jukebox
Mute - Turns off the sound
Visual- Activates the iTunes visualizer, a display that generates
exciting color patterns that move in time with your music
EQ - Direct access to the equalizer which gives you control over
frequency response. Allows you to adjust bass and treble to fine
tune the sound
Calibrate - Calibrates the touchscreen. Accessing this menu will
allow you to adjust touch screen response. The “Lift Off” mode
locks your iTunes interface in place. Turn the mode off when
moving songs and content to create personal playlists and CD's
6
Basic Operation
Set Up
1.Place the jukebox stand on a flat level surface where you
would like the jukebox to be located. With the help of another
person, carefully lift the jukebox onto the stand.
2.Place the keyboard and monitor in the drawer of the
jukebox stand for storage.
3.There is a stylus pen holder on the inside of the drawer for
storing the stylus pen when not in use.
Basic Operation
Inserting A CD
1. To play a CD, insert the
CD into the CD slot.
2. Push the CD into the
jukebox until the internal computer grabs it and pulls it in.
3. To eject, press the eject button on the display window.
Basic Operation
Powering UpYour Jukebox
Lights
To turn the on the lights, press the Light Control button (3).
Once the lights are turned on, the bubble tubes will start to bubble
in 10-15 minutes.
Note: The bubble tubes will not bubble without the lights being on.
Sound
1.Press the Main Power button (6).
This turns on the main power and amplifiers.
2.Press the Media Server Power button (5).
This will activate the Server.
3.Press the power button on the touchscreen monitor to
turn it on.
4.Once everything is powered up and iTunes is showing on
the monitor, the jukebox is ready for use. Use the included
stylus pen to operate the touch screen monitor.
5.See the included iTunes User Guide for information on
using iTunes.
Note: iTunes User Guide is also available for download at www.apple.com
7
External Speaker Jacks
1.This jukebox is equipped with external speaker outputs.
These outputs allow the user to add additional speakers if
desired.
2.The speaker jacks for external speakers are located on the
back of the radio. Beside the speaker jacks is the Speaker
Switch (9) which is labeled (INT./EXT./MIX). The INT. setting
will only allow the internal speakers to play. Setting the
switch to EXT. redirects the power to the external speaker
jacks. To play the internal and external speakers together,
place the switch in the MIX position.
3.If you decide not to use the external speakers, be sure the
switch is on INT..
8
ED WARRANTY
General
Troubleshooting
There is no sound
1. Make sure the Main Power is turned on.
2. Be sure the Speaker switch is set to the proper setting.
3. Check that the volume is not muted.
Bubble Tubes
Bubble Tubes not bubbling
1.The bubble tubes take 10-15 minutes to warm up after the lights
are turned on before they begin to bubble. If after 15 minutes the
tubes aren't bubbling, very gently tap on the bottom part of the
tube with your fingernail to start the bubbling.
Bubble Tubes Characteristics
Your jukebox is equipped with four "Bubble Tubes". Bubble Tubes have
been used in jukeboxes since the 1940s. Their bright bubbling appearance
creates an enchanting display which adds color and movement to your
Crosley Jukebox. The tubes are very safe in their sealed environment,
however, care should be taken not to jar or bend the tubes. If broken, you
should not handle the fluid. Clean up fluid with a dry cloth. Like the neon in
your Crosley jukebox, bubble tubes should never wear out.
It takes 10-15 minutes for the bubble tubes to begin bubbling after the
jukebox has been turned on. If the bubbles don't start in that length of time
you can very gently tap on the bottom of the tube with your fingernail to
start the bubbling.
The "air" at the top of each tube is not air, but a vacuum. The amount of
vacuum may be greater or smaller at various times due to atmospheric
conditions and ambient temperature. The tubes must have the vacuum at
the top so that they do not shatter when heated. Although some of the vacuum is hidden by the chrome pieces on the jukebox it is considered normal
to have a small amount of vacuum or air space showing.
Wa r r a n t y
ED WARRANTY
Crosley Digital Jukeboxes are warranted against defects in material
and workmanship for a period of 1 Year beginning from the date of
sale to the retailer/end user.
Should the unit fail under normal usage during the 1 Year warranty
period, a request for RETURN AUTHORIZATION (R.A.) must be
made by the retailer/end user before returning the unit. This request
can be by mail or phone to the Customer Service Department at the
address below.
Please call 1-800-275-2273 to register the warranty for the computer.
You will need the part number and the serial number located on the
computer box.
If it is necessary for the jukebox to be returned for replacement or
repair, you must pack it to insure the jukebox is returned to us safely.
Display the RETURN AUTHORIZATION on the outside of the carton
which will be returned to:
CROSLEY
DEER PARK DISTRIBUTORS, LLC
111 W. Birch St., P.O. Box 370
Brownstown, IL 62418
618-427-3761
For product and parts information, call Customer Service at
(618)427-3761, 8:30 A.M. to 4:30 P.M. (CST) Monday to Friday.
The warranty does not apply to Crosley Jukeboxes which have been repaired by
unauthorized persons in any way so as, in our judgment to reduce their performance or reliability,
or which have been subject to misuse, abuse, neglect or accident.
This warranty gives the retailer/end user specified legal rights in addition to
any rights which vary from state to state.
Certain warranty issues may be handled by a third party.
In accordance with the "Moss-Magnuson Warranty Act" of July 10, 1975,
this is termed a "limited warranty" which in no way compromises
Crosley Radio's high standards of Quality and Workmanship.
9
10
1220 East Oak Street
Louisville, Kentucky 40204