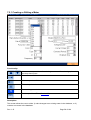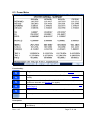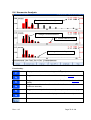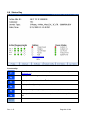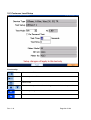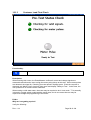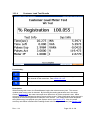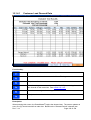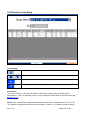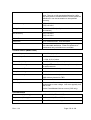
1
PowerMaster® 5 Series Firmware Version 1.0.0.28 Product Manual Revision 1.15 Rev: 1.15 Page 1 of 184 Copyright Notice: Copyright © by TEC, 2011. All rights reserved. No part of this document may be reproduced, transmitted, transcribed, stored in a retrieval system, or translated into any language in any form by any means without the express written permission of TEC. Disclaimer This documentation is provided for information purposes. TEC makes no warranty of any kind with regard to this material, including, but not limited to, the implied warranties of merchantability and fitness for a particular purpose. TEC shall not be liable for errors, omissions, or inconsistencies which may be contained herein or for incidental or consequential damages in connection with the furnishing, performance, or use of the material. Information in this document is subject to change without notice and does not represent a commitment on the part of TEC. Rev: 1.15 Page 2 of 184 Table of Contents Contacting Powermetrix ............................................................................... 6 Warranty ........................................................................................................ 8 Safety ............................................................................................................. 9 Product Manual Release Notes .................................................................. 10 1 Introduction ........................................................................................... 12 2 Product Description.............................................................................. 16 2.1 Keypad ........................................................................................................................... 16 2.1.1 3 Keypad and USB Keyboard Use Table.................................................................... 20 2.2 Screen ............................................................................................................................ 22 2.3 Connector Panel ............................................................................................................. 22 2.4 Communication Ports...................................................................................................... 24 2.5 Battery ............................................................................................................................ 25 2.6 Standard Accessories ..................................................................................................... 27 2.7 Optional Accessories ...................................................................................................... 27 Graphical User Interface....................................................................... 34 3.1 Controls .......................................................................................................................... 34 4 Splash Screen ....................................................................................... 38 5 Menu System......................................................................................... 39 6 Main Menu (Pre Site Selection) ............................................................ 40 6.1.1 7 Main Menu (After Site Selection) ............................................................................. 41 Site Selection and Editing .................................................................... 44 7.1 How Do I Select A Site?.................................................................................................. 45 7.2 How Do I Edit A Site?...................................................................................................... 45 7.3 How Do I Delete A Site? ................................................................................................. 46 7.4 How Do I Create A New Site? ......................................................................................... 46 7.4.1 Details On Creating a New Site ............................................................................... 47 7.4.1.1 Details on Creating and Editing a Test Setup .................................................. 49 7.4.1.2 Details on Creating and Editing a Phantom Load Setup .................................. 51 7.4.2 Creating a New Site (Page 2) .................................................................................. 54 7.4.3 Creating a New Site (Page 3) .................................................................................. 55 7.4.4 Creating a New Site (Page 4 & 5)............................................................................ 56 7.5 Meter Editor .................................................................................................................... 57 7.5.1 7.6 Rev: 1.15 Creating or Editing a Meter...................................................................................... 58 PT Editor......................................................................................................................... 59 Page 3 of 184 7.6.1 7.7 CT Editor .........................................................................................................................61 7.7.1 7.8 7.9 Creating or Editing an AMR .....................................................................................64 Site Editor FAQ’s .............................................................................................................65 Hot Keys ................................................................................................ 68 8.1 Waveforms ......................................................................................................................71 8.2 Vector Diagram ...............................................................................................................73 8.2.1 Vector Diagram Reference.......................................................................................75 8.2.2 Vector Diagram Wiring Display ................................................................................76 8.3 Power Meter ....................................................................................................................77 8.4 Harmonics Analysis .........................................................................................................79 8.4.1 9 Creating or Editing a CT ..........................................................................................62 AMR Editor ......................................................................................................................63 7.8.1 8 Creating or Editing a PT...........................................................................................60 Harmonics Details....................................................................................................81 8.5 Full Analysis ....................................................................................................................83 8.6 Status Key .......................................................................................................................84 8.6.1 Software Revisions ..................................................................................................86 8.6.2 Probe Scan..............................................................................................................87 Integrated Site Test ............................................................................... 90 10 Meter Testing......................................................................................... 92 10.1 Customer Load Setup......................................................................................................94 10.1.1 Customer Load Setup With Demand Test................................................................96 10.1.2 Customer Load Probe Setup....................................................................................98 10.1.3 Customer Load Final Check.....................................................................................99 10.1.4 Customer Load Test Results..................................................................................101 10.1.4.1 Customer Load Demand Data........................................................................103 10.1.4.2 Customer Load Trending Data .......................................................................105 10.2 Phantom Load Setup.....................................................................................................106 10.2.1 Phantom Load Test Procedure ..............................................................................108 10.2.2 Phantom Load Test Results...................................................................................111 11 Transformer Testing ........................................................................... 114 11.1 CT Testing (Customer Load) .........................................................................................115 11.1.1 CT Test Probe Setup .............................................................................................118 11.1.2 CT Testing Results (Complete for Burden + Ratio) ................................................119 11.1.3 CT Testing Results (Complete for Burden Only) ....................................................121 11.1.4 CT Testing Results Graphs....................................................................................123 Rev: 1.15 Page 4 of 184 11.1.4.1 CT Testing Results Data................................................................................ 124 11.1.4.2 CT Testing Results Data (Burden Only)......................................................... 125 11.1.4.3 CT Demagetization........................................................................................ 126 11.2 CT Bench Top Testing (Load Box) ................................................................................ 128 11.3 CT Boost Testing (Load Box) ........................................................................................ 132 12 Data Trending ...................................................................................... 138 12.1 Trending Results........................................................................................................... 140 12.2 Recalling Trend Results ................................................................................................ 141 13 Recall Data........................................................................................... 144 14 Utilities................................................................................................. 146 14.1 Connect to Meter Site Manager .................................................................................... 147 14.2 Manual Load Box Control.............................................................................................. 148 14.3 Calibration Verification .................................................................................................. 150 14.3.1 Calibration Verification Setup ................................................................................ 151 14.3.2 Auto Calibration Check (Load Box) ....................................................................... 155 14.4 Save a Database Backup.............................................................................................. 159 14.5 Install a System Upgrade .............................................................................................. 161 14.6 Quick Edit ..................................................................................................................... 163 14.7 Set System Time........................................................................................................... 164 14.8 Edit Test Session Notes................................................................................................ 165 14.9 User Preferences .......................................................................................................... 166 14.9.1 Error Limits and Data Save Options ...................................................................... 166 14.9.2 Measurement Calculations .................................................................................... 168 14.9.3 General Settings ................................................................................................... 171 14.9.4 User Defined Fields for the Test Session .............................................................. 173 14.9.5 Load Box Labels ................................................................................................... 174 14.9.6 User Defined Fields for the Site............................................................................. 175 14.9.7 Display Preferences .............................................................................................. 176 15 Specifications...................................................................................... 178 Appendix 1................................................................................................. 182 Rev: 1.15 Page 5 of 184 Contacting Powermetrix General For general information regarding Powermetrix products and services, contact one of the following representatives listed in the table below: COMPANY Brownstown Electric Supply P.O. Box L 690 E. State Road 250 Brownstown, IN 47220 TERRITORY CONTACT IL, IN, KY,OH Phone: (800) 742-8492 Fax: (812) 358-2484 Website: www.brownstown.com Carlson Sales, Inc. 9317 NE Hwy 99 Ste O Vancouver, WA 98665 AK, CA, HI, ID, MT, OR, UT, WA Phone: (360) 573-8203 Fax: (360) 573-8289 Website: www.carlson-sales.com Electrical Resources Co 5872 Sterling Dr. Howell, MI 48843 MI Phone: (517) 586-9000 Fax: (517) 586-9009 Website: www.elecres.com D.C., MD, NC, West PA, SC, East TN (east of I-75), VA, WV Phone: (919 )934-5802 Fax: (919) 934-9685 Website: www.ensales.com Ensales, Inc. 222 Peedin Rd. Smithfield, NC 27577 EUSCO, A Division of RESCO 4100 30th Ave. S. Moorehead, MN 56560 George M. Fraser, Ltd 1815 Ironstone Manor Unit #11 Pickering, Ontario L1W 3X9 Hotline Electrical Sales & Service 6120 West 73rd Ave. Arvada, CO 80003 Kriz-Davis Co. 1516 NW Saline Topeka, KS 66618 IA, MN, ND, SD, NE, WI Canada AZ, CO, NM, NV, WY KS, MO Shamrock Power Sales 81 River Rd. Willinton, CT 06279 CT, MA, ME, NH, NY, RI, VT SouthCon 3724 1st Ave N. Birmingham, AL 35222 AL, GA (excluding Georgia Power), West FL (west of Apalachicola River), MS (Mississippi Power only) Tri-State Utility Products, Inc. 160 Garrett Dr. Havana, FL 32333 Powermetrix Rev: 1.15 East FL (east of Apalachicola River) AR, DE, LA, TN, MS, OK, Phone: (800 )346-3330 Fax: (218) 233-0695 Website: www.resco1.com/eusco.htm Phone: (905) 420-6555 Fax: (905) 420-4333 Email: [email protected] Website: www.gmfraser.com Phone:(303) 430-9552 Fax: (303) 427-0435 Website: www.hotlineelectrical.com Phone: (785) 354-9532 Fax: (785) 354-1129 Email: [email protected] Website: www.krizdavis.com Phone: (860) 487-3710 Fax: (860) 487-3813 Email: [email protected] Phone: (205) 324-8656 Fax: (205) 328-2292 Website: www.southcon.net Phone: (850) 539-8088 Fax: (850) 539-8087 Website: www.tristateutility.com Phone: (865) 966-5856 Page 6 of 184 10737 Lexington Dr. Knoxville, TN 37932 East PA, NJ, TX, Central & South America & Other ANSI Standard Metering Countries Fax: (865) 675-2156 Website: www.powermetrix.com Technical Support For technical support, please contact the factory at (865) 218-5838 (877-966-5851 toll free) and ask for “Powermetrix Technical Support.” You may alternatively email Powermetrix at [email protected]. The support staff will answer questions about the operation and care of your equipment, assist you in troubleshooting a problem, and help you overcome common application difficulties whenever possible. If it becomes necessary for your equipment to be returned to us for any reason, you will be issued an RMA number during the technical support contact. Feedback Powermetrix depends on information from our customers to continue the attributes of quality, dependability, and simplicity associated with our products. We invite you to contact our Technical Support office. Calibration and Certification Your Powermetrix equipment is calibrated and certified effective the date of shipment. Powermetrix requires the unit to be calibrated by Powermetrix or a Powermetrix authorized service facility on an annual basis to insure accuracy and currency of installed electronic components. In addition, current and voltage probes are also required calibration on an annual basis or when dropped, damaged or suspect of improper operation. The unit is identified as calibrated by a sticker stating the date of calibration and next due date of calibration. A certificate of calibration is provided to you to verify compliance to inspectors. A permanent record of your calibration is maintained by Powermetrix. For information on calibration services, contact Powermetrix Technical Support. Additional services to be included at no additional charge during annual calibration: 1. 2. 3. 4. 5. 6. 7. Inspection of probes, cables, and internal circuit boards Proper maintenance and/or prevention to any suspect components ECN’s (Engineering Change Notices) Manual cleaning of unit, cables, probes, and case Update firmware Reproducibility report for clamp-on probes Service Report for all work completed NOTE: The annual calibration is required in order to comply with the terms of the PowerMaster® warranty. See “Warranty” in the next section for details. Rev: 1.15 Page 7 of 184 Warranty PowerMaster® 5 Series Warranty TEC/Powermetrix Division warrants the POWERMASTER®® product to be free of defects in material and workmanship for a period of two (2) years following the purchase date. Note that there are no user serviceable parts in the unit. The warranty covers the POWERMASTER®® provided it is properly used, stored and maintained in accordance with provisions in the User Manual. Items not covered under the warranty policy include (but not limited to) cracked or broken LCD, water damage, connecting auxiliary leads to voltages above 530V AC, and neglect to the battery (see Section 2.5). Annual calibration at the Knoxville TN factory is required to maintain the validity and terms of this warranty. Please call TEC-Powermetrix Division at (865)966-5856 to obtain an RMA number and form prior to any return of equipment for service or recalibration. Your PowerMaster® unit will alarm you when it is time for a recalibration. Please send your unit in at this time. If an annual calibration is not maintained for over one (1) year from either the purchase date or the last calibration date (within a maximum of two (2) years from purchase date), the warranty is null and void. To re-enter the warranty period, the customer must send the POWERMASTER®® in for calibration cost. At this time the warranty period is valid for one (1) year from calibration date, as long as the two (2) year time period has not exceeded the purchase date. If a repair is required while the POWERMASTER® is within two (2) years from purchase date, but outside one (1) year of last calibration, the customer has the option of paying for the repair cost or paying for the annual calibration cost to be re-instated into the warranty period (within a maximum of two (2) years from purchase date). If the POWERMASTER® is outside the purchase date of two (2) years, the cost of the calibration and/or repair service will be at the customer’s expense. Rev: 1.15 Page 8 of 184 Safety Operation of the PowerMaster® and the supplied accessories and adapters can present the user to potentially hazardous conditions. Please follow all required safety procedures set forth by the user’s safety organization within the company. If no safety organization exists, please follow all applicable OSHA rules and standards for PPE (Person Protective Equipment) when working in high voltage and low voltage environments. This equipment should be used by trained and qualified personnel ONLY. Safety Tips for Testing: 1. Connect the green safety ground to a true earth ground (if possible) before testing begins. Remove the green safety ground last after testing is complete. 2. Verify the probe is rated for the voltage and current being tested (see Section 2.6 for probe specifications). 3. Never connect a probe around a conductor or connect to a live terminal before terminating it to its cable and to the PowerMaster® . 4. Never disconnect the Current Direct probes (duck bill) from the PowerMaster® while still inserted into the test switch. This will cause the CT to have an open circuit. 5. For LiteWire probes, verify the fiber optic cable is clean to prevent surface arcing. For cleaning and maintenance information, refer to the Amp LiteWire or Volt LiteWire manual supplied with the probe. 6. When using LiteWire probes, verify the hot stick being used has been certified previously to prevent high voltage arcing. 7. When inserting duck bill probes into a test switch, short the CT secondary (+) first by pulling the test switch in an open position. This will prevent possible arcing. 8. For clamp-on probes, clean contact surfaces and then snap and release the jaws to verify a metal-to-metal contact of the jaws (dirt and grease may contaminate the surfaces). 9. For flexible probes, take care to pad mount CT installations. Always wear appropriate PPE when inside the CT installation. 10. For pad mount CT installations, be wary of various items around the installation (chairs, tables, etc.) which can potentially become a safety hazard. Rev: 1.15 Page 9 of 184 Product Manual Release Notes Product: PowerMaster® 5 Series Release Date: 6/30/11 Manual Version: 1.15 What’s New 1. Fixed a typo in Section 7.4.1. 2. Updated representatives section. 3. Added section for PT Testing with the VP600 probe. 4. Clarified some details in Section 10.2. 5. Added error message descriptions in Section 10.2.1. Rev: 1.15 Page 10 of 184 1 Introduction Rev: 1.15 Page 11 of 184 1 Introduction The PowerMaster® 5 Series is a top-of-the-line field instrument with a true 3-phase analyzing standard with optional integrated current and voltage sources. Accuracy With an accuracy of ± 0.04% in the field, the PowerMaster® is more accurate than most lab standards and 5 times more accurate than most meters. User Interface The user interface is a Windows CE based program that enables the user to perform complex tasks with an easy-to-use dashboard. The Main Menu can be easily accessed at any time pressing the HOME key. This allows the user to either select the appropriate test within the list, or select "Integrated Site Testing" which incorporates all tests together in a step-by-step process. Hot keys on the front panel are used as shortcuts to quickly view the vector diagram, power meter, waveforms, and harmonics at any time during testing. A dynamic HELP function was developed to not only direct the user to the appropriate section of the pre-loaded user manual, but it will also display to the user possible errors found concerning the test and appropriate actions that need to be taken. With features designed to help the meter technician with their job, this user interface is a tool for beginners to metering that normally was designated to seasoned technicians and engineers only. Integrated Site Testing Using Integrated Site Test, the user can easily test the entire site using a step-by-step process that eliminates mistakes and proves the installation is operating accurately. Integrated Site Test allows the user to perform ALL of the tests that are built into the PowerMaster®. The user will have the option to customize each test for a particular site, which can be associated to any site in the database. These test setups can be created and customized as many as required. Instrument Transformer Testing Some of the most powerful features of the PowerMaster® are in the Instrument Transformer Testing section. The PowerMaster® has the ability to simultaneously test all three CT's in the metering circuit. Using the Hot Keys, the user can quickly view the power pairs (secondary and primary) for diagnostics. Each test displays the graphs of the burden, ratio, and parallelogram for all phases on one page. Using the dynamic HELP function, if any errors are found during testing, the user can quickly determine the problem with a supplied list of tips and diagnostic features. If the CT circuit has little to no load, the CT can be added with load to perform a test in the field. No separate boxes or devices are needed. Customer Load Meter Testing In accordance with ANSI C-12.1-2001 using Method 3 (5.1.5.3), a customer load test can be performed. The PowerMaster® can determine within seconds on how accurate the meter is under real-world conditions. Determining this accuracy is incredibly valuable since the customer is being billed under these conditions. Phantom Load Meter Testing Implementing a true 3-Phase current source, the PowerMaster® can simulate a phantom load meter test with an accuracy (± 0.04%) exceeding most meter shop test boards. The user interface allows the ability to select a pre-loaded setup or create a custom setup. Testing can be done under many varying conditions including active and reactive energy, and delivered or received energy flow. Without removing connections, a phantom load test can be performed while the meter is in the socket. The currents are injected with the standard lead sets (alligator current lead set available), so there is no need to change leads in the middle of a test. For meters without a test switch or self-contained meters, various meter base adapters are available. Rev: 1.15 Page 12 of 184 Hot Keys The user can easily access important functions at any time in the PowerMaster® with a push of a button. The 1) vector diagram, 2) power meter, 3) waveforms, and 4) harmonics all have dedicated buttons on the PowerMaster® front panel. Another function key, 5) full analysis, displays all four functions in one screen for a powerful overview of the entire circuit. The 6) status key can be pressed to view the condition of the test setup and the internal workings of the PowerMaster®. These keys can be alternatively accessed using a PC/laptop or USB keyboard via function keys (F7-F12 respectively). Database The PowerMaster® has a built-in SQL database that can hold all information pertaining to the site including (but not limited to) the meter, CT, PT, AMR, account number, address, substation, GPS locator, billing multiplier, and when the site needs to be tested again. The user can easily select a pre-loaded component (meter, CT, PT, etc.) from our large database or create a new component to be associated to each metering site. Using the Meter Site Manager PC software, this information along with data results can easily be synchronized to the master database or formatted into a .csv or .txt file for exporting into the utility’s master database. The real power of having a built-in database inside the PowerMaster® is the ability to create a daily "route" of tests for the user that can be setup in the shop (or synched from Meter Site Manager) before going into the field. Hardware The PowerMaster® is housed in a compact Pelican 1550 case, which is waterproof, weathertight, and extremely rugged. The large front panel allows the user to keep safety gloves on at all times. The large buttons are on a tactile keypanel creating a splash-proof membrane. A keyboard and mouse can be alternatively used instead of the keypanel, which allows the user the freedom of operating the PowerMaster® identical to a PC. Implementing an 8.4 inch, full color transflective VGA display allows the user to view the data and operate much easier in full sunlight. It also prevents eye strain found in other products with small, black and white displays. Rev: 1.15 Page 13 of 184 Rev: 1.15 Page 14 of 184 2 Product Description Rev: 1.15 Page 15 of 184 2 Product Description This section gives the user a brief tour of the PowerMaster®. It describes the various keys and their functions, the input and output ports, and the standard accessories supplied with the PowerMaster®. Optional accessories are discussed later in Section 2.7. 2.1 Keypad The PowerMaster® keypad uses 46 function keys. Descriptions of all keys are discussed below: To turn the system on, press and hold down the ON key located at the top right of the PowerMaster® keypad until the green LED embedded in the key turns green. Once powered pressing the ON button again turns the system OFF. The PowerMaster® incorporates a power conservation function. If no activity (keystroke) occurs within 1 minute following the ON Rev: 1.15 Page 16 of 184 keystroke, the PowerMaster® will go into “sleep” mode in which the display is turned off. Any tests in process will not be affected. To restore the display press any key. The HOT KEYS are used to quickly access the power data at any time while using the PowerMaster®. All hot keys are located to the right of the display. The key functions are: 1) waveform display, 2) vector analysis, 3) power meter, 4) harmonics, and 5) full analysis, respectively. For more information on the hot keys, see Section 8. The STATUS key is used to determine the internal state of the PowerMaster®, the user’s setup criteria, and other helpful information. The STATUS key can be pressed at any time while using the PowerMaster®. The Function keys (F1 - F6) are located directly below the PowerMaster® display. Six rectangular boxes on the display directly above the function keys define their use as it corresponds to each screen. The purpose of each key may change from screen to screen. If any of the screen boxes are blank, the box’s corresponding key has no function in that screen. The TAB key moves the cursor from one field to the next field. The BACK TAB key moves the cursor from one field to the previous field. The DROP-DOWN key enters the drop-down box menu once the cursor is focused on that field. All available selections are displayed at the time of keystroke. This key also checks and unchecks checkboxes. Press the key a second time to select an item and close the dropdown list. The PREVIOUS key is used to allow the user to go back to the previous screen. Continually pressing this key will always take the user back to the Main Menu. The DIRECTIONAL keys are used to move the cursor up or down in a menu selection. Also, the keys are used to make selections in a drop-down box. These keys can be used alternatively to view selections in a drop-down box without having to press the DROP-DOWN key. Rev: 1.15 Page 17 of 184 The HOME key is used to quickly go back to the Main Menu in the PowerMaster®. This key can be pressed at any time. The HELP key is used to enter the troubleshooting mode when the PowerMaster® detects possible errors. It is also used to launch an electronic version of this User Manual. (Function currently in development; firmware update coming soon). The ESCAPE key is an “undo” key when entering text. Pressing ESC again “re-does” the previous text before edits were made. Also, check boxes will highlight/un-highlight when pressing the ESC key. The BACKSPACE key will delete one character at a time in a reverse direction OR delete the text in the field entry all together if highlighted PAGE UP and PAGE DOWN keys are used to move the screen either up or down one page. This function is available if information exceeds the first page of the screen. The ENTER key is used to accept data or a menu selection. The SPACE key is used to place a space in between text fields and can also be used to check/uncheck checkboxes. The ten alphanumeric keys (0 through 9 / A through &) are used to input alphanumeric values into the PowerMaster®. A single press followed by a one-second delay returns the numeric value (first character of the key. Two rapid presses followed by a one second delay returns the second character (first of the three alpha characters) of the key. Three or four rapid presses followed by a one-second delay returns the third or fourth (second or third alpha) characters of the key, respectively. For example, if you want to type the letter “N” which is the third character on its Rev: 1.15 Page 18 of 184 corresponding key, press the key three times rapidly, and then stop for one second. The letter “N” will appear on the screen. The symbols keys operate the same as the alphanumeric keys. These keys will normally be used when entering notes and comments in the PowerMaster®. Note the “period” key (second from left) is used to help enter the Kt value of the meter (ex. 1.8 Kt). Rev: 1.15 Page 19 of 184 2.1.1 Keypad and USB Keyboard Use Table The PowerMaster® allows the user to input a USB keyboard & mouse to alternatively operate the PowerMaster®. The USB keyboard & mouse is used by connecting to one of the USB ports labeled “USB PERIPHERALS.” The following table is an explanation for each corresponding key on the PowerMaster® keypad. Label PowerMaster Key USB Keyboard & Mouse Key On N/A Waveform hot key F7 Vector Diagram hot key F8 Power Meter hot key F9 Harmonics hot key F10 Full Analysis hot key F11 Status key F12 Function keys F1 – F6 Tab key Tab Back Tab key Shift, Tab Drop-Down key Num Lock disabled, 5 Previous key End Directional keys Rev: 1.15 Page 20 of 184 Home key Home Help key N/A Escape key Esc Backspace key Backspace Page Up, Page Down Page Up, Page Down Enter key Enter Space key Space bar Alphanumeric keys 1-0 (Numbers) Alphanumeric keys A-Z (Letters) Symbol keys Rev: 1.15 -, (, ), =, ., :, ;, “, +, @, #, $, ?, <, >, ! Page 21 of 184 2.2 Screen The full graphics Liquid Crystal Display (LCD) screen is how the PowerMaster® communicates with the user. In computer technology, the screen is the “graphical user interface.” The screen displays messages, menus, selection lists, and graphic illustrations. The display is 8.4” in diameter. It is a full-color VGA (video graphics array) with a resolution of 640 x 480 pixels. It is a transflective display, which means that the screen is readable in any lighting situation. The display can be read in full darkness as well as full sunlight. A thin piece of clear polycarbonate material is used to protect the screen and is mounted on top of the display. 2.3 Connector Panel Air Vent Fan CURRENT This connector provides direct access to the current inputs of the measuring standard. The standard current lead set has an eight foot lead terminated with three test switch probes (“duckbill”) for phases A, B, C. These probes are meant to insert into the test switch of a CT Rev: 1.15 Page 22 of 184 rated installation. The three AC current inputs are rated at 20 amps (50 amp inputs available on models 7305 and 7335) each. Optional current leads are available with other types of termination. VOLTAGE This connector provides direct access to the voltage inputs of the measuring standard. The standard voltage lead set has a eight foot lead terminated with four banana jacks and alligator clips for phases A, B, C, N. It also contains two separate leads for auxiliary power (AUX POWER and AUX NEUTRAL). The phase voltage inputs are intended to connect to the potentials of the metering installation. The four voltage measurement inputs are rated at 1000 VDC Peak (600 VAC Nominal) each. The AUX power leads can be connected to any AC source (45 – 65 Hz) having a voltage of 100 VAC to 530 VAC. When connected the system is powered from this source and if needed the internal battery will charge. PROBE SET 1 & PROBE SET 2 These connectors are used for all other probes (not including the test switch probes). The input connects to a 3-phase clamp-on probe cable (standard accessory) that is terminated with three connectors. One each for phases A, B and C. They are color-coded red, yellow and blue respectively. When probes are connected on the end of the 3-phase clamp-on probe cable, the PowerMaster® recognizes the type of probe and calibration detail. To use clamp-on current probes for secondary current measurements connect them to Probe Set 1. Secondary current probes are normally the MN353 probes. Probes for any other purpose can be connected to either probe set input. If you wish to use three probes for simultaneously measuring the primary currents for CT testing connect all three to the same probe set. When testing sites with CTs the user would normally use the CURRENT direct inputs to measure the secondary currents and probes connected to Probe Set 1 to measure the primary currents. In cases where a test switch is not available a set of MN373 probes would be connected to PROBE SET 1 for measuring secondary current and another set of probes (SR752, JM875, FLEX current probes, or Amp LiteWire) would be connected to PROBE SET 2 to measure primary current. By using two separate probe sets, the user can view both the secondary and primary currents without moving or changing connections. For self contained meters connect the current probes to PROBE SET 1. Specifications for available probes can be found in Section 2.7. AUX DIGITAL This external port is normally used with meter testing pickups. All pickups are terminated with the 9-pin connector. It can also be used as a calibration pulse output. Fan The fan is used to circulate cool air through the internal system during testing. When auxiliary power is connected to a voltage source (100-530Vac), the fan automatically powers on. Air Vent The air vent is used to vent the heat from the internal system during testing. DO NOT OBSTRUCT THE VENT IN ANY WAY. In the 5300 and 7300 the fan operates at a fixed speed. In all other models the fan is variable speed. The speed is controlled by the internal temperature. If environmental conditions combined with the heat generated from the voltage and current drives exceeds the ability of the fan to maintain acceptable internal temperatures a warning is displayed. If the temperature exceeds absolute maximum rating the system will automatically shut back operation. The audible speaker is also mounted behind the air vent for maximum volume. Rev: 1.15 Page 23 of 184 2.4 Communication Ports USB These two USB ports are used for external USB devices. Examples of these devices are: a keyboard, mouse, barcode reader, memory storage device, etc. USB TO HOST This port is for a Type B USB cable (standard accessory) for connectivity to a host computer. This port is used to communicate with the PowerMaster® PC software, Meter Site Manager. RS-232 This port is for legacy devices that may use the RS-232 connectivity. It can also be used to connect an ANSI C12.18 meter communication interface. ETHERNET This port is for a high speed connection including internet. AUDIO This port is for a headphone or microphone jack. All PowerMaster® sounds and beeps are exported out of this connection when a headphone is detected. Voice commands will also be available using a microphone (in development). Rev: 1.15 Page 24 of 184 2.5 Battery The PowerMaster® features a 14.4V, 4.5AHr Nickel Metal Hydride (NiMH) rechargeable battery pack internal to the unit. The charging circuit inside the PowerMaster® is considered to be a “fast charging” circuit. This circuit operates when Auxiliary Power is connected. Charging the Battery To charge the battery, connect the Auxiliary Power AC Adapter to VOLTAGE on the PowerMaster® and plug into a normal AC power outlet. Verify the Auxiliary Power switch is in the “ON” position (fans are running). The battery is also charged by connecting the Auxiliary Power leads (AUX PWR, AUX NEU) to a voltage source between 100-530VAC. WARNING: The battery must be charged at least once in a 30 day period. Not doing so will result in permanent damage to the battery requiring replacement at the customer’s expense. Charge Life With a full charge (100%), the battery will last between 4-5 hours. During data acquisition with the LCD backlight at full power, the battery will last between 1-2 hours. To extend charge life, by default the backlight powers off after 60 seconds if data acquisition is not occurring. A simple keystroke will power up the backlight again. Charging Time A full charge to the battery from a minimally charged state (10%) will take 2-3 hours. Battery Status To view the battery life in percentage, press the STATUS key. This will also display what state the charging circuit is in: Charger Ready Charging Top Off Mode Paused Fault When green, the battery status is at or near 100%. When red, the AUX power is not connected to line voltage When green, the battery is actively charging When green, the battery is performing a “trickle” charge to maintain 100% When red, the battery charge is shut down When red, the battery is detected to have an error Battery Status Rev: 1.15 Page 25 of 184 Battery Voltages The maximum voltage of the battery at full charge (100%) is 17V. When the battery voltage reaches 13V, the PowerMaster® will alarm the user to charge the battery as soon as possible. When the battery voltage reaches 12V, the PowerMaster® will automatically power off to prevent permanent damage to the battery. To view the battery voltage, press STATUS then F2 (Internals). Battery is currently charging (connected to AC power) PowerMaster® is powered on battery voltage exclusively (disconnected from AC power) Battery Life The PowerMaster® battery should last between 1-2 years with heavy use (400+ charge cycles). The battery must be replaced at the factory and cannot be replaced by the user in the field. Rev: 1.15 Page 26 of 184 2.6 Standard Accessories The PowerMaster® base unit comes with the following standard accessories: Part Number 10-340-0027 Product 3-Phase Test Switch Current Direct Probes Notes 0.1- 20A, 600V. Used for insertion into test switch. 10-340-0005 3-Phase Voltage Cable 10 - 600V. Terminated with banana jacks to allow user customization 10-340-0014 3-Phase Probe Adapter Cable Used for all current and voltage probes 10-100-1036 36” Flexible Current Probe 5 – 1000A. Normally used as a CT probe 10-340-0026 15’ Extension Cable Extension for any probe. EP10-100-3327 IR Pulse Detector For interfacing to the pulse output of solid state meters EP10-320-0433 CT Jumper Set Set of (4); For use when doing load box meter testing using “duckbill” probes (not included for the 5300) 75-800-4005 USB Communication Cable Type B USB cable for communication to a computer 10-340-0045 Auxiliary Power AC Adapter (North America) For plugging the PowerMaster® AUX power directly into a wall outlet. 75-900-7301 Soft Accessory Case Rugged case to store accessories Meter Site Manager Software to be used on a PC or laptop; Used for communicating with the PowerMaster® User Manual Printed manual for reference 2.7 Optional Accessories The accessories listed below are not included in the standard accessories package with the PowerMaster® base unit. These accessories are purchased as separate items. Detailed specifications can be found at www.powermetrix.com. As more features become available, more accessories will be available for purchase. Rev: 1.15 Page 27 of 184 CURRENT PROBES 10-140-3353 Set of (3) MN353 Clamp-On Probes These probes are normally used if no test switch is present or for testing a class 200 selfcontained meters. Range Max Voltage Opening Accuracy 10-1403375 0.1 – 150A 600V 0.83” (21mm) TBD Set of (3) MN375 Clamp-On Probes These probes are normally used if no test switch is present. Range Max Voltage Opening: Accuracy: 10-140-0752 0.1 – 10A 600V 0.83” (21mm) TBD Set of (3) SR752 Clamp-On Probes These set of clamp-on probes are normally used for class 200, 400, and 600 self-contained meter testing or CT ratio testing. Range Max Voltage Opening: Accuracy: 10-140-1036 0.001 – 1200A 600V 2.25” (57mm) TBD 36” Flexible Current Probe 1000A These probes are normally used for used for class 200, 400, and 600 self-contained meter testing or CT ratio testing. Range Max Voltage Opening: Accuracy: 10-140-1048 5 – 1000A 600V N/A TBD 48” Flexible Current Probe 1000A These probes are normally used for used for class 200, 400, and 600 self-contained meter testing or CT ratio testing. Range Max Voltage Opening: Accuracy: Rev: 1.15 5 – 1000A 600V N/A TBD Page 28 of 184 10-140-30K48 48” Flexible Current Probe 30,000A These probes are normally used for used for class 200, 400, and 600 self-contained meter testing or CT ratio testing. Other current ranges available upon request. Range Max Voltage Opening: Accuracy: 10-140-8016 5 – 30,000A 600V N/A TBD Amp LiteWire These probes are normally used for used for CT ratio testing. They can be used for high voltage (> 600V) or low voltage (< 600V) installations. Range Max Voltage Opening: Accuracy: 1 – 2000A 150,000V N/A TBD CURRENT & VOLTAGE DIRECT LEADS 10-340-0028 3-Phase Current Lead Set (terminated with alligator clips) This lead set is normally used for class 20 CT connected meters and CT testing. Range Voltage 0.1 – 20A 277 VAC to ground CABLES & ADAPTERS 10-340-0026 15 Foot Probe Extension Cable This cable is terminated with 8-pin connectors. Multiple cables can be connected serially for longer lengths - maximum length 45 feet. Any type of probe can be used with this extension cable. 10-340-0025 BNC to PowerMaster Probe Adapter Cable For connection to High Voltage Amp or Volt Litewire probe 75-700-2001 40' Fiber Optic Replacement Cable For High Voltage Amp and Volt Litewire Probes SPARE PARTS 22-100-1550 Hard Carrying Case for Accessories Rugged, watertight case. Can also be used as spare PowerMaster carry case EP10-320-3309 RS232 Cable Assy – comm. 75-800-4005 USB Cable 75-300-9001 Replacement clip for Flexible Current Probes 50-950-0001 White Alligator Clip Rev: 1.15 Page 29 of 184 50-950-0002 Black Alligator Clip 50-950-0003 Red Alligator Clip 50-950-0004 Yellow Alligator Clip 50-950-0005 Blue Alligator Clip 50-950-0006 Green Alligator Clip METER TESTING PICKUPS 10-100-3309 Suction Cup Infrared Pulse Pickup Infrared pulse detector with suction cup mount for attachment to electronic meter face. 10-120-0005 Isolated KYZ Contact Pickup Rated for use on dry contacts or powered contacts up to 480 Vac. Connected to terminal blocks via rugged mini clips. 10-100-3326 Photo Disk Detector with Flexible Arm Mount Sensor detects meter revolutions using a reflective mode optical pickup. For mechanical meters. 10-100-3311 Manual Pushbutton Switch This pushbutton provides a manual pulse input to verify meter accuracy for any meter (6’ lead). METER BASE ADAPTERS 75-310-0013 Form 9 Meter Base Test Adapter (13 Terminal) Also used with Form 8 and Form 6 installations 75-310-0008 Form 5 Meter Base Test Adapter (8 Terminal) 75-310-0006 Form 4 Meter Base Test Adapter (6 Terminal) Also used with Form 3 installations. 10-130-0015 MTA15 Test Adapter Passive meter base test adapter in a rugged Pelican case. Allows the testing of any selfcontained or transformer rated socket meters. Connections can be terminated using standard PowerMaster® current and voltage leads, or using 6mm plugs. Load completely driven using the PowerMaster® current and/or voltage output. CALIBRATION CHECK ACCESSORIES 10-340-0031 External Digital Cable Multi-function cable adapter for the AUX DIGITAL input on the PowerMaster®. Used for a standard pulse output/input. 10-340-0035 External Digital Cable (STD OUT only) Condensed version of 10-340-0031 where the measurement of the standard’s energy pulse output are only required. 10-340-0046 External Digital Cable (STD OUT, STD IN only) Condensed version of 10-340-0031 where the measurement of the standard’s energy pulse output or the PowerMaster®’s pulse input are only required. 10-340-0033 Rev: 1.15 Series 20A Current Test Cable Page 30 of 184 Secondary current measurement when performing series-parallel testing for standards comparison. 10-340-0045 AUX Power, US AC plug to Safety Banana Plug Adapter Allows insertion of auxiliary power, neutral, and ground leads into a safe AC adapter. Recommended for all lab applications. CALIBRATION PACKAGES Pre-paid discounted calibrations for five years from the last calibration date. 10-165-5300 Two Year Annual Calibration Package 5300 10-165-5302 Two Year Annual Calibration Package 5302 SINGLE CALIBRATIONS 10-161-5300 Single Calibration 5300 10-161-5302 Single Calibration 5302 Rev: 1.15 Page 31 of 184 Rev: 1.15 Page 32 of 184 3 Graphical User Interface Rev: 1.15 Page 33 of 184 3 Graphical User Interface Name of Active Site Name of Current Screen Drop-Down Box Check Box Text Box Function Keys 3.1 Controls The PowerMaster® human interface uses familiar Windows style controls. The behavior of many of the controls have been enhanced to eliminate the need for a pointing device such as a mouse. Text Boxes Text boxes are entered by or . When the cursor enters the control, any data in the text box is highlighted. Typing at this point will replace the information currently in the text box. If the text box is colored yellow, it is a required field. If the text box is colored gray, the field cannot be edited. This is typically data from the master database which is presented for reference only. Rev: 1.15 Page 34 of 184 Drop-down boxes Once the user tabs ( of two ways: or ) into a dropdown list box, they can change the selection in one 1. Press or to move to the previous or next selection in the list, press accept and continue. 2. Press to cause the selection list to drop down, then press selection, press or to to make a again or ENTER to accept the selection. Note: focus remains on the drop down box. The user must press to go to the next field. In drop-down boxes, the user can also enter text as long as an item is not presently selected. Required Fields These tagged fields (yellow background) require entry before continuing to the next screen. If the user continues with no entry, a pop-up window states, “These fields are required: x,x,x” “Enter to continue” The cursor returns to the first required field if not entered. Check Boxes When the user tabs ( then press or or ) into a check box, the label highlights in orange. The user can key to change the state of the check box. Grid Control The and , , keys allow the user to enter the grid. Once in the grid, the user can press , to navigate the cells (denoted by an orange cursor). Once the user selects a cell to edit, the user presses the key to edit or drop down a combo box. Once the user has edited the cell, the user presses the key to accept the change. ESCAPE key The key is an “undo” key when entering text. It returns the contents of the control to their previous edit value. Every text box and combo box remembers two things: The old text (info that was there when you first entered the field or after the last Undo/Redo) and the new text (whatever the user last changed it to). Pressing after changing the info in a text box or drop-down box causes it to undo (put back the old text). Pressing Rev: 1.15 again causes it to redo (swap back to the new text). Page 35 of 184 As long as the user keeps hitting and new text , it will continue to swap back and forth between old text Check boxes will check/un-check when pressing Rev: 1.15 Page 36 of 184 4-6 Splash Screen & Menu Systems Rev: 1.15 Page 37 of 184 4 Splash Screen At power up, the PowerMaster® displays a “splash” screen briefly. If the user has a USB mouse connected to one of the USB Peripherals, the screen can be paused for 10 more seconds. After the 10 seconds are complete, the analyzer will boot up to the main menu as normal. This screen gives useful information about contact information from the manufacturer, the current date and time, and the installed version of firmware. Rev: 1.15 Page 38 of 184 5 Menu System All menus in the system operate in the same manner. A menu entry may be selected by using the and keys may be used to move up and down between items. Pressing the key then causes the selected item to be executed. Alternately pressing the numeric key of the label next to the menu item executes it immediately. Rev: 1.15 Page 39 of 184 6 Main Menu (Pre Site Selection) Prior to selecting a site for testing from the database only a limited number of menu items are selectable. These are: 1) Select Site (select a site for analysis or access the site manager database editor) 2) Utilities (view or edit user preferences, other applications) 3) Recall Data (view previously saved data). Rev: 1.15 Page 40 of 184 6.1.1 Main Menu (After Site Selection) Once a site is selected all system test capabilities are selectable. These are: 1) Select Site (select a site for analysis or access the site manager database editor) 2) Integrated Site Test (automated test procedure which takes the user step-by-step through a predefined test sequence.) 3) Meter Testing (takes the user to the meter testing menu where various meter tests methods are available) 4) Instrument Transformer Testing (takes the user to the CT/PT testing options) 5) Utilities (view or edit user preferences, other applications) 6) Recall Data (view previously saved data). Rev: 1.15 Page 41 of 184 Rev: 1.15 Page 42 of 184 7 Site Selection & Editing Rev: 1.15 Page 43 of 184 7 Site Selection and Editing Functionality: Moves cursor up and down to a preferred site Creates a new site in the database (see section 7.4) Edits a pre-existing site in the database (see section 7.2) Deletes a pre-existing site in the database (see section 7.3) Selects the site and goes to the Main Menu (see section 7.1) Goes up one page (available if sites exceed the first page) Goes down one page (available if sites exceed the first page) Returns to the Main Menu Rev: 1.15 Page 44 of 184 Description: This screen allows the user to 1) select a site for testing, 2) edit a site’s information, 3) delete a site from the database, or 4) create a new site database record. All information related to a site is contained in the PowerMaster® database. This information can also be synchronized to a PC database using Meter Site Manager. 7.1 How Do I Select A Site? STEP 1 STEP 2 STEP 3 Press #1 or Enter at Main Menu Press F6 to Select Site Edit Tech and Test Comments if desired. F6 to Continue. You are now ready to test the site. All testing options are available at this point. The site is now ready to begin testing and saving data. The data from all tests preformed are recorded in the database referenced to this site. 7.2 How Do I Edit A Site? STEP 1 STEP 2 STEP 3 Press #1 or Enter at Main Menu Press F3 to Edit the Site Make changes to information for this site or any of the supporting data tables then press F6 Ready for Site Selection! Rev: 1.15 Page 45 of 184 7.3 How Do I Delete A Site? STEP 1 STEP 2 STEP 3 Press #1 or Enter at Main Menu Press F4 to Delete the Site Confirm Delete by pressing F6 7.4 How Do I Create A New Site? STEP 1 STEP 2 STEP 3 Press #1 or Enter at Main Menu Press F2 to Create a New Site Enter Information, then press F6 Rev: 1.15 Page 46 of 184 7.4.1 Details On Creating a New Site Functionality: Quickly moves to the next section of information Moves to the next page (see Section 7.4.2) Displays the appropriate editor for the selected drop-down box, i.e. CT Editor, PT Editor, and AMR Editor Saves and exits the Site Editor form Backs up to “Select Site” screen. No changes made during this editing session are saved. Description: This screen allows the user to enter information about the site. This information may include the customer’s address, billing multiplier, installed meter, installed CT’s and PT’s, etc. A few fields are required (which are noted in yellow), but most fields are not. It is up to the user to determine how much information they would like to use. Rev: 1.15 Page 47 of 184 Required Fields: The following fields are required before the user saves and exits (F6) the Site Editor screen. They are noted in yellow: Site ID: This field is the site identifier. This field is 30 characters long and accepts both numerical and alphabetical characters. Normally, an identifier must be chosen which is unique for the site. It is also helpful if the identifier is easily recognized by the technician. Powermetrix does not recommend the use of the meter serial number, because the meter can always be changed out. Service Type: This field is the precise metering configuration of the site. It includes the type of service (such as 4-wire Wye or 3-wire delta), It identifies the instrument transformer configuration of the site using primary current (“PC”) probes (such as 2PC or 3PC). It also identifies whether a self contained or transformer rated meter is being used (SC or TR respectively). Test Setup: This field identifies a pre-defined testing scenario to be used for the site. The Test Setup is drives Integrated Site Test and is used in all other tests. See Section 7.4.1.1 for more details. Meter: This field is for the meter that is to be tested. Entering the drop-down box will display all of the meters in the PowerMaster® database. If the desired meter is not in the database, press F4 to create a new meter. See Section 7.5 for more details. Alternatively, the user can select “NONE” and enter the Kt for testing. Other Fields: Billing Mult: This field is for the site’s billing multiplier. To calculate the billing multiplier, take the CT ratio to 1 (i.e. 200:5 = 40:1). Multiply that number by the PT ratio. If there are no PT’s installed, multiply by 1. For example, an installation with 200:5 CT’s and 4:1 PT’s, the billing multiplier is 160. Next Test: This field allows the user to set a date at which this site is to be tested again. The date is generated off of today’s date. The user has the option to select 6 months to 5 years from today’s date to test again. Locator: A user field of 30 characters which can be used as a location reference. User1/User2: These two fields are custom fields. They can be used for anything the user would like. The labels can be edited in the Preferences menu. Rev: 1.15 Page 48 of 184 7.4.1.1Details on Creating and Editing a Test Setup Functionality: Creates a new Test Setup Saves and exits the Test Setup form Backs up to “Site Editor” screen Description: The Test Setup helps the user simplify the testing process and drives Integrated Site Testing. This setup allows the user to pre-define all necessary testing functions before the actual step-bystep process begins. This prevents the user from having to define every test criteria for every individual test. This information is saved to the internal database. Any test setup can be selected for use by site. This allows uniform test procedures to be established and consistently performed. Two default Test Setups are predefined in the database. These setups can be used but cannot be edited. By default, each new site installation that is created in the Site Editor form has a Test Setup of “Default 1.” Powermetrix strongly suggests the user establish their own procedures by creating them in the database. Rev: 1.15 Page 49 of 184 How Do I Edit a Test Setup? STEP 1 STEP 2 STEP 3 Tab to “Test Setup,” press F4 Press F1 to edit the Test Setup Make changes, then press F6 How Do I Create A New Test Setup? STEP 1 STEP 2 STEP 3 Tab to “Test Setup,” press F4 Press F2 to edit the Test Setup Make changes, then press F6 How Do I Delete A Test Setup? STEP 1 Tab to “Test Setup,” press F4 Rev: 1.15 STEP 2 Press F3 to delete the Test Setup STEP 3 Press F6 to confirm deletion Page 50 of 184 7.4.1.2Details on Creating and Editing a Phantom Load Setup Functionality: Cancels selection Creates a new Phantom Load Setup (PLS) Edits an existing Phantom Load Setup (PLS) Saves and exits Test Setup Description: The Phantom Load Setup (PLS) is used to select a setup, create a new setup, or edit an existing setup. Two default setups are included and cannot be edited. To view all setups, verify check box for “Phantom Load” is selected first. Procedures to create, edit, or delete setups are included in the following pages. Refer to Section 3.1 for instructions on how to use the grid control in the Phantom Load Setups. Rev: 1.15 Page 51 of 184 How Do I Create A New PLS? STEP 1 STEP 2 STEP 3 In Site Editor, tab to “Test Setup” then press F4 Select then press F2 to edit the Test Setup Tab to “Phantom Load Setup,” then press F4 STEP 4 STEP 5 STEP 6 Enter name and press F4 to create a new row(s) Edit fields accordingly, then press F6 to exit and save Press F6 to save Test Setup STEP 1 STEP 2 STEP 3 In Site Editor, tab to “Test Setup” then press F4 Select then press F2 to edit the Test Setup Tab to “Phantom Load Setup,” select correct PLS, then press F5 How Do I Edit a PLS? Rev: 1.15 Page 52 of 184 STEP 4 STEP 5 Edit fields accordingly, then press F6 to exit and save Press F6 to save Test Setup How Do I Delete a PLS? STEP 1 STEP 2 STEP 3 In Site Editor, tab to “Test Setup” then press F4 Select then press F2 to edit the Test Setup Tab to “Phantom Load Setup,” select correct PLS, then press F5 STEP 4 STEP 5 Press F3 to delete PLS Press F6 to confirm deletion Rev: 1.15 Page 53 of 184 7.4.2 Creating a New Site (Page 2) Functionality: Moves to next field Moves to previous field Enters drop down box View selections in drop down box Quickly moves to the next most important section Moves to the next page Displays the CT Editor, PT Editor, and AMR Editor when selected Saves and exits the Site Editor form Backs up to Site Editor page 1 Rev: 1.15 Page 54 of 184 7.4.3 Creating a New Site (Page 3) Functionality: Quickly moves to the next most important section Moves to the next page Saves and exits the Site Editor form Backs up to Site Editor page 2 Description: This screen allows the user to enter notes and comments about the site installation before testing begins. Rev: 1.15 Page 55 of 184 7.4.4 Creating a New Site (Page 4 & 5) Functionality: Quickly moves to the next most important section Moves to the next page Saves and exits the Site Editor form Backs up to Site Editor page 3 Description: This screen allows the user to enter up to 60 custom fields that are directly associated with the site. The interface to change the names of the fields can be found in the User Preferences. Rev: 1.15 Page 56 of 184 7.5 Meter Editor Functionality: Moves cursor up and down for selecting a meter Disables the selected meter (see Section 7.5.1) Shows all enabled and disabled meters in database (default = enabled only) Creates a new meter (see Section 7.5.1) Opens the selected meter to be edited (see Section 7.5.1) Deletes the selected meter Selects the meter for the site and exits Rev: 1.15 Page 57 of 184 7.5.1 Creating or Editing a Meter Functionality: Moves cursor up and down for selecting a meter and for selecting options in the drop down boxes Moves to next field Moves to previous field Enters drop down box Saves changes and exits Backs up to Meter Editor (Section 7.5) Description: This screen allows the user to either 1) make changes to an existing meter in the database, or 2) create a new meter in the database. Rev: 1.15 Page 58 of 184 7.6 PT Editor Functionality: Moves cursor up and down for selecting a PT (voltage transformer) Disables the selected PT (see Section 7.6.1) Shows all enabled and disabled PT’s in database (default = enabled only) Creates a new PT (see Section 7.6.1) Opens the selected PT to be edited (see Section 7.6.1) Deletes the selected PT Selects the PT for the site and exits Rev: 1.15 Page 59 of 184 7.6.1 Creating or Editing a PT Functionality: Moves cursor up and down for selecting a PT and for selecting options in the drop down boxes Moves to next field Moves to previous field Enters drop down box Saves changes and exits Backs up to PT Editor (Section 7.6) Rev: 1.15 Page 60 of 184 7.7 CT Editor Functionality: Moves cursor up and down for selecting a CT (current transformer) Disables the selected CT (see Section 7.7.1) Shows all enabled and disabled CT’s in database (default = enabled only) Creates a new CT (see Section 7.7.1) Opens the selected CT to be edited (see Section 7.7.1) Deletes the selected CT Selects the CT for the site and exits Rev: 1.15 Page 61 of 184 7.7.1 Creating or Editing a CT Functionality: Moves cursor up and down for selecting a PT and for selecting options in the drop down boxes Moves to next field Moves to previous field Enters drop down box Saves changes and exits Backs up to CT Editor (Section 7.7) Rev: 1.15 Page 62 of 184 7.8 AMR Editor Functionality: Moves cursor up and down for selecting an AMR (Automatic Meter Reading) Disables the selected AMR (see Section 7.8.1) Shows all enabled and disabled AMR’s in database (default = enabled only) Creates a new AMR (see Section 7.8.1) Opens the selected AMR to be edited (see Section 7.8.1) Deletes the selected AMR Backs up to Site Editor page 2 Rev: 1.15 Page 63 of 184 7.8.1 Creating or Editing an AMR Functionality: Moves cursor up and down for selecting an AMR and for selecting options in the drop down boxes Moves to next field Moves to previous field Enters drop down box Saves changes and exits Backs up to AMR Editor (Section 7.8) Rev: 1.15 Page 64 of 184 7.9 Site Editor FAQ’s Where do I find the information for the Meter, CT, PT, and AMR? These specifications that are entered in this screen are normally found on the product nameplate. If a manufacturer catalog is available, this information may be found there as well. In Type, what does “TR” and “SC” stand for? TR = transformer rated, SC = self-contained What is “Kt”? The value Kt is the test pulse register. In most situations, the Kh value on the meter nameplate is the same as Kt. What does “Enabled” mean? “Enabled” means that the component will always show in the Editor drop down box. Most utilities have a few manufacturers in their entire system. Since this is true, the user may not want to view ALL components that the PowerMaster® holds in the database. This is especially true if the utility has one or two components they presently use. When you “disable” a component, it will not show in the Editor’s drop down box. In short, if the user uses a component (Meter, CT, PT, or AMR) that is in the database, make sure it is “enabled.” All others should be “disabled.” Rev: 1.15 Page 65 of 184 Rev: 1.15 Page 66 of 184 8 Hot Keys Rev: 1.15 Page 67 of 184 8 Hot Keys Hot keys are used as “shortcuts” to get to a specific screen in the PowerMaster®. The PowerMaster® supports (6) hot keys accordingly: Waveform Vector Diagram Power Meter Harmonics Full Analysis Status When a hot key is pressed, the form will populate the screen. A hot key is accessible at ANY time in the application. All of the function keys are accessible (F1-F6) when applicable. When the form is on screen, the PowerMaster® will remember the last form the user was on before the hot key was pressed. Once the same hot key is pressed a second time, the form will go away and the last form remembered is re-displayed. For all “Hot” displays pressing also takes you back to the screen you were at before you pressed the first hot key. It is equivalent to pressing the same hot key twice in a row. Common Function Keys: Instantaneous, Interval, Test Period This function key can be found on the vector diagram, power meter, and harmonics. The main job for this key is to allow the user to view measurements in three different time bases: Instantaneous: This is the default time base. Measurements are displayed every 4 cycle interval. The PowerMaster® screen updates once per second. Interval: This is a user defined time base (currently in development). By default, values are displayed every second. During and after a meter test, this time is based on the last meter pulse seen. Test Period: This time base takes measurements until the user tells it to stop (F6). During this time base, power is accumulated (summed) and all other signals are averaged. Active measurement time Rev: 1.15 Page 68 of 184 Sec V, Sec I; Sec V, Pri I; Pri V, Pri I; Neutrals This function key can be found on the waveforms, vector diagram, power meter, and harmonics. The main job for this key is to allow the user to view different probe sets that are attached to the PowerMaster®. This process may include viewing a single probe for a certain application, or it may be to change the “power pairs” altogether. Sec V, Sec I: This is the default selection. This setting corresponds to the secondary voltage probes and the secondary current probes (test switch probes, clamp-on probes, etc.). For metering, this is the “power pair” that is used for calculating power and registration. Sec V, Pri I: This setting corresponds to the secondary voltage probes and the primary current probes (flexible current probes, Amp Litewire, etc.). If the user wants to view the relationship between the secondary voltage and the primary current, this is the correct selection. This setting will change the “power pair” and power (W, VA, VAR) is calculated accordingly to the inputs selected. If no primary probes are detected, this setting is not available. Neutrals: This setting corresponds to a single secondary voltage probe and a secondary clampon current probe (MN353). This allows the user to view the secondary neutral phase for the voltage and current. If no single clamp-on probe is detected, this setting is not available. Active “Power Pair” setting Enable Ratios This function key can be found on the vector diagram and the power meter. The main job for this key is to allow the user to view measurements with the CT and PT ratios enabled. When a CT and PT are selected in the Site Editor, the ratios are used to calculate all power measurements without the requirement of primary current and voltage probes. Toggles between Connection View and Meter View This function key can be found on the waveforms, vector diagram, power meter, harmonics, and full analysis. The main job for this key is to allow the user to view the different signals according to the meter installation. Meter View is the default display, and it displays the signals that are internal to the meter. Connection View displays the signals as they are connected at the actual terminals (i.e. test switch). While in Connection View, power is not calculated. Below is an example of a 3-Phase, 4-Wire WYE (2V, 3C) Z-coil TR – S009F06 using both Meter View (default) and Connection View: Rev: 1.15 Page 69 of 184 Meter View Rev: 1.15 Connection View Page 70 of 184 8.1 Waveforms Icn Vcn Ibn Vbn Ian Van Functionality: Toggles between waveform pairs and full waveform displays Toggles between Connection View and Meter View (see Section 8 for details) Toggles between Sec V, Sec I, Sec V, Pri I, Pri V, Pri I, Neutrals (if correct probes are detected; see Section 8 for details) Stops all active measurements for display Closes waveforms screen Description: This oscilloscope-type display shows the user the amplitude and phase relationships in time between the voltage and current. All phases are color-coded (A = red, B = yellow, C =blue). The line weight for each phase is used to differentiate between the voltages and currents. The voltage lines are graphically displayed with a thinner weight than the currents (see graph labels above). Rev: 1.15 Page 71 of 184 The x-axis is time (in a 4-cycle measurement) and the y-axis is amplitude (i.e. volts & amps). The primary y-axis is for the amplitude for voltage, and the secondary y-axis is for current. The waveform display uses an auto-scaling function. This gives the user the ability to view both currents and voltages efficiently when amplitude is much greater than the other. When harmonic distortion is present, the waveform lines will appear uneven to display non-linear load situations. Leading or lagging power factor is displayed here. When the current waveform peaks after the voltage waveform, the power factor is considered to be “lagging” and termed as an inductive load. This is normal in most metering installations. When the current waveform peaks before the voltage waveform, the power factor is considered to be “leading” and termed as a capacitive load. A leading power factor is not as common in metering, but is normally seen when capacitor banks are used in service installations when no load is present. Phase rotation can easily be seen in this graph as well. Whichever phase voltage “peaks” first in time determines the phase rotation. If the A phase voltage displays its peak first in the waveform, the rotation is considered to be ABC. In the graph above, the rotation is ABC since A phase voltage displays its full peak first. Rev: 1.15 Page 72 of 184 8.2 Vector Diagram Functionality: Goes to the reference vector diagram Toggles between Connection View and Meter View (see Section 8 for details) Toggles between Instantaneous, Interval, and Test Period (see Section 8 for details) Toggles between Sec V, Sec I, Sec V, Pri I, Pri V, Pri I, Neutrals (if correct probes are detected) Displays calculated values with CT and PT ratios enabled (defined in the Site Editor page 2) Stops all active measurements for display, enables F1 to manually save data Closes vector diagram screen Rev: 1.15 Page 73 of 184 Description: The vector diagram is arguably the best tool for site analysis. In one screen, the PowerMaster® displays the phase relationship between the current and voltages. The PowerMaster® considers this relationship to be the “power pair” where all power is calculated. The amplitude of the voltage and current (i.e. length of the displayed line) is proportionate to the current and voltage readings. In other words, as the current increases the line will increase in length. The phase angle is displayed to show the relationship in time (by convention it is displayed in degrees) according to the way the service transformers are wired. In the USA, Van or Vab is always displayed at the 0° line (i.e. 3 o’clock position). In Canada, service types typically plot Ean at 330° and Eab at 270°. The user is allowed to change the “power pair” when primary probes are detected (voltage and/or current). For secondary currents, the vector displays “SVan” to signify the secondary current for A voltage in reference to Neutral. Similarly, the secondary currents are labeled “SIa” to signify the secondary current for A phase. If primary probes are detected, the user can press F4 to switch the “power pair” to view the relationship between the secondary voltages (SVan) and the primary currents (PIa). The user can press the F4 key again to view the relationship between the primary voltages (PVan) and the primary currents (PIa) as well. Power will be calculated accordingly. Leading or lagging power factor is also displayed here. As the current vector shifts to the right of the voltage vector, the power factor is considered to be “lagging” and termed as an inductive load. This is normal in most metering installations. As the current vector shifts to the left of the voltage vector, the power factor is considered to be “leading” and termed as a capacitive load. A leading power factor is not as common in metering, but is normally seen when capacitor banks are used in service installations when no load is present. Rotation (“ROT”) is displayed in the System (SYS) box to signify the rotation of the service transformers (ABC or CBA). The “SYS” values are the averages of the voltage, current, and power factor for all active phases. Rev: 1.15 Page 74 of 184 8.2.1 Vector Diagram Reference Functionality: Goes to Wiring Display Toggles between Connection View and Meter View (see Section 8 for details) Rotates current vectors clockwise by 5° Rotates current vectors counterclockwise by 5° Resets rotation to zero, default values from service type Closes vector diagram screen Rev: 1.15 Page 75 of 184 8.2.2 Vector Diagram Wiring Display Functionality: Goes back to live vector diagram display Toggles between Connection View and Meter View (see Section 8 for details) Closes vector diagram screen Description: This screen allows the user to view the service type connections (along with color-coded PowerMaster® probe connections) and the associated vector diagram. The vector diagram is always displayed to the bottom left and is show in a “unity” situation (power factor = 1.00). Rev: 1.15 Page 76 of 184 8.3 Power Meter Functionality: Toggles between Connection View and Meter View (see Section 8 for details) Toggles between Instantaneous, Interval, and Test Period (see Section 8 for details) Toggles between Sec V, Sec I, Sec V, Pri I, Pri V, Pri I, Neutrals (if correct probes are detected; see Section 8 for details) Displays calculated values with CT and PT ratios enabled (defined in the Site Editor page 2) Stops all active measurements for display, enables F1 to manually save data Closes power meter screen Description: V(xx) Rev: 1.15 Voltage measurement per phase (calculation defined in Measurement Calculations) Page 77 of 184 V (Fund) Fundamental voltage measurements per phase (inside 50 or 60 Hz) I(xx) Current measurement per phase (calculation defined in Measurement Calculations) A (Fund) Fundamental current measurement per phase (inside 50 or 60 Hz) VΘ Phase angle measurement for voltage (reference phase is service type dependent) IΘ Phase angle measurement for current (reference phase is service type dependent) DPFΘ Displacement Power Factor (difference between VΘ and IΘ) PF (xx) Power Factor for each phase (calculation defined in Measurement Calculations) W(xx) Watts per phase, accumulative in System (calculation defined in Measurement Calculations) VA(xx) Volt-Amperes per phase, accumulative in System (calculation defined in Measurement Calculations) VAR(xx) Volt-Amperes Reactive per phase, accumulative in System (calculation defined in Measurement Calculations) THD V Total Harmonic Distortion for voltage (displayed in %) THD I Total Harmonic Distortion for current (displayed in %) FREQ Frequency (50 or 60 Hz) Column Labels The labels for each column are determined by the active “power pairs” selected by the F4 key. For example, the first column has a label of “ΦSVanSIa”. This corresponds to the secondary voltage (in reference to neutral) and the secondary current for A phase. A label at the bottom of the screen also lets the user know what “power pair” is active (i.e. “Sec V, Sec I”). Further details of the “power pairs” can be found in Section 8. Pulse Output One of the functions of the Power Meter is to display power information during a W-hr/Var-hr standard accuracy check against the PowerMaster®. The pulse output on the PowerMaster® is always active, so the power calculation option selected in the User Preferences (see Section 14.3) will be noted in bold-faced type on this screen. This allows the user to view the measured power (default “Instantaneous”) or actual consumption (press F3 to change to “Test Period”). The user can press F6 to stop measurements. The user then has the option of saving the data (F1) or restarting power consumption (F6). For more detailed information on the pulse output, see Rev: 1.15 Page 78 of 184 8.4 Harmonics Analysis Total Harmonic Distortion (%) 3rd Voltage & Current Harmonic 11th Current Harmonic Only 7th Voltage Harmonic Only Functionality: Displays the data for each harmonic (up to 100th) per phase Toggles between Connection View and Meter View (see Section 8 for details) Toggles between Instantaneous, Interval, and Test Period (see Section 8 for details) Toggles between Sec V, Sec I, Sec V, Pri I, Pri V, Pri I, Neutrals (if correct probes are detected) Toggles between % (of the fundamental) and amplitude (volts and amps) Stops all active measurements for display, enables F1 to manually save data Closes harmonics screen Rev: 1.15 Page 79 of 184 Description: This screen allows the user to view the harmonics present in the measurement circuit. For each phase, both the voltage and current harmonics can be seen. The current harmonics are shown as a bold red bar, and the voltage harmonics are shown as a thinner black bar. The THD (Total Harmonic Distortion) for both voltage and current can be seen at the top right of each graph per phase. Rev: 1.15 Page 80 of 184 8.4.1 Harmonics Details Functionality: Views graphical harmonic data Toggles between Connection View and Meter View (see Section 8 for details) Toggles between Instantaneous, Interval, and Test Period (see Section 8 for details) Toggles between Sec V, Sec I, Sec V, Pri I, Pri V, Pri I, Neutrals (if correct probes are detected) Toggles between % (of the fundamental) and amplitude (volts and amps) Stops all active measurements for display, enables F1 to manually save data Goes up to the previous set of data Goes down to the next set of data Rev: 1.15 Page 81 of 184 Closes harmonics screen Description: This screen gives the user the ability to view each individual harmonic in accordance to the respective phase current and voltage. By pressing F5, the user can toggle between the percent of the fundamental and the amplitude of the voltage and current. Pressing the PAGE UP and PAGE DOWN keys will allow the user to move up and down the table. In Preferences (Section 16.1), the user can select how many harmonics are displayed and how many harmonics are saved. The user can select from 0, 5, 20, 30, 50, and 100. The user can also set the minimum threshold which sets the minimum harmonic content to be saved. For example, if the user sets the minimum to 1%, all harmonics that are 0.9% and below will not be saved. This prevents the user from saving too much unnecessary data to the database. Rev: 1.15 Page 82 of 184 8.5 Full Analysis Functionality: Toggles between Connection View and Meter View (see Section 8 for details) Toggles between Instantaneous, Interval, and Test Period (see Section 8 for details) Toggles between Sec V, Sec I, Sec V, Pri I, Pri V, Pri I, Neutrals (if correct probes are detected) Stops all active measurements for display, enables F1 to manually save data. Data to be saved includes: waveforms, power meter, vector, and harmonics. Closes full analysis screen Description: This screen gives the user an efficient display of the entire power measurement system. The measurement parameters are labeled at the bottom left. Rev: 1.15 Page 83 of 184 8.6 Status Key Functionality: Runs “Probe Scan” to detect all active probes that are connected (see Section 8.6.1) Displays internal voltages and temperatures Displays all current PowerMaster® software revisions Displays all configured options in the user’s unit Displays all engineering changes made in the history of the user’s unit Displays all calibrations that have been performed in the history of the user’s unit Closes status screen Rev: 1.15 Page 84 of 184 Description: This gives the user a quick verification of the analyzer’s condition. Different function keys are displayed to access further detail or perform a probe scan (see Section 8.6.2). The “Active Measurements” show the user what currents and voltages are detected by the attached probes and lead sets. The “Battery” display shows the user the current battery status (based off the internal battery voltage reading). Charger Ready Charging Top Off Mode Paused Fault When green, the battery status is at or near 100%. When red, the AUX power is not connected to line voltage When green, the battery is actively charging When green, the battery is performing a “trickle” charge to maintain 100% When red, the battery charge is shut down When red, the battery is detected to have an error The “Power Status” displays that the active voltages from the internal components are within tolerance. When red, the component is not actively reading voltage and may require repair. Contact Technical Support for more assistance. Rev: 1.15 Page 85 of 184 8.6.1 Software Revisions Description: This screen is to allow the user to view the version of software that is presently in the PowerMaster®. The installed options can also be seen in this screen. Rev: 1.15 Page 86 of 184 8.6.2 Probe Scan Functionality: Enters drop down box and views service type selections (available when no site is selected) Moves cursor up and down for selecting a service type in the drop down box Rescans the probes after connection is made Continues Description: This screen is to allow the user to view and change what probes are required according to the service type. If the required probes are not detected, the Probe Scan will display a red light next to the required probe(s). Once the user connects the required probe, press Rescan (F2) to scan for the probe. If the probe is successfully detected, the light is displayed green. Rev: 1.15 Page 87 of 184 Direct Inputs The direct inputs are the voltage and current (“duckbills”) lead sets that are standard accessories to the PowerMaster®. On the connector panel, they are labeled VOLTAGE and CURRENT respectively. Direct inputs do not include any type of clamp-on probe, flexible probe, or high voltage probe. Service Type The user can change the service type at this screen. Once the service type is selected, the Probe Scan will automatically run and display to the user the required probes. Color Key GREEN Probe is required and is successfully connected RED Probe is required and is not connected. Connect required probe and press Rescan to confirm YELLOW Probe is optional for use, but is not required BLACK Probe is not used for this service type Rev: 1.15 Page 88 of 184 9 Integrated Site Testing Rev: 1.15 Page 89 of 184 9 Integrated Site Test Functionality: Moves to next field Moves to previous field Enters drop down box and views service type selections Moves cursor up and down for selecting a service type in the drop down box Resets any changes made Continues Description: Integrated Site Test is a step-by-step procedure that guides the user through the testing process. This process eliminates setup mistakes and simplifies the entire testing procedure. This screen allows the user to make changes to the setup that was selected in the Site Editor (see Section 7.4.1.1). For more information on Integrated Site Testing, see Application Notes (website). Rev: 1.15 Page 90 of 184 10 Meter Testing Rev: 1.15 Page 91 of 184 10 Meter Testing Functionality: Moves cursor up and down to a menu selection Accepts and enters menu selection Customer Load “Customer Load” is a meter test that is performed using the customer’s active (W-hr), reactive (Var-hr), or apparent energy (VA-hr). This test is considered to be “passive” since the PowerMaster® only measures what the meter is registering. So, for instance, if the load changes during the meter test, the PowerMaster® will accurately measure the change and reflect it in the completed registration test. What makes this test so valuable is the fact that the PowerMaster® measures the meter under conditions the customer is actually being billed. Rev: 1.15 Page 92 of 184 Phantom Load (Not available for Model 5300) “Phantom Load” is a meter test that is performed simulating current, voltage or both. Since this test is considered to be an “active” test, the user has the ability to simulate different circumstances for each test. This is in contrast to a “customer load” test. Rev: 1.15 Page 93 of 184 10.1 Customer Load Setup Functionality: Moves to next field Moves to previous field Enters drop down box and views test mode selections; checks/unchecks check boxes Moves cursor up and down for selecting a test mode in the drop down box Resets any changes made back to default database values Continues Rev: 1.14 Page 94 of 184 Description: This screen allows the user to perform a meter test using the customer’s load. This means that the PowerMaster® will calculate the registration (accuracy of the meter under test) over a set timed period (either time or pulses). The end result is expressed as a percent. The values above are populated using the settings in the Test Editor that is associated with the site installation. These fields cannot be edited in this screen, but must be edited in the Site Editor screen. Any changes apply to this test only. FAQ’s How do I change the “Kt” in this screen? The Kt value is pulled from the site installation database. The “Kt” on this screen is considered to be a read-only field (i.e. cannot be edited) to protect the data integrity, so the “Kt” value can only be changed in the Site Editor (section 8.4.1) screen. This is done by either selecting a meter in the meter database or overriding the “Kt” value located below the meter entry. What is the difference between “Test Time” and “Test Revs”? Test Time is the amount of seconds the user defines for the test. If the time exceeds before a pulse is expected, the PowerMaster® will wait until the last pulse is seen before completing. Test Revs is the amount of pulses or revolutions the meter test will count before completing. If both fields have values present, the meter test will complete when either value comes first (whether it is time or revs). How many “Revs” does Powermetrix recommend to perform an accurate meter test? If time permits, 10 revs or more is ideal. How do I perform a Var-Hr meter test? First, make sure Test Mode is set to “VARh”. Next, verify the meter pulse pickup is aligned to view Var-hr pulses and not Watt-hr. This may incorporate a meter programming change to do this. Rev: 1.14 Page 95 of 184 10.1.1 Customer Load Setup With Demand Test Functionality: Moves to next field Moves to previous field Enters drop down box and views test mode selections; checks/unchecks check boxes Moves cursor up and down for selecting a test mode in the drop down box Resets any changes made to default database values Continues Rev: 1.14 Page 96 of 184 Description: This screen allows the user to perform a demand test using the customer’s load. This means that the PowerMaster® will accumulate the power (and accuracy of the meter under test) over a set timed period (defined by the demand interval). Min, max, and average values are given over the entire test period. The values above are populated using the settings in the Test Editor that is associated with the site installation. These fields cannot be edited in this screen, but must be edited in the Site Editor screen. FAQ’s How do I change the “Kt” in this screen? The Kt value is pulled from the site installation database. The “Kt” on this screen is considered to be a read-only field (i.e. cannot be edited) to protect the data integrity, so the “Kt” value can only be changed in the Site Editor (section 8.4.1) screen. This is done by either selecting a meter in the meter database or overriding the “Kt” value located below the meter entry. What selection do I use for “Demand Interval”? This value can usually be found on the meter nameplate. What is “Synchronize Test to Clock (End-To-End Testing)”? This feature is normally used for Canadian customers. The first demand interval (5 min) will begin when the PowerMaster® clock is at a minute mark that is divisible by 5. For example, if the demand test starts at 11:03am, the first interval will not start until 11:05am. The next interval will start at 11:10am, and so on. This is used to precisely time the demand intervals for comparison to meter data acquisition systems. With the GPS option, the clock is based on the precise GPS time base. The GPS clock is currently the most accurate time clock in the world. What is the “Internal Pulser” option? The Internal Pulser is used when the meter pulses from the meter cannot be used or accessed. Using the internal clock in the analyzer, it simulates a constant pulse count to synch the data acquisition. No meter registration will be displayed when this option is selected. Rev: 1.14 Page 97 of 184 10.1.2 Customer Load Probe Setup Voltage Connections Current Connections Functionality: Verifies connected probes if a problem occurs Continues Description: When entering this screen, the PowerMaster® performs both a “Probe Scan” (see Section 8.6.1) and allows the user to verify probe connections. A key is displayed at the left of the screen and shows what probes are active and required for this test. Color codes are also displayed (A = red, B = yellow, C = blue, N = gray). Rev: 1.14 Page 98 of 184 10.1.3 Customer Load Final Check Functionality: Continues Description: When entering this screen, the PowerMaster® verifies all current and voltage signals are reasonable and allows the user to align the meter pulse pickup at this time. When meter pulses are detected, the signal for “Checking for meter pulses” displays green. Each time a pulse is detected, the “Meter Pulse” signal will light green and display “Ready to Test.” At this time, the user presses F6 to continue to the meter test. When testing a solid state meter, the meter may be required to be in “test mode.” This normally is done by a toggle switch underneath the meter glass, but in rare cases the user may be required to change the programming of the meter. FAQ’s: Why am I not getting a pulse? Verify the following: Rev: 1.14 Page 99 of 184 1. Meter is in “test mode” 2. Pulse pickup is connected to “AUX DIGITAL” 3. Ample load is present (press to verify amp readings) 4. Use a cloth or hat to shield pickup from visible sunlight Rev: 1.14 Page 100 of 184 10.1.4 Customer Load Test Results Functionality: Clears all data and restarts meter test Views the voltage, current, and power (W, VA, VAR) data during the total time interval for the meter test. See section 10.1.4.2. Completes meter test and saves data Description: When entering this screen, the PowerMaster® begins the meter accuracy test. This screen updates when every pulse is detected. By following the testing parameters set in the setup screen (Section 10.1), the meter test stops when either time or pulses required is met. Meter accuracy results are displayed at the top center of the screen. Other information during the test is displayed in the bottom right and left sections of the screen. The voltage and current amplitude along with energy is displayed using the System values (see Section 8.3). Also, the meter accuracy calculation is based off the settings found in the Configuration menu (see Section 14.2). Rev: 1.14 Page 101 of 184 FAQ’s: What does Powermetrix consider to be a bad customer load meter test? Powermetrix believes a good customer load meter test should be within ±2%. Most ct-rated meters are classified at 0.2%, but that accuracy class is based off of lab conditions and under artificial load points (120V @ 2.5 amps). With customer load, the load will vary between the designated test points (FL, PF, LL), and the PowerMaster® helps the user determine how well the meter performs under existing conditions (including harmonic content). Rev: 1.14 Page 102 of 184 10.1.4.1 Customer Load Demand Data Functionality: Clears all data and restarts demand test Quits data collection and returns to the Meter Testing menu Stops data collection Views the voltage, current, and power (W, VA, VAR) data during the total time interval for the meter test. See section 10.1.4.2. Views the meter registration during the entire demand test Completes demand test and saves data Description: When entering this screen, the PowerMaster® begins the demand test. The screen updates at every five (5) minute interval from start time. Based on the “Demand Period” selected (see Rev: 1.14 Page 103 of 184 Section 10.1.1), the demand test will stop after time is relinquished. For example, if a 15 minute demand period is selected, the test performs for the next 15 minutes and displays values at each 5 minute interval (15 minutes = 3 intervals). Meter registration is also displayed at each interval. Synchronize Test to Clock (End-to-End Testing When using the “Synchronize Test to Clock (End-to-End Testing” feature, the first demand interval (5 min) begins when the PowerMaster® clock is at a minute mark that is divisible by 5. For example, if the demand test starts at 11:03am, the first interval will not start until 11:05am. The next interval will start at 11:10am, and so on. This is used to precisely time the demand intervals for comparison to meter data acquisition systems. With the GPS option, the clock will be based on the precise GPS time base. The GPS clock is currently the most accurate time clock in the world. Synchronize To Meter If the user would like to compare accumulated results from the PowerMaster® and the meter, enter the Demand Test screen as normal. To synchronize both the meter and the PowerMaster®, do the following: press the RESET on the meter to reset all accumulated demand results and press the F1 (Restart) button then F6 (Start Testing) on the PowerMaster® SIMULTANEOUSLY. This will synchronize the results and accumulate power accordingly. After the test is complete, compare the “Demand Interval” results against the meter. These results are the accumulated power during the demand period. Rev: 1.14 Page 104 of 184 10.1.4.2 Customer Load Trending Data Functionality: Moves to the next page to display VA, VAR, and PF trend graphs Goes back to the test results Description: This screen displays the data that is accumulated during the test period. When performing customer load meter tests, the customer’s load is normally changing. These graphs give the user a visual perspective of how much the load changed during the test. If the graphs appear to be excessively changing, the user may decide to do a retest when the load is more stable. Also, viewing these graphs gives the user the ability to troubleshoot problems that cannot be immediately seen. For example, if there is a loose connection at the test block for voltages, the graph will display the “peaks” and “valleys” to show the intermittent connections during the meter test (however minuscule in detail). Rev: 1.14 Page 105 of 184 10.2 Phantom Load Setup Functionality: Enters drop down box and views stored Phantom Load Setups Views selections in drop down box Allows the user to edit/delete an existing setup or create a new setup Selects test and continues Description: This screen verifies to the user the details of each test and what order each test will be administered. This is a read-only screen, so any changes must be made in the Site Editor (see Section 7.4.1.2). Phase: This corresponds to the particular phase(s) to be tested. Selections are A, B, C, or All. “All” applies to 3-phase simultaneous measurements. When a 1 or 2 element meter is testing, Rev: 1.14 Page 106 of 184 “All” will still apply. When testing single elements, the user will select only the appropriate phase that corresponds to the particular service type. Label: This generates a label for the test. Selections are FL, PF, LL, FL PF, and LL PF. Labels can be edited and created in the User Preferences menu (see Section 15.4). Mode: This corresponds to the energy calculation for each test. Selections are Whr, VARhr, and VAhr. All energy calculations are based on the selected measurement calculations selected in the User Preferences menu (see Section 15.2). Note that selections for VARhr and VAhr will not automatically set the required phase shift. These values must be manually entered in the “PF” field. Voltage: This corresponds to the desired generated voltage for all active phases. “Line” refers to the actual line voltage for the meter installation. “Line” is the only available option for the Model 5302. Current: This corresponds to the desired generated current for all active phases. The user may enter a value between 0.1 to 20A for Models 7302 & 7332, and a value between 0.1 to 50A for Models 7305 & 7335. PF: This corresponds to the cosine of the phase angle for the current for all active phases. The voltage phase angles are set by the selected service type. The user may enter a value between 0 to 1.00 for the desired power factor, positive or negative. Lead/Lag: This corresponds to the desired phase shift for all active current phases. Flow: This corresponds to the desired energy flow for all active phases. Selections are Delivered or Received. When “Received” is selected, all active current phases will automatically shift 180˚. Pulses: This corresponds to the desired number of pulses to measure during each test. Time: This corresponds to the desired time to measure during each test. If both Pulses and Time are selected, the test completes when either selection is first exceeded. Rotation: This corresponds to the desired phase rotation for all active current phases. Selections are ABC or CBA. When using “Line” for voltage, it is important to match the desired rotation to the actual rotation of the meter installation. Harm: This refers to the desired harmonic content available for each test. This feature is currently in development. FAQ’s Can I edit this setup? Yes. If you press F3, you can edit or create new setups. See Section 15.6 for more details. Can I change the setup being used? Yes. You can use the drop down box to view all stored Phantom Load Setups. Creating new setups and/or editing setups must be done in the Site Editor (see Section 7.4.1.2). Rev: 1.14 Page 107 of 184 10.2.1 Phantom Load Test Procedure Functionality: Continues Description: This screen starts the Phantom Load test procedure. This process includes verifying the correct probes are connected, the service type is correct, and the jumpers are installed. Next, the load box will begin to generate current and voltage (model dependent) and allow time for the load to settle. Next, current and voltage readings are measured to verify everything is correct. Lastly, when meter pulses are detected the unit is ready to test. When current is detected and error screen will display. Correct the problem by installing the CT Jumpers, then press “Retry” to attempt the test again. The same applies if voltage is detected when generating a synthesized voltage. This process is done to prevent damage to the PowerMaster® unit and the meter installation. CT Jumpers: These are used to create a path for the synthesized current to flow. The user will short the CT circuit by opening the current (+) path on the test switch. While this takes the CT out of service and the meter will register no current, a pathway is not in place. To accommodate this, the current jumpers are installed for each active phase current. While the CT is “open” (CT Rev: 1.14 Page 108 of 184 switch is in an open position), the user will connect one end of the current jumper (J) to the top of the test switch (+). The other end of the jumper (J) will connect to the bottom of the current return path (Ret). Each active phase current must have an installed jumper for the phantom load box to operate. See diagram below: Procedure STEP 1 STEP 2 STEP 3 Connect CT jumpers Hook up pulse pickup to meter Select test, then press F6 STEP 4 STEP 5 After pulses detected, press F6 After test, press F6 to complete Error Messages In some instances, the load box (WFG) will display errors when certain criteria are not met. These errors may also occur when a fundamental error with the setup is diagnosed. The load box will specify what phase is causing the error (ex. “Ia”). Rev: 1.14 Page 109 of 184 If the user encounters one or more of these error codes, please check the setup again. Verify the current jumpers are installed correctly and the test switch is in a testing prepared method. For the PowerMaster® to correctly stabilize the currents, the Neutral voltage must be tied to an earth ground at the test switch. Examples: The PowerMaster® cannot detect an auxiliary power source between 100-530VAC. Check the connections and/or verify the Auxiliary Power switch is in the “on” position (- = on). The PowerMaster® cannot communicate with the WFG board. Attempt to power off/on to fix the issue. If this is not successful, contact Technical Support. The PowerMaster® cannot stabilize the currents and/or voltages. Attempt the following: 1. Verify the CT jumper connections 2. Verify the green safety ground lead is connected to true earth 3. Attempt moving auxiliary leads to a different AC source 4. Attempt to uncheck “Stabilize Load Box Phases” in User Preferences (see Section 15.9.3) Rev: 1.14 Page 110 of 184 10.2.2 Phantom Load Test Results Functionality: Moves cursor up and down for selecting a point to retest Retest selected point Retest all points Completes test and shuts down load box Description: After results are complete, the ability to retest each point is offered to the user. If satisfied with the results, press F6 to complete the test. Rev: 1.14 Page 111 of 184 Rev: 1.14 Page 112 of 184 11 Transformer Testing Rev: 1.14 Page 113 of 184 11 Transformer Testing Functionality: Moves cursor up and down to a menu selection Accepts and enters menu selection Description: The screen allows the user to select the appropriate instrument transformer test. Rev: 1.14 Page 114 of 184 11.1 CT Testing (Customer Load) Functionality: Moves to next field Moves to previous field Enters drop down box and views test mode selections; checks/unchecks check boxes Moves cursor up and down for selecting a test mode in the drop down box Views the database information for CT phase A (default) Views the database information for CT phase B Views the database information for CT phase C Continues Rev: 1.14 Page 115 of 184 Description: This screen allows the user to perform a current transformer (CT) test using the customer’s load. This test has several options to choose from: 1. Burden Only: Checks only the effect of additional burden (resistive load) on the CT secondary output current. Error readings are based off of the burden class rating of the CT. 2. Ratio Only: Checks only the CT ratio (and angle) as measured from the actual CT primary and secondary currents 3. Burden + Ratio: Simultaneously checks the CT secondary current and ratio as additional burden is applied. If practical, Burden + Ratio Testing is recommended since it provides ratio data that can be directly compared to the nameplate value. The values for “CT Mode” and “Maximum Burden” are populated using the settings in the Test Editor that is associated with the site installation. These fields are editable, but the edits are never saved back to the database. These changes apply to this test only. The “Transformer Specs” for each individual phase are populated using the information from the Site Editor. These fields cannot be edited in this screen, but must be edited in the Site Editor screen. The PowerMaster® will follow a designated set of rules to help protect the hardware under certain testing conditions. These rules follow the revision of the CMUX board inside the PowerMaster®. To find the revision level of the CMUX board, press Status, System Config (F4). CMUX Revision A or B 1. A burden test cannot be performed for secondary currents above 12A. 2. For a max applied test burden of 1Ω or less, then these rules apply: a. If the secondary current is <10A, no restrictions b. If the secondary current is ≥10A, a 30 second delay will be applied between each test. 3. For a max applied test burden greater than1Ω, the following restrictions occur: a. If the secondary current is <8A, no restrictions b. If the secondary current is 8-12A, a 30 second delay will be applied between each test c. If the secondary current is >12A, burden test cannot be performed Testing Tips: 1. Verify the probe is rated for the voltage and current being tested 2. Never connect a current probe around a conductor before terminating it to its cable and to the PowerMaster®. 3. For LiteWire probes, verify the optic cable is clean to prevent surface arcing. 4. Position the probe head perpendicular to the current carrying conductor as nearly in the center of the probe opening as practical. 5. For clamp-on probes, clean contact surfaces and then snap and release the jaws to verify a metal-to-metal contact of the jaws (dirt and grease may contaminate the surfaces.) 6. For flexible probes, the plastic closure connector should be fully closed and be positioned as far as possible from the conductor (also observe #7 below). Rev: 1.14 Page 116 of 184 7. Position the probe as far as practical from other current carrying conductors. (All current probes will respond to external currents.) 8. For LiteWire probes, press the black button 2x on the head assembly to force the 2000A range when currents are above 100 amps. (Note that the decimal is not displayed on the receiver unit when the 2000A range is active.) 9. For LiteWire probes, position the open end such that it is not pointing toward other current carrying conductors. 10. IN GENERAL, if a CT Ratio test has an erroneous ratio result or a phase angle greater than ±1°, check the installation of the current pro be before suspecting a CT problem. Rev: 1.14 Page 117 of 184 11.1.1 CT Test Probe Setup Functionality: Verifies connected probes if a problem occurs Continues Description: When entering this screen, the PowerMaster® performs both a “Probe Scan” (see Section 8.6.1) and allows the user to verify probe connections. A key is displayed at the left of the screen and shows what probes are active and required for this test. Color codes are also displayed (A = red, B = yellow, C = blue, N = gray). If the primary probe(s) are not connected at this point, an error is displayed. The signal next to the Primary Current fields (PIa, PIb, PIc) displays red. To rescan the probe inputs, press F1. If the probes are detected, a green signal displays next to the primary probe fields A single primary probe (Flexible current probe, Amp Litewire, or clamp-on probe) is required. The user has the option to connect up to three (3) primary probes for three-phase testing. These probes will connect to the 3-Phase Probe Adapter Cable. This cable is then connected to the PROBE SET 1 or PROBE SET 2 input on the front panel. Rev: 1.14 Page 118 of 184 11.1.2 CT Testing Results (Complete for Burden + Ratio) Functionality: Moves cursor up and down for selecting a CT to retest Performs a retest on a highlighted CT Retests all CT’s Runs a demagnetization test on the selected CT Views the graphical test data for all CT’s Views the numerical test data for all CT’s Completes CT test and saves data Rev: 1.14 Page 119 of 184 Description: This screen displays the results of the CT test for each phase. A phase is always located at the top graph, then the other two graphs correspond to B phase and C phase respectively. If the user is testing a service type with only 1 or 2 CT’s present, the PowerMaster® will only test the CT’s that are active for the particular service type. The measured CT ratio value is displayed as “Measured Ratio.” This value is calculated from the current readings from the secondary probe(s) and primary probe(s). Phase angle information is also displayed as an angle or in minutes. Generally, the user desires the measured CT ratio value to be as close as possible to the CT nameplate value. Once this is determined, the user can specify the test to “pass” or “fail” according to their utility’s standard procedures. The “PASS” or “FAIL” message is generated using the CT accuracy class (see Section 7.7.1) and the selected error limit from the User Preferences menu (see Section 14.1). If no CT nameplates are selected in the Site Editor, the PowerMaster® estimates a nameplate according to the readings and a default accuracy class of 0.3. Once the measured ratio is displayed, the PowerMaster® calculates the error to see if it is within limits. For example, if the measured ratio is 201.86:5, the nameplate is 200:5, the accuracy class is 0.1, and the error limit is set to “2.0x Specification Accuracy,” then the PowerMaster® will display a “FAIL” message. Here is how it is calculated: [(201.86-200) / 200]*100 = 0.93% error (Accuracy class = 0.1) * (Error limit = 2) = ±0.2% 0.93% > 0.2% = FAIL Rev: 1.14 Page 120 of 184 11.1.3 CT Testing Results (Complete for Burden Only) Functionality: Moves cursor up and down for selecting a CT to retest Performs a retest on a highlighted CT Retests all CT’s Views the numerical test data for all CT’s Completes CT test and saves data Description: After the Burden Only test is complete, the results are displayed. “Sec Amps” shows the user the current value for the particular phase before burden is applied. “Max Chg” is the highest percent change for all burden points tested. “Bur Class” is the burden class selected for the CT under test, which is found in the CT Editor (see Section 7.7.1). Rev: 1.14 Page 121 of 184 “Chg @ Class” is the max percent error after the burden class is exceeded. The error limits are generated using the limits found in the Preferences menu (Section 14.1). If no CT is selected in the Site Editor, defaults are used for analysis: “Bur Class” = 0.5 Rev: 1.14 Page 122 of 184 11.1.4 CT Testing Results Graphs Functionality: Isolates graph for A phase only Isolates graph for B phase only Isolates graph for C phase only Views graphs for all phases (default) Views numerical data for each phase (see Section 11.1.6.1) Rev: 1.14 Page 123 of 184 11.1.4.1 CT Testing Results Data Functionality: Goes back to CT Testing Results Graphs (see Section 11.1.6) Description: This screen allows the user to view the tabular data for each CT. Each data point is based on the next pertinent burden step. For example, if the user selects a max burden of 0.5Ω for the Ratio+Burden test, the data will be presented up to that point. All other cells will display “N/A” to disclose that no test exists for that particular burden point. Rev: 1.14 Page 124 of 184 11.1.4.2 CT Testing Results Data (Burden Only) Functionality: Goes back to CT Burden Results (see Section 11.1.4) Description: This screen allows the user to view the tabular data for each CT. Each data point (percent change in secondary amps) is based on the next pertinent burden step. For example, if the user selects a max burden of 0.5Ω for the Burden Only test, the data will be presented up to that point. All other cells will display “N/A” to disclose that no test exists for that particular burden point. The data presented is the percent change in secondary amps. This means that as each burden step applies, the PowerMaster® will calculate the percent change from the last burden step. Rev: 1.14 Page 125 of 184 11.1.4.3 CT Demagetization Functionality: Completes the test and goes back to CT Test Results (see Section 11.1.2) Description: This feature allows the user to demagnetize the current transformer. A CT can be magnetized by a current surge when opening the primary at heavier loads. Magnetization can also occur when accidentally opening the secondary while the load is still applied. CT magnetization is not a common occurrence, but there are traits the user should look for. When performing a CT Burden or CT Burden + Ratio test (Ratio Only not applicable), the user may notice the ratio results to be inaccurate. When the user toggles over to view the Graphs or Data, the change in secondary current is relatively stable (<1%) throughout the test. This may be an indication the CT is magnetized. The demagnetization key is available after the CT results are displayed (see Section 11.1.2). Select the desired CT, then press the F3 key. Press F6 to begin the process. The PowerMaster® will step up resistance on the existing secondary current up to 4.0 ohms. Once it reaches its peak, it will slowly step the resistance back down to 0 applied burden. The PowerMaster will repeat this process up to 5 times until complete. When the process is complete (either pass or fail), the user presses the F6 key to continue. At this time, the user will be prompted to test the Rev: 1.14 Page 126 of 184 CT post-demagnetization to verify the registration. After the CT is tested, the user will press the F6 key to complete the test and save the data. The PowerMaster® will follow a designated set of rules to help protect the hardware under certain testing conditions. These rules follow the revision of the CMUX board inside the PowerMaster®. To find the revision level of the CMUX board, press Status, System Config (F4). CMUX Revision A or B A demagnetization test cannot be performed for secondary currents above 8A. For secondary currents 8A and below, there are no restrictions. Rev: 1.14 Page 127 of 184 11.2 CT Bench Top Testing (Load Box) Functionality: Moves to next field Moves to previous field Enters drop down box and views test mode selections; checks/unchecks check boxes Moves cursor up and down for selecting a CT in the drop down box Edits the selected CT or creates another CT (see Section 7.7.1) Starts the test Description: This screen allows the user to perform a current transformer (CT) test using the phantom load. Using the CT Current Drive cable (separate accessory), the user can connect to a de-energized Rev: 1.14 Page 128 of 184 CT to verify the accuracy and proper operation before it is installed in the field. The A phase current will act as the “primary” current drive for the CT. The B phase current will act as the “secondary” output for the CT. C phase is not used. This option cannot be used on a CT that is currently installed in a field application. For window-type CT’s, the user can use the current cable extension to loop through the CT as many as four times. This effectively multiplies the current driving through the transformer. For example, if the user desires an 80A test current, the user will select a Drive Current of 20 and 4 Turns (4*20=80A). PowerMaster® Connections: 1. Connect the multi-pin current cable to CURRENT on the PowerMaster®. 2. Connect the standard 3-Phase Voltage Cable to VOLTAGE on the PowerMaster®. 3. Connect the green safety ground to a known earth ground. 4. From the 3-Phase Voltage Cable, stack the A (red) and N (white) connections to AUX PWR and AUX NEU respectively. Terminate the two ends with alligator clips. 5. Connect the voltage leads to a source between 100-530VAC. Connections for Window (Donut) type CT’s: 1. From the multi-pin current cable, connect the female-female extension cable to DRIVE on the A phase drive lead (red/black). 2. Insert the DRIVE end into the polarity side of the CT (white dot). Make as many loops as needed (max 4). 3. Terminate the other end of the DRIVE cable to the A phase return lead (red/white). 4. Connect the yellow DRIVE cable to X2 of the secondary output of the CT. Terminate the other end to the B phase drive lead (yellow/black). 5. Connect the white RETURN cable to X1 of the secondary output of the CT (white dot). Terminate the other end to the B phase return lead (yellow/white). STEPS 1-3 STEPS 4-5 READY! Insert A DRIVE, loop & terminate Connect to secondary (white=dot) Ready to Test! Connections for Bar type CT’s: 1. From the multi-pin current cable, connect the female alligator clamp cable to DRIVE on the A phase current lead (red/black). 2. Connect the DRIVE alligator clamp to the high side (+) of the CT. Rev: 1.14 Page 129 of 184 3. From the multi-pin current cable, connect the other female alligator clamp cable to RETURN on the A phase current lead (red/white). 4. Connect the RETURN alligator clamp to the low side (-) of the CT. 5. Connect the yellow DRIVE cable to X2 of the secondary output of the CT. Terminate the other end to the B phase drive lead (yellow/black). 6. Connect the white RETURN cable to X1 of the secondary output of the CT (white dot). Terminate the other end to the B phase return lead (yellow/white). STEPS 1-4 STEPS 5-6 Clamp to high and low side Connect to secondary (white=dot) Application Procedure: STEP 1 STEP 2 STEP 3 Press #1 or Enter at Main Menu Press F2 to Create a New Site Enter required information and select “CT Bench Top Test” as service type, then press F6 STEP 4 STEP 5 STEP 6 Press F6 to select the site Press #4 at Main Menu Press #3 Rev: 1.14 Page 130 of 184 STEP 7 STEP 8 STEP 9 Enter selections, press F6 Verify connections, press F6 Load Box begins STEP 10 STEP 11 STEP 12 Load Box is ready, press F6 Ready to test, press F6 View results, press F6 to save Rev: 1.14 Page 131 of 184 11.3 CT Boost Testing (Load Box) Functionality: Moves to next field Moves to previous field Enters drop down box and views test mode selections; checks/unchecks check boxes Moves cursor up and down for selecting a CT in the drop down box Edits the selected CT or creates another CT (see Section 7.7.1) Starts the test Description: This screen allows the user to perform a current transformer (CT) test using the phantom load. Using the CT Current Drive cable (separate accessory), the user can connect to an energized CT Rev: 1.14 Page 132 of 184 to “boost” the current and verify the accuracy and proper operation in the field. The A phase current will act as the “primary” current drive for the CT. The B phase current will act as the “secondary” output for the CT. C phase is not used. For window-type CT’s, the user can use the current cable extension to loop through the CT as many as four times. This effectively multiplies the current driving through the transformer. For example, if the user desires an 80A test current, the user will select a Drive Current of 20 and 4 Turns (4*20=80A). PowerMaster® Connections: 1. Connect the multi-pin current cable to CURRENT on the PowerMaster®. 2. Connect the standard 3-Phase Voltage Cable to VOLTAGE on the PowerMaster®. 3. Connect the green safety ground to a known earth ground. 4. From the 3-Phase Voltage Cable, connect t A (red) and N (white) to the A phase and Neutral potentials respectively. 5. Connect the AUX PWR and AUX NEU to a source between 100-530VAC. 6. Connect the 3-Phase Current Probe Adapter Cable to PROBE SET 1. 7. Connect a primary probe (ex. 36” Flexible Current Probe) to the red connector on the 3Phase Current Probe Adapter Cable. Direct Connections to the CT The following instructions are for making connections to the CT directly (i.e. bypassing the secondary connections at the meter). STEP 1 STEP 2 STEP 3 Remove cover for X1 & X2 Insert shorting bar Remove wires from X1 & X2 Continued… Rev: 1.14 Page 133 of 184 STEP 4 STEP 5 STEP 6 Connect alligator clips (white=dot) Remove shorting bar Insert A Drive, loop, terminate STEP 7 Wrap probe around all conductors (arrow towards the load) ALTERNATE Connections to the CT and Test Switch The following instructions are for making alternate connections to the CT and the secondary connections at the meter. STEP 1 STEP 2 STEP 3 Insert A Drive, loop, terminate Wrap flex around all conductors (arrow towards the load) Connect alligator clips to current return (insert spacer) Rev: 1.14 Page 134 of 184 Application Procedure: STEP 1 STEP 2 STEP 3 Setup test; F6 to continue Confirm the probes are connected, F6 to continue Press F6 to continue STEP 4 STEP 5 STEP 6 Allow stabilization to occur After stabilization complete, F6 to continue View results; move connections to B phase and repeat steps 3-5 STEP 7 STEP 8 View results; move connections to C phase and repeat steps 3-5 View results for all CT’s, F6 to complete and save data Rev: 1.14 Page 135 of 184 Rev: 1.14 Page 136 of 184 12 Data Trending Rev: 1.14 Page 137 of 184 12 Data Trending Functionality: Moves to next field Moves to previous field Enters drop down box and views test mode selections Moves cursor up and down for selecting a test mode in the drop down box Check or un-check text boxes Scans USB Peripherals for an external memory device (required) Continues Rev: 1.14 Page 138 of 184 Description: Data Trending is a recording function, and an option for the 5 Series. This function enables the user to view and analyze data changes over an extended period of time. Data Trending can help diagnose voltage imbalances, peaks and swells, harmonic content, etc. in real time. The trending interval can be recorded either by time (“Time Interval”) or by meter pulses (“Meter Pulse Interval”). Time Interval: When selected, the user will set a time base in the text box to the right. This time base can be from 1 to 255 seconds. At the designated time base, the data will be recorded and displayed (if applicable) in the data trend graph. The lower the time base, the more data is recorded. Meter Pulse Interval: When selected, the data will be recorded and displayed (if applicable) when a meter pulse occurs. This normally occurs when a full KW-Hr revolution completes. “Meter Registration” can be selected and displayed. Total Time: This designates the total time the data trend will run and collect data. The minimum time to be selected is 00:00:01 and maximum time is 99:59:59 (> 4 days). If “Meter Pulse Interval” is selected, the test will end on the last pulse after total time is exhausted. Event High/Event Low: For significant changes, the user can use the Events criteria. This allows the user to select how high or how low (in percent) a change can occur without alarm. To set an event, enter a value between 1-99% to set the peak (Event High) or valley (Event Low) of a data point change in time. Once the data point change exceeds the high or low event, it is recorded with a time/date stamp. On the graph, the beginning and end point of the event is displayed in a pink bar. Display Signals: The data trend function records 40 signals simultaneously, but the user can only select up to 6 signals to display in the trend graph. Color codes are used to help the user determine which signal is displayed on the trend graph during and after testing. Storage Device: Due to the possibility of a large amount of data to be recorded, the user is required to have an external memory device available. This can include a USB memory dongle or a SD memory card. Once the memory device is installed in either the USB peripheral or the SD Device, press F3 to scan. Once recognized and memory size is determined, the device is ready. Rev: 1.14 Page 139 of 184 12.1 Trending Results Functionality: Exits to Main Menu Description: During the data trend, data points will be displayed according to the time base. The X-axis is percent change in reference to the nominal start of reading. The Y-axis is the time base. Rev: 1.14 Page 140 of 184 12.2 Recalling Trend Results Functionality: Views list of events (in development) Narrows window of the gross data (displays in bottom graph) Widens window of the gross data Moves window left Moves window right Resets any changes Rev: 1.14 Page 141 of 184 Description: When recalling trend data, the user has the ability to narrow down the data that is the most pertinent. By pressing the F2 key, the user can “zoom” in to enlarge the data trend. This data is displayed in the bottom window. By pressing the F4 and F5 key, the user can move the window around the completed results. Pressing F6 resets any “zooms” and goes to the default display. Events are displayed in pink bars at the start and finish of the set event. Data Trend Recall Setup When recalling the trend data from “Recall Data”, the user has the ability to change the event tables and view different signals (max 6). Similar to Section 12, the user checks the text boxes for the desired signals. The events can be changed as well to either tighten or loosen the desired data points. Rev: 1.14 Page 142 of 184 13 Recall Data Rev: 1.14 Page 143 of 184 13 Recall Data Functionality: Moves to next section Moves to previous section Expands boxes Expands boxes or Selects data to view Description: This screen allows the user to view saved data for each site installation in the database. After the user “expands” the data, the user presses F6 to view the stored information. Rev: 1.14 Page 144 of 184 14 Utilities Rev: 1.14 Page 145 of 184 14 Utilities Functionality: Moves cursor up and down to a menu selection Accepts and enters menu selection Description: The menu allows the user to change the PowerMaster® settings and other various tasks and applications. Rev: 1.14 Page 146 of 184 14.1 Connect to Meter Site Manager Description: This screen allows the user to communicate with Meter Site Manager 2. After communications are complete, press Enter or Space to reboot the PowerMaster®. Rev: 1.14 Page 147 of 184 14.2 Manual Load Box Control Functionality: Moves to next field Moves to previous field Enters drop down box and views test mode selections; checks/unchecks check boxes Moves cursor up and down for selecting a Service Type in the drop down box Starts the test Description: This application allows the user to test different applications using a manual interface to the PowerMaster® load box. Default values are displayed once the service type is selected. After the user selects a service type, amplitude and phase can edited as needed. Connections are made identical to the connections using the Phantom Load Meter Test (see Section 10.2.1). Refer to Rev: 1.14 Page 148 of 184 the table below to determine the min/max values that are obtainable according to the model number: Model Min/Max Amplitude (V)* Min/Max Amplitude (I)* Min/Max Phase Angle 5302 N/A 0.1-20 0-360˚ *Values stated are per phase Many types of testing can be performed using the Manual Load Box. The following tests are included (but not limited to) below: 1. Demand Testing 2. Data Trending 3. Synthesize field conditions in the lab Rev: 1.14 Page 149 of 184 14.3 Calibration Verification Functionality: Enter Calibration Check Rev: 1.14 Page 150 of 184 14.3.1 Calibration Verification Setup Functionality: Moves to next field Moves to previous field Enters drop down box and views test mode selections; checks/unchecks check boxes Moves cursor up and down for selecting a test mode in the drop down box Continues Description: This feature can perform a cross-check against the user’s shop standard to verify the accuracy. Enter the Kh value of the shop standard into the field for “Standard (Kt)”. Remember if the standard is single phase and you have the system hooked up series-parallel then you need to multiply the standard Kt by three (3). The user can also enter the desired test time and energy Rev: 1.14 Page 151 of 184 test mode (Wh, VAh, and VARh). When selecting the Energy Test Mode, verify the shop standard is correctly matched to the PowerMaster®’s energy test mode. Using Standard Voltage and Current Cables with the PowerMaster® What Do I Need? 1. PowerMaster® unit 2. Standard current and voltage leads 3. PowerMaster® External Digital Cable (separate accessory) 4. External power supply (current and voltage source) 5. Whr/VAhr/VARhr standard 6. AC adapter with a “pigtail” termination (line & neutral bare wires) 7. 10-terminal test switch 8. 18+ AWG wire for voltage and 12+ AWG wire for current Hookup Instructions: 1. From the external power supply, connect the voltage output to the A phase potential on the test switch 2. From the external power supply, connect the voltage output return to the N phase potential on the test switch. 3. From the test switch, connect the N phase potential to a known earth ground. 4. From the test switch, connect a jumper wire from A potential to B potential. Connect another jumper wire from B potential to C potential. This creates a parallel circuit for the voltage. 5. From the W-hr/Var-hr standard, connect the line voltage to the A phase potential on the test switch. 6. From the W-hr/Var-hr standard, connect the neutral voltage to the N phase potential on the test switch. 7. From the external power supply, connect the current output to the bottom of the A phase current on the test switch. 8. From the external power supply, connect the current output return to the “current out” of the W-hr/Var-hr standard. 9. From the W-hr/Var-hr standard, connect the “current in” of the W-hr/Var-hr standard to the C phase current return on the test switch. 10. From the test switch, a) connect a jumper wire from the top of the A phase current to the top of the A phase current return. From the bottom of the A phase current return, b) connect a jumper wire to the bottom of B phase current. From the top of B phase current, c) connect a jumper wire to the top of B phase current return. From the bottom of B phase current return, d) connect a jumper wire to the bottom of C phase current. From the top of C phase current, e) connect a jumper wire to the top of C phase current return. This creates a series circuit for the current. 11. From the PowerMaster®, connect the VOLTAGE leads to the voltage potentials on the test switch (A=red, B=yellow, C=blue, N=white). Connect the green safety ground lead to the N phase potential on the test switch. Rev: 1.14 Page 152 of 184 12. From the PowerMaster®, insert the CURRENT leads into the current return phases on the test switch (A=red, B=yellow, C=blue). 13. From the PowerMaster® DIGITAL input, connect the External Digital Cable (STD IN) to the pulse output on the W-hr/Var-hr standard. 14. From the PowerMaster®, connect the AUX PWR and AUX NEU to a voltage source between 100-530VAC to power the analyzer (recommended). 15. From the W-hr/Var-hr standard, use the AC adapter to connect the auxiliary power from the standard. Procedure: 1. Verify all connections according to the hookup instructions and wiring diagram. 2. Using the external power supply, select the desired voltage, current, and power factor for the test. This will be a series-parallel load. 3. At the Calibration Check screen, select the correct energy test mode (Whr, VARhr, or VAhr) and enter the desired time and Kh value of the standard. When using a series parallel load, the Kh value should be multiplied by 3 (ex. 0.00001 * 3 = 0.00003) 4. Press F6 (Start Test) to begin the test. 5. View and record results. 6. Press PREV to return to the Calibration Verification menu. Using the Calibration Cable Set with the PowerMaster® What Do I Need? 1. PowerMaster® unit 2. PowerMaster® Calibration Cables Kit 3. PowerMaster® External Digital Cable (separate accessory) 4. External power supply (current and voltage source) 5. W-hr/Var-hr standard 6. AC adapter with a “pigtail” termination (line & neutral bare wires) 7. 18+ AWG wire for voltage and 12+ AWG wire for current Hookup Instructions: 1. From the PowerMaster®, connect the one end of the Voltage calibration cable to line (red) and neutral (black) of the W-hr/Var-hr standard. 2. From the PowerMaster®, connect the other end of the Voltage calibration cable to the external power supply (red = V out HI, white = V out LO, yellow = V sense HI, blue = V sense LO). Connect the ground (green) to a known earth ground. 3. From the PowerMaster®, connect the Current calibration cable for line (red) to the Whr/Var-hr standard’s current return. Then, connect the neutral (black) to the external power supply’s current output neutral (LO). 4. From the external power supply, connect the current output (HI) to the W-hr/Var-hr standard’s current. 5. From the PowerMaster® DIGITAL input, connect the External Digital Cable (STD IN) to the pulse output on the W-hr/Var-hr standard. Rev: 1.14 Page 153 of 184 6. From the PowerMaster®, connect the AUX PWR and AUX NEU to a voltage source between 100-530VAC to power the analyzer (recommended). 7. From the W-hr/Var-hr standard, use the AC adapter to connect the auxiliary power from the standard. Procedure: 1. Verify all connections according to the hookup instructions and wiring diagram. 2. Using the external power supply, select the desired voltage, current, and power factor for the test. This will be a series-parallel load. 3. At the Calibration Check screen, select the correct energy test mode (W-hr, Var-hr, or Vahr) and enter the desired time and Kh value of the standard. When using a series parallel load, the Kh value should be multiplied by 3 (ex. 0.00001 * 3 = 0.00003) 4. Press F6 (Start Test) to begin the test. 5. View and record results. 6. Press PREV to return to the Calibration Verification menu. Rev: 1.14 Page 154 of 184 14.3.2 Auto Calibration Check (Load Box) Functionality: Moves to next field Moves to previous field Enters drop down box and views test mode selections; checks/unchecks check boxes Moves cursor up and down for selecting a test mode in the drop down box Continues Description: This feature can perform an automatic cross-check against the user’s shop standard to verify the accuracy. This feature is not available for the Model 7300. Enter the Kh value of the shop standard into the field for “Standard (Kt)”. The user can also select the desired energy test mode (Whr, VAhr, VARhr). Please note that selection of the desired energy test mode DOES NOT adjust the phase angle for the test point. It simply corresponds to the PowerMaster®’s energy Rev: 1.14 Page 155 of 184 algorithm. The tests will be performed by either “Timed” or “Pulse to Pulse”. “Timed” is an automated process that will stop at the time designated for each test point. “Pulse to Pulse” is a manual operation using a Manual Pushbutton Switch (separate accessory) to stop and start each individual test point. Powermetrix recommends using the “Timed” option. After the calibration verification is complete, the load box will automatically shut down and the data is stored (.csv format) in flash memory in the PowerMaster® . The data can be accessed through ActiveSync (or Windows Mobile Device Center for Windows 7 users) by viewing the “My Device\Flash\Powermaster” directory. WFG Test Setups: The user can select many types of WFG Test Setups, one at a time. Default setups are included, but the user can create their own for special calibration checks. The setups are saved in a .txt file (created using Notepad) using a specific format. An example format can be seen below: 1V-3C-Short-120V-20AMax 120,0,0,0,0,0,.1,.1,.1,0,0,0,30 120,0,0,0,0,0,.25,.25,.25,0,0,0,20 120,0,0,0,0,0,.5,.5,.5,0,0,0,10 120,0,0,0,0,0,1,1,1,0,0,0,10 120,0,0,0,0,0,2.5,2.5,2.5,0,0,0,10 120,0,0,0,0,0,5,5,5,0,0,0,10 120,0,0,0,0,0,10,10,10,0,0,0,10 120,0,0,0,0,0,15,15,15,0,0,0,10 120,0,0,0,0,0,20,20,20,0,0,0,10 -1 The name of the file must always be noted in the first line of the text document. Also, the name of the file and the first line must always be equal. The second line and beyond are used for each individual test point (unlimited). The required notation of “-1” is used to tell the PowerMaster® to end the test. This is always the last line in the text document. Each test point has a specific format as well. There are 13 data points each separated with a comma and no spaces. An explanation of the 13 data points is below: Va, Vb, Vc, VaΦ, VbΦ, VcΦ, Ia, Ib, Ic, IaΦ, IbΦ, IcΦ, Time (seconds) For example, “Va” signifies the amplitude for A phase voltage. “VaΦ” signifies the phase angle for A phase voltage (expressed in degrees). The last data point is Time, which is always expressed in seconds. After the test setup is complete and saved, below are instructions on how to save the setup(s) into the PowerMaster®’s flash memory: 1. Power up the PowerMaster® (verify Auxiliary Power AC Adapter is connected). 2. From the PC, plug in the USB cable to "USB TO HOST" on the PowerMaster®. 3. At the bottom right tray on the PC, double click the ActiveSync icon (green) 4. Click Explore 5. In Mobile Device, double click "Flash" Rev: 1.14 Page 156 of 184 6. Double click "PowerMaster" 7. Double click "Calibration Tests" 8. Copy and paste the .txt file(s) into this directory 9. Power off, then power on the PowerMaster® . Using a Single Phase Standard with the PowerMaster® What Do I Need? 1. PowerMaster® unit 2. Standard voltage leads 3. 3-Phase Current Lead Set (terminated with alligator clips) (separate accessory) 4. PowerMaster® External Digital Cable (separate accessory) 5. Single-phase Whr/VAhr/VARhr standard 6. Auxiliary Power Adapter (separate accessory, 10-340-0045) 7. AC adapter with a “pigtail” termination (line & neutral bare wires) Hookup Instructions: 1. From the AC adapter with a “pigtail” termination, connect the line and neutral to “Auxiliary Power” of the single phase standard. Plug into an AC source. 2. From the PowerMaster®, connect the VOLTAGE leads to the line potential (hot) on the single phase standard (A=red, B=yellow, C=blue). Connect the ground (green) and the Neutral lead (white) to the neutral potential on the single phase standard. 3. From the PowerMaster®, connect the auxiliary power leads to the Auxiliary Power Adapter. Plug into an AC source. Note that fans will run on the PowerMaster®. 4. From the PowerMaster®, connect the CURRENT leads for A phase drive (red) to phase A and A phase return (white) to phase A return on the single phase standard. Repeat this for phase B and C taps on the single phase standard. 5. From the PowerMaster®, connect the External Digital Cable’s “STD IN” to the Output of the single phase standard. Application Procedure: STEP 1 STEP 2 STEP 3 Press F6 to continue Allow stabilization to occur After stabilization complete, F6 to continue Rev: 1.14 Page 157 of 184 STEP 4 STEP 5 Test automatically runs View results. Press F6 to complete Rev: 1.14 Page 158 of 184 14.4 Save a Database Backup Functionality: Cancels and returns to Configuration Menu Scans flash drive for free space Description: When the user may want to backup the PowerMaster® database for security purposes, place a USB flash drive into one of the PowerMaster®’s USB peripheral ports. Next, press F3 to scan the USB flash drive to verify enough space is required to save the database. As an alternative, the user can run this process instead of downloading the database using Meter Site Manager 2. Refer to the Meter Site Manager 2 Instruction Manual for further details. The following steps show the user how to update the PowerMaster® in the field: Rev: 1.14 Page 159 of 184 STEP 1 STEP 2 STEP 3 Insert USB Flash drive into a USB peripheral and press F3 to scan After free space is confirmed, press F6 to begin backup Copy of the database will save to USB flash drive Rev: 1.14 DO NOT REMOVE USB FLASH DRIVE Page 160 of 184 14.5 Install a System Upgrade Functionality: Cancels and returns to Configuration Menu Scans flash drive for PowerMaster® upgrade file (.PMX) Description: When new software updates are available, Powermetrix will contact the user of its availability. The upgrade file package (.PMX extension) must be moved to a USB flash drive. Once the file package is on the USB flash drive, the user will connect it to one of the PowerMaster®’s USB peripheral ports. The following steps show the user how to update the PowerMaster® in the field: Rev: 1.14 Page 161 of 184 STEP 1 STEP 2 STEP 3 Insert USB Flash drive into a USB peripheral and press F3 to scan Select the .PMX upgrade file and press F6 to install After recognition, reset the PowerMaster by turning off then turning back on STEP 4 STEP 5 After power up, the PowerMaster® will run the update application automatically (this may take several minutes) After installation, reset the PowerMaster® by turning off then turning back on Rev: 1.14 Page 162 of 184 14.6 Quick Edit Functionality: Moves cursor up and down for selecting an entry Description: This menu allows the user to quickly enter a form for the purposes of editing or deleting. New components and setups can be created here as well. This is meant as an alternative method for editing as opposed to using the Site Editor exclusively (see Section 7.4.1). Rev: 1.14 Page 163 of 184 14.7 Set System Time Functionality: Moves to next field Moves to previous field Enters drop down box and views selections; checks/unchecks check boxes Moves cursor up and down for selecting a value in the drop down box Changes the time format for domestic and international time zones Changes the time zone Saves changes and exits Rev: 1.14 Page 164 of 184 14.8 Edit Test Session Notes Functionality: Moves to next field Moves to previous field Cancels changes and goes back to the Utilities menu Saves changes and exits Description: This screen allows the user to edit the initial comments made during the beginning of the test session. The user can also add up to 15 custom fields to use for each test session. These may include (but are not limited to) schematic number, customer telephone, etc. To edit the names of these 15 fields, see Section 15.8.4. Rev: 1.14 Page 165 of 184 14.9 User Preferences 14.9.1 Error Limits and Data Save Options Functionality: Moves to next field Moves to previous field Enters drop down box and views test mode selections; checks/unchecks check boxes Moves cursor up and down for selecting a test mode in the drop down box Moves to the next important section of the screen Moves to the next set of user preferences Saves changes and exits Rev: 1.14 Page 166 of 184 Description: This screen allows the user to set the error limits for testing and how much (or little) data is saved. Error Limits The three error limits are based on the accuracy class of the component. For example, if the meter has an accuracy class of 0.2% and an error limit set to “2.0x Specification Accuracy,” the PowerMaster® will only display an error if the registration is outside of 99.60% and 100.40%. Accuracy class = 0.2% Error Limit = 2.0x Specification Accuracy 0.2 * 2 = ±0.4% Optionally, the user selects “User Defined Accuracy” to set a custom error limit Save Additional Data After Meter Tests The user has the option to save additional information: Meter Trend Data: This option saves the trending graphs to the database. Waveforms: This option allows the user to auto save during a Meter Test and manually save the waveform diagrams. Significant Harmonics: This option allows the user to auto save during a Meter Test and manually save the harmonic information. Demand Test Options This allows the user to choose the timed intervals for a demand test. Choices available are 5 minute or 3 minute intervals. The user also has the ability to change the display from energy (Whr) or demand (W) accumulation. The user can also select how the results will be displayed: Demand Sum (Whr/hr, sum of all intervals), Demand Average (Whr/hr, average of all intervals), or Energy (Whr, average of all intervals). Harmonic Limits This option is displayed when “Significant Harmonics” is selected. This narrows down the number of harmonics the user feels significant and wishes to save to the database. Max to view: This allows the user to select how many harmonics are displayed on the screen Min Threshold: This option sets the minimum harmonic distortion percentage to be saved. For example, if the user sets the minimum to 1%, all harmonics that are 0.9% and below will not be saved. This prevents the user from saving too much unnecessary data to the database. Rev: 1.14 Page 167 of 184 14.9.2 Measurement Calculations Functionality: Moves to next field Moves to previous field Enters drop down box and views test mode selections Moves cursor up and down for selecting a test mode in the drop down box Moves to the next important section of the screen Moves to the next set of user preferences Changes all calculations using the time domain Changes all calculations using the fundamental only (no harmonics) Rev: 1.14 Page 168 of 184 Changes all calculation using frequency (default) Saves changes and exits Description: The following describes how the PowerMaster® specifically calculates power according to the user’s selections above: TIME DOMAIN1 In Time Domain, data is processed on a point by point basis and the results integrated over precisely one cycle of the incoming signal. The quantities calculated are: Calculations Vrms = 1 ∑Vn2 N n V(TDRMS) - The processing properly accounts for the exact number of samples in a cycle including fractional data points I rms = 1 ∑ I n2 N n I(TDRMS) ∑VI Active Power (Pa) – Calculation includes any DC component as well as all frequencies in the signal up to the cutoff frequency of 32 kHz. Pa = 1 N n i i Sa = VA = VrmsIrms = i = N −1 1 N Qa = S 2 − P 2 PFa = ∑Vi 2 • i =0 i = N −1 1 N ∑ I i2 i =0 Apparent Power (Sa) - Calculation includes any DC component as well as all frequencies in the signal up to the cutoff frequency of 32 kHz. Reactive Power (Qa) – There is not a good formulation in the time domain for directly computing Q. We have adopted the approach of computing it from the “Power Triangle” assumption. Power Factor (PFa) Pa Sa FREQUENCY DOMAIN2 In Frequency Domain (FFT), Every 2048 data points a complete Fourier analysis is performed. The user has control over the maximum number of harmonics to be included in the analysis as well as the ability to set a threshold which can exclude harmonics whose amplitude is below the user set threshold (see section 14.1). While time domain calculations of power quantities yield energy directly because they are integrals, Fourier calculations deliver average rates over the time interval of the analysis. According to Fourier’s Theorem any periodic signal can be represented in the following manner: V (t ) = Rev: 1.14 a0 ∞ + ∑ (anCos (nω 0t ) + bnSin(nω 0t ) ) 2 n =1 Page 169 of 184 The PowerMaster® calculates an , bn and ω0 for n = 0 to 100. Given these parameters we can calculate any of the quantities of interest as follows: Calculations: Vt(FDRMS) – RMS voltage computed using all harmonics which pass the user definable filter.1 1/ 2 Vrms 1 = 1 / 2 ∑ (avn2 + bvn2 ) (2) n 1/ 2 1 I rms = 1 / 2 ∑ (ain2 + bin2 ) ( 2) n v v Pt = ∑ Vn • I n = ∑ (avn ain + binbvn ) n n It(FDRMS) – RMS current computed using all harmonics which pass the user definable filter.1 Pt(FD) – Active power computed by summing the vector dot products of each of the harmonics1 = ∑Vn I n cos(θ n ) n v v Qt = ∑ Vn × I n = ∑ (avnbin − ainbvn ) n n Qt(FD) – Reactive power computed by summing the vector dot products of each of the harmonics1 = ∑Vn I n sin(θ n ) n 1 St = ∑ (a vn2 + bvn2 )(a in2 + bin2 ) 2 n Pt PFt = St 1/ 2 St(FD) – Apparent power computed by summing the Vrms times Irms for each harmonic. Power Factor (PFt) Note: 1 The a0 component is not included in numbers reported by the PowerMaster®. 2 Normalization constants have been omitted for simplicity FUNDAMENTAL ONLY For Fundamental Only, the PowerMaster® uses a subset calculation from the Frequency Domain. In this case, harmonics are not included in the analysis. Calculations: V1 = [ ] 1/ 2 1 av21 + bv21 1/ 2 (2) [ ] 1/ 2 1 ai21 + bi21 1/ 2 ( 2) v v P1 = V1 • I1 = av1ai1 + bv1bi1 = V1I1 cos(θ1 ) I1 = v v Q1 = V1 × I1 = av1bi1 − ai1bv1 = V1I1 sin(θ1 ) S1 = 1 2 (av1 + bv21 )1 / 2 (ai21 + bi21 )1 / 2 2 PF 1 = P1 S1 Rev: 1.14 V1(FDRMS) – RMS voltage for the fundamental frequency only. I1(FDRMS) – RMS current for the fundamental frequency only. P1(FD) - Active power for the fundamental only P1(FD) - Reactive power for the fundamental only S1t(FD) – Apparent power computed as Irms times Vrms for the fundamental only. Power Factor (PF1) Page 170 of 184 14.9.3 General Settings Functionality: Moves to next field Moves to previous field Checks all checkboxes Moves cursor up and down for selecting a test mode in the drop down box Moves to the next important section of the screen Moves to the next set of user preferences Saves changes and exits Rev: 1.14 Page 171 of 184 Description: This screen allows the user to set general settings in the PowerMaster®. Default Pulse Output Mode These options allow the user to customize the pulse output for the PowerMaster®. Energy selections are Wh, VARh, and VAh. The user will enter the Kh value in measurements of µWh (micro Watt-hours) per pulse. Pause after each test for user acceptance This selection is used for Integrated Site Testing. By default, after each component test (meter, CT, PT, etc.) results are displayed, the PowerMaster® will wait for customer input. This allows the user to retest or cancel the test altogether. If this selection is unchecked, the PowerMaster® will verify the results meet the required specifications (see Section 14.1 for Error Limits) and move forward to the next test. If the results do not meet the required specifications, the PowerMaster® will stop and wait for customer input. Enable Audio Feedback & Language This selection allows the user to turn the audio off (unchecked) and on (checked). The volume can be increased or decreased for both the general audio and the meter pulse. “Language” allows the user to select the language preference for text displayed. Stabilize Load Box Phases If this selection is checked, the PowerMaster will use a correction to accurately stabilize the phase angles when performing a phantom load test. If this selection is un-checked it will ignore the correction. Phantom Load Meter Testing This selection allows the user to adjust the meter warm up period before verification begins. The minimum time period is 30 seconds, and the maximum is 1,800 seconds. Rev: 1.14 Page 172 of 184 14.9.4 User Defined Fields for the Test Session Functionality: Moves to next field Moves to previous field Moves to the next important section of the screen Moves to the next set of user preferences Saves changes and exits Description: These screens (pages 4-5) allow the user to change the labels for custom fields in the PowerMaster®. The Custom Fields for Test Session are directly input into the MasterTestRecord table in the database. They can be exported from the database, but cannot be directly viewed from Meter Site Manager 2. Rev: 1.14 Page 173 of 184 14.9.5 Load Box Labels Functionality: Moves to next field Moves to previous field Allows edits to be made for the active field Moves to the next important section of the screen Moves to the next set of user preferences Deletes a row Creates a new row for more entries Saves changes and exits Rev: 1.14 Page 174 of 184 14.9.6 User Defined Fields for the Site Functionality: Moves to next field Moves to previous field Moves to the next important section of the screen Moves to the next set of user preferences Saves changes and exits Description: These screens (pages 7-9) allow the user to change the labels for custom fields in the PowerMaster®. The Custom Fields for the Site are directly input into the SiteDescription table in the database. They can be exported from the database, and can be directly viewed from Meter Site Manager 2 in the Site Report. Rev: 1.14 Page 175 of 184 14.9.7 Display Preferences Functionality: Moves to next field Moves to previous field Allows edits to be made for the active field Moves to the next important section of the screen Moves to the next set of user preferences Saves changes and exits Description: These selections allow display options for IEC meter support. The user can also change the display colors for the current and voltage phases. Rev: 1.14 Page 176 of 184 15 Specifications Rev: 1.14 Page 177 of 184 15 Specifications Overview AC Current Direct Channels 3 inputs, 0 to 20A AC Voltage Channels 4 inputs at 10 to 600 Vrms AC Current Probe Channels Two sets of 3 probe inputs each for clamp-on probes, flexible probes, Amp Litewire probes, or combination System Power Active & Reactive per IEEE1459 Auxiliary Power 100 to 530 VAC up to 500W depending on model System has internal battery charger. Frequency 45-65 Hz AC Current Direct Channels Channels 3 inputs, 0 to 20A Accuracy *(R1) 0.08A to 0.2A , ±0.1%, Phase Error < 0.02° *(R2) 0.2A to 20A, ±0.04%, Phase Error < 0.006° Resolution 0.000001A AC Voltage Channels Channels 4 inputs, 10 to 600 Vrms Accuracy *(R1) 10 to 55 V , ±0.04%, Phase Error < 0.002° *(R2) 55 to 600 V, ±0.02%, Phase Error < 0.002° Resolution 0.000001V AC Current Probe Channels Channels Two sets of 3 probe inputs each for clamp-on probes, flexible probes, Amp Litewire probes, or combination Input Range 0.001V to 3.2 V(RMS), ±5.0 V peak Probes Accepted 0.1mV/A to 100 mV/A, 0.00001mV/V to 1mV/V Voltage output clamp-on current probes, flex probes, high voltage current probes, power provided to probes from system, calibration information stored in probe Resolution Display determined by probe type Accuracy (not including probe errors) *(R1) 0.001 to 0.032 V , 0.05% ±20µV *(R2) 0.032V to 3.2V, 0.04% Phase Error < 0.006° Measurements Frequency 45-65 Hz, 10 µHz resolution, 50ppm accuracy Power Quantities Watts, VA, VAR, PF (multiple user selectable Rev: 1.14 Page 178 of 184 calculations) Note: There is no US standard definition for VARs. We certify that our measurements of VARs match the definitions in our documentation to the specified accuracy. Watts Accuracy *(R1) ± 0.08%** *(R2) ± 0.04%** Energy Quantities Whr, VAhr, VARhr (multiple user selectable calculations) Whr Accuracy *(R1) ± 0.08%** *(R2) ± 0.04%** Power Factor -1.00 to 1.00 Harmonics Up to 100th harmonic, user selectable Definitions System can calculate each quantity using a variety of user selectable definitions. Either full spectrum or fundamental only calculations are available. Current Source (Model 5302) Current Output 0.1 to 20 amps per phase Current Output Resolution I < 5.0A, 1% of value I > 5.0A, 0.2% of value Phase adjustability 0 to 359.9° in 0.1° steps each phase Harmonics Sourcing Through 20th order with arbitrary amplitude and phase for each harmonic Total Harmonic Distortion < 1.0%, fundamental only Compliance Voltage 0.88V at cable termination Current Accuracy ±0.2%, fundamental only RMS Arbitrary harmonics TBD Stability TBD Operating Modes Passive: Current source is phase locked and synchronizer to user voltage. Lock error typically less than 0.005°. Active: PowerMaster® drives current (5302 only). Environmental Temperature (Operating) -20°C to +50°C (-7°F to 122 °F) Temperature (Storage) -20°C to +80°C (-7°F to 176°F ) Humidity 0% to 95% non-condensing Rev: 1.14 Page 179 of 184 Communication External Pulse Input 1 (for meter pulse pickups) USB to PC Port 1 (for connectivity to PC/Laptop) USB Ports for Peripherals 2 (for keyboard, mouse, barcode reader, memory devices, etc.) Ethernet Port 1 (for high speed connectivity including internet RS232 Port 1 (for legacy devices) Audio Port 1 (for microphone, headphones Physical Display Resolution Full color transflective VGA (640 x 480) Display Size 8.4 inch Dimensions (H x W x D) 21 x 17 x 8.5 Weight (5300) 29.4 lbs (13.3 kg) (not including cables & accessories) Weight (5302) 35.6 lbs (16.1 kg) (not including cables & accessories) Case Pelican 1550 Power Auxiliary Supply Voltage 100 to 530 VAC Auxiliary Supply Power Battery charge with simultaneous passive operation: 100W Operation, driving maximum voltage and current into maximum under maximum load conditions: 600W Unit can operate in passive site test mode from battery, no external power required. Internal Battery 14.4 V, 4.5 AHr NiMH battery pack. Unit has internal rapid charger which operates when Aux Power is connected. *All amplitude errors are expressed as percent of measurement. All phase errors are expressed in degrees at 60 Hz. R1 = Range 1, R2 = Range 2 ** All accuracy specifications are over the "Standard Operating Range" (10°C to 35°C). Performance over the "Extended Operating Range" (-20°C to 50°C) are reduced by 10ppm/°C outside the Stand Operating Range. Measurements made using the AC Current Direct and AC Voltage channels. Rev: 1.14 Page 180 of 184 16 Appendices Rev: 1.14 Page 181 of 184 Appendix 1 Precision Pulse Output Description Introduction The PowerMaster® incorporates a high accuracy pulse output which can be driven by any of the following quantities: Active Power (P): Pa: active power computed in the time domain ( once per cycle). Includes DC and all frequency components up to 16 kHz. P1: active power computed in the frequency domain ( once every four cycles). Includes only the fundamental frequency component. Pt: active power computed in the frequency domain ( once every four cycles). Can include up to the 100th harmonic. The maximum number of harmonics to include are user selectable. A threshold (as a percent of the fundamental) can also be set to exclude harmonics with very low amplitudes. Reactive Power (P): Qa: Q1: reactive power computed in the frequency domain ( once every four cycles). Includes only the fundamental frequency component. Qt: reactive power computed in the frequency domain ( once every four cycles). Can include up to the 100th harmonic. The maximum number of harmonics to include are user selectable. A threshold (as a percent of the fundamental) can also be set to exclude harmonics with very low amplitudes. Apparent Power (P): Sa: Rev: 1.14 reactive power computed in the time domain ( once per cycle). Includes DC and all frequency components up to 16 kHz. reactive power computed in the time domain ( once per cycle). Includes DC and all frequency components up to 16 kHz. S1: reactive power computed in the frequency domain ( once every four cycles). Includes only the fundamental frequency component. St: reactive power computed in the frequency domain ( once every four cycles). Can include up to the 100th harmonic. The maximum number of harmonics to include are user selectable. A threshold (as a percent of the fundamental) can also be set to exclude harmonics with very low amplitudes. Page 182 of 184 User Setup The system defaults to Active Power as the output mode. The selection between Pa, P1, and Pt is determined by the user setting on page 2 of the User Preferences menu. The default Kh of the system is 10 micro-units per pulse. Hence the default output is 10 µWh per pulse. The Kh can be changed on page 3 of the User Preferences dialog. The range of possible Kh values is 5 micro-units to 65535 micro-units. Using 10 micro-units per pulse gives the same Kh as most commonly available standards. Pulse Generation Power quantities are defined over a single cycle of the measured cycle. While instantaneous power may vary from positive to negative over a cycle, the pulse output is designed to be proportional to the net power over a cycle. To analyze the net power over a cycle we cannot know the result until the cycle is completed. Trace Description Measured Cycle Output Pulses Output Pulses Magenta Phase A Yellow Zero Crossing Signal Blue Output Pulses When operating in Time Domain measurement mode (a power computation every cycle), the PowerMaster® computes the result for one cycle (for example the cycle designated by the vertical cursors above) and outputs the associated pulses starting approximately 5 ms later. The pulses have a constant frequency of 1.2288 MHz. The number of pulses in the burst is equal to the measured value for the previous cycle divided by Kh. Any fractional remainder is carried over to the next cycle. Start of pulse burst. Rev: 1.14 Page 183 of 184 When operating in Frequency Domain measurement mode (a power computation every 4 cycles), the PowerMaster computes the result for a four cycle interval (for example the cycles designated by the vertical cursors above) and outputs the associated pulses starting approximately 10 ms later. The pulses have a constant frequency of 1.2288 MHz. The number of pulses in the burst is equal to the measured value for the previous four cycles divided by Kh. Any fractional remainder is carried over to the next measurement period. Measurement Interval Output Pulses Using the PowerMaster Pulse Output Accurately To get the highest possible accuracy when using the PowerMaster pulse output the pulses should be counted for precisely an integral number of seconds. This will insure that the number of pulses counted is accurate provided that the load is stable for at least four cycles prior to the beginning of counting and eight cycles prior to the end of counting. Rev: 1.14 Page 184 of 184