1
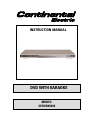
INSTRUCTION MANUAL
DVD WITH KARAOKE
MODEL:
CEDVD95245
Safety Precautions
The lightning flash with an arrowhead symbol within an equilateral triangle is
intended to alert the user to the presence of uninsulated "dangerous voltage" within
the product's enclosure that may be of sufficient magnitude to constitute a risk of
electric shock to persons.
!
WARNING:
CAUTION:
The exclamation point within an equilateral triangle is intended to alert the user to
the presence of important operating and maintenance (servicing) instructions in the
literature accompanying the appliance.
CAUTION
RISK OF ELECTRIC SHOCK
DO NOT OPEN
AVIS
!
RISQUE DE CHOC ELECTRIQUE NE
PAS OUVRIR
CAUTION: TO REDUCE THE RISK OF ELECTRIC SHOCK,
DO NOT REMOVE COVER (OR BACK). NO USERSERVICEABLE PARTS INSIDE. REFER SERVICING TO
QUALIFIED SERVICE PERSONNEL.
CAUTION: (Visible) Laser Radiation When Open.
DO NOT STARE INTO BEAM.
TO REDUCE THE RISK OF FIRE OR ELECTRIC, DO NOT EXPOSE THIS APPARATUS TO RAINOR
MOISTURE.
THE APPARATUS SHALL NOT BE EXPOSED TO DRIPPING OR SPLASHING AND THAT NO OB
JECTS FILLED WITH LIQUIDS, SUCH AS VASES, SHALL BE PLACED ON THE APPARATUS.
Do not open the cabinet, dangerous high voltages are present inside the
enclosure. only qualified service personnel should attempt this.
TO PREVENT ELECTRIC SHOCK, MATCH WIDE BLADE OF PLUG TO WIDE SLOT, AND
FULLY INSERT.
ATTENTION:
POUR EVITER LES CHOCS ELECTRIQUE, INTRODUIRE LA LAME LA PLUS LARGE DE LA
FICHE DANS LA BORNE CORRESPONDANTE DE LA PRISE ET POUSSER JUSQU' AU FOUD.
CAUTION:
This player employs a Laser System. To prevent direct exposure to the laser beam,
do not try to open the enclosure.
Visible laser radiation when open and interlocks defeated.
Use of controls or adjustments or performance of procedures other than those specified
radiation exposure.
DO NOT STARE INTO BEAM.
To ensure proper use of this product, please read this operating instructions care
fully and retain for future reference.
Should the unit require maintenance, contact an authorized service location, or
contact local dealer. only qualified service personnel should remove the cover.
WARNING:
CLASS 1
LASER PRODUCT
Changes or modifications made to this equipment, not expressly approved by manu
facturer or parties authorized by manufacturer will void all the manufacture warranties.
Since it is very usual for DVD movies to be released at different times in different regions of the world, all
players have region codes and discs can
have an optional region code. If you load a disc of a different region code to your player, you will see the region
code notice on the screen.
The disc will not play, and should be unloaded.
For Customer Use:
In spaces provided below, record the Model and Serial No. located on the rear panel of your player.
Model No.
Serial No.
Retain this information for future reference.
Important Safety Instructions
CAUTION: Use of controls or adjustments or performance of procedures other than those specified
herein may result in hazardous radiation exposure.
CAUTION: PLEASE READ AND OBSERVE ALL WARNINGS AND INSTRUCTIONS GIVEN IN THIS OPERATING
INSTRUCTION AND THOSE MARKED ON THE UNIT. RETAIN THIS BOOKLET FOR FUTURE REFERENCE.
This set has been designed and manufactured to assure personal safety. Improper use can result in electric shock or fire
hazard. The safeguards incorporated in this unit will protect you if you observe the following procedures for installation, use
and servicing. This unit fully transistorized and does not contain any parts that can be repaired by the user.
DO NOT REMOVE THE CABINET COVER, OR YOU MAY BE EXPOSED TO DANGEROUS VOLTAGE.
REFER SERVICING TO QUALIFIED SERVICE PERSONNEL ONLY.
1. Read these instructions.
2. Keep these instructions.
3. Heed all warnings
4. Follow all instructions.
5. Do not use this apparatus near water.
6. Clean only with dry cloth
7. Do not block any ventilation openings. Install in accordance with the manufacturer's instructions.
8. Do not install near any heat sources such as radiators, heat registers, stoves, or other apparatus (including amplifiers)
that produce heat.
9. Do not defeat the safety purpose of the polarized or grounding-type plug. A polarized plug has two blades with one
wider than the other. A grounding type plug has two blades and a third grounding prong. The wide blade or the third prong
is provided for your safety. If the provided plug does not fit into your outlet, consult an electrician for replacement of the
obsolete outlet.
10. Protect the power cord from being walked on or pinched particularly at plugs, convenience receptacles, and the point
where they exit from the apparatus.
11. Only use attachments/accessories specified by the manufacturer.
12. Use only with the cart, stand, tripod, bracket, or table specified by the manufacturer, or sold with the apparatus. When
a cart is used, use caution when moving the cart/apparatus combination to avoid injury from tip-over.
13. Unplug this apparatus during lightning storms or when unused for long periods of time.
14. Refer all servicing to qualified service personnel. Servicing is required when the apparatus has been damaged in any
way, such as power-supply cord or plug is damaged, liquid has been spilled or objects have fallen into the apparatus, the
apparatus has been exposed to rain or moisture, does not operate normally, or has been dropped.
ADDITIONAL SAFETY INSTRUCTIONS
15. When you use Microphones, keep the volume at a moderate level. If you use the Microphones continuously with high
volume sound, it may cause tearing damage.
16. Do not overload wall outlets; extension cords, or integral convenience receptacles as this can result in a risk of fire or
electric shock.
17. Keep your fingers well clear of the disc tray as it is closing. Neglecting to do so may cause serious personal injury.
18. Do not place a heavy object on or step on the apparatus. The object may fall, causing serious personal injury and
serious damage to the apparatus.
19. Do not use a cracked, deformed, or repaired disc. These discs are easily broken and may cause serious personal injury
and apparatus malfunction.
20. Caution - Do not attempt to service this product yourself as opening or removing covers may expose you to dangerous
voltage or other hazards. Refer all servicing to qualified service personnel.
Caution: This unit should only be serviced by an authorized and properly trained technician. Opening the cover
or other attempts by the user to service this unit may result in serious injury or death from electrical shock, and
may increase the risk of fire.
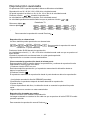
Precautions
Notes on handling
• When shipping the Player, the original shipping carton and packing materials come in handy. For maximum
protection, repack the unit as it was originally packed at the factory.
• Do not use volatile liquids, such as insect spray, near the player. Do not leave rubber or plastic products in
contact with the Player for a long time. They will leave marks on the finish.
• The top and rear panels of the Player may become warm after a long period of use. This is not a
malfunction.
• When the Player is not in use, be sure to remove the disc and turn off the power.
• If you do not use the Player for a long period, the unit may not function properly in the future. Turn on and
use the player occasionally.
Notes on locating
• Place the player on a level surface. Do not use is on a shaky or unstable surface such as a wobbling table
or inclined stand. The loaded disc may come off the proper position and cause damage to the player.
• When you place this player near a TV or radio, the playback picture may become poor and the sound may
be distorted. In this case, place the player away from the TV or radio.
Notes on cleaning
Use a soft, dry cloth for cleaning.
• For stubborn dirt, soak the cloth in a weak detergent solution, wring well and wipe. Use a dry cloth to wipe
it dry. Do not use any type of solvent, such as thinner and gasoline, as they may damage the surface of the
player.
• If you use a chemical saturated cloth to clean the unit, follow that product's instructions.
To obtain a clear picture
The player is a high technology, precision device. If the optical pick-up lens and disc drive parts are dirty or
worn down, the picture quality becomes poor. To obtain a clear picture, we recommend regular inspection
and maintenance (cleaning or parts replacement) every 1,000 hours of use depending on the operating
environment. For details, contact your nearest dealer.
Notes on moisture condensation
Moisture condensation damages the player. Please read the following carefully.
Moisture condensation occurs, for example, when you pour a cold drink into a glass on a warm day. Drops of
water form on the outside of the glass. In the same way, moisture may condense on the optical pick-up lens
inside this unit, one of the most crucial internal parts of the player.
Moisture condensation occurs during the following cases.
• When you bring the player directly from a cold place to a warm place.
• When you use the player in a room where you just turned on the heater, or a place where the cold wind from
the air conditioner directly hits the unit.
• In summer, when you use the player in a hot and humid place just after you move the unit from an airconditioned room.
• When you use the player in a humid place.
Do not use the player when moisture condensation may occur.
If you use the player in such a situation, it may damage discs and internal parts. Remove the disc, connect
the power cord of the player to the wall outlet, turn on the player, and leave it for two or three hours, the player
will have warmed up and evaporated any moisture. Keep the player connected to the wall outlet and moisture
condensation will seldom occur.
Introduction
Your DVD video player is a player for digital video discs
conforming to the universal DVD video standard. With it, you will be able to enjoy fulllength movies with true cinema picture quality, and multichannel sound. Unique features of
this player include selection of soundtrack and subtitle languages, different camera angles
(depending on the disc), digital outputs to hook up Dolby Digital. What’s more, Parental
Control lets you decide which discs your children can watch. Your player supports audio CDs,
and the new MP3 format.
You will find your player remarkably easy to use, by way of On-Screen Display and wireless
remote control.
UNPACKING
First check and identify the contents of your DVD video player package, as listed below:
- DVD Video Player
- Remote control handset with separately packed batteries
- AV cable (yellow, red and white) (1)
- AAA batteries (2)
- Operation Manual
If any item should be damaged or missing, please inform your dealer without delay.
Keep the packaging materials, you may need them to transport your player in the future.
WHERE TO LOCATE YOUR UNIT
A. Place the unit on a firm, flat surface.
B. When you place this DVD video player near a radio, or VCR, the playback picture may
become poor and/or distorted. In this situation, move the DVD video player away from the
other units.
C. If placed in a cabinet, please allow at least 2.5 cm (1 inch) of free space all around the player for
proper ventilation.
TO OBTAIN A CLEAR PICTURE
The DVD video player is a precision device. If the optical pick-up lens and disc drive parts
are dirty or worn down, picture quality becomes poor. We recommend regular inspection
and maintenance every 1,000 hours of use depending on the operating environment.
Note:
The OSD and illustration in this manual may be somewhat different from the unit.
Please take the unit as the standard.
Notes on Discs
how to handle, clean, and store discs.
handling discs
• Do not touch the playback side of the disc.
• Do not attach paper or tape to discs.
cleaning discs
• Fingerprints and dirt on the disc cause picture and sound deterioration. Wipe the disc from the
center outward with a soft cloth. Always keep the disc clean.
• If you cannot wipe off the dirt off, wipe the disc lightly with a slightly
moistened soft cloth and finish with a dry cloth.
• Do not use any type of solvent such as a thinner, benzine,
commercially available cleaners or anti-static spray for vinyl LP’s.
storing discs
• Do not store discs in places subject to direct sunlight or near heat sources.
• Do not store discs in places subject to moisture and dust.
• store discs vertically in a case. Stacking or placing objects on discs outside of their case may cause
warping.
type of tv system
Playable discs
This DVD video player can play back the following discs.
Disc mark
DVD
video
disc
Contains
Audio
+
Video
(moving
pictures)
Audio
CD
Audio
MP3
CD
Audio
Kodak
Picture
CD
MPEG4
Spec.
Audio
+
Video
(moving
pictures)
Disc size
Maximum playback time
Approx. 4 hours
(single sided disc)
12 cm
Approx. 8 hours
(double sided disc)
12 cm
Approx. 74 minutes
8 cm
(CD single)
Approx. 20 minutes
12 cm
Approx. 600+
minutes
12 cm
Depends on picture
files size
12 cm
Approx. 8 hours
Connect this DVD video player to
a TV compatible with the NTSC or
PAL system.
Table of Contents
Safety Precautions...............................1
Playing Repeatedly ...............................17
Important Safety Instructions................2
Zooming a Picture....................................18
Precautions...........................................3
Selecting Subtitles....................................18
Introduction...........................................4
Selecting The Camera Angles/
Languages/Audio Settings...................... 19
Notes On Discs....................................5
MP3/MPEG4 Operation ...........................20
Identification of Controls.......................7
Playing Back Your
Kodak Picture CD/JPEG.......................... 20
Remote Control......................................8
Using the On-screen Display................... 20
Connecting to a TV.............................. 10
Setting the Parental Lock.........................21
Connecting to Optional Equipment...... 11
Customizing the Function Settings...........22
Playing Back a Disc..............................13
Specifications............................................24
Locating a Specific Title,
Chapter or Track.................................. 15
Troubleshooting Guide..............................25
Karaoke................................................ 16
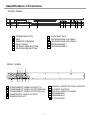
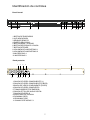
Identification of Controls
FRONT PANEL
1
2
1
2
3
4
5
6
3
4
5
POWER BUTTON
LED
REMOTE SENSOR
DISC DOOR
OPEN/CLOSE BUTTON
PLAY/PAUSE BUTTON
7
8
9
10
11
6
7
8
9
10
11
STOP BUTTON
MICROPHONE VOLUME 1
MICROPHONE VOLUME 2
MICROPHONE 1
MICROPHONE 2
REAR PANEL
1
11
1
2
3
4
5
2
3
4
10 9
8
7
5
6
6 DIGITAL AUDIO OPTICAL OUTPUT
COMPONENT VIDEO OUTPUT(Y)
7 S-VIDEO OUTPUT
COMPONENT VIDEO OUTPUT(Pb/Cb)
8 DIGITAL AUDIO COAXIAL
COMPONENT VIDEO OUTPUT(Pr/Cr)
9 DOWNMIX(R)
COMPOSITE VIDEO OUTPUT
10
DOWNMIX(L)
POWER OUTLET
11 5.1CH AUDIO
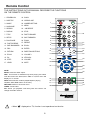
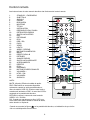
Remote Control
The instructions in this manual describe the functions
on the remote control.
1. STANDBY-ON
18. SLOW
2. SUBTITLE
19. OPEN/CLOSE
3. ANGLE
20. NUMBER BUTTONS
4. LANGUAGE
21. MENU
5. SEARCH
22. a-b repeat
6. DISPLAY
23. STOP
7. TITLE
24. FAST FORWARD
8. SETUP
25. SKIP FORWARD
9. PLAY/PAUSE
26. ZOOM
6
10. FAST REVERSE
27. repeat
11. SKIP BACKWARD
28. ECHO+
7
8
12. PBC
29. ENTER
13. RETURN
30. direction BUTTONS
14. ECHO-
31. volume +
15. R/L
32. NTSC/PAL
16. STEP
33. volume -
17. VIDEO
34. MUTE
1
19
2
3
20
4
5
21
22
9
23
10
24
11
25
12
26
13
27
14
28
29
NOTE:
MUTE: Close the audio output.
PBC: This function is available only when playing 2.0 edition
VCD disc.Press this button,when PBC is on,VCD menu will
display on TV screen.
RAN: DVD/VCD disc random playback(when playing
CD,MP3,JPEG,RAN button no function).
RETURN: Returns to Previous menu.
VIDEO: Yuv/S-Video
R/L: When you playback VCD disc,press this button can
change the audio channel.
!
• When“
30
15
16
17
31
32
18
34
” displayed on TV, function is not operational on the disc.
33
Remote Control
Continued
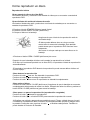
PREPARING THE REMOTE CONTROL
To operate the DVD video player, you must first place the batteries in the
remote control.
3
2
1
Open the cover.
Insert batteries (AA Asize).
Make sure to match the + and - on
the batteries to the marks inside the
battery compartment.
Close the cover.
OOPERATING WITH THE REMOTE CONTROL
Operating video player with the remote control.
30˚
The remote control must point at the remote
sensor in order for the player to function
correctly.
30˚
Distance: Maximum of 7 m from the front of
the remote sensor.
Angle: Approximately 30º from each
direction.
*Do not place the remote sensor towards any
light source such as direct sunlight.
!
batteries
incorrect use of batteries might cause them to leak, corrode or explode.
• Do not place the batteries in the wrong direction.
• It is dangerous to charge, heat, open or short-circuit the batteries.
• Do not leave dead batteries or mix old with new battery in the remote control.
• When not using the remote control for a long duration of time, remove the batteries.When operating range
becomes reduced, replace batteries.
• If battery leakage occurs, wipe the battery liquid from the battery compartment, then replace batteries.
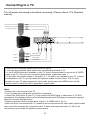
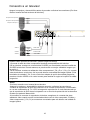
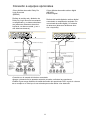
Connecting to a TV
Turn off power and unplug units before connecting. (Please refer to TV’s Operation
manual)
Component video input Pr/Cr
Component video input Pb/Cb
S-Video
Component video input Y
Audio In
Audio cable
S-Video
S-Video Cable
Video In
Video Cable
There are four connecting modes:(See the above figure)
1. Connect the composite video cable to the corresponding terminal of TV.
2. If the S-VIDEO terminal is available in your TV, you’re recommended to connect the S-VIDEO
output to the TV. Thus you can receive the better picture quality than mode 1.
3. If the video component outputs Y, Pb and Pr or Y, Cb and Cr are available in your TV, connect
the terminals to your TV, you can obtain the optimum quality of picture.If the Y,Cb, Cr input
terminals on your TV adopt progressive input mode, please press the VIDEO button on the
remote control to switch the unit to progressive output mode.
Notes:
• Please refer to the manual of the TV
• Turn off power and unplug both units before connecting.
• Connect the DVD player to your TV. If you connect this DVD player to camcorder or TV/VCR
combination, the playback picture will be distorted because the DVD player incorporate copyright
protection circuitry by Macrovision.
• Please consult the relative details about output of S-VIDEO and Y, Cb, Cr.
• When the DVD is connected with TV, please be sure to disconnect the other video output modes
when one of the terminals like composite video, S-video and component video (Y, Cb,Cr) are
connected so as to obtain the optimum picture quality.
10
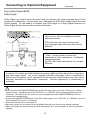
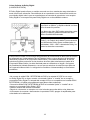
Connecting to Optional Equipment
Enjoying Dolby Pro Logic Surround
Sound (Good)
Dolby Pro Logic Surround
Enjoying Digital Stereo Sound
(BETTER)
Digital Stereo
Enjoy the dynamic realistic sound of Dolby
Pro Logic Surround by connecting an
amplifier and speaker system (right and left
front speakers, a center speaker, and one or
two rear speakers).
Enjoy the dynamic sound of Digital Stereo
by connecting an amplifier equipped with a
digital audio input and speaker system (right
and left front speakers).
TO VIDEO OUT
TO PCM/
BITSTREAM
TO VIDEO OUT
TO ANALOG
AUDIO OUT
Coaxial cable
(Optional)
Yellow
Yellow
Audio cable
To audio
input
Connection
Example
To video
input
Amplifier
equipped with
Dolby Pro
Logic
Surround
Amplifier equipped
with digital audio input
TV
To video
input
Front
speaker
(right)
Front
speaker
(left)
To digital
audio input
Connection
Example
Front
speaker
(left)
Center speaker
Front
speaker
(right)
TV
Connect one or
two speakers.
The output sound
from the rear
speakers will be
monaural even if
you connect two
rear speakers.
Rear
speaker
!
• Refer to the manual of the connected TV.
• Turn off power and unplug both units before setting connecting.
• Due to the wide dynamic range of sound output of the DVD video player, adjust the volume of your
receiver to a comfortable listening level to avoid speaker damage.
11
Connecting to Optional Equipment
continued
Enjoy Dolby Digital (BEST)
Dolby Digital
Dolby Digital can deliver surround sound with five discrete full range channels plus a sixth
channel for a subwoofer. You can enjoy your Manufacturer DVD with a Dolby Digital Surround
Sound System. All you need is to connect your DVD player to a Dolby Digital receiver or a
Dolby Digital Ready receiver with an external decoder.
It is forbidden by law to copy, broadcast, show,
play in public, and rent copyrighted material
without permission.
To VIDEO OUT
To PCM/BITSTREAM
(Optional)
DVD video discs are copy protected, and
any recordings made from these discs will be
distorted.
Manufactured under license from Dolby Labs. “Dolby” and the double-D symbol are
trademarks of Dolby Laboratories. Confidential
unpublished works.
c
1992-1997
Dolby Laboratories, Inc. All rights
reserved.
This product incorporates copyright protection technology that is protected by method claims
of certain U.S. patents and other intellectual property rights owned by Macrovision Corporation
and other rights owners. Use of this copyright protection technology must be authorized by
Macrovision Corporation, and is intended for home and other limited viewing uses only unless
otherwise authorized by Macrovision Corporation. Reverse engineering or disassembly is
prohibited.
!
• Do not connect the PCM/BITSTREAM jack of the DVD video player to the AC-3 RF input of a Dolby Digital receiver. Instead,connect to the “OPTICAL” or “COAXIAL” input of a Dolby Digital receiver or Processor. The input of the A/V receiver is not compatible with the PCM/BITSTREAM jack and is
primarily for Laserdiscs only.
• Connect the PCM/BITSTREAM jack of the DVD video player to the “OPTICAL” or “COAXIAL” input of a
Dolby Digital/DTS receiver or Processor.
• Refer to the manual of the connected TV.
• Adjust the volume of your receiver to a comfortable listening level to avoid any speaker damage.
• When connecting any disconnecting the DVD video player, turn off the amplifier to avoid any speaker damage.
12
Playing Back a Disc
how to playback a disc.
Basic Playback
How to playback DVD video discs.
• Turn on the TV and choose the video input source which is connected to the DVD video player.
How to enjoy the sound from the audio system
• Turn on the audio system and choose the input source that is connected to the DVD video player.
1. Press the STANDBY-ON button on the front panel.
2. Press the OPEN/CLOSE button.
3. Place the disc on the disc tray.
!
• A disc may be damaged if not correctly
placed on the guides in the disc tray.
This may also cause the DVD video
player to malfunction.
• Do not force or place anything other
than the discs on the disc tray.
Be sure the playback side is faced down.
4. Press the OPEN/CLOSE button again.
After the disc tray closed, playback will start.
If the disc you want to playback is a DVD disc, the DVD video player will start playback tomatically.
!
• Moving the DVD video player during playback may cause damage to the disc as well as the player.
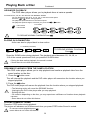
how to stop playback
Press the
Press the
Press the
button once, the DVD video player is stopped.
button to replay.
button twice, the DVD video player is stopped completely.
how To remove the disc
Press the OPEN/CLOSE button.Wait until the disc tray is completely open before removing
any discs.
After removing the discs, press the OPEN/CLOSE button to close the disc tray.
how to pause playback (still playback)
Press the
Press the
!
during playback.
or ENTER button to resume normal playback.
• At the completion of each movie a menu screen will appear. Be aware that the on-screen
setup menu may damage your TV by permanently burning that image onto the screen. To
avoid this, press the button at the completion of each movie. You may also decide to setup
the Screen Saver.
13
Playing Back a Disc
Continued
advanced playback
The DVD video player allows you to playback discs at various speeds.
playing at 2X, 4x, 8x, 16x or 32X the normal speed
You can playback a disc at 2x, 4x, 8x, 16x, or 32x the normal speed.
Press the
or
button during playback.
The playback speed becomes 2x the normal speed.
The playback speed changes, each time you press the
or
button.
TV SCREEN
: Fast reverse
: Fast forward
!
2X
4X
8X
16X
32X
2X
4X
8X
16X
32X
To resume normal playback.Press
.
PLAYing IN SLOW-MOTION
A disc can also be played back in slow-motion.
TV SCREEN (FORWARD)
1/4
1/2
1/2 the normal
speed
1/4 the normal
speed
1/8
1/8 the normal
speed
1/16
1/16 the normal
speed
normal speed
To resume normal playback.
Press
.
Press the SLOW button during playback,The playback speed becomes 1/2, 1/4,1/8, or
1/16 of the normal speed each time you press the SLOW button.
!
• During the slow-motion playback, the sound is muted.
• Some discs do not utilize this feature.
RESUMING PLAYBACK FROM THE SAME LOCATION
This DVD video player allows you to stop playback and continue playback later from the same location on the disc.
1. Press the button once.
This will interrupt the playback and the DVD video player will memorizes the location where you
stopped playback.
2. Press the
button.
The DVD video player will resume the playback from the location where you stopped playback.
!
• The following action will cancel the RESUME function:
- Unplugging the DVD video player after you stop playback.
- Ejecting the disc.
• On occasion depending on the disc, you may experience a difference of location where playback
resumes.
• Some discs do not utilize this feature.
PLAYING FRAME BY FRAME
Press the STEP button during playback.
The picture will advance one of frame each time you press STEP button.Sound is muted.
!
•To resume normal playback,press
.
• some discs do not utilize this feature.
14
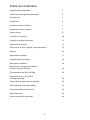
Locating a Specific Title, Chapter or Track
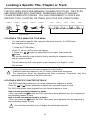
THE DVD VIDEO DISCS ARE NORMALLY DIVIDED INTO TITLES. THE TITLES
ARE SUB-DIVIDED INTO CHAPTERS. MOREOVER, AUDIO CD AND MP3
CD ARE DIVIDED INTO TRACKS. YOU CAN CONVENIENTLY LOCATE ANY
SPECIFIC TITLE, CHAPTER, OR TRACK WITH THIS DVD VIDEO PLAYER.
Chapter 1
Chapter 2
Chapter 1
TITLE 1
Chapter 2
Track 1
Chapter 3
Track 2
Track 3
Track 4
Track 5
TITLE 2
Audio CD
DVD Video Disc
LOCATING A TITLE USING THE TITLE MENU
You can locate a specific title using the title menu function, if a DVD video
disc contains a title menu.
1. Press the TITLE button
On the TV screen, the title menu will appear.
2. Press the
button
button to select the title you want, then press the
You can also directly locate a specific title by pressing its assigned number
with the number buttons.
This will cause the DVD video player to start playback from chapter 1 of the
title selected.
!
• You may find that some discs will not respond to this function.
• If different instructions appear on the TV screen, follow those instructions.
The instructions above are describing the basic procedure. Procedures may vary
depending on the contents of the DVD video disc.
locating a specific chapter or track
This DVD video player allows you to locate consecutive chapters or tracks.
Press the
or
button repeatedly to display the requested chapter or track
The DVD video player starts playback from the selected chapter or track.
How to locate preceding chapters or tracks
• When you press the
button, the DVD video player starts playback from the beginning of
the preceding chapter or track.
How to locate succeeding chapters or tracks
• When you press the
button, the DVD video player starts playback from the beginning of
the succeeding chapter or track.
!
On some discs the titles may not display the sub-divided chapters.
15
Locating a Specific Title, Chapter or Track
Continued
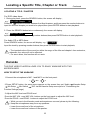
LOCATING A TITLE / CHAPTER
For DVD video discs:
1. During play back, press the SEARCH button, the screen will display ,
e.g. “ Title 01/03 Chapter
/18 ”.
Press the
buttons to switch between the titles/chapters, and then press the number buttons to
input the title and chapter you want to be played,then press ENTER button to start playback .
2. Press the SEARCH button twice continuously, the screen will display
e.g. “ Title 01/03 Time
:
:
”.
Input the 2-digit number by pressing number buttons,then press ENTER button to start playback.
For Audio CD or MP3 discs:
Press SEARCH button, the screen will display, e.g. “ - - - /012 ”.
Input the track by pressing number buttons,then press ENTER button to start playback,
!
• The inputted value of time must be within the range of the title and chapter’s time extension,
otherwise, the value will not be effectual.
• For some discs, this function will not work.
Karaoke
THIS DVD VIDEO PLAYER ALLOWS YOU TO ENJOY KARAOKE WITH TWO
MICROPHONES
HOW TO SETUP THE KARAOKE
1.Connect the microphone to MIC 1 and MIC 2 on the front panel .
1
MIC
2
2.Press SETUP button ,the setup menu appear on the screen then set “Audio Karaoke Setup
Mic Setup Mic Switch ON” via the Karaoke Setup menu(refer to "Customizing the
Function Settings"page).
3. Adjust the MIC level and ECHO level.
Press the MIC VOL + and MIC VOL- buttons on the front panel to adjust the MIC level.
Press the ECHO + and ECHO - buttons to adjust the ECHO level.
• While you are in the Karaoke mode and experience a sound, please try the following:
• Keep the microphones away from any speakers.
• Lower the sound level of the microphone.
• Lower the sound level volume of the speaker.
!
16
Playing Repeatedly
THIS DVD VIDEO PLAYER ALLOWS YOU TO PLAYBACK A SPECIFIC TITLE,
CHAPTER, TRACK, OR SEGMENT REPEATEDLY. (TITLE REPEAT, CHAPTER/
TRACK REPEAT, A-B REPEAT).
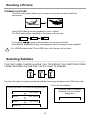
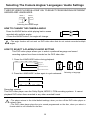
HOW TO REPEAT A TITLE, CHAPTER, OR TRACK
1. select the title, chapter, or track you want to repeat.
2. Press the REPEAT button.
The repeat mode changes each time you press the REPEAT button.
Chapter
Repeats the same chapter.
Title
Repeats the same title.
Repeats the disc.
All
Normal playback.
DVD video disc
how to REPEAT A SPECIFIC SEGMENT
1. Press the A-B button at the beginning
of the segment in which you want to repeat
playback. (point A)
2. Press the A-B button again at the end
of the segment (point B).
The DVD video player will automatically
return to point A and start to repeat playback
of the selected segment (A-B).
A
AB
3. Press the A-B button to cancel the A-B repeat
function.
The DVD video player will resume to normal playback.
!
• Depending on the disc, you may experience a difference between point A and the location
where playback actually resumes.
• Be aware that some discs will not respond to the A-B repeat function.
17
Zooming a Picture
zooming a picture
This DVD video player allows you to zoom into a picture as well as shift the
zoom point.
Press ZOOM during normal playback or slow - motion.
The DVD video player magnifies in the center of the picture.
2x
4x
3x
If you press
during zoom playback, the zoom point shifts.
Press ZOOM repeatedly during zoom playback until it resumes normal playback.
!
• For JEPG/Kodak picture CD and DIVX disc, this function will not work.
Selecting Subtitles
This Dvd video player allows you to display the subtitles from
those included on the disc, on to your tv screen.
Good evening
Bonsoir
Buenas tardes
You have the option to select a preferred subtitle from those included on the DVD video disc.
To turn off the subtitles.
Press the SUBTITLE button during playback.
subtitle
1/03 : English
subtitle
2/03 : Spanish
subtitle
3/03 : French
Press the SUBTITLE during
playback until the subtitles
disappears.
Subtitle Off
subtitle Off
18
Selecting The Camera Angles/ Languages / Audio Settings
This DVD video plAyer allows you to select from several different
ANGLEs AND LANGUAGES.
ANGLE 1
ANGLE 2
Selecting the camera angle
how to change the camera angle
Press the ANGLE button while playing back a scene
recorded with multiple angles.
• Press the ANGLE button, the angle will change.
!
1/2
2/2
• The angle function will not work on DVD video discs that do not contain recorded multiple
angles.
How to SELECT A PLAYBACK AUDIO SETTING
This DVD video player allows you to select a preferred language and sound
recording system from those included on the DVD video disc. 1. Press the LANGUAGE button during playback.
Audio
1/3 :
AC3
5.1CH
English
Language
Dolby AC-3
Total Audio Channels
Current Audio Position
Good evening
2. Press the LANGUAGE button again to cycle ackwards.
Audio
2/3 : AC3
5.1CH
French
Audio
3/3 : AC3
5.1CH
Spanish
Audio
1/3 : AC3
5.1CH
Bonsoir
Buenas tardes
Selecting a language
English
Recording systems
This DVD video player uses the Dolby Digital, MPEG 2, PCM recording systems. It cannot
playback DVD video discs recorded in any other recorded format.
!
• The player returns to the initial default settings, when you turn off the DVD video player or
replace a disc.
• The DVD video player plays the prior sound programmed on the disc, when you select a
format which is not included on the disc.
19
MP3/MPEG4 Operation
1. To pIay you must view through your television. Insert an MP3/MPEG4 disc, the DVD video
player will initialize the disc when the tray is closed and the directory (folder) will be shown in an
MP3/MPEG4 MENU on screen.
2. Press
then
buttons to select and highlight an MP3/MPEG4 file.
Press
to play.
!
•When playing a disc which contain MP3 and JPEG pictures,the DVD player will finish playing
JPEG, then following MP3.
Playing Back Your Kodak Picture CD/JPEG
normal
When a JPEG or Kodak Picture CD is inserted, an automated slide show is launched, Each picture
in the current directory will be displayed consecutively in a slide-show fashion and will be scaled to
fit most of the TV screen.
Using the On-Screen Display
THe DVD VIDEO PLAYER ALLOWS YOU TO VIEW THE OPERATIONAL STATUS AND DISC
INFORMATION ON YOUR TV SCREEN.
checking the operational status
With this function you can view on your TV the following: -Current title
-Track number
-Total playing time
For DVD discs
For VCD discs
For CD/MP3 discs
Press DISPLAY during playback
Press DISPLAY during playback
Press DISPLAY during playback
Current Title
Current Chapter
TT 01/12
0:02:20
CH
0:00:28
06/039
Total Chapters
Total Titles
CH
Single Remain
Track 05/06
Title Remain
TT 01/12
0:18:50
Single Elapsed
Track 05/06
Title Elapsed
06/039
0:22:51
Total Elapsed
Chapter Elapsed
TT 01/12
0:03:50
CH
06/039
0:02:34
Chapter Remain
TT 01/12
0:10:40
Track 05/06
CH
06/039
Total Remain
Track 05/06
0:46:10
Display Off
Display Off
20
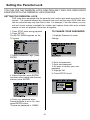
Setting the Parental Lock
you can use the parental lock function only with dvd video discs
equipped with the parental lock feature.
setting the parental lock
DVD video discs equipped with the parental lock function are rated according to their
content. The contents allowed by a parental lock level and the way a DVD video disc
can be controlled may vary from disc to disc. For example, if the disc allows, you can
edit out violent scenes unsuitable for children and replace them with more suitable
scenes, or lock out playback of the disc all together.
To change your password
1. Press STOP twice during playback
2. Press SETUP
The SETUP MENU appears on the
TV screen.
1. Highlight Password to enter
Change.
3. Select Preference Page, press
ENTER.
2. Enter old password.
3. Enter new password.
4. Re-enter to confirm your new
password.
5. Highlight OK.
6. Press SETUP to exit.
4. Select Parental, press ENTER.
And then select rating with direction
buttons, press ENTER.
5. Enter your password when
Password Mode is set to On, then
press ENTER button.
The pre-set password is 136900.
21
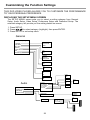
Customizing the Function Settings
THIS DVD VIDEO PLAYER ALLOWS YOU TO CUSTOMIZE THE PERFORMANCE
TO YOUR PERSONAL PREFERENCE.
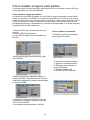
displaying the setup menu screen
The SETUP MENU screen asks you to select a setting category from General
Setup, Audio Setup, Video Setup, Preference Setup and Password Setup. The
selected category will provide you the setting details on-screen.
1. Press SETUP.
2. Press
to select category (highlight), then press ENTER.
3. Press SETUP to exit setup menu.
General
--General Setup Page-TV Display
Angle Mark
OSD Lang
Captions
Screen Saver
Hdcd
Last Memory
Normal /PS
Normal /LB
Wide
On
Off
English
Spanish
Portuguese
On
Off
On
Off
Off
1X
2X
LT/RT
Stereo
5.1ch
On
Off
Audio
--Audio Setup Page-Speaker Setup
Spdif Setup
Karaoke Setup
Large
Small
Large
Small
Off
Downmix
Front Speaker
Center Speaker
Rear Speaker
Subwoofer
On
Off
Spdif Off
Spdif/Raw
Spdif/Pcm
Spdif Output
Mic Setup
22
Large
Small
Off
Mic Switch
Mic Vol
Echo Level
On
Off
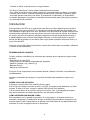
Customizing the Function Settings
Video
Dolby
--Dolby Digital Setup-Dual Mono
Dynamic
Continued
Stereo
L-Mono
R-Mono
Mix-Mono
--Video Setup Page-Component
Tv Mode
P-Scan
Interlace
High
Medium
Low
Sharpness
FULL
3/4
1/2
1/4
OFF
S-Video
Yuv
Brightness
Contrast
-20~+20
-16~+16
Preference
--Preference Page-TV Type
Audio
Subtitle
Disc Menu
Parental
Password
Default
PAL
Multi
NTSC
English
French
Spanish
Chinese
Japanese
Korean
Russian
porluguese
Others
English
French
Spanish
Chinese
Japanese
Korean
Russian
porluguese
Others
English
French
Spanish
Chinese
Japanese
Korean
Russian
porluguese
off
Others
1 KID SAFE
2G
3 PG
4 PG-13
5 PG R
6R
7 NC-17
8 ADULT
Change
Reset
Old Password
New Password
Confirm PWD
OK
• Preset password is 136900 .
•The SETUP MENU screen disappears if you press the SETUP button while it is
displayed.
• Functions and menu are subject to change without notice.
• You must set up preference, when the unit is stopped completedly.
23
Specifications
dvd video player/outputs/supplied accessories
DVD VIDEO PLAYER
Power supply
100-240V~50/60Hz
Power consumption
12W
Weight
Around 2.5kg
External dimensions
420 x 38 x 255 mm (W/H/D)
Signal system
PAL/NTSC
Laser
Semiconductor laser, wavelength 650 nm
OUTPUTS
Video output 1.0 V (p-p), 75 Ω, negative sync., pin jack x 1
S-video output (Y) 1.0 V (p-p), 75 Ω negative sync., Mini DIN 4-pin x 1
(C) 0.286 V (p-p), 75 Ω
Audio output (digital audio) 0.5 V (p-p), 75 Ω, pin jack x 1
Audio output (analog audio) 2.0 V (rms), 10K Ω, pin jack(L,R) x 1
SUPPLIED ACCESSORIES
AV cable (yellow, red, whiter)
1
Remote control
1
Batteries(AAA)
2
Operation manual
1
24
Troubleshooting Guide
Check the following guide for a possible correction to a
problem before contacting customer service.
symptoms and correction
Symptom
No power
No picture
Correction
• Connect the power plug into the wall outlet securely.
• Verify the connection from the DVD video output to the TV video input. Then switch
TV to appropriate mode (video 1)
• Connect the video cable into the jacks securely. Refer to your television owners
manual.
No sound
• Connect the audio cables into the jacks securely.
• Verify the connection from the DVD audio output to the TV or receiver audio input.
Then switch to the appropriate source on the receiver. Refer to your audio amplifier
owners manual.
Rolling b/w picture
• Press the P/N button on your remote control.
• Adjust the vertical hold on your TV.
Black & White
picture
The playback
picture has
occasional
distortion
• Damaged S-Video connector (bent pin)
Brightness is
unstable or noises
are produced on
playback pictures
• Connect the DVD player directly through the TV and not through any other source.
What you’re viewing is the effect of the copy protection circuitry required on all DVD
players.
• If you don’t have a video input on your TV, you must purchase an RF adapter from
your dealer.
The DVD video
player does not
start playback
• Place the disc with the graphics side up.
• A small amount of picture distortion may appear because of a poor quality video/sound
transfer to disc. This is especially true of some discs manufactured between 19971998..
• Scratched disc
• Place the disc on the disc tray correctly inside the guide.
• Make sure the disc is free from scratches & fingerprints.
• Press the SETUP button to turn off the menu screen.
• Cancel the parental lock function or change the parental lock level.
• Turn the power off then disconnect the power plug and reinsert it back into the wall
outlet.
MP3 won’t read
disc or it skips
• Reburn disc as the software edition used may not be compatible with the player. Check
web site for instruction.
• Use new editions of software such as Voyetra Audiostation 4, Adaptec’s “Easy CD
Creator”, NTI or Roxio’s Toast Titanium.
• Make sure MP3 files are not encoded with a variable bit rate such as provided by
Real Networks.
The remote control
does not work
properly
• Replace the batteries with new ones.
25
MANUAL DEL USUARIO
DVD CON KARAOKE
MODELO:
CEDVD95245
PRECAUCIONES DE SEGURIDAD
(VWHVtPERORFRQXQDÀHFKDHQIRUPDGHUD\RGHQWURGHXQWULiQJXORHTXLOiWHURVLUYH
SDUDDOHUWDUDOXVXDULRGHODSUHVHQFLDGHYROWDMHSHOLJURVRQRDLVODGRGHQWURGHDOJXQDVSDUWHVGHOSURGXFWRTXHSXHGDQFRQVWLWXLUXQULHJRGHGHVFDUJDHOpFWULFD
(VWHVtPERORFRQXQVLJQRGHH[FODPDFLyQGHQWURGHXQWULiQJXORVLJQL¿FDTXHH[LVWHQ
LQVWUXFFLRQHVLPSRUWDQWHVGHIXQFLRQDPLHQWR\GHPDQWHQLPLHQWRHQORVIROOHWRVR
PDQXDOHVTXHYLHQHQFRQHOHOHFWURGRPpVWLFR
PRECAUCIÓN
5LHVJRGHGHVFDUJDHOpFWULFD1RDEULU
35(&$8&,Ï1&RQHO¿QGHUHGXFLUHOULHVJRGHXQDGHVFDUJD
HOpFWULFDQRUHWLUHODVWDSDVQLFXELHUWDV1RHQFRQWUDUiSLH]DV
GHXWLOLGDGDGHQWUR7RGRVHUYLFLRGHUHSDUDFLyQGHEHGHVHU
OOHYDGRDFDERSRUHOSHUVRQDOFDOL¿FDGR
35(&$8&,Ï15DGLDFLyQOiVHUYLVLEOHFXDQGRVHDEUH1R
PLUHGLUHFWDPHQWHDOUD\R
ADVERTENCIA: CON EL FIN DE PREVENIR UN INCENDIO O DESCARGA
(/e&75,&$12(;321*$(67($3$5$72$/$//89,$2+80('$'12/2(;321*$
$*27(5$626$/3,&$'85$612&2/248(2%-(726&21$*8$7$/(6&20281
)/25(52(1&,0$'(/$3$5$72
PRECAUCIÓN: &21(/),1'(35(9(1,581$'(6&$5*$(/e&75,&$(1&$-(
/$(;75(0,'$'0È6$1&+$(/(1&+8)((1/$5$185$&255(6321',(17('(/
720$&255,(17(,16(57È1'2/2727$/0(17(
PRECAUCIÓN: (VWHUHSURGXFWRUXWLOL]DXQVLVWHPDOiVHU&RQHO¿QGH
SUHYHQLUODH[SRVLFLyQGLUHFWDDOUD\ROiVHUQRDEUDHODSDUDWR
5DGLDFLyQOiVHUYLVLEOHFXDQGRHODSDUDWRVHHQFXHQWUDDELHUWR\VHHOLPLQDQORVVHJXURV
(OXVRGHFRQWUROHVRDMXVWHVRSURFHGLPLHQWRVTXHVHDQGLIHUHQWHVDDTXHOORVTXHVHHVSHFL¿FDQHQHVWHPDQXDOSXHGHQRFDVLRQDUODH[SRVLFLyQSHOLJURVDDODUDGLDFLyQ
NO MIRE DIRECTAMENTE AL RAYO LÁSER
&RQHO¿QGHDVHJXUDUXQXVRDSURSLDGRGHHVWHDSDUDWROHDODVLQVWUXFFLRQHVGHVHJXULGDG
FXLGDGRVDPHQWH\JXiUGHODVSDUDFXDOTXLHUFRQVXOWDHQHOIXWXUR6LHODSDUDWRQHFHVLWDUD
PDQWHQLPLHQWRSyQJDVHHQFRQWDFWRFRQHOVHUYLFLRWpFQLFRDXWRUL]DGRGHVXORFDOLGDGRFRQHO
GLVWULEXLGRU6yORHOSHUVRQDOFDOL¿FDGRSXHGHUHWLUDUODWDSDGHODSDUDWR
ADVERTENCIA: /RVFDPELRVRPRGL¿FDFLRQHVTXHVHKDJDQDHVWH
HTXLSR\TXHQRHVWpQH[SUHVDPHQWHDSUREDGRVSRUHOIDEULFDQWHDWUDYpVGHODVSHUVRQDV
DXWRUL]DGDVSRUHOIDEULFDQWHDQXODUiQODVJDUDQWtDVGHIiEULFD
3URGXFWR/iVHU
Clase 1
<DTXHHVQRUPDOHQODVSHOtFXODVGH'9'VHHVWUHQHQHQpSRFDVGLIHUHQWHVHQGLVWLQWDV
UHJLRQHVGHOPXQGRWRGRVORVUHSURGXFWRUHVYLHQHQFRQFyGLJRVGHUHJLyQ\ORVGLVFRVSXHGHQ
WHQHUXQFyGLJRGHUHJLyQRSFLRQDO6LVHFRORFDXQGLVFRFRQXQFyGLJRGHUHJLyQGLIHUHQWH
DOGHOUHSURGXFWRUODSDQWDOODPRVWUDUiXQDYLVRVREUHHOFyGLJRGHUHJLyQ(VWHGLVFRQRVHUi
UHSURGXFLGR\SRUORWDQWRQRGHEHVHUXWLOL]DGR
3DUDXVRGHOFOLHQWH
(QORVHVSDFLRVGHDEDMRUHJLVWUHHOPRGHORGHOQ~PHURGHVHULHXELFDGRHQHOSDQHOSRVWHULRU
GHVXUHSURGXFWRU
0RGHOR1RBBBBBBBBBBBBBBBBBBB6HULH1RBBBBBBBBBBBBBBBBBBBBB
*XDUGHHVWDLQIRUPDFLyQSDUDFXDOTXLHUUHIHUHQFLDGHOIXWXUR
1
,QVWUXFFLRQHVGHVHJXULGDGLPSRUWDQWHV
PRECAUCIÓN: El uso de controles, ajustes o procedimientos que no sean aquellos
que se indican en este manual puede ocasionar el quedar expuesto al peligro de la
radiación láser.
35(&$8&,Ï1325)$925/($<2%('(=&$72'$6/$6$'9(57(1&,$6(,16758&&,21(648(6(2)5(&(1(1/$6,16758&&,21(6'()81&,21$0,(172
<$48(//$648(9(1*$10$5&$'$6(1(/$3$5$720,602*8$5'((67(
0$18$/3$5$&8$/48,(55()(5(1&,$(1(/)87852
(VWHHTXLSRKDVLGRGLVHxDGR\IDEULFDGRSDUDDVHJXUDUVXVHJXULGDGSHUVRQDO(OXVR
LQDSURSLDGRGHODSDUDWRSXHGHRFDVLRQDUXQDGHVFDUJDHOpFWULFDRIXHJR
/DVPHGLGDVGHVHJXULGDGTXHYLHQHQLQFRUSRUDGDVHQHVWHDSDUDWRORSURWHJHUiQVLVH
VLJXHORVVLJXLHQWHVSURFHGLPLHQWRVGHLQVWDODFLyQXVR\PDQWHQLPLHQWR
(VWHDSDUDWRHVWRWDOPHQWHWUDQVLVWRUL]DGR\QRFRQWLHQHSDUWHVTXHSXHGDQVHUUHSDUDGDV
SRUSDUWHGHOXVXDULR
125(7,5(/$7$3$<$48(38('(48('$5(;38(672$92/7$-(3(/,*5262
72'26(59,&,27e&1,&2'(%(6(5//(9$'2&$%2325(/3(5621$/&$/,),&$'2
/HDHVWDVLQVWUXFFLRQHV
*XDUGHHVWDVLQVWUXFFLRQHV
2EHGH]FDWRGDVODVDGYHUWHQFLDV
6LJDWRGDVODVLQVWUXFFLRQHV
1RXWLOLFHHVWHDSDUDWRFHUFDDODJXD
/LPSLHVRORFRQXQSDxRVHFR
1RREVWUX\DODVDEHUWXUDVGHYHQWLODFLyQ,QVWDOHHODSDUDWRGHDFXHUGRDODVLQVWUXFFLRQHV
GHOIDEULFDQWH
1RORFRORTXHFHUFDGHIXHQWHVGHFDORUWDOHVFRPRHVWXIDVWHUPRVWDWRVFRFLQDVRFXDOTXLHURWURDSDUDWRLQFOX\HQGRDPSOL¿FDGRUHVTXHSURGX]FDFDORU
1RHOLPLQHHOVLVWHPDGHVHJXULGDGGHOHQFKXIHSRODUL]DGRRGHWLHUUD(OHQFKXIHSRODUL]DGRWLHQHGRVH[WUHPLGDGHVVLHQGRXQDPiVDQFKDTXHODRWUD(OGHWLHUUDWLHQHDGHPiVGH
ODVGRVH[WUHPLGDGHVXQDWHUFHUDSDWDRH[WUHPLGDGDGLFLRQDODWLHUUD(VWDVH[WUHPLGDGHV
HVSHFLDOHVHVWiQGLVHxDGDVSDUDVXVHJXULGDG6LHOHQFKXIHQRHQFDMDHQVXWRPDFRUULHQWH
FRQVXOWHDXQHOHFWULFLVWDSDUDTXHUHHPSODFHVXWRPDFRUULHQWHREVROHWR
(YLWHTXHVHSLVHRVHDSULHWHHOFRUGyQHVSHFLDOPHQWHHQODSDUWHGHOHQFKXIHHQWUDGDV
\HQODSDUWHGHGRQGHpVWHVDOHGHODSDUDWR
8WLOLFHVRODPHQWHORVDGLWDPHQWRVRDFFHVRULRVHVSHFL¿FDGRVSRUHOIDEULFDQWH
8WLOLFHHODSDUDWRVRORFRQXQFDUULWRVRSRUWHPHVDRPXHEOHTXHHOIDEULFDQWHUHFRPLHQGHRTXHYHQJDFRQHODSDUDWR6LVHXWLOL]DXQPXHEOHWHQJDFXLGDGRDOWUDVODGDUHO
PXHEOHFRQHODSDUDWRSDUDHYLWDUOHVLRQHVVLpVWHVHLQFOLQD\VHFDH
'HVHQFKXIHHODSDUDWRGXUDQWHODVWRUPHQWDVHOpFWULFDVRFXDQGRQRVHOHXWLOLFHGXUDQWH
SHULRGRVSURORQJDGRV
&RQWiFWHVHFRQHOVHUYLFLRWpFQLFRSDUDFXDOTXLHUWLSRGHPDQWHQLPLHQWR(QQHFHVDULR
OODPDUDOVHUYLFLRWpFQLFRVLHODSDUDWRKDVXIULGRDOJ~QGDxRKDVLGRH[SXHVWRDODOOXYLDR
KXPHGDGQRIXQFLRQDQRUPDOPHQWHRKDVXIULGRXQDFDtGD
INSTRUCCIONES DE SEGURIDAD ADICIONALES
6LVHXVDPLFUyIRQRVKiJDORDXQYROXPHQDQLYHOPRGHUDGR6LVHXVDPLFUyIRQRVFRQWLQXDPHQWHFRQHOYROXPHQDOWRVHSXHGHRFDVLRQDUGDxRVDODSDUDWR
1RVREUHFDUJXHORVWRPDFRUULHQWHVFDEOHVGHH[WHQVLyQRDGDSWDGRUHV\DTXHHVWR
SXHGHRFDVLRQDUHOULHVJRGHTXHVHSURGX]FDIXHJRRXQDGHVFDUJDHOpFWULFD
0DQWHQJDVXVGHGRVIXHUDGHODEDQGHMDGHOGLVFRFRQIRUPHpVWDVHFLHUUD6LQRVH
KDFHDVtVHSXHGHQSURGXFLUOHVLRQHVJUDYHV
1RFRORTXHXQREMHWRSHVDGRQLVHSDUHVREUHHODSDUDWR(OREMHWRSXHGHFDHUVHFDXVDQGROHVLRQHVSHUVRQDOHVDVtFRPRGDxRVDODSDUDWR
1RXWLOLFHXQGLVFRUDMDGRGHIRUPDGRRUHSDUDGR(VWRVGLVFRVSXHGHQURPSHUVHIiFLO2
PHQWH\FDXVDUOHVLRQHVJUDYHV\GHVSHUIHFWRVHQHODSDUDWR
3UHFDXFLyQQRLQWHQWHUHSDUDUHODSDUDWRXVWHGPLVPR\DTXHDODEULURDOUHWLUDUODVWDSDV
XVWHGSXHGHTXHGDUH[SXHVWRDYROWDMHSHOLJURVRXRWURVSHOLJURV&RQWiFWHVHFRQHOVHUYLFLR
WpFQLFRSDUDFXDOTXLHUUHSDUDFLyQ
3UHFDXFLyQ(VWHDSDUDWRGHEHUiVHUUHSDUDGRVRODPHQWHSRUHOSHUVRQDOWpFQLFRDXWRUL]DGR
(ODEULUODWDSDRHOLQWHQWDUUHSDUDUHODSDUDWRSRUSDUWHGHOXVXDULRSXHGHRFDVLRQDUOHVLRQHV
JUDYHVRKDVWDODPXHUWHGHELGRDXQDGHVFDUJDHOpFWULFD\SXHGHLQFUHPHQWDUHOULHVJRGH
TXHVHSURGX]FDIXHJR
3UHFDXFLRQHV
Información sobre cómo manipular el aparato
(OHPSDTXHRFDUWyQRULJLQDO\ORVPDWHULDOHVGHHPSDTXHHQHOTXHVHWUDQVSRUWDURQHO
DSDUDWRSXHGHQVHUOH~WLOHV3DUDXQDPHMRUSURWHFFLyQFRORTXHHODSDUDWRHQVXVHPSDTXHV
FRPRYLQRGHIiEULFDRULJLQDOPHQWH
1RXWLOLFHOtTXLGRVYROiWLOHVWDOHVFRPRDHURVROHVFRQWUDLQVHFWRVFHUFDGHODSDUDWR1RGHMH
SURGXFWRVGHMHEHRSOiVWLFRHQFRQWDFWRFRQHODSDUDWRGXUDQWHXQWLHPSRSURORQJDGR(VWR
SXHGHGHMDUPDUFDVHQHODFDEDGR
/DSDUWHGHODQWHUD\WUDVHUDGHODSDUDWRSXHGHFDOHQWDUVHGHVSXpVGHXQWLHPSRSURORQJDGR
GHXVR(VWRQRHVXQDLQGLFDFLyQGHXQGHVSHUIHFWR
6LQRVHYDDXWLOL]DUHOUHSURGXFWRUDVHJ~UHVHGHUHWLUDUHOGLVFR\DSDJDUOR
6LQRVHXVDHOUHSURGXFWRUGXUDQWHXQSHULRGRSURORQJDGRSXHGHTXHHODSDUDWRQRIXQFLRQH
DGHFXDGDPHQWHHQHOIXWXUR(QFLHQGD\XWLOLFHHODSDUDWRGHYH]HQFXDQGR
Información sobre la ubicación del aparato
&RORTXHHOUHSURGXFWRUVREUHXQDVXSHU¿FLHSODQD1RORFRORTXHVREUHXQDVXSHU¿FLH
LQHVWDEOHFRPRXQDPHVDTXHVHPXHYDRXQPXHEOHLQFOLQDGR(OGLVFRTXHVHHQFXHQWUD
GHQWURGHODEDQGHMDSXHGHPRYHUVHGHVXSRVLFLyQ\FDXVDUGDxRVDODSDUDWR
6LVHFRORFDHOUHSURGXFWRUFHUFDGHXQWHOHYLVRURUDGLRODLPDJHQSXHGHYHUVHDIHFWDGD\HO
VRQLGRGLVWRUVLRQDGR(QHVWHFDVRFRORTXHHOUHSURGXFWRUOHMRVGHXQWHOHYLVRURUDGLR
Información sobre la limpieza del aparato
8WLOLFHXQSDxRVXDYH\VHFRSDUDHIHFWXDUODOLPSLH]D
3DUDVDFDUODVXFLHGDGPX\LPSUHJQDGDUHPRMHHOSDxRHQXQDVROXFLyQFRQGHWHUJHQWH
VXDYH\SURFHGDDOLPSLDU8WLOLFHXQSDxRVHFRSDUDVHFDUELHQ1RXWLOLFHQLQJ~QWLSRGHGLVROYHQWHWDOHVFRPRGLOXHQWH\JDVROLQD\DTXHHVWRSXHGHGDxDUODVXSHU¿FLHGHOUHSURGXFWRU
6LVHXVDXQSDxRGHOLPSLH]DLPSUHJQDGRFRQDOJ~QTXtPLFRVLJDODVLQVWUXFFLRQHVGHO
SURGXFWR
Cómo obtener una imagen clara
(VWHUHSURGXFWRUHVXQDSDUDWRGHDOWDWHFQRORJtD\SUHFLVLyQ6LHOOHQWHySWLFR\HOVLVWHPD
GHOGLVFRVHHQVXFLDQRVHGHVJDVWDQODFDOLGDGGHODLPDJHQVHGHELOLWD3DUDREWHQHUXQD
LPDJHQFODUDUHFRPHQGDPRVLQVSHFFLRQDUGHPDQHUDUHJXODU\GDUOHPDQWHQLPLHQWROLPSLH]D
\FDPELRGHSLH]DVDODSDUDWRFDGDKRUDVGHXVRGHSHQGLHQGRGHODPELHQWHHQHOTXH
VHOHXWLOLFH3DUDPiVGHWDOOHVSyQJDVHHQFRQWDFWRFRQVXGLVWULEXLGRUPiVFHUFDQR
Información sobre la condensación de humedad
/DFRQGHQVDFLyQGHKXPHGDGGDxDHOUHSURGXFWRU3RUIDYRUOHDORVLJXLHQWHGHWHQLGDPHQWH
/DFRQGHQVDFLyQGHKXPHGDGRFXUUHSRUHMHPSORFXDQGRVHYLHUWHXQDEHELGDIUtDHQXQ
YDVRGXUDQWHXQGtDFDOXURVR3HTXHxDVJRWDVGHDJXDVHIRUPDQHQODSDUWHH[WHULRUGHO
YDVR'HODPLVPDPDQHUDODKXPHGDGSXHGHFRQGHQVDUVHHQHOOHQWHySWLFRGHQWURGHO
DSDUDWRXQDGHODVSDUWHVLQWHUQDVPiVFUXFLDOHVGHOUHSURGXFWRU
/DFRQGHQVDFLyQGHKXPHGDGRFXUUHGXUDQWHORVVLJXLHQWHVFDVRV
&XDQGRVHWUDVODGDHOUHSURGXFWRUGLUHFWDPHQWHGHXQOXJDUIUtRDXQRFDOLHQWH
&XDQGRVHXWLOL]DHOUHSURGXFWRUHQXQDKDELWDFLyQHQGRQGHVHDFDEDGHTXHHQFHQGHUXQD
HVWXIDXQOXJDUGRQGHHOYLHQWRIUtRSURGXFLGRSRUXQHTXLSRGHDLUHFRQGLFLRQDGRGLUHFWDPHQWHDSXQWDDODSDUDWR
(QHOYHUDQRFXDQGRVHXWLOL]DHOUHSURGXFWRUHQXQOXJDUFDOXURVR\K~PHGRGHVSXpVGH
KDEHUORWUDVODGDGRGHXQDKDELWDFLyQFRQDLUHDFRQGLFLRQDGR
3
&XDQGRVHXWLOL]DHOUHSURGXFWRUHQXQOXJDUK~PHGR
1RXWLOLFHHOUHSURGXFWRUFXDQGRH[LVWDFRQGHQVDFLyQGHKXPHGDG
6LVHXWLOL]DHOUHSURGXFWRUEDMRHVWDVFRQGLFLRQHVVHSXHGHQGDxDUORVGLVFRV\ODVSDUWHV
LQWHUQDV5HWLUHHOGLVFRHQFKXIHHODSDUDWRDOWRPDFRUULHQWHHQFLHQGDHODSDUDWR\GpMHOR
HQFHQGLGRGXUDQWHXQDVGRVRWUHVKRUDV(OUHSURGXFWRUVHFDOHQWDUi\VHHYDSRUDUiOD
KXPHGDG0DQWHQJDHOUHSURGXFWRUFRQHFWDGRDOWRPDFRUULHQWHSDUDHYLWDUTXHVHSURGX]FD
ODFRQGHQVDFLyQGHKXPHGDG
,QWURGXFFLyQ
(VWHUHSURGXFWRUGH'9'HVXQUHSURGXFWRUSDUDGLVFRVGHYLGHRGLJLWDOHVTXHVHDMXVWDDO
HVWiQGDUGHYLGHRXQLYHUVDO'9'&RQHVWHDSDUDWRXVWHGSRGUiGLVIUXWDUGHSHOtFXODV\GH
XQDFDOLGDGGHLPDJHQLJXDODOGHOFLQHDVLPLVPRFRPRGHVRQLGRVGHFDQDOHVP~OWLSOHV/DV
FDUDFWHUtVWLFDVHVSHFLDOHVGHHVWHUHSURGXFWRULQFOX\HQODVHOHFFLyQGHOLGLRPDGHODEDQGD
GHVRQLGRVHOHFFLyQGHVXEWtWXORVGLIHUHQWHViQJXORVGHFiPDUDGHSHQGLHQGRGHOGLVFR
\VDOLGDVGLJLWDOHVSDUDFRQHFWDU'ROE\'LJLWDO$GHPiVHOFRQWUROSDUDSDGUHVOHSHUPLWH
GHFLGLUTXpGLVFRVSXHGHQYHUVXVQLxRV(VWHHTXLSRSXHGHUHSURGXFLUGLVFRVGHDXGLR\HO
QXHYRIRUPDWR03
9HUiTXHHVPX\IiFLOXWLOL]DUHOUHSURGXFWRUDWUDYpVGHODLQIRUPDFLyQHQSDQWDOOD\XWLOL]DQGR
HOFRQWUROUHPRWRLQDOiPEULFR
DESEMPAQUE DEL APARATO
3ULPHURYHUL¿TXHHLGHQWL¿TXHORVFRQWHQLGRVGHOHPSDTXHGHVXUHSURGXFWRUVHJ~QODOLVWD
GHDEDMR
5HSURGXFWRUGHYtGHR'9'
&RQWUROUHPRWRFRQEDWHUtDVHPSDFDGDVSRUVHSDUDGR
&DEOH$9DPDULOORURMR\EODQFR
%DWHUtDV$$$
0DQXDOGHLQVWUXFFLRQHV
6LDOJXQRGHORVFRPSRQHQWHVVHHQFRQWUDUDGDxDGRRIDOWDQWHLQIyUPHORDVXGLVWULEXLGRU
LQPHGLDWDPHQWH
*XDUGHORVPDWHULDOHVGHHPSDTXH/RVSXHGHQHFHVLWDUSDUDWUDVODGDUVXHTXLSRHQHO
IXWXUR
DÓNDE COLOCAR SU EQUIPO
$&RORTXHHOHTXLSRVREUHXQDVXSHU¿FLH¿UPH\SODQD
%6LVHFRORFDHOHTXLSRFHUFDGHXQUDGLRRXQ9&5ODLPDJHQSXHGHGHELOLWDUVH\RGLVWRUVLRQDVH6LpVWHHVHOFDVRFRORTXHHOHTXLSR'9'OHMRVGHRWURVDSDUDWRV
&6LVHFRORFDGHQWURGHXQPXHEOHGHMHSRUORPHQRVFPXQDSXOJDGDGHHVSDFLR
OLEUHDWRGRDOUHGHGRUGHOHTXLSRSDUDSHUPLWLUXQDDGHFXDGDYHQWLODFLyQ
CÓMO OBTENER UNA IMAGEN CLARA
(VWHUHSURGXFWRUHVXQDSDUDWRGHSUHFLVLyQ6LHOOHQWHySWLFRRHOVLVWHPDGHOGLVFRVH
HQVXFLDQRGHVJDVWDQODFDOLGDGGHODLPDJHQVHGHELOLWD5HFRPHQGDPRVLQVSHFFLRQDUGH
PDQHUDUHJXODU\GDUOHPDQWHQLPLHQWRDODSDUDWRFDGDKRUDVGHXVRGHSHQGLHQGRGHO
DPELHQWHHQHOTXHVHKDJDIXQFLRQDUHOUHSURGXFWRU
4
Cómo manipular, limpiar y guardar los discos.
Cómo manipular los discos.
Limpieza de los discos
Cómo guardar los discos
DISCOS QUE SE PUEDE REPRODUCIR EN ESTE EQUIPO
Depende del tamaño de
los archivos de fotos
Espec
Aproximadamente 8
horas
TIPO DE SISTEMA DE TV
5
ËQGLFHGHFRQWHQLGRV
3UHFDXFLRQHVGHVHJXULGDG
,QVWUXFFLRQHVGHVHJXULGDGLPSRUWDQWHV 3UHFDXFLRQHV
,QWURGXFFLyQ
,QIRUPDFLyQVREUHORVGLVFRV ,GHQWL¿FDFLyQGHORVFRQWUROHV &RQWUROUHPRWR
&RQH[LyQDHTXLSRVRSFLRQDOHV
5HSURGXFFLyQGHOGLVFR
&yPRXELFDUXQWtWXORFDStWXORRSLVWDHVSHFt¿FRV .DUDRNH &RQH[LyQDXQWHOHYLVRU
5HSURGXFFLyQUHSHWLGD
$FHUFDPLHQWRGHODLPDJHQ
6HOHFFLyQGHVXEWtWXORV
6HOHFFLyQGHORViQJXORVGHFiPDUD
,GLRPDVRSFLRQHVGHDXGLR )XQFLRQDPLHQWRGHO0303(*
5HSURGXFFLyQGHXQ&'-3(*
GHLPiJHQHV.RGDN
&yPRXWLOL]DUODLQIRUPDFLyQHQSDQWDOOD &yPRDFWLYDUHOFRQWUROSDUDSDGUHV
&yPRSHUVRQDOL]DUODVIXQFLRQHV
(VSHFL¿FDFLRQHV
*XtDGHVROXFLyQGHSUREOHPDV
6
,GHQWL¿FDFLyQGHFRQWUROHV
Panel frontal
3
4
5
6
7
8
%27Ï1'((1&(1','2
/8=,1',&$'25$
6(16255(0272
38(57$'(/',6&2
%27Ï1$%5,5&(55$5
%27Ï15(352'8&,53$86$
%27Ï1'(7(1(5
92/80(1'(/0,&5Ï)212
92/80(1'(/0,&5Ï)212
0,&5Ï)212
0,&5Ï)212
Panel posterior
3
4
0 9
8
7
5
6
6$/,'$'(9Ë'(2&20321(17(<
6$/,'$'(9Ë'(2&20321(17(3%&%
6$/,'$'(9Ë'(2&20321(17(35&5
6$/,'$'(9Ë'(2&2038(67$
720$&255,(17('((1(5*Ë$
6$/,'$Ï37,&$'($8',2',*,7$/
6$/,'$'(9Ë'(26
$8',2',*,7$/&2$;,$/
'2:10,;'(5
'2:10,;,=4
&$1$/(6'($8',2
7
9
0
&RQWUROUHPRWR
/DVLQVWUXFFLRQHVGHHVWHPDQXDOGHVFULEHQODVIXQFLRQHVGHOFRQWUROUHPRWR
67$1'%<±(1&(1','2
68%7Ë78/2
È1*8/2
,',20$
%Ò648('$
02675$5
7Ë78/2
,167$/$&,Ï1
5(352'8&&,Ï13$86$
5(752&(625È3,'2
6$/72+$&,$$75È6
3%&
5(7251$5
(&2
'(5,=4
3$62
9Ë'(2
/(172
$%5,5&(55$5
%2721(6180e5,&26
0(1Ò
5(3(7,&,Ï1$%
'(7(1(5
$9$1&(5È3,'2
6$/72+$&,$$'(/$17(
$&(5&$0,(172
5(3(7,5
(&2
,1*5(6$5
%2721(6',5(&&,21$/(6
92/80(1
176&3$/
92/80(1
6,/(1&,2
1
19
2
3
20
4
5
6
7
8
21
22
9
23
10
24
11
25
12
26
13
27
14
28
29
30
127$
087(VLOHQFLR(OLPLQDODVDOLGDGHDXGLR
3%&(VWDIXVLyQVHHQFXHQWUDGLVSRQLEOH
VRODPHQWHFXDQGRVHHVWpUHSURGXFLHQGRXQ
GLVFRGHHGLFLyQ9&'3UHVLRQHHVWHERWyQ\
FXDQGRHVWpDFWLYDGRHO3%&HOPHQ~GH9&'VH
PRVWUDUiHQODSDQWDOODGHOWHOHYLVRU
5(7851UHWRUQDUUHWRUQDDOPHQ~DQWHULRU
9,'(2<XY69LGHR
5/&XDQGRVHUHSURGX]FDXQGLVFR9&'SUHVLRQHHVWHERWyQSDUDFDPELDUHOFDQDOGHDXGLR
HQWUHGHUHFKRHL]TXLHUGR
15
16
17
31
32
18
34
&XDQGRVHPXHVWUHOD¿JXUD HQODSDQWDOODGHOWHOHYLVRUHVLQGLFDFLyQGHTXHODIXQFLyQQRHVWiGLVSRQLEOHHQHVHGLVFR
8
33
Cómo preparar el control remoto
3DUDRSHUDUHOUHSURGXFWRU'9'SULPHURVHGHEHFRORFDUODVEDWHUtDVHQHOFRQWUROUHPRWR
$EUDODWDSD
,QVHUWHODVEDWHUtDVWDPDxR$$$
$VHJ~UHVHGHFRQFRUGDUODSRODULGDG
\GHODVEDWHUtDVFRQODVPDUFDV
GHQWURGHOFRPSDUWLPLHQWR
&LHUUHODWDSD
Cómo utilizar el control remoto
&yPRKDFHUIXQFLRQDUHOUHSURGXFWRUFRQHOFRQWUROUHPRWR
(OFRQWUROUHPRWRGHEHHVWDUGLULJLGRKDFLD
HOVHQVRUUHPRWRSDUDTXHHOUHSURGXFWRU
IXQFLRQHFRUUHFWDPHQWH
'LVWDQFLD8QPi[LPRGHPGHVGHODSDUWH
GHODQWHUDGHOVHQVRUUHPRWR
ÈQJXOR$SUR[LPDGDPHQWHHQFDGD
GLUHFFLyQ
1RFRORTXHHOVHQVRUUHPRWRHQGLUHFFLyQ
GHFXDOTXLHUWLSRGHOX]WDOFRPRODOX]VRODU
GLUHFWD
BATERÍAS
(/862,1&255(&72'(/$6%$7(5Ë$638('(&$86$548(6('(55$0(16(
&2552$12(;3/27(1
1RFRORTXHODVEDWHUtDVHQODGLUHFFLyQLQFRUUHFWD
(VSHOLJURVRFDUJDUFDOHQWDUDEULURHIHFWXDUFRUWRFLUFXLWRVFRQODVEDWHUtDV
1RGHMHEDWHUtDVDJRWDGDVQLPH]FOHEDWHUtDVQXHYDVFRQXVDGDVHQHOFRQWUROUHPRWR
6LQRVHYDDXVDUHOFRQWUROUHPRWRGXUDQWHXQSHULRGRSURORQJDGRUHWLUHODVEDWHUtDV&XDQGRHOUDQJRGHIXQFLRQDPLHQWRVHYHDGHELOLWDGRUHHPSODFHODVEDWHUtDV
6LRFXUUHXQGHUUDPHGHEDWHUtDVOLPSLHHOOtTXLGRGHODVEDWHUtDVGHOFRPSDUWLPLHQWR/XHJR
FRORTXHODVEDWHUtDV
9
&RQH[LyQDXQWHOHYLVRU
$SDJXHORVHTXLSRV\GHVHQFK~IHORVDQWHVGHSURFHGHUDHIHFWXDUODVFRQH[LRQHV3RUIDYRU
YpDVHHOPDQXDOGHLQVWUXFFLRQHVGHOWHOHYLVRU
Component video input Pr/Cr
Component video input Pb/Cb
S-Video
Component video input Y
Audio In
Audio cable
S-Video
S-Video Cable
Video In
Video Cable
([LVWHQFXDWURRSFLRQHVGHFRQH[LyQ9pDVHOD¿JXUDGHDUULED
&RQHFWHHOFDEOHGHYtGHRFRPSXHVWRDOWHUPLQDOFRUUHVSRQGLHQWHGHOWHOHYLVRU
6LVXWHOHYLVRUFXHQWDFRQXQWHUPLQDOGH69,'(2VHUHFRPLHQGDFRQHFWDUODVDOLGDGH
69,'(2DOWHOHYLVRU'HHVWDPDQHUDVHSXHGHUHFLELUXQDPHMRUFDOLGDGGHLPDJHQTXH
ODRSFLyQ
6LVXWHOHYLVRUFXHQWDFRQVDOLGDVGHYtGHRFRPSRQHQWHV<3E\3UR<&E\&UFRQHFWH
HVWRVWHUPLQDOHVDVXWHOHYLVRU$VtVHSXHGHREWHQHUXQDFDOLGDGGHLPDJHQySWLPD6LORV
WHUPLQDOHVGHHQWUDGD<&E&UGHVXWHOHYLVRUDGRSWDQODRSFLyQGHHQWUDGDSURJUHVLYD
SUHVLRQHHOERWyQ9,'(2HQHOFRQWUROUHPRWRSDUDFDPELDUHOHTXLSRDODRSFLyQGHVDOLGD
SURJUHVLYD
Notas:
3RUIDYRUFRQVXOWHFRQHOPDQXDOGHVXWHOHYLVRU
$SDJXHORVHTXLSRV\GHVHQFK~IHORVDQWHVGHSURFHGHUDHIHFWXDUODVFRQH[LRQHV
&RQHFWHHOUHSURGXFWRUGH'9'DVXWHOHYLVRU6LVHFRQHFWDHOUHSURGXFWRUDXQD¿OPDGRUDRDXQDFRPELQDFLyQGH799&5ODLPDJHQGHUHSURGXFFLyQVHYHUiGLVWRUVLRQDGD\D
TXHHOUHSURGXFWRUGH'9'YLHQHLQFRUSRUDGRFRQXQFLUFXLWRGHSURWHFFLyQGHORVGHUHFKRV
GHDXWRUSRUSDUWHGH0DFURYLVLyQ
$OPRPHQWRGHFRQHFWDUHOUHSURGXFWRUDOWHOHYLVRUDVHJ~UHVHGHFRQHFWDUODVRWUDV
VDOLGDVGHYtGHRFXDQGRXQRGHORVWHUPLQDOHVWDOHVFRPRHOYtGHRFRPSXHVWR69LGHR\
YtGHRFRPSRQHQWH<&E&UVHHQFXHQWUHQFRQHFWDGRVSDUDDVtREWHQHUXQDFDOLGDGGH
LPDJHQySWLPD
10
&RQH[LyQDHTXLSRVRSFLRQDOHV
&yPRGLVIUXWDUGHVRQLGR'ROE\3UR
/RJLF6XUURXQG
%8(12
&yPRGLVIUXWDUGHVRQLGRHVWpUHRGLJLWDO
0(-25
(VWpUHR'LJLWDO
'LVIUXWHGHVRQLGRUHDO\GLQiPLFRGH
'ROE\3UR/RJLF6XUURXQGFRQHFWDQGR
XQDPSOL¿FDGRU\XQVLVWHPDGHDOWDYRFHVDOWDYRFHVGHODQWHURVGHUHFKRH
L]TXLHUGRXQDOWDYR]FHQWUDO\XQRR
GRVDOWDYRFHVWUDVHURV
'LVIUXWHGHOVRQLGRGLQiPLFRHVWpUHRGLJLWDO
FRQHFWDQGRXQDPSOL¿FDGRUHTXLSDGRFRQ
XQDHQWUDGDGHDXGLRGLJLWDO\XQVLVWHPD
GHDOWDYRFHVDOWDYRFHVGHODQWHURVGHUHFKRHL]TXLHUGR
$ODVDOLGDGHYLGHR
$PDULOOR
$O3&0%LWVWUHDP
$ODVDOLGDGHYLGHR
$ODVDOLGDGHYtGHRDQiORJR
&DEOHGHDXGLR
$PDULOOR
&DEOHGHDXGLR
$PSOL¿FDGRUHTXLSDGRFRQ
HQWUDGDGHDXGLRGLJLWDO
$OWDYR]GHODQWHUR
GHUHFKR
$OWDYR]GHODQWHUR
L]TXLHUGR
$OWDYR]GHODQWHUR
L]TXLHUGR
$OWDYR]GHODQWHUR
GHUHFKR
Conecte uno o
GRVDOWDYRFHV(O
VRQLGRGH
VDOLGDGHORVDOWDYRFHV
WUDVHURVVHUiGH
DXGLRPRQRD~Q
FXDQGRVHFRQHFWHGRV
DOWDYRFHV
$OWDYR]WUDVHUR
&RQVXOWHFRQHOPDQXDOGHOWHOHYLVRUFRQHFWDGR
$SDJXH\GHVHQFKXIHORVDSDUDWRVDQWHVGHSURFHGHUDHIHFWXDUODVFRQH[LRQHV
'HELGRDOJUDQUDQJRGLQiPLFRGHVDOLGDGHVRQLGRGHOUHSURGXFWRU'9'UHJXOHHOYROXPHQ
GHVXUHFHSWRUDXQQLYHOTXHOHVHDFyPRGRSDUDHYLWDUGDxRVDORVDOWDYRFHV
11
Cómo disfrutar de Dolby Digital
/$0(-2523&,g1
(O'ROE\'LJLWDOSXHGHRIUHFHUXQVRQLGRVXUURXQGFRQFLQFRFDQDOHVGHUDQJRWRWDOPiVXQ
VH[WRFDQDOFRPRVXEZRRIHU3DUDGLVIUXWDUGHVXUHSURGXFWRUFRQHOVLVWHPDGHVRQLGRVXUURXQGGROE\GLJLWDOWRGRORTXHVHQHFHVLWDKDFHUHVFRQHFWDUHOUHSURGXFWRUDXQUHFHSWRU
'ROE\'LJLWDORXQUHFHSWRUOLVWRSDUD'ROE\'LJLWDOFRQXQGHFRGL¿FDGRUH[WHUQR
(VWiSURKLELGRSRUOH\FRSLDUHPLWLUPRVWUDU
UHSURGXFLUHQS~EOLFR\DOTXLODUPDWHULDOFRQGHUHFKRVGHDXWRUVLQSHUPLVR
/RVGLVFRVGHYtGHR'9'HVWiQSURWHJLGRVFRQWUD
FRSLDV\FXDOTXLHUJUDEDFLyQKHFKDFRQHVWRV
GLVFRVUHVXOWDUiGLVWRUVLRQDGD
)DEULFDGREDMROLFHQFLDGH'ROE\/DEV
³'ROE\´\HOVtPERORGHODGREOH'VRQPDUFDVGH
ORVODERUDWRULRV'ROE\2EUDVFRQ¿GHQFLDOHVQR
SXEOLFDGDV±/DERUDWRULRV'ROE\,QF
WRGRVORVGHUHFKRVUHVHUYDGRV
(VWHSURGXFWRFXHQWDFRQWHFQRORJtDGHSURWHFFLyQGHORVGHUHFKRVGHDXWRUTXHVHHQFXHQWUDDPSDUDGDSRUFLHUWDVSDWHQWHVGHORV(VWDGRV8QLGRV\RWURVGHUHFKRVGHSURSLHGDG
LQWHOHFWXDOSRUSDUWHGHOD&RUSRUDFLyQ0DFURYLVLyQ\RWURVGHUHFKRKDELHQWHV(OXVRGH
HVWDWHFQRORJtDGHSURWHFFLyQGHORVGHUHFKRVGHDXWRUGHEHDXWRUL]DUVHSRUSDUWHGHOD
&RUSRUDFLyQ0DFURYLVLyQ\KDVLGRGLVHxDGDSDUDVHUXWLOL]DGDHQHOKRJDURHQOXJDUHV
GHYLVXDOL]DFLyQOLPLWDGDVRODPHQWHDQRVHUTXHVHDXWRULFHQGHRWUDIRUPDSRUSDUWHGH
OD&RUSRUDFLyQ0DFURYLVLyQ/DUHLQJHQLHUtDUHYHUWLGDRHOGHVHQVDPEODMHVHHQFXHQWUDQ
SURKLELGRV
1RFRQHFWHODVDOLGD3&0%,7675($0GHO'9'DODHQWUDGD$&5)GHXQUHFHSWRU'ROE\'LJLWDO(QVXOXJDUFRQHFWHDODHQWUDGD³ySWLFD´R³FRD[LDO´GHXQUHFHSWRUR
SURFHVDGRU'ROE\'LJLWDO/DHQWUDGDGHOUHFHSWRU$9QRHVFRPSDWLEOHFRQODVDOLGD3&0
%,7675($0\VHXWLOL]DSULPRUGLDOPHQWHSDUDGLVFRVOiVHUVRODPHQWH
&RQHFWHODVDOLGD3&0%,7675($0GHO'9'DODHQWUDGD³ySWLFD´R³FRD[LDO´GHXQ
UHFHSWRURSURFHVDGRU'ROE\'LJLWDO'76
9pDVHHOPDQXDOGHOWHOHYLVRUFRQHFWDGR
5HJXOHHOYROXPHQGHVXUHFHSWRUDXQQLYHOFyPRGRSDUDHYLWDUGDxRVDORVDOWDYRFHV
$OPRPHQWRGHFRQHFWDURGHVFRQHFWDUHOUHSURGXFWRU'9'DSDJXHHODPSOL¿FDGRUSDUD
HYLWDUGDxRVDORVDOWDYRFHV
12
&yPRUHSURGXFLUXQGLVFR
Reproducción básica
Cómo reproducir discos de vídeo DVD
(QFLHQGDHOWHOHYLVRU\VHOHFFLRQHXQDHQWUDGDGHYtGHRTXHVHHQFXHQWUHFRQHFWDGDDO
UHSURGXFWRU'9'
Cómo disfrutar del sonido del sistema de audio
(QFLHQGDHOVLVWHPDGHDXGLR\VHOHFFLRQHXQDIXHQWHGHHQWUDGDTXHVHHQFXHQWUHFRQHFWDGDDOUHSURGXFWRU'9'
3UHVLRQHHOERWyQ67$1'%<21HQHOSDQHOIURQWDO
3UHVLRQHHOERWyQ23(1&/26(DEULOFHUUDU
&RORTXHHOGLVFRHQODEDQGHMD
$VHJ~UHVHGHTXHHOODGRGHODUHSURGXFFLyQHVWpGH
FDUDKDFLDDEDMR
(OGLVFRSXHGHGDxDUVHVLQRVHFRORFDFRUUHFWDPHQWHVREUHODUDQXUDGHODEDQGHMD(VWRWDPELpQ
SXHGHFDXVDUTXHHOUHSURGXFWRU'9'IXQFLRQHLQFRUUHFWDPHQWH
1RIXHUFHQLFRORTXHQDGDTXHQRVHDQGLVFRVHQOD
EDQGHMD
3UHVLRQHHOERWyQ23(1&/26(DEULOFHUUDUGHQXHYR
'HVSXpVGHTXHODEDQGHMDGHOGLVFRHVWpFHUUDGDODUHSURGXFFLyQVHLQLFLDUi
6LHOGLVFRTXHVHGHVHDUHSURGXFLUHVXQGLVFR'9'HOUHSURGXFWRULQLFLDUiODUHSURGXFFLyQ
DXWRPiWLFDPHQWH
(OWUDVODGDUHOUHSURGXFWRU'9'GXUDQWHODUHSURGXFFLyQSXHGHFDXVDUGDxRVDOGLVFRDVt
FRPRDOHTXLSR
Cómo detener la reproducción
3UHVLRQHHOERWyQ XQDYH]6HGHWHQGUiHOUHSURGXFWRU'9'
3UHVLRQHHOERWyQ SDUDUHDQXGDUODUHSURGXFFLyQ
3UHVLRQHHOERWyQ GRVYHFHV(OUHSURGXFWRUVHGHWHQGUiFRPSOHWDPHQWH
Cómo retirar el disco
3UHVLRQHHOERWyQ23(1&/26(DEULOFHUUDU$VHJ~UHVHGHTXHODEDQGHMDVHHQFXHQWUH
FRPSOHWDPHQWHDELHUWDDQWHVGHUHWLUDUORVGLVFRV'HVSXpVGHUHWLUDUORVGLVFRVSUHVLRQHHO
ERWyQ23(1&/26(DEULOFHUUDUSDUDFHUUDUODEDQGHMD
Cómo poner en pausa la reproducción (reproducción congelada)
3UHVLRQHHOERWyQ GXUDQWHODUHSURGXFFLyQ
3UHVLRQHHOERWyQ RHOERWyQ(17(5SDUDUHDQXGDUODUHSURGXFFLyQQRUPDO
$O¿QDOL]DUXQDSHOtFXODDSDUHFHUiXQDSDQWDOODGHPHQ~7HQJDFXLGDGRGHTXHHOPHQ~
HLQVWDODFLyQHQSDQWDOODQRGDxHHOWHOHYLVRUDOSHUPDQHQWHPHQWHTXHPDUODLPDJHQVREUH
ODSDQWDOOD3DUDHYLWDUHVWRSUHVLRQHHOERWyQ
DO¿QDOL]DUFDGDSHOtFXOD7DPELpQVH
SXHGHLQVWDODUHO3URWHFWRUGH3DQWDOOD
13
5HSURGXFFLyQDYDQ]DGD
(OUHSURGXFWRU'9'OHSHUPLWHUHSURGXFLUGLVFRVDGLIHUHQWHVYHORFLGDGHV
5HSURGXFFLyQHQ;;;;R;GHODYHORFLGDGQRUPDO
6HSXHGHUHSURGXFLUXQGLVFRHQ[[[[R[GHODYHORFLGDGQRUPDO
3UHVLRQHHOERWyQ RGXUDQWHODUHSURGXFFLyQ
/DYHORFLGDGGHUHSURGXFFLyQVHGXSOLFD[ODYHORFLGDGQRUPDO
/DYHORFLGDGUHSURGXFFLyQFDPELDFDGDYH]TXHVHSUHVLRQHHOERWyQR
5HWURFHVRUiSLGR
$YDQFHUiSLGR
3DQWDOODGH79
3DUDUHDQXGDUODUHSURGXFFLyQQRUPDO3UHVLRQH
Reproducción en cámara lenta
8QGLVFRWDPELpQSXHGHUHSURGXFLUVHHQFiPDUDOHQWD
3DUDUHDQXGDUODUHSURGXFFLyQQRUPDO
3UHVLRQH
3DQWDOODGH79KDFLDDGHODQWH
3UHVLRQHHOERWyQ6/2:GXUDQWHODUHSURGXFFLyQ
/DYHORFLGDGVHYROYHUiíîRGHODYHORFLGDGQRUPDOFDGDYH]TXHVHSUHVLRQHHO
ERWyQ6/2:
'XUDQWHODUHSURGXFFLyQHQFiPDUDOHQWDHOVRQLGRTXHGDVXSULPLGR
$OJXQRVGLVFRVQRFXHQWDQFRQHVWDFDUDFWHUtVWLFD
Cómo reanudar la reproducción desde el mismo punto
(VWHUHSURGXFWRU'9'OHSHUPLWHGHWHQHUODUHSURGXFFLyQ\FRQWLQXDUODUHSURGXFFLyQPiV
WDUGHGHVGHHOPLVPRSXQWRHQHOGLVFR
3UHVLRQHHOERWyQ6723XQDYH]
(VWRLQWHUUXPSLUiODUHSURGXFFLyQ\HOUHSURGXFWRUPHPRUL]DUiODXELFDFLyQGRQGHVH
GHWXYRODUHSURGXFFLyQ
3UHVLRQHHOERWyQ (OUHSURGXFWRUUHDQXGDUiODUHSURGXFFLyQGHVGHHOSXQWRGRQGHVHGHWXYRODUHSURGXFFLyQ
/RVLJXLHQWHFDQFHODUiODIXQFLyQ5(680(UHDQXGDU
'HVHQFKXIDUHOUHSURGXFWRUGHVSXpVGHKDEHUGHWHQLGRODUHSURGXFFLyQ
(\HFWDUHOGLVFR
$YHFHVGHSHQGLHQGRGHOGLVFRODXELFDFLyQGRQGHVHUHDQXGHODUHSURGXFFLyQSXHGH
YDULDU
$OJXQRVGLVFRVQRFXHQWDQFRQHVWDFDUDFWHUtVWLFD
Reproducción de cuadro por cuadro
3UHVLRQHHOERWyQ67(3GXUDQWHODUHSURGXFFLyQ
/DLPDJHQDYDQ]DUiXQFXDGURDODYH]FDGDYH]TXHVHSUHVLRQHHOERWyQ67(3(OVRQLGR
TXHGDUiVXSULPLGR
3DUDUHDQXGDUODUHSURGXFFLyQQRUPDO3UHVLRQH
14
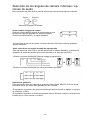
&yPRXELFDUXQWtWXORFDStWXORRSLVWDHVSHFt¿FRV
/RVGLVFRV'9'HVWiQQRUPDOPHQWHGLYLGLGRVHQWtWXORV/RVWtWXORVHVWiQVXEGLYLGLGRV
HQFDStWXORV$GHPiVORVGLVFRVGHDXGLR\03HVWiQGLYLGLGRVHQSLVWDV6HSXHGHGH
PDQHUDFRQYHQLHQWHXELFDUXQWtWXORFDStWXORRSLVWDHVSHFt¿FRVFRQHVWHUHSURGXFWRU
'LVFRGHYLGHR'9'
'LVFRGH$XGLR
Como ubicar un título utilizando el menú de títulos
6HSXHGHXELFDUXQWtWXORHVSHFt¿FRXWLOL]DQGRODIXQFLyQGHPHQ~GHWtWXORVVLHOGLVFRGH
YtGHR'9'FRQWLHQHXQPHQ~GHWtWXORV
3UHVLRQHHOERWyQ7,7/(
(OPHQ~GHWtWXORVDSDUHFHUiHQODSDQWDOODGHOWHOHYLVRU
3UHVLRQHHOERWyQ SDUDVHOHFFLRQDUHOWtWXORGHVHDGROXHJRSUHVLRQHHOERWyQ
7DPELpQVHSXHGHXELFDUGLUHFWDPHQWHHOWtWXORHVSHFt¿FRSUHVLRQDQGRHOQ~PHURDVLJQDGR
DHVHWtWXORXWLOL]DQGRORVERWRQHVPpGLFRV
(VWRKDUiTXHHOUHSURGXFWRULQLFLHODUHSURGXFFLyQGHVGHFDStWXORGHOWtWXORVHOHFFLRQDGR
6HHQFRQWUDUiTXHDOJXQRVGLVFRVQRUHVSRQGHQDHVWDIXQFLyQ
6LDSDUHFLHUDQLQVWUXFFLRQHVGLIHUHQWHVHQODSDQWDOODGHOWHOHYLVRUVLJDHVDVLQVWUXFFLRQHV
/DVLQVWUXFFLRQHVGHDUULEDVRQSDUDGHVFULELUXQSURFHGLPLHQWREiVLFR/RVSURFHGLPLHQWRV
SXHGHQYDULDUGHSHQGLHQGRGHORVFRQWHQLGRVGHOGLVFRGHYtGHR'9'
&yPRXELFDUXQFDStWXORHVSHFt¿FRRSLVWD
(VWHUHSURGXFWRUOHSHUPLWHXELFDUFDStWXORVRSLVWDVFRQVHFXWLYDV
3UHVLRQHHOERWyQRUHSHWLGDPHQWHSDUDPRVWUDUHOFDStWXORRSLVWDVROLFLWDGD
(OUHSURGXFWRULQLFLDUiODUHSURGXFFLyQGHVGHHOFDStWXORRSLVWDVHOHFFLRQDGRV
Cómo ubicar capítulos o pistas anteriores
&XDQGRVHSUHVLRQDHOERWyQHOUHSURGXFWRULQLFLDODUHSURGXFFLyQGHVGHHOFRPLHQ]R
GHOFDStWXORRSLVWDDQWHULRU
Cómo ubicar capítulos o pistas posteriores
&XDQGRVHSUHVLRQDHOERWyQHOUHSURGXFWRULQLFLDODUHSURGXFFLyQGHVGHHOFRPLHQ]R
GHOFDStWXORRSLVWDSRVWHULRURVLJXLHQWH
(QHOFDVRGHDOJXQRVGLVFRVORVWtWXORVSXHGHQQRPRVWUDUORVFDStWXORVVXEGLYLGLGRV
15
&yPRXELFDUXQWtWXORFDStWXOR
3DUDGLVFRVGHYtGHR'9'
'XUDQWHODUHSURGXFFLyQSUHVLRQHHOERWyQ6($5&+\ODSDQWDOODPRVWUDUiSRUHMHPSOR
³7tWXOR&DStWXOR´
3UHVLRQHORVERWRQHV¿JXUDSDUDSDVDUHQWUHWtWXORVFDStWXORV\OXHJRSUHVLRQHORVERWRQHVQXPpULFRVSDUDLQJUHVDUHOWtWXOR\FDStWXORTXHHVWpHQUHSURGXFFLyQ/XHJRSUHVLRQH
HOERWyQ(17(5SDUDLQLFLDUODUHSURGXFFLyQ
3UHVLRQHHOERWyQ6($5&+GRVYHFHVGHPDQHUDFRQVHFXWLYD/DSDQWDOODPRVWUDUiSRU
HMHPSOR³7tWXOR7LHPSR³
,QJUHVHHOQ~PHURGHGRVGtJLWRVXWLOL]DQGRORVERWRQHVQXPpULFRV/XHJRSUHVLRQHHOERWyQ
(17(5SDUDLQLFLDUODUHSURGXFFLyQ
3DUDGLVFRVGHDXGLR\03
3UHVLRQHHOERWyQ6($5&+/DSDQWDOODPRVWUDUiSRUHMHPSOR³´
,QJUHVHODSLVWDSUHVLRQDQGRORVERWRQHVQXPpULFRV/XHJRSUHVLRQHHOERWyQ(17(5SDUD
LQLFLDUODUHSURGXFFLyQ
(OYDORUGHWLHPSRLQJUHVDGRGHEHHQFRQWUDUVHGHQWURGHOUDQJRGHH[WHQVLyQGHWLHPSRGHO
WtWXOR\HOFDStWXORGHRWUDIRUPDHOYDORUQRSRGUiHIHFWXDUVH
(QHOFDVRGHDOJXQRVGLVFRVHVWDIXQFLyQQRIXQFLRQDUi
.DUDRNH
(VWHUHSURGXFWRUGHYtGHR'9'OHSHUPLWHGLVIUXWDUGHOVLVWHPD.DUDRNHFRQGRVPLFUyIRQRV
Cómo instalar el karaoke
&RQHFWHHOPLFUyIRQRD0,&\0,&HQHOSDQHOIURQWDO
3UHVLRQHHOERWyQ6(783$SDUHFHUiHOPHQ~GHLQVWDODFLyQHQODSDQWDOOD\OXHJR
VHOHFFLRQH³$XGLR±.DUDRNH±6HWXSLQVWDODFLyQ±0LF6HWXSLQVWDODFLyQGHPLFUyIRQR
±0LF6ZLWFKFDPELRGHPLFUyIRQR±21HQFHQGLGR´DWUDYpVGHOPHQ~GHLQVWDODFLyQGH
.DUDRNHYpDVHODSiJLQD³&yPRSHUVRQDOL]DUODVIXQFLRQHV´
5HJXOHHOQLYHOGHPLFUyIRQR0,&\GHOHFR(&+2
3UHVLRQHORVERWRQHV0,&92/\0,&92/HQHOSDQHOIURQWDOSDUDUHJXODUHOQLYHOGHO
PLFUyIRQR
3UHVLRQHORVERWRQHV(&+2\(&+2SDUDUHJXODUHOQLYHOGHOHFR
6LVHHVWiGHQWURGHODIXQFLyQGH.DUDRNH\VHH[SHULPHQWDUXLGRVLQWHQWHORVLJXLHQWH
0DQWHQJDORVPLFUyIRQRVDOHMDGRVGHORVDOWDYRFHV
'LVPLQX\DHOQLYHOGHVRQLGRGHOPLFUyIRQR
'LVPLQX\DHOQLYHOGHYROXPHQGHORVDOWDYRFHV
16
5HSURGXFFLyQUHSHWLWLYD
(VWHUHSURGXFWRUGHYtGHR'9'OHSHUPLWHUHSURGXFLUXQWtWXORFDStWXORSLVWDRVHJPHQWR
HVSHFt¿FRGHPDQHUDUHSHWLWLYD5HSHWLFLyQGHWtWXORUHSHWLFLyQGHFDStWXORSLVWD
UHSHWLFLyQ$%
Cómo repetir un título, capítulo o pista
6HOHFFLRQHHOWtWXORFDStWXORRSLVWDTXHVHGHVGHUHSHWLU
3UHVLRQHHOERWyQ5(3($7
/DIXQFLyQGHUHSHWLFLyQFDPELDFDGDYH]TXHVHSUHVLRQDHOERWyQ5(3($7
UHSLWHHOPLVPRFDStWXOR
UHSLWHHOPLVPRWtWXOR
UHSLWHHOGLVFR
UHSURGXFFLyQQRUPDO
'LVFRGHYtGHR'9'
&yPRUHSHWLUXQVHJPHQWRHVSHFt¿FR
3UHVLRQHHOERWyQ$±%DOFRPLHQ]RGHOVHJPHQWRTXHVHGHVHD
UHSHWLU3XQWR$
¿JXUD
3UHVLRQHHOERWyQ$±%GHQXHYRDO¿QDOGHOVHJPHQWR3XQWR%
(OUHSURGXFWRUDXWRPiWLFDPHQWHUHJUHVDUiDOSXQWR$\FRPHQ]DUiOD
UHSURGXFFLyQUHSHWLGDGHOVHJPHQWRVHOHFFLRQDGR$±%
3UHVLRQHHOERWyQ$±%SDUDFDQFHODUODIXQFLyQGHUHSHWLFLyQ$±%
(OUHSURGXFWRUUHDQXGDUiODUHSURGXFFLyQQRUPDO
'HSHQGLHQGRGHOGLVFRVHSRGUtDH[SHULPHQWDUXQDGLIHUHQFLDHQWUHHOSXQWR$\ODXELFDFLyQHQGRQGHODUHSURGXFFLyQUHDOPHQWHVHUHDQXGH
7HQJDSUHVHQWHTXHDOJXQRVGLVFRVSXHGHQQRUHVSRQGHUDODIXQFLyQGHUHSHWLFLyQ$±%
17
$FHUFDPLHQWRGHODLPDJHQ
(VWHUHSURGXFWRUGHYLGHR'9'OHSHUPLWHKDFHUXQDFHUFDPLHQWRGHODLPDJHQDVtFRPR
FDPELDUHOSXQWRGHDFHUFDPLHQWR
3UHVLRQH=220GXUDQWHODUHSURGXFFLyQQRUPDORODIXQFLyQGHFiPDUDOHQWD
(OUHSURGXFWRUPDJQL¿FDUiRDXPHQWDUiHOFHQWURGHODLPDJHQ
6LVHSUHVLRQD
ELD
GXUDQWHODUHSURGXFFLyQHQDFHUFDPLHQWRHOSXQWRGHDFHUFDPLHQWRFDP-
3UHVLRQH=220FRQVHFXWLYDPHQWHGXUDQWHODUHSURGXFFLyQGHDFHUFDPLHQWRKDVWDTXHVH
UHDQXGHODUHSURGXFFLyQQRUPDO
(QHOFDVRGHGLVFRVGHLPiJHQHV-(3*.RGDN\GLVFRV',9;HVWDIXQFLyQQRIXQFLRQDUi
6HOHFFLyQGHVXEWtWXORV
(VWHUHSURGXFWRUGHYtGHR'9'OHSHUPLWHPRVWUDUORVVXEWtWXORVGHDTXHOORVLQFOXLGRVHQHO
GLVFRHQODSDQWDOODGHVXWHOHYLVRU
6HWLHQHODRSFLyQGHVHOHFFLRQDUXQVXEWtWXORGHVHDGRGHDTXHOORVLQFOXLGRVHQHOGLVFR'9'
3UHVLRQHHOERWyQ68%7,7/(GXUDQWHODUHSURGXFFLyQ
3DUDGHVDFWLYDUORVVXEWtWXORV
3UHVLRQHHOERWyQ68%7,7/(GXUDQWH
ODUHSURGXFFLyQKDVWDTXHORVVXEWtWXORVGHVDSDUH]FDQ
18
6HOHFFLyQGHORViQJXORVGHFiPDUDLGLRPDVRSFLRQHVGHDXGLR
(VWHUHSURGXFWRUGHYtGHR'9'OHSHUPLWHVHOHFFLRQDUHQWUHGLYHUVRViQJXORVHLGLRPDV
ÈQJXOR ÈQJXOR
6HOHFFLyQGHOiQJXORGHFiPDUD
Cómo cambiar el ángulo de cámara
3UHVLRQHHOERWyQ$1*/(GXUDQWHODUHSURGXFFLyQGHXQD
HVFHQDTXHKD\DVLGRJUDEDGDFRQiQJXORVP~OWLSOHV
3UHVLRQHHOERWyQ$1*/(\HOiQJXORFDPELDUi
/DIXQFLyQGHiQJXORQRIXQFLRQDUiFRQGLVFRVGHYtGHR'9'VLQRFRQWLHQHQJUDEDGRV
iQJXORVP~OWLSOHV
Cómo seleccionar una opción de audio de reproducción
(VWHUHSURGXFWRUGHYtGHR'9'OHSHUPLWHVHOHFFLRQDUXQLGLRPDGHVHDGR\XQVLVWHPDGH
JUDEDFLyQGHVRQLGRGHDTXHOORVTXHYLHQHQLQFOXLGRVHQHOGLVFRGHYtGHR'9'
3UHVLRQHHOERWyQ/$1*8$*(LGLRPDGXUDQWHODUHSURGXFFLyQ
3UHVLRQHHOERWyQ/$1*8$*(GHQXHYRSDUDVDOWDUKDFLDDWUiV
Sistemas de grabación
(VWHUHSURGXFWRUXWLOL]DORVVLVWHPDVGHJUDEDFLyQ'ROE\'LJLWDO03(*3&01RSXHGH
UHSURGXFLUGLVFRVTXHKD\DQVLGRJUDEDGRVFRQRWURIRUPDWR
(OUHSURGXFWRUUHJUHVDUiDODVRSFLRQHVLQLFLDOHVSRUGHIHFWRFXDQGRVHDSDJXHHOHTXLSRR
VHUHHPSODFHHOGLVFR
(OUHSURGXFWRUUHSURGXFHHOVRQLGRSURJUDPDGRDQWHULRUGHOGLVFRFXDQGRVHVHOHFFLRQDXQ
IRUPDWRTXHQRYLHQHLQFOXLGRHQHOGLVFR
19
)XQFLRQDPLHQWRGHO0303(*
3DUDSRGHUUHSURGXFLUVHWLHQHTXHYLVXDOL]DUDWUDYpVGHODWHOHYLVLyQ,QVHUWHXQGLVFR
0303(*(OUHSURGXFWRULQLFLDOL]DUiHOGLVFRFXDQGRVHFLHUUHODEDQGHMD\HOGLUHFWRULR
VHPXHVWUHHQHOPHQ~0303(*HQODSDQWDOOD
3UHVLRQHHOERWyQ\OXHJRORVERWRQHVSDUDVHOHFFLRQDU\UHVDOWDUHODUFKLYR03
03(*
$OUHSURGXFLUXQGLVFRTXHFRQWHQJD03HLPiJHQHV-3(*HOUHSURGXFWRUUHSURGXFLUiOR
-3(*\OXHJRORV03
&yPRUHSURGXFLUXQ&'-3(*GHLPiJHQHV.RGDN
&XDQGRXQ-3(*R.RGDN3LFWXUH&'HVLQWURGXFLGRVHDFWLYDDXWRPiWLFDPHQWHXQVKRZ
WLSRGLDSRVLWLYDV&DGDIRWRHQHOGLUHFWRULRDFWXDOVHUiPRVWUDGDFDQVHFXWLYDPHQWHHQHVWLOR
GHGLDSRVLWLYD\DMXVWDGRDOWDPDxRGHODSDQWDOOD
8VDQGRHQHO0HQ~2SHUDFLRQDO
(VWHUHSURGXFWRUGHYtGHR'9'OHSHUPLWHYLVXDOL]DUHOHVWDGRRSHUDFLRQDO\ODLQIRUPDFLyQ
GHOGLVFRHQVXSDQWDOODGHWHOHYLVRU
&yPRYHUL¿FDUHOHVWDGRRSHUDFLRQDO
&RQHVWDIXQFLyQVHSXHGHYLVXDOL]DUHQVXWHOHYLVRUORVLJXLHQWH
7tWXORDFWXDO
1~PHURGHODSLVWD
7LHPSRGHUHSURGXFFLyQWRWDO
3DUDGLVFRV'9'
3UHVLRQH',63/$<PRVWUDU
GXUDQWHODUHSURGXFFLyQ
3DUDGLVFRV&9'
3UHVLRQH',63/$<GXUDQWHODUHSURGXFFLyQ
7tWXORDFWXDO
Capítulo actual
Title Elapsed
TT 0/
0:0:0
CH
Track 05/06
0:00:8
06/039
7RWDOGHFDStWXORV
7RWDOGHWtWXORV
Title Remain
TT 0/
0:8:50
CH
CH
06/039
Chapter Remain
TT 0/
0:0:40
CH
Single Remain
Track 05/06
06/039
Chapter Elapsed
TT 0/
0:03:50
Single Elapsed
06/039
0::5
Total Elapsed
Track 05/06
0:0:34
Total Remain
Track 05/06
0:46:0
Display off
Display off
20
3DUDGLVFRV&'03
3UHVLRQH',63/$<
GXUDQWHODUHSURGXFFLyQ
&yPRLQVWDODUHOVHJXURSDUDSDGUHV
6HSXHGHXWLOL]DUODIXQFLyQGHVHJXURSDUDSDGUHVVyORFRQORVGLVFRVGHYtGHR'9'TXH
YLHQHQHTXLSDGRVFRQHVWDFDUDFWHUtVWLFD
Cómo instalar el seguro para padres
/RVGLVFRVGHYtGHR'9'HTXLSDGRVFRQODIXQFLyQGHVHJXURSDUDSDGUHVYLHQHQFODVL¿FDGRVGHDFXHUGRDVXFRQWHQLGR/RVFRQWHQLGRVSHUPLWLGRVSRUXQQLYHOGHFRQWUROSDUD
SDGUHV\ODPDQHUDGHTXHVHSXHGDFRQWURODUXQGLVFRGHYtGHRSXHGHQYDULDUGHXQGLVFR
DRWUR3RUHMHPSORVLHOGLVFRORSHUPLWHVHSXHGHHGLWDU\VDFDUHVFHQDVYLROHQWDVQR
DSURSLDGDVSDUDQLxRV\UHHPSOD]DUODVFRQHVFHQDVPiVDSURSLDGDVRVHSXHGHEORTXHDU
ODUHSURGXFFLyQGHOGLVFRWRWDOPHQWH
3UHVLRQH6723GRVYHFHVGXUDQWHODUHSURGXFFLyQ
3UHVLRQH6(783LQVWDODFLyQ
(OPHQ~6(783DSDUHFHUiHQODSDQWDOODGHO
WHOHYLVRU
Cómo cambiar la contraseña
5HVDOWHODRSFLyQGHFRQWUDVHxD
SDUDLQJUHVDUHOFDPELR
6HOHFFLRQHODSiJLQDGHSUHIHUHQFLDV\SUHVLRQH(17(5
,QJUHVHODFRQWUDVHxDDQWLJXD
,QJUHVHODFRQWUDVHxDQXHYD
5HLQJUHVHSDUDFRQ¿UPDUOD
QXHYDFRQWUDVHxD
5HVDOWHODRSFLyQ³2.´
3UHVLRQH6(783SDUDVDOLU
6HOHFFLRQHODRSFLyQ³3DUHQWDO´SDGUHV\
SUHVLRQH(17(5/XHJRVHOHFFLRQHHOQLYHOGH
FODVL¿FDFLyQXWLOL]DQGRORVERWRQHVGLUHFFLRQDOHV
\SUHVLRQH(17(5
,QJUHVHVXFRQWUDVHxDFXDQGRODRSFLyQGH
FRQWUDVHxDVHHQFXHQWUHDFWLYDGD\OXHJRSUHVLRQHHOERWyQ(17(5
/DFRQWUDVHxDSUHGHWHUPLQDGDHV
21
&yPRSHUVRQDOL]DUODVIXQFLRQHV
(VWHUHSURGXFWRUGHYtGHR'9'OHSHUPLWHSHUVRQDOL]DUHOIXQFLRQDPLHQWRGHDFXHUGRVXV
SUHIHUHQFLDV
Cómo mostrar la pantalla del menú de instalación
(OPHQ~GHLQVWDODFLyQHQSDQWDOODOHSLGHVHOHFFLRQDUXQDFDWHJRUtDGHLQVWDODFLyQHQWUHODV
VLJXLHQWHV,QVWDODFLyQ*HQHUDO,QVWDODFLyQGH$XGLR,QVWDODFLyQGH9tGHR,QVWDODFLyQGH
3UHIHUHQFLDVH,QVWDODFLyQGH&RQWUDVHxD/DFDWHJRUtDVHOHFFLRQDGDOHRIUHFHUiORVGHWDOOHV
GHLQVWDODFLyQHQODSDQWDOOD
3UHVLRQH6(783
3UHVLRQHSDUDVHOHFFLRQDUODFDWHJRUtDUHVDOWDUOD\OXHJRSUHVLRQH(17(5
3UHVLRQH6(783SDUDVDOLUGHOPHQ~GHLQVWDODFLyQ
General
--General Setup Page-TV Display
Angle Mark
oSD Lang
Captions
Screen Saver
Hdcd
Last Memory
Normal /PS
Normal /LB
Wide
on
off
English
Spanish
Portuguese
on
off
on
off
off
X
X
LT/RT
Stereo
5.ch
on
off
Audio
--Audio Setup Page-Speaker Setup
Spdif Setup
Karaoke Setup
Large
Small
Large
Small
off
Downmix
Front Speaker
Center Speaker
Rear Speaker
Subwoofer
on
off
Spdif off
Spdif/Raw
Spdif/Pcm
Spdif output
Mic Setup
22
Large
Small
off
Mic Switch
Mic Vol
Echo Level
on
off
&yPRSHUVRQDOL]DUODVIXQFLRQHVFRQWLQXDFLyQ
Video
Dolby
--Dolby Digital Setup-Dual Mono
Dynamic
--Video Setup Page-Component
Stereo
L-Mono
R-Mono
Mix-Mono
Tv Mode
P-Scan
Interlace
High
Medium
Low
Sharpness
Brightness
FULL
3/4
/
/4
oFF
S-Video
Yuv
Contrast
-0~+0
-6~+6
3UHIHUHQFLD
--Preference Page-TV Type
Audio
Subtitle
Disc Menu
Parental
Password
Default
PAL
Multi
NTSC
English
French
Spanish
Chinese
Japanese
Korean
Russian
porluguese
others
English
French
Spanish
Chinese
Japanese
Korean
Russian
porluguese
others
English
French
Spanish
Chinese
Japanese
Korean
Russian
porluguese
off
others
KID SAFE
G
3 PG
4 PG-3
5 PG R
6R
7 NC-7
8 ADULT
Change
Reset
old Password
New Password
Confirm PWD
oK
/DFRQWUDVHxDSUHGHWHUPLQDGDHV
(OPHQ~GHLQVWDODFLyQHQSDQWDOODGHVDSDUHFHVLVHSUHVLRQDHOERWyQ6(783PLHQWUDVpVWH
VHHQFXHQWUHHQSDQWDOOD
/DVIXQFLRQHV\HOPHQ~HVWiQVXMHWRVDFDPELRVLQSUHYLRDYLVR
3DUDLQVWDODUODVSUHIHUHQFLDVHOHTXLSRGHEHHVWDUFRPSOHWDPHQWHGHWHQLGR
23
(VSHFL¿FDFLRQHV
5HSURGXFWRUVDOLGDVDFFHVRULRVLQFOXLGRV
Reproductor de video
)XHQWHGHHQHUJtD &RQVXPRGHHQHUJtD
3HVR
'LPHQVLRQHVH[WHUQDV
6LVWHPDGHVHxDO /iVHU Salidas
6DOLGDGHYtGHR
6DOLGDGH6YLGHR
6DOLGDGHDXGLR
DXGLRGLJLWDO
6DOLGDGHDXGLR
DXGLRDQiORJR
9+]
12 :
Alrededor de 2.5Kg
[[PP$$)
3$/176&
/iVHUVHPLFRQGXFWRUORQJLWXGGHEDQGDQP
9SS2KPLRVV\QFQHJDWLYRHQWUDGDWLSRSLQ[
<9SS2KPLRVV\QFQHJDWLYR
0LQL',1SLQ[&9SS2KPLRV
9SS2KPLRVHQWUDGDWLSRSLQ[
9UPV.2KPLRVHQWUDGDWLSRSLQ'HU,]T[
Accesorios incluidos
&DEOH$9DPDULOORURMREODQFR
&RQWUROUHPRWR
%DWHUtDV$$$
0DQXDOGHIXQFLRQDPLHQWR *XtDGHVROXFLyQGHSUREOHPDV
9HUL¿TXHORVLJXLHQWHSDUDHQFRQWUDUXQDSRVLEOHFRUUHFFLyQDOSUREOHPDDQWHVGHFRQWDFWDUVHFRQHOVHUYLFLRDOFOLHQWH
24
25