1
USER GUIDE
Cisco Small Business Pro
SPA 500 Series IP Phones
Model SPA 525G
FCC and IC Statement
Federal Communication Commission Interference Statement
This equipment has been tested and found to comply with the limits for a Class B
digital device, pursuant to Part 15 of the FCC Rules. These limits are designed to
provide reasonable protection against harmful interference in a residential
installation. This equipment generates, uses and can radiate radio frequency
energy and, if not installed and used in accordance with the instructions, may
cause harmful interference to radio communications. However, there is no
guarantee that interference will not occur in a particular installation. If this
equipment does cause harmful interference to radio or television reception, which
can be determined by turning the equipment off and on, the user is encouraged to
try to correct the interference by one of the following measures:
•
Reorient or relocate the receiving antenna.
•
Increase the separation between the equipment and receiver.
•
Connect the equipment into an outlet on a circuit different from that to which
the receiver is connected.
•
Consult the dealer or an experienced radio/TV technician for help.
FCC Caution: Any changes or modifications not expressly approved by the party
responsible for compliance could void the user's authority to operate this
equipment.
This device complies with Part 15 of the FCC Rules. Operation is subject to the
following two conditions:
1. This device may not cause harmful interference, and
2. This device must accept any interference received, including interference that
may cause undesired operation.
CCDE, CCENT, CCSI, Cisco Eos, Cisco HealthPresence, Cisco IronPort, the Cisco logo, Cisco Nurse Connect, Cisco Pulse, Cisco SensorBase, Cisco StackPower,
Cisco StadiumVision, Cisco TelePresence, Cisco Unified Computing System, Cisco WebEx, DCE, Flip Channels, Flip for Good, Flip Mino, Flipshare (Design), Flip
Ultra, Flip Video, Flip Video (Design), Instant Broadband, and Welcome to the Human Network are trademarks; Changing the Way We Work, Live, Play, and Learn,
Cisco Capital, Cisco Capital (Design), Cisco:Financed (Stylized), Cisco Store, Flip Gift Card, and One Million Acts of Green are service marks; and Access
Registrar, Aironet, AllTouch, AsyncOS, Bringing the Meeting To You, Catalyst, CCDA, CCDP, CCIE, CCIP, CCNA, CCNP, CCSP, CCVP, Cisco, the Cisco Certified
Internetwork Expert logo, Cisco IOS, Cisco Lumin, Cisco Nexus, Cisco Press, Cisco Systems, Cisco Systems Capital, the Cisco Systems logo, Cisco Unity,
Collaboration Without Limitation, Continuum, EtherFast, EtherSwitch, Event Center, Explorer, Follow Me Browsing, GainMaker, iLYNX, IOS, iPhone, IronPort, the
IronPort logo, Laser Link, LightStream, Linksys, MeetingPlace, MeetingPlace Chime Sound, MGX, Networkers, Networking Academy, PCNow, PIX, PowerKEY,
PowerPanels, PowerTV, PowerTV (Design), PowerVu, Prisma, ProConnect, ROSA, SenderBase, SMARTnet, Spectrum Expert, StackWise, WebEx, and the WebEx
logo are registered trademarks of Cisco Systems, Inc. and/or its affiliates in the United States and certain other countries.
All other trademarks mentioned in this document or website are the property of their respective owners. The use of the word partner does not imply a
partnership relationship between Cisco and any other company. (0910R)
© 2009 Cisco Systems, Inc. All rights reserved.
OL-18193-03
IMPORTANT NOTE
FCC Radiation Exposure Statement:
This equipment complies with FCC radiation exposure limits set forth for an
uncontrolled environment. This equipment should be installed and operated with
minimum distance 20cm between the radiator & your body.
This transmitter must not be co-located or operating in conjunction with any other
antenna or transmitter.
Industry Canada Statement
This device complies with RSS-210 of the Industry Canada Rules. Operation is
subject to the following two conditions:
1. This device may not cause harmful interference, and
2. This device must accept any interference received, including interference that
may cause undesired operation.
© 2009 Cisco Systems, Inc. All rights reserved.
OL-18193-03
Contents
FCC and IC Statement
2
Federal Communication Commission Interference Statement
2
IMPORTANT NOTE
3
Industry Canada Statement
3
Chapter 1: Getting Started
6
Overview of the Cisco SPA 525G IP Phone
Caring for Your Phone
Understanding Your Phone’s Lines and Buttons
Phone Components
Softkey Buttons
Using the Keypad and Buttons with Menus
7
8
9
9
11
14
Using Keypad Shortcuts
14
Using the Navigation Button
14
Entering Numbers and Text in Fields
15
Using Phone Hardware and Accessories
16
Using the Speakerphone
16
Using Wired and Wireless Headsets
16
Connecting the Headset
16
Connecting Bluetooth Headsets
17
Using a Headset with Your IP Phone
18
Switching Between the Handset/Headset/Speakerphone
During a Call
Chapter 2: Installing Your Phone
18
20
Before You Begin
21
Connecting the Handset
21
(Optional) Attaching the Desk Stand
23
(Optional) Mounting the Phone to the Wall
24
Connecting Your Phone’s Power
26
Cisco Small Business Pro IP Phone SPA 525G (SIP)
1
Contents
Connecting Your Phone to the Computer Network
27
Connecting Your Phone to the Wired Network
27
Connecting Your Phone to the Wireless Network
27
Determining Your Wireless Router Security Type
28
Using Wi-Fi Protected Setup with the Cisco SPA 525G
31
Manually Adding a Wireless Profile on the Cisco SPA 525G
32
Uploading Security Certificates to the Phone
34
Verifying Phone Startup
35
Upgrading Your Phone’s Firmware
35
Chapter 3: Using Basic Phone Functions
Placing or Answering a Call
Using Dial Assistance
Adjusting Call Volume and Muting
37
38
39
39
Adjusting Call Volume
39
Using Mute
39
Putting a Call on Hold
39
Resuming a Call
40
Ending a Call
40
Transferring Calls
40
Performing an Attended Transfer
40
Performing an Unattended (Blind) Transfer
41
Redialing
41
Viewing and Returning Missed Calls
42
Returning a Missed Call
42
Viewing a List of Missed Calls
42
Turning the Missed Calls Shortcut On and Off
43
Forwarding Calls
43
Forwarding Calls to a Single Number
44
Forwarding Calls When Your Phone is Busy
44
Forwarding Calls When You Don’t Answer the Phone
45
Cisco Small Business Pro IP Phone SPA 525G (SIP)
2
Contents
Delaying Call Forwarding When You Don’t Answer the Phone
45
Stopping Call Forwarding
45
Setting Do Not Disturb
45
Configuring Call Waiting
46
Picking Up a Call
47
Parking a Call
48
Placing a Three-Way Conference Call
49
Using the Phone Directories
50
Using Your Personal Address Book
50
Adding a New Contact
51
Copying a Contact
52
Searching for a Contact
52
Deleting a Contact
52
Editing a Contact
53
Using the Corporate Directory
53
Using the Call History Lists
54
Viewing the Call History Lists
54
Deleting a Call History List
55
Calling from the Call History Lists
55
Deleting an Entry from the Call History Lists
55
Saving a Call History List Number to Your Directory
56
Setting or Changing a Phone Password
Logging In and Logging Out of Your Phone
Accessing Voicemail
Chapter 4: Using Advanced Phone Features
Configuring Privacy and Security Features
56
57
57
59
60
Blocking Caller ID
60
Blocking Anonymous Calls
60
Using Secure Call
61
Enabling Dial Assistance
61
Connecting to a Virtual Private Network (VPN)
62
Cisco Small Business Pro IP Phone SPA 525G (SIP)
3
Contents
Creating and Using Speed Dials
63
Creating Speed Dials on Unused Line Buttons
64
Creating Numerical Speed Dials
64
Playing MP3 Files on Your Phone
65
Creating the Playlist
65
Playing Songs
66
Changing the Left and Right Channel for Stereo Headsets
67
Using the Paging Feature
68
Paging Another Phone
68
Paging a Group of Phones
68
Configuring Auto Answer
68
Customizing Your LCD Screen
69
Changing the LCD Screen Contrast
69
Setting the Screen Backlight Timer
69
Configuring the Phone Screen Saver
70
Changing the Phone Wallpaper
70
Using Ring Tones
71
Accessing Weather and News on Your Phone
72
Accessing Weather Information
72
Accessing News
73
Configuring Date and Time Parameters on Your Phone
74
Using Star Codes
75
Restarting Your Phone
77
Viewing Phone, Network, and Call Information
77
Viewing Phone Information
77
Viewing Network Information
78
Viewing Phone Line and Extension Information
78
Viewing Peripheral Status
79
Viewing the Wireless Connection Status
79
Advanced Menus for Technical Support Personnel
80
Cisco Small Business Pro IP Phone SPA 525G (SIP)
4
Contents
Chapter 5: Using the Web Interface
81
Logging in to the Web Interface
82
Configuring Your Address Book
82
Setting Do Not Disturb
83
Configuring Call Forwarding
84
Configuring Call Waiting
85
Blocking Caller ID
85
Blocking Anonymous Calls
86
Viewing Call History Lists
86
Creating Speed Dials
87
Configuring Wi-Fi
87
Configuring Bluetooth
88
Upgrading Firmware
89
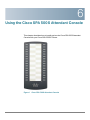
Chapter 6: Using the Cisco SPA 500S Attendant Console
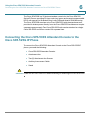
Connecting the Cisco SPA 500S Attendant Console to the
Cisco SPA 525G IP Phone
90
91
Connecting a Single Cisco SPA 500S
92
Connecting a Second Cisco SPA 500S
96
Configuring the Cisco SPA 500S
98
Using the Cisco SPA 500S
99
Monitoring the Cisco SPA 500S
99
Appendix A: Where to Go From Here
Cisco Small Business Pro IP Phone SPA 525G (SIP)
100
5
1
Getting Started
This chapter provides an overview of your Cisco SPA 525G IP phone. It contains
the following sections:
•
Overview of the Cisco SPA 525G IP Phone, page 7
•
Understanding Your Phone’s Lines and Buttons, page 9
•
Using the Keypad and Buttons with Menus, page14
•
Entering Numbers and Text in Fields, page15
•
Using Phone Hardware and Accessories, page16
NOTE The Cisco SPA 525G features vary, depending on the type of call control system
you are using. This document describes using the Cisco SPA 525G with a SIP
phone system, such as the Cisco SPA 9000 Voice System or a Broadsoft or
Asterisk system. If you are using the Cisco SPA 525G with a Cisco Unified
Communications 500 Series, see the Cisco Unified Communications Manager
Express for Cisco Small Business Pro IP Phone SPA 525G User Guide.
Cisco Small Business Pro IP Phone SPA 525G (SIP) User Guide
6
Getting Started
Overview of the Cisco SPA 525G IP Phone
1
Overview of the Cisco SPA 525G IP Phone
The Cisco SPA 525G IP Phone is a full-featured VoIP (Voice over Internet Protocol)
phone that provide voice communication over an IP network. It provides traditional
features, such as call forwarding, redialing, speed dialing, transferring calls,
conference calling and accessing voice mail. Calls can be made or received with a
handset, headset or speaker.
The Cisco SPA 525G phone is connected to the network through its Ethernet
connection or the built-in Wireless-G connection. If you are using the Wireless-G
connection, a separate power adapter (PA-100) is required. The Cisco SPA 525G
provides an additional Ethernet port that allows a computer to be connected to the
network through the IP phone. (This option is only available when phone is
connected to the network via the wired Ethernet connection).
Unlike traditional phones, the Cisco SPA 525G requires a separate power source.
Either connect your phone to an Ethernet switch that provides Power over Ethernet
(PoE), or use a separate power adapter (PA-100).
Cisco Small Business Pro IP Phone SPA 525G (SIP) User Guide
7
Getting Started
Overview of the Cisco SPA 525G IP Phone
1
The Cisco SPA 525G has a 320 x 240 color, 3.2" inch LCD screen and provides up
to five telephone extensions. It provides the following hardware features:
•
2 Ethernet 10/100 Mbps ports
•
802.3af Power over Ethernet support
•
USB 2.0 host port for connecting a USB memory device to play MP3 music
files
•
AUX port (to attach a Cisco SPA 500S attendant console)
•
Bluetooth capability for headset support
•
2.5mm stereo earphone jack for headset
•
Wireless-G client support
•
Kensington security slot support
Caring for Your Phone
The Cisco Small Business Pro IP phones are electronic devices that should not be
exposed to excessive heat, sun, cold or water. To clean the equipment, use a
slightly moistened paper or cloth towel. Do not spray or pour cleaning solution
directly onto the hardware unit.
Cisco Small Business Pro IP Phone SPA 525G (SIP) User Guide
8
1
Getting Started
Understanding Your Phone’s Lines and Buttons
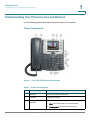
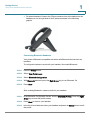
Understanding Your Phone’s Lines and Buttons
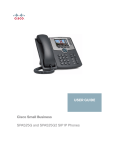
Use the following graphic and table to identify the parts of your phone.
Phone Components
Figure 1 Cisco SPA 525G Phone Components
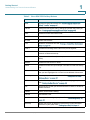
Table 1 IP Phone Components
#
Phone Feature
Description
1
Handset
Pick up to answer or place calls.
2
Speaker
Speaker for phone.
3
Message Waiting
Indicator
When lit:
Cisco Small Business Pro IP Phone SPA 525G (SIP) User Guide
•
•
Red—You have a new voice mail message.
Flashing Red—You have an incoming call.
9
1
Getting Started
Understanding Your Phone’s Lines and Buttons
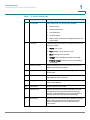
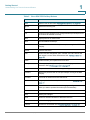
Table 1 IP Phone Components
#
Phone Feature
Description
4
LCD Screen
Your phone may vary, but typically displays:
•
•
•
•
•
5
Line keys
Date and time
Phone station name
Line extensions
Softkey options
Startup logo, screen saver, background photo, and
photo album
Indicates phone line status. Your phone may vary, but
typically, when lit:
•
•
•
•
•
Green: Line is idle.
Red (steady): Line is active or in use.
Red (blinking): Line is on hold.
Orange: Line is unregistered (cannot be used).
Flashing Orange: The phone is not connected to
the network.
6
Softkey buttons
Press a softkey button to perform the action on the
label on the LCD screen above.
7
Navigation button
Press in each direction to scroll through items on the
LCD screen.
8
Center Select button
Press this button to select the option or menu that is
highlighted on the LCD screen.
9
Messages button
Press to access voice mail (must be set up by your
phone administrator).
10
Hold button
Press to place a call on hold.
11
Setup button
Press to access the phone’s configuration menu to
configure features and preferences (such as your
directory and speed dials), access your call history,
and set up functions (such as call forwarding).
12
Mute button
Press to mute or unmute the phone. When the phone is
muted, the button glows red. A flashing red mute
button indicates that the phone has no network
connectivity.
Cisco Small Business Pro IP Phone SPA 525G (SIP) User Guide
10
1
Getting Started
Understanding Your Phone’s Lines and Buttons
Table 1 IP Phone Components
#
Phone Feature
Description
13
Volume button
Press + to increase the volume and press - to lower
the volume of the handset, headset, speaker (when
the handset is off hook), or ringer (when the handset is
on hook).
14
Headset button
Press to turn the headset on or off. When the headset
is on, the button glows green.
15
Speaker button
Press to turn the speaker on or off. When the speaker
is on, the button glows green.
16
Keypad
Press keys to dial phone numbers, enter letters, and
choose menu items.
Softkey Buttons
The phone displays four softkey buttons at a time on the LCD screen. Different
softkey buttons display depending on the phone screen or menu that is shown.
Press the Right Arrow or Left Arrow keys to see additional softkeys.
The following table shows some of the typical Cisco SPA 525G softkey buttons
that are available (in alphabetical order). You may not have all of these softkey
buttons on your phone, and you may have additional buttons that are not listed
here. For example, your phone administrator may also provide custom softkey
buttons on your phone, such as buttons that provide a speed dial to a company
number, or that access a specialized program that runs on your phone. Contact
your phone administrator for more information.
Table 2
Cisco SPA 525G Softkey Buttons
Button
Function
Add
Adds a new item (for example, a new directory entry).
AddList
Creates a list (for example, of MP3 files to play).
Alpha
Press to enter alphabetic characters in a data entry field.
Answer
Answers an incoming call.
Back
Returns you to the previous screen.
Barge
Press to interrupt a call on a shared extension.
Cisco Small Business Pro IP Phone SPA 525G (SIP) User Guide
11
1
Getting Started
Understanding Your Phone’s Lines and Buttons
Table 2
Cisco SPA 525G Softkey Buttons
Button
Function
BXfer
Performs a blind call transfer. See “Performing an Unattended
(Blind) Transfer,” on page 41.
Call Rtn
Returns the last missed call by dialing the number that called you.
See “Viewing and Returning Missed Calls,” on page 42.
Clear
Deletes an entire text/number field.
Clr DND
Clears Do Not Disturb.
Clr Fwd
Clears Call Forward.
Conf
Initiates a conference call. See “Placing a Three-Way Conference
Call,” on page 49.
ConfLx
Conferences existing active calls on the phone together.
Connect
Connects to the selected item (for example, to the wireless
network or Bluetooth device).
Copy
Copies the selected item (for example, a contact in the Address
Book).
delChar
Deletes the last number or letter.
Delete
Deletes an entire item (for example, a number from the Call History
list).
Dial
Dials the string of numbers that you have entered, or the number
that you have highlighted in a list such as the Missed Calls screen.
Directory
Access your personal address book. See “Using Your Personal
Address Book,” on page 50.
DND
Do Not Disturb; prevents incoming calls from ringing your phone.
See “Setting Do Not Disturb,” on page 45.
Edit
Opens an item so that you can edit numbers or letters, or enable or
disable a feature.
EditDial
Edits a number before dialing.
End Call
Disconnects a call.
Forward
Forwards calls coming to your phone. See “Forwarding Calls,” on
page 43.
GrPickup
Allows you to pick up (answer) a call at that is ringing at another
extension in your group. See “Picking Up a Call,” on page 47.
Cisco Small Business Pro IP Phone SPA 525G (SIP) User Guide
12
1
Getting Started
Understanding Your Phone’s Lines and Buttons
Table 2
Cisco SPA 525G Softkey Buttons
Button
Function
Hold
Places a call on hold. See “Putting a Call on Hold,” on page 39.
Ignore
Ignores an incoming call.
Join
Connects a conference call.
List
In some menus, shows a list of configured items (for example, a list
of locations for weather or news).
Miss
Displays the list of missed calls.
More
Access additional softkeys.
Next
Moves to the next item in a list (for example, a song in the MP3
Playlist).
Option
Enters a sub-menu.
Park
Parks a call at a designated “park” number. The call is active until
you unpark it, or the caller disconnects. See “Parking a Call,” on
page 48.
Paste
Pastes the item you copied into a list or field.
Pickup
Allows you to pick up (answer) a call that is ringing at another
extension. See “Picking Up a Call,” on page 47.
Play
Plays a selected item such as a song or a ringtone.
Previous
Moves to a previous item in a list (for example, a song in the MP3
Playlist).
PrivHold
Puts a call on hold on an active shared line.
Redial
Brings up the list of recently dialed numbers. See “Redialing,” on
page 41.
Refresh
Refreshes the screen. Useful after changing a configuration or
when you want to update information (such as weather).
Resume
Resumes a call that is on hold.
Save
Saves your changes.
Scan
Scans for wireless networks or Bluetooth devices.
Select
Selects the highlighted item on the LCD screen.
Transfer
Performs a call transfer. See “Transferring Calls,” on page 40.
Cisco Small Business Pro IP Phone SPA 525G (SIP) User Guide
13
1
Getting Started
Using the Keypad and Buttons with Menus
Table 2
Cisco SPA 525G Softkey Buttons
Button
Function
Unpark
Connects to a parked call. See “Parking a Call,” on page 48.
View
Displays more information about a selected item.
XferLX
Transfers existing active calls on the phone.
Using the Keypad and Buttons with Menus
You press a softkey button or other buttons to enter menus on the LCD screen.
Using Keypad Shortcuts
Use the keypad to enter the number of the menu or sub-menu item. For example,
to reach the Call History menu, press the Setup button and press 2.
NOTE Menus and options can change depending on the software release.
Using the Navigation Button
Use the navigation button to scroll up or down through the menu items, and then
press the Select softkey button or the center Select button to choose the
highlighted item.
Cisco Small Business Pro IP Phone SPA 525G (SIP) User Guide
14
1
Getting Started
Entering Numbers and Text in Fields
Entering Numbers and Text in Fields
Some fields on the IP phones require you to enter numbers and text using the
keypad and/or softkey buttons. In general, the following guidelines apply:
•
Use the keypad to enter numbers and characters, pressing the key multiple
times to select the correct number or letter.
•
Press the number key multiple times to move to a different letter under that
number. (For example, to enter “Mary,” you would press 6 five times rapidly
and then pause (for M); press 2 and then pause (for A), press 7 three times
rapidly (for r), then press 9 three times rapidly (for y).
Available characters are shown in the following table:
Key
Character Set
1
1/:\,!;$^|
2
abc2ABC
3
def3DEF
4
ghi4GHI
5
jkl5JKL
6
mno6MNO
7
pqrs7PQRS
8
tuv8TUV
9
wxyz9WXYZ
0
Space 0 ~ ? > ‘ < “
*
.@*&%[]_
#/P
#+-=(){}
Use the delChar softkey button to backspace and delete the last character.
Use the Option > Clear softkey button to remove the entire entry.
Cisco Small Business Pro IP Phone SPA 525G (SIP) User Guide
15
Getting Started
Using Phone Hardware and Accessories
1
Using Phone Hardware and Accessories
Using the Speakerphone
The SPA IP Phones provide a speakerphone. To use the speakerphone, press the
Speaker button (the handset can be either on or off hook).
Using Wired and Wireless Headsets
The SPA IP Phones support headsets from different manufacturers. For the latest
supported models, contact your reseller. Additional information can be found at
the manufacturer’s websites:
http://www.plantronics.com
http://www.jabra.com
Connecting the Headset
Each brand and type of headset may require different steps for connection.
Consult the documentation for your particular headset for more information. In
general, to connect a headset:
•
For Bluetooth headsets: See the ”Connecting Bluetooth Headsets” section on
page17.
•
For wireless, non-Bluetooth headsets (such as Plantronics or Jabra): Follow the
instructions for your product to connect the phone to the wireless headset
base.
Cisco Small Business Pro IP Phone SPA 525G (SIP) User Guide
16
Getting Started
Using Phone Hardware and Accessories
•
1
For wired headsets: Connect the 2.5mm connector from the headset into the
headset port on the right side of the IP phone as shown in the following
graphic:
Connecting Bluetooth Headsets
Your phone is Bluetooth compatible and works with Bluetooth devices such as
headsets.
To configure the phone to work with your headset, first enable Bluetooth:
STEP 1
Press the Setup button.
STEP 2
Select User Preferences.
STEP 3
Select Bluetooth Configuration.
STEP 4
With Bluetooth selected, press the Right Arrow key to turn Bluetooth On.
STEP 5
Press Save.
After enabling Bluetooth, create a profile for your headset:
STEP 1
In the Bluetooth Configuration screen, scroll to Bluetooth Profiles. Press the Right
Arrow key to enter the profile screen.
STEP 2
Press Scan to scan for your headset.
STEP 3
In the list of found devices, select your headset and press the Select button to edit
the profile.
Cisco Small Business Pro IP Phone SPA 525G (SIP) User Guide
17
1
Getting Started
Using Phone Hardware and Accessories
STEP 4
Scroll to PIN and enter the PIN for your Bluetooth headset.
STEP 5
Scroll to Connect Automatically and press the Right Arrow key to turn to On.
STEP 6
Press Connect. The profile screen displays and a check mark appears next to the
headset if the connection was successful.
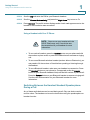
Using a Headset with Your IP Phone
NOTE: Steps to use your headset with the
SPA IP Phone may vary. Consult the user
documentation for your headset for more
information.
•
To use a wired headset, press the Headset button on your phone and dial
the number to place a call, or press the headset button to answer a ringing
call.
•
To use a non-Bluetooth wireless headset (such as Jabra or Plantronics), you
may need to lift the receiver off hook before speaking or listening through
the headset.
•
To use a Bluetooth headset, make sure your headset is powered on. Press
the Headset button on your phone (or, if supported, press the Answer
button on your Bluetooth headset twice) and dial the number to place a call.
Press the Answer button on your Bluetooth headset to answer a ringing call.
See the user documentation for your Bluetooth headset for more
information.
Switching Between the Handset/Headset/Speakerphone
During a Call
Any of these audio devices can be used during a call. Only one device can be
used at a time. The handset can be on the hook when using the speakerphone or
headset function.
Cisco Small Business Pro IP Phone SPA 525G (SIP) User Guide
18
Getting Started
Using Phone Hardware and Accessories
1
To switch from the handset to the speakerphone, press the Speakerphone button
and place the handset back on the hook.
To switch from the speakerphone to a headset, press the Headset button.
To switch from the speakerphone to the handset, pick up the handset.
To switch from the headset to the speakerphone, press the Speakerphone button.
Cisco Small Business Pro IP Phone SPA 525G (SIP) User Guide
19
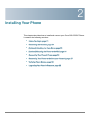
2
Installing Your Phone
This chapter describes how to install and connect your Cisco SPA 525G IP Phone.
It contains the following sections:
•
Before You Begin, page 21
•
Connecting the Handset, page 21
•
(Optional) Attaching the Desk Stand, page 23
•
(Optional) Mounting the Phone to the Wall, page 24
•
Connecting Your Phone’s Power, page 26
•
Connecting Your Phone to the Computer Network, page 27
•
Verifying Phone Startup, page 35
•
Upgrading Your Phone’s Firmware, page 35
Cisco Small Business Pro IP Phone SPA 525G (SIP) User Guide
20
2
Installing Your Phone
Before You Begin
Before You Begin
Before you install and connect your phone, verify with your System Administrator
(if applicable) that the network is ready for the phone, read the safety notices, and
make sure you have all the phone parts and documentation available.
NOTE: The RJ-11 port marked “AUX” is
reserved for connection with the Cisco SPA
500S Attendant Console that works with the
Cisco SPA 525G. It is not for use as a telephone
line port.
!
CAUTION: Do not plug a telephone line cord
into the port marked “AUX.”
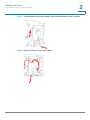
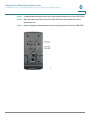
Connecting the Handset
STEP 1
Find the longer end of the coiled phone cord. Insert it into the back of the phone
base in the slot marked with a phone symbol. This port is labeled #5 on the Cisco
SPA 525G IP Phone Connections graphic.
STEP 2
Insert the short end of the handset cord into the jack at the bottom of the handset
(not shown).
Cisco Small Business Pro IP Phone SPA 525G (SIP) User Guide
21
2
Installing Your Phone
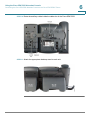
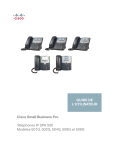
Connecting the Handset
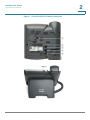
Figure 1 Cisco SPA 525G IP Phone Connections
Cisco Small Business Pro IP Phone SPA 525G (SIP) User Guide
22
2
Installing Your Phone
(Optional) Attaching the Desk Stand
Number
Component
1
Auxiliary port. Only for use with the Cisco SPA 500S attendant console.
2
Power port. Insert the power adapter plug into this port.
3
Additional Ethernet port. Connect an Ethernet cable to this port to provide
network connectivity to a PC. (This port cannot be used when the phone
is connected to the network via the built-in Wireless-G client.)
4
Switch (Ethernet) port. Connect the network cable to this port.
5
Phone cord slot. Insert one end of the phone cord into this slot and the
other into the jack at the bottom of the phone handset.
6
USB port. For use with an external USB memory device (optional).
(Optional) Attaching the Desk Stand
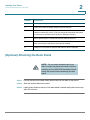
NOTE: Do not attach the desk stand if you
want to mount the phone to the wall. If you are
attaching a Cisco SPA 500S attendant console
attach the console before attaching the desk
stand.
STEP 1
Line up the tabs on the desk stand with the slots on the back of the phone.
STEP 2
Slide the bottom tabs into the slots
STEP 3
Lightly press down on the top of the desk stand. It should easily slide into the top
slots. Do not force.
Cisco Small Business Pro IP Phone SPA 525G (SIP) User Guide
23
Installing Your Phone
(Optional) Mounting the Phone to the Wall
2
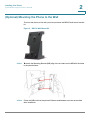
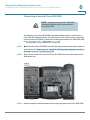
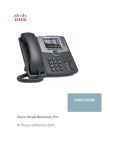
(Optional) Mounting the Phone to the Wall
To mount the phone to the wall, you must purchase the MB100 wall mount bracket
kit.
Figure 2
MB100 Wall Mount Kit
STEP 1
To attach the Mounting Bracket (MB), align the two cleats on the MB with the holes
in the phone’s base.
STEP 2
Orient the MB such that the phone’s Ethernet and handset ports are accessible
after installation.
Cisco Small Business Pro IP Phone SPA 525G (SIP) User Guide
24
Installing Your Phone
(Optional) Mounting the Phone to the Wall
2
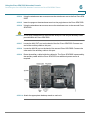
STEP 3
Push the MB onto the phone’s base. Slide the MB upwards to lock it in place.
STEP 4
Plug in the Ethernet and power cables.
Cisco Small Business Pro IP Phone SPA 525G (SIP) User Guide
25
2
Installing Your Phone
Connecting Your Phone’s Power
STEP 5
Hang onto screws mounted in the wall.
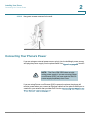
Connecting Your Phone’s Power
If you are using an external power source, plug it into the building’s power source,
and plug the power supply into the phone base. See Figure 1 on page 22, item #2.
NOTE: The Cisco SPA 525G does not ship
with a power supply. If you are not using Power
over Ethernet (PoE), you must order the PA-100
power supply separately from Cisco.
If you are using Power over Ethernet (PoE) to power the phone, the phone will
receive power when you connect an Ethernet cable from the phone’s WAN port to
a switch in your network that provides PoE. See the ”Connecting Your Phone to the
Wired Network” section on page 27.
Cisco Small Business Pro IP Phone SPA 525G (SIP) User Guide
26
2
Installing Your Phone
Connecting Your Phone to the Computer Network
Connecting Your Phone to the Computer Network
Connecting Your Phone to the Wired Network
You connect your phone to the local network by using an Ethernet cable:
STEP 1
Plug the Ethernet cable into the back of the base station into the slot marked “SW.”
This port is labeled #4 on Figure 1 on page 22.
STEP 2
Plug the other end of the Ethernet cable into the appropriate device on your
network, such as a network switch.
NOTE: The Cisco SPA 525G provides a
second Ethernet port. You can connect a PC to
this port to provide network access to the PC.
This port is labeled #3 in the Cisco SPA 525G
IP Phone Connections graphic. This port cannot
be used when the phone is connected to the
network via the built-in Wireless-G client.
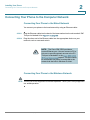
Connecting Your Phone to the Wireless Network
NOTE The PC port is not supported in wireless operation. The PC port is only supported
in a wired operation.
Cisco Small Business Pro IP Phone SPA 525G (SIP) User Guide
27
Installing Your Phone
Connecting Your Phone to the Computer Network
2
The Cisco SPA 525G phone supports a direct connection to the wireless network.
Before setting up the wireless network, you need to know the wireless security
type for your router. The Cisco SPA 525G works with the following security types:
•
WEP—Wired Equivalent Privacy. With this type of security, you need to
enter a 64 or 128-bit key on the phone (or a more easily remembered
passphrase to generate the key). The phone then authenticates with your
router to provide a secure connection.
•
WPA—Wi-Fi Protected Access. The Cisco SPA 525G supports WPA PSK,
WPA2 PSK, WPA Enterprise, and WPA2 Enterprise. With this type of
security, you will at the very minimum be required to enter a password on
the phone. The phone then authenticates with your router to provide a
secure connection.
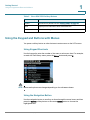
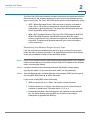
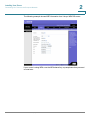
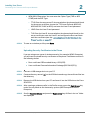
Determining Your Wireless Router Security Type
If you do not know your wireless router security type, you need to log in to the
router interface to get this information. The steps below are written for a Linksys
router, but procedures for other routers should be similar.
STEP 1
Log in to your wireless router’s web interface using a web browser. Your computer
must be connected to your wireless network. Enter the IP address of the wireless
router in the browser toolbar.
STEP 2
If required, enter the user name and password. (By default, Linksys routers
typically use “admin” for the user name and “admin” for the password.)
STEP 3
View the Wireless tab or window. Note the network name (SSID) and the type of
security (WEP, WPA Personal, or WPA2 Personal).
If your router is using WEP, note the following:
•
WEP encryption: 64 bit or 128 bit. You need to choose this later.
•
Default transmit key, or TX key: The default key (of the 4) that the router
transmits to authenticate. This value will be 1, 2, 3, or 4.
•
Passphrase and keys: You choose one of two methods to enter the WEP
key. You either directly enter the WEP key, or enter a more simple
passphrase to generate the WEP key.
Cisco Small Business Pro IP Phone SPA 525G (SIP) User Guide
28
Installing Your Phone
Connecting Your Phone to the Computer Network
2
The following example shows WEP information for a Linksys WRV200 router:
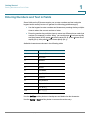
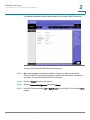
If your router is using WPA, note the WPA shared key, or passphrase that you need
to enter later.
Cisco Small Business Pro IP Phone SPA 525G (SIP) User Guide
29
Installing Your Phone
Connecting Your Phone to the Computer Network
2
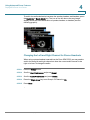
The following example shows WPA information for a Linksys WRT160N router:
To set up the Cisco SPA 525G wireless connection:
STEP 1
If you have plugged in an Ethernet cable to connect the phone to the wired
network, remove it and reboot the phone. If an Ethernet connection is present on
the phone, it is used instead of the Wi-Fi connection.
STEP 2
Press the Setup button on your phone.
STEP 3
Scroll to Network Configuration and press Select.
STEP 4
In the Wi-Fi field, press the Left or Right Arrow key to turn Wi-Fi On. Press the Save
softkey.
Cisco Small Business Pro IP Phone SPA 525G (SIP) User Guide
30
Installing Your Phone
Connecting Your Phone to the Computer Network
STEP 5
2
Scroll to Wi-Fi Configuration and press the Right Arrow key. Choose one of the
following options:
•
Wireless Profile—Use this option to add a new wireless profile (either
manually or by scanning for available networks), edit an existing wireless
profile, or connect to a previously configured network. See Manually Adding
a Wireless Profile on the Cisco SPA 525G, page 32.
•
Wi-Fi Protected Setup—If your wireless router supports Wi-Fi Protected
Setup, use this method to set up your wireless connection. See Using Wi-Fi
Protected Setup with the Cisco SPA 525G, page 31.
Using Wi-Fi Protected Setup with the Cisco SPA 525G
If your router has a WPS button, you can use Wi-Fi Protected
Setup to add a new wireless network profile.
STEP 1
In the Wireless Configuration window, select Wi-Fi Protected Setup.
STEP 2
Choose one of the following options:
Push Button Configuration:
a. Press the WPS button on your router.
b. On your phone, with Push Button Configuration highlighted, press Select. Your
phone may reboot before the Wi-Fi connection is working.
PIN Configuration
a. After selecting PIN Configuration on your phone, note the PIN displayed.
b. Connect to your router’s web interface using a web browser. Your computer
must be connected to your wireless network. Enter the IP address of the
wireless router in the browser address bar.
c. If required, enter the user name and password. (By default, Linksys routers
typically use “admin” for the user name and “admin” for the password.)
d. View the Wireless tab or window. Locate the Wireless Protected Setup
configuration menu.
Cisco Small Business Pro IP Phone SPA 525G (SIP) User Guide
31
Installing Your Phone
Connecting Your Phone to the Computer Network
2
e. Enter the PIN into the field that allows you to setup wireless devices using a
PIN.
f.
Save your changes.
g. On the Cisco SPA 525G, with PIN Configuration highlighted, press Select. To
add the connection as a profile, press OK. Your phone may reboot before the
Wi-Fi connection is working.
Manually Adding a Wireless Profile on the Cisco SPA 525G
To add a new wireless network profile:
STEP 1
In the Network Configuration screen, ensure Wi-Fi is enabled.
STEP 2
Scroll to Wi-Fi Configuration. Press the Right Arrow key to enter the Wi-Fi
Configuration screen.
STEP 3
Select Wireless Profile. Any previously configured wireless profiles are displayed.
STEP 4
Do one of the following:
•
Scan for available networks. See Scanning for Available Networks, page 32.
•
Manually add the network. See Manually Adding a Network, page 33.
Scanning for Available Networks
NOTE If your router has SSID (router name) broadcast disabled, it may not appear in the
list of networks. In that case, you need to manually add it (see Manually Adding a
Network, page 33).
STEP 1
In the Wireless Profile screen, press Scan.
STEP 2
In the list of available networks, scroll to the desired network and click Add to
select the highlighted network.
Cisco Small Business Pro IP Phone SPA 525G (SIP) User Guide
32
Installing Your Phone
Connecting Your Phone to the Computer Network
STEP 3
2
(Optional) Press the Right Arrow key under Security Mode to set the security
options:
•
WEP—Wired Equivalent Privacy: You must enter the Default Transmit Key,
Key Type and Length, and the keys.
•
WPA PSK or WPA2 PSK: You must enter the Cipher Type (TKIP or AES
CCMP) and the shared key.
•
WPA/WPA2 Enterprise: This type of authentication requires some
advanced expertise because it involves setting up a radius server for
authentication and, in some cases, creation of certificates for both the
radius server and the phone. See
You must enter the Cipher Type (TKIP or AES CCMP) and the EAP Type:
STEP 4
-
TTLS—Enter the anonymous ID, choose whether the phone should
check for the server certificate, choose the TTLS Inner Protocol
(MSCHV2, MSCHAP, PAP, CHAP, or MD5), and enter the User ID and
password.
-
LEAP—Enter the User ID and password.
-
TLS—Enter the User ID, choose whether the phone should check for the
server certificate, enter the User ID, and configure the Root certificate
and User certificate (see the ”Uploading Security Certificates to the
Phone” section on page 34).
To save as a wireless profile, press Save.
Manually Adding a Network
STEP 1
From the Wireless Profile screen, press Option and select Add New to manually
add the network.
STEP 2
(Optional) Press the Right Arrow key under Security Mode to set the security
options:
•
WEP—Wired Equivalent Privacy: You must enter the Default Transmit Key,
Key Type and Length, and the keys.
•
WPA PSK or WPA2 PSK: You must enter the Cipher Type (TKIP or AES
CCMP) and the shared key.
Cisco Small Business Pro IP Phone SPA 525G (SIP) User Guide
33
Installing Your Phone
Connecting Your Phone to the Computer Network
•
STEP 3
2
WPA/WPA2 Enterprise: You must enter the Cipher Type (TKIP or AES
CCMP) and the EAP Type:
-
TTLS: Enter the anonymous ID, choose whether the phone should check
for the server certificate, choose the TTLS Inner Protocol (MSCHV2,
MSCHAP, PAP, CHAP, or MD5), and enter the User ID and password.
-
LEAP: Enter the User ID and password.
-
TLS: Enter the User ID, choose whether the phone should check for the
server certificate, enter the User ID, and configure the Root certificate
and User certificate (see the ”Uploading Security Certificates to the
Phone” section on page 34).
To save as a wireless profile, press Save.
Uploading Security Certificates to the Phone
If you are using some types of wireless security (for example, WPA2 Enterprise),
you will need to upload security certificates to the phone. Certificates must be in
the following format:
•
Root certificate: DER encoded binary x.509 (CER)
•
User certificate: Personal Information Exchange (PKCS#12(.PFX))
STEP 1
Connect a USB storage device to your PC.
STEP 2
Create a directory named “ca” on the USB device and copy the certificate files into
that directory.
STEP 3
Remove the USB device from your PC and insert it into the USB slot on the Cisco
SPA 525G.
STEP 4
After creating a wireless profile, in the Profile screen, press the Right Arrow key
under Security Mode to set the security options (WPA Enterprise or WPA2
Enterprise).
STEP 5
Scroll to Root Certificate and press the Right Arrow key. All files in the “ca” folder
are displayed.
Cisco Small Business Pro IP Phone SPA 525G (SIP) User Guide
34
2
Installing Your Phone
Verifying Phone Startup
STEP 6
Use the Up Arrow or Down Arrow key to choose the certificate you want to install
(for example, the root certificate). Press the Select softkey.
STEP 7
Press Save to save the profile.
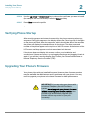
Verifying Phone Startup
After receiving power and network connectivity, the phone executes a boot-up
sequence. During this sequence, the display shows the Cisco logo. All of the lights
on the phone will flash. After the sequence, which should take about five seconds,
the phone will display the standard menu for the phone. The date, name and
number of the phone appear on the top line of the LCD screen. At the bottom of the
LCD screen, softkeys appear over their associated soft buttons.
If the phone does not display this screen, confirm your installation and
connections. If these are correct, try unplugging the phone and plugging it back in
again. If you still don’t see the display, then contact your Phone Administrator or
Internet Telephony Service Provider (ITSP).
Upgrading Your Phone’s Firmware
Your phone ships with pre-installed firmware. However, later firmware versions
may be available that add features and fix problems with your phone. You may
need to upgrade your phone to the latest firmware for ideal performance.
!
IMPORTANT: If you are using your phone with
an Internet Telephony Service Provider’s
system, do not upgrade your phone’s firmware
without consulting your service provider. Your
provider may automatically upgrade your
phones without any action on your part
necessary.
Cisco Small Business Pro IP Phone SPA 525G (SIP) User Guide
35
2
Installing Your Phone
Upgrading Your Phone’s Firmware
There are two ways to upgrade your phone’s firmware:
•
Download the firmware to your PC and log in to the web interface to run the
upgrade procedure. See the ”Upgrading Firmware” section on page 89.
•
Upgrade using the Cisco SPA 9000 Voice System Setup Wizard (if your
phone is part of a Cisco SPA 9000 Voice System network). See the Cisco
SPA 9000 Voice System Setup Wizard User Guide.
Cisco Small Business Pro IP Phone SPA 525G (SIP) User Guide
36
3
Using Basic Phone Functions
This chapter describes how to use the basic functions of your Cisco SPA 525G IP
phone. It includes the following sections:
•
Placing or Answering a Call, page 38
•
Adjusting Call Volume and Muting, page 39
•
Putting a Call on Hold, page 39
•
Resuming a Call, page 40
•
Ending a Call, page 40
•
Transferring Calls, page 40
•
Redialing, page 41
•
Viewing and Returning Missed Calls, page 42
•
Turning the Missed Calls Shortcut On and Off, page 43
•
Forwarding Calls, page 43
•
Setting Do Not Disturb, page 45
•
Picking Up a Call, page 47
•
Parking a Call, page 48
•
Placing a Three-Way Conference Call, page 49
•
Using the Phone Directories, page 50
•
Using the Call History Lists, page 54
•
Setting or Changing a Phone Password, page 56
•
Accessing Voicemail, page 57
Cisco Small Business Pro IP Phone SPA 525G (SIP) User Guide
37
3
Using Basic Phone Functions
Placing or Answering a Call
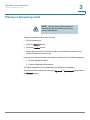
Placing or Answering a Call
NOTE: You may have to dial a number or
numbers to reach an outside line. Ask your
system administrator.
To place or answer a call, do one of these:
•
Pick up the receiver.
•
Press the Speaker button.
•
Press the Headset button.
•
Press a green line button (to place a call) or a red flashing line button or the
Answer softkey (to answer a call).
If you are on a call and another call comes in, choose one of the following options:
•
Press the Answer softkey.
•
Press the flashing red line button.
The call in progress is put on hold and the incoming call is answered.
To return to the first call, select it using the Up Arrow or Down Arrow key and press
the Resume softkey.
Cisco Small Business Pro IP Phone SPA 525G (SIP) User Guide
38
Using Basic Phone Functions
Adjusting Call Volume and Muting
3
Using Dial Assistance
If dial assistance is enabled, when placing calls, you’ll see a list of closely-matched
phone numbers on the screen after you begin dialing. If you want to choose one of
these numbers:
STEP 1
Use the navigation button to scroll down and highlight a phone number on the LCD
screen.
STEP 2
Press the Select button or Dial to complete the call.
See “Enabling Dial Assistance,” on page 61 for more information on enabling this
feature.
Adjusting Call Volume and Muting
Adjusting Call Volume
To adjust the volume while you are on a call, press + on the Volume button to
increase the volume, or press - to decrease the volume. Press Save.
Pressing the Volume button while not on a call adjusts the volume of the phone’s
ringer.
Using Mute
To mute the phone microphone, speaker, or headset microphone, press the Mute
button on the phone. The button lights red. Press the Mute button again to unmute.
Putting a Call on Hold
To put a call on hold, press the Hold button. A series of beeps indicates the call is
on hold.
Cisco Small Business Pro IP Phone SPA 525G (SIP) User Guide
39
3
Using Basic Phone Functions
Resuming a Call
Resuming a Call
To resume the call, press the flashing red line button for the call. If you have
multiple calls, all calls are put on hold except the active call.
Ending a Call
To end a call:
•
If you are using the handset, hang up.
•
If you are using the speakerphone, press the Speaker button.
•
If you are using the headset, either press the Headset button (wired) or replace
the receiver (wireless).
Transferring Calls
You can perform two types of transfers:
•
Attended—You call the person to whom you are transferring the call and
speak to them before transferring the call.
•
Blind—You transfer the call without speaking to the other party to which you
are transferring the call.
Performing an Attended Transfer
STEP 1
During an active call, or a call on hold, press Transfer.
STEP 2
Either:
STEP 3
•
Enter the number to which you want to transfer the call; or
•
Press Directory and either choose a number from the personal directory.
Press Dial or wait a few seconds. The call is placed on hold and a new line is
opened to dial the number.
Cisco Small Business Pro IP Phone SPA 525G (SIP) User Guide
40
3
Using Basic Phone Functions
Redialing
STEP 4
Do one of the following:
•
To transfer the call without waiting for the other person to answer, press
Transfer after the call begins to ring and hang up. If you hang up before the
second call rings, the transfer fails and the first call is disconnected. If you
misdial, press the second line button again to receive a dial tone.
•
To transfer after speaking privately to the other person, press Transfer at
any time during the conversation.
Performing an Unattended (Blind) Transfer
STEP 1
During an active call, press BXfer.
STEP 2
Enter the number to which you want to transfer the call and press Dial. The call is
transferred with no further action required on your part.
Redialing
To redial a number:
STEP 1
Press the Redial button and select the desired number.
STEP 2
(Optional) Press EditDial to select a number and modify it (for example, to add an
area code).
STEP 3
Lift the handset or press Dial to select a number. The number is automatically
dialed.
Cisco Small Business Pro IP Phone SPA 525G (SIP) User Guide
41
3
Using Basic Phone Functions
Viewing and Returning Missed Calls
Viewing and Returning Missed Calls
The LCD screen on your IP phone notifies you if a call came in that was
unanswered. (You can also turn off this feature - see the ”Turning the Missed Calls
Shortcut On and Off” section on page 43.)
Returning a Missed Call
To return a missed call:
•
If the LCD screen shows a missed call, press the Call Rtn button to return the
call.
•
If the LCD screen does not show a missed call, you can return a call from the
Missed Call list. See ”Viewing a List of Missed Calls” on page 42. Choose the
call you want to return and press Dial.
NOTE: If the call was from a long distance
number, you may have to edit the call before
returning it. Press the Edit button to edit the call
and use the softkey buttons and keypad to edit
the number.
Viewing a List of Missed Calls
To view a list of all missed calls:
•
If the LCD screen shows a missed call, press the Missed softkey to view a list
of missed calls.
•
If the LCD screen does not show a missed call:
a. Press the Setup button.
b. Scroll to Call History and press Select.
Cisco Small Business Pro IP Phone SPA 525G (SIP) User Guide
42
Using Basic Phone Functions
Turning the Missed Calls Shortcut On and Off
3
c. Scroll to Missed Calls and press Select. You can do one of the following:
•
Press Dial to dial the number that called you.
•
Press EditDial to edit the number before calling it, then press Dial.
•
Press the Option softkey and choose one of the following:
-
Delete Entry—Delete the entry from the Missed Calls list.
-
Delete List—Delete all entries from the Missed Calls list.
-
Add to Address Book—Add the entry to your personal address book.
Turning the Missed Calls Shortcut On and Off
This option controls the Missed Call notification that appears on your LCD screen
when you miss a call. To access this option:
STEP 1
Press the Setup button.
STEP 2
Scroll to User Preferences and press Select.
STEP 3
Select Call Preferences.
STEP 4
Scroll to Miss Call Shortcut.
STEP 5
Press the Right Arrow key to turn the feature on and press the Save softkey.
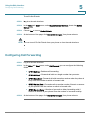
Forwarding Calls
You can forward all calls, forward calls when the phone is busy or forward calls
when there is no answer. You can also set call forwarding options from your PC
using the IP Phone Web Interface; see the ”Configuring Call Forwarding” section
on page 84.
To forward calls:
STEP 1
Press the Setup button.
STEP 2
Scroll to User Preferences and press Select.
Cisco Small Business Pro IP Phone SPA 525G (SIP) User Guide
43
Using Basic Phone Functions
Forwarding Calls
3
STEP 3
Select Call Preferences.
STEP 4
Under Call Forwarding, press the Right Arrow key to turn call forwarding on and
press the Save softkey.
See the following sections for information on the types of call forwarding.
Forwarding Calls to a Single Number
STEP 1
In the Call Preferences screen, scroll to Forward All Number.
STEP 2
Enter a number to which to forward all calls; for example, your voice mailbox,
another extension, or an outside line. If forwarding calls to an outside line, be sure
to enter any access and area codes required.
TIP
STEP 3
If you need to enter a URL, press Option and choose Input IP before entering the call
forwarding information.
Press Save.
Forwarding Calls When Your Phone is Busy
STEP 1
In the Call Preferences screen, scroll to Forward Busy Number.
STEP 2
Enter “vm” for voice mail, or a number to which to forward all calls; for example,
another extension, or an outside line. If forwarding calls to an outside line, be sure
to enter any access and area codes required.
STEP 3
Press Save.
Cisco Small Business Pro IP Phone SPA 525G (SIP) User Guide
44
Using Basic Phone Functions
Setting Do Not Disturb
3
Forwarding Calls When You Don’t Answer the Phone
STEP 1
In the Call Preferences screen, scroll to Forward No Ans Number.
STEP 2
Enter “vm” for voice mail, or a number to which to forward all calls; for example,
another extension, or an outside line. If forwarding calls to an outside line, be sure
to enter any access and area codes required.
STEP 3
Press Save.
Delaying Call Forwarding When You Don’t Answer the Phone
STEP 1
In the Call Preferences screen, scroll to Forward No Ans Delay.
STEP 2
Enter the number of seconds to delay forwarding calls, if there is no answer at your
phone.
STEP 3
Press Save.
Stopping Call Forwarding
To stop forwarding calls:
STEP 1
Under Call Forwarding, press the Right Arrow key to turn call forwarding Off.
STEP 2
Press the Save softkey.
Setting Do Not Disturb
Use the Do Not Disturb feature to prevent incoming calls from ringing your phone.
If you have voice mail configured, incoming callers immediately reach voice mail. If
voice mail is not configured, callers hear a busy signal or message.
You can also set Do Not Disturb from your PC using the IP Phone Web Interface;
see the ”Setting Do Not Disturb” section on page 83.
Cisco Small Business Pro IP Phone SPA 525G (SIP) User Guide
45
Using Basic Phone Functions
Configuring Call Waiting
3
To set Do Not Disturb, choose one of the following options:
•
Press the Do Not Disturb softkey on your phone. The LCD screen indicates that
Do Not Disturb is turned on for your phone; or
•
Press the Setup button and select User Preferences. Then:
STEP 1
Choose Call Preferences.
STEP 2
Scroll to Do Not Disturb.
STEP 3
Press the Right Arrow key to turn Do Not Disturb on.
STEP 4
Press Save.
To turn off Do Not Disturb, choose one of the following options:
•
Press the Clr DND softkey on your phone; or
•
Press the Setup button and select User Preferences. Then:
STEP 1
Choose Call Preferences.
STEP 2
Scroll to Do Not Disturb.
STEP 3
Press the Right Arrow key to turn Do Not Disturb Off.
STEP 4
Press Save.
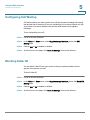
Configuring Call Waiting
Call waiting alerts you when you are on a call with a status message and ringing
that another call is incoming. If you turn call waiting off, incoming calls do not ring
your phone if you are on another call, and the caller hears a busy signal or
message.
To turn call waiting on or off:
STEP 1
Press the Setup button.
STEP 2
Scroll to User Preferences and press Select.
Cisco Small Business Pro IP Phone SPA 525G (SIP) User Guide
46
Using Basic Phone Functions
Picking Up a Call
3
STEP 3
Select Call Preferences.
STEP 4
Scroll to Call Waiting and press the Right Arrow key to turn call waiting On or Off.
STEP 5
Press Save.
Picking Up a Call
You can pick up a call that is ringing at another extension. Depending on the way
your phone network is configured, you can pick up a call ringing at any extension,
or you may have a group of phones configured where members of the group can
pick up a call ringing at any group member’s phone.
To pick up a call ringing at an extension in your group:
STEP 1
Press GrPickup. The phone displays any extensions in the group that have ringing
calls.
STEP 2
Choose the call you want to pick up and press Dial.
To pick up a call ringing at any extension:
STEP 1
Press the Pickup button.
STEP 2
Enter the extension number of the phone from which you are picking up the call
and press Dial.
STEP 3
Select the call from the list and press Dial again.
Cisco Small Business Pro IP Phone SPA 525G (SIP) User Guide
47
Using Basic Phone Functions
Parking a Call
3
Parking a Call
You can “park” a call on a designated line so that another person in your company
can pick up the call. The call is active until it is “unparked” or the caller hangs up.
NOTE Not all phone systems support call park. If this feature is not working, check with
your system administrator.
To park a call:
STEP 1
While on an active call, press the Park button.
STEP 2
Enter a number to identify the park line and press Dial. The park line number does
not correspond with an actual phone extension number. You can pick any easilyremembered number. The call is then parked on that line, and the caller hears “on
hold” music or messages.
STEP 3
You or another person must then “unpark” the call.
To unpark a call, you can either use the Unpark button (if you know the park line
number), or view a list of parked calls and unpark it from the list.
To unpark if you know the park line number:
STEP 1
Press the Unpark button.
STEP 2
Enter the number identifier of the park line (for example, the number that was
entered in Step 2 of “parking a call.”)
STEP 3
Press Dial. The call is picked up on your phone.
Cisco Small Business Pro IP Phone SPA 525G (SIP) User Guide
48
Using Basic Phone Functions
Placing a Three-Way Conference Call
3
To view a list of parked calls (and unpark from the list):
STEP 1
Press the Setup button.
STEP 2
Select Status.
STEP 3
Scroll to Call Park Status and press Select.
STEP 4
Choose the parked call you want to retrieve and press Unpark.
Placing a Three-Way Conference Call
To initiate a conference call:
STEP 1
Press the Conf button during an active call. The first call is placed on hold, a
second line is opened, and you hear a dial tone.
STEP 2
Dial the second person’s telephone number.
STEP 3
Press the Conf button again. All three parties are connected in the conference call.
When you hang up, the other two parties are disconnected. To keep the other
parties in a call, but disconnect yourself from the call, press Join.
To conference two active calls on your phone:
STEP 1
On one of the active calls, press ConfLx. If you have two active lines, the calls are
conferenced. If you have more than two active lines, you must scroll to choose the
line you want to conference in.
STEP 2
Press Select.
Cisco Small Business Pro IP Phone SPA 525G (SIP) User Guide
49
3
Using Basic Phone Functions
Using the Phone Directories
Using the Phone Directories
The Cisco SPA 525G IP phone provides several different types of phone
directories, depending on the phone model and what the system administrator has
set up for the company.
In general, the phones provide the following types of directories:
•
Personal Address Book—The personal directory provides a place for you to
store and view frequently dialed numbers. You can also dial numbers from
the directory.
•
Corporate Directories—Depending on your phone network configuration,
you may have one or more of the following directories available:
-
Corporate Directory (XML)
-
Corporate Directory
-
Directory using Lightweight Directory Access Protocol (LDAP)
Using Your Personal Address Book
To access the Phone Directory, press the Directory button, or press the Setup
button, select Directories, and select Personal Address Book.
You have the following options in the Address Book:
•
Options—Press Options and choose one of the following:
-
Search—Search for a name.
-
Delete—Delete a contact.
-
Copy—Copy a contact.
-
Paste—Paste a contact.
-
Edit Dial—Edit a contact’s number before dialing.
•
Dial—Press to dial a highlighted contact.
•
Add—Choose to add a new contact.
Use the Down Arrow key to scroll through entries in the address book. Use the
Right Arrow key to scroll through the phone numbers available for the highlighted
contact.
Cisco Small Business Pro IP Phone SPA 525G (SIP) User Guide
50
Using Basic Phone Functions
Using the Phone Directories
3
You can also view and edit the directory from your PC using the IP Phone Web
Interface. See the ”Configuring Your Address Book” section on page 82.
Adding a New Contact
To add a new entry to the directory:
STEP 1
In the Personal Address Book screen, press Add.
STEP 2
Use the keypad to enter the name of the directory entry. When finished with the
name, use the Down Arrow key to navigate to the other fields.
TIP
To enter numbers and letters, press Option and select Input All. To enter only
numbers, press Option and select Input Num. To clear all characters from an entry,
press Option and select Clear.
STEP 3
Enter the office, mobile, or home phone number, including any digits you must dial
to access an outside line and the appropriate area code, if necessary. You must
enter at least one phone number for a contact.
TIP
To enter numbers and letters, press Option and choose Input All. To enter only
numbers, press Option and select Input Num. To enter an IP address, press Option
and select Input IP. To enter a star code, press Option and select Input Star Code.
(See “Using Star Codes,” on page 75.) To clear all characters from an entry, press
Option and select Clear.
STEP 4
(Optional) To change the ring tone for the caller:
a. Press the Right Arrow key to enter the Select Ring Tone screen.
b. Scroll through the available ring tones.
c. Press the Play button to play the selected ring tone or the Select button to
assign that ringtone to the person whose number you are adding to the
directory.
STEP 5
Press Save to save the entry.
Cisco Small Business Pro IP Phone SPA 525G (SIP) User Guide
51
Using Basic Phone Functions
Using the Phone Directories
3
Copying a Contact
You can copy a contact to create a new contact, changing information as
necessary on the second contact. To copy a contact:
STEP 1
In the Personal Address Book screen, scroll to highlight a contact.
STEP 2
Press Option and select Copy.
STEP 3
Press Option again and select Paste.
STEP 4
Edit any necessary fields and press Save.
Searching for a Contact
To search for a contact:
STEP 1
In the Personal Address Book screen, press Option and select Search.
STEP 2
Begin to enter the person’s name. The list below displays entries as you type in
characters. Scroll to highlight the entry you want.
You can press Dial to call the contact, or Option to delete, copy, or edit the contact.
Deleting a Contact
To delete a contact:
STEP 1
In the Personal Address Book screen, highlight the contact you want to delete.
STEP 2
Press Option and select Delete.
STEP 3
Press OK to delete the contact.
Cisco Small Business Pro IP Phone SPA 525G (SIP) User Guide
52
3
Using Basic Phone Functions
Using the Phone Directories
Editing a Contact
To edit a contact’s phone information:
STEP 1
In the Personal Address Book screen, highlight the contact you want to edit.
STEP 2
Choose one of the following:
Press the center Select button to choose the contact and edit the numbers in the
entry. Use the delChar key to delete numbers individually, or press Option and
choose Clear to delete all numbers and start over.
Press Save when finished.
Using the Corporate Directory
NOTE: Depending on your Internet Telephony
Service Provider or corporate network setup,
you may not have a corporate directory
available to you.
To use the corporate directory:
STEP 1
Press the Setup button and select Directories.
STEP 2
Scroll to the Corporate Directory you want to view and press Select.
To use the Lightweight Directory Access Protocol (LDAP) directory:
STEP 1
Press the Setup button and select Directories.
STEP 2
Scroll to the LDAP Directory and press Select.
Cisco Small Business Pro IP Phone SPA 525G (SIP) User Guide
53
3
Using Basic Phone Functions
Using the Call History Lists
STEP 3
STEP 4
Choose the type of search to perform and press Select:
•
Simple Search: Enter a last name and press Search. A first name may be
required if too many results are found for the last name.
•
Advanced Search: The fields available in advanced search depend on your
system configuration. Enter information into the fields and press Search.
In the results, press Dial to dial the contact, or choose one of the other options.
Using the Call History Lists
You can also view the Call History Lists from your PC using the IP Phone Web
Interface. See the ”Viewing Call History Lists” section on page 86.
Viewing the Call History Lists
To view the Call History lists:
STEP 1
Press the Setup button.
STEP 2
Scroll to Call History and press Select.
STEP 3
Select the Call History list you want to view. Available Call History lists are:
STEP 4
•
All Calls—Shows all calls placed, received, and missed on the phone.
•
Missed Calls—Shows the last 60 missed calls.
•
Received Calls—Shows the caller ID of the last 60 answered calls.
•
Placed Calls—Shows all calls placed from the phone.
Press Select to view the list.
Cisco Small Business Pro IP Phone SPA 525G (SIP) User Guide
54
Using Basic Phone Functions
Using the Call History Lists
3
Deleting a Call History List
STEP 1
Press the Setup button.
STEP 2
Scroll to Call History and press Select.
STEP 3
Scroll to the Call History list you want to delete.
STEP 4
Press Option and select Delete List.
STEP 5
Press OK to delete the list.
Calling from the Call History Lists
To dial a number from one of the Call History lists:
STEP 1
Choose the call.
STEP 2
Press Dial.
NOTE If the call was from a long distance number, you may have to edit the call before
dialing it. Press the EditDial button to edit the call and use the softkey buttons and
keypad to edit the number.
Deleting an Entry from the Call History Lists
STEP 1
In the call history list, choose the call.
STEP 2
Press Option and select Delete Entry.
STEP 3
Press OK.
Cisco Small Business Pro IP Phone SPA 525G (SIP) User Guide
55
Using Basic Phone Functions
Setting or Changing a Phone Password
3
Saving a Call History List Number to Your Directory
STEP 1
In the call history list, choose the call.
STEP 2
Press Option and select Add to Address Book.
STEP 3
Press Select. The Address Book entry screen appears.
STEP 4
Edit the information (if desired) and press Save again. The entry is added to your
directory.
Setting or Changing a Phone Password
You can set or change the password for your phone to prevent unauthorized use.
To set a password for your phone:
STEP 1
Press the Setup button.
STEP 2
Scroll to Device Administration and press Select.
STEP 3
Select Set Password.
STEP 4
Enter your old password (leave blank if you have never set a password). Press the
Down Arrow key to go to New Password.
STEP 5
Enter your new numeric password. Press the Down Arrow key to go to Re-enter
New Password.
STEP 6
Reenter the same password.
STEP 7
Press Save.
To delete a password:
STEP 1
Press the Setup button.
STEP 2
Scroll to Device Administration and press Select.
STEP 3
Select Set Password.
STEP 4
Enter your old password. Press the Down Arrow key to go to New Password.
Cisco Small Business Pro IP Phone SPA 525G (SIP) User Guide
56
Using Basic Phone Functions
Accessing Voicemail
STEP 5
Leave the New Password and Reenter New Password fields empty.
STEP 6
Press Save.
3
Logging In and Logging Out of Your Phone
After you’ve set a password, you can log in and out of your phone. Logging out
leaves the phone locked so that no one can access the directory, call history, user
preferences, and other features on your phone.
If you are in a menu (for example, Directories) and are not logged in, the system
prompts you for your password. Enter your password and press Login.
To log in through the Administration menu:
STEP 1
Press the Setup button.
STEP 2
Scroll to Device Administration and press Select.
STEP 3
Scroll to Login and press Select.
STEP 4
Enter your password and press Login.
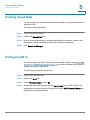
Accessing Voicemail
To access voicemail, press the Messages button on your phone. Your system
administrator should configure your phone with the correct voicemail number so
that pressing the Messages button automatically dials your voicemail system.
If you need to change the number for your voicemail (for example, if your phone is
not part of a Cisco SPA 9000 Voice System and you have external voicemail),
perform the following steps:
STEP 1
Press the Setup button.
STEP 2
Scroll to User Preferences and press Select.
STEP 3
Scroll to Call Preferences and press Select.
STEP 4
Scroll to Voice Mail.
Cisco Small Business Pro IP Phone SPA 525G (SIP) User Guide
57
Using Basic Phone Functions
Accessing Voicemail
3
STEP 5
Enter the number to dial for voicemail. For a Cisco SPA 9000 Voice System, this is
normally “vmm.” For an external system, enter the phone number, including any
digits you must dial to reach an outside line.
TIP
To enter digits, press Option and choose Input Num. To clear the field of a previous
entry, press Option and choose Clear.
STEP 6
Press Save.
Cisco Small Business Pro IP Phone SPA 525G (SIP) User Guide
58
4
Using Advanced Phone Features
This chapter describes how to configure advanced features on your Cisco SPA
525G IP phone. It contains the following sections:
•
Configuring Privacy and Security Features, page 60
•
Creating and Using Speed Dials, page 63
•
Playing MP3 Files on Your Phone, page 65
•
Using the Paging Feature, page 68
•
Customizing Your LCD Screen, page 69
•
Using Ring Tones, page 71
•
Accessing Weather and News on Your Phone, page 72
•
Configuring Date and Time Parameters on Your Phone, page 74
•
Using Star Codes, page 75
•
Restarting Your Phone, page 77
•
Viewing Phone, Network, and Call Information, page 77
•
Viewing the Wireless Connection Status, page 79
•
Advanced Menus for Technical Support Personnel, page 80
Cisco Small Business Pro IP Phone SPA 525G (SIP) User Guide
59
Using Advanced Phone Features
Configuring Privacy and Security Features
4
Configuring Privacy and Security Features
You can also configure these features using your PC and the IP Phone Web
Interface. See “Blocking Caller ID,” on page 85 and the “Blocking Anonymous
Calls,” on page 86.
Blocking Caller ID
You can block Caller ID from your phone so that your phone number will not
appear to the person you call.
To block Caller ID:
STEP 1
Press the Setup button.
STEP 2
Scroll to User Preferences and press Select.
STEP 3
Select Call Preferences.
STEP 4
Scroll to Block Caller ID and press the Right Arrow key to choose On.
STEP 5
Press Save.
Blocking Anonymous Calls
Blocking anonymous calls prevents calls with unknown Caller ID from ringing your
phone. (For example, if a caller set his phone to not display Caller ID, the call is
considered anonymous.) These callers receive a busy signal or message when
calling your phone if anonymous calls are blocked.
To block anonymous calls:
STEP 1
Press the Setup button.
STEP 2
Scroll to User Preferences and press Select.
STEP 3
Select Call Preferences.
Cisco Small Business Pro IP Phone SPA 525G (SIP) User Guide
60
Using Advanced Phone Features
Configuring Privacy and Security Features
STEP 4
Scroll to Block Anonym Call and press the Right Arrow key to choose On.
STEP 5
Press Save.
4
Using Secure Call
With the secure call feature, the active call is encrypted so that others cannot
eavesdrop. Before enabling Secure Call, ask your system administrator if Secure
Call is available.
NOTE Your phone must be part of a Cisco SPA 9000 Voice Network and your service
provider must install a mini-certificate to enable this feature.
To use secure call:
STEP 1
Press the Setup button.
STEP 2
Scroll to User Preferences and press Select.
STEP 3
Select Call Preferences.
STEP 4
Scroll to Secure Call and press the Right Arrow key to choose On.
STEP 5
Press Save. When you dial, you will hear a tone before the call.
Enabling Dial Assistance
If you enable dial assistance, when you place calls, the LCD will display phone
numbers based on the best matched entries in the Directory and Call History lists.
To enable dial assistance:
STEP 1
Press the Setup button.
STEP 2
Scroll to User Preferences and press Select.
STEP 3
Select Call Preferences.
Cisco Small Business Pro IP Phone SPA 525G (SIP) User Guide
61
Using Advanced Phone Features
Configuring Privacy and Security Features
STEP 4
Scroll to Dial Assist and press the Right Arrow key to choose On.
STEP 5
Press Save.
4
If dial assistance is enabled, after beginning to dial, you can use the navigation
button to scroll down, highlight a phone number on the LCD screen, and press Dial
to complete the call.
Connecting to a Virtual Private Network (VPN)
Your phone administrator can set up a VPN that allows you to use your phone at an
offsite location to securely connect to the company phone network over the
Internet. You will need to get from your phone administrator the IP address of the
VPN, your username, and password.
To configure your phone for use with a VPN:
STEP 1
Press the Setup button.
STEP 2
Scroll to Network Configuration and press Select.
STEP 3
Scroll to VPN and press the Right Arrow key.
STEP 4
Enter the IP address of the VPN server. You need to get this information from your
phone administrator.
STEP 5
Press the Down Arrow key to enter your user name.
STEP 6
Press the Down Arrow key to enter your password.
STEP 7
Press the Down Arrow key to enter the tunnel group (typically not required).
STEP 8
(Optional) If you want your phone to connect to the VPN every time it starts up (for
example, if you will always be using it at an offsite location), press the Down Arrow
key to the Connect on Bootup field, and press the Right Arrow key to check this
field.
STEP 9
Press Save.
Cisco Small Business Pro IP Phone SPA 525G (SIP) User Guide
62
Using Advanced Phone Features
Creating and Using Speed Dials
4
To connect to the VPN (if you have not chosen to automatically connect on startup):
STEP 1
Press the Setup button.
STEP 2
Scroll to Network Configuration and press Select.
STEP 3
Scroll to VPN and press the Right Arrow key.
STEP 4
Press the Down Arrow button to Connect and press the Right Arrow key to
connect to the VPN.
Viewing Your VPN Status
To see if you are connected to the VPN:
STEP 1
Press the Setup button.
STEP 2
Scroll to Status and press Select.
STEP 3
Scroll to VPN Status and press Select.
Creating and Using Speed Dials
You can configure different types of speed dials:
•
You can assigned unused line buttons on your phone to act as a speed dial.
Depending on how your extensions are configured, you can have up to 4
speed dials on the line buttons.
•
You can create speed dials assigned to a number, that, when pressed on
the keypad, dials the number assigned to it. You can have up to 8 of these
speed dials. Each speed dial can be a phone number, IP address or URL.
You can create and edit speed dials on the phone, or by using your PC and the IP
Phone Web Interface. (See “Creating Speed Dials,” on page 87 for web
instructions.)
Cisco Small Business Pro IP Phone SPA 525G (SIP) User Guide
63
Using Advanced Phone Features
Creating and Using Speed Dials
4
Creating Speed Dials on Unused Line Buttons
STEP 1
Press the unused line button and hold down for three seconds. The Define Speed
Dial window displays.
STEP 2
Enter the name for the speed dial.
STEP 3
Press the Down Arrow key to reach the phone number field. Enter the phone
number and press Save.
STEP 4
After creating the speed dial, it displays next to the line button. Press the line
button to use the speed dial.
Creating Numerical Speed Dials
STEP 1
Press the Setup button.
STEP 2
Scroll to Speed Dials and press Select.
STEP 3
For a new speed dial, scroll to select an unused speed dial location (2 through 9).
You can have up to 8 speed dials (location 1 is reserved for voice mail). To edit a
previously existing speed dial, select it.
STEP 4
Press Edit.
STEP 5
Enter the name and phone number for the speed dial.
TIP
STEP 6
To select a contact from the Address Book, press Option and select Select From
Address Book. Scroll to choose the contact and press Select.
Press Save.
Cisco Small Business Pro IP Phone SPA 525G (SIP) User Guide
64
Using Advanced Phone Features
Playing MP3 Files on Your Phone
4
To call one of your configured speed dial numbers, choose one of the following options:
•
Press the line button that has been configured as a speed dial.
•
Open a phone line and press the number for the speed dial, then wait a few
seconds or press Dial.
•
Press the Setup button, select Speed Dial, choose the number, and press Dial.
Playing MP3 Files on Your Phone
Your phone contains an audio player that can play .mp3 files. To play music on your
phone, you must load the audio files onto a USB memory device (not sold with the
phone). The phone reads the files from the device, so the device must remain
inserted while playing the files.
NOTE Only MP3 music with no Digital Media Rights protection can be played on the Cisco
SPA 525G IP Phone.
Creating the Playlist
NOTE The MP3 playlist on the Cisco SPA 525G is limited to 48 songs.
STEP 1
Connect a USB storage device to your PC.
STEP 2
Create a directory named “mp3” on the USB device and copy the audio files into
that directory.
STEP 3
Remove the USB device from your PC and insert it into the USB slot on the Cisco
SPA 525G.
STEP 4
Press the Setup button.
STEP 5
Scroll to MP3 Player and press Select.
STEP 6
Press Add List to create a playlist from the songs on the USB device.
Cisco Small Business Pro IP Phone SPA 525G (SIP) User Guide
65
Using Advanced Phone Features
Playing MP3 Files on Your Phone
STEP 7
4
Choose songs by choosing one of the following methods:
•
Choose individual songs by scrolling to the song you want and pressing the
Right Arrow key or the Select button.
•
Choose all songs on the USB device by pressing SelectAll.
You can clear all selected songs by pressing ClearAll.
STEP 8
After choosing songs, the songs will be marked with a check in the box next to the
song. Press Add to add the selected songs to the playlist.
Playing Songs
In the Playlist, scroll to the song you want to begin playing and press Play.
You have the following controls:
•
Stop—Stop the song. Pressing play will restart song play.
•
Previous—Move to the previous song in the playlist.
•
Next—Move to the next song in the playlist.
•
Back—Move back one screen to the playlist.
Controlling the Audio
Use the Volume button on the phone to turn the music up or down.
Cisco Small Business Pro IP Phone SPA 525G (SIP) User Guide
66
Using Advanced Phone Features
Playing MP3 Files on Your Phone
4
To switch the audio destination between the speaker, headset, and handset, press
the Up Arrow or Down Arrow key. The icon on the left above the song length
display shows the audio destination of speaker, handset, or headset (see the
following graphic).
Changing the Left and Right Channel for Stereo Headsets
When using a stereo headset inserted into the Cisco SPA 525G, you may need to
switch the audio left and right channels to hear the correct audio channel in the
right or left ear. To change the audio:
STEP 1
Press the Setup button.
STEP 2
Scroll to User Preferences and press Select.
STEP 3
Scroll to Audio Preferences and press Select.
STEP 4
Press the Right Arrow key to set Swap L/R Channel to On.
STEP 5
Press Save.
Cisco Small Business Pro IP Phone SPA 525G (SIP) User Guide
67
Using Advanced Phone Features
Using the Paging Feature
4
Using the Paging Feature
Your Cisco SPA 525G can automatically answer pages from other Cisco SPA
phones in the Cisco SPA 9000 Voice System. When your phone is paged, the
phone emits a series of beeps, and two-way audio is established between your
phone and the phone that called you. You do not have to accept the page.
NOTE Your phone must be part of a Cisco SPA 9000 Voice Network to use this feature.
Paging Another Phone
To page another phone, dial *96 plus the extension of the phone you are paging. If
the phone you are paging is not set up to auto answer pages, the call will ring as a
normal voice call.
Paging a Group of Phones
Your phone administrator can configure a group of phones that you can page
simultaneously. Each paging group has a number associated with it. Your
administrator must give you the number of the groups that are configured. To page
this group, dial *96 plus the number of the paging group.
Configuring Auto Answer
To configure your phone to auto answer pages:
STEP 1
Press the Setup button.
STEP 2
Scroll to User Preferences and press Select.
STEP 3
Select Call Preferences.
STEP 4
Scroll to Auto Answer Page. Press the Right Arrow key to choose On.
STEP 5
Press Save.
Cisco Small Business Pro IP Phone SPA 525G (SIP) User Guide
68
Using Advanced Phone Features
Customizing Your LCD Screen
4
Customizing Your LCD Screen
You can customize your LCD screen in the ways described below.
Changing the LCD Screen Contrast
To adjust the contrast of the LCD screen:
STEP 1
Press the Setup button.
STEP 2
Scroll to User Preferences and press Select.
STEP 3
Scroll to Screen Preferences and press Select.
STEP 4
Scroll to Display Brightness. The default contrast is 15. Enter a number between 1
(lowest) and 15 (greatest) to change the contrast.
STEP 5
Press Save.
Setting the Screen Backlight Timer
You can set a timer for your screen so that your LCD screen becomes dark after a
specified time when the phone is idle.
STEP 1
Press the Setup button.
STEP 2
Scroll to User Preferences and press Select.
STEP 3
Scroll to Screen Preferences and press Select.
STEP 4
Scroll to Backlight. Press the Right Arrow key to choose On, which means that the
darkening feature is enabled.
STEP 5
Scroll to Backlight Timer. Enter the number of seconds before the display should
shut off after the phone is idle.
STEP 6
Press Save.
Cisco Small Business Pro IP Phone SPA 525G (SIP) User Guide
69
4
Using Advanced Phone Features
Customizing Your LCD Screen
Configuring the Phone Screen Saver
You can enable your phone’s screen saver and specify its appearance and the
amount of time for the phone to be idle before it begins.
To configure your screen saver:
STEP 1
Press the Setup button.
STEP 2
Scroll to User Preferences and press Select.
STEP 3
Scroll to Screen Preferences and press Select.
STEP 4
With Screen Saver highlighted, press the Right Arrow key to choose On.
STEP 5
Scroll to Screen Saver Settings and press the Right Arrow key to choose the
settings:
•
STEP 6
Screen Saver Type—Choose from:
-
Black Background—Displays a black screen.
-
Gray Background—Displays a gray screen.
-
Black/Gray Rotation—The screen incrementally cycles from black to
gray.
-
Picture Rotation—The screen rotates through available pictures that
your system administrator has made available on the phone.
-
Digital Frame—Shows the background picture.
•
Trigger Interval—Enter the number of seconds that the phone remains idle
before the screen saver turns on.
•
Refresh Interval—Enter the number of seconds before the screen saver
should refresh (if, for example, you chose a rotation of pictures).
Press Save.
Changing the Phone Wallpaper
You can change the background picture on your phone to one stored in the phone,
or to one on a USB memory device attached to the phone.
Cisco Small Business Pro IP Phone SPA 525G (SIP) User Guide
70
Using Advanced Phone Features
Using Ring Tones
4
If you are going to use a picture from the USB memory device, perform the
following steps:
STEP 1
Connect a USB storage device to your PC.
STEP 2
Create a directory named “pictures” on the USB device and copy the image files
into that directory. Image files must be between 30K and 300K in size. The phone
can only read 45 images from the USB device.
STEP 3
Remove the USB device from your PC and insert it into the USB slot on the Cisco
SPA 525G.
To change the background picture on your phone:
STEP 1
Press the Setup button.
STEP 2
Scroll to User Preferences and press Select.
STEP 3
Scroll to Screen Preferences and press Select.
STEP 4
Scroll to Wallpaper. Press the Right Arrow key to select an image to use as the
wallpaper.
STEP 5
Use the navigation arrows to choose an image. Press Select to choose the image,
or to preview how the image will look on your phone, select the image and press
View. Press Select to choose the image, or use the Previous, Next, and Back keys.
STEP 6
Press Save.
Using Ring Tones
Each extension of your phone can have a different ring tone.
To change a ring tone:
STEP 1
Press the Setup button.
STEP 2
Scroll to User Preferences and press Select.
STEP 3
Scroll to Audio Preferences and press Select.
Cisco Small Business Pro IP Phone SPA 525G (SIP) User Guide
71
Using Advanced Phone Features
Accessing Weather and News on Your Phone
4
STEP 4
Scroll to the extension for which you want to select a ring tone and press the Right
Arrow key.
STEP 5
Scroll through the ring tones and press Play to play the highlighted ring tone. Press
Select to choose the highlighted ringtone for that extension.
Accessing Weather and News on Your Phone
You can access some pre-configured weather and news web services on your IP
phone (if enabled by your system administrator). To access these services:
STEP 1
Press the Setup button.
STEP 2
Select Web Applications.
STEP 3
Select the type of service.
Accessing Weather Information
You can view weather information for a maximum of three cities.
To add a city:
STEP 1
In the Web Applications screen, select Weather.
STEP 2
Press Add.
STEP 3
Enter the city name or zip code, and press Search.
STEP 4
Select the city from the list of results and press Add.
To view a city:
STEP 1
In the Web Applications screen, select Weather.
STEP 2
Weather information for the first entry in the list of cities is displayed. To view other
cities on the list, press List and select the city. Then press View.
Cisco Small Business Pro IP Phone SPA 525G (SIP) User Guide
72
Using Advanced Phone Features
Accessing Weather and News on Your Phone
TIP
4
Press Refresh to update weather information when viewing the weather screen.
To edit the list of cities:
STEP 1
In the Web Applications screen, select Weather.
STEP 2
To move entries up or down in the list or delete an entry, select the city you want to
move, press Option, and choose Move Up, Move Down, or Delete.
Accessing News
STEP 1
In the Web Applications screen, select News.
STEP 2
Scroll to select the type of news you want to view:
•
Local
•
World
•
Finance
•
Sports
•
Politics
STEP 3
Press Select to bring up the list of articles and use the Up and Down Arrow keys to
scroll through them.
STEP 4
Press View to read an article, using the Down Arrow key to scroll through the
article. Press Prev or Next to go to other articles in the news category.
Cisco Small Business Pro IP Phone SPA 525G (SIP) User Guide
73
Using Advanced Phone Features
Configuring Date and Time Parameters on Your Phone
4
Configuring Date and Time Parameters on Your Phone
The date and time for your phone normally come from the phone server. However,
if you need to change some date and time parameters, you can follow these steps:
STEP 1
Press the Setup button.
STEP 2
Scroll to Device Administration and press Select.
STEP 3
Scroll to Date/Time and press Select.
STEP 4
Scroll to the date and time setting that you want to change:
•
Time Zone—Adds or subtracts hours to Greenwich Mean Time, or Western
European Time. Press the Right Arrow key to change the time zone. Press
Save.
•
Daylight Saving—Adjusts the time on your phone at the twice-yearly
adjustment intervals for Daylight Saving Time. Press the Right Arrow key to
turn Daylight Saving Time to On or Off.
•
Automatic Mode—Configures your phone to receive the time and date from
the phone server. Press the Right Arrow key to turn automatic mode to On
or Off. Press Save.
•
NTP Server 1 and NTP Server 2—Configures your phone to receive the
time and date from a Network Time Protocol server. Enter the name or the IP
address of the server and press Save.
•
Set Current Time Manually—Press the Right Arrow key to choose the date
and time. Use the Right Arrow key to move between the year, month, date,
hour, and minute. Use the Up and Down Arrow keys to change the time.
Press Set.
NOTE If your phone is connected to an administration server, any changes you make to the
date and time will be lost when rebooting the phone.
Cisco Small Business Pro IP Phone SPA 525G (SIP) User Guide
74
4
Using Advanced Phone Features
Using Star Codes
Using Star Codes
The Cisco SPA 525G supports numerous “star codes” to access phone
supplementary services. These codes, which start with *, are entered before
dialing a telephone number and provide services. For example, to block caller ID
(star code 67), you would dial *67, followed by the telephone number you are
calling.
Following is a list of supported star codes:
Code
Definition
03
Request media loopback for a call to monitor Voice over IP quality.
16
Activate Secure Call feature for all calls.* See Using Secure Call,
page 61.
17
Deactivate Secure Call feature for all calls.* See Using Secure Call,
page 61.
18
Activate Secure Call feature for a single call.* See Using Secure Call,
page 61.
19
Deactivate Secure Call feature for a single call.* See Using Secure Call,
page 61.
36
Pick up a call at another extension.* See Picking Up a Call, page 47.
37
Pick up a group call.* See Picking Up a Call, page 47.
38
Park a call.* See Parking a Call, page 48.
39
Unpark a call.* See Parking a Call, page 48.
66
Activate Call Back. Causes the Cisco SPA 525G to repeatedly dial a
busy number until the called party rings or answers.
69
Calls the last number that called your phone.
72
Activate Call Forward All. See Forwarding Calls, page 43.
73
Deactivate Call Forward All. See Forwarding Calls, page 43.
77
Activate anonymous call blocking. See Blocking Anonymous Calls,
page 60.
Cisco Small Business Pro IP Phone SPA 525G (SIP) User Guide
75
4
Using Advanced Phone Features
Using Star Codes
Code
Definition
86
Deactivate Call Back.
87
Deactivate anonymous call blocking. See Blocking Anonymous Calls,
page 60.
90
Activate Call Forward Busy. See Forwarding Calls, page 43.
91
Deactivate Call Forward Busy. See Forwarding Calls, page 43.
92
Activate Call Forward No Answer. See Forwarding Calls, page 43.
93
Deactivate Call Forward No Answer. See Forwarding Calls, page 43.
96
Page an extension.** See Paging Another Phone, page 68.
01729
Configure the phone to prefer the G729 codec for all calls.
02729
Force the phone to prefer the G729 codec for all calls.
017110
Configure the phone to prefer the G711u codec for all calls.
017111
Configure the phone to prefer the G711a codec for all calls.
027110
Force the phone to use the G711u codec for all calls.
027111
Force the phone to use the G711a codec for all calls.
0172632
Configure the phone to prefer the G726r32 codec for all calls.
0272632
Configure the phone to force the G726r32 codec for all calls.
*Requires that your Cisco SPA 525G phone be part of a Cisco SPA 9000 Voice
System network.
**Requires that the paged extension be part of a Cisco SPA 9000 Voice System
network.
Cisco Small Business Pro IP Phone SPA 525G (SIP) User Guide
76
Using Advanced Phone Features
Restarting Your Phone
4
Restarting Your Phone
Occasionally you may need to restart your phone if the screen locks up. To restart
your phone:
STEP 1
Press the Setup button.
STEP 2
Scroll to Device Administration and press Select.
STEP 3
Scroll to Restart and press Select.
Viewing Phone, Network, and Call Information
The Cisco SPA 525G provides menus to view information about your phone.
Viewing Phone Information
To view information about your phone:
STEP 1
Press the Setup button.
STEP 2
Scroll to Status and press Select.
STEP 3
Select Product Information. You can view the following information:
•
Product Name
•
Serial Number
•
MAC (Hardware) Address
•
Software Version
•
Hardware Version
•
Certificate
•
Customization
Cisco Small Business Pro IP Phone SPA 525G (SIP) User Guide
77
Using Advanced Phone Features
Viewing Phone, Network, and Call Information
4
Viewing Network Information
To view network information for your phone:
STEP 1
Press the Setup button.
STEP 2
Scroll to Status and press Select.
STEP 3
Scroll to Network Status and press Select. You can view the following information:
•
Network Type
•
Network Status
•
Addressing Type
•
IP Address
•
Subnet Mask
•
Default Router
•
Primary DNS
•
Secondary DNS
•
MAC (Hardware) Address
Viewing Phone Line and Extension Information
To view phone line and extension information:
STEP 1
Press the Setup button.
STEP 2
Scroll to Status and press Select.
Cisco Small Business Pro IP Phone SPA 525G (SIP) User Guide
78
Using Advanced Phone Features
Viewing the Wireless Connection Status
STEP 3
4
Scroll to Phone Status and press Select. You can view the following information:
•
Phone Status—Up time and packets sent/received
•
Extension Status—If an extension is registered, when it was registered, and
more
•
Line Status—Active calls and call information
•
Provisioning Status—If a profile rule was used, and the status
•
Call Statistics History—Information about individual calls.
Viewing Peripheral Status
To view information about phone peripherals, such as a USB memory stick or a
Cisco SPA 500S attendant console:
STEP 1
Press the Setup button.
STEP 2
Scroll to Status and press Select.
STEP 3
Scroll to Peripheral Status and press Select. You can view the following
information:
•
USB Status
•
Attendant Console (Attn Cons) Status
Viewing the Wireless Connection Status
If you have set up your wireless connection (described in ”Connecting Your Phone
to the Wireless Network” section on page 27), you can view the status of your
wireless connection.
STEP 1
Press the Setup button.
STEP 2
Scroll to Network Configuration and press Select.
Cisco Small Business Pro IP Phone SPA 525G (SIP) User Guide
79
Using Advanced Phone Features
Advanced Menus for Technical Support Personnel
4
STEP 3
Select Wi-Fi Configuration and press the Right Arrow key.
STEP 4
Scroll to Wireless Status and press Select. The status, SSID name, and signal
strength are displayed. Press Detail for more information.
Advanced Menus for Technical Support Personnel
!
CAUTION These menus are used to configure and troubleshoot your phone and the phone
network. You should not change these settings or perform these actions unless
directed to do so by your Administrator.
Settings Menu
Network Configuration:
•
Connection Type
•
Static IP Address Settings
•
CDP
•
VLAN
•
VLAN ID
•
Multicast Address
Device Administration:
•
Factory Reset
•
Custom Reset
•
Profile Rule
•
Call Control Settings
Cisco Small Business Pro IP Phone SPA 525G (SIP) User Guide
80
5
Using the Web Interface
The Cisco SPA 525G provides a web interface to the phone that allows you to
configure some features of your phone using a web browser. This chapter
contains the following sections:
•
Configuring Your Address Book, page 82
•
Setting Do Not Disturb, page 83
•
Configuring Call Forwarding, page 84
•
Configuring Call Waiting, page 85
•
Blocking Caller ID, page 85
•
Blocking Anonymous Calls, page 86
•
Viewing Call History Lists, page 86
•
Creating Speed Dials, page 87
•
Configuring Wi-Fi, page 87
•
Configuring Bluetooth, page 88
•
Upgrading Firmware, page 89
Cisco Small Business Pro IP Phone SPA 525G (SIP) User Guide
81
Using the Web Interface
Logging in to the Web Interface
5
Logging in to the Web Interface
STEP 1
Obtain the IP address of your phone by pressing the Setup button and selecting
Status.
STEP 2
Scroll to Network Status and press Select. Note the IP address.
STEP 3
On your PC, open Internet Explorer.
STEP 4
Enter the IP address in the browser’s toolbar.
STEP 5
The Info page of the IP Phone Web Interface displays.
The web interface has several different tabs. The tabs that allow you to configure
options on your phone are the Phone and User tabs. Click the tab names to switch
between these tabs.
Configuring Your Address Book
The Cisco SPA 525G phone provides an address book for you to store and view
frequently dialed numbers. The address book appears on your phone, and you
can dial numbers from the directory.
To view and edit your address book:
STEP 1
Log in to the web interface.
STEP 2
Choose the Personal Address Book tab. A window appears with the listings for
your address book.
To enter a new contact into the address book:
STEP 1
In the Personal Address Book tab, click Add Personal Address Entry.
STEP 2
Enter the name, office number, home number, or mobile number, and ring tone for
the new contact.
STEP 3
Click Submit All Changes. The contact is added to your address book.
Cisco Small Business Pro IP Phone SPA 525G (SIP) User Guide
82
Using the Web Interface
Setting Do Not Disturb
STEP 4
5
(Optional) To add the contact to a speed dial:
a. Click the Phone icon under Speed Dials.
b. Choose the phone (office, home, or mobile) that you want to add as a speed
dial.
c. Choose the speed dial position to assign the contact.
d. Press Confirm.
To remove a contact from the address book:
STEP 1
In the Personal Address Book tab, check the box next to the contacts you want to
remove. To select all contacts, check the box at the top of the column.
STEP 2
Press Remove.
STEP 3
Press OK. The contacts are removed from your address book.
To edit a contact’s information:
STEP 1
In the Personal Address Book tab, click the Edit icon in the row for that contact.
STEP 2
Enter the information and press Submit All Changes.
Setting Do Not Disturb
Use the Do Not Disturb feature to prevent incoming calls from ringing your phone.
If you have voice mail configured, incoming callers immediately reach voice mail. If
voice mail is not configured, callers hear a busy signal or message.
Cisco Small Business Pro IP Phone SPA 525G (SIP) User Guide
83
5
Using the Web Interface
Configuring Call Forwarding
To set Do Not Disturb:
STEP 1
Log in to the web interface.
STEP 2
In the Voice tab, User menu, under Supplementary Services, locate the Do Not
Disturb field.
STEP 3
Choose Yes to turn on Do Not Disturb.
STEP 4
At the bottom of the page, click Submit All Changes. Your phone reboots.
NOTE You can turn off Do Not Disturb from your phone or from the web interface.
Configuring Call Forwarding
STEP 1
Log in to the web interface.
STEP 2
In the Voice tab, User menu, under Call Forward, you can configure the following
fields:
STEP 3
•
CFWD Setting—Enables call forwarding.
•
CFWD All Dest—Forwards all calls to a single number that you enter.
•
CFWD Busy Dest—Forwards all calls to another number when the phone is
busy. Enter the number to which to forward calls.
•
CFWD No Ans Dest—Forwards calls to another number if there's no answer
at your phone. Enter the number to which to forward calls.
•
CFWD No Ans Delay—Number of seconds to delay forwarding calls, if
there is no answer at your phone. Enter the number of seconds to delay.
At the bottom of the page, click Submit All Changes. Your phone reboots.
Cisco Small Business Pro IP Phone SPA 525G (SIP) User Guide
84
Using the Web Interface
Configuring Call Waiting
5
Configuring Call Waiting
Call waiting alerts you when you are on a call with a status message and ringing
that another call is incoming. If you turn call waiting off, incoming calls do not ring
your phone if you are on another call, and the caller hears a busy signal or
message.
To turn call waiting on or off:
STEP 1
Log in to the web interface.
STEP 2
In the Voice tab, User menu, under Supplementary Services, locate the CW
Setting field.
STEP 3
Choose yes or no to enable or disable.
STEP 4
At the bottom of the page, click Save All Settings. Your phone reboots.
Blocking Caller ID
You can block Caller ID from your phone so that your phone number will not
appear to the person you call.
To block Caller ID:
STEP 1
Log in to the web interface.
STEP 2
In the Voice tab, User menu, under Supplementary Services, locate the Block CID
Setting field.
STEP 3
Choose yes or no to enable or disable.
STEP 4
At the bottom of the page, click Save All Settings. Your phone reboots.
Cisco Small Business Pro IP Phone SPA 525G (SIP) User Guide
85
5
Using the Web Interface
Blocking Anonymous Calls
Blocking Anonymous Calls
Blocking anonymous calls prevents calls with unknown Caller ID from ringing your
phone. (For example, if a caller set his phone to not display Caller ID, the call is
considered anonymous.) These callers receive a busy signal or message.
To block anonymous calls:
STEP 1
Log in to the web interface.
STEP 2
In the Voice tab, User menu, under Supplementary Services, locate the Block ANC
Setting field.
STEP 3
Choose yes or no to enable or disable.
STEP 4
At the bottom of the page, click Save All Settings. Your phone reboots.
Viewing Call History Lists
To view Call History Lists:
STEP 1
Log in to the web interface.
STEP 2
Choose the Call History tab. A window appears with the call history for your
phone. Select a call history list to show from the drop-down list:
STEP 3
•
All Calls—All calls placed to and from your phone.
•
Placed Calls—Shows information for the last 60 numbers dialed from your
phone.
•
Received Calls—Shows information for the last 60 answered calls.
•
Missed Calls—Shows the last 60 missed calls.
(Optional) To add a call from one of these lists to your address book, click the
Address Book icon under the Add column. Edit any information and press Submit
All Changes.
Cisco Small Business Pro IP Phone SPA 525G (SIP) User Guide
86
Using the Web Interface
Creating Speed Dials
5
Creating Speed Dials
You can configure up to 8 speed dials. Each speed dial can be a phone number, IP
address or URL.
To create or edit a speed dial:
STEP 1
Log in to the web interface.
STEP 2
Choose the Speed Dials tab.
STEP 3
Enter the name and number for the speed dial entries you want to create or edit.
Remember to enter any digits you must dial to reach an outside line.
STEP 4
Click Submit All Changes.
Configuring Wi-Fi
You can configure your Wi-Fi connection from the web interface. See Connecting
Your Phone to the Wireless Network, page 27 for more information on the types of
wireless connections supported.
To configure your wireless connection:
STEP 1
Log in to the web interface.
STEP 2
Choose the Wi-Fi tab.
STEP 3
Ensure Wireless Enable is set to On.
STEP 4
To manually enter a Wi-Fi profile, choose Wi-Fi Profile from the Wi-Fi Device list
and proceed to the next section. To use WPS, choose Wi-Fi Protected Setup and
follow the on-screen instructions
Cisco Small Business Pro IP Phone SPA 525G (SIP) User Guide
87
Using the Web Interface
Configuring Bluetooth
5
You can enter up to three wireless profiles. To create a wireless profile:
STEP 1
In the Wi-Fi tab, ensure Wi-Fi Profile is selected in the Wi-Fi Device box.
STEP 2
(Optional) To scan for available wireless networks, click Site Survey. Click the icon
under Add in the row of the wireless network you want to select.
STEP 3
Click Add New Wi-Fi Profile.
STEP 4
Enter or edit (if you performed Step 2) the name, SSID, security mode, and security
parameters. (See Connecting Your Phone to the Wireless Network, page 27 for
more information on security.)
STEP 5
Click Submit. The wireless profile is added to the list.
STEP 6
Click Submit All Changes.
Configuring Bluetooth
You can use a Bluetooth headset with your phone and configure it from the web
interface.
STEP 1
Log in to the web interface.
STEP 2
Choose the Bluetooth Configuration tab.
STEP 3
Ensure Bluetooth Device is set to On.
STEP 4
To scan for your headset, click Search Bluetooth Device.
STEP 5
If found, your device appears in the Bluetooth Device List.
STEP 6
Click the name for your device.
STEP 7
Enter your PIN and press Submit All Changes.
Cisco Small Business Pro IP Phone SPA 525G (SIP) User Guide
88
5
Using the Web Interface
Upgrading Firmware
Upgrading Firmware
!
IMPORTANT: If you are using your phone with
an Internet Telephony Service Provider’s
system, do not upgrade your phone’s firmware
without consulting your service provider. Your
provider may automatically upgrade your
phones without any action on your part
necessary.
Before upgrading your firmware, you need to download the latest version from
http://www.cisco.com/go/smallbiz. Unzip the file to your PC.
STEP 1
Log in to the web interface.
STEP 2
Choose the Firmware Upgrade tab.
STEP 3
Click Firmware Upgrade Window.
STEP 4
Browse to select the firmware file from your PC. Click Submit. The firmware is
installed and your phone reboots.
Cisco Small Business Pro IP Phone SPA 525G (SIP) User Guide
89
6
Using the Cisco SPA 500S Attendant Console
This chapter describes how to install and use the Cisco SPA 500S Attendant
Console with your Cisco SPA 525G IP Phone.
Figure 1 Cisco SPA 500S Attendant Console
Cisco Small Business Pro IP Phone SPA 525G User Guide
90
Using the Cisco SPA 500S Attendant Console
Connecting the Cisco SPA 500S Attendant Console to the Cisco SPA 525G IP Phone
6
The Cisco SPA 500S is a 32-button attendant console for the Cisco SPA 500
Series IP Phones, providing 32 three-color (red, green, and orange) programmable
LEDS, with support for Broadsoft Busy Lamp Field and Asterisk Line Monitoring.
The Cisco SPA 500S attaches to the Cisco SPA 525G with the attachment arm
provided. It obtains power directly from the Cisco SPA 525G and does not require
a separate power supply. Two Cisco SPA 500S units can be attached to a single
Cisco SPA 525G to monitor a total of 64 separate lines.
Connecting the Cisco SPA 500S Attendant Console to the
Cisco SPA 525G IP Phone
To connect the Cisco SPA 500S Attendant Console to the Cisco SPA 525G IP
phone, you need the following:
•
Cisco SPA 500S Attendant Console
•
Attachment Arm
•
Two (2) Attachment Arm Screws
•
Auxiliary Interconnect Cable
•
Stand
!
CAUTION Power off the Cisco SPA 525G before attaching or detaching the Cisco SPA 500S.
Cisco Small Business Pro IP Phone SPA 525G User Guide
91
Using the Cisco SPA 500S Attendant Console
Connecting the Cisco SPA 500S Attendant Console to the Cisco SPA 525G IP Phone
6
Connecting a Single Cisco SPA 500S
STEP 1
Turn both the Cisco SPA 525G and Cisco SPA 500S face down.
STEP 2
Align the screw hole in the Cisco SPA 525G with one of the holes on the attachment
arm.
STEP 3
Insert the pegs on the attachment arm into the peg holes on the Cisco SPA 525G.
Cisco Small Business Pro IP Phone SPA 525G User Guide
92
Using the Cisco SPA 500S Attendant Console
Connecting the Cisco SPA 500S Attendant Console to the Cisco SPA 525G IP Phone
6
STEP 4
Using an attachment arm screw, secure the attachment arm to the Cisco SPA 525G.
STEP 5
Align the right screw hole in the Cisco SPA 500S with the unused hole on the
attachment arm.
STEP 6
Insert the pegs on the attachment arm into the peg holes on the Cisco SPA 500S.
Cisco Small Business Pro IP Phone SPA 525G User Guide
93
Using the Cisco SPA 500S Attendant Console
Connecting the Cisco SPA 500S Attendant Console to the Cisco SPA 525G IP Phone
STEP 7
6
Using an attachment arm screw, secure the attachment arm to the Cisco SPA 500S.
!
CAUTION Do not plug a telephone line cord into the AUX port. Use only the auxiliary cable
provided with the Cisco SPA 500S.
STEP 8
Locate the AUX IN port on the back of the Cisco SPA 500S. Connect one end of the
auxiliary cable to this port.
STEP 9
Locate the AUX port on the back of the Cisco SPA 525G. Connect the other end of
the auxiliary cable to this port. The Cisco SPA 500S is powered by the auxiliary
cable with the Cisco SPA 525G; no additional power source is required.
Cisco Small Business Pro IP Phone SPA 525G User Guide
94
Using the Cisco SPA 500S Attendant Console
Connecting the Cisco SPA 500S Attendant Console to the Cisco SPA 525G IP Phone
6
STEP 10 Route the auxiliary cable inside the cable slot of the Cisco SPA 500S.
STEP 11 Attach the appropriate desktop stand to each unit.
Cisco Small Business Pro IP Phone SPA 525G User Guide
95
Using the Cisco SPA 500S Attendant Console
Connecting the Cisco SPA 500S Attendant Console to the Cisco SPA 525G IP Phone
6
Connecting a Second Cisco SPA 500S
NOTE: A maximum of two Cisco SPA 500S
Attendant Consoles can be connected to a
Cisco SPA 525G.
A maximum of two Cisco SPA 500S attendant consoles can be connected to a
Cisco SPA 500 Series IP Phone. The instructions in this section are for connecting
a second Cisco SPA 500S. If you are not attaching a second Cisco SPA 500S, skip
to ”Configuring the Cisco SPA 500S” on page 98.
STEP 1
Attach the first Cisco SPA 500S to the IP phone and connect the auxiliary cable as
described in the ”Connecting the Cisco SPA 500S Attendant Console to the Cisco
SPA 525G IP Phone” section on page 91.
STEP 2
Align the left screw hole in the first Cisco SPA 500S with one of the holes on the
attachment arm.
STEP 3
Insert the pegs on the attachment arm into the peg holes on the Cisco SPA 500S.
Cisco Small Business Pro IP Phone SPA 525G User Guide
96
Using the Cisco SPA 500S Attendant Console
Connecting the Cisco SPA 500S Attendant Console to the Cisco SPA 525G IP Phone
6
STEP 4
Using the attachment arm screw, secure the attachment arm to the first Cisco SPA
500S.
STEP 5
Insert the pegs on the attachment arm into the peg holes on the Cisco SPA 500S.
STEP 6
Using the attachment arm screw, secure the attachment arm to the second Cisco
SPA 500S.
!
CAUTION Do not plug a telephone line cord into the AUX port. Use only the auxiliary cable
provided with the Cisco SPA 500S.
STEP 7
Locate the AUX OUT port on the back of the first Cisco SPA 500S. Connect one
end of the auxiliary cable to this port.
STEP 8
Locate the AUX IN port on the back of the second Cisco SPA 500S. Connect the
other end of the auxiliary cable to this port.
STEP 9
Route the auxiliary cable inside the cable slot. The Cisco SPA 500S is powered by
the auxiliary cable with the Cisco SPA 525G; no additional power source is
required.
STEP 10 Attach the appropriate desktop stands to each unit.
Cisco Small Business Pro IP Phone SPA 525G User Guide
97
Using the Cisco SPA 500S Attendant Console
Configuring the Cisco SPA 500S
6
Configuring the Cisco SPA 500S
The Cisco SPA 500S can be configured to easily access other phone lines in the
system. For example, buttons on the Cisco SPA 500S can be configured to monitor
another extension, speed dial a number, transfer calls to another extension, and
more.
NOTE The options available on the Cisco SPA 500S depend on the phone system
configuration. Your phone system might not provide all of the features mentioned in
this document.
Configuration of the Cisco SPA 500S and assignment of the line buttons is
performed by the system administrator and is not described in this document. To
configure the Cisco SPA 500S:
•
If the Cisco SPA 500S and attached Cisco SPA 525G are part of a Cisco
SPA 9000 Voice System, we recommend that you use the Cisco SPA 9000
Setup Wizard. For instructions on using the Setup Wizard, see the System
Configuration Using the SPA 9000 Setup Wizard document on Cisco.com.
See Appendix A, “Where to Go From Here” for the location of this
document.
•
If you want to manually configure the Cisco SPA 500S using the web user
interface for the Cisco SPA 525G to which the Cisco SPA 500S is attached,
see the Cisco SPA 500 Series and Wireless IP Phone Administration Guide
on Cisco.com. See Appendix A, “Where to Go From Here” for the location of
this document.
•
If the Cisco SPA 500S and attached Cisco SPA 525G are used with a
Broadsoft or Asterisk server, see the Cisco SPA 500 Series and Wireless IP
Phone Administration Guide on Cisco.com. See Appendix A, “Where to Go
From Here” for the location of this document.
Cisco Small Business Pro IP Phone SPA 525G User Guide
98
Using the Cisco SPA 500S Attendant Console
Using the Cisco SPA 500S
6
Using the Cisco SPA 500S
The functions of Cisco SPA 500S buttons may differ depending on configuration.
However, in general, you can:
•
Monitor an extension by viewing its color. The LED color of a line button
gives you information about the line being monitored:
-
Green: The line is idle.
-
Red (steady): The line is in use.
-
Red (blinking): The line is ringing.
-
Orange (steady): The line is not registered; there is a problem with phone
connectivity.
-
Orange (blinking): The line is not configured properly.
-
Off: The line is not configured.
•
Transfer a call by pressing the line button on the Cisco SPA 500S when an
incoming call is ringing.
•
Dial a configured extension by pressing the green line button on the Cisco
SPA 500S.
•
Pick up a call ringing at the extension by pressing the flashing red line
button.
Monitoring the Cisco SPA 500S
To view the status of the Cisco SPA 500S, perform the following steps:
STEP 1
Press the Setup button.
STEP 2
Scroll to Status and press Select.
STEP 3
Scroll to Peripheral Status and press Select.
STEP 4
The status is shown in the “Att Cons” fields.
Cisco Small Business Pro IP Phone SPA 525G User Guide
99
A
Where to Go From Here
Cisco provides a wide range of resources to help you obtain the full benefits of the
Cisco SPA 525G.
Product Resources
Support
Cisco Small Business
Support Community
www.cisco.com/go/smallbizsupport
Online Technical Support
and Documentation (Login
Required)
www.cisco.com/support
Phone Support Contacts
www.cisco.com/en/US/support/
tsd_cisco_small_ business_support_
center_contacts.html
Software Downloads
(Login Required)
Go to tools.cisco.com/support/downloads, and
enter the model number in the Software Search
box.
Product Documentation
IP Phone
www.cisco.com/en/US/products/ps10499/
tsd_products_support_series_home.html
Accessories
http://cisco.com/en/US/products/ps10042/
tsd_products_support_series_home.html
Cisco SPA 9000 Voice
System
www.cisco.com/en/US/products/ps10030/
tsd_products_support_series_home.html
Cisco Small Business Pro IP Phone SPA 525G User Guide
100
A
Where to Go From Here
Cisco Unified
Communications 500 Series
for Small Business
www.cisco.com/en/US/products/ps7293/
tsd_products_support_series_home.html
Cisco Small Business
Cisco Partner Central for
Small Business (Partner
Login Required)
www.cisco.com/web/partners/sell/smb
Cisco Small Business Home
www.cisco.com/smb
Marketplace
www.cisco.com/go/marketplace
Cisco Small Business Pro IP Phone SPA 525G User Guide
101