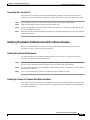
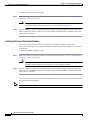
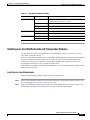
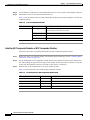
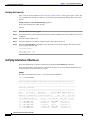
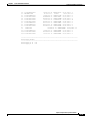
1
C H A P T E R
2
Quick Installation Procedures
This chapter describes procedures for installing essential hardware components. This section describes
common hardware installation tasks. Refer to the Cisco ONS 15540 ESP Hardware Installation Guide
or the Cisco ONS 15540 ESPx Hardware Installation Guide for complete hardware installation
instructions.
This chapter contains the following major sections:
•
Installing Cisco ONS 15540 ESP Hardware, page 2-1
•
Installing Cisco ONS 15540 ESPx Hardware, page 2-10
•
Common Installation Procedures, page 2-27
Installing Cisco ONS 15540 ESP Hardware
Perform these procedures for the Cisco ONS 15540 ESP:
•
Preparing to Install the Chassis, page 2-1
•
Installing the Chassis, page 2-2
•
Installing the Processor Card, page 2-2
•
Installing Mux/Demux Motherboards and Mux/Demux Modules, page 2-5
•
Installing Line Card Motherboards and Transponder Modules, page 2-6
•
Cabling Transponder Modules, page 2-9
•
Cabling Mux/Demux Modules, page 2-9
Preparing to Install the Chassis
The Cisco ONS 15540 ESP chassis is designed for rack-mounting in a cabinet rack. Use star-type lock
washers on the rack screws to ensure a good conductive connection between the chassis and the rack.
For information about installing the units in a customer cabinet, see the instructions from the cabinet
manufacturer.
Three chassis fit in a standard rack. However, if you use the external AC-input power supply, you can
install two chassis with the power supply.
Optical Transport Turn-Up and Test Guide
78-14964-01
2-1
Chapter 2
Quick Installation Procedures
Installing Cisco ONS 15540 ESP Hardware
Perform this procedure to install the Cisco ONS 15540 ESP chassis in a standard 19-inch rack:
Step 1
Place the L brackets on the sides of the chassis.
Step 2
Secure the L brackets to the chassis using the 14 M4 Phillips countersunk-head screws provided in the
rack-mount kit. Use seven screws on each L bracket on the sides of the chassis.
Step 3
Place the top cable guide over the top of the chassis. Ensure that the earth contact is visible through the
cable guide.
Step 4
Secure the cable guide to the shelf with five 6-32 screws.
Installing the Chassis
To install the Cisco ONS 15540 ESP chassis in the rack, follow these steps:
Step 1
Grasp the bottom edge of the chassis with one hand near the front and the other near the back. With one
person at each side of the chassis, slowly lift the chassis in unison.
Step 2
Position the chassis in the rack.
Step 3
Align the mounting holes in the L bracket and the bottom cable management guide with the mounting
holes in the equipment rack.
Step 4
Install the 12-24 or 10-32 screws through the elongated holes in the L bracket and into the threaded holes
in the mounting post.
Step 5
Place the bottom cable guides over the fan assembly.
Step 6
Secure the cable guide to the rack with the 6-32 screws.
Installing Strain Relief Brackets
The Cisco ONS 15540 ESP system uses a power supply cable strain relief bracket for connections to its
power supply and an alarm cable strain relief bracket for alarm cable connections. The strain relief
brackets must be installed after the shelf is rack mounted and installed in the rack. The brackets are
required for proper function of the power supply and alarm cables.
To install the strain relief brackets, follow these steps:
Step 1
Place the strain relief bracket over the designated slots on the back panel.
Step 2
Use the two screws provided to secure the strain relief bracket to the shelf.
Installing the Processor Card
The mux/demux motherboards, line card motherboards, and processor cards are hot-swappable. We
recommend installing the processor cards first and then filling the chassis from slots 0 to 11, left to right.
Optical Transport Turn-Up and Test Guide
2-2
78-14964-01
Chapter 2
Quick Installation Procedures
Installing Cisco ONS 15540 ESP Hardware
Perform the following procedure to install the processor card in the Cisco ONS 15540 ESP.
Step 1
Insert the processor card carefully into chassis slot 6. Guide the upper and lower edges of the
motherboard or processor card in the tracks until its connectors come into contact with the backplane.
Step 2
Use your thumb and forefinger of each hand to simultaneously push the motherboard or processor card
in until it is fully seated in the backplane connector.
Step 3
Use a 3/16-inch flat-blade screwdriver to tighten the captive installation screws.
Step 4
If not installing a redundant processor card, insert a blank card into slot 7.
Table 2-1 lists the LEDs on the processor card faceplate, their default conditions, and what the
conditions indicate.
Table 2-1
Processor Card LEDs
LED
Status
Description
Status
Red
A board resets or initially powers on.
Orange
System initialization.
Green
Full initialization and operational.
Active
Green
This board is the primary processor and is running IOS software.
Standby
Green
This board is the secondary processor.
Slot 0
Green
Flash PC Card is present.
Slot 1
Green
Flash PC Card is present.
Green
Full duplex is running.
Off
Half duplex is running.
Green
Operating at 100 Mbps.
Off
Operating at 10 Mbps.
Green
Link is up.
Off
Link is down.
Green
Full duplex is running.
Off
Half duplex is running.
Green
Operating at 100 Mbps.
Off
Operating at 10 Mbps.
Green
Link is up.
Off
Link is down.
Critical Alarm
Yellow
A critical alarm condition exists.
Major Alarm
Yellow
A major alarm condition exists.
Minor Alarm
Yellow
A minor alarm condition exists.
NME
1
Full Duplex
100 Mbps
Link
ASE2
Full Duplex
100 Mbps
Link
Optical Transport Turn-Up and Test Guide
78-14964-01
2-3
Chapter 2
Quick Installation Procedures
Installing Cisco ONS 15540 ESP Hardware
Table 2-1
Processor Card LEDs (continued)
LED
Status
Description
Alarm Cutoff
Yellow
A major or minor alarm condition exists and the cutoff button has
been pushed. Turns off by software when the original alarm clears
or any new alarm occurs.
History
Yellow
A major or minor alarm occurred. Clears if the History Clear
button is pushed and no alarm exists.
1. NME = network management Ethernet
2. ASE = aggregation shelf Ethernet
To install a redundant processor card, perform the next procedure.
For more details about using the Console Ports, NME Ports, and Auxiliary Ports of the processor card,
refer to the Cisco ONS 15540 ESP Configuration Guide and Command Reference.
Installing a Redundant Processor Card
Perform the following procedure to install the redundant processor card:
Step 1
Insert the processor card carefully into chassis slot 7. Guide the upper and lower edges of the
motherboard or processor card in the tracks until its connectors come into contact with the backplane.
Step 2
Use your thumb and forefinger of each hand to simultaneously push the motherboard or processor card
in until it is fully seated in the backplane connector.
Step 3
Use a 3/16-inch flat-blade screwdriver to tighten the captive installation screws.
For more details on redundant processors refer to the Cisco ONS 15540 ESP Configuration Guide and
Command Reference.
Connecting the Console Port
The console port is a female, DCE (data communications equipment), DB-25 receptacle used for
connection to a console terminal or modem. There is a console port on both processor cards.
To connect cables to the console port, follow these steps:
Step 1
Place the DB-25 connector in front of the console port on the processor card faceplate.
Step 2
Align the male DB-25 connector with the female console port.
Step 3
Gently push the DB-25 connector into the console port and secure it in place by tightening the side
screws on the DB-25 connector.
Step 4
Route the fiber cables down through the cutout holes on the cable management tray out of the right side
of the shelf assembly.
Optical Transport Turn-Up and Test Guide
2-4
78-14964-01
Chapter 2
Quick Installation Procedures
Installing Cisco ONS 15540 ESP Hardware
Installing Mux/Demux Motherboards and Mux/Demux Modules
The Cisco ONS 15540 ESP chassis uses one optical mux/demux motherboard for unprotected operation
or two per system for protected operation.
Installing Mux/Demux Motherboards
You can install up to two motherboards into slot 0 and slot 1. Perform the following procedure to install
a mux/demux motherboard.
Note
In Cisco ONS 15540 ESP systems, there are additional rules for slot placement of mux/demux modules
and line cards. Refer to the Cisco ONS 15540 ESP Planning and Design Guide.
Step 1
Remove the backplane side dust covers and transponder side dust covers from the motherboards, and
clean the optical connectors. See the “Cleaning Optical Connectors” section on page 2-28.
Step 2
Insert the card carefully into the chassis slot. Guide the upper and lower edges of the motherboard or
processor card in the tracks until its connectors come into contact with the backplane.
Step 3
Use your thumb and forefinger of each hand to simultaneously push the card in until it is fully seated in
the backplane connector.
Step 4
Use a 3/16-inch flat-blade screwdriver to tighten the captive installation screws.
Step 5
Install blank covers into the unused motherboard slots.
Note
Mux/demux motherboards without OSC have no LEDs.
Table 2-2
Mux/Demux Motherboard LEDs
LED
Status
Description
Status
Blinking green
Motherboard has a good system clock from the primary
processor and is out of the reset state.
Solid green
Software initialization is successful.
Orange
System clock is not present. Board is unavailable.
Off
Board failure
Solid green
OSC is present and the optical laser output is enabled.
Off
OSC is not present and the optical laser output is disabled.
Solid green
OSC is present and the receiver is enabled.
Off
OSC is not present and the receiver is disabled.
Tx
Rx
Optical Transport Turn-Up and Test Guide
78-14964-01
2-5
Chapter 2
Quick Installation Procedures
Installing Cisco ONS 15540 ESP Hardware
Installing 4-Channel or 8-Channel Mux/Demux Modules
This section describes the procedure for installing a 4-channel or 8-channel mux/demux module in the
Cisco ONS 15540 ESP. To install the module, follow these steps:
Step 1
Remove the dust covers from the module, and clean the optical connectors. See the “Cleaning Optical
Connectors” section on page 2-28.
Caution
Step 2
Wear grounding wrist straps to avoid ESD damage to the card. Do not directly touch the
backplane with your hand or any metal tool, or you could shock yourself.
Insert the module carefully into the motherboard slot while guiding the upper and lower edges of the
module in the tracks until its connectors come into contact with the backplane connectors. You hear a
click when it is connected.
Table 2-2 lists the LEDs on the mux/demux motherboard with OSC faceplate, their default conditions,
and what the conditions indicate.
Installing 16-Channel Mux/Demux Modules
This section describes the procedure for installing 16-channel mux/demux modules in the
Cisco ONS 15540 ESP. To install the 16-channel mux/demux module, follow these steps:
Step 1
Remove the dust covers from the module, and clean the optical connectors. See the “Cleaning Optical
Connectors” section on page 2-28.
Step 2
Insert the correct inset tray for the 16-channel mux/demux module and secure the tray to the
motherboard by tightening the screws.
Step 3
Insert the 16-channel mux/demux module with OSC carefully into the top motherboard slot while
guiding the upper and lower edges of the module in the tracks until its connectors come into contact with
the backplane connectors. You hear a click when it is connected.
Step 4
If you are installing a second 16-channel mux/demux module, insert the module without OSC carefully
into the bottom motherboard slot while guiding the upper and lower edges of the module in the tracks
until its connectors come into contact with the backplane connectors. You hear a click when it is
connected.
Installing Line Card Motherboards and Transponder Modules
You can install up to eight hot-swappable line card motherboards in slots 2 to 5 and 8 to 11 of the
Cisco ONS 15540 ESP chassis.
Each line card motherboard holds up to four transponder modules that have a single protocol-transparent
and bit-rate transparent external interface to the client side network and an internal interface that
connects over the system's backplane to the mux/demux modules. The transponder modules are
hot-pluggable, allowing in-service upgrades and replacement.
Optical Transport Turn-Up and Test Guide
2-6
78-14964-01
Chapter 2
Quick Installation Procedures
Installing Cisco ONS 15540 ESP Hardware
Transponders are available in single-mode, and multimode. Line card motherboards are available with
or without splitter protection.
Note
In Cisco ONS 15540 ESP systems, there are additional rules for slot placement of mux/demux modules
and line cards. For more information on shelf rules, refer to the Cisco ONS 15540 ESP Planning and
Design Guide.
Installing Line Card Motherboards
Perform the following procedure to install the line card motherboard.
Step 1
Remove the backplane side dust covers and the transponder side dust covers from the motherboard, and
clean the optical connectors. See the “Cleaning Optical Connectors” section on page 2-28.
Step 2
Insert the motherboard carefully into the chassis slot while guiding the upper and lower edges of the
motherboard in the tracks until its connectors come into contact with the backplane.
Step 3
Use the handles to push the line card motherboard in until it is fully seated in the backplane connector.
Step 4
Use a 3/16-inch flat-blade screwdriver to tighten the captive installation screws.
Step 5
Install blank covers into the unused motherboard slots.
Table 2-3 lists the LEDs on the line card motherboard faceplate, their default conditions, and what the
conditions indicate.
Table 2-3
Line Card Motherboard LEDs
LED
Status
Description
Status
Blinking green
Motherboard has a good system clock from the primary
processor and is out of the reset state.
Solid green
Software initialization is successful.
Orange
System clock is not present. Board is unavailable.
Off
Board failure
Optical Transport Turn-Up and Test Guide
78-14964-01
2-7
Chapter 2
Quick Installation Procedures
Installing Cisco ONS 15540 ESP Hardware
Installing SM Transponder Modules or MM Transponder Modules
Perform the following procedure to install SM transponder modules or MM transponder modules.
Step 1
Remove the dust covers from the module, and clean the optical connectors. See the “Cleaning Optical
Connectors” section on page 2-28.
Step 2
Lift the latch handle on the transponder module and insert the module carefully into the motherboard
slot while guiding the upper and lower edges of the module in the tracks until its connectors come into
contact with the backplane connectors. You hear a click when it is connected.
Step 3
Push the latch on the module down to secure the module in place.
Table 2-4 lists the LEDs for the extended range transponder module.
Table 2-4
SM Transponder or MM Transponder Module LEDs
LED
Status
Description
LCL RX OK
Green
Data is received on the client side.
TRUNK RX OK
Green
Data is received on the trunk side.
LCL TX ENABLE
Green
Client side transmit laser is enabled.
TRUNK TX ENABLE
Green
Trunk side transmit laser is enabled.
Installing Extended Range Transponder Modules
Perform the following procedure to install extended range transponder modules.
Step 1
Remove the dust covers from the module, and clean the optical connectors. See the “Cleaning Optical
Connectors” section on page 2-28.
Step 2
Install the transceiver by inserting it into the extended range transponder. Push the transceiver until it is
securely set in the module.
Optical Transport Turn-Up and Test Guide
2-8
78-14964-01
Chapter 2
Quick Installation Procedures
Installing Cisco ONS 15540 ESP Hardware
Step 3
Lift the latch handle on the extended range transponder module and insert the module carefully into the
motherboard slot while guiding the upper and lower edges of the module in the tracks until its connectors
come into contact with the backplane connectors. You hear a click when it is connected.
Step 4
Push the latch on the module down to secure the module in place.
Table 2-5 lists the LEDs for the extended range transponder module.
Table 2-5
Extended Range Transponder Module LEDs
LED
Status
Description
CLIENT RX
Green
Data is received on the client side.
TRUNK RX
Green
Data is received on the trunk side.
CLIENT TX
Green
Client side transmit laser is enabled.
TRUNK TX
Green
Trunk side transmit laser is enabled.
Cabling Transponder Modules
To install fiber-optic cables in the Cisco ONS 15540 ESP, a fiber cable with the corresponding connector
type must be connected to the transmit and receive ports on the modules. On Cisco ONS 15540 optical
ports, the top connector is Transmit and the bottom connector is Receive. Label the transmit and receive
and the working and protection fibers at each end of the fiber span to avoid confusion with cables that
are similar in appearance.
Step 1
Place the connector in front of the connection point on the transponder module faceplate. Each
transponder module has at least one transmit and one receive connector to create an optical carrier port.
Step 2
Align the keyed ridge of the cable connector with the receiving slot on the faceplate connection point.
Gently push the cable connector into the faceplate connection point until the connector snaps into place.
Step 3
Route fiber cables through the cable retaining clips on the optical card faceplate into the cable
management tray on the bottom of the shelf assembly.
Step 4
Route the fiber cables from the cable management tray out of the right side of the shelf assembly through
cutout holes from the cable management tray.
Cabling Mux/Demux Modules
This section describes the connections between pairs of mux/demux modules and between mux/demux
modules and mux/demux motherboards in the Cisco ONS 15540 ESP. The assumption is made that the
motherboard and modules are already installed and checked.
Optical Transport Turn-Up and Test Guide
78-14964-01
2-9
Chapter 2
Quick Installation Procedures
Installing Cisco ONS 15540 ESPx Hardware
Connecting Mux/Demux Module and OSC Ports
Perform the following steps to connect the motherboard and module. Use MU-MU connectors (short
fiber length) to connect OSC ports of the motherboard to OSC In and OSC Out on the module.
Step 1
Connect OSC Tx from the motherboard to OSC In on the module.
Step 2
Connect OSC Rx from the motherboard to OSC Out on the module.
Connecting 4-Channel or 8-Channel Mux/Demux Modules
If you have more than one 4-channel or 8-channel mux/demux module, perform the following steps to
cascade the modules. Use MU-MU connectors (short fiber length) to connect the modules.
Step 1
Connect the Thru Out port of the module with the DWDM Trunk to Trunk In of the next module in slot 0.
Step 2
Connect the Thru Out of the remaining modules to Trunk In of the next module in slot 0.
Step 3
Perform the steps above for Thru In and Trunk Out in the same slot. Repeat the steps above for slot 1.
Step 4
Connect the trunk fiber to the mux/demux module.
Installing Cisco ONS 15540 ESPx Hardware
Perform these procedures for the Cisco ONS 15540 ESPx
•
Preparing to Install the Chassis, page 2-11
•
Installing the Chassis, page 2-11
•
Installing Cross Connect Drawers, page 2-12
•
Installing the Processor Card, page 2-13
•
Installing Mux/Demux Motherboards and Mux/Demux Modules, page 2-15
•
Installing Line Card Motherboards and Transponder Modules, page 2-17
•
Cabling Transponder Modules, page 2-19
•
Cabling Mux/Demux Modules, page 2-20
•
Cabling Together Mux/Demux Modules and Line Card Motherboards, page 2-20
Optical Transport Turn-Up and Test Guide
2-10
78-14964-01
Chapter 2
Quick Installation Procedures
Installing Cisco ONS 15540 ESPx Hardware
Preparing to Install the Chassis
Perform this procedure to install the Cisco ONS 15540 ESPx chassis in a standard 19-inch rack:
Step 1
Place the L brackets on the sides of the chassis.
Step 2
Secure the L brackets to the chassis using the #12-24 screws provided in the rack-mount kit. Use seven
screws on each L bracket on the sides of the chassis. Start with the first screw at the top of the chassis
and use a screw every two rack units to equally space the screws out and safely secure the chassis in the
rack.
Installing the Chassis
Warning
Only trained and qualified personnel should be allowed to install, replace, or service this equipment.
To install the chassis in the rack, follow these steps:
Step 1
Grasp the bottom edge of the chassis with one hand near the front and the other on the handles. With one
person at each side of the chassis, use the handles on the chassis to slowly lift the chassis in unison.
Step 2
Position the chassis in the rack.
Step 3
Align the mounting holes in the L bracket with the mounting holes in the equipment rack.
Step 4
Use the 12-24 screws shipped with the chassis to mount the chassis in the rack. Use seven screws on each
L bracket on the sides of the chassis. Start with the first screw at the top of the chassis and use a screw
every two rack units to equally space out the screws and safely secure the chassis in the rack.
Step 5
Place the cable management tray over the fan assembly, ensuring that the tray is just under the chassis
slots.
Step 6
If installing a cable management tray, secure the tray to the rack with four 12-24 screws, two on each
side. To ensure correct placement of the tray, install the second of the two screws in the sixth slot up
from the bottom of the chassis rack.
Note
Step 7
Test the cable management tray placement before cabling up the system.
Attach the top cable management guide to the chassis just above the slots using the 12-24 screws. Make
sure the grounding holes are visible through the top cable management guide.
Optical Transport Turn-Up and Test Guide
78-14964-01
2-11
Chapter 2
Quick Installation Procedures
Installing Cisco ONS 15540 ESPx Hardware
Installing Cross Connect Drawers
The process for installing the cable storage and cross connect drawers is the same. The order of
placement beneath the chassis is important, and the drawers should be installed in the following order
from top to bottom:
a. Cable storage drawer
b. Cross connect drawer
c. Cross connect drawer
d. Cable storage drawer
e. Cross connect drawer
f. Cross connect drawer
The first cable storage drawer can be used for direct connections and for connections that use the first
and second cross connect drawers. Each cable storage drawer stores cables for two cross connect
drawers.
The cross connect and cable storage drawers ship with the rack mount ears already installed. To install
the cross connect and cable storage drawers into the rack, follow these steps:
Step 1
Hold the drawer with both hands and position the drawer in the rack beneath the chassis. All drawers
following this first one can be stacked directly underneath each other.
Step 2
Align the mounting holes on the bracket with the mounting holes in the equipment rack.
Step 3
Install the 12-24 or 10-32 screws through the elongated holes in the brackets and into the threaded holes
in the mounting post. Repeat this step for the other side.
Installing the Adapters in the Cross Connect Drawers
The cross connect drawers for the Cisco ONS 15540 ESPx ship bare and require installation of the
adapters into your cross connect panels. You must have these adapters for cross connecting cables in
your system.
To install adapters into the cross connect panels, follow these steps:
Step 1
Open the cross connect drawer.
Step 2
Lock the drawer in the open position by pushing the lever at the back left of the drawer down into the
locked position.
Step 3
Pull up the cross connect panel by flipping up the latches and using them to pull up the panel
simultaneously.
Step 4
Remove the adapter from its packaging.
Step 5
Insert the adapter into the panel from the front.
Step 6
Flip the latches down and push the panel down when all desired adapters have been installed.
Optical Transport Turn-Up and Test Guide
2-12
78-14964-01
Chapter 2
Quick Installation Procedures
Installing Cisco ONS 15540 ESPx Hardware
Installing the Vertical Cable Guides
Vertical cable guides for the Cisco ONS 15540 ESPx are installed onto the rack next to the cross connect
drawers. They are used to guide and hold down the cables from the line card motherboards into the cross
connect drawers.
To install the vertical cable guides onto the chassis, follow these steps:
Step 1
Make sure you have the correct vertical cable guide for the side of the rack you are installing on.
Step 2
Hold the vertical cable guide over the rack next to the correct storage or cross connect drawer
Step 3
Align the mounting holes on the vertical cable guide with the mounting holes in the equipment rack.
Step 4
Secure the vertical cable guides with 12-24 or 10-32 screws.
Installing the Processor Card
Perform the following procedure to install the processor card in the Cisco ONS 15540 ESPx:
Step 1
Insert the processor card carefully into chassis slot 6. Guide the upper and lower edges of the
motherboard or processor card in the tracks until its connectors come into contact with the backplane.
Step 2
Use your thumb and forefinger of each hand to simultaneously push the motherboard or processor card
in until it is fully seated in the backplane connector.
Step 3
Use a 3/16-inch flat-blade screwdriver to tighten the captive installation screws.
Step 4
If not installing a redundant processor card, insert a blank card into slot 7.
Table 2-6 lists the LEDs on the processor card faceplate, their default conditions, and what the
conditions indicate.
Table 2-6
Processor Card LEDs
LED
Status
Description
Status
Red
A board resets or initially powers on.
Orange
System initialization.
Green
Full initialization and operational.
Active
Green
This board is the primary processor and is running IOS software.
Standby
Green
This board is the secondary processor.
Slot 0
Green
Flash PC Card is present.
Slot 1
Green
Flash PC Card is present.
Green
Full duplex is running.
Off
Half duplex is running.
Green
Operating at 100 Mbps.
Off
Operating at 10 Mbps.
NME
1
Full Duplex
100 Mbps
Optical Transport Turn-Up and Test Guide
78-14964-01
2-13
Chapter 2
Quick Installation Procedures
Installing Cisco ONS 15540 ESPx Hardware
Table 2-6
Processor Card LEDs (continued)
LED
Status
Description
Link
Green
Link is up.
Off
Link is down.
Green
Full duplex is running.
Off
Half duplex is running.
Green
Operating at 100 Mbps.
Off
Operating at 10 Mbps.
Green
Link is up.
Off
Link is down.
Critical Alarm
Yellow
A critical alarm condition exists.
Major Alarm
Yellow
A major alarm condition exists.
Minor Alarm
Yellow
A minor alarm condition exists.
Alarm Cutoff
Yellow
A major or minor alarm condition exists and the cutoff button has
been pushed. Turns off by software when the original alarm clears
or any new alarm occurs.
History
Yellow
A major or minor alarm occurred. Clears if the History Clear
button is pushed and no alarm exists.
ASE2
Full Duplex
100 Mbps
Link
1. NME = network management Ethernet
2. ASE = aggregation shelf Ethernet
To install a redundant processor card, perform the next procedure.
For more details about using the Console Ports, NME Ports, and Auxiliary Ports of the processor card
refer to the Cisco ONS 15540 ESPx Configuration Guide and Command Reference.
Installing the Redundant Processor Card
Perform the following procedure to install the redundant processor card:
Step 1
Insert the processor card carefully into chassis slot 7. Guide the upper and lower edges of the
motherboard or processor card in the tracks until its connectors come into contact with the backplane.
Step 2
Use your thumb and forefinger of each hand to simultaneously push the motherboard or processor card
in until it is fully seated in the backplane connector.
Step 3
Use a 3/16-inch flat-blade screwdriver to tighten the captive installation screws.
For more details on redundant processors refer to the Cisco ONS 15540 ESPx Configuration Guide and
Command Reference.
Optical Transport Turn-Up and Test Guide
2-14
78-14964-01
Chapter 2
Quick Installation Procedures
Installing Cisco ONS 15540 ESPx Hardware
Connecting the Console Port
The console port is a female, DCE (data communications equipment), DB-25 receptacle used for
connection to a console terminal or modem. To connect cables to the console port, follow these steps:
Step 1
Place the DB-25 connector in front of the console port on the processor card faceplate.
Step 2
Align the male DB-25 connector with the female console port.
Step 3
Gently push the DB-25 connector into the console port and secure it into place by tightening the side
screws on the DB-25 connector.
Step 4
Route the fiber cables down through the cutout holes on the cable management tray out of the right side
of the shelf assembly.
Installing Mux/Demux Motherboards and Mux/Demux Modules
The Cisco ONS 15540 ESPx chassis uses one optical mux/demux motherboard for unprotected
operation or two per system for protected operation.
Installing Mux/Demux Motherboards
You can install up to two mux/demux motherboards into slot 0 and slot 1. Perform the following
procedure to install a mux/demux motherboard.
Step 1
Insert the card carefully into the chassis slot. Guide the upper and lower edges of the motherboard or
processor card in the tracks until its connectors come into contact with the backplane.
Step 2
Use your thumb and forefinger of each hand to simultaneously push the card in until it is fully seated in
the backplane connector.
Step 3
Use a 3/16-inch flat-blade screwdriver to tighten the captive installation screws.
Installing 4-Channel or 8-Channel Mux/Demux Modules
This section describes the procedure for installing a 4-channel or 8-channel mux/demux module in the
Cisco ONS 15540 ESPx. Up to four 4-channel or 8-channel mux/demux modules can be installed in a
mux/demux motherboard.
Optical Transport Turn-Up and Test Guide
78-14964-01
2-15
Chapter 2
Quick Installation Procedures
Installing Cisco ONS 15540 ESPx Hardware
To install the module, follow these steps:
Step 1
Remove the dust covers from the module, and clean the optical connectors. See the “Cleaning Optical
Connectors” section on page 2-28.
Caution
Step 2
Wear grounding wrist straps to avoid ESD damage to the card. Do not directly touch the
backplane with your hand or any metal tool, or you could shock yourself.
Insert the module carefully into the motherboard slot while guiding the upper and lower edges of the
module in the tracks until its connectors come into contact with the backplane connectors. You hear a
click when it is connected.
Installing 32-Channel Mux/Demux Modules
This section describes the procedure for installing a 32-channel mux/demux module in the
Cisco ONS 15540 ESPx. One 32-channel terminal mux/demux module can be installed in slot 0 or slot 1
of the chassis.
To install the module, follow these steps:
Step 1
Remove the dust covers from the module, and clean the optical connectors. See the “Cleaning Optical
Connectors” section on page 2-28.
Caution
Step 2
Wear grounding wrist straps to avoid ESD damage to the card. Do not directly touch the
backplane with your hand or any metal tool, or you could shock yourself.
Insert the module carefully into the motherboard slot while guiding the upper and lower edges of the
module in the tracks until its connectors come into contact with the backplane connectors. You hear a
click when it is connected.
Table 2-7 lists the LEDs on the mux/demux motherboard with OSC faceplate, their default conditions,
and what the conditions indicate.
Note
Mux/demux motherboards without OSC have no LEDs.
Optical Transport Turn-Up and Test Guide
2-16
78-14964-01
Chapter 2
Quick Installation Procedures
Installing Cisco ONS 15540 ESPx Hardware
Table 2-7
Mux/Demux Motherboard LEDs
LED
Status
Description
Status
Blinking green
Motherboard has a good system clock from the primary
processor and is out of the reset state.
Solid green
Software initialization is successful.
Orange
System clock is not present. Board is unavailable.
Off
Board failure
Solid green
OSC is present and the optical laser output is enabled.
Off
OSC is not present and the optical laser output is disabled.
Solid green
OSC is present and the receiver is enabled.
Off
OSC is not present and the receiver is disabled.
Tx
Rx
Installing Line Card Motherboards and Transponder Modules
You can install up to eight hot-swappable line card motherboards in slots 2 to 5 and 8 to 11 of the
Cisco ONS 15540 ESPx chassis.
Each line card motherboard holds up to four transponder modules that have a single protocol-transparent
and bit-rate transparent external interface to the client side network and an internal interface that
connects over the system's backplane to the mux/demux modules. The transponder modules are
hot-pluggable, allowing in-service upgrades and replacement.
Transponders are available in single-mode and multimode. Line card motherboards are available with or
without splitter protection.
Installing Line Card Motherboards
Perform the following procedure to install the line card motherboard:
Step 1
Remove the transponder side dust covers from the motherboard, and clean the optical connectors. See
the “Cleaning Optical Connectors” section on page 2-28.
Step 2
Insert the motherboard carefully into the chassis slot while guiding the upper and lower edges of the
motherboard in the tracks until its connectors come into contact with the backplane.
Optical Transport Turn-Up and Test Guide
78-14964-01
2-17
Chapter 2
Quick Installation Procedures
Installing Cisco ONS 15540 ESPx Hardware
Step 3
Use the handles to push the line card motherboard in until it is fully seated in the backplane connector.
Step 4
Install blank covers into the unused motherboard slots.
Table 2-8 lists the LEDs on the line card motherboard faceplate, their default conditions, and what the
conditions indicate.
Table 2-8
Line Card Motherboard LEDs
LED
Status
Description
Status
Blinking green
Motherboard has a good system clock from the primary
processor and is out of the reset state.
Solid green
Software initialization is successful.
Orange
System clock is not present. Board is unavailable.
Off
Board failure
Installing SM Transponder Modules or MM Transponder Modules
Perform this procedure to install SM transponder modules or MM transponder modules.
Step 1
Remove the dust covers from the module, and clean the optical connectors. See the “Cleaning Optical
Connectors” section on page 2-28.
Step 2
Lift the latch handle on the transponder module and insert the module carefully into the motherboard
slot while guiding the upper and lower edges of the module in the tracks until its connectors come into
contact with the backplane connectors. You hear a click when it is connected.
Step 3
Push the latch on the module down to secure the module in place.
Table 2-9 lists the LEDs for the extended range transponder module.
Table 2-9
SM Transponder or MM Transponder Module LEDs
LED
Status
Description
LCL RX OK
Green
Data is received on the client side.
TRUNK RX OK
Green
Data is received on the trunk side.
LCL TX ENABLE
Green
Client side transmit laser is enabled.
TRUNK TX ENABLE
Green
Trunk side transmit laser is enabled.
Optical Transport Turn-Up and Test Guide
2-18
78-14964-01
Chapter 2
Quick Installation Procedures
Installing Cisco ONS 15540 ESPx Hardware
Installing Extended Range Transponder Modules
Perform this procedure to install extended range transponder modules.
Step 1
Remove the dust covers from the module, and clean the optical connectors. See the “Cleaning Optical
Connectors” section on page 2-28.
Step 2
Install the transceiver by inserting it into the extended range transponder. Push the transceiver until it is
securely set in the module.
Step 3
Lift the latch handle on the extended range transponder module and insert the module carefully into the
motherboard slot while guiding the upper and lower edges of the module in the tracks until its connectors
come into contact with the backplane connectors. You hear a click when it is connected.
Step 4
Push the latch on the module down to secure the module in place.
Table 2-10 lists the LEDs for the extended range transponder module.
Table 2-10 Extended Range Transponder Module LEDs
LED
Status
Description
CLIENT RX
Green
Data is received on the client side.
TRUNK RX
Green
Data is received on the trunk side.
CLIENT TX
Green
Client side transmit laser is enabled.
TRUNK TX
Green
Trunk side transmit laser is enabled.
Cabling Transponder Modules
To install fiber-optic cables in the Cisco ONS 15540 ESPx, a fiber cable with the corresponding
connector type must be connected to the transmit and receive ports on the modules. We recommend that
you label the transmit, receive and the working and protection fibers at each end of the fiber span to avoid
confusion with cables that are similar in appearance. Labels that you can use to do this are shipped with
the system.
To cable the transponder module client equipment, follow these steps:
Step 1
Place the cable connector in front of the connection point on the transponder module faceplate. Each
transponder module supports at least one transmit and one receive connector to create an optical carrier
port.
Step 2
Align the keyed ridge of the cable connector with the receiving slot on the faceplate connection point.
Step 3
Gently push the cable connector into the faceplate connection point until the connector snaps into place.
Step 4
Route the fiber cables down through the cable management tray out of the right side of the shelf
assembly.
Optical Transport Turn-Up and Test Guide
78-14964-01
2-19
Chapter 2
Quick Installation Procedures
Installing Cisco ONS 15540 ESPx Hardware
Cabling Mux/Demux Modules
This section describes the connections between pairs of mux/demux modules and between mux/demux
modules and mux/demux motherboards in the Cisco ONS 15540 ESPx. The assumption is made that the
motherboard and modules are already installed and checked.
Connecting Mux/Demux Module and OSC Ports
Perform the following steps to connect the motherboard and module. Use MU-MU connectors (short
fiber length) to connect OSC ports of the motherboard to OSC In and OSC Out on the module.
Step 1
Connect OSC Tx from the motherboard to OSC In on the module.
Step 2
Connect OSC Rx from the motherboard to OSC Out on the module.
Connecting 4-Channel or 8-Channel Mux/Demux Modules
If you have more than one 4-channel or 8-channel mux/demux module, perform the following steps to
cascade the modules. Use MU-MU connectors (short fiber length) to connect the modules.
Step 1
Connect the Thru Out port of the module with the DWDM Trunk to Trunk In of the next module in slot 0.
Step 2
Connect the Thru Out of the remaining modules to Trunk In of the next module in slot 0.
Step 3
Perform the steps above for Thru In and Trunk Out in the same slot. Repeat the steps above for slot 1.
Step 4
Connect the trunk fiber to the mux/demux module.
Cabling Together Mux/Demux Modules and Line Card Motherboards
Optical components on the Cisco ONS 15540 ESPx can be cabled together in two different ways:
•
Direct connections with an MTP cable storage drawer
•
With cross connect drawers.
Optical Transport Turn-Up and Test Guide
2-20
78-14964-01
Chapter 2
Quick Installation Procedures
Installing Cisco ONS 15540 ESPx Hardware
Cabling Directly with Cable Storage Drawers
To connect the Cisco ONS 15540 ESPx directly, follow these steps:
Step 1
Open the cable storage drawer by pushing the tabs in to release the lock on the drawer (Figure 2-1).
Opening the Cable Storage Drawer
77639
Figure 2-1
Optical Transport Turn-Up and Test Guide
78-14964-01
2-21
Chapter 2
Quick Installation Procedures
Installing Cisco ONS 15540 ESPx Hardware
Step 2
Pull out the cable storage drawer (Figure 2-2 on page 2-22).
Pulling out the Cable Storage Drawer
79725
Figure 2-2
Optical Transport Turn-Up and Test Guide
2-22
78-14964-01
Chapter 2
Quick Installation Procedures
Installing Cisco ONS 15540 ESPx Hardware
Step 3
Lock the drawer in the open position by pushing the latch at the back left of the drawer down into the
locked position (Figure 2-3 on page 2-23).
Locking the Drawer
79527
Figure 2-3
Step 4
Use the MTP cable installation tool to push the MTP connector of the cable into the adapter on the
mux/demux until the connector snaps into place.
Step 5
Route the MTP cable down through the cutout holes on the cable management tray on the bottom of the
shelf assembly. Pull the cable out the left side of the tray.
Step 6
Route the cable down the left side of the chassis and into the drawer. Continue to route the cable through
the drawer around the round cable retainers to the right side.
Step 7
Pull the cable up out of the right side of the drawer and the back up through the cutout holes on the cable
management tray.
Step 8
Insert the MTP connector into the MTP adapter on the desired line card motherboard.
Step 9
To close the drawer, unlock it by moving the latch back into an upright position.
Connecting Mux/Demux Modules and Line Card Motherboards to the Cross Connect Drawer
The line card motherboards and the mux/demux modules on the Cisco ONS 15540 ESPx can connect to
each other through the cross connect drawers using MTP-to-MU breakout cables (Figure 2-6 on
page 2-26). Each breakout cable has an MTP connector on one end and eight individual MU connectors
on the other end.
Each cross connect drawer is an 8-channel drawer. To configure a 32-channel system you need four
drawers and two cable storage drawers. All MTP and MTP to MU breakout cables are pulled out to the
left of the chassis and enter the drawers on the left side of the cable storage drawers. They then route out
Optical Transport Turn-Up and Test Guide
78-14964-01
2-23
Chapter 2
Quick Installation Procedures
Installing Cisco ONS 15540 ESPx Hardware
of the right of the cable storage drawer, enter the cross connect drawers through the right side, and
connect to their destination connector. The breakout cables are color coded and should be matched to
their corresponding colors on the cross connect panel inside the drawer.
The cabling route inside the drawers is suggested cabling only. Use your own judgement as to how to
best route your cable in the drawer according to your configuration and cable length.
Figure 2-4 shows connections at the cross connect drawer for a configuration with two 8-channel
splitter-based line card motherboards.
Figure 2-4
Cross Connect Drawer on the Cisco ONS 15540 ESPx with 8-Channel Splitter-Based Line
Card Motherboard
-
Splitter Based LCMB 2
4 TSP ITU
Wavelengths
from
LCMB 1W
4 TSP ITU
Wavelengths
from
LCMB 1E
4 TSP ITU
Wavelengths
from
LCMB 2W
4 TSP ITU
Wavelengths
from
LCMB 2E
To West
Mux/Demux
To East
Mux/Demux
To West
Mux/Demux
To East
Mux/Demux
85349
Splitter Based LCMB 1
Optical Transport Turn-Up and Test Guide
2-24
78-14964-01
Chapter 2
Quick Installation Procedures
Installing Cisco ONS 15540 ESPx Hardware
Figure 2-5 shows an unprotected configuration using four line card motherboards.
Figure 2-5
Cross Connect Drawer on the Cisco ONS 15540 ESPx with 16-Channel Line Card
Motherboard
-
Non- Splitter Based LCMB
4 TSP ITU
Wavelengths
4 TSP ITU
Wavelengths
4 TSP ITU
Wavelengths
LCMB 1
LCMB 2
LCMB 3
LCMB 4
To West
Mux/Demux
To East
Mux/Demux
To West
Mux/Demux
To East
Mux/Demux
85350
4 TSP ITU
Wavelengths
Optical Transport Turn-Up and Test Guide
78-14964-01
2-25
Chapter 2
Quick Installation Procedures
Installing Cisco ONS 15540 ESPx Hardware
Figure 2-6 shows the cross connect drawer on the Cisco ONS 15540 ESPx.
Figure 2-6
Cross Connect Drawer on the Cisco ONS 15540 ESPx
-
LINECARD
LINECARD
LINECARD
LINECARD
MUX-DEMUX
MUX-DEMUX
MUX-DEMUX
MUX-DEMUX
85394
Blue
Grey
Orange
White
Green
Red
Brown
Black
1 TX
1 RX
2 TX
2 RX
3 TX
3 RX
4 TX
4 RX
1 TX
1 RX
2 TX
2 RX
3 TX
3 RX
4 TX
4 RX
Perform the following procedure to connect through the cross connect drawer.
Step 1
Open the cable storage drawer by pushing the tabs in to release the lock on the drawer.
Step 2
Pull out the cable storage drawer.
Step 3
Lock the drawer in the open position by pushing the lever at the back left of the drawer down in the lock
position.
Step 4
Use the MTP cable installation tool to push the MTP connector of the cable into the adapter on the
mux/demux module until the connector snaps into place.
Step 5
Route the MTP cable down through the cutout holes on the cable management tray on the bottom of the
shelf assembly. Pull the cable out the left side of the tray.
Step 6
Route the MTP cable down through the cable management tray. Pull the cable out the left side of the tray.
Step 7
Route the cable down the left side of the chassis and into the drawer.
Step 8
Continue to route the cable through the drawer around the round cable retainers to the right side.
Step 9
Close the cable storage drawer once you route the cables out of the right side and you unlock the drawer.
Step 10
Open the cross connect drawer appropriate for your system configuration.
Step 11
Flip the latches on the cross connect panel up and use them to pull the panel up.
Step 12
Route the MU breakout end of the cable in through the left side of the drawer.
Step 13
Mount the transition box.
Optical Transport Turn-Up and Test Guide
2-26
78-14964-01
Chapter 2
Quick Installation Procedures
Common Installation Procedures
Step 14
Connect the MU breakout end of the cable to the bottom half of the desired adapter mux/demux
connections on the inner side of the cross connect panel. These are color coded and should be connected
by matching the color on the panel to the colored wires out of the transition box. See Figure 2-6.
Step 15
Connect the line card motherboard to the cross connect panel in the same way as the mux/demux cabling
on the left hand side of the chassis as well. Connect the MU breakout end of the cable to the top half of
the connections on the inner side of the cross connect panel.
Connecting Mux/Demux Modules and Transponder Modules
To connect the mux/demux modules and transponder modules in the cross connect drawer, use the MU
to MU cables. Each cross connect drawer is an eight-channel drawer. To configure a 32-channel system
you need four drawers and two cable storage drawers. MTP and MTP to MU breakout cables are pulled
out to the left of the chassis and enter the drawers on the left side of the cable storage drawers. Route
out of the right of the cable storage drawer and enter the cross connect drawers through the right side
and connect to their destination connector.
Follow these steps to connect mux/demux and transponders.
Step 1
Connect one end of the MU to MU cable to the top half of the desired mux/demux connections on the
outside of the cross connect panel.
Step 2
Connect the other end of the same MU to MU cable to the bottom half of the desired line card
motherboard connection on the outside of the cross connect panel.
Step 3
Push the panel down and lock it by pushing the tabs down.
Step 4
Push the drawer in when your connections are completed.
Common Installation Procedures
After completing the installation procedures for the Cisco ONS 15540 ESP or Cisco ONS 15540 ESPx,
perform these procedures common to both platforms:
•
Shelf Grounding Procedure, page 2-27
•
Cleaning the Shelf, page 2-28
•
Powering Up the Chassis, page 2-29
•
Verifying Installation of Hardware, page 2-30
Shelf Grounding Procedure
This section describes how to connect the Cisco ONS 15540 to earth ground. You must complete this
procedure before connecting system power or powering up your shelf.
Tip
If you use the cable management guides, install the grounding equipment after you install the top cable
management guide.
Optical Transport Turn-Up and Test Guide
78-14964-01
2-27
Chapter 2
Quick Installation Procedures
Common Installation Procedures
To ground the shelf, follow these steps:
Step 1
Use a wire-stripping tool to remove approximately 0.75 inch (20 mm) of the covering from the end of
the grounding wire.
Step 2
Insert the stripped end of the grounding wire into the open end of the grounding lug.
Step 3
Use the crimping tool to secure the grounding wire in place in the grounding lug.
Step 4
Locate the grounding receptacle on the chassis.
Step 5
Remove the label that covers the grounding receptacle.
Step 6 is optional if you are not using the top cable management guide.
Note
Step 6
Place the lug mounting adapter against the grounding receptacle at the top of the chassis.
Step 7
Place the grounding lug against the lug mounting adapter.
Step 8
Insert two screws through the holes in the grounding lug and the grounding receptacle. Ensure that the
grounding lug does not interfere with other hardware or rack equipment.
Step 9
Install the locking washers and nuts; tighten them to secure the grounding lug to the grounding
receptacle.
Step 10
Prepare the other end of the grounding wire and connect it to an appropriate grounding point in your site
to ensure adequate earth ground for the Cisco ONS 15540.
Cleaning the Shelf
Be careful with the airflow system when you clean the chassis. If the cleaning process must be done
while the system is running, be aware that the airflow system is in operation. Clean the chassis with a
damp cloth only and be careful of the following:
Warning
•
Do not touch the airflow system while fans are operating.
•
Do not use wet tissues for cleaning the chassis.
•
Do not use any harsh or abrasive cleaning agents.
Invisible laser radiation might be emitted from the end of the fiber or connector. Do not stare into the
beam or view directly with optical instruments.
Cleaning Optical Connectors
When installing your optical connectors, consider the following issues:
•
Dirty optical connectors are a common source of light loss. Keep the connectors clean at all times
and keep the dust cover installed when not in use.
•
Before installing any type of cable or connector, use a lint-free alcohol pad from a cleaning kit to
clean the ferrule, the protective white tube around the fiber, and the end-face surface of the fiber.
•
As a general rule, whenever there is a significant, unexplained loss of light, clean the connectors.
Optical Transport Turn-Up and Test Guide
2-28
78-14964-01
Chapter 2
Quick Installation Procedures
Common Installation Procedures
Caution
Use extreme care when removing or installing connectors so you do not damage the connector housing
or scratch the end-face surface of the fiber. Always install filler modules on unused or disconnected
components to prevent contamination. Always clean fiber connectors before installing them.
Use a swab saturated with isopropyl alcohol to clean the end-surfaces. Use dry, oil-free compressed air
after applying the isopropyl alcohol.
To clean the optical connectors, follow these steps:
Step 1
Wipe the ferrules and end-face surfaces of the connector gently with an alcohol pad from the cleaning
kit. Be sure that the pad makes full contact with the end-face surfaces. Wait five seconds for the surfaces
to dry and repeat.
Step 2
Blow dry the connectors with canned, dry, oil-free, compressed air.
Step 3
Use a magnifying glass to inspect the ferrule.
The connectors used inside the system have been cleaned by the manufacturer and connected to the
adapters in the proper manner. The operation of the system should be error free if the customer provides
clean connectors on the application side, follows the previous directions, and ensures the following:
•
Clean the connectors using lens tissues before connecting to the adapters. Use pure alcohol to
remove soil.
•
Do not clean the inside of the connector adapters. Do not use force or quick movements when
connecting the fiber optic connectors in the adapters.
•
Cover the connector adapters to avoid soiling or contaminating the inside of the adapters while
cleaning the chassis. When not using the connectors, cover the connectors and adapters to avoid the
inside of the adapters or the surface of the connectors from getting dirty.
Note
If the surface is not clean or does not have a uniform shine, repeat the process using a fresh
surface of the alcohol pad.
Powering Up the Chassis
Before powering up the chassis, the following conditions must be met:
•
The system is set for the correct AC (or DC) power voltages. Refer to the Cisco ONS 15540 ESP
Hardware Installation Guide or the Cisco ONS 15540 ESPx Hardware Installation Guide for power
voltages.
•
You must verify the rectifier status. Use a voltmeter on the DC output of the rectifier to verify the
operational status of the rectifier.
•
The power cables are connected to the system.
•
A console terminal is connected to the system.
Optical Transport Turn-Up and Test Guide
78-14964-01
2-29
Chapter 2
Quick Installation Procedures
Common Installation Procedures
Verifying the Power Up
Once you have met the conditions in the “Powering Up the Chassis” section, power up the system. The
CLI (command-line interface) prompts you to enter the initial configuration dialog. Answer no to this
prompt:
Would you like to enter the initial dialog? [yes]: no
You see the following user EXEC prompt:
Switch>
Step 1
Verify that the Status LED is green.
Step 2
Verify that the Active LED on the primary processor and the Standby LED on the standby processor are
both green.
Step 3
Verify that alarm LEDs are off.
Step 4
Verify that LEDs on mux/demux modules and line card modules are green.
Step 5
Perform a show hardware command to verify the status of both power supplies. The status for both
power supplies should be OK.
Power-Supply Module
Power-Supply A is : OK
Power-Supply B is : OK
Verifying Installation of Hardware
Verify that all hardware is correctly installed by performing a show hardware command.
Verify that all modules in the chassis are reported in the proper slot. Verify that the modules have the
correct hardware version and software version.
Example
The following example shows how to verify the hardware installation:
Switch# show hardware
-------------------------------------------------------------------------------Manhattan_Backplane_PHASE_0 named Switch, Date: 00:46:49 UTC Thu Oct 24 2002
--------------------------------------------------------------------------------------------------------------------------------------------------------------Back-Plane Information
--------------------------------------------------------------------------------------------------------------------------------------------------------------Model
Ver Serial No.
MAC-Address
MAC-Size RMA No RMACode MFG-Date
--------- --- ------------ ----------------- -------- ------ ------- ----------Manhattan 3.0 TBC05031556 00-00-16-44-28-eD 16
0x00
0x00
02/16/2001
-------------------------------------------------------------------------------Slot Orderable Product No.
Part No.
Rev Serial No.
Mfg. Date H/W Ver.
---- ------------------------- ---------- --- ------------ ---------- ---------0/* 15540-MMMB-0100=
73-5656-03 A0 CAB0608MMEX 03/08/2002 3.0
0/0 15540-MDXA-16AD
05-0893-01 2
402114
06/21/2001 1.0
0/2 15540-MDXA-16EH
05-0894-01 2
402273
06/21/2001 1.0
1/* 15540-MMMB-0100=
73-5656-03 A0 CAB0604MDBF 03/25/2002 3.0
1/0 15540-MDXB-08A0
30-1318-01 2
401394
06/21/2001 1.0
Optical Transport Turn-Up and Test Guide
2-30
78-14964-01
Chapter 2
Quick Installation Procedures
Common Installation Procedures
1/2
1/3
2/*
2/0
2/1
2/2
2/3
3/*
5/*
5/3
6/*
7/*
11/*
11/0
11/3
15540-MDXA-08C0=
MA-MDXA-08D0
15540-LCMB-0100=
15540-TSP1-01B3=
15540-TSP1-01B3=
15540-TSP1-03B3=
15540-TSP1-03B3=
15540-LCMB-0100=
15540-LCMB-0100=
15540-TSP1-15B3=
15540-CPU
15540-CPU
15540-LCMB-0100=
15540-TSP1-29B3=
15540-TSP1-31B3=
74-2657-01 A1 ANX06040003 01/21/2002 1.0
30-1317-01 2
401118
06/21/2001 1.0
73-5813-05 02 CAB0525J5VB 02/15/2001 5.1
68-XXXX-XX 02 CAB0537KE7Y 02/23/2001 3.0
68-1510-02 02 CAB06190EWM 05/24/2002 2.1
73-5757-02 02 sak04490026 02/23/2001 2.31
68-1511-02 02 CAB06190EWL 05/24/2002 2.1
68-1372-02 C0 CAB0607MK5V 03/01/2002 5.0
68-1372-01 16 CAB0517HLSF 06/25/2001 5.1
68-1429-01 B0 CAB0549LRNZ 01/04/2002 4.5
73-5621-02 02 CAB0505GZH3 02/15/2001 2.5
73-5621-02 03 CAB0510HATF 02/16/2001 2.3
73-5813-05 05 CAB0516HKE2 03/30/2001 5.1
68-1436-01 B0 CABO549LRP7 01/02/2002 2.5
73-5757-02 10 CAB0518HN8Y 05/23/2001 2.3
-------------------------------------------------------------------------------Power-Supply Module
-------------------------------------------------------------------------------Power-Supply A is : OK
Power-Supply B is : OK
Optical Transport Turn-Up and Test Guide
78-14964-01
2-31
Chapter 2
Quick Installation Procedures
Common Installation Procedures
Optical Transport Turn-Up and Test Guide
2-32
78-14964-01