1
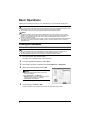
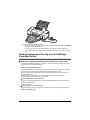
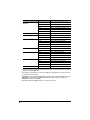
Quick Start Guide Table of Contents Introduction 1 Preparing the Printer 2 Installing the Printer Driver 3 Basic Operations 4 Printing with Windows 4 Printing with Macintosh 5 Printing Photographs Directly from a PictBridge Compliant Device 6 Connecting to a PictBridge Compliant Device 6 Printing Photographs Directly from a PictBridge Compliant Device 7 Reading On-screen Manuals 11 . AND BE QT5-0178-V01 Exif Print This printer supports ExifPrint. Exif Print is a standard for enhancing the communication between digital cameras and printers. By connecting to an Exif Print-compliant digital camera, the camera’s image data at the time of shooting is used and optimized, yielding extremely high quality prints. International ENERGY STAR® Program As an ENERGY STAR® Partner, Canon Inc. has determined that this product meets the ENERGY STAR guidelines for efficiency. The International ENERGY STAR® Office Equipment Program is a global program that promotes energy saving through the use of computer and other office equipment. The program backs the development and dissemination of products with functions that effectively reduce energy consumption. It is an open system in which business can participate voluntarily. The targeted products are office equipment such as computers, monitors, printers, faxes and copiers. Their standards and logos are uniform among participating nations. Power Requirements Never use a power supply voltage other than that supplied in the country of purchase. Using the incorrect voltage could cause a fire or electric shock. The correct power supply voltages and frequencies are as follows: AC 110-240V, 50-60Hz Safety Precautions Warning z Never attempt to plug the power cord into the power outlet or unplug the power cord when your hands are wet. z Never damage, modify, stretch, or excessively bend or twist the power cord. Do not place heavy objects on the power cord. z Never use any power supply other than the standard power supply available in the country of purchase. Using the incorrect voltage and frequency could cause a fire or electric shock. z Always push the plug all the way into the power outlet. Caution z For safety reasons, store ink tanks out of the reach of small children. z Do not drop or shake ink tanks as this may cause the ink to leak out and stain your clothes and hands. Also read the Safety Precautions in the User’s Guide. Observe the warnings and cautions to avoid personal injury or damage to the printer. Printer Model: K10273 (iX5000/iX4000) Euro Introduction Thank you for purchasing a Canon Inkjet Printer. This Quick Start Guide uses the following symbols to indicate important information. Always observe the instructions indicated by these symbols. Warning Instructions that, if ignored, could result in death or serious personal injury caused by incorrect operation of the equipment. These must be observed for safe operation. Caution Instructions that, if ignored, could result in personal injury or material damage caused by incorrect operation of the equipment. These must be observed for safe operation. Important Instructions that must be observed for safe operation. The diagrams and computer screens in this guide refer to the iX5000. The operations are exactly the same with the iX4000, unless otherwise described. Trademark Notices z “Windows” and “Internet Explorer” are trademarks of Microsoft Corporation, registered in the United States and other countries. z “Macintosh” and “Mac” are trademarks of Apple Computer, Inc., registered in the U.S. and other countries. z “Adobe” and “Adobe RGB (1998)” are either registered trademarks or trademarks of Adobe Systems Incorporated in the United States and/or other countries. Copyright ©2006 CANON INC. All rights reserved. No part of this publication may be transmitted or copied in any form whatsoever without the express written permission. Introduction 1 Preparing the Printer Be sure to read your setup sheet first for setting up your printer and getting it ready for use. 1 Turn on the printer. Caution Be sure to remove the tapes before you turn on the printer. Note The tape position is subject to change. 2 Install the Print Head. Caution Do not touch internal parts other than the Print Head Lock Lever. Important If the Top Cover is opened more than ten minutes, the Print Head Holder moves to the right side. If this occurs, close the Top Cover, and open it again. Notes z There might be some transparent or light blue ink on the inside of the bag the print head comes in, or the inside of the protective cap - this has no effect on print quality. Be careful not to get ink on yourself when handling these items. z Do not reattach the protective cap once it has been removed. 3 Install the ink tanks. Important z Ensure that all the ink tanks are installed in the order directed by the label. The printer cannot be used unless all the ink tanks are installed. z Once you have installed the ink tanks, the POWER lamp will flash green. Wait for about two minutes until the POWER lamp displays a steady green light and the printer has stopped making operating noises before proceeding. Notes z Be sure to remove the clear film from the ink tank in the exact order as shown in step 3 of your setup sheet. z Do not squeeze the side of ink tanks as this may cause the ink to leak out and stain your clothes and hands. z Do not reattach the protective cap once you have removed it. z The ALARM lamp on the printer still flashes orange if an ink tank is not installed properly. Open the Top Cover and make sure that all the ink tanks are installed in the correct order directed on the label. 4 Load paper. In the following process, you will be required to perform the Print Head Alignment, and you will need one sheet of A4 or Letter-sized plain paper loaded in the Auto Sheet Feeder. Important Always load paper in portrait orientation. Loading paper in landscape orientation can cause the paper to be jammed. 2 Preparing the Printer Installing the Printer Driver Information Common to Windows® and Macintosh® Notes on the Installation Process z If the Select Language screen appears, select a language, then click Next. z If the Select Your Place of Residence screen appears, select your place of residence, then click Next. z There are two ways of installing the printer driver and other software: Easy Install: the items included on the Setup CD-ROM are installed automatically Custom Install: you can select particular items to install Notes on the Print Head Alignment z Print Head Alignment will take about four minutes to complete. Do not open the Top Cover while printing. z If the pattern is not printed successfully, refer to “Eleven flashes” in “The ALARM Lamp Flashes Orange” in the User’s Guide. Information for Windows Notes z When installing the printer driver in Windows XP or Windows 2000, log on to the system as a member of the Administrators group. z Before installing the driver, disable all anti-virus programs and automatically loading programs. z If the following screen appears automatically, click Cancel to quit the screen and turn off the printer. Next, remove the USB cable connected to your computer. Then start the installation process again. For details on the installation process, refer to your setup sheet. z To install PhotoRecord or Adobe® RGB (1998), click Custom Install and follow the instruction on the screen. z Adobe® RGB (1998) cannot be installed in Windows Me and Windows 98. z When a message asking for your confirmation to restart your computer appears during the installation process, click OK. The system is restarted automatically. z If the connection is not recognized, refer to “Cannot Install Printer Driver” in the User’s Guide. Information for Macintosh Notes z Do not remove or insert the USB cable during installation, as this may result in the computer or printer not operating normally. z Before installing the driver, disable all anti-virus programs and automatically loading programs or remove them from your system folder. z When you perform the Print Head Alignment and cannot find your printer name in Printer List, click Add to add the printer. For details, refer to the Printer Setup Utility Help in the Mac® Help. z To install the User’s Guide in other language than the installed one, double-click the Manual folder in Setup CD-ROM, Canon folder, and then copy a language folder to your hard disk. Installing the Printer Driver 3 Basic Operations Adjusting the print settings according to your needs allows you to produce better quality prints. Caution z If you detect smoke, unusual smells or strange noises around the printer, immediately switch the printer off and always unplug the printer. Contact your local Canon service representative. z To avoid injury, never put your hand or fingers inside the printer while it is printing. Notes z If prints are unclear or specific colors are not reproduced even if there is plenty of ink, print head nozzles may be clogged. Print the nozzle check pattern, check the results, then perform print head cleaning. For details about maintenance, refer to “When Printing Becomes Faint or Colors are Incorrect” in the User’s Guide. z You can use Easy-PhotoPrint to easily do print operations when printing photographs. Easy-PhotoPrint is provided on the Setup CD-ROM. For details on how to use Easy-PhotoPrint, refer to the Photo Application Guide. Printing with Windows Notes z Menu and command names may differ between software applications, and more steps may be required. For details, refer to the documentation for each software application you use. z The steps described in this section are for printing in Windows XP Service Pack 2. 1 Turn on the printer, then load the paper. For details, refer to “Loading Paper” in the User’s Guide. 2 3 4 From your application’s File menu, select Print. Ensure that your printer is selected, then click Preferences or Properties. Specify the required settings and click OK. Notes z For details about the printer driver, refer to the Printer Driver Guide. z Click Instructions on the Main tab or Maintenance tab, to view the Printer Driver Guide. If the On-screen Manual is not installed, Instructions is not displayed. 5 To start printing, click Print or OK. Printing will start in a few moments. Do not open the Top Cover while printing. 4 Basic Operations Printing with Macintosh Notes z Menu and command names may differ between software applications, and more steps may be required. For details, refer to the documentation for each software application you use. z The steps described in this section are for printing in Mac OS X v.10.4.x. 1 Turn on the printer, then load the paper. For details, refer to “Loading Paper” in the User’s Guide. 2 3 4 5 6 7 8 From your application’s File menu, select Page Setup. Select your printer name from Format for. Select the paper size to be used. Click OK. From your application’s File menu, select Print. Select Quality & Media from the pop-up menu. Specify the printing settings according to your requirements. Notes z For details about the printer driver, refer to the Printer Driver Guide. z To view the Printer Driver Guide, click on any Print dialog box that has a Quality & Media, Color Options, Special Effects, Borderless Printing, or Margin selected from the pop-up menu. If the Onscreen Manual is not installed, the Printer Driver Guide is not displayed even if is clicked. 9 Click Print. Printing will start in a few moments. Do not open the Top Cover while printing. Basic Operations 5 Printing Photographs Directly from a PictBridge Compliant Device Connecting a PictBridge compliant device such as a digital camera, camcorder or mobile phone to the printer allows you to print recorded images directly without using a computer. Notes z PictBridge is an industry standard enabling a range of digital photo solutions, including the direct printing of photos from a digital still camera, camcorder or mobile phone* without the need to use a computer. z The Print Head cannot be aligned using the controls of the digital device. You can align the print head from the controls of the printer. If the printer driver is not installed in the computer, align the print head in this way. With the printer on, load a sheet of A4 or Letter-sized plain paper in the Auto Sheet Feeder. Hold the RESUME/CANCEL button until the POWER lamp flashes four times. * Hereafter, the PictBridge compliant digital camera, digital camcorder, or camera-equipped mobile phone are collectively called a PictBridge compliant device. Connecting to a PictBridge Compliant Device Caution Do not connect any equipment other than PictBridge compliant devices to the Direct Print Port of the printer. If you do so, electric shock, fire, or damage to the printer could result. Note When producing photos with the digital device connected to the printer, it is advisable to use the AC adapter supplied with the device. If you use the device battery, be sure to charge it fully. 1 2 3 Turn on the printer. Load the paper in the printer. Connect the PictBridge compliant device to the printer. Note Depending on the model or brand of your PictBridge compliant device, you may have to select a mode of producing photos before connecting the device. You may also have to turn on the device or select Play mode manually after connecting the device to the printer. Perform necessary operations according to the instruction manual supplied with your device. (1) Ensure that the device is turned off. (2) Connect the device to the printer using the USB cable (for connection to a computer) supplied with the device. The PictBridge compliant devices turn on automatically when connected to the printer. If the device does not turn on automatically, turn it on manually. 6 Printing Photographs Directly from a PictBridge Compliant Device (3) Set up the device for direct printing. When the connection between the device and printer has been established, the POWER lamp on the printer flashes twice. * The power-on sequence may differ depending on the model or brand of the device. will appear on the LCD display of the device when the printer is correctly connected. Printing Photographs Directly from a PictBridge Compliant Device Checking or Changing PictBridge Print Settings From Your Camera To change the PictBridge print setting, operate your device to select the PictBridge print setup mode and confirm or change the settings. About the Settings Explained Below The settings explained on the following pages cannot be made on some devices. If any setting cannot be made, the default setting explained on the following pages is used. Names of settings that are displayed on Canon PictBridge compliant device are used in the description given below. Different names may be displayed on your device depending on the brand or model. For details, refer to your device’s instruction manual. z About Image Data Format for Printing This printer accepts images* taken with a camera compatible with the Design rule for Camera File system and PNG files. * Exif2.21 compliant z About “Paper size” and “Paper type” The following sizes and types of paper can be loaded in the printer by selecting options from Paper size and Paper type. Printing Photographs Directly from a PictBridge Compliant Device 7 “Paper size” setting “Paper type” setting Paper loaded in printer 10 x 15 cm / 4" x 6" (Default) Photo (Default) Photo Paper Plus Glossy Photo Photo Paper Plus Semi-gloss Photo Glossy Photo Paper Photo Glossy Photo Paper “Everyday Use” Photo Photo Stickers*1 Fast Photo Photo Paper Pro 13 x 18 cm / 5" x 7" Photo Photo Paper Plus Glossy 8" x 10" Default Photo Paper Plus Semi-gloss Fast Photo Photo Paper Pro A4 / 8.5" x 11"*3 *4 10" x 12"*2 A3 / 11" x 17"*3 A3+ / 13" x 19"*2 Photo Photo Paper Plus Glossy Photo Photo Paper Plus Semi-gloss Photo Glossy Photo Paper Photo Glossy Photo Paper “Everyday Use” Fast Photo Photo Paper Pro Default Photo Paper Plus Semi-gloss Fast Photo Photo Paper Pro Photo Photo Paper Plus Glossy Photo Photo Paper Plus Semi-gloss Photo Glossy Photo Paper Fast Photo Photo Paper Pro Photo Photo Paper Plus Glossy Photo Photo Paper Plus Semi-gloss Photo Glossy Photo Paper Fast Photo Photo Paper Pro 5.4 x 8.6 cm / Credit Card Photo 8 Glossy Photo Paper *1 This paper is exclusively used to print photo stickers. When printing on sticker paper, select 10 x 15 cm / 4" x 6" in Paper size. *2 This setting can be selected only for Canon PictBridge compliant devices (note that it cannot be selected for some models). *3 Plain Paper can be selected for Paper type when A4 or A3 is selected for Paper size. When Plain Paper is selected for Paper type, bordered printing will be performed even when Borderless is selected for Layout. *4 When A4 is selected for Paper size, you can print in 4-up layout. Printing Photographs Directly from a PictBridge Compliant Device z About “Layout” and “Trimming” By default, Borderless is selected for Layout and Off (No trimming) is selected for Trimming. Notes When printing onto Photo Stickers (PS-101) (16-up), select N-up for Layout, then select 16. z Some PictBridge compliant devices display the Layout option; 2-up, 4-up, 9-up, and 16-up. In this case always select 16-up. z If there are no options on the PictBridge compliant device that correspond to 16-up, printing on stickers is not possible. z When printing onto Photo Stickers (PS-101) (16-up), do not select Borderless for Layout. z About “Image optimize” By default, ExifPrint is selected for this printer. If you use a Canon PictBridge-compliant device, you can select VIVID, NR, or VIVID+NR. (Note that these options cannot be selected for some models.) Notes z When VIVID is selected, green and blue portions of photos are printed vividly. z When NR (Noise Reduction) is selected, noise in blue portions, such as the sky, and dark portions is removed. z When VIVID+NR is selected, functions of both VIVID and NR are performed. z About “Date/File No. print” By default, Off is selected for this printer. If you select an image which has had the shooting date embedded in it using a camera with print mode, select Off for this function. If you select Date, File No., or Both, the date and/or file number will be printed over the embedded date. z Other Settings If you use a Canon PictBridge-compliant device, you can use the following print settings. (Note that these print settings cannot be used for some models.) For details, refer to your device’s instruction manual. • Shooting Info (Exif Data) You can print shooting info (Exif data) on photos in list format, or in the margins of specified photos. Select Layout, then select the item displayed with the [i] icon. • 35 mm Film Style Layout (Contact Printing Layout) You can print selected photos or index-specified photos in 35 mm film style layout (contact printing layout). Select Layout then select the item displayed with the film icon. Printing Photographs Directly from a PictBridge Compliant Device 9 Notes z Never disconnect the USB cable during printing. z When disconnecting the USB cable between the device and printer, follow the instructions given in the device’s instruction manual. z Controls of the device cannot be used for the following: – Print quality setting – Printer maintenance z For the device operation method and troubleshooting, refer to your device’s manual. z For print error messages, refer to “Cannot Print Properly from the Digital Camera” in the User’s Guide. Checking or Changing PictBridge Print Settings From the Printer You can change the printer's default PictBridge print settings, such as paper size and type. To do this, install the Canon Setup Utility from the included Setup CD-ROM and connect the printer to a computer. For details, refer to “Canon Setup Utility Menu (Windows)” or “Canon Setup Utility Menu (Macintosh)” in the User’s Guide. 10 Printing Photographs Directly from a PictBridge Compliant Device Reading On-screen Manuals Along with this Quick Start Guide, On-screen Manuals are also supplied with your printer. For detailed instructions on installing the On-screen Manuals, refer to your setup sheet. You can view the On-screen Manuals in the following way: To view the On-screen Manual, double-click the iX5000/iX4000 On-screen Manual shortcut icon on the desktop, or click Start and select All Programs (or Programs), Canon iX5000/iX4000 Manual and iX5000/iX4000 On-screen Manual. System Requirements Browser: Windows HTML Help Viewer Notes z Microsoft Internet Explorer® 5.0 or later must be installed. z The on-screen manual may not be displayed properly depending on your operating system or Internet Explorer version. We recommend that you keep your system up to date with Windows Update. To view the On-screen Manual, double-click the iX5000/iX4000 On-screen Manual alias on the desktop. Note If you installed the User’s Guide from the Manual folder in the Setup CD-ROM, open the folder in which you copied the User’s Guide and double-click top.htm. System Requirements Browser: Help Viewer Notes z The on-screen manual may not be displayed properly depending on your operating system. We recommend that you keep your system up to date. z We recommend using Safari as your Web browser to view the HTML format On-screen Manuals. If Safari is not installed on your computer, download it from Apple Computer, Inc. website and install it. Reading On-screen Manuals 11 12 Reading On-screen Manuals European Union (and EEA) only. printat the e obal d other ation of is an d prods and Using tages are wet. on the Using d /iX4000) This symbol indicates that this product is not to be disposed of with your household waste, according to the WEEE Directive (2002/96/EC) and your national law. This product should be handed over to a designated collection point, e.g., on an authorized one-for-one basis when you buy a new similar product or to an authorized collection site for recycling waste electrical and electronic equipment (EEE). Improper handling of this type of waste could have a possible negative impact on the environment and human health due to potentially hazardous substances that are generally associated with EEE. At the same time your cooperation in the correct disposal of this product will contribute to the effective usage of natural resources. For more information about where you can drop off your waste equipment for recycling, please contact your local city office, waste authority, approved WEEE scheme or your household waste disposal service. For more information regarding return and recycling of WEEE products, please visit www.canon-europe.com/. (EEA: Norway, Iceland and Liechtenstein) Q Tabl Introd Prepa Instal Basic Printi The following ink tanks are compatible with this printer. For details on ink tank replacement, refer to “Replacing an Ink Tank” in the User’s Guide. QT5-0178-V01 XXXXXXXX ©CANON INC.2006 PRINTED IN THAILAND Readi