1
Operating Instructions
System Settings
Read this manual carefully before you use this product and keep it handy for future
reference. For safety, please follow the instructions in this manual.
Introduction
This manual contains detailed instructions on the operation and maintenance of this machine. To get
maximum versatility from this machine all operators should carefully read and follow the instructions in
this manual. Please keep this manual in a handy place near the machine.
Please read the Safety Information in the Copy Reference before using this machine. It contains important information related to USER SAFETY and PREVENTING EQUIPMENT PROBLEMS.
Notes
Some illustrations may be slightly different from your machine.
Certain options may not be available in some countries. For details, please contact your local dealer.
Operator Safety
This machine is considered a CDRH class I laser device, safe for office/EDP use. The machine contains a 5-milliwatt, 760-800 nanometer wavelength, GaAIAs laser diode. Direct (or indirect reflected )
eye contact with the laser beam might cause serious eye damage. Safety precautions and interlock
mechanisms have been designed to prevent any possible laser beam exposure to the operator.
Laser Safety:
The Center for Devices and Radiological Health (CDRH) prohibits the repair of laser-based optical unit
in the field. The optical housing unit can only be repaired in a factory or at a location with the requisite
equipment. The laser subsystem is replaceable in the field by a qualified Customer Engineer. The laser
chassis is not repairable in the field. Customer engineers are therefore directed to return all chassis
and laser subsystems to the factory or service depot when replacement or the optical subsystem is required.
Warning:
Use of controls or adjustment or performance of procedures other than those specified in this manual
might result in hazardous radiation exposure.
Notes:
The model names of the machines do not appear in the following pages. Check the type of your machine before reading this manual. (For details, see P.2 “Machine Types”.)
•
Type 1: 15 copies/minute (A4K, 81/2" × 11"K)
•
Type 2: 18 copies/minute (A4K, 81/2" × 11"K)
Certain types might not be available in some countries. For details, please contact your local dealer.
Two kinds of size notation are employed in this manual. With this machine refer to the inch version.
For good copy quality, the supplier recommends that you use genuine toner from the supplier.
The supplier shall not be responsible for any damage or expense that might result from the use of parts
other than genuine parts from the supplier with your office products.
Power Source
120V, 60Hz, 12A or more
Please be sure to connect the power cord to a power source as above. For details about power source,
see “Power Connection” in the Copy Reference manual.
ENERGY STAR Program
As an ENERGY STAR Partner, we have determined
that this machine model meets the ENERGY STAR
Guidelines for energy efficiency.
The ENERGY STAR Guidelines intend to establish an international energy-saving system for
developing and introducing energy-efficient office equipment to deal with environmental issues, such as global warming.
When a product meets the ENERGY STAR Guidelines for energy efficiency, the Partner shall
place the ENERGY STAR logo onto the machine model.
This product was designed to reduce the environmental impact associated with office equipment by means of energy-saving features, such as Low-power mode.
• Low Power mode
This product automatically lowers its power consumption 15 minutes after
the last copy or print job has finished. Fax reception and printing is still possible in Low Power mode, but if you wish to make copies press the operation
switch first.
For details about how to change the default interval that the machine waits
before entering Low Power mode, see “ 4.Energy Saver Timer” on P.16 “System Settings”.
• Sleep mode (Fax or printer installed)
If the fax or printer features are installed, this product automatically lowers
its power consumption even further 30 minutes after the last copy or print job
has finished. Fax reception and printing is still possible in Sleep mode, but if
you wish to make copies press the operation switch first.
For details about how to change the default interval that the machine waits
before entering Sleep mode, see “6.Auto Off Timer” on P.16 “System Settings”
• Auto Off mode (Copier only)
To conserve energy, this product automatically turns off 30 minutes after the
last copying or printing job has completed. If you wish to make copies when
the machine is in Auto Off mode, press the main power switch.
For details about how to change the default interval that the machine waits
before entering Auto Off mode, see “6.Auto Off Timer” on P.16 “System Settings”.
i
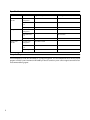
Specification
Low Power
mode
Sleep mode
Auto Off
mode
Copier only
Fax or printer installed
Power consumption
70 Wh
80 Wh
Default interval
15 minutes
15 minutes
Recovery time Less than 20 seconds
Less than 20 seconds
Power consumption
-
70 Wh
Default interval
-
30 minutes
Recovery time -
20 seconds
Power consumption
less than 1 Wh
-
Default interval
30 minutes
-
Recovery time 20 seconds
-
Recycled Paper
In accordance with the ENERGY STAR Program, we recommend use of recycled
paper which is environment friendly.Please contact your sales representative for
recommended paper.
ii
How to Read this Manual
Symbols
In this manual, the following symbols are used:
R WARNING:
This symbol indicates a potentially hazardous situation that might result in
death or serious injury when you misuse the machine without following the instructions under this symbol. Be sure to read the instructions, all of which are described in the Safety Information section.
R CAUTION:
This symbol indicates a potentially hazardous situation that might result in minor or moderate injury or property damage that does not involve personal injury
when you misuse the machine without following the instructions under this
symbol. Be sure to read the instructions, all of which are described in the Safety
Information section.
* The statements above are notes for your safety.
Important
If this instruction is not followed, paper might be misfed, originals might be
damaged, or data might be lost. Be sure to read this.
Preparation
This symbol indicates the prior knowledge or preparations required before operating.
Note
This symbol indicates precautions for operation, or actions to take after misoperation.
Limitation
This symbol indicates numerical limits, functions that cannot be used together,
or conditions in which a particular function cannot be used.
Reference
This symbol indicates a reference.
{
}
Keys built into the machine's operation panel.
iii
TABLE OF CONTENTS
Manuals for This Machine......................................................................... 1
Machine Types........................................................................................... 2
Additional Functions Provided by Internal Options...............................
Copy Mode....................................................................................................
Facsimile Mode (Option) ...............................................................................
Printer Mode (Option)....................................................................................
3
3
3
3
1. Modes
Changing Modes........................................................................................ 5
Multi-access ............................................................................................... 6
Copy Mode ................................................................................................. 8
Changing to Copy Mode ............................................................................... 8
Facsimile Mode.......................................................................................... 9
Changing to Facsimile Mode......................................................................... 9
Sending a Fax ............................................................................................... 9
Printing a Received Fax ................................................................................ 9
Printer Mode............................................................................................. 10
Changing to Printer Mode ........................................................................... 10
Printing ........................................................................................................ 10
2. User Tools (System Settings)
Keys for User Tools (System Settings) .................................................
Accessing the User Tools (System Settings) .......................................
Exiting from the User Tools.........................................................................
Printing the Counter Value ..........................................................................
User Tools Menu (System Settings) ......................................................
11
13
14
14
15
Settings You Can Change with the User Tools .................................... 16
System Settings .......................................................................................... 16
INDEX........................................................................................................ 21
iv
Manuals for This Machine
This is a multi-functional machine combining copier, printer and fax functions.
A separate manual is provided for each function. Please consult the manual that
suits your needs.
❖ System Settings
Provides an overview of the machine. This manual introduces the functions
of the machine. It also introduces the options allowing you to use additional
functions and describes how to access the system user tools to make the machine easier to use.
❖ Copy Reference
Describes the various copying functions from basic copying to more advanced functions such as reducing/enlarging copies or combining originals
into one copy.
❖ Facsimile Basic Features (Option)
Explains the most frequently used facsimile functions and operations.
❖ Facsimile Advanced Features (Option)
Describes more advanced facsimile functions and also explains settings for
key operations.
❖ Printer Reference 1 (Option)
Describes the system settings, procedures and functions for using this machine as a printer.
❖ Printer Reference 2 (Option)
Describes the procedures and provides necessary information about using
this machine as a printer.
❖ Network Interface Board Quick Configuration Guide (Option)
Describes the procedures and provides necessary information about setting
up and using the printer under the network environment.
❖ PS Level 2 Emulation Type 2 Operating Instructions Supplement (Option)
Describes the menus and features you can set using the PostScript printer
driver.
❖ Network Interface Board Type 2 Owner's Manual (Option)
Describes the procedures and provides necessary information about setting
up and using the printer under the network environment.
❖ Unix Supplement (Option)
Provides information about setting up and using the printer in a UNIX environment.
1
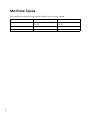
Machine Types
This machine comes in two models which vary in copy speed.
Type 1
Type 2
15 copies/minute (A4K, 81/2"
× 11"K)
18 copies/minute (A4K, 81/2"
× 11"K)
Fax unit
Option
Option
Printer unit
Option
Option
Copy speed
2
Additional Functions Provided by Internal
Options
You can expand the capabilities of this machine to include fax functions and
printer functions. When you want to add a function, contact your sales or service
representative.
Copy Mode
In copy mode you can make basic copies and also copy using more sophisticated
techniques, such as reduction/enlargement or combining several originals onto
one copy. You can install an optional memory expansion for storage of document images, thereby making the best use of memory with various copy functions (Type 1 requires the optional 16MB copier memory unit when using Sort
or Combine features).
Options for Memory Expansion
❖ 16MB copier memory unit (Type 1 only)
Increases copier features, allowing you to use Sort or Combine features.
Note
❒ For North American users, a 16MB copier memory unit is installed as the
standard.
❖ 32MB DIMM
Increases memory capacity, allowing you to increase the data of originals to
be stored. For Type 1, it is available only when the optional 16MB copier
memory unit is installed.
Facsimile Mode (Option)
You can send and receive fax messages in facsimile mode.
Printer Mode (Option)
You can use this machine as a printer when you install the optional printer controller.
3
4
1. Modes
Changing Modes
Press the {Copy}, {Facsimile} or {Printer} key to switch to copy, fax or printer
mode respectively.
Limitation
❒ You cannot switch modes in any of the following cases:
• When scanning in a fax message for transmission.
• During immediate transmission.
• When accessing the user tools.
• During on hook dialing for fax transmission.
• During Energy Saver mode.
• When the fax handset is lifted.
5
Modes
Multi-access
You can carry out another job using a different function while the current job is
being performed.
This allows you to handle your jobs efficiently regardless of how the machine is
being used. For example:
• While making copies, the machine can send a fax message that has been
stored in memory.
• You can make copies while receiving fax data.
• The machine can receive print data in any mode.
Performing multiple functions simultaneously like this is called Multi-access.
1
Note
❒ You can choose which mode has highest priority for print jobs. The default is
“Copier”. See “11Print Priority” in P.16 “System Settings”.
- Sample operations
This chart is based on the following conditions:
• “11Print Priority” is set to “Interleave” (See “11Print Priority” in P.16 “System
Settings”)
• For details on operations under other conditions, contact your service representative.
6
Multi-access
Mode after you select Copy
Facsimile
Printer
Transmission Operation/
Manual Reception Operation
Scanning An Original for
Memory Transmission
Memory Transmission
Immediate Transmission
Memory Reception
❍
❍
❍
❍
✩
✩
✩
✩
✩
Sort
❍
❍ *1 ❍ *2 ❍ *2 ✩
❍ *2 ✩
✩
✩
✩
✩
❍
×
×
✩
×
✩
✩
✩
✩
✩
Scanning An Original for ×
Memory Transmission
×
×
×
✩
×
✩
✩
✩
✩
✩
Copy
Reception Transmission
✩
Sort
Printing
Receive Data
1
✩
✩
✩
✩
×
×
×
✩
✩
✩
✩
Immediate Transmission ×
×
×
×
×
×
×
✩
✩
✩
✩
Memory Reception
✩
✩
✩
✩
×
×
→
✩
✩
✩
✩
Printing Received Data
✩
✩
✩
✩
✩ *3 ✩ *3 ✩ *3 →
✩
✩
✩
Receive Data
✩
✩
✩
✩
✩
✩
✩
✩
→
→
→
Printing
✩
✩
✩
✩
✩
✩
✩
✩
→
→
→
Sort
✩
✩
✩
✩
✩
✩
✩
✩
→
→
→
Print
Facsimile
❍
Transmission Operation/
Manual Reception Operation
❍
Printing Received Data
Sort
Copying
Mode before you select
Printer
Print
Copying
Transmission Reception
Memory Transmission
✩…means that these functions can be used together.
❍…means that you can interrupt the current job with Function keys to proceed
to a subsequent job.
→…means that another job will automatically start after the current job is finished.
×…means that you must manually start another job after the current job is finished (i.e. these functions cannot be used together).
*1
*2
*3
For type 1, available only when the optional 16MB copier memory unit is installed.
Simultaneous operations are only available after all copy originals have been
scanned and copying is in progress.
When receiving multiple data simultaneously, other operations are not available until the current reception is finished.
7
Modes
Copy Mode
Changing to Copy Mode
1
You can always make a copy when
the machine is not printing or scanning a fax data.
A Press the {Copy}} key.
The copy display appears on the
panel display.
Reference
For details, see the Copy Reference manual.
8
Facsimile Mode
Facsimile Mode
Changing to Facsimile Mode
B Complete
You can always use the machine for
faxing when you are not using a scanner.
C After
A Press the {Facsimile}} key.
D Reset the copy job originals, then
The fax display appears on the
panel display.
the usual operations
for sending a fax, then press the
{Start}
} key.
1
the transmission has finished, press the {Copy}
} key.
press the {Start}
} key.
The machine resumes the interrupted copy run.
Sending a fax while printing
Note
❒ The Memory Transmission/Reception function is performed
automatically even when another function is being used.
You need not to switch the display. When data is received in
memory, the Receive File indicator is lit.
A Press the {Facsimile}} key to switch
Reference
For details, see the Facsimile
Reference manual.
When you are not copying, a received
fax is printed automatically. You do
not need to switch to Facsimile mode.
Sending a Fax
Sending a fax while copying
A Press the {Facsimile}} key to switch
to the fax display.
B Complete
the usual operations
for sending a fax, then press the
{Start}
} key.
Printing a Received Fax
Note
❒ Machine operations are different
depending “11Print Priority” (See
P.16 “System Settings”) or “13Key
Op. Tools” (See P.16 “System Settings”) settings.
to the fax display.
Note
❒ When you press the {Facsimile}
key while scanning originals or
sorting in Copy mode, remove
any originals of your copy job.
9
Modes
Printer Mode
Changing to Printer Mode
1
Whenever you print from applications, you do not have to switch to
printer mode.
Reference
For details, see the Printer Reference manual.
Printing
The machine can receive a print data
while any feature go on.
10
2. User Tools (System Settings)
Keys for User Tools (System Settings)
❖ When the machine has the copier feature only
❖ When the machine has the printer or fax feature
1. {Cancel}} key
6. {Clear/Stop}} key
Press to return to the previous menu.
Press to delete a number you have entered or to stop copying.
2. Panel display
Shows operation status, error messages
and function menu.
3. 0 or 1 keys (Cursor keys)
7. {Clear Modes}} key
Press to clear the previously entered copy
job settings.
Press to display the previous/next menu
or select an item on the panel display.
8. Function keys (Fax or printer installed machine only.)
4. {OK}} key
Press to change modes.
Press to set the new settings and return to
the previous menu.
9. Number keys
5. {User Tools/Counter}} key
10. {Start}} key
See P.13 “Accessing the User Tools (System
Settings)”.
Press to start copying or faxing.
Use to enter a numeric value.
11
User Tools (System Settings)
11. Operation switch
Press this switch to turn the power on or
return from the low power mode or the
sleep mode. To turn the power off, press
this switch again.
2
12
Accessing the User Tools (System Settings)
Accessing the User Tools (System Settings)
This section is for the key operators in
charge of this machine. You can change
or set the machine's default settings.
C
Press the 0 or 1 key until your
desired menu is displayed, and
then press the {OK}
} Key.
Preparation
After using the user tools, be sure
to return to Copy mode.
2
The settings are not canceled even
if the operation switch is turned off
or the {Clear Modes} key is pressed.
Reference
For information on Copy, Fax, and
Printer User Tools, see the appropriate reference manual.
A Press the {User Tools/Counter}} key.
The User Tools Main Menu appears.
B Press the 0 or 1 key until “2.System Settings” is displayed, then
press the {OK}
} key.
Note
❒ To view the total number of
prints made by the machine. See
P.14 “Printing the Counter Value”.
❒ To switch the display language,
select “6. Language”and then
press the {OK} key.
13
User Tools (System Settings)
Exiting from the User Tools
Note
❒ 1: Press to go to the next menu.
❒ 0: Press to go back to the previous menu.
2
A After changing the user tools settings, press the {User Tools/Counter}
} key.
Printing the Counter Value
Reference
P.15 “User Tools Menu (System
Settings)”
Type 1 requires the optional 16 MB copier
memory unit.
D Change the settings by following
A Press the {User Tools/Counter}} key.
the instructions on the panel display. Then press the {OK}
} key.
Reference
P.16 “Settings You Can Change
with the User Tools”
Note
❒ {OK} : Press to set the new settings and return to the previous
menu.
❒ {Cancel} : Press to return to the
previous menu without changing any data.
B Make
sure “1.Counter” is displayed, then press the {OK}
} key to
view the total number of prints.
C Press the {Start}} key.
14
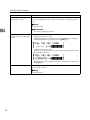
User Tools Menu (System Settings)
User Tools Menu (System Settings)
2
15
User Tools (System Settings)
Settings You Can Change with the User
Tools
Reference
For how to access the user tools, see P.15 “User Tools Menu (System Settings)”.
2
System Settings
Menu
Description
1.Function Priority
You can specify the mode (Copier, Fax or Printer) to be displayed
immediately after the operation switch is turned on or System Reset mode is turned on.
Note
❒ Default: Copier
2.CopyCount Display
The copy counter can be set to show the number of copies made
(count up) or the number of copies remaining to be made (count
down).
Note
❒ Default: Up
3.System Reset
The machine returns to its prioritized mode automatically after
your job is finished, when you selected the time. This function is
called “System Reset”. The time can be set from 10 to 999 seconds,
or no system reset.
Note
❒ Default: On (60 seconds)
❒ You can specify the prioritized mode with the user tools. See
“1.Function Priority”.
4.Energy Saver Timer
The machine enters Low Power mode automatically after your job
is finished, after the selected time. The time can be set from 1 to 240
minutes.
In Low Power mode, power consumption is reduced by 30% compared with Standby mode. This value applies to Copier features
only.
Note
❒ Default: 15 minutes
❒ Energy Saver might not be effective when an error message is
displayed.
❒ When the machine receives a fax or printer data in Energy Saver mode, it automatically prints the fax or the printer data.
16
Settings You Can Change with the User Tools
Menu
Description
5.Energy Saver Level
You can select the Energy Saver level.
❖ Level 1
• Power Consumption:
Reduced by about 30% compared standby mode.
• Warm-Up Time:
about 10 seconds
2
❖ Level 2
• Power Consumption:
Reduced by about 60% compared standby mode.
• Warm-Up Time:
about 15 seconds
❖ Level 3
• Power Consumption:
Reduced by about 70% compared standby mode.
• Warm-Up Time:
about 20 seconds
This value applies to Copier features only.
Note
❒ Default: Level 1
6.Auto Off Timer
The machine turns itself off automatically to conserve energy after
your job is finished, after the selected time. This function is called
“Auto Off ”. The time can be set from 1 to 240 minutes.
Note
❒ Default: 30 minutes
❒ Auto Off might not be effective when an error message is displayed.
❒ To return to the ready condition from Auto Off, the machine requires the same warm-up time as the time for becoming ready
after power is turned on.
❒ When the machine receives a fax or printer data in Auto Off
mode, it automatically prints the fax or the printer data.
7.AOF(Keep it on.)
Note
❒ For details of this function, contact your service representative.
8.Special Paper Size
Select the size of the paper set in the paper tray.
Note
❒ If the specified paper size differs from the size of paper actually
set in the paper tray, a paper misfeed might occur because the
paper size is not detected correctly.
Reference
See “Changing the Paper Size” in the Copy Reference manual.
17
User Tools (System Settings)
Menu
Description
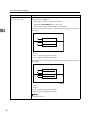
9.Pap.Tray Priority (for
Copy mode only)
You can select the paper tray which will be selected as a default in
the following conditions:
• When the operation switch is turned on.
• When the {Clear Modes} key is pressed.
• When Auto Paper Select mode is not selected.
This illustration shows Type 1 with the optional paper tray unit (2tray type).
2
1: Tray 1
2: Tray 2 (optional paper tray unit)
3: Tray 3 (optional paper tray unit)
This illustration shows Type 2 with the optional paper tray unit (2tray type).
1: Tray 1
2: Tray 2
3: Tray 3 (optional paper tray unit)
4: Tray 4 (optional paper tray unit)
Note
❒ Default: Tray 1
18
Settings You Can Change with the User Tools
Menu
Description
10Auto Tray Switch (for
Copy mode only)
If you load paper of the same size in two or more trays, the machine automatically shifts another tray when the tray in use runs
out of paper. You can set or cancel this setting.
Note
❒ Default: On
11Print Priority (setting
the multi-accessing function)
Sets the print priority for each mode.
2
• “Copier”
Print priority is given to the copy function.
• “Fax”
Print priority is given to the fax function.
• “Printer”
Print priority is given to the printer function.
• “Interleave”
Prints jobs in the order in which they are initiated regardless of
mode/function.
• “Display”
Print priority is given to the mode displayed on the display.
Note
❒ Default: Copier
Reference
P.6 “Multi-access”
12Display Contrast
You can adjust the brightness of the panel display.
13Key Operators Tools
(13Key Op. Tools)
Used to view or print counters, and set up user codes. If you have
registered the access code and set“3.Key Op. Access”to “On”, you
cannot use this function unless entering the correct code.
Reference
“4.Prog. Key Op. Code” and “3.Key Op. Access”.
1.Show Counter
View counter values on the panel display.
• Total Pages
• Printer (for machines with optional printer function)
• Copier
• Fax (for machines with optional fax function)
• A3 size
2.Print Counter
Print counter lists.
Limitation
❒ Type 1 requires the optional 16MB copier memory unit when
using this function.
19
User Tools (System Settings)
Menu
Description
3 Key Operator Access
(3.Key Op. Access)
Turn the key operator access code “On” or “Off”. If you select
“On”, the registered access code is required for using all applications.
Note
❒ Default: Off
2
Reference
See “4.Prog. Key Op. Code”
4 Registering the key oper- Register or change the key operator access code (8 digits).
ator code (4.Prog. Key Op. • Register the access code
Code)
Select this function and input your desired number (8 digits)
with the number keys, then press the {OK} key.
•
Change the access code
When you select this function, the currently registered code is
displayed on the left.
Enter the new code (8 digits) with the number keys, then press
the {OK} key.
5.Restricted Access
Restrict user access for each mode (Copier, Fax or Printer) using
optional key counter.
Note
❒ Default: Off
20
INDEX
A
Auto Off Timer, 17
Auto Tray Switch, 19
C
Clear Modes key, 11
Clear/Stop key, 11
Contrast, 19
Copy Count Display, 16
Copy Mode, 3, 8
Cursor keys, 11
E
Energy Saver Timer, 16
F
Facsimile Advanced Features, 1
Facsimile Mode, 3, 9
Function Priority, 16
K
N
Number keys, 11
O
OK key, 11
Operation switch, 12
P
Panel display, 11
Paper Tray Priority, 18
Printer Mode, 3, 10
Print Priority, 19
S
Special Paper Size, 17
Start key, 11
System Reset, 16
U
User Tools/Counter key, 11
User Tools (System Settings), 11
Key Operators Tools, 19
Keys for User Tools (System Settings), 11
M
Modes, 5
Multi-access, 6
21
MEMO
22
MEMO
23
MEMO
24
UE
USA
B039
Note to users in the United States of America
Notice:
This equipment has been tested and found to comply with the limits for a Class B digital device, pursuant to Part 15 of the FCC Rules. These limits are designed to provide reasonable protection against
harmful interference in a residential installation. This equipment generates, uses and can radiate radio
frequency energy and, if not installed and used in accordance with the instructions, may cause harmful
interference to radio communications. However, there is no guarantee that interference will not occur
in a particular installation. If this equipment does cause harmful interference to radio or television reception, which can be determined by turning the equipment off and on, the user is encouraged to try to
correct the interference by one more of the following measures:
Reorient or relocate the receiving antenna.
Increase the separation between the equipment and receiver.
Connect the equipment into an outlet on a circuit different from that to which the receiver is
connected.
Consult the dealer or an experienced radio /TV technician for help.
Warning
Changes or modifications not expressly approved by the party responsible for compliance could void
the user's authority to operate the equipment.
Note to users in Canada
Note:
This Class B digital apparatus complies with Canadian ICES-003.
Remarque concernant les utilisateurs au Canada
Avertissement:
Cet appareil numérique de la classe B est conforme à la norme NMB-003 du Canada.
In accordance with IEC 60417, this machine uses the following symbols for the main power switch:
a means POWER ON.
c means STAND BY.
Trademarks
Adobe®, Acrobat®, and PostScript® are registered trademarks of Adobe Systems Incorporated.
Microsoft®, Windows®, Windows NT® are registered trademarks of Microsoft Corporation in the United
States and / or other countries.
Macintosh is a registered trademark of Apple Computer, Incorporated.
Type for Aficio 1015/1018/2515/2518/1502/1802
Printed in China
UE USA Part # G1564