1
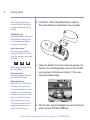
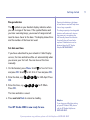
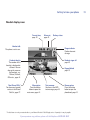
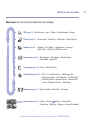
User Guide
BT STUDIO 2300
Section
Welcome…
to your BT Studio 2300 digital
cordless colour screen telephone
SMS text messaging. Send and receive texts.
Large, easy to read colour screen.
150 Name and number phonebook.
Use Caller Display to see who is calling and keep track of
unanswered calls. (Requires subscription to a Caller
Display service.)
Register up to 5 handsets to a base without the need for
additional wiring.
Easy settings for Call Diversion, Call Waiting and
Reminder Call.
Assign ringtones to entries in the phonebook.
Range of up to 300 metres outside and up to 50 metres
indoors (in ideal conditions).
If you experience any problems, please call the Helpline on 0870 605 8047
This User Guide provides you with all
the information you need to get the
most from your phone.
Got everything?
Section
BT Studio 2300 base
BT Studio 2300 handset
2 x NiMH AAA
rechargeable batteries
You must first set up your phone
before you can use it. This doesn’t
take long and is easy to do. Just
follow the simple instructions on the
next few pages.
Need help?
If you have any problems setting up or using your
BT Studio 2300, contact the Helpline on 0870 605 8047.
Battery compartment
cover
Mains power adaptor
Telephone line cord
In addition
If you have purchased a
BT Studio 2300 multiple
pack, you will have the
following for each
additional handset:
BT Studio 2300 handset
Alternatively, you may find the answer in ‘Help’ at the
back of this guide.
BT Studio 2300 charger
Hearing aid?
Battery compartment
cover
Please note that the BT Studio works by sending radio
signals between the base and handset. These signals
may interfere with some hearing aids, causing a
humming noise.
2 x NiMH AAA
rechargeable batteries
Mains power adaptor
If you experience any problems, please call the Helpline on 0870 605 8047
4
In this guide
Getting started . . . . . . . . . . . . . . . . . .7
Location . . . . . . . . . . . . . . . . . . . . . . .7
Setting up . . . . . . . . . . . . . . . . . . . . . .7
Battery performance . . . . . . . . . . . . . .8
BT Studio multiple pack . . . . . . . . . . . .10
Call another handset . . . . . . . . . . . . . .20
3-Way call . . . . . . . . . . . . . . . . . . . . . .20
Transfer a call . . . . . . . . . . . . . . . . . . .21
Caller on hold . . . . . . . . . . . . . . . . . . .21
Getting to know your phone . . . . . . .11
Handset buttons . . . . . . . . . . . . . . . . .11
Base . . . . . . . . . . . . . . . . . . . . . . . . . .12
Display icons . . . . . . . . . . . . . . . . . . . .13
Navigating the menu . . . . . . . . . . . . . .14
Menu map . . . . . . . . . . . . . . . . . . . . . .15
Phonebook . . . . . . . . . . . . . . . . . . . . .22
Writing tips . . . . . . . . . . . . . . . . . . . . .22
Add entry . . . . . . . . . . . . . . . . . . . . . .22
Dial . . . . . . . . . . . . . . . . . . . . . . . . . . .22
Edit name and number . . . . . . . . . . . .23
View details . . . . . . . . . . . . . . . . . . . . .23
Delete an entry . . . . . . . . . . . . . . . . . .24
Using the phone . . . . . . . . . . . . . . . . .16
Switch handset on/off . . . . . . . . . . . . .16
Make a call . . . . . . . . . . . . . . . . . . . . .16
Preparatory dialling . . . . . . . . . . . . . . .16
Call timer . . . . . . . . . . . . . . . . . . . . . .16
End a call . . . . . . . . . . . . . . . . . . . . . .16
Receiving calls . . . . . . . . . . . . . . . . . . .17
Handsfree . . . . . . . . . . . . . . . . . . . . . .17
Earpiece/handsfree volume . . . . . . . . .17
Redial . . . . . . . . . . . . . . . . . . . . . . . . .18
Secrecy . . . . . . . . . . . . . . . . . . . . . . . .18
Paging . . . . . . . . . . . . . . . . . . . . . . . . .19
Keypad lock . . . . . . . . . . . . . . . . . . . . .19
Internal calls . . . . . . . . . . . . . . . . . . . .19
SMS text messaging . . . . . . . . . . . . . .25
To subscribe . . . . . . . . . . . . . . . . . . . .25
Cost of the fixed line service . . . . . . . .26
Using SMS . . . . . . . . . . . . . . . . . . . . . .26
Write an SMS text message . . . . . . . . .26
Writing tips . . . . . . . . . . . . . . . . . . . . .27
Character map . . . . . . . . . . . . . . . . . .27
Using options . . . . . . . . . . . . . . . . . . .28
Outbox . . . . . . . . . . . . . . . . . . . . . . . .29
Deleting . . . . . . . . . . . . . . . . . . . . . . .30
Receiving and reading text messages . .30
Open Inbox . . . . . . . . . . . . . . . . . . . . .31
Open Inbox from standby screen . . . . .32
SMS settings . . . . . . . . . . . . . . . . . . . .32
If you experience any problems, please call the Helpline on 0870 605 8047
In this guide
SMS Service Centre numbers . . . . . . . .32
To change the SMS Service Centre
phone numbers . . . . . . . . . . . . . . . . . .33
Set SMS text alert . . . . . . . . . . . . . . . .33
User areas . . . . . . . . . . . . . . . . . . . . . .34
Set personal user area . . . . . . . . . . . . .35
Send text message from a user area . .35
Delete user area . . . . . . . . . . . . . . . . .36
Default SMS settings . . . . . . . . . . . . . .36
BT Calling Features . . . . . . . . . . . . . .37
Caller Display . . . . . . . . . . . . . . . . . . .37
Calls lists . . . . . . . . . . . . . . . . . . . . . . .37
Missed calls . . . . . . . . . . . . . . . . . . . . .38
Redial . . . . . . . . . . . . . . . . . . . . . . . . .39
Delete Calls Lists . . . . . . . . . . . . . . . . .39
Call Diversion . . . . . . . . . . . . . . . . . . .40
Call Waiting . . . . . . . . . . . . . . . . . . . . .40
Reminder call . . . . . . . . . . . . . . . . . . .41
Edit number . . . . . . . . . . . . . . . . . . . .42
Default settings . . . . . . . . . . . . . . . . . .42
Handset settings . . . . . . . . . . . . . . . .43
Handset ringtone . . . . . . . . . . . . . . . . .43
Ringer volume . . . . . . . . . . . . . . . . . . .43
Handset name . . . . . . . . . . . . . . . . . . .44
Language . . . . . . . . . . . . . . . . . . . . . .44
Menu colour . . . . . . . . . . . . . . . . . . . .44
Auto talk . . . . . . . . . . . . . . . . . . . . . . .45
Handset default settings . . . . . . . . . . .45
Base settings . . . . . . . . . . . . . . . . . . .46
Ringtone . . . . . . . . . . . . . . . . . . . . . . .46
Ringer volume . . . . . . . . . . . . . . . . . . .46
Handset priority . . . . . . . . . . . . . . . . .47
System PIN . . . . . . . . . . . . . . . . . . . . .47
Default base settings . . . . . . . . . . . . . .48
Time settings . . . . . . . . . . . . . . . . . . .49
Set alarm . . . . . . . . . . . . . . . . . . . . . .49
Alarm tone . . . . . . . . . . . . . . . . . . . . .50
Switch alarm off . . . . . . . . . . . . . . . . .50
Set time and date . . . . . . . . . . . . . . . .50
Additional handsets and bases . . . . . .51
Register a new BT Studio handset . . . .51
Register handset with an
additional base . . . . . . . . . . . . . . . . . .52
Select base . . . . . . . . . . . . . . . . . . . . .53
De-register a handset . . . . . . . . . . . . .53
Help . . . . . . . . . . . . . . . . . . . . . . . . . .54
Replacing handset batteries . . . . . . . . .54
Helpline . . . . . . . . . . . . . . . . . . . . . . .59
If you experience any problems, please call the Helpline on 0870 605 8047
5
6
In this guide
General information . . . . . . . . . . . . . .60
Safety . . . . . . . . . . . . . . . . . . . . . . . . .60
Cleaning . . . . . . . . . . . . . . . . . . . . . . .61
Environmental . . . . . . . . . . . . . . . . . . .61
Guarantee . . . . . . . . . . . . . . . . . . . . . .62
Returning your phone . . . . . . . . . . . . .63
How many telephones
can you have? . . . . . . . . . . . . . . . . . . .64
Connecting to a switchboard . . . . . . . .64
Access code and entering a pause . . . .65
Recall . . . . . . . . . . . . . . . . . . . . . . . . .65
Declaration of Conformance . . . . . . . .66
R&TTE . . . . . . . . . . . . . . . . . . . . . . . .66
Accessories and replacement items . . .66
For your records . . . . . . . . . . . . . . . . .66
If you experience any problems, please call the Helpline on 0870 605 8047
Getting started
Location
You need to place your BT Studio 2300 within 2 metres
of a mains power and telephone socket so that the
cables will reach.
Make sure it is at least 1 metre away from other electrical
appliances to avoid interference.
Your BT Studio 2300 works by sending radio signals
between the handset and base. The strength of the
signal depends on where you site the base. Putting it as
high as possible ensures the best signal.
Setting up
1. Plug the power adaptor and telephone cable into the
back of the base.
7
WARNING
Do not place your BT Studio 2300
in the bathroom or other humid
areas.
Handset range
The BT Studio 2300 has a range of
300 metres outdoors when there is
a clear line of sight between the
base and handset. When there is
no clear line of sight between the
base and handset, e.g. base
indoors and handset either indoors
or outdoors, the range could be
reduced to 50 metres. Thick stone
walls severely affect the range.
Signal strength
The
symbol on your handset
screen indicates when you are in
range. When you are out of range,
it flashes.
IMPORTANT
Do not connect the telephone line
until at least one of the handsets is
fully charged.
The base must be plugged into the
mains power at all times.
Which socket?
Power socket
2. Plug the power adaptor into the mains wall socket and
switch the power on. When connected correctly, the
green Power light on the base comes on.
Telephone line socket
If you experience any problems, please call the Helpline on 0870 605 8047
8
Getting started
The red Charging light stays on
while the handset is on the base,
even when the batteries are fully
charged.
3. Install the 2 x AAA rechargeable batteries supplied.
Then slide the battery compartment cover into place.
Talk/Standby time
Under ideal conditions, fully charged
handset batteries should give up
to 8 hours talktime or 80 hours
standby on a single charge.
Battery low warning
The handset battery symbol is
empty and you will hear a warning
beep. Start recharging your handset
right away.
When charging the battery, level
bars are animated.
Replacing batteries
Use only rechargeable 750mAh or
higher AAA NiMH batteries.
4. Charge the handset for at least 24 hours by placing it on
the base. The red Charging light comes on. The handset
is pre-registered to the base as Handset 1. The screen
shows the standby display.
Battery performance
When batteries are fully charged
the display shows 3 green bars.
To keep your batteries in the best
conditions, leave the handset off
the base for a few hours at a time
(after the initial 24 hour charge).
Please note however, that new
NiMH batteries do not reach full
capacity until they have been in
normal use for several days.
5. After 24 hours, plug the telephone line cord into the wall
socket and your BT Studio 2300 base.
If you experience any problems, please call the Helpline on 0870 605 8047
Getting started
Range indicator
The
symbol on your handset display indicates when
you are in range of the base. If the symbol flashes and
you hear a warning beep, you are out of range and will
need to move closer to the base. The display shows Base
and the number of the base last used.
Set date and time.
Running the batteries right down
at least once a week will help them
last as long as possible.
The charge capacity of rechargeable
batteries will reduce with time as
they wear out, so reducing the
talk/standby time of the handset.
Eventually they will need to be
replaced. New batteries can be
obtained from the BT Studio
Helpline 0870 605 8047.
If you have subscribed to your network’s Caller Display
service, the time and date will be set automatically when
you receive your first call. You can also set the time
manually.
to Time Settings
1. On the handset, press Menu. Scroll
and press OK. Scroll
to Set Date & Time and press OK.
G
9
D
3
EF
W
0
4
0
HI
6
XYZ
3. Enter the time, e.g.
Press OK.
M
1
NO
2. Enter the date, e.g.
OK.
0
for 16th April. Press
for 9:30am.
The time and date is saved.
4. Press and hold Back to return to standby.
Your BT Studio 2300 is now ready for use.
Helpline
If you have any difficulties setting
up your BT Studio 2300, please
call the BT Studio Helpline on
0870 605 8047.
If you experience any problems, please call the Helpline on 0870 605 8047
9
10
Getting started
Additionally, if you have purchased
a BT Studio 2300 multiple pack
On each charger:
1. Connect the power adaptor to the charger and switch on.
Ensure the charger is connected to
the mains at all times.
On each additional handset:
2. Insert the batteries.
3. Charge the handset for at least 24 hours.
Your BT Studio 2300 additional handset(s) comes
pre-registered to the base as Handset 2, Handset 3,
Handset 4 etc and this is shown on the display.
Your BT Studio 2300 multiple pack is now ready
for use.
If you experience any problems, please call the Helpline on 0870 605 8047
Getting to know your phone
Handset buttons
Dig
ita
l
ty
ari
Cl
On-screen options
Open the menu and select the
options you require, page 14.
Redial
Opens the redial list, page 18.
Allows you to scroll through entries.
Also increases the volume.
End call/Cancel/Power on & off
Press to end a call, page 16.
Go back one level/exit the menu,
page 14.
Press and hold to switch handset
on or off, page 16.
On-screen options
Open the menu and select the
options you require, page 14.
Talk/Handsfree
Press to make calls, page 16.
Press twice to make a call in
handsfree mode, page 17.
3
JKL
6
M
5
PQ
W
9
TUV
8
0
R
Z
XY
7
#
Press and hold to switch the
keylock on, page 19.
NO
4
EF
ABC
2
G
RS
R
For use with a switchboard, page
64-65 and BT Calling Features,
page 37.
1
HI
Calls list/Scroll
Opens the Calls list and lets you
scroll through the entries, page 37.
D
Int
Lets you make calls between
handsets registered to the base,
page 19.
Also used to switch between upper
and lower case characters.
Int
If you experience any problems, please call the Helpline on 0870 605 8047
11
12
Getting to know your phone
Base buttons and LEDs
Digital Clarity
DECT
Page
Press to page
handset(s), page 19.
Page
Also used when
registering handsets,
page 51.
BT
St
udio 2300
Ch
arg
ing
Charging indicator
On = Handset charging
Power
/ In
e
Us
Power/In use indicator
On
= Power on
Flashes = During a call
When the phone rings
When registering handsets
If you experience any problems, please call the Helpline on 0870 605 8047
Getting to know your phone
Handset display icons
Current time,
page 50.
Alarm set,
page 49.
Battery status.
Handset idle
The phone is not in use.
Range indicator
Flashes when out
of range.
Handset ringer off
page 43.
Handset identity
The number of the
handset is displayed at
all times. You can
change the name on
the handsets, e.g.
Michael, Kitchen,
Office etc., page 44.
New Missed Calls*
You have new (unread)
entries in the Missed
Calls list, page 37.
Keypad locked
page 19.
Menu option
Press the button
below to open the
main menu, page 14.
Text message
You have a new SMS
text message, page 25.
Names option
Press the button
below to open the
phonebook, page 22.
* For this feature to work you must subscribe to your Network Provider’s Caller Display service. A quarterly fee may be payable.
If you experience any problems, please call the Helpline on 0870 605 8047
13
14
Getting to know your phone
Navigating the menu
Your BT Studio 2300 has a menu system which is easy to
use. Each menu leads to a list of options. The menu map
is shown on the following page.
When the handset is switched on and in standby, press
Menu to view the menu options. Pressing
will scroll
through the menu options, press OK to select the menu
option you wish to configure.
Vol
For example to change the handset ringer volume:
1. Press Menu then scroll
2. Scroll
to Handset and press OK.
to Ring Volume then press OK.
3. The current setting is displayed. Press
to increase or
to decrease the volume, the ringtone is played at each
level you select. Press OK to confirm.
Vol
Exit or go back one level in the menu
To go back to the previous level in the menu, press Back.
To cancel and return to standby at any time, press and
hold Back.
If no button is pressed for 60 seconds, the handset
returns to standby automatically.
If you experience any problems, please call the Helpline on 0870 605 8047
Getting to know your phone
Menu map These are the options under each menu heading.
SMS (page 25) • Write Message • Inbox • Outbox • Delete Messages • Settings
Calls lists (page 37) • Received calls • Missed calls • Dialled calls • Delete Calls List
Handset (page 43)
• Ringtone • Ring Volume • Handset Name • Language
• Menu Colour • Auto Talk • PABX Access Code
Base settings (page 46) • Base Ringtone • Base Volume • Handset Priority
• Recall Mode • System PIN
Time settings (page 49) • Alarm • Set Date & Time
Calling Features (page 37) • BT 1471 • Call Diversion On • Call Diversion Off
• Call Diversion Check • Call Waiting On • Call Waiting Off
• Call Waiting Check • Reminder Call Set • Reminder Call
Cancel • Reminder Call Check • Edit Number
Registration (page 51) • Register Handset • Select Base • De-register
Names menu (page 22) • Names • Options
Add Entry • Show Details
• Delete Entry • Edit Entry • Ringtone • Delete all Phonebook
If you experience any problems, please call the Helpline on 0870 605 8047
15
16
Using the phone
Simple and easy.
Switch handset on/off
1. Press and hold
to switch the handset off.
again or place it in the base to switch the
2. Press
handset back on.
Make a call
1. Press
then dial the number you want.
Preparatory dialling
1. Enter the number first. If you make a mistake, press
Clear to delete. Press Press
to dial.
Call timer
1. The display shows the duration of all external calls.
After you hang up, the total call time is shown briefly.
End a call
1. Press Press
or place the handset back on the base.
If you experience any problems, please call the Helpline on 0870 605 8047
Using the phone
Receiving calls
Providing you have subscribed to your network’s Caller
Display service, the caller’s number (and name if stored
in the phone book) is displayed.
1. Press
or if the handset is on the base, simply lift
it up and speak.
Handsfree
Handsfree lets you talk to your caller without holding the
handset. It also enables other people in the room listen
to both sides of your conversation.
You can switch to handsfree at any
time during a call. Just press
.
Make a handsfree call
When in ‘handsfree’, the display
shows the
icon.
1. Press
twice. Dial the number. Your call can be heard
over the handset’s loudspeaker.
2. To switch back to the handset at any time, press
Press
to end the call.
again.
Adjust earpiece/handsfree volume
1. During a handsfree call, press
1-5.
Vol
or
to select volume
If you experience any problems, please call the Helpline on 0870 605 8047
17
18
Using the phone
Answer a call in handsfree
When the phone rings:
twice. The call comes through the handset
1. Press
loudspeaker. If you want to switch the call to the
earpiece, press
.
Redial
You can redial up to 20 of the last numbers called.
If you have stored a name in the phonebook to go with
the number, the name will be displayed as well as the
number, see phonebook, page 22.
Redial a number from the list
1. Press
to enter the redial list. Scroll
number you want is displayed.
Vol
2. Press
Vol
or
until the
to dial the number.
Secrecy
During a call, you can talk to someone nearby without
your caller hearing you.
1. During the call, press Secrecy. Display shows Secrecy
On. Your caller cannot hear you.
If you experience any problems, please call the Helpline on 0870 605 8047
Using the phone
2. Press OFF to return to your caller.
Paging calls cannot be answered
by a handset.
Paging
You can use the Page button on the base to alert handset
users that they are wanted or locate a missing handset.
1. Press Page on the base. The handset(s) ring. Display
shows Paging.
2. Press Page to stop the handsets ringing or press any
button on the handset.
Keypad lock
You can lock the keypad to prevent accidental dialling
while carrying the handset around.
1. Press and hold
Locked and the
You cannot make any calls,
including 999 and 112 emergency
calls while the keypad is locked.
Answer incoming calls by pressing
as normal.
The
icon is displayed while the
keypad is locked.
until the screen shows Keypad
symbol appears.
2. Press Unlock then YES to use the keypad again.
Internal calls
If you have two or more handsets registered to your
base, you can make internal calls. Two handsets can be
If you experience any problems, please call the Helpline on 0870 605 8047
19
20
Using the phone
holding an internal call while a third is making an
external call.
Call another handset
1. Press
Int
then the handset number you want (1-5).
2. To end the call press
the base.
or replace the handset back on
3-Way call
You can put an external caller on hold, talk to another
handset user, then hold a call between all three.
1. During an external call, press Int your caller is put on
hold. Enter the handset number you want (1-5).
2. When the other handset answers, press and hold
start the conference call.
If the other handset does not answer, press
speak to your external caller.
3. To end the call press Press
back on the base.
Int
again to
or replace the handset
If you experience any problems, please call the Helpline on 0870 605 8047
to
Using the phone
Transfer a call
You can transfer an external call to another handset.
During the call:
1. Press Int . Your caller is put on hold. Enter the handset
number you want (1-5).
2. When the other handset answers you can tell them
they have a call, then press
. The external caller is
transferred.
If the other handset does not answer or you decide not to
transfer the call, press Int to talk to your caller again.
Caller on hold
You can put an external caller on hold, talk to another
handset user, then resume your external call.
1. During a call, press Int your caller is put on hold. Enter
the handset number you want.
2. Press Int to end the internal call and return to your
external caller. The other handset presses Talk Off to
end the call.
If you experience any problems, please call the Helpline on 0870 605 8047
21
22
Phonebook
If you subscribe to your network’s
Caller Display service, and want
the names in your Phonebook
displayed instead of the phone
numbers, you must store the full
telephone number including the
national code.
Your own directory, stored in a handset.
Each Studio handset can store up to 150 names and
numbers. Names can be up to 16 characters long and
numbers up to 20 digits.
Add entry
Writing tips
Entering names
Use the keypad letters to enter
names, e.g. to store TOM:
1. Press
TUV
8
2. Press
6
3. Press
6
NO
M
NO
M
once to enter T.
three times to enter O.
once to enter M.
If you make a mistake, press Clear
to delete the last character or digit.
Press Int to switch between upper
and lower case letters.
The
icon will be displayed when
you have selected upper case.
1. Press Names.
2. If the Phonebook is empty, Add Entry is highlighted.
Press OK.
Or
3. If names have been stored, they are listed.
Press Options. Add Entry is highlighted. Press OK.
4. Use the keypad to enter the name, then press OK.
5. Use the keypad to enter the number, then press OK.
The screen shows the Names list.
6. Press and hold Back to return to standby.
Dial
1. Press Names.
2. Scroll
or
to the name you want or use the keypad
to enter the first letter of the name, e.g. press 7 four
times for names beginning with S.
Vol
PQ
RS
3. Press
to dial.
If you experience any problems, please call the Helpline on 0870 605 8047
Phonebook
Edit name and number
1. Press Names then scroll
or
to the name you want,
to Edit Entry and press OK.
then press Options. Scroll
Vol
2. Edit Entry screen is displayed. Press Clear to delete or
use
or
to position the cursor. Use the keypad to
change the name. Press OK.
Vol
3. Edit the number and press OK. Display returns to the list
of names.
4. Press and hold Back to return to standby.
View details
1. Press Names then scroll
and then press Options.
2. Scroll
Vol
or
to the name you want,
to Show Details and press OK.
3. Display shows the number.
4. Press and hold Back to return to standby.
If you experience any problems, please call the Helpline on 0870 605 8047
23
24
Phonebook
Delete an entry
1. Press Names then scroll
then press Options.
2. Scroll
Vol
or
to the name you want,
to Delete Entry and press OK.
3. Press Yes to confirm or No to cancel.
4. Press and hold Back to return to standby.
If you experience any problems, please call the Helpline on 0870 605 8047
SMS text messaging
Welcome to the BT Text Service on your BT Studio 2300.
The SMS Service is provided by BT.
Your BT Studio 2300 can send and receive messages to
any mobile phone from participating mobile networks
and compatible landline telephones in the UK.
The fixed line SMS service is provided under BT’s terms
and conditions for telephone service. These can be found
by visiting the BT.com website at:
http://www.bt.com/terms/tor.htm
To subscribe to the SMS text messaging service
When you send your first SMS text message from your
BT Studio 2300 you will automatically be registered for
the service.
On receipt of your first SMS through the service, the
system will send you a welcome SMS message back.
Please note that if you set up different user areas you
will need to send a message from each user area to
register them.
You may also register by sending the word Register to 00000
upon which you will receive a confirmation message.
25
IMPORTANT
You must subscribe to your
Network Provider’s Caller Display
Service in order to use SMS text
messaging.
A quarterly fee may be payable.
You must not have your telephone
number withheld for this service to
work.
You may also send messages to
landline phones that are NOT SMS
compatible. Messages to noncompatible lines will be connected
to voice text and delivered in
spoken words to the telephone as
a call. Please note that the
conversion can translate common
abbreviations and smileys etc, but
to ensure maximum clarity of
message delivery, abbreviations
etc should be used sparingly.
Some other network operators or
line providers may not be
compatible with this SMS service.
If you experience any problems, please call the Helpline on 0870 605 8047
26
SMS text messaging
Cost of the fixed line service
There is no subscription charge (other than the
subscription to Caller Display). Visit the BT.com website
(www.bt.com) to find out how much it costs to send a
text message (depends upon your call package).
Using SMS
Helpline
If you have any difficulties sending
or receiving SMS text messages,
please see page 58 for the relevant
Helpline number.
When using SMS for the first time,
it is recommended that you send a
message to yourself on the
telephone number your BT Studio
2300 is connected to. If you do
this you can see how messages are
both sent and received.
Write an SMS text message
1. Press Menu. The SMS screen is displayed. Press OK.
2. Press OK again to select Write Message.
You can enter a word by pressing each letter button a
number of times to display the character you want on the
screen.
JKL
G
4
6
D
G
M
4
M
6
,
3
M
6
If you experience any problems, please call the Helpline on 0870 605 8047
.
D
3
EF
JKL
NO
JKL
EF
JKL
NO
JKL
NO
JKL
HI
To write the word “Hello”, press
5
5
5 , 5
5
5 ,
HI
CHARACTERS
Counts down the number of
characters available from 160 to 0
so you always know how much
more text you can write.
With SMS (Short Message Services) you can send and
receive text messages up to 160 characters long.
,
SMS text messaging
Writing tips
Deleting text
When writing, press Clear. When
reading, press Options, select
Delete then OK.
Character map
Pressing the buttons for normal message writing will
give you the following characters with each successive
press of the button.
Button
0
0
ABC
2
EF
D
3
G
HI
5
JKL
NO
M
6
PQ
RS
7
@
TUV
8
XYZ
W
9
&
,
:
;
!
?
¡
¿
A
B
C
2
Ä
Å
Æ
Ç
?
D
E
F
3
É
%
space .
1
4
Character
G
H
I
4
_
J
K
L
5
-
M
N
O
6
Ñ
P
Q
R
S
7
/
T
U
V
8
Ü
:
W
X
Y
Z
9
)
✱
€
£
$
¥
Ö
’
”
1
(
#
To switch between uper and lower case characters, press
the Int button.
If you experience any problems, please call the Helpline on 0870 605 8047
27
28
SMS text messaging
Switch between upper and lower
case by pressing Int .
In addition, the following characters appear in lower case
only:
Button
ABC
2
EF
D
3
G
HI
4
5
JKL
NO
M
6
PQ
RS
7
TUV
8
XYZ
W
9
Character
a
b
c
2
à
ä
d
e
f
è
é
%
å
æ ?
g
h
i
4
ì
__
j
k
l
5
-
m
n
o
6
n¨
p
q
r
s
7
ò
ö
ø
ß
/
t
u
v
8
w
x
y
z
ù
ü
:
9
)
(
Use
or
to move the cursor. If you make a mistake
or want to delete text press Clear.
Vol
To read through your message if it is too long to fit on
one screen, scroll
or .
Vol
Using options
While writing press Options to access the following
options:
Sending
When you are sending a text, the
screen shows Sending SMS then
Message Sent.
Send To – press OK. Enter the number when prompted
or press Search to open the phonebook.
You can send a message to an individual entry.
If you experience any problems, please call the Helpline on 0870 605 8047
SMS text messaging
Save – scroll
to Save then press OK to save the
message for sending later.
Insert Symbol – scroll
to Insert Symbol then press
OK to display the symbol chart. Scroll
or
to select,
then OK to insert.
Vol
Symbols
When writing a message, you can
select a symbol from the options list.
User Name – You can send from the default user name or
select your own user area so that the receiver knows who
has sent the text. To set a user area scroll
to User
Name then press OK. Scroll
or
to select the name,
then OK to confirm, see page 34.
Vol
Outbox
Sent messages are stored in the Outbox.
You can read, forward and delete messages in your
Outbox.
If forwarding a message to another person, you can edit
the message before finally sending it.
1. From the standby screen, press Menu then OK.
Press OK again to open the SMS menu. Scroll down to
Outbox and press OK.
2. Scroll
or
to select the message you want then press
Read. You can now open the Options menu to Edit,
Send To, Delete or assign a user name to the message.
Vol
If you experience any problems, please call the Helpline on 0870 605 8047
29
30
SMS text messaging
Deleting
You can delete all messages from the Inbox or Outbox
folder, or delete All Messages from all folders.
1. From the standby screen, press MENU then OK. Scroll
down to Delete Messages and press OK.
or
to select the folder you want or All
Messages. Press OK. The appropriate screen is displayed.
2. Scroll
Vol
3. Press OK to confirm or Back to cancel.
4. Press and hold Back to return to standby.
Receiving and reading text messages
When you receive a message it is stored automatically in
the Inbox.
The screen alerts you to a new message then displays the
new message icon along with the number of new
messages in your Inbox. On the base, the New SMS light
comes on. You can also set an audible alert, see page 33.
Delivery of SMS messages
The system will always try and deliver the message to
a text enabled phone in written format, only if there is
a problem with delivery will the message be delivered
If you experience any problems, please call the Helpline on 0870 605 8047
SMS text messaging
as voice text, with the exception of forced voice text
messages. See the Help section on page 58-59.
Once registered, SMS message delivery is 24 hours.
Open Inbox
1. Press Read then scroll
or
to select the message
you want to read then press OK.
Vol
2. When reading your messages press Options to access
the following options:
Reply – press OK to send a reply.
Forward – scroll
to Forward then press OK to forward
the message to another number. Enter the number when
prompted or press Search to open the phonebook. You
can send a message to an individual entry.
Delete - scroll
When replying to or forwarding a
message you have access to the
same Options menu used for
writing a text message.
When you open the SMS menu,
new messages in the Inbox are
marked with an ✱.
to Delete then press OK to delete the
message.
3. Press Back to return to the Inbox screen and to standby.
If you experience any problems, please call the Helpline on 0870 605 8047
31
32
SMS text messaging
Open Inbox from standby screen
1. From the standby screen, press Menu and then SMS to
open the SMS menu. Scroll
to Inbox and press OK.
2. You can now scroll
or
to the message you want and
press Read to open it. You can now open the options
menu to reply, forward or delete.
Vol
SMS settings
The SMS settings menu lets you:
Select alternative service centres.
Set the Terminal number.
Switch SMS Alert on or off.
Set different users so that each handset can have its own
text mailbox.
SMS Service Centre numbers
To send and receive SMS text messages you need the
telephone number of your Network’s SMS Centre.
These numbers have been pre-loaded into the
BT Studio 2300.
If you experience any problems, please call the Helpline on 0870 605 8047
SMS text messaging
If you accidentally delete the Send or Receive SMS
Service Centre numbers you will need to re-enter them
in order for your SMS Service to work.
The Send SMS Service number is: 1470P1709400
The Receive SMS Service number is: 0800 587 52
To change the SMS Service Centre phone numbers
1. From the standby screen, press Menu then select SMS to
open the SMS menu. Scroll
to Settings and press OK.
2. Press OK to open Service Centres menu. Scroll
setting you want and select OK.
to the
Receive Centre – lets you set the number of the
message receiving centre.
Send Centre – lets you set the number of the message
sending service.
See above for the pre-set Service Centre numbers.
Set SMS text alert
Your handset can play a different melody, a morse beep
or a discreet tone to announce a new text message.
The default setting is On.
1. From the standby screen, press Menu then select SMS to
open the SMS menu. Scroll
to Settings and press OK.
If you experience any problems, please call the Helpline on 0870 605 8047
33
34
SMS text messaging
to SMS Alert.
2. Scroll
3. Press OK.
The default setting is Morse.
to Set Alert and press OK.
or
to select the type of alert you want –
Morse, Discreet or Polyphonic.
4. Scroll
Scroll
Vol
5. Press OK to confirm or Back to return to the previous
menu.
6. Scroll
or
to set the alert On or Off and press OK to
confirm the setting.
Vol
7. Press and hold Back to return to standby.
User areas
You can receive text messages into a user area or
mailbox. The default user area setting is 9.
All handsets can see the default User Area. You can set
your own private user area which is protected by a PIN
number. Your private user area can be accessed from
any registered handset once the correct PIN number
has been given.
Up to 5 user areas are available (default +4). However,
you can allocate any number between 0-9 to them.
The terminal number is automatically allocated but it
can be changed.
If you experience any problems, please call the Helpline on 0870 605 8047
SMS text messaging
Set personal user area
1. From the standby screen, press Menu then select SMS to
open the SMS menu. Scroll
to Settings and press OK.
Scroll
to Users and press OK.
2. If necessary, scroll
to Add User and press OK.
Enter the user name and press OK.
3. Enter a password between 1 and 5 digits and press OK.
Enter the password again to confirm and press OK. Your
user screen is displayed.
PIN protected
If you have protected your text
messages with a security PIN you
will have to enter the PIN each
time you open your Inbox to read
your messages
Keep track of your PIN
You can keep a record of the
current security PIN in the space
provided on page 66.
If you enter a PIN incorrectly the
screen returns to standby.
4. You will be assigned a terminal number 0-8. To see your
Terminal Number scroll
to Terminal Number and
press OK.
5. Press Back to return to the previous menu.
Send text message from a user area
1. From the standby screen, press Menu then select SMS
then OK.
2. When you have written your message, press Options and
scroll
to User Name.
3. If required, scroll to the user area you want and press OK.
Enter your PIN number and press OK.
4. The options menu is displayed again. You can now scroll
to the next option you want, e.g. Send To.
If you experience any problems, please call the Helpline on 0870 605 8047
35
36
SMS text messaging
Delete user area
1. From the standby screen, press SMS to open the SMS
to
menu. Scroll
to Settings and press OK. Scroll
Users and press OK.
2. Scroll
to Delete User and press OK. Scroll
select the user you want and press OK.
Vol
or
to
3. Enter the PIN (that was previously allocated) and press
OK to delete. The display returns to the previous menu.
Default settings for SMS text
messaging
Receiving Service Centre 1
0800 58752
Sending Service Centre 1
1470P1709400
Predictive Text
Off
Set SMS Alert Melody
Morse
User Area
None set
Password protection
Off
Default user PIN
0000
If you experience any problems, please call the Helpline on 0870 605 8047
BT Calling Features
Helping you manage your calls.
Caller Display
If you subscribe to a Caller Display service you can see
who is calling you on your handset display, as well as the
time and date of their call.
If you have stored a name to go with the number in your
handset phonebook, the name will be displayed as well.
Please store the full telephone number, including the area
code, otherwise the name will not match the number
stored in the phonebook and any picture or ringtone you
have selected will not be used.
Calls lists
Your BT Studio 2300 lets you view details of your last calls.
Received calls – shows details of all recent callers.
37
IMPORTANT
To use Caller Display you must first
subscribe to the service from your
network provider. A quarterly fee
may be payable.
For more information, call BT free
on 0800 800 150.
Caller information not available.
With some incoming calls, the
telephone number of the caller is
not available and cannot therefore
be displayed.
In this case your BT Studio 2300
provides you with some explanatory
information.
Unavailable – The number is
unavailable.
Withheld
– The caller has withheld
their number.
Ringback – Ringback call.
Operator – The call has been
made via the operator.
Payphone – The caller is ringing
from a payphone.
Int’l
– International call.
Missed calls – shows details of calls that were not
answered, or ‘missed’.
Dialled calls – list shows details of the last 20 calls made
from your handset.
A combined total of 50 calls can be stored in the
Received and Missed calls.
If you experience any problems, please call the Helpline on 0870 605 8047
38
BT Calling Features
To access Calls Lists via the menu
1. Press Menu then scroll
to Calls Lists and press OK
to open the Calls list screen.
2. The Received calls list is highlighted. Scroll
to
highlight the Missed or Dialled Calls list. Press OK.
3. If the name of the caller has been stored in the
phonebook it is displayed.
4. Press Options. You can now select:
Delete – to delete the entry.
Show Details – to view the number.
Save Number – to store the number in the phonebook.
Press
to select the option you want then press OK.
Or press Back to return to the previous screen.
An
next to a number in the
Calls list indicates a new caller.
You can display, scroll through and
dial numbers in the Calls lists and
copy them into the phonebook.
Missed calls
To access missed Calls List using the navigator button:
1. From the standby screen, press
indicated with an ✱. Press
or
list.
Vol
If a call is received when the Calls
list is full, the oldest entry will be
replaced with details of the new
caller.
You can view, dial, delete and add
entries to the phonebook.
. New calls are
to scroll through the
2. Press
to dial a number or Options to delete the
entry, see further details or add the number to the
phonebook.
If you experience any problems, please call the Helpline on 0870 605 8047
BT Calling Features
Redial
1. From the standby screen, press . The redial list is
displayed. Press
or
to scroll through the list.
Vol
Vol
to dial a number or Options then select:
2. Press
Delete – to delete the number.
Show Details – if a name is displayed, this shows the
number as well.
Save Number – to create an entry in the phonebook.
Enter the name, press OK. The number is displayed.
Press OK to store the number.
Delete Calls lists
1. Press Menu the scroll
to Calls Lists and press OK to
open the Calls list screen.
2. Scroll
to Delete Calls Lists and press OK. Press
or
to select the list you want to delete:
Vol
Received Calls
Missed Calls
Dialled Calls
All Calls
Press OK.
3. Press Yes to delete or No to cancel.
If you experience any problems, please call the Helpline on 0870 605 8047
39
40
BT Calling Features
Call Diversion is a chargeable
service. Check with your network
provider for details.
For BT, call 0800 800 150.
Call Diversion
Divert an incoming call to another number where you
can be reached.
1. Press Menu then scroll
OK.
2. Press
Vol
or
to Calling Features and press
to select:
Call Diversion On
Call Diversion Off
Call Diversion Check
Press OK. The Call Diversion service number is dialled.
Follow the prompts given.
Call Waiting is a subscription
service. Please check with your
network provider for details.
For BT, call 0800 800 150.
Call Waiting
If an incoming call arrives while you are already on the
phone, you will hear a soft beep every 5 seconds. This
beep is not audible to the person you are speaking to.
The second caller’s number (and name if stored in the
phonebook) will appear on the handset display.
Instead of the engaged tone, the second caller will hear
an announcement to hold on as you are aware that there
is a second call.
The name of the waiting caller will be displayed if you
have stored their details in the phonebook and have
subscribed to your network’s Caller Display service.
If you experience any problems, please call the Helpline on 0870 605 8047
BT Calling Features
1. Press Menu then scroll
press OK.
2. Press
Vol
or
to Calling Features and
to select:
Call Waiting On
Call Waiting Off
Call Waiting Check
Press OK to confirm. The Call Waiting service number is
dialled. Follow the prompts given.
Reminder Call
Reminder Call is a pay as you use
service.
You can request a BT reminder call for any time of day
or night.
to Calling Features and press
1. Press Menu then scroll
OK. Press
to highlight Reminder Call then
press OK.
2. Press
Vol
or
to select:
Reminder Call Set
Reminder Call Cancel
Reminder Call Check
Press OK. The Reminder Call service number is dialled.
Follow the prompts given.
If you experience any problems, please call the Helpline on 0870 605 8047
41
42
BT Calling Features
Edit number
This will enable you to edit the number dialled to access
Call Diversion, Call Waiting or Reminder Call services.
Default settings
Call Diversion on
✱2 1 ✱
Call Diversion off
#2 1 #
Call Diversion check
✱# 2 1 #
Call Waiting on
✱4 3 #
Call Waiting off
#4 3 #
Call Waiting check
✱# 4 3 #
Reminder call set
✱5 5 ✱
Reminder call cancel
#5 5 #
Reminder call check
✱# 5 5 #
If you experience any problems, please call the Helpline on 0870 605 8047
Handset settings
43
It’s your phone, make it work the way you want.
The Handset menu lets you set a number of preferences
for each handset.
Handset ringtone
You can choose from 5 melodies. You can set different
melodies for internal and external calls.
1. Press Menu, scroll
to Handset and press OK.
The default ringtone for external
calls is Melody 1.
The default ringtone for internal
calls is Melody 5.
or
to
2. Ringtone is highlighted. Press OK. Press
switch between Internal or External and press OK.
Vol
3. Scroll
or
to the melody you want. A sample is
played. Press OK to confirm.
Vol
4. Press and hold Back to return to standby.
Ringer volume
There are five handset ringer volume levels and off. If you
select off, calls will still ring at the base and your handset
screen will indicate incoming calls.
1. Press Menu then scroll
2. Scroll
If you select Ringer off, the
is shown on the display.
to Handset and press OK.
to Ring Volume and press OK.
3. The current setting is displayed. Press
to increase or
to decrease the volume. Press OK to confirm.
Vol
4. Press and hold Back to return to standby.
If you experience any problems, please call the Helpline on 0870 605 8047
icon
44
Handset settings
Handset name
You can change the name displayed on your handset’s
screen, e.g. to Peter, Kitchen etc. The name can be up
to 8 characters long. The handset number is not altered.
1. Press Menu then scroll
2. Scroll
to Handset and press OK.
to Handset Name, then press OK.
3. Press Clear to delete the existing name. Enter the
handset name you want. If you make a mistake press
Clear. Press OK to confirm.
4. Press and hold Back to return to standby.
Language
Choose the display language – English, Français,
Deutsch, Italiano, Español, Nederlands or Portuguès.
1. Press Menu then scroll
to Handset and press OK.
2. Press
to highlight Language and press OK. Press
or
to highlight the language you want and press OK
to select or Back to return to the previous menu.
Vol
3. Press and hold Back to return to standby.
Menu colour
You can select Blue, Green or Pink as the display menu
colour.
If you experience any problems, please call the Helpline on 0870 605 8047
Handset settings
1. Press Menu then scroll
to Menu Colour, then press OK.
2. Scroll
3. Scroll
Save.
to Handset and press OK.
Vol
or
to highlight the colour you want and press
4. Press and hold Back to return to standby.
Auto talk
When the handset is on the base and the phone rings, you
can answer a call just by picking the handset up from the
base, without having to press the
button. You can
also end a call by placing the handset back on the base.
By switching Auto Talk off you have to press the
button to answer a call. You can end a call by pressing
the
button or by placing the handset back on
the base.
1. Press Menu then scroll
to Handset and press OK.
2. Scroll
to Auto Talk, then press OK.
The current setting is highlighted.
3. Scroll
or
to switch between On and Off.
Press OK to confirm your selection.
Vol
Handset default settings
Handset ringer
volume
5
Handset name
Studio
Earpiece volume
3
Ringer melody
External
Internal
1
5
Display colours
Blue
Auto Talk
On
4. Press and hold Back to return to standby.
If you experience any problems, please call the Helpline on 0870 605 8047
45
46
Base settings
What’s your fancy?
The default base ringtone is
Melody 5.
Ringtone
Choose from 5 standard ringer melodies.
1. Press Menu then scroll
press OK.
to Base Settings and
or
to select
2. Press OK select Base Ringtone. Scroll
the ringtone you want. As you highlight each option, you
hear a quick sample.
Vol
3. Press OK to set the ringtone.
The default base ringer volume is 3.
Ringer volume
There are five ringer volume levels and Off.
to Base Settings and press
1. Press Menu then scroll
OK. Press
to highlight Base Volume then press OK.
2. Scroll
to increase volume or
then OK to confirm.
Vol
to decrease volume
If you experience any problems, please call the Helpline on 0870 605 8047
Base settings
Handset priority
Normally, if you have more than one handset registered
to your base, they all ring at the same time. However, you
can set one of them to ring before the others, so that calls
can always be answered at one handset first.
to Base Settings and
1. Press Menu then scroll
to highlight Handset Priority
press OK. Press
then press OK.
Display highlights All Handsets. Press OK to select All
Handsets to make all handsets ring together.
Or
2. Scroll
to Select Handset and press OK. Scroll
or
to the handset you want to ring first. Press OK.
Vol
3. Scroll
or
to select the number of rings at the
handset before the other handsets start ringing. Press OK
to confirm.
Vol
System PIN
The System PIN is used for registering and deregistering
handsets and some other optional settings. The default
System PIN is 0000.
to Base Settings and press
1. Press Menu then scroll
OK. Press
to highlight System PIN then press OK.
Protecting your settings
When entering a PIN the digits are
shown as asterisks.
Keep track of your PIN
If you change the System PIN,
keep a record of new number by
writing in the space provided on
page 66. You need your System
PIN for registering handsets and
for some other optional settings.
If you experience any problems, please call the Helpline on 0870 605 8047
47
48
Base settings
2. Enter the current PIN (Original setting 0000) and press OK.
3. Enter the new PIN, press OK. Confirm New PIN is displayed.
Enter your new PIN again.
If you enter the PIN incorrectly the
screen shows Incorrect Pin.
4. Press OK to confirm.
Default base settings
Base ringtone
Standard melody 5
Base ringer volume
5
System PIN
0000
Handset priority
All handsets
If you experience any problems, please call the Helpline on 0870 605 8047
Time settings
49
Use your phone as an alarm clock.
Set the date and time and use your BT Studio 2300 to
give you a reminder alarm.
You can have a different alarm setting for each handset
registered to your base. The alarm rings only at the
handset, not at the base or any other handset.
Set alarm
IMPORTANT
If you have subscribed to your
network’s Caller Display service the
date and time will be set
automatically when you receive
your first call and you will not need
to set the date and time manually,
although this is an option.
When the alarm is switched on, the
standby icon shows the
icon
1. Press Menu then scroll
to Time Settings and press
OK. Press OK to select Alarm.
2. Press OK to select On/Off. Scroll
option you want:
Vol
or
to highlight the
On Once – alarm goes off just once.
On Daily – alarm goes off same time each day.
Off – alarm off.
Press OK to confirm.
3. If you are setting an alarm, the screen shows
Time. Enter the time you want the alarm to go off,
e.g. 0 7 3 0 for 7.30am, then press OK
to confirm.
D
RS
EF
PQ
If you experience any problems, please call the Helpline on 0870 605 8047
50
Time settings
Alarm tone
From a choice of 4, you can set which ringtone is played
for your alarm.
to Time Settings and press
1. Press Menu then scroll
OK. Press OK to select Alarm.
to highlight Set Alarm Tone, and press OK.
2. Press
3. Scroll
or
to select the Alarm Tone you want then
press OK to confirm.
Vol
Switch alarm off
1. When the alarm sounds, press any button on the handset
to switch if off.
Set date and time
1. Press Menu then scroll
to Time Settings and press
OK. Press
to highlight Set Date & Time then press OK.
2. Enter the date,
e.g. 2 2 0
confirm.
ABC
ABC
3. Enter the time,
e.g. 1 4 3
confirm.
D
HI
EF
G
ABC
2
0
for 22nd February. Press OK to
for 2.30pm then press OK to
If you experience any problems, please call the Helpline on 0870 605 8047
Additional handsets and bases
Expanding your system is easy.
Up to five handsets can be registered and operated from
the BT Studio 2300.
You can make internal calls between two handsets while
third is making an external call.
Each handset can be registered on up to four bases.
If you buy new handsets to use with your BT Studio 2300
they will have to be registered to the base before you can
use them.
Register a new BT Studio handset
At the base:
You can create phonebook entries
and adjust some handset settings
such as ringer melody and volume
on an unregistered handset or out
of range handset.
IMPORTANT
Before registration, make sure the
handset batteries are fully charged
and that you are close to the base.
You can purchase additional
handsets for your BT Studio 2300
by calling the BT Studio Helpline
on 0870 605 8047.
1. Press and hold Page until you hear the base beep. Press
OK to confirm. The handset screen then shows Handset
Registered. The handset reverts to standby and is given
the first available handset number. You can now use the
handset.
On the handset:
2. Press Menu, then scroll down to Registration and
press OK.
3. Register Handset is highlighted. Press OK.
If you experience any problems, please call the Helpline on 0870 605 8047
51
52
Additional handsets and bases
4. If you have more than one base, scroll
the base. Press OK.
Vol
or
to select
5. Enter the base’s SYSTEM PIN (original setting 0000).
Press OK.
Register handset with an additional base
To register a GAP compatible
handset to your BT Studio base,
please refer to the instructions
supplied with the handset you are
trying to register.
All the bases that a handset can be
linked to are indicated by an ✱.
A handset registered with one base can then be registered
with up to three more bases, e.g. at work, at home, at a
relative’s home.
Please ensure that you are in range of the base unit
before proceeding.
1. Press Menu then scroll
to Registration and press OK.
2. Register Handset is highlighted. Press OK.
3. Scroll
Vol
or
to select the base. Press OK.
4. Enter the selected base’s SYSTEM PIN (original setting
0000). Press OK.
5. At the base: press and hold Page until you hear the base
beep. The handset screen shows the base ID number,
press OK. The handset reverts to standby and
is given the first available handset number. It is now
registered to the new base and ready for use.
If you experience any problems, please call the Helpline on 0870 605 8047
Additional handsets and bases
Select base
You can switch your BT Studio handset between bases.
You can also set it to automatically select the base with
the strongest signal. The handset must first be registered
with each base individually and you must be in range of
the base unit.
1. Press Menu then scroll
to Registration and press OK.
2. Scroll
to Select Base then press OK. The current
base being used is highlighted.
3. Scroll
or
to select the base you want or Automatic
to connect to the base with the strongest signal. Press OK.
Vol
De-register a handset
Use one handset to de-register another handset from the
same base.
1. Press Menu then scroll
to Registration and press OK.
2. Scroll down to De-Register. Press OK.
3. Enter the system PIN (original setting 0000) then press
OK. The screen lists all handsets registered to the base.
4. Scroll
or
to select the handset you want to
deregister and press OK.
Vol
5. Press Yes to confirm or No to return to the previous
screen listing the handsets.
If you experience any problems, please call the Helpline on 0870 605 8047
53
54
Help
Replacing the handset batteries
After a time, you may find that the handset batteries are running out of charge more
quickly. This is a standard sign of wear and the batteries will need replacing.
For spare 2 x AAA rechargeable NiMH batteries, please contact the BT Studio Helpline
0870 605 8047.
Remove the battery compartment cover and remove existing batteries. Insert new batteries
and replace the compartment cover.
NOTE: BT accepts no responsibility for damage caused to your BT Studio handset by
using any other type of batteries.
Problems
Possible cause
No display
The batteries may be dead. Recharge or replace the
batteries.
Is the handset switched off? To switch the handset on,
see page 16.
No dial tone
Check that the telephone line cord is plugged into the
phone socket.
Check that the base is connected to the mains power
and switched on.
If you experience any problems, please call the Helpline on 0870 605 8047
Help
Problems
Possible cause
You cannot link up
with the base
Is the display flashing
? Check that the base is
connected to the mains power and switched on.
Are you are out of range? Move the handset closer to
the base.
Are the batteries low or flat? If so, charge the batteries
or replace them if necessary.
If using more than one base, check that you are connected
to the correct base, see page 53.
No ring on the handset
Check that the ringer volume is switched on, see page 43.
Check that the base is plugged into the phone socket
and that it is also connected to the mains power and
switched on.
Buzzing noise on my
radio, TV, computer
or hearing aid
Sometimes, your BT Studio 2300 and other DECT GAP
compatible handsets can interfere with other electrical
equipment if placed too close. Try moving it at least one
metre away from such appliances.
The charging does not
appear to be working
Check that the base is plugged into the mains socket
and switched on.
If you experience any problems, please call the Helpline on 0870 605 8047
55
56
Help
Problems
Possible cause
Check that you are using the correct power adaptor plug.
BT Studio 2300 base – Item Code 021604
BT Studio 2300 Twin charger – Item Code 021299
Check that the handset has slotted correctly into the base.
Check that the handset batteries have been correctly
fitted.
Cannot adjust an
option in the base
Someone else might be making changes using another
handset. Try again when the other handset user has
finished.
SMS messages
cannot be sent and
screen displays
Unable To Send
The base station power supply or telephone line cord
might not be properly connected. Check that the base
station power supply is plugged into the mains socket
and switched on and that the telephone is plugged into
the telephone wall socket.
There might be a fault on the line.
Check your telephone line is working properly.
You might have deleted the server number in error.
Refer to page 32-33 for instructions on how to enter
the number.
Your SMS memory might be full.
Delete unwanted text messages,see page 30.
If you experience any problems, please call the Helpline on 0870 605 8047
Help
Problems
Possible cause
More than one SMS product plugged into the line.
Remove other products.
Cannot send text
Check Service Centre number is correct including 1470
prefix.
Check call barring (option 4) is not activated on your line
if you have the call barring service rented from BT.
Cannot receive text
Check Service Centre number is correct.
Ensure you have subscribed to a Caller Display Service and
that it is active. You can check this by noting if your phone
displays data regarding your caller’s number when you
receive an incoming call.
Handset is registered
to the SMS service
and text has been
previously sent and
received but you are
now only receiving
incoming messages
as voice text
This may be due to your handset being de-registered.
All you need to do is type Register and send it to 00000.
You will receive a confirmation message back. This
assumes that your Caller Display service is active and
working on your line.
Note: Messages sent to 00000 are not charged for.
If you experience any problems, please call the Helpline on 0870 605 8047
57
58
Help
Further help and advice for SMS related queries on BT lines:
BT Residential customers – call 151, choose option 2, when prompted by the Fault
Management Service select option 2, input your phone number on the handset and wait
to speak to a customer adviser.
BT Business customers – call 154, choose option 2, when prompted by the Fault
Management Service select option 2, input your phone number on the handset and wait
to speak to a customer adviser.
For other telephone service providers please contact their customer services.
General sales enquiries:
BT Residential lines – call 150. BT Business lines – call 152.
For other telephone service providers please contact their customer services.
Billing enquiries:
Refer to the telephone number shown on your telephone bill.
Other functions and services available from the SMS service
By sending the following commands to the BT text self administration facility you can
control functions and capabilities in your SMS phone and the way messages are handled.
Press Menu. Press Menu again to select SMS. Press OK to select Write message.
Type in the following commands (depending upon what you wish to do) and press Options
then OK to send to 00000.
1
This will enable you to opt out from receiving voice text messages.
If you experience any problems, please call the Helpline on 0870 605 8047
Help
Turns off the opt out option.
1
ABC
Turns on permanent voice text message delivery to your phone.
This means all incoming text is delivered as voice text.
ABC
Turns off permanent voice text message delivery.
2
2
If you are sending a message from a fixed line phone to another fixed line phone.
EF
D
3
Forces a message sent to be delivered as voice text even though the
recipient may have an SMS enabled phone and usually receives written text.
This command is inserted at the start of the message and applies only to
that message, e.g.
“Hello I will be home late”.
3
EF
D
If you are sending a message from a fixed line phone and require a status report.
0
Will allow a status report to be send back to you when you have sent a
message to confirm delivery. Place
at the start of your text
0
message. Write the message and send it. You will receive a reply text back
to your phone giving the status report for that message.
BT Studio Helpline
0870 605 8047
Call the dedicated BT Studio Helpline:
if you are having difficulties using your BT Studio 2300
if you need replacement batteries or mains power lead
Lines open 9am – 5.30pm, Monday to Friday and 9.30am – 2.30pm, Saturday
If you experience any problems, please call the Helpline on 0870 605 8047
59
60
General information
Important
This equipment is not designed for making emergency telephone call when the power
fails. Alternative arrangements should be made for access to emergency services.
This product is intended for connection to analogue public switched telephone networks
and private switchboards in the United Kingdom.
Safety
General
Only use the power supply included with the product. Using an unauthorised power
supply will invalidate your guarantee and may damage the telephone. The item number
for the power supply used with the base is 021604. The item number for the power
supply used with the charger is 021299 (only applicable when you have purchased the
BT Studio 2300 Twin).
Use only the approved rechargeable batteries supplied. Spare rechargeable batteries are
available from the BT Studio Helpline 0870 605 8047.
Do not open the handset (except to replace the handset batteries) or the base. This could
expose you to high voltages or other risks. Contact the Helpline for all repairs.
Radio signal transmitted between the handset and base may cause interference to
hearing aids.
It is recommended that advice from a qualified expert be sought before using this
product in the vicinity of emergency/intensive care medical equipment.
If you experience any problems, please call the Helpline on 0870 605 8047
General information
It is recommended that if you have a pacemaker fitted you check with a medical expert
before using this product.
Your product may interfere with other electrical equipment, e.g. TV and radio sets,
clock/alarms and computers if placed too close. It is recommended that you place your
product at least one metre away from such appliances to minimise any risk of
interference.
Never dispose of batteries in a fire. There is a serious risk of explosion and/or the release
of highly toxic chemicals.
Cleaning
Simply clean the handset and base with a damp (not wet) cloth, or an anti-static wipe.
Never use household polish as this will damage the product. Never use a dry cloth as this
may cause a static shock.
Environmental
Do not expose to direct sunlight.
The produce may heat up when the batteries are being recharged or during prolonged
periods of use. This is normal. However, we recommend that to avoid damage you do not
place the product on antique/veneered wood.
Do not stand your product on carpets or other surfaces which generate fibres, or place it
in locations preventing the free flow of air over its surface.
Do not submerge any part of your product in water and do not use it in damp or humid
conditions, such as bathrooms.
If you experience any problems, please call the Helpline on 0870 605 8047
61
62
General information
Do not expose your product to fire, explosive or other hazardous conditions.
There is a slight chance that your phone could be damaged by an electrical storm. We
recommend that you unplug the power and telephone line cord from the base for the
duration of the storm.
Guarantee
Your BT Studio 2300 is guaranteed for a period of 12 months from the date of purchase.
Subject to the terms listed below, the guarantee will provide for the repair of, or at BT’s
or its agent’s discretion the option to replace the BT Studio 2300 or any component
thereof, (other than batteries), which is identified as faulty or below standard, or as a
result of inferior workmanship or materials. Products over 28 days old from the date of
purchase may be replaced with a refurbished or repaired product.
The conditions of this guarantee are:
The guarantee shall only apply to defects that occur within the 12 month guarantee
period.
Proof of purchase is required.
The equipment is returned to BT or its agent as instructed.
This guarantee does not cover any faults or defects caused by accidents, misuse, fair
wear and tear, neglect, tampering with the equipment, or any attempt at adjustment or
repair other than through approved agents.
This guarantee does not affect your statutory rights.
If you experience any problems, please call the Helpline on 0870 605 8047
General information
Within the 12 month guarantee period:
If you experience difficulty using the product, prior to returning it, please read the Help
section beginning on page 54, or contact the BT Studio Helpline on 0870 605 8047, 9am
to 5.30pm Monday to Friday and 9.30am to 2.30pm Saturday.
In the unlikely event of a defect occurring, please follow the Helpline’s instructions for
replacement or repair.
Outside of the 12 month guarantee period:
If your product needs repair after the guarantee period has ended, the repair must meet
the approval requirements for connection to the telephone network. We recommend that
you contact BT’s approved repair agent, TecLogic on 08702 405029 or a local qualified
repairer.
Returning your phone
If the Helpline is unable to remedy your problem they will ask you to return the product.
Where possible, pack the product in its original packaging. Please remember to include
all parts, including the line cords, power supply units and the original batteries. (Please
note that we cannot take responsibility for goods damaged in transit.) Please obtain and
keep proof of posting from the Post Office or Carrier.
If you experience any problems, please call the Helpline on 0870 605 8047
63
64
General information
Technical information
How many telephones can you have?
All items of telephone equipment have a Ringer Equivalence Number (REN), which is used
to calculate the number of items which may be connected to any other telephone line.
Your BT Studio 2300 has a REN of 1. A total REN of 4 is allowed. If the total REN of 4 is
exceeded, the telephone may not ring.
With different telephone types there is no guarantee of ringing, even when the REN is
less than 4.
Only use the approved power adaptor and charger.
Only use approved AAA NiMH rechargeable batteries.
Connecting to a switchboard
This product is intended for use within the UK for connection to public telephone network
and compatible switchboards, which support tone dialling and timed break recall. If in
doubt please consult your service provider.
If you experience any problems, please call the Helpline on 0870 605 8047
General information
Access code and entering a pause
If you are connecting your BT Studio 2300 to a switchboard/PBX you may need to prefix
stored numbers with an access code (e.g. 9) in order to get an outside line. So that the
switchboard has time to pick up an outside line, you may also need to add a Pause after
the access code.
PABX access code
1. Press Menu then scroll
2. Scroll
to Handeset and press OK.
to PABX access code and press OK.
3. Display shows Set Code. Press OK.
4. Enter your PABX access code and press Save.
5. Scroll
to ON and press OK.
6. Press and hold Back to return to standby.
Entering a pause
A pause is entered when storing a number in the phonebook (see page 22) or PABX access
button until the display shows P.
code by pressing and holding the
Vol
Recall
The R (Recall) button is used when connected to certain switchboards (PBXs) and with
some BT Calling Features, or equivalent services available via your Network Provider.
If you experience any problems, please call the Helpline on 0870 605 8047
65
66
General information
Declaration of Conformance
Hereby, Suncorp Technologies declares that this BT Studio 2300 is in compliance with the
essential requirements and other relevant provisions of Directive 1999/5/EC.
The Declaration of Conformance for the BT Studio 2300 is published on the website:
http://www.suncorptech.com/bt
R&TTE
This product is intended for use within the UK for connection to the public telephone
network and compatible switchboards.
This equipment complies with the essential requirements for the Radio Equipment and
Telecommunications Terminal Equipment Directive 1999/5/EC.
For your records
Date of purchase:
Place of purchase:
Enter your BT Studio 2300 base
PIN here:
[
/
/
/
]
(see page 47 for more information)
Serial number:
For guarantee purposes proof
of purchase is required so please
keep your receipt.
Enter your BT Studio 2300 SMS
security code here:
[
/
/
/
BT accessories and
replacement items
For a full range of accessories and
replacement items for BT products
please call 0870 240 5522, or visit:
]
(see page 35 for more information)
If you experience any problems, please call the Helpline on 0870 605 8047
Visit us at www.bt.com
Offices worldwide
The telecommunications services described in this publication
are subject to availability and may be modified from time to time.
Services and equipment are provided subject to British
Telecommunications plc’s respective standard conditions of
contract. Nothing in this publication forms any part of any contract.
© British Telecommunications plc 2005.
Registered Office: 81 Newgate Street, London EC1A 7AJ.
Registered in England No. 1800000.
BT Studio 2300 Issue 2 (09/05) 1
Designed and produced by The Art & Design Partnership Ltd.
Printed in China