1
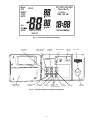
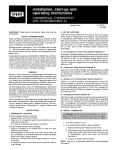
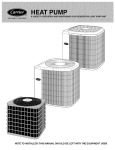
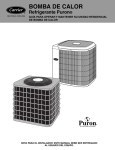
user’s information
manual
COMMERCIAL THERMOSTAT
(P/N TSTATBBPCM01-B)
Cancels: OM TSTAT-1
IMPORTANT: Read entire instructions before programming
the thermostat.
GENERAL
Bryant’s 7-day, commercial, programmable thermostats are
wall-mounted, low-voltage thermostats which maintain
room temperature by controlling the operation of an HVAC
(heating, ventilation, and air conditioning) system. Separate
heating and cooling set points and auto-changeover capability allow occupied and unoccupied programming schedules
for energy savings.
All thermostats allow up to 4 time and temperature settings
to be programmed per 24-hr period. Each thermostat stores
programs for 7 independent days. Batteries are not required.
During power interruption the internal memory stores programs for an unlimited time.
OPERATION
I. THERMOSTAT DISPLAY
The thermostat display is located in the top center of the
thermostat. See Fig. 1. The following information can be displayed on the screen:
•
•
•
•
•
•
•
•
•
•
mode (OFF, EHEAT, COOL, AUTO, or HEAT)
fan setting (ON or AUTO)
hold status
room temperature
desired temperature
clean filter status
time of day
day of the week
schedule period (OC1, UN1, OC2, or UN2)
outdoor temperature (optional)
II. THERMOSTAT PROGRAMMING BUTTONS AND
OPERATION
The thermostat has programming buttons which are used to
change the set points of the thermostat, set the modes, and
program schedules. The programming buttons are accessible
from underneath the thermostat cover. To access the programming buttons, pull on the hinged thermostat cover. See
Fig. 2. The programming buttons are: Copy Previous Day,
Program, Mode, Change Day, End, Fan, Set Time/Temp,
Occupied, and Hold.
The Up and Down buttons are used to change the current,
desired temperature set point and to scroll through programming set points. The Up and Down buttons are accessible
from the outside of the thermostat.
The daily schedule can be overridden in 3 ways: pressing the
Hold button, pressing the Up and Down buttons to change
the temperature set point, or pressing the Occupied button.
OM TSTAT-51
9/15/99
A. Programming Button Lockout
The thermostat has a lockout feature which will not
acknowledge programming buttons until the lockout code is
entered. After the lockout code has been entered, the keypad
will remain unlocked until the user has stopped pressing
buttons for 2 minutes. The lockout feature is configured by
the installer.
NOTE: The lockout code sequence is Mode, Copy Previous
Day, Set Time/Temp, and Hold.
NOTE: The Occupied button is not disabled by the Lockout
feature.
B. Hold Button Operation
Pressing the Hold button disables the time and temperature
schedule and holds the current desired temperature set
point. When a Hold is active, the HOLD annunciator is displayed on the thermostat screen. To release the Hold, press
the Hold button a second time. The Hold will remain active
indefinitely and the desired temperature will not change
according to the program time or the derived temperature
values. The desired temperature can be changed using the
Up and Down buttons.
C. Fan Button Operation
The Fan button selects fan operation. When the fan is set to
ON, the fan will run continuously. When the fan is set to
AUTO, the fan will run during heating and cooling operation
only.
If the fan is set to ON, but the Allow Continuous Fan During
Unoccupied Hours configuration is set to OF, the fan will not
run during unoccupied hours when heating or cooling is not
active. A small triangle will be displayed next to the Fan On
icon to show the user that the fan is not running because of
the unoccupied time period.
D. Mode Button Operation
The Mode button selects the operating mode of the thermostat. If OFF is selected, the thermostat will not enter Heating or Cooling mode. If HEAT is selected, the thermostat will
only enter Heating mode (if the room temperature is below
the heating set point). If COOL is selected, the thermostat
will only enter Cooling mode (if the room temperature is
above the cooling set point). If AUTO is selected, the thermostat will enter Heating or Cooling mode based on the room
temperature and the heating and cooling set points. Units
also have an EHEAT selection which is configured by the
installer. If EHEAT is selected, the unit will use the second
stage of heating to provide heating, if necessary. The annunciator for each selection will be displayed on the thermostat
when selected.
E. Auto-Changeover
When the thermostat mode is set to AUTO, the thermostat
will provide automatic changeover from Heating to Cooling
mode and Cooling to Heating mode when required. The thermostat will automatically switch to maintain the desired
temperature setting. The thermostat does not need to be
manually changed from heating to cooling or cooling to heating operation.
NOTE: It is recommended that auto-changeover mode not be
used if the outdoor temperature is consistently lower than
50 F or greater than 80 F. In these cases, select heating or
cooling mode only.
F. Unoccupied Override
The Occupied button is only active during unoccupied periods. The Occupied button is inactive during occupied periods.
If the thermostat is in unoccupied mode and the user presses
the Occupied button, the set points are changed to the OC1
set points for heating and cooling. The OC1 icon will flash to
show the user that the thermostat is in override.
The thermostat will remain in override until the next scheduled time period or for the number of allowed override hours
programmed in the thermostat configuration (Option 18)
whichever comes first.
NOTE: If the set points are changed during unoccupied override, the unoccupied 1 (UN1) set points will be changed.
G. Smart Recovery (Heating Mode)
The smart recovery function is designed to save energy by
gradually adjusting temperatures to meet scheduled set
points. The thermostat has 2 schedule modes, normal occupied mode and setback mode (a time when the space is unoccupied). The Smart Recovery function begins 1 to 1.5 hours
before the scheduled occupied mode and gradually adjusts
room temperature so the temperature is at the occupied
mode set point when the occupied time period begins.
This is more efficient than making the system run at full
capacity until the desired temperature is met.
NOTE: Smart Recovery does not apply to cooling operation.
VI. PROGRAMMING THERMOSTAT SCHEDULES
Before programming the thermostat, plan the thermostat
daily schedule. The schedule is divided into 7 days (Monday
through Sunday). Each day has 4 time periods (OC1, UN1,
OC2, UN2). Each time period has a start time, heating set
point, and cooling set point. Fill in Table 1 on page 4 as an
aid to programming the daily schedules.
When choosing the times for OC1, UN1, OC2, and UN2, the
following rules must be followed:
• The maximum number of hours allowed from OC1 to
UN1, or from OC2 to UN2 is 12 hours. For example, if
OC1 has a value of 6:00 AM and UN1 had a value of
5:00 PM, this would be acceptable. If however, OC1 has
a value of 6:00 AM and UN1 has a value of 7:00 PM, this
would not be acceptable because the difference is greater
than 12 hours.
• The value of UN2 must be greater than or equal to the
value of OC2, while the value of OC2 must be greater
than or equal to the value of UN1, and the value of UN1
must be greater than or equal to OC1. For example,
acceptable values would be:
OC1
UN1
OC2
UN2
6:00 AM
5:00 PM
5:00 PM
10:00 PM
In the example above, the thermostat will be occupied from
6:00 AM to 10:00 PM. However, if the following values were
entered, the thermostat would not be occupied as one may
expect:
OC1
UN1
OC2
UN2
6:00 AM
7:00 PM
6:00 PM
12:00 AM
In the new example, the thermostat will display UN2 from
12:00 AM to 6:00 AM, then OC1 from 6:00 AM to 6:00 PM,
then OC2 from 6:00 PM to 7:00 PM, then UN1 from
7:00 PM to 12:00 AM. The thermostat, in this example,
would be occupied from 6:00 AM to 7:00 PM because OC2
has a value less than the value of UN1.
A. Programming Mode
To program the daily schedules, perform the following
procedure:
1. Enter Programming mode by pressing the Program
button. The PROGRAMMING annunciator will
appear on the thermostat display. The current day of
the schedule will be displayed and the current programming time period of that day will be displayed.
The TIME annunciator will flash.
III. SET CURRENT DAY
The Change Day button will change the day shown on the
thermostat display to the next day. If a schedule has been
entered, the thermostat will follow the schedule of the new
selected day.
IV. SET CURRENT TIME
The Set Time/Temp button allows the user to change the
time displayed on the thermostat. Press the Set Time/Temp
button. The TIME annunciator will flash. Press the Up and
Down buttons until the correct time is shown. Hold down the
buttons to quickly move through the time display. The AM
and PM annunciators will automatically change. To ensure
the schedules are properly followed, make sure that AM or
PM is correct for the time chosen. When the correct time is
shown, press the End button to exit the Set Time mode.
V. RESET FILTER
The Reset Filter function is used to clear the “Clean Filter”
icon on the display screen. The Reset Filter function is initiated by pressing the Hold and Occupied buttons simultaneously. The “Clean Filter” icon reminds the user when it is
time to change or clean the filter of the unit.
NOTE: If a programming button is not pushed for 2 minutes,
the thermostat will exit Programming mode and any
changes made will be saved.
2. Press the Up and Down buttons to set the start time
for the schedule day and period shown.
3. Press the Set Time/Temp button once the correct
time is shown. The TIME annunciator will stop flashing and the HEAT annunciator will flash.
4. The heating and cooling set points can now be programmed. The HEAT and COOL annunciators will
flash for the heating and cooling set points respectively. The Set Time/Temp button is used to toggle
between the time, heating, and cooling set points.
Use the Up and Down buttons to raise and lower the
temperature set points.
NOTE: There must be at least 2 degrees difference between
the cooling and heating set points. The thermostat will automatically change any set points closer than 2 degrees.
—2—
OC1 UN1 OC2 UN2
Mode
HOLD
OFF
EHEAT
COOL
AUTO
Fan
ON
AUTO
Mo Tu We Th
Fr Sa Su
TIME AM PM
COOL
HEAT
CLEAN FILTER
AUX HT
PROGRAMMING
Fig. 1 — Thermostat Liquid Crystal Display
CHANGE DAY
BUTTON
COPY PREVIOUS
DAY BUTTON
PROGRAM
BUTTON
MODE BUTTON
DISPLAY
SCREEN
UP BUTTON
Programmable
Thermostat
COPY PREVIOUS DAY
CHANGE DAY
SET TIME/TEMP
THERMOSTAT
COVER (OPEN)
SET TIME/TEMP
BUTTON
OCCUPIED
BUTTON
END
BUTTON
PROGRAM
MODE
END
FAN
OCCUPIED
HOLD
RESET FILTER
(PRESS
SIMULTANEOUSLY)
HOLD
BUTTON
Fig. 2 — Thermostat Display and Programming Buttons
—3—
FAN
BUTTON
DOWN
BUTTON
5. Press the Program button to advance to the next time
period.
6. Perform Steps 2 through 5 until the times and temperature set points have been entered for the entire
day. Press the Change Day button to move to the
schedule for the next day.
7. Repeat Steps 2 through 6 to program the remaining
schedule days. The Copy Previous Day button can be
used to copy the previous day’s schedule if the schedules are the same.
8. After all the times and set points for each day have
been entered, press the End button to finish entering
the schedule.
NOTE: The thermostat will continue to follow the schedule
until a new one is entered. The schedule may need to
be updated for different seasons or prolonged changes in
temperature.
VII. OVERRIDING THE SCHEDULE
The schedule can be overridden in three ways, the Hold button can be pressed to lock in the current temperature setting, the Up or Down buttons can be pressed to change the
desired temperature, or the Occupied button can be pressed
to change the unoccupied set points to OC1. The HOLD
annunciator will turn on and the desired temperature will
not change according to the program time or desired temperature values. The HOLD will last indefinitely until the
HOLD button is pressed again. The user can still change the
desired temperature by using the Up and Down buttons.
When using the Up or Down buttons, the thermostat will use
the new set point until the next scheduled time period. At
the next scheduled time period the thermostat will revert
back to the programmed temperature values.
The Occupied override button can be used to force the thermostat into Occupied mode.
VIII. DISPLAY OUTDOOR-AIR OR LEAVING-AIR
TEMPERATURE
When the Up and Down buttons are pressed at the same
time, the display will show the temperature of the sensor
wired to the thermostat. The temperature is displayed for
4 seconds with the letters “od” or “LA” (outdoor temperature
or leaving air temperature, respectively). The display then
returns to normal. If a sensor is not connected, the thermostat has been configured for use with a remote room sensor,
or the reading is out of range, then “--” is displayed.
The valid temperature range for the outdoor-air sensor is
–38 to 145 F. The valid temperature range for the leaving-air
sensor is –38 to 145 F.
Table 1 — Daily Schedule Planner
DAY OF
THE WEEK
Monday
OC1
Time / Heat / Cool
/
/
SCHEDULE
UN1
OC2
Time / Heat / Cool
Time / Heat / Cool
/
/
/
/
UN2
Time / Heat / Cool
/
/
Tuesday
/
/
/
/
/
/
/
/
Wednesday
/
/
/
/
/
/
/
/
Thursday
/
/
/
/
/
/
/
/
Friday
/
/
/
/
/
/
/
/
Saturday
/
/
/
/
/
/
/
/
Sunday
/
/
/
/
/
/
/
/
NOTE: The cooling temperature set point must be at least 2 degrees higher than the heating temperature set point.
Copyright 1999 Bryant Heating & Cooling Systems
11-01A
CATALOG NO. 809-694