1
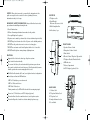
Bogen 130% 9/26 10/5/01 11:08 AM Page 1
LIMITED WARRANTY
Bogen warranties all headsets and amplifiers against defects in material or
workmanship provided that the equipment has not been subjected to abuse
or accident or altered in any way for two (2) years from the date of sale to
the original purchaser. Any part of the equipment covered by this warranty
that, with normal installation and use, becomes defective will be repaired or
replaced by Bogen, at our option, provided the product is shipped, insured
and prepaid, to:
Bogen Factory Service Department, 50 Spring St., Ramsey, NJ 07446, USA.
The equipment will be returned to you freight prepaid. This warranty does
not extend to any of our products that have been subjected to misuse,
improper storage, neglect, accident, improper installation or have been
modified or repaired in any manner that Bogen believes may affect the
reliability of the product, or where the serial number or date code has
been removed or defaced.
USER GUIDE
THE FOREGOING LIMITED WARRANTY IS BOGEN'S SOLE AND
EXCLUSIVE WARRANTY AND THE PURCHASER'S SOLE AND
EXCLUSIVE REMEDY. BOGEN MAKES NO OTHER WARRANTIES
OF ANY KIND, EITHER EXPRESS OR IMPLIED, AND ALL IMPLIED
WARRANTIES OF MERCHANT ABILITY OR FITNESS FOR A PARTICULAR PURPOSE ARE HEREBY DISCLAIMED AND EXCLUDED.
Bogen's liability arising out of the manufacture, sale or supplying of products
or their use or disposition, whether based upon warranty, contract, tort or
otherwise, shall be limited to the price of the product. In no event shall
Bogen be liable for special, incidental or consequential damages (including,
but not limited to, loss of profits, loss of data or loss of use damages) arising
out of the manufacture, sale or supplying of products, even if Bogen has
been advised of the possibility of such damages or losses.
Products that are out of warranty will also be repaired by the Bogen Factory
Service Department— same address as above or call 201-934-8500. The parts
and labor involved in these repairs are warranted for 90 days when repaired
by the Bogen Factory Service Department. All shipping charges, in addition
to parts and labor charges, will be at the owner's expense.
50 Spring Street, Ramsey, NJ 07446, U.S.A.
Tel: 201-934-8500, Fax: 201-934-9832, www.bogen.com
54-2066-01
© 2001 Bogen Communications, Inc. Printed in USA 0110 Specifications subject to change.
HAA20
TELEPHONY
HEADSET AMPLIFIER
Bogen 130% 9/26 10/5/01 11:08 AM Page 3
NOTICE: Every effort was made to ensure that the information in this
guide was complete and accurate at the time of printing. However,
information is subject to change.
IMPORTANT SAFETY INFORMATION Always follow these basic safety
precautions when installing and using the unit:
1. Read all instructions.
CONTENTS
1.
1. Telephone cable
2. Rapid Headset
Disconnect/Reconnect cable
2.
3. HAA20 Amplifier Box
4. AA batteries, 2 pcs
2. Follow all warnings and instructions marked on the product.
3. Never spill liquid on the product.
4. Repair or service must be performed by a factory authorized repair facility.
3.
5. DO NOT staple or otherwise attach the AC power cord to building surfaces.
6. DO NOT use the product near water or in a wet or damp place.
7.
7. DO NOT use extension cords. Install product within 6 feet of an outlet.
FRONT PANEL
1. Speaker Volume Control
8. DO NOT install telephone wiring during a lightning storm.
2. Microphone Volume Control
1.
3. Mute Switch
8.
FEATURES
6.
Supports both electret and carbon type telephone systems.
Easy to install and user friendly.
To conserve the battery, the unit automatically performs a power down
(sleep mode) when the unit is not being used. It will automatically resume
normal operation when an incoming signal is detected.
4. Electret/Carbon Telephone Type switch
5. Telephone Headset/Handset Switch
4.
5.
3.
6. LED indicator
7. Battery Compartment
8. AC/DC Adapter (optional) Jack
The HAA20 will automatically "learn" your telephone handset configuration.
Low battery and function LED indicator.
2.
- LED "off": Standby or power down mode
- LED "on": Mute switch is on
- LED "flash": Battery low
- During normal use, the LED will flicker with the incoming ring signal
BACK PANEL
9. Headset Jack
Power: two 1.5V AA battery or AC/DC adapter (optional).
10. Telephone Handset Jack
This unit will not alter the normal function of your telephone system.
11. Telephone Jack
This unit will provide a hands-free solution during telephone usage.
12. Ampbox Buzzer location
9.
10.
11.
12.
13. Scan Switch
2
13.
3
Bogen 130% 9/26 10/5/01 11:08 AM Page 5
INSTALLATION
5. Turn the HAA20 over and place the microphone portion of the telephone
handset over the area labeled Buzzer (#12).
Note: The HAA20 is not compatible with a
telephone that has the keypad located in handset.
6. Push the Scan switch (#13) for no more
than 1 second.
1. Disconnect the telephone handset cable from the
telephone and plug it into the handset jack (#10)
indicated by the handset symbol.
Note: You should hear tones from the HAA20.
2. Connect one end of the supplied telephone cable
to the telephone jack (#11) indicated by the
telephone symbol. Connect the other end
to the handset jack on your telephone.
Note: If the tones continue for more than 30
seconds, stop the process by pressing the Scan
switch again. Then try the procedure
again from step 5. If the tones continue
for more than 30 seconds again, contact
Bogen for technical assistance.
7. When the tones stop, setup procedure
is completed.
3. Connect the Rapid Headset
Disconnect/Reconnect cable (supplied with
the headset) to the headset jack (#9) indicated
by the headset symbol. Connect the Rapid Headset Disconnect/Reconnect
end of the cable to the actual headset.
4. Install the batteries or optional AC/DC adapter. Route cables to the rear
of the HAA20 under the cable retention tangs.
TELEPHONE HANDSET PROGRAMMING
Please perform the following procedure to configure the HAA20 for your
particular telephone.
1. Set the Telephone Type switch (#4) on the front panel to the 'C' position
and determine if the system performance is acceptable by making
a call to another party.
Note: If the LED is illuminated, switch the Mute Switch to the Mouth
symbol for conversation.
If performance is acceptable, skip the remaining steps in this section.
If performance is not acceptable, follow these steps for the HAA20 to
optimize its setup for your particular telephone.
2. Set the Telephone Type switch (#4) on the front panel to the “E” position.
3. Set the Mute switch (#3) to the mouth position.
4. Set the Telephone Handset/Headset switch (#5) on the front panel to the
headset position.
4
8. Place the handset back on the cradle
of your telephone.
MANUAL MODE
The HAA20 also allows users to manually step through the different configuration settings. Following the steps below, the user can select the optimum
configuration. Typically this would only be done if either the Auto Learn was
unable to select the optimum configuration setting or if many HAA20 amplifiers were to be set to the same configuration as in a call center application.
1. Set the Telephone Handset/Headset switch (#5) on the front panel to the
Handset position.
2. Remove the telephone handset from its cradle and dial the number of a
person to assist you in configuring the HAA20 by listening to the quality of
your voice as you go through the seven different settings.
Note: Each of the seven configuration settings is accessed using the scan
switch and is identified by its own unique tone. The tones sound like Do,
Re, Mi, Fa, So, La, Ti.
3. Once the call is established, put on the headset and set the Telephone
Handset/Headset switch (#5) to the Headset position.
4. Press and hold the Scan switch (#13) for approximately 3 seconds until
the first tone is heard. You will have 12 seconds to test the unit's performance using this setting. If the performance is acceptable, then wait for 2
short beeps from the HAA20 and the configuration will be stored.
5
Bogen 130% 9/26 10/5/01 11:08 AM Page 7
If the performance is not acceptable, push the scan switch again within
12 seconds for the next setting and test again. Repeat this process until you
find the setting that gives the HAA20 acceptable performance. The unit will
continuously rotate through the available settings as the Scan switch is pressed.
5. After the optimum setting is stored, terminate the call by putting the telephone handset back on its cradle. The configuration process will be completed.
OPERATION
It is recommended that you call someone to help you make initial volume
adjustments and enable you to get familiar with using the HAA20 before
using it for business service.
Perform the following steps to operate the HAA20.
1. Ensure that the Mute switch (#3) is in the mouth position and the
Telephone Handset/Headset switch (#5) is in the headset position.
2. Remove the handset of your telephone from its cradle.
Our Applications Engineering Department is available to assist you from
8:30 a.m. to 6:00 p.m. and on call until 8:00 p.m., Eastern Daylight Time,
Monday through Friday. Call 1-800-999-2809, Option 2.
This equipment complies with 47CFR Part 68.
Registered equipment may not be used with Coin Telephone Lines.
Equipment may be used with Party Lines in areas where state tariffs
permit such connections and when equipment is adaptable for such
service. This equipment is registered as follows:
Registration Number - US:CD2TXNAN46049
Ringer Equivalence - 0.0B
4. Adjust the receive volume of the Headset for a comfortable listening level.
If trouble is experienced, the equipment should be disconnected from the
interface to determine if this equipment or the telephone line is the trouble
source. If the equipment is determined to be malfunctioning, it should not
be reconnected until repairs are made.
5. If the person on the other end of the line has trouble hearing you, adjust
the MIC volume control.
Repairs to this equipment, other than routine repairs, can be made by the
manufacturer or its authorized agents.
6. Place the Handset of your telephone back on its cradle to terminate a call.
If the equipment causes harm to the telephone network, the local telephone
company may temporarily discontinue your service and, if possible, notify
you in advance. If advance notice is not practical, you will be notified as
soon as possible. You will be given the opportunity to correct the problem
and informed of your right to file a complaint with the FCC.
3. Wait until you hear a dial tone and dial the number of the party you
wish to contact.
Note: The handset of your phone still controls the state of your phone
(hung up or off hook).
You may at anytime during a call switch between the handset of your
telephone and your Bogen Headset by using the Telephone Handset/Headset
switch on the front panel of the HAA20.
To mute your microphone, set the Mute switch to the symbol of the mouth
with an “X” over it. The LED on the front panel will light continuously when
the Mute is on. To take the mute off, set the Mute Switch to the symbol of
the mouth and the LED will turn off.
6
TECHNICAL ASSISTANCE
The local telephone company may make changes in its facilities, operations,
or procedures that could affect the proper functioning of your equipment.
If they do, you will be given adequate notice in writing to allow you an
opportunity to maintain uninterrupted telephone service.
7
Bogen 130% 9/26 10/5/01 11:08 AM Page 1
LIMITED WARRANTY
Bogen warranties all headsets and amplifiers against defects in material or
workmanship provided that the equipment has not been subjected to abuse
or accident or altered in any way for two (2) years from the date of sale to
the original purchaser. Any part of the equipment covered by this warranty
that, with normal installation and use, becomes defective will be repaired or
replaced by Bogen, at our option, provided the product is shipped, insured
and prepaid, to:
Bogen Factory Service Department, 50 Spring St., Ramsey, NJ 07446, USA.
The equipment will be returned to you freight prepaid. This warranty does
not extend to any of our products that have been subjected to misuse,
improper storage, neglect, accident, improper installation or have been
modified or repaired in any manner that Bogen believes may affect the
reliability of the product, or where the serial number or date code has
been removed or defaced.
USER GUIDE
THE FOREGOING LIMITED WARRANTY IS BOGEN'S SOLE AND
EXCLUSIVE WARRANTY AND THE PURCHASER'S SOLE AND
EXCLUSIVE REMEDY. BOGEN MAKES NO OTHER WARRANTIES
OF ANY KIND, EITHER EXPRESS OR IMPLIED, AND ALL IMPLIED
WARRANTIES OF MERCHANT ABILITY OR FITNESS FOR A PARTICULAR PURPOSE ARE HEREBY DISCLAIMED AND EXCLUDED.
Bogen's liability arising out of the manufacture, sale or supplying of products
or their use or disposition, whether based upon warranty, contract, tort or
otherwise, shall be limited to the price of the product. In no event shall
Bogen be liable for special, incidental or consequential damages (including,
but not limited to, loss of profits, loss of data or loss of use damages) arising
out of the manufacture, sale or supplying of products, even if Bogen has
been advised of the possibility of such damages or losses.
Products that are out of warranty will also be repaired by the Bogen Factory
Service Department— same address as above or call 201-934-8500. The parts
and labor involved in these repairs are warranted for 90 days when repaired
by the Bogen Factory Service Department. All shipping charges, in addition
to parts and labor charges, will be at the owner's expense.
50 Spring Street, Ramsey, NJ 07446, U.S.A.
Tel: 201-934-8500, Fax: 201-934-9832, www.bogen.com
54-2062-01R2
© 2001 Bogen Communications, Inc. Printed in USA 0110 Specifications subject to change.
HAA20
TELEPHONY
HEADSET AMPLIFIER