1
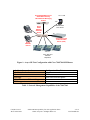
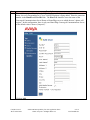
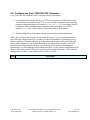
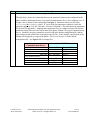
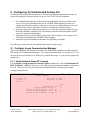
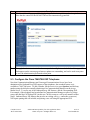
Avaya Solution & Interoperability Test Lab
Configuring SIP IP Telephony Using Avaya Converged
Communications Server, Avaya Communication Manager,
and Cisco 7940/7960 SIP Telephones – Issue 1.0
Abstract
These Application Notes describe the configuration steps required to connect Cisco 7940/7960
SIP telephones to a SIP infrastructure consisting of the Avaya Converged Communications
Server and Avaya S8300 Media Server with G700 Media Gateway. Also described is how
Avaya Outboard Proxy SIP station features can be made available to Cisco telephones in
addition to the standard features supported in the telephone. The configuration steps described
are also applicable to other Linux-based Avaya Media Servers and Media Gateways running
Avaya Communication Manager.
FAS; Reviewed:
WCH 10/22/2004
Solution & Interoperability Test Lab Application Notes
©2004 Avaya Inc. All Rights Reserved.
1 of 35
Cisco7960SIP.doc
1. Introduction
1.1. Background
With the introduction of the SIP protocol standard that supports telephony as well as a wide
range of other communication modes, there is a much broader range of SIP telephones available
to customers. This allows customers to replace their existing telephony infrastructure with
Avaya servers and re-use their existing telephones.
In addition, Avaya Communication Manager running on Avaya Media Servers and Gateways has
the capability to extend advanced telephony features to Outboard Proxy SIP stations. This
feature set can be extended to non-Avaya SIP phones, providing enhanced calling features in
advance of SIP protocol definitions and telephone implementations. See Section 3.1.
These Application Notes describe the configuration steps for using the Cisco 7940/7960 SIP
telephones with the Avaya Converged Communications Server, S8300 Media Server, and G700
Media Gateway. Only those configuration steps pertinent to interoperability of Cisco and Avaya
equipment are covered. General administration information can be found in the product
documentation as well as the specific references listed in Section 8. The configuration described
should be applicable to other Linux-based Avaya Media Servers and Media Gateways running
Avaya Communication Manager.
1.2. Configuration
The configuration used as an example in these Application Notes is shown in Figure 1. Several
Cisco 7940/7960 SIP telephones are configured in a single subnet with the Avaya Converged
Communications Server and S8300 Media Server with G700 Media Gateway. A PC provides
web browser and TFTP server support. The telephones are registered to the Converged
Communications Server and are also administered as Outboard Proxy SIP Stations in the S8300,
so that in addition to the SIP telephony features supported by the phones, Outboard Proxy SIP
features are available from Communication Manager. The media server also contains the Avaya
IA770 INTUITY™ AUDIX® Messaging Application for voice messaging support. These
Application Notes do not address configuration of the Avaya 4602 SIP telephones, which were
successfully tested using the standard product configuration steps.
The main difference between the Cisco 7940 and 7960 SIP telephones is the number of line
appearances supported by each phone (two and six, respectively). The configuration steps
described in these Application Notes apply to both models. Table 1 profiles the network
management capabilities of the phones.
FAS; Reviewed:
WCH 10/22/2004
Solution & Interoperability Test Lab Application Notes
©2004 Avaya Inc. All Rights Reserved.
2 of 35
Cisco7960SIP.doc
Avaya S8300 Media Server
G700 Media Gateway
IA770 INTUITY Messaging
System
10.1.1.0/24
.103
.10
Avaya
P333T
Modular
Stackable
Switch
Web Browser
TFTP Server
.5
.50
Avaya Converged
Communication
Server (CCS)
Avaya
4602 SIP
Phones
.170-172
Cisco 7940 and
7960 SIP
Telephones
Figure 1: Avaya SIP Test Configuration with Cisco 7940/7960 SIP Phones
Administration mechanisms
Administration levels
File transfer server
Error logs
802.3af Power over Ethernet Support
SNMP support
Configuration files, Telnet
Administrator
TFTP
Stored and viewed at phone
No
None
Table 1: Network Management Capabilities of the 7940/7960
FAS; Reviewed:
WCH 10/22/2004
Solution & Interoperability Test Lab Application Notes
©2004 Avaya Inc. All Rights Reserved.
3 of 35
Cisco7960SIP.doc
2. Equipment and Software Validated
The following equipment and software were used in the configuration shown in Table 2. Be
sure to use the software version combination shown when following these Application Notes.
Equipment
Avaya Converged Communication Server
Avaya P333T Modular Stackable Switch
Avaya S8300 Media Server with G700 Media Gateway
Avaya IA770 INTUITY®AUDIX™ Messaging
System
Cisco 7940/7960 SIP Telephones
Software
2.0
3.12.1
Communication Manager 2.0.1
N1.2-5.2
POS3-06-3
Table 2: Equipment and Software Versions Used
3. Supported Calling Features
3.1. The SIPPING-19
In addition to basic calling capabilities, the Internet Engineering Task Force (IETF) has defined a
supplementary set of calling features, often referred to as the SIPPING-19 [2]. This provides a
useful framework to describe product capabilities and compare calling features supported by
various equipment vendors. Table 3 gives a summary of calling features supported on the Cisco
7940/7960 SIP telephones within the Avaya SIP infrastructure. Some features require only the
Converged Communications Server and Cisco telephones, while others additionally require
Avaya Communication Manager and the Outboard Proxy SIP feature set.
Avaya Outboard Proxy SIP provides advanced calling features beyond the SIPPING-19 that can
be extended to the telephone. These features are summarized in Table 4. Since the Cisco
7940/7960 SIP telephones are compatible with Outboard Proxy SIP, these features can be made
available to the user. Details on their operation and administration can be found in Reference
[4].
Section 4 of these Application Notes describes the steps for configuring the Cisco telephone and
Avaya Converged Communications Server to support the basic feature set (those indicated by a
“yes” in the Phone + Converged Communications Server column of Table 3). To take
advantage of the extended feature set, including additional SIPPING-19 features (indicated in the
Telephone + Converged Communications Server + Communication Manager/Outboard Proxy
SIP column) and others listed in Table 4, the Cisco telephones must be configured for Outboard
Proxy SIP support. The additional configuration steps required for this are described in Section
5.
FAS; Reviewed:
WCH 10/22/2004
Solution & Interoperability Test Lab Application Notes
©2004 Avaya Inc. All Rights Reserved.
4 of 35
Cisco7960SIP.doc
No.
FEATURE
Telephone +
CCS
Telephone + CCS +
Communication
M anager/OPS
COMMENTS
1
2
3
4
5
6
7
8
9
Call Hold
Consultation Hold
Music On Hold
Unattended Transfer
Attended Transfer
Transfer - IM
Call Forward Unconditional
Call Forward Busy
Call Forward No Answer
YES
YES
NO
YES
YES
NO
YES
NO
NO
YES
YES
NO
YES
YES
NO
YES
YES
YES
10
3-way conference - 3rd party added by user
YES
YES
NO
NO
NO
NO
NO
NO
NO
YES
YES
NO
YES
YES
OPS + bridged appearance
OPS + bridged appearance
Available in OPS (future release)
OPS
OPS
12
13
14
15
16
3-way conference - 3rd party calls and is
joined by user
Single Line Extension (forking)
Find-me
Incoming Call Screening
Outgoing Call Screening
Call Park
17
Call Pick-up
NO
YES
OPS call pick-up & directed call pick-up
18
19
Automatic Redial
Click to Dial
NO
NO
NO
NO
Available in OPS (future release)
11
OPS + Class of Restriction
OPS call park/answer back
Table 3: SIPPING-19 Telephony Feature Support
No.
1
2
3
4
5
6
7
8
9
10
11
12
13
14
15
Telephone +
CCS
Telephone + CCS +
Communication
Manager/OPS
NO
NO
NO
NO
NO
NO
NO
NO
NO
NO
NO
NO
NO
NO
NO
YES
YES
YES
YES
YES
YES
YES
YES
YES
YES
YES
YES
YES
YES
YES
FEATURE
Active Appearance Select
Conference on Answer
Calling Number Block
Calling Number Unblock
Drop Last Added Party
Held Appearance Select
Idle Appearance Select
Last Number Dialed
Malicious Call Trace
Malicious Call Trace Cancel
Priority Call
Send All Calls
Send All Calls Cancel
Transfer On Hang-Up
Transfer to Voice Mail
Table 4: Outboard Proxy SIP Telephony Features Beyond SIPPING-19
FAS; Reviewed:
WCH 10/22/2004
Solution & Interoperability Test Lab Application Notes
©2004 Avaya Inc. All Rights Reserved.
5 of 35
Cisco7960SIP.doc
3.2. Message Waiting Indicator (MWI)
With the Outboard Proxy SIP extended feature set, a SIP telephone that supports IETF RFC 3265
and MWI Draft 4 (Subscribe/Notify method) will illuminate/extinguish its MWI lamp when
voice messages are left/read for that extension. Since the Cisco 7940/7960 SIP phones support
only the unsolicited Notify method for MWI, this feature is not currently supported in
Communication Manager.
4. Configuring for the Basic Feature Set
4.1. Administer Users on the Avaya Converged Communications
Server
The following steps describe configuration of the Avaya Converged Communications Server to
for use with Cisco 7940/7960 SIP telephones. Other standard administration functions are
covered in Reference [1].
Steps
Description
1.
The Avaya Converged Communications Server is configured using a web browser. Set the URL
of the browser to the IP address of the Converged Communications Server, and log in as admin
using the appropriate administrator password.
FAS; Reviewed:
WCH 10/22/2004
Solution & Interoperability Test Lab Application Notes
©2004 Avaya Inc. All Rights Reserved.
6 of 35
Cisco7960SIP.doc
Steps
Description
2.
The Converged Communications Server administration web interface will be displayed. Expand
the Users link on the left side of the page and click on Add.
FAS; Reviewed:
WCH 10/22/2004
Solution & Interoperability Test Lab Application Notes
©2004 Avaya Inc. All Rights Reserved.
7 of 35
Cisco7960SIP.doc
Steps
Description
3.
The Add User page will be displayed. Fill in the required fields (indicated by *). In the screen
below, the user corresponding to a Cisco 7960 SIP telephone is being added. Enter the extension
number in the Handle and User ID fields. The Host field should be set to the name of the
Converged Communications Server Home or Home/Edge server to which the user’s phone will
register. In this configuration, there is only one Home/Edge Converged Communications Server,
so the default value is shown (“impress”).
Click on Add.
FAS; Reviewed:
WCH 10/22/2004
Solution & Interoperability Test Lab Application Notes
©2004 Avaya Inc. All Rights Reserved.
8 of 35
Cisco7960SIP.doc
Steps
Description
4.
The confirmation page will be displayed. Click Continue.
5.
Repeat Steps 2-4 for each user to be supported.
To apply the administration in the above steps, click on Update on the left side of the page. This
link appears on the current page whenever updates are outstanding, and can be used at any time
to save the administration performed to that point.
FAS; Reviewed:
WCH 10/22/2004
Solution & Interoperability Test Lab Application Notes
©2004 Avaya Inc. All Rights Reserved.
9 of 35
Cisco7960SIP.doc
4.2. Configure the Cisco 7940/7960 SIP Telephone
Cisco 7940/7960 SIP telephones can be configured using two methods:
1. Configuration files downloaded from a TFTP server specified via DHCP at boot time.
Two such files are installed on the TFTP server: a default configuration file containing
parameter settings that apply to all phones (SIPDefault.cnf), and a phone-specific
configuration file containing settings applicable only to that phone (SIP<MACaddress>.cnf, where <MAC-address> is the MAC address of the phone).
2. Manual configuration of the phone using its screen interface and keypad buttons.
With a few exceptions (one of which will be noted in Section 5.3.2), most parameters can be
specified in the configuration file(s), and this is the preferred method for maintaining a large
number of phones. Parameters that are manually changed at the phone will revert back to the
values in the configuration file(s) when the phone is re-booted, unless the DHCP and TFTP
parameters have been manually changed. See Reference [3] for details on installing and
maintaining Cisco SIP telephones using configuration files. For the sample configuration, the IP
address of the phone and its TFTP server were manually entered at the phone. The remaining
configuration was done via the configuration files where possible.
Steps
FAS; Reviewed:
WCH 10/22/2004
Description
Solution & Interoperability Test Lab Application Notes
©2004 Avaya Inc. All Rights Reserved.
10 of 35
Cisco7960SIP.doc
Steps
Description
1.
Edit the default and phone-specific configuration file(s).
The table below shows the relationship between the parameters that must be configured for the
phone and those administered in the Converged Communications Server for a telephony user. A
sample value is shown for the configuration in Figure 1. Parameter names have the form
ObjectNameXParamName, where “X” refers to the line appearance number to which the
parameter applies (1-2 for the 7940 and 1-6 for the 7960 phone). The table shows the parameters
for the first line appearance. Although other parameters may be configured, those listed are the
minimum required for successful registration of the phone with the Converged Communications
Server. Normally, the proxy parameters would reside in the default configuration file, and the
name and password would reside in the phone-specific file. In the example, specification of the
bitmap to be displayed as a logo on the phone (“Powered by Avaya”) is in the default
configuration file. See Figures 2-3 for sample files.
Avaya Converged
Communications Server
Cisco 7940/7960
Parameter Name
Example Value
User Administration
FAS; Reviewed:
WCH 10/22/2004
User ID line1_name
Password line1_password
23071
hello123
Proxy Administration
Proxy IP address proxy1_address
Proxy Port proxy1_port
Proxy_register
10.1.1.50
5060
1
Solution & Interoperability Test Lab Application Notes
©2004 Avaya Inc. All Rights Reserved.
11 of 35
Cisco7960SIP.doc
Steps
Description
2.
Reboot the phone. If TFTP support has been properly configured, the phone will download the
default and specific configuration files, and register with the Avaya Converged Communications
Server. Registration can be verified by the absence of an “X” near the phone icon for the line
appearance, as shown below.
Registered
Unregistered
For basic feature set operation, the dial plan can be specified using:
1. Address maps in the Avaya Converged Communications Server (see Section 5.2.1, and
Reference [1]). They control how Avaya Converged Communications Server routes a
call, based on the number dialed.
2. Dial plan file (dialplan.xml) downloaded to the phone from the TFTP server (see
Reference [3]). The phone uses this file to determine when enough digits have been
pressed to complete dialing, so that the user need not press an additional key to “send”
the call. The dial plan file can also be used to specify the local region dial tone to be
played locally on the phone. If no dial tone configuration is specified, the default (US)
dial tone is used.
FAS; Reviewed:
WCH 10/22/2004
Solution & Interoperability Test Lab Application Notes
©2004 Avaya Inc. All Rights Reserved.
12 of 35
Cisco7960SIP.doc
# SIP Default Generic Configuration File
# Image Version
image_version: P0S3-06-3-00
# Proxy Server
proxy1_address:
proxy2_address:
proxy3_address:
proxy4_address:
proxy5_address:
proxy6_address:
"10.1.1.50"
""
""
""
""
""
;
;
;
;
;
Can
Can
Can
Can
Can
; Can be dotted
be dotted IP or
be dotted IP or
be dotted IP or
be dotted IP or
be dotted IP or
IP or FQDN
FQDN
FQDN
FQDN
FQDN
FQDN
# Proxy Server Port (default - 5060)
proxy1_port: 5060
proxy2_port: 5060
proxy3_port: 5060
proxy4_port: 5060
proxy5_port: 5060
proxy6_port: 5060
# Proxy Registration (0-disable (default), 1-enable)
proxy_register: 1
# Phone Registration Expiration [1-3932100 sec] (Default - 3600)
timer_register_expires: 3600
# Codec for media stream (g711ulaw (default), g711alaw, g729a)
preferred_codec: g711ulaw
# TOS bits in media stream [0-5] (Default - 5)
tos_media: 5
# Inband DTMF Settings (0-disable, 1-enable (default))
dtmf_inband: 1
####### New Parameters added in Release 4.0
# URL for branding logo to be used on phone display
logo_url: "http://10.1.1.103/AvayaPhoneLogo.bmp"
Figure 2: Sample Default Configuration File for Cisco 7940/7960 SIP Phones (Abbreviated)
FAS; Reviewed:
WCH 10/22/2004
Solution & Interoperability Test Lab Application Notes
©2004 Avaya Inc. All Rights Reserved.
13 of 35
Cisco7960SIP.doc
# SIP Configuration Generic File
# Line 1 appearance
line1_name: 23071
# Line 1 Registration Authentication
line1_authname: "23071"
# Line 1 Registration Password
line1_password: "hello123"
# Line 2 appearance
line2_name: ""
# Line 2 Registration Authentication
line2_authname: ""
# Line 2 Registration Password
line2_password: ""
####### New Parameters added in Release 2.0 #######
# All user_parameters have been removed
# Phone Label (Text desired to be displayed in upper right corner)
phone_label: "Avaya CCS"
; Has no effect on SIP messaging
# Line 1 Display Name (Display name to use for SIP messaging)
line1_displayname: "Cisco 1"
# Line 2 Display Name (Display name to use for SIP messaging)
line2_displayname: ""
####### New Parameters added in Release 3.0 ######
# Phone Prompt (The prompt that will be displayed on console and telnet)
phone_prompt:
"SIP Phone"
; Limited to 15 characters (Default - SIP
Phone)
# Phone Password (Password to be used for console or telnet login)
phone_password: "cisco" ; Limited to 31 characters (Default - cisco)
# User classifcation used when Registering [ none(default), phone, ip ]
user_info: none
Figure 3: Sample Per-Phone Configuration File for Cisco 7940/7960 SIP Phones
FAS; Reviewed:
WCH 10/22/2004
Solution & Interoperability Test Lab Application Notes
©2004 Avaya Inc. All Rights Reserved.
14 of 35
Cisco7960SIP.doc
5. Configuring for the Extended Feature Set
In addition to the steps outlined in Section 4, the following additional administration steps are
required to support the extended feature set on the Cisco 7940/7960 SIP telephones:
1. On Communication Manager, define stations corresponding to those specified on the
Avaya Converged Communications Server, off-PBX station mappings to route call
requests involving those stations to the Avaya Converged Communications Server, and
off-PBX Feature Name Extensions (FNEs) for invoking the extended features.
2. Define the appropriate address map in the Avaya Converged Communications Server so
that FNEs and other Outboard Proxy SIP station extensions dialed at the phone will be
routed to Communication Manager.
3. Add parameters to the default phone configuration file to support voice message access
and Communication Manager off-PBX station mapping.
4. Administer speed dial buttons on the phone for frequently used FNEs.
The following sections describe the administration details for these steps.
5.1. Configure Avaya Communication Manager
This section highlights the important commands for defining SIP telephones as Outboard Proxy
SIP stations on Communication Manager. For complete documentation, see Reference [4]. Use
the System Access Terminal (SAT) interface to perform these steps. Log in with the appropriate
permissions.
5.1.1. Verify Outboard Proxy SIP Capacity
Use the display system-parameters customer-options command to verify that Maximum OffPBX Telephones – OPS has been set to a value that will accommodate the number of phones to
be used. Avaya Services has provisioned this during installation according to the system
configuration purchased.
Display system-parameters customer-options
OPTIONAL FEATURES
G3 Version: V12
Location: 1
Platform: 7
1 of
10
RFA System ID (SID): 1
RFA Module ID (MID): 1
Maximum Ports:
Maximum XMOBILE Stations:
Maximum Off-PBX Telephones - EC500:
Maximum Off-PBX Telephones - OPS:
Maximum Off-PBX Telephones - SCCAN:
FAS; Reviewed:
WCH 10/22/2004
Page
100
0
5
20
10
USED
50
0
0
0
0
Solution & Interoperability Test Lab Application Notes
©2004 Avaya Inc. All Rights Reserved.
15 of 35
Cisco7960SIP.doc
(NOTE: You must logoff & login to effect the permission changes.)
5.1.2. Define Outboard Proxy SIP Feature Access Codes (FACs)
In order to define the FNEs for the Outboard Proxy SIP features listed in Table 3, a FAC must
also be specified for each feature. Use the change dialplan analysis command to specify the
format of the FAC, and then the change feature-access-codes command to define the codes
themselves.
change dialplan analysis
Page
1 of
12
DIAL PLAN ANALYSIS TABLE
Percent Full:
Dialed
String
1
2
3
4
5
6
7
8
9
*
Total
Length
3
5
5
5
5
3
5
1
1
2
Call
Type
dac
ext
ext
ext
ext
fac
ext
fac
fac
fac
Dialed
String
Total Call
Length Type
Dialed
String
change feature-access-codes
Total Call
Length Type
Page
1 of
FEATURE ACCESS CODE (FAC)
Abbreviated Dialing List1 Access Code:
Abbreviated Dialing List2 Access Code:
Abbreviated Dialing List3 Access Code:
Abbreviated Dial - Prgm Group List Access Code:
Announcement Access Code:
Answer Back Access Code: 612
Attendant Access Code:
Auto Alternate Routing (AAR) Access Code: 8
Auto Route Selection (ARS) - Access Code 1: 9
Access Code 2:
Automatic Callback Activation: 600
Deactivation: 601
Call Forwarding Activation Busy/DA: 602
All: 603
Deactivation: 604
Call Park Access Code: 605
Call Pickup Access Code: 606
CAS Remote Hold/Answer Hold-Unhold Access Code: 630
CDR Account Code Access Code:
Change COR Access Code:
Change Coverage Access Code:
Contact Closure
Open Code:
Close Code:
Contact Closure Pulse Code:
FAS; Reviewed:
WCH 10/22/2004
Solution & Interoperability Test Lab Application Notes
©2004 Avaya Inc. All Rights Reserved.
3
6
16 of 35
Cisco7960SIP.doc
change feature-access-codes
Page
2 of
FEATURE ACCESS CODE (FAC)
Data Origination Access Code:
Data Privacy Access Code:
Directed Call Pickup Access Code: 607
Emergency Access to Attendant Access Code:
Enhanced EC500 Activation:
Deactivation:
Extended Call Fwd Activate Busy D/A
All:
Deactivation:
Extended Group Call Pickup Access Code:
Facility Test Calls Access Code:
Flash Access Code:
Group Control Restrict Activation:
Deactivation:
Hunt Group Busy Activation:
Deactivation:
ISDN Access Code:
Last Number Dialed Access Code: 608
Leave Word Calling Message Retrieval Lock:
Leave Word Calling Message Retrieval Unlock:
Leave Word Calling Send A Message:
Leave Word Calling Cancel A Message:
Malicious Call Trace Activation: 620
Deactivation: 621
Meet-me Conference Access Code Change:
change feature-access-codes
Page
3 of
6
6
FEATURE ACCESS CODE (FAC)
PASTE (Display PBX data on Phone) Access
Personal Station Access (PSA) Associate
Per Call CPN Blocking Code Access
Per Call CPN Unblocking Code Access
Code:
Code:
Code: 613
Code: 614
Priority Calling Access Code: 609
Program Access Code:
Refresh Terminal Parameters Access Code:
Remote Send All Calls Activation:
Self Station Display Activation:
Send All Calls Activation: 610
Station Firmware Download Access Code:
Station Lock Activation:
Station Security Code Change Access Code:
Station User Admin of FBI Assign:
Station User Button Ring Control Access Code:
Terminal Dial-Up Test Access Code:
Dissociate Code:
Deactivation:
Deactivation: 611
Deactivation:
change feature-access-codes
Remove:
Page
4 of
FEATURE ACCESS CODE (FAC)
Terminal Translation Initialization Merge Code:
Separation Code:
Transfer to Voice Mail Access Code: 623
Trunk Answer Any Station Access Code:
User Control Restrict Activation:
Deactivation:
Voice Coverage Message Retrieval Access Code:
Voice Principal Message Retrieval Access Code:
Whisper Page Activation Access Code:
FAS; Reviewed:
WCH 10/22/2004
Solution & Interoperability Test Lab Application Notes
©2004 Avaya Inc. All Rights Reserved.
6
17 of 35
Cisco7960SIP.doc
5.1.3. Define Feature Name Extensions (FNEs)
Now the FNEs can be defined using the change off-pbx-telephone feature-name-extensions
command. It is recommended that a uniform format for these extensions be used as shown (e.g.,
all beginning with 70xxx), so that the definition of the address map in the Avaya Converged
Communications Server later (Section 5.2) will be as simple as possible.
change off-pbx-telephone feature-name-extensions
EXTENSIONS TO CALL WHICH ACTIVATE FEATURES BY NAME
Active Appearance Select:
Automatic Call-Back Cancel:
Call Forward All:
Call Forward Busy/No Answer:
Call Forward Cancel:
Call Park:
Call Park Answer Back:
Call Pick-Up:
Conference on Answer:
Calling Number Block:
Calling Number Unblock:
Directed Call Pick-Up:
Drop Last Added Party:
Exclusion (Toggle On/Off):
Held Appearance Select:
70003
70004
70005
70006
70007
70008
70009
70010
70011
70012
70013
70014
70015
70016
70017
Page
Idle Appearance Select:
Last Number Dialed:
Malicious Call Trace:
Malicious Call Trace Cancel:
Priority Call:
Send All Calls:
Send All Calls Cancel:
Transfer On Hang-Up:
Transfer to Voice Mail:
1 of
1
70018
70019
70020
70021
70000
70001
70002
70022
70023
5.1.4. Specify Class of Service (COS)
Use the change class-of-service command to set the appropriate service permissions to support
the off-PBX features (shown in bold). For the example, COS 1 was used.
change cos
Page
1 of
1
CLASS OF SERVICE
Auto Callback
Call Fwd-All Calls
Data Privacy
Priority Calling
Console Permissions
Off-hook Alert
Client Room
Restrict Call Fwd-Off Net
Call Forwarding Busy/DA
Personal Station Access (PSA)
Extended Forwarding All
Extended Forwarding B/DA
Trk-to-Trk Transfer Override
QSIG Call Offer Originations
Contact Closure Activation
FAS; Reviewed:
WCH 10/22/2004
0
n
n
n
n
n
n
n
y
n
n
n
n
n
n
n
1
n
y
y
y
n
n
n
y
y
n
n
n
n
n
n
2
y
n
n
n
n
n
n
y
n
n
n
n
n
n
n
3
n
y
n
n
n
n
n
y
n
n
n
n
n
n
n
4
y
y
n
n
n
n
n
y
n
n
n
n
n
n
n
5
n
n
y
n
n
n
n
y
n
n
n
n
n
n
n
6
y
n
y
n
n
n
n
y
n
n
n
n
n
n
n
7
n
y
y
n
n
n
n
y
n
n
n
n
n
n
n
8
y
y
y
n
n
n
n
y
n
n
n
n
n
n
n
9 10 11 12 13 14 15
n y n y n y n
n n y y n n y
n n n n y y y
y y y y y y y
n n n n n n n
n n n n n n n
n n n n n n n
y y y y y y y
n n n n n n n
n n n n n n n
n n n n n n n
n n n n n n n
n n n n n n n
n n n n n n n
n n n n n n n
Solution & Interoperability Test Lab Application Notes
©2004 Avaya Inc. All Rights Reserved.
18 of 35
Cisco7960SIP.doc
5.1.5. Add stations
Use the add-station command to add a station for each SIP phone to be supported. Use 4620 for
the Station Type and be sure to include the Coverage Path for voice messaging if it is available.
Use the COS value specified in the previous section. The Name field is optional and is shown
on the display of the destination phone when making calls. Use default values for the other fields
on Page 1.
Note: For Outboard Proxy SIP configuration, the station extension must be different than that
administered for the Avaya Converged Communications Server. The Communication Manager
extension will be the “public” extension that users associate with their phones. The Avaya
Converged Communications Server extension will be a “private” extension that is used in the
system configuration, but is not dialed by users. To make it easy to relate the two, make the
extensions the same except for one high order digit. For example, in the following Outboard
Proxy SIP configuration, the public Communication Manager extension is 24071 and the private
Converged Communications Server extension is 23071.
add station 24071
Page
1 of
4
STATION
Extension:
Type:
Port:
Name:
24071
4620
S00024
Cisco 1
Lock Messages? n
Security Code:
Coverage Path 1: 1
Coverage Path 2:
Hunt-to Station:
STATION OPTIONS
Loss Group: 19
Speakerphone: 2-way
Display Language: english
Survivable GK Node Name:
FAS; Reviewed:
WCH 10/22/2004
BCC:
TN:
COR:
COS:
Personalized Ringing Pattern:
Message Lamp Ext:
Mute Button Enabled?
Expansion Module?
0
1
1
1
1
24071
y
n
Media Complex Ext:
IP SoftPhone? n
IP Audio Hairpinning? y
Interworking Message: PROGress
Solution & Interoperability Test Lab Application Notes
©2004 Avaya Inc. All Rights Reserved.
19 of 35
Cisco7960SIP.doc
For most applications, the default values can be used for Page 2.
add station 24071
Page
2 of
4
STATION
FEATURE OPTIONS
LWC Reception:
LWC Activation?
LWC Log External Calls?
CDR Privacy?
Redirect Notification?
Per Button Ring Control?
Bridged Call Alerting?
Active Station Ringing:
spe
y
n
n
y
n
n
single
H.320 Conversion? n
Service Link Mode: as-needed
Multimedia Mode: enhanced
MWI Served User Type:
AUDIX Name:
Auto Select Any Idle Appearance?
Coverage Msg Retrieval?
Auto Answer:
Data Restriction?
Idle Appearance Preference?
n
y
none
n
n
Restrict Last Appearance? y
Per Station CPN - Send Calling Number?
Display Client Redirection? n
Select Last Used Appearance? n
Coverage After Forwarding? s
Multimedia Early Answer? n
Direct IP-IP Audio Connections? y
IP Audio Hairpinning? y
Emergency Location Ext: 24071
On Page 3, fill in function button names, if required, for off-PBX FNEs that will be used at the
phone. Table 5 correlates the FNE to required function button names. For the example, the Idle
Appearance Select requires call-appr. The maximum number of call-appr buttons should match
that of the Cisco phone type (two for 7940, six for 7960).
add station 24071
Page
3 of
4
STATION
SITE DATA
Room:
Jack:
Cable:
Floor:
Building:
ABBREVIATED DIALING
List1:
BUTTON ASSIGNMENTS
1: call-appr
2: call-appr
3: call-appr
4:
FAS; Reviewed:
WCH 10/22/2004
Headset?
Speaker?
Mounting:
Cord Length:
Set Color:
List2:
n
n
d
0
List3:
5:
6:
7:
8:
Solution & Interoperability Test Lab Application Notes
©2004 Avaya Inc. All Rights Reserved.
20 of 35
Cisco7960SIP.doc
Off-PBX Station Feature Name Extension (FNE)
Active Appearance Select
Automatic Call-Back Cancel
Call Forward All
Call Forward Busy/No Answer
Call Forward Cancel
Call Park
Call Park Answer Back
Call Pick-Up
Conference on Answer
Calling Number Block
Calling Number Unblock
Directed Call Pick-Up
Drop Last Added Party
Exclusion (Toggle On/Off)
Held Appearance Select
Idle Appearance Select
Last Number Dialed
Malicious Call Trace
Malicious Call Trace Cancel
Priority Call
Send All Calls
Send All Calls Cancel
Transfer On Hang-Up
Transfer to Voice Mail
Station Button Required
call-appr, brdg-appr, or abrdg-appr
(not yet supported)
(none)
(none)
(none)
(none)
(none)
(none)
no-hold-conf
(none)
(none)
(none)
drop
exclusion
call-appr, brdg-appr, or abrdg-appr
(none)
(none)
(none)
(none)
(none)
(none)
(none)
transfer
(none)
Table 5: Station Buttons Required for off-PBX Features
Use the change off-pbx-telephone station-mapping command to map the Communication
Manager extension (24071) to the Converged Communications Server extension (23071). Enter
the field values shown. For the sample configuration, the Trunk Selection value indicates that
Automatic Alternate Routing (AAR) will be used, and that the routing pattern to reach this
Converged Communications Server extension will point to the SIP trunk to the Converged
Communications Server. The Configuration Set value can reference a set that has the default
settings in Communication Manager.
change off-pbx-telephone station-mapping 24071
STATIONS WITH OFF-PBX TELEPHONE INTEGRATION
Station
Extension
24071
Application
FAS; Reviewed:
WCH 10/22/2004
OPS
Dial
Phone Number
Prefix
- 23071
-
Trunk
Selection
aar
Solution & Interoperability Test Lab Application Notes
©2004 Avaya Inc. All Rights Reserved.
Page
1 of
2
Configuration
Set
1
21 of 35
Cisco7960SIP.doc
5.2. Configure the Avaya Converged Communications Server
5.2.1. Adding an Address Map
Address maps are used in the Converged Communications Server to specify how incoming SIP
calls are to be routed, based on the dialed number. They are grouped by the SIP contact to which
they will be routed. For host maps, specified in the Hosts link, the SIP contact must be specified
completely. To configure support for the Outboard Proxy SIP features supported by
Communication Manager on an Avaya Media Server, Media Server maps are defined using the
Media Servers link. In this case, the contact information is automatically generated and dialed
numbers matching the map specification cause the call to be routed to the associated Media
Server. In this configuration, any number the user may dial, including the FNEs defined in
Section 5.1, must be covered by the map specification, so that these calls (i.e. SIP INVITE
messages) will be routed to the S8300/G700, where Communication Manager will route the call
based on its dial plan. This means that the map specification(s) must agree with the dial plan
administered in Communication Manager.
Note: To route toll calls back through the Converged Communications Server and on to a SIP
service provider, configure Communication Manager such that the number sent to Converged
Communications Server on the SIP trunk is not identical to that dialed by the user. Otherwise
the Converged Communications Server will route the call back to Communication Manager and
a loop will result. For example, to dial outbound numbers, the user may have to dial “9”
followed by the area code and number. A media server map in the Converged Communications
Server would match on the initial 9 and route the call to Communication Manager.
Communication Manager would in turn route the call back to the Converged Communications
Server using a modified form of the number that would match a Converged Communications
Server address map for outbound routing to the service provider.
The following steps describe how to administer the Media Server Map. See Reference [1] for
more information on the syntax used to specify address maps.
FAS; Reviewed:
WCH 10/22/2004
Solution & Interoperability Test Lab Application Notes
©2004 Avaya Inc. All Rights Reserved.
22 of 35
Cisco7960SIP.doc
Steps
Description
1.
Click on the Media Servers link on the left side of the main Converged Communications Server
web page. The List Media Servers page is displayed.
Click on Map.
FAS; Reviewed:
WCH 10/22/2004
Solution & Interoperability Test Lab Application Notes
©2004 Avaya Inc. All Rights Reserved.
23 of 35
Cisco7960SIP.doc
Steps
Description
2.
The List Address Map page is displayed.
Select Add Map in New Group.
FAS; Reviewed:
WCH 10/22/2004
Solution & Interoperability Test Lab Application Notes
©2004 Avaya Inc. All Rights Reserved.
24 of 35
Cisco7960SIP.doc
Steps
Description
3.
The Add Address Map page will be displayed. Specify a Name for the address map, and the
Pattern match specification. In this example, all FNEs begin with 70. The pattern match
specification is applied to the Uniform Resource Identifier (URI) field of incoming INVITE
messages. The URI usually takes the form sip:user@domain, where domain can be a domain
name or an IP address. For example, the URI for the Call Pickup FNE could be
sip:[email protected] or sip:[email protected].
The specification means that if the URI begins with “sip:” followed by either a 2, 7, or 9, route
the call to the Media Server. In the sample configuration, this would cover extension, Outboard
Proxy SIP FNE, and outbound dialing, respectively. Check Replace URI. When routing the
incoming INVITE from the phone, the Converged Communications Server will replace the
request URI with the URI specified in the contact (see Step 4).
Click on Add; then click on Continue on the confirmation page.
FAS; Reviewed:
WCH 10/22/2004
Solution & Interoperability Test Lab Application Notes
©2004 Avaya Inc. All Rights Reserved.
25 of 35
Cisco7960SIP.doc
Steps
Description
4.
The List Address Map page will be displayed again, this time with the updated map information.
Note that the contact for the S8300/G700 has been automatically generated.
5.
To apply the administration in the above steps, click on Update on the left side of the page. This
link appears on the current page whenever updates are outstanding, and can be used at any time
to save the administration performed to that point.
5.3. Configure the Cisco 7940/7960 SIP Telephone
Now that Communication Manager and Converged Communications Server have been
administered for Outboard Proxy SIP support of the telephones, the extended feature set is
available to 7940/7960 users. To dial a number, lift the receiver (or press Speaker) and dial any
number using the dial plan centrally administered in Communication Manager on the Avaya
Media Server. To access any of the Outboard Proxy SIP features, dial the corresponding FNE.
For example, if the telephone has been defined in Communication Manager as part of a pickup
group, then dial the Call Pickup FNE (in this case 70010) to answer a call to any member of that
group. Outboard Proxy SIP features that involve an existing call (e.g., conference on answer)
will require putting that call on hold, and placing a new call using the appropriate FNE.
FAS; Reviewed:
WCH 10/22/2004
Solution & Interoperability Test Lab Application Notes
©2004 Avaya Inc. All Rights Reserved.
26 of 35
Cisco7960SIP.doc
5.3.1. Add Parameters to Configuration Files
The configuration files should be modified to support two functions relative to Communication
Manager /Outboard Proxy SIP: Public extension display (see Section 5.1.5) and voice message
access.
The Cisco 7940/7960 phone will normally display the “private” extension (User ID) used to
register to the Converged Communications Server. The desired display is the “public” Outboard
Proxy SIP extension. To do this, the shortname parameter must be added to the phone-specific
configuration file for each phone and set to the public extension for that line appearance. In the
sample configuration, the parameter for line appearance one would be:
line1_shortname: “24071”
This will cause 24071 to be displayed on the phone even though 23071 is used to register with
Converged Communications Server.
Even though MWI is not supported, the messages button can be programmed to call the
extension corresponding to Avaya voice messaging. This can be accomplished by setting a
parameter in the default configuration file, and will be apply to all phones in the system.
The parameter to be added is:
messages_uri: 25000
In the sample configuration, the AUDIX hunt group on the S8300/G700 has extension 25000.
5.3.2. Define Outboard Proxy SIP Speed Dial Buttons
Access to Outboard Proxy SIP features can be streamlined by using free line appearance buttons
on the telephone for speed dialing. Commonly used FNEs can be defined on these buttons, in
many cases facilitating one-button dialing. Since the Cisco 7960 SIP telephone has six line
appearances, it is preferred over the 7940, which has two. The following steps describe how to
configure the 7960 set with Outboard Proxy SIP speed dial buttons. They also apply to the 7940,
although only one speed dial button is available in this case. General configuration information
can be found in Reference [3].
Note: The following configuration must be done at the telephone, and cannot be centrally
defined in configuration files.
FAS; Reviewed:
WCH 10/22/2004
Solution & Interoperability Test Lab Application Notes
©2004 Avaya Inc. All Rights Reserved.
27 of 35
Cisco7960SIP.doc
Steps
Description
1.
At the telephone, press the settings button to bring up the main configuration menu.
up/down
FAS; Reviewed:
WCH 10/22/2004
Solution & Interoperability Test Lab Application Notes
©2004 Avaya Inc. All Rights Reserved.
28 of 35
Cisco7960SIP.doc
Steps
Description
2.
Using the up/down button, move the highlighted selection to Unlock Configuration, and press
the Select function button. Enter the appropriate password using the keypad.
The main configuration menu will be displayed again. Move the highlighted selection to Call
Preferences, and press the Select function button.
FAS; Reviewed:
WCH 10/22/2004
Solution & Interoperability Test Lab Application Notes
©2004 Avaya Inc. All Rights Reserved.
29 of 35
Cisco7960SIP.doc
Steps
Description
3.
The Call Preferences menu will be displayed. Move the highlighted selection to Speed Dial
Lines, and press the Select function button.
FAS; Reviewed:
WCH 10/22/2004
Solution & Interoperability Test Lab Application Notes
©2004 Avaya Inc. All Rights Reserved.
30 of 35
Cisco7960SIP.doc
Steps
4.
Description
The Speed Dial Configuration menu will be displayed. Move the highlighted selection to the
desired speed dial button and press the Edit function button.
FAS; Reviewed:
WCH 10/22/2004
Solution & Interoperability Test Lab Application Notes
©2004 Avaya Inc. All Rights Reserved.
31 of 35
Cisco7960SIP.doc
Steps
Description
5.
Enter the Name and Number for the speed dial button. For Outboard Proxy SIP features, this
should be one of the FNEs.
Press the Accept function button when finished.
FAS; Reviewed:
WCH 10/22/2004
Solution & Interoperability Test Lab Application Notes
©2004 Avaya Inc. All Rights Reserved.
32 of 35
Cisco7960SIP.doc
Steps
Description
6.
Repeat steps 4-5 for each button desired, selecting most frequently used Outboard Proxy SIP
features for assignment to the buttons. A representative button arrangement is shown below.
When finished, press the settings button to exit from phone configuration mode.
6. Verification Steps
The following steps can be used to verify and/or troubleshoot installations in the field.
1. After rebooting the 7940/7960 telephone, use the settings button at the phone to verify
that the parameters set in the default (proxy server address and port number, register with
proxy, etc.) and phone-specific (User ID, Password, etc.) configuration files have been
loaded. Verify that the phone icon by each defined line appearance does not have an “X”
next to it, indicating that registration has not occurred. If the “X” appears, check that the
proxy server IP address and port number are correct and that the Proxy Register
parameter is set to Yes. Verify that the line appearance shows the Communication
Manager extension for that phone.
FAS; Reviewed:
WCH 10/22/2004
Solution & Interoperability Test Lab Application Notes
©2004 Avaya Inc. All Rights Reserved.
33 of 35
Cisco7960SIP.doc
2. Verify basic feature set administration by lifting the handset (or pressing the speaker
button), and making calls to other phones. Test those features for which Yes appears in
the second column of Table 2.
3. Verify that speed dial buttons defined locally at the phone are displayed on the right hand
side. If any are missing or are inoperative, use the local phone menus to re-check their
configuration.
4. Verify extended Outboard Proxy SIP features by pressing the speed dial button for the
feature, or lifting the handset and dialing the FNE. If busy or intercept tone is heard,
check Communication Manager administration for the correct FNE, proper permissions
under COS, and the proper station button assignment to support the feature.
5. Press the messages button and verify that the voice messaging system is called.
7. Conclusion
These Application Notes have described the administration steps required to use Cisco 7940 and
7960 SIP telephones with the Avaya Converged Communications Server and Communication
Manager. Both basic and extended feature sets were covered. The extended set includes
features not yet available to SIP telephones via the current IETF standards. IETF standardsbased Message Waiting Indicator (MWI) support is not yet available on Cisco SIP Telephones,
although one-touch access to Avaya voice messaging is available.
8. Additional References
[1]
[2]
[3]
[4]
[5]
Converged Communications Server Installation and Administration, Doc # 555-245-705,
February, 2004.
Session Initiation Protocol Service Examples - draft-ietf-sipping-service-examples-06,
SIPPING Working Group, Internet-Draft, 2/15/2004.
Cisco SIP IP Phone Administrator Guide, Release 6.0, 6.1, 7.0, 7.1, May 2004, Cisco
Systems, Inc.
Avaya Extension to Cellular and Off-PBX Station Installation and Administration Guide,
Doc. # 210-100-500, Issue 6, November, 2003.
Converting a Cisco 7940/7960 CallManager Phone to a SIP Phone and the Reverse
Process, Cisco Systems, Inc.
FAS; Reviewed:
WCH 10/22/2004
Solution & Interoperability Test Lab Application Notes
©2004 Avaya Inc. All Rights Reserved.
34 of 35
Cisco7960SIP.doc
©2004 Avaya Inc. All Rights Reserved.
Avaya and the Avaya Logo are trademarks of Avaya Inc. All trademarks identified by ® and ™
are registered trademarks or trademarks, respectively, of Avaya Inc. All other trademarks are the
property of their respective owners. The information provided in these Application Notes is
subject to change without notice. The configurations, technical data, and recommendations
provided in these Application Notes are believed to be accurate and dependable, but are
presented without express or implied warranty. Users are responsible for their application of any
products specified in these Application Notes.
Please e-mail any questions or comments pertaining to these Application Notes along with the
full title name and filename, located in the lower right corner, directly to the Avaya Solution &
Interoperability Test Lab at [email protected]
FAS; Reviewed:
WCH 10/22/2004
Solution & Interoperability Test Lab Application Notes
©2004 Avaya Inc. All Rights Reserved.
35 of 35
Cisco7960SIP.doc