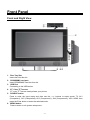
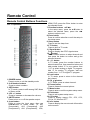
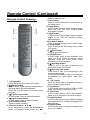
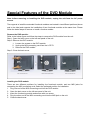
1
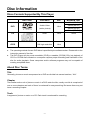
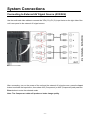
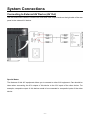
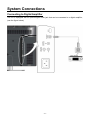
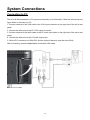
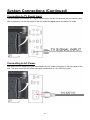
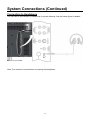
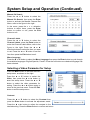
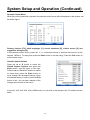
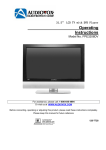
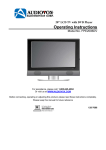
27” LCD TV with DVD Player
Operating Instructions
Model No. FPE2706DV
For assistance, please call: 1-800-645-4994
Or visit us at WWW.AUDIOVOX.COM
Before connecting, operating or adjusting this product, please read these instructions completely.
Please keep this manual for future reference
128-7726
Table Of Contents
Important Safety Instruction----------------------------------------------------------------------1
Product Features ------------------------------------------------------------------3
Disc Information -------------------------------------------------------------------4
Front Panel---------------------------------------------------------------------------5
Rear Panel----------------------------------------------------------------------------7
Remote Control---------------------------------------------------------------------------------8
Special features of the DVD Module----------------------------------------11
System Connections-----------------------------------------------------------------------12
Connecting to External AV Signal Source (AV1) ---------------------------------- 12
Connecting to External AV Signal Source (AV2) ---------------------------------- 13
Connecting to External AV Signal Source (Video3 /Video4) ---------------------------------14
Connecting to HDMI Output Device-------------------------------------------------------------15
Connecting to External AV Device (AV OUT) --------------------------------------------------16
Connecting to Digital Amplifier ---------------------------------------------------------------------------17
Connecting to PC ---------------------------------------------------------------------------------18
Connecting to TV Signal Input------------------------------------------------------------------19
Connecting to Power Supply--------------------------------------------------------------------19
Connecting to Earphone------------------------------------------------------------------------20
Input Source Selecting----------------------------------------------------------21
System Setup-----------------------------------------------------------------------------------22
Preparations---------------------------------------------------------------------------------------22
Setup Setting--------------------------------------------------------------------------------------22
Video Setting--------------------------------------------------------------------------------------23
Audio Setting-----------------------------------------------------------------------------------25
Feature Setting------------------------------------------------------------------------------------26
DVD Player Operation-----------------------------------------------------------29
USB and SD/MS/MMC Card Function---------------------------------------33
DVD System Setup----------------------------------------------------------------34
Troubleshooting------------------------------------------------------------------------------41
Specifications----------------------------------------------------------------------------------42
1
Important Safety Instructions
The lightning flash with arrowhead symbol, within an equilateral triangle, is
intended to alert the user to the presence of un-insulated “dangerous voltage”
within the product’s enclosure that may be of sufficient magnitude to constitute a
risk of electric shock to persons.
The exclamation point within an equilateral triangle is intended to alert the user to
the presence of important operating and maintenance (servicing) instructions in
the literature accompanying the appliance.
CAUTION: Laser radiation when open. Do not stare into
beam.
CAUTION: USE OF ANY CONTROLS, ADJUSTMENTS, OR PROCEDURES OTHER THAN
THOSE SPECIFIED HEREIN MAY RESULT IN HAZARDOUS RADIATION EXPOSURE.
POWER SUPPLY:
Connect the supplied AC Power Cord to the side of the FPE2706DV in the connector marked
110-220V-50/60Hz. Plug the three prong end of the power cord to an AC110-220V outlet. If the unit
will not the used for a long time, disconnect the plug from the outlet.
NOTE:
Before plugging the power cord into an AC outlet, make sure that all the connections have been
made.
CAUTION: These servicing instructions are for use by qualified service personnel only. To reduce
the risk of electric shock, do not perform any servicing other than that contained in the operating
instructions unless you are qualified to do so.
Refer to service manual for servicing instructions.
-2-
Important Safety Instructions
Note:
1.
2.
3.
4.
5.
6.
7.
IMPORTANT FOR LASER PRODUCTS
1. CLASS 1 LASER PRODUCT
2. DANGER: Visible laser radiation when open and interlock
failed or defeated. Avoid direct exposure to beam.
3. CAUTION: Do not open the top cover. There are no user
serviceable parts inside the unit. Leave all servicing to
qualified service personnel.
Read these instructions.
Keep these instructions.
Heed all warnings.
Follow all instructions.
Do not use near water.
Clean only with dry cloth.
Do not block any ventilation openings. Maintain well ventilated conditions around the product.
Do not put product on bed, sofa or anything that blocks ventilation. Install in accordance with
the manufacturer’s instructions.
8. Do not install near any heat sources such as radiators, heat registers, stoves, or other apparatus
(including amplifiers) that produce heat.
9. Do not defeat the safety purpose of the polarized or grounding-type plug. A polarized plug has
two blades with one wider than the other. If the provided plug does not fit into your outlet, consult
an electrician for replacement of the obsolete outlet.
10. Protect the power cord from being walked on or pinched particularly at plugs, convenience
receptacles, and the point where they exit from the apparatus.
11. Only use attachments/accessories specified by the manufacturer.
12. Use only with the cart, stand, tripod, bracket, or table specified by the
manufacturer, or sold with the apparatus. When a cart is used, use
caution when moving the cart/apparatus combination to avoid injury
from tip-over.
13. Unplug this apparatus during lightning storms or when unused for long periods of time.
14. Refer all servicing to qualified service personnel. Servicing is required when the apparatus has
been damaged in any way, such as power-supply cord or plug is damaged, liquid has been
spilled or objects have fallen into the apparatus, the apparatus has been exposed to rain or
moisture, does not operate normally, or has been dropped.
15. Apparatus shall not be exposed to dripping or splashing and no objects filled with liquids, such
as vases, shall be placed on the apparatus.
Note: Never touch the color TFT LCD screen with your hand.
Copyright Protection
This product incorporates copyright protection technology that is protected by U.S. patents and
other intellectual property rights. Use of this copyright protection technology must be authorized by
Macrovision, and is intended for home and other limited viewing uses only unless otherwise
authorized by Macrovision. Reverse engineering or disassembly is prohibited.
-3-
Product Features
This product is designed with movable Disc Tray. The Disc Tray can be installed in two
different positions. The movable Disc Tray offers you the flexibility to choose which
direction to insert your DVD in order to maximize your space. The unit incorporates
high-resolution LCD display, DVD player and TV receiver in one system.
Multiple Mode
High Resolution
Adopt an MPEG2 decoding format to achieve
horizontal resolution more than 500 lines.
Superior sound
Supports SRS and SAP function, reproduce
high quality sound.
LCD (Liquid Crystal Display)
Designed with 27" plasma display that clearly
shows your picture.
Stereo amplifier
Built-in 2x10w speakers provide high quality
sound.
AV And VGA Input
Can be connected to external audio and video
signal source and PC.
Color Separation Function
Built-in 3D Y/C chroma chip to separates luma
and chroma effectively.
Multi-audio and Multi-video modes
Supports Multi-audio and multi-video modes,
provide more selections.
TV mode
AV1 (Composite 1)
AV2 (Composite 2)
AV3 (Component 1)
AV4 (Component 2)
VGA
HDMI
DVD
High Quality Features
Movable Disc Tray
The unit is designed with a movable Disc Tray.
The tray can be installed in two different
positions; on top or on bottom of the LCD. The
movable Disc Tray offers you the flexibility to
choose which direction to insert your DVD in
order to maximize your space.
TV Signal Input
Supports ATSC and NTSC signals so you can
receive more TV programs.
TV Function
Auto program scan and manual program
searching, provide you more convenience.
Channel Edit Function
Supports channel edit function, you can edit the
channel for your preference.
Special Function
Supports V-CHIP, CCD and sleep timer setting
functions.
USB and CARD PORTS
Designed with USB and SD/MS/MMC card
port, can be connected to USB device or
SD/MS/MMC Card.
Advanced Playing Features
Compatibility
DVD, CD, CD-R, CD-RW and JPEG discs
compatible.
All Playback Functions
Fast forward and reverse, slow playback and
repeat playback.
Special playback.
Support multi-angle, multi-language and
multi-subtitle playback.
-4-
Disc Information
Discs Formats Supported By This Player
DISC LOGO
CONTENTS
SIZE
MAXIMUM TIME
133min(SS-SL)
DVD
Audio+Video
(active picture)
12cm
242min(SS-DL)
266min(DS-SL)
484min(DS-DL)
CD
Audio
12cm
JPEG
Still high resolution
12cm
74min
The operating method of some DVD discs is specified by the software maker. Please refer to the
instruction manual of the disc.
The DVD Player will play most recordable (CD-R) or erasable (CD-RW) CDs, but playback of
CD-R or CD-RW discs created on a computer requires proper formatting and finalization of the
disc for audio playback. Some computers and/or software programs may not be capable of
creating compatible discs.
About Disc Terms
Title
Generally, pictures or music compressed on a DVD are divided into several sections, “title”.
Chapter
The smaller section unit of picture or music in a DVD under the title, usually one title is comprised of
one or more chapters and each of them is numbered for easy searching. But some discs may not
have a recording chapter.
Track
A segment of picture or music on a CD. Each track is numbered for searching.
-5-
Front Panel
Front and Right View
1. Disc Tray Slot
Insert disc into this slot.
2. SD/MS/MMC card port
Insert SD/MS/MMC card into this slot.
3. USB Port
Connecting to the USB device.
4. 27" Color TFT screen
27" color TFT screen clearly shows your picture.
5. SOURCE button
Press to enter the Input menu and then use the buttons to select mode: TV, AV1
(Composite1), AV2 (Composite2), AV3 (Component1), AV4 (Component2), VGA, HDMI, then
press the Enter button to enter the selected mode.
6. MENU button
Press to enter or exit system setup menu.
-6-
Front Panel (Continued)
7. CH ▲/▼button
In TV mode, press to select channels.
In setup menu, the same function as ▲/▼ direction buttons.
8. VOL ▲/▼ button
Press to decrease or increase the volume, the same function as ◄/► direction buttons in setup
menu.
9. STOP button
Press to stop playback in DVD mode.
10. PLAY button
Press to start playback in DVD mode.
11. EJECT button
Press to eject the disc out from the disc tray.
12. POWER button
Press to enter or exit the standby mode.
13. Remote Sensor
Remote sensor window for the remote control.
14. Power Indicator
In standby mode, it turns red; when operation it is blue;
15. Speakers
Provides high quality sound.
-7-
Rear Panel
Rear View
Open the back cover on the right side of the unit’s rear panel, all the jacks will appear, as shown on
the figure below:
1. Y/Pr(Cr)/Pb(Cb) and L/R audio Input
Jacks
Connections for the Y/Pr(Cr)/Pb(Cb) inputs
in AV3 (Component) mode.
2. Y/Pr(Cr)/Pb(Cb) and L/R audio Input
Jacks
Connections for the Y/Pr(Cr)/Pb(Cb) inputs
in AV4 (Component) mode.
3. Video and L/R audio Input Jacks
Connections for the audio and video signal
input in AV1 (Composite) mode.
4. Video/S-VIDEO and L/R audio Input
Jacks
Connections
for
the
audio
and
video/S-Video signal inputs in AV2
(Composite) mode. Video and S-Video use
the same L/R audio jacks, with S-Video
input given priority.
5. Headphone Jack
Used for connecting to a headphone.
6. TV Signal Input Jack
Connected to TV antenna in TV mode.
7. VGA Input Jack
Connect to the VGA output jack of a PC in
VGA mode.
8. HDMI Jack
Connect to the HDMI.
9. OPTICAL audio output Jack
Connection for optical digital audio (SPDIF)
output.
10. AV Output Jack
Connection for audio and video signal
output.
11. Power In Jack
Connection for AC power.
-8-
Remote Control
Remote Control Buttons Functions
HDMI, DVD, press the Enter button to enter
the selected mode.
7. Direction buttons ▲▼◄►
In the setup menu, press the ▲▼button to
select the desired items, press the ◄►
button to adjust or set.
8. Enter button
Press to confirm selection or exit the setup in
the setup menu.
9. Sleep button
Press to set the sleep time.
10. TV button
Press to shift to TV mode.
11. Signal button
Press to display the ATSC signal status.
12.
button
Press number buttons to select channel and
then press the button to confirm and go the
selected channel.
13. +10/- button
In TV mode, press the number buttons to
select channel first, then press this button and
add number button “0” or one number from
“1~5” to select analog or digital TV program.
Add “0” for analog TV program, add one
number from “1~5” for digital TV program.
14. Last button
In TV mode, press to return to the channel
last viewed.
15. CH /button
In TV mode, press to select channel.
16. Freeze button
Press to freeze the current picture.
17. Menu button
Press to enter or exit the system setup menu.
18. Exit button
Press to exit system setup menu.
19. CC button
Press to display among CC1, CC2, CC3,
CC4 or CC function OFF.
20. Info. button
Press to display the current mode information
on the screen.
For TV Operation
1.POWER button
Press to enter or exit the standby mode.
2. 0~9 Number buttons
Press to select numbers.
3. MTS button
In TV mode, press to shift among SAP, Mono
or Stereo mode.
4. VOL +/- button
Press to increase or decrease the volume.
5. MUTE button
Press to turn on or off the speaker output.
6. Input button
Press to enter the input menu, then use
the▲▼button to select mode: TV, AV1
(Composite1), AV2 (Composite2), AV3
(Component1), AV4 (Component2), VGA,
-9-
Remote Control (Continued)
button to adjust or set.
7. Enter button
Press to confirm selection or exit the setup in
the setup menu.
8. Audio button
In DVD mode, press to select audio language
when the DVD disc with multiple audio
languages is played.
9. Angle button
In DVD mode, Press to select various camera
angles (if the DVD disc contains multiple
camera angles).
10. Dvdmenu button
Press to access the disc menu in DVD mode.
11. Setup button
Press to access the DVD setup menu under
DVD mode.
Eject button
12.
Press to eject the disc out.
13. ■ Stop button
In DVD mode, press to stop playback, then
press the PLAY button to resume normal
playback. Press the STOP button twice
repeatedly to stop completely.
14. Next Skip button
Press to skip to the next chapter/track for
some discs under DVD mode.
15. Previous Skip button
Press once to skip to the beginning of the
current chapter/track.
Press twice repeatedly to skip to the previous
chapter/track for some discs under DVD
mode.
16. +10/- button
Press the button and 0~9 number buttons to
select number greater than 9.
17. Card button
In DVD mode, press to shift to USB or CARD
mode when there is the input source..
18. Title button
In DVD mode, during a DVD disc playback,
press to go to title menu if the disc contains.
19. Subtitle button
In DVD mode, press to select different subtitle
languages during a multiple language DVD
disc playback.
20. Repeat button
In DVD mode, press to repeat a chapter, track,
title, or all content.
Remote Control Drawing
For DVD Operation
1. Play button
Press to play the disc under DVD mode.
Pause button
2.
In DVD mode, Press to pause the playback or
start step frame by frame playback.
Press the PLAY button to resume normal
playback.
3. Fast Reverse button
In DVD mode, Press to search backward.
4. Fast Forward button
In DVD mode, Press to search forward.
5. 0~9 Number buttons
Press to select numbers.
6. Direction buttons ▲▼◄►
In the setup menu, press the ▲▼button to
select the desired items, press the ◄►
- 10 -
Remote Control(Continued)
Preparation of Remote Control
Using Remote control
Softly push the back cover plastic latch to open
Point the remote control from no more than
the battery compartment.
about 20 feet (7m) from the remote control
sensor and at an angle of 60 degrees from the
front of the unit.
Insert two batteries (1.5V, size AAA), please
make sure the polarity matches the marks
inside the compartment.
The
Softly press the back cover to close it.
operating
distance
may
vary
depending on the brightness of the
location.
Notes:
Do not point bright lights directly at the
remote control sensor.
Do not place objects between the remote
control unit and the remote control sensor.
Do not use this remote control unit while
simultaneously
Under normal use the battery will last for six
months.
operating
the
control unit of any other equipment.
Remove batteries when the remote is not
going to be used for a long time.
- 11 -
remote
Special Features of the DVD Module
Note: before removing or installing the DVD module, unplug the unit from the AC power
source.
The supports to install the extended functional modules are located in two different positions (above
and to the side) and supports the installation of two functional modules at the same time. Please
follow the below steps to remove or install a function module.
Remove the DVD module:
Refer to the below figure and follow the steps to remove the DVD module from the unit:
Step 1: Open the back cover on the left rear panel of the unit.
Step 2: Remove the DVD module.
1. Loosen the screws on the DVD module.
2. Unplug the MGI connecting cord from the LCD TV.
3. Remove the DVD module.
Step 3: Close the back cover.
Installing the DVD module:
There are two different positions for installing the functional module, and two MGI jacks for
connecting the MGI connecting cord. Select the preferred position for installation:
1. Plug one end of the MGI connecting cord into the DVD module.
2. Open the back cover on the left rear panel of the unit.
3. Insert the functioning module and secure with one screw.
4. Plug the other end of the MGI connecting cord into the MGI jack on the unit.
5. Close the back cover.
- 12 -
System Connections
Do not connect the power cord until all other connections have been made.
Ensure that you observe the color cables when connecting audio and video cables.
Before connecting, open the cover on the right side of the unit’s rear panel.
Connecting To External AV Signal Source (AV1)
Use the audio and video cable to connect the input jacks on the right side of the unit’s rear panel to
the external AV signal source.
After connecting, turn on the power of the unit and the external AV signal source, press the Input
button to invoke the Input menu, then select AV1 (Composite) and press the Enter button to activate
the selected mode.
- 13 -
System Connections
Connecting To External AV Signal Source (AV2)
Use the audio and video cable to connect the input jacks on the right side of the unit’s rear panel to
the external AV signal source.
Also use the S-Video cable to connect the S-Video input jack on the right side of the unit’s rear panel
to the external AV signal source.
Note: S-VIDEO cable will produces higher quality images.
After connecting, turn on the power of the unit and the external AV signal source, press the Input
button to invoke the Input menu, then select AV2 (Composite) and press the Enter button to activate
the selected mode.
If connected to the two group AV and S-Video signal sources at the same time, the S-Video is the
priority. If the other two AV inputs have a video signal applied at the same time a signal is present
at the S-Video connector, the S-Video signal will take priority over the other two.
- 14 -
System Connections
Connecting to External AV Signal Source (AV3/AV4)
Use the audio and video cables to connect the Y/Pb (C b) /Pr (Cr) input Jacks on the right side of the
unit’s rear panel to the external AV signal source.
After connecting, turn on the power of the unit and the external AV signal source, press the Input
button to activate the Input menu, then select AV3 (Component) or AV4 (Component) and press the
Enter button to enter the selected mode.
Note: The Component cable will produce a better image quality.
- 15 -
System Connections
Connecting to HDMI Output Device
This unit can be connected to an AV device with HDMI output. See the below figure for details:
After connecting, turn on the power to the unit and the external HDMI output device, press the Input
button to activate the Input menu, then select HDMI and press the Enter button to enter the HDMI
mode.
- 16 -
System Connections
Connecting to External AV Device (AV Out)
Use the audio/video cables to connect the audio and video output Jacks on the right side of the rear
panel to the external AV device.
Special Notes:
The features of this A/V equipment allows you to connect to other A/V equipment. Care should be
taken when connecting the A/V outputs of this device to the A/V inputs of the other device. For
example, composite output of this device needs to be connected to composite inputs of the other
device.
- 17 -
System Connections
Connecting to Digital Amplifier
The unit is equipped with an optical digital audio jack that can be connected to a digital amplifier,
(see the figure below)
- 18 -
System Connections
Connecting to PC
The unit can be connected to a PC (personal computer) via a VGA cable. Follow the instructions and
figure below to connect to a PC:
1. Connect one end of the VGA cable to the VGA input connector on the right side of the unit’s rear
panel.
2. Connect the other end to the PC VGA output connector.
3. Connect one end of the audio cable to the PC audio input jacks on the right side of the unit’s rear
panel.
4. Connect the other end to the PC audio output jack.
5. Set the PC’s resolution at 1024×768; and the refresh frequency must be set at 60Hz.
After connecting, press the Input button and select VGA mode.
- 19 -
System Connections (Continued)
Connecting to TV Signal Input
This unit can be connected to a TV signal output source via the 75Ω antenna jack on the rear panel.
After connecting, turn on the power to the unit, press the Input button and select TV mode.
Connecting to AC Power
One end of the AC power cord gets connected to the AC power connector on the rear panel of the
unit. The other end of the AC power cord gets connected to a 110 ~220V AC outlet.
- 20 -
System Connections (Continued)
Connecting to Headphone
This unit can be connected to a headphone for private listening. See the below figure for details:
Note: Turn down the volume before connecting the headphone.
- 21 -
Input Source Selecting
The unit supports multiple video modes, which the user selects via the input menu.
Press the Input button to activate the Input menu, the screen will display the following:
Press the direction button to select the desired video mode, followed by pressing the Enter
button to activate the selected mode.
NOTE:
If external video signals are simultaneously connected to AV2 (composite) are S-Video, the unit will
default to S- Video when the operator selects AV2 as the video input source. If the unit is equipped
with DVD or PVR module, DVD or RECORDER will be displayed on the input screen for selecting.
- 22 -
System Setup and Operation
Preparations
1. Connect the unit to the required power, antenna and video sources then press the POWER button
to turn on the unit.
2. Press the Input button to display the Input menu, then press the or button to select TV. Follow
by pressing the Enter button to activate the TV mode.
Selecting a Function for Set Up
Press the Menu button to activate the main
setup menu, as shown on the right:
Use the ▲ or ▼ button to select Setup then
press ◄ or ► button to enter the setup
menu. Use ▲ or ▼ button to highlight the
function which will be setup. Press the ◄ or
► button to return to the previous menu.
Press the Exit button to exit the setup
menu.
Tuning Band
Press the ▲ or ▼ button to select the Tuning Band then press the Enter button to cycle through the
available option: Air, Cable, Cable HRC, Cable IRC, Cable Auto.
DTV Signal
Press the ▲ or ▼ button to select DTV Signal then press the Enter button, the screen will display
the DTV Signal status, press the Enter button again to return to the previous menu.
Auto Ch Search
Press the ▲ or ▼ button to select the Auto
Ch Search then press the Enter button to
begin the auto searching/programming, see
the figure to the right :
After auto-searching/programming, the unit
will exit and automatically memorizing the
channels found. Upon exiting it will go to the
first found channel.
During searching, press the Exit button to
terminate the search process and exit
Setup.
- 23 -
System Setup and Operation (Continued)
Manual Ch Search
Press the ▲ or ▼ button to select the
Manual Ch Search, then press the Enter
button to activate the Manual Channel Set
Menu, refer to the figure to the right :
In the menu, press the direction
buttons to select items, press the Enter
button to confirm or set, press the Exit
button to exit.
Channel Labels
Press the ▲ or ▼ button to select the
Channel Labels, press the Enter button to
enter the Channel Labels Menu, refer to the
figure to the right: Press the ◄ or ►
direction buttons to select the item you want
to set. Press the ▲ or ▼ button to set the
item then press the Exit button to exit.
Menu Language
Press the ▲ or ▼ button to select the Menu Language then press the Enter button to cycle through
the available languages: English Spanish, French. Press the exit button once desired language has
been selected.
Selecting a Video Parameter for Setup
Press the Menu button to activate the main
setup menu, as shown on the right:
Press the ▲ or ▼ button to select the
Video, then press the ◄ or ► button to
enter the setup menu. Press the ▲ or ▼
button to select the video parameter for
setting. Press the ◄ or ► button again to
return to the previous menu. Press the Exit
button to exit the setup menu.
Contrast
Press the ▲ or ▼ button to select the Contrast then
press the Enter button to activate the adjustment mode.
Press the ◄ or ► button to adjust the contrast to the
desired setting. Press the Enter button to confirm and return.
- 24 -
System Setup and Operation (Continued)
Brightness
Press the ▲ or ▼ button to select the Brightness then
press the Enter button to activate the adjustment mode.
Press the ◄ or ► button to adjust the brightness. Press
the Enter button to confirm and return.
Sharpness
Press the ▲ or ▼ button to select the Sharpness then
press the Enter button to activate the adjustment mode.
Press the ◄ or ► button to adjust the sharpness. Press
the Enter button to confirm and return.
Color
Press the ▲ or ▼ button to select the Color then
press the Enter button to activate the adjustment mode.
Press the ◄ or ► button to adjust the color. Press the
Enter button to confirm and return.
Tint
Press the ▲ or ▼ button to select the Tint then press
the Enter button to activate the adjustment mode.
Press the ◄ or ► button to adjust the tint. Press the
Enter button to confirm and return.
Backlight
Press the ▲ or ▼ button to select the Backlight then
press the Enter button to activate the adjustment mode.
press the ◄ or ► button to adjust the backlight. Press
the Enter button to confirm and return.
Aspect Ratio
Press the ▲ or ▼ button to select Aspect Ratio then press the Enter button to cycle through the
available options: Normal, Zoom, Wide and Cinema. Once the desired setting is selected press the
◄ or ► to return to the setup menu.
Settings
Press the ▲ or ▼ button to select Settings, press the Enter button to set all the settings on the
setup page to their factory default settings.
- 25 -
System Setup and Operation (Continued)
Selecting an Audio Parameter for Setup
Press the Menu button to activate the main
setup menu, as shown on the right:
Press the ▲ or ▼ button to select the Audio
then press the ◄ or ► button to enter the
setup menu. Press the ▲ or ▼ button to
select one of the Audio parameters for
setting. Press the ◄ or ► button again to
return to the previous menu. Press the Exit
button to exit the setup menu.
Audio Language
Press the ▲ or ▼ button to select Audio Language then press the Enter button to select the
desired audio language.
TRUBASS
Press the ▲ or ▼ button to select TRUBASS then press
the Enter button to activate the adjusting mode. Press
the ◄ or ► button to adjust the value. Press the Enter
button again to confirm and return.
Digital Audio Output
Press the ▲ or ▼ button to select the Digital Audio Output then press the Enter button to select
RAW or PCM. Once the desired setting is selected press ◄ or ► to exit.
TV Speaker
Press the ▲ or ▼ button to select TV Speaker then press the Enter button to select On or Off. Once
the desired setting is selected press ◄ or ► to exit.
Mode
Press the ▲ or ▼ button to select Mode, press the Enter button to cycle through the available
options: TRUBASS , BYPASS, WOW,TSXT. Once the desired setting is selected press ◄ or ► to
exit.
Settings
Press the ▲ or ▼ button to select Settings then press the Enter button to have the unit restore all
the factory settings for the current parameters shown on the screen.
- 26 -
System Setup and Operation (Continued)
Selecting a Feature for Setup
Press the Menu button to activate the main
setup menu, as shown on the right:
Press the ▲ or ▼ button to select the
Feature then press the ◄ or ► button to
enter the setup menu. Press the ▲ or
▼button to select one of the features for
setting. Press the ◄ or ► button again to
return to the previous menu. Press the Exit
button to exit the setup menu.
Time Set
Press the ▲ or ▼ button to select Time Set
then press the Enter button to activate the
Time Set Menu, as shown on the right:
In the menu, press the ▲ or ▼ direction
buttons to select items, press the Exit
button to exit.
Time Set Mode
Press the ▲ or ▼ button to select the Time Set Mode then press the Enter button to cycle between
Auto or Manual. Select Manual if you intend to manually set the other parameters. Once the desired
mode is selected press exit to exit.
Time Zone
Press ▲ or ▼ button to select the Time Zone then, press the Enter button to cycle through the
available options: EASTERN CENTRAL MOUNTAIN, PACIFIC, ALASKA, HAWAII. Once the
desired zone is selected press exit to exit.
Year
Press ▲ or ▼ button to select the Year then press ◄ or ► button to set the year. Once the
desired year is set press exit to exit.
Date
Press ▲ or ▼ button to select the Date then press ◄ or ► button to set the date. Once the
desired date is set press exit to exit.
Time
Press ▲ or ▼ button to select the Time then press the ◄ or ► button to set the time. Once the
desired time is set press exit to exit.
Sleep Timer
Press ▲ or ▼ button to select the Sleep Timer then press the Enter to cycle through the available
sleep time settings. Once the desired time is selected press ◄ or ►button to exit.
- 27 -
System Setup and Operation (Continued)
Selecting an Advanced Video Menu Item
for Setup
Press the ▲ or ▼ button to select
Advanced Video Menu then, press the
Enter button to activate the Advanced
Video Menu Setup Screen. See the figure to
the right. Press the ▲ or ▼direction buttons
to select items then press the Enter button
to cycle through the available settings.
Once the desired setting is selected, press
the Exit button to exit.
Password Set
Press the ▲ or ▼ button to select
Password Set then press the Enter button.
See the figure to the right:
Use the number buttons to input the
password. the original password is 0000.
Follow the system prompts and enter the
information requested. Upon successful
completion the system will display
PASSWORD CHANGED.
Parental Control
The Parental Control setting is a feature that
provides parents with the capability of
selecting what the acceptable program
content will be. Depending on the setting,
you can edit violence, language and explicit
content.
Press the ▲ or ▼ button to select
Parental Control then press the Enter
button.
Use the number buttons on the remote
control to input the password, the default
password is 0000.
- 28 -
System Setup and Operation (Continued)
Parental Control Menu
When the correct password is inputted, the parental control menu will be displayed on the screen, see
the below figure:
Fantasy violence [FV], adult languages [L], sexual situations [S], violent scenes [V] and
suggestive dialogues [D]
In the parental control menu, press the direction buttons to position the blue box at the
desired MPAA or TV rating then press the Enter button to set the rating. Press the Exit button to
exit the setup menu.
Closed Caption Options
Press the ▲ or ▼ button to select the
Closed Caption Options then press the
Enter button, see the figure to the right.
Press the ▲ or ▼direction buttons to select
an items then press the Enter button to
cycle through the allowable settings. Once
the desired setting is visible, press the Exit
button to exit. You can see a sample of the
change at the bottom of the menu.
In the AV1, AV2, AV3, AV4, VGA, HDMI mode, you can refer to the setups in the TV mode to set the
items.
- 29 -
DVD Player Operation
Disc Loading Steps:
1. Press the POWER button to turn on the power. Press the Input button and select DVD mode,
press the Enter button to select DVD mode.
2. Insert the disc with its printed side facing you into the disc tray. (Refer to the figure below.)
3. Disc will automatically be pulled into the disc player. While the disc is loading, “Loading” will
appear on the liquid crystal display and playback will begin.
Warning: Do not play poor quality discs that may damage the player.
DVD Playback
Region Code
DVD players and discs are coded by region. These regional codes must match the played discs. If
the codes don’t match, the disc cannot be played. This player’s default code is region 1.
Play
Press the Play button to start playback. Press the STOP button once on the remote control to stop
playback, and press thePlay button again to resume playback.
Stop
Press the ■ Stop button once to stop playback and then press Play button to resume. Press this
button twice to stop playback completely.
- 30 -
DVD Player Operation (Continued)
Pause
Press the
Pause button once to pause the playback, press it repeatedly to start step-by-step
playback, press the Play button to resume normal playback.
Previous and Next Press the button to go to the next chapter. Press the button once to return to the beginning of
the current chapter, press it twice to go to the previous chapter.
Fast Playback
Press the or button on the remote control to activate fast forward or backward playback.
Repeat
Press the REPEAT button repeatedly to cycle through the various repeat modes (Chapter, Title or
All).
DVD Menu
DVD disc contain a selection menu, to access this menu, press the red MENU button. Use the
direction buttons to highlight an item, then press the ENTER button to confirm.
Title & Chapter
DVD discs normally contain multiple titles and multiple chapters (sections) in a title. You can select
any title or chapter quickly by entering the relevant number.
Language (Audio)
There can be up to 8 audio languages on a DVD disc. When you play a multi-language DVD disc you
can press the Audio button to select different audio languages.
Subtitle
The DVD player can support multiple kinds of subtitles. When you play a multi-subtitle disc you can
press the Subtitle button to select different subtitle languages.
Various Camera Angles
The movies on some DVDs have been recorded from various camera positions. This lets you enjoy
the same scene from different perspectives. In this case you’ll usually find a marking on the DVD
sleeve.
When playing a DVD containing various camera angles the camera symbol appears on the screen.
Press the Angle button repeatedly until the desired perspective is shown. The picture will adjust in
1or 2 seconds.
- 31 -
DVD Player Operation (Continued)
CD Playback
The player will play all tracks on a CD disc by default. You can use the and (PREV/NEXT skip)
buttons, or number buttons to select a specific track.
Stop ■
Press the ■ Stop button once to stop playback and then press Play button to resume. Press this
button twice to stop playback completely.
Pause
Press the
Pause button to pause the playback and then press the Play button to resume
normal playback.
Previous and Next
Press the button once to go the beginning of the track. Press twice to go the previous track.
Press the button to play from the beginning of the next track.
Fast Playback
Press the or button on the remote control to activate fast forward or fast backward playback.
Repeat
Press the Repeat button repeatedly to select between Single, All or cancel repeat.
NOTE: Some discs do not support the repeat function.
Audio
During CD playback, press the Audio button on the remote control to select the audio output mode:
Mono Left, Mono Right, Mix-Mono and Stereo.
- 32 -
DVD Player Operation (Continued)
JPEG Playback
JPEG is a common picture format that requires small amounts of storage per image and has low loss
in resolution. Hundreds of pictures can be stored on a disc in this format. In order to view JPEG
photo albums, you can ask your film development company to make a ”PICTURE CD” when they
develop your film.
Normal Playback
Insert a JPEG disc into the player and allow it to load. Upon completion of the load process the root
menu will be displayed on the screen. Use the Enter button and the direction button to select a
submenu, and then use the ▲▼ direction button to select the contents. Many discs have other
contents besides pictures.
For Picture CD disc, it will display the pictures automatically.
During playback, press the or button to select picture.
NOTE: Many discs have other content besides pictures.
Stop
Press the Stop button once to stop playback and return to the preview menu. Press the Play
button to resume normal playback.
Pause
Press the
Pause button to pause playback, press the Play button to resume playback.
Repeat
During playback, pressing the Repeat button repeatedly will result in the cycling through the repeat
modes Shuffle, Random, Single, Repeat One, Repeat All and Repeat Off.
Previous and Next
During playback, press the or button to select a previous or next picture.
Menu
Press the Dvdmenu button once to stop playback and return to the root menu.
Picture Rotation
Use the ◄ or ► buttons to rotate the currently displayed picture. The rotation will remain in effect as
long as the current picture is displayed.
Once another picture is selected, rotation will automatically be cancelled.
NOTE: Some JPEG disc may not support rotating function.
- 33 -
USB and SD/MS/MMC Card Function
USB and SD/MS/MMC Card Function
Preparation:
1. Press POWER to turn on the unit.
2. Press the Input button and select DVD, press the Enter button to shift to DVD mode.
3. Insert the USB memory stick into the unit’s USB slot, or insert the SD/MS/MMC card into the
SD/MS/MMC card slot on the right side of the unit. Please see the below figure:
Make sure that files are stored on the USB and the SD/MS/MMC card before the installation.
4. Press the Card button to cycle among disc playback, USB playback or SD/MMC, MS playback.
The default state is disk playback. Please see the below figure:
00:00 00:00
001/002
BAK
JPEG
5. Press the ◄ or ►button to select the folder, and press Enter button to enter.
6. Press the ◄ or ► buttons to select the desired track. Then press Play button to start
playback.
7. Press the Stop button to stop playback: if the Stop button is pressed, the playback will start
from the beginning of the current track. Press the button to return to the folder menu.
Note:
1. The screen display will vary from disc to disc.
2. Pull out the USB or SD/MS/MMC card directly after the files are played. Then the unit will be in
the state of disc playback again.
- 34 -
DVD System Setup
Preparations
1. Press the Input button and select DVD, press the Enter button to activate DVD mode.
2. Press the Setup button on the remote control to display the settings menu. The menu includes
General setup, Audio setup, Video setup, Preference.
3. Press the direction buttons on the remote control to select a category. All the items in the
category will appear on the screen.
4. Press the Setup button again to exit the setup.
General Setup Page
Press the Setup button to enter the General setup menu. The screen will display as the following:
In the menu, Use the direction buttons to
select the desired item. Press the Enter button to
enter the item. Press the button to return.
TV Display
1. Press the ▲ or ▼ direction buttons to select TV
Display.
2. Press the Enter button to enter the setup.
3. Use the ▲ or ▼ direction buttons to select a
item.
4. Press the Enter button to confirm selection and
return.
Angle Mark
1. Press the ▲ or ▼ direction buttons to select
Angle Mark.
2. Press the Enter button to enter the setup.
3. Use the ▲ or ▼ direction buttons to select On
or Off.
4. Press the Enter button to confirm selection and
return.
- 35 -
DVD System Setup (Continued)
OSD Lang
1. Press the ▲ or ▼ direction buttons to select
OSD Lang.
2. Press the Enter button to enter the setup.
3. Use the ▲ or ▼ direction buttons to select a
language.
4. Press the Enter button again to confirm
selection and return.
Captions
1. Press the ▲ or ▼ direction buttons to select
Caption.
2. Press the Enter button to enter the setup.
3. Use the ▲ or ▼ direction buttons to select on or
off.
4. Press the Enter button again to confirm
selection and return.
Screen Saver
1. Press the ▲ or ▼ direction buttons to select
Screen Saver.
2. Press the Enter button to enter the setup.
3. Use the ▲ or ▼ direction buttons to select On
or Off.
4. Press the Enter button again to confirm
selection and to return.
Last Memory
1. Press the ▲ or ▼ direction buttons to select
Last Memory.
2. Press the Enter button to enter the setup.
3. Use the ▲ or ▼ direction buttons to select On
or Off.
4. Press the Enter button again to confirm
selection and return.
- 36 -
DVD System Setup (Continued)
Media Center
1. Press the ▲ or ▼ direction buttons to select
Media Center.
2. Press the Enter button to enter the setup.
3. Use the ▲ or ▼ direction buttons to select
DVD, USB, SD/MMC or MS.
4. Press the Enter button again to confirm
selection and return.
Audio Setup Page
Press the Setup button to enter the General setup menu, then use the ◄ or ► direction buttons to
select Audio Setup Page, the screen will display as the following:
Use the ▼ direction button to select the desired
item for setup. Press the ENTER button to enter the
setup mode for the selected item. Press the
button to return.
Dolby Digital Setup
Dual Mono
1. Press the ▲ or ▼ direction buttons to select
Dolby Digital Setup.
2. Press the Enter button twice to enter setup, the
screen will display as shown in the figure to the
left:
3. Use the ▲ or ▼ direction buttons to select
items.
4. Press the Enter button to enter the setup. Press
the button to return.
1. Press the ▲ or ▼ direction buttons to select
Dual Mono.
2. Press the Enter button to enter the setup.
3. Use the ▲ or ▼ direction buttons to select an
item.
4. Press the Enter button to confirm selection and
return.
- 37 -
DVD System Setup (Continued)
Dynamic
1. Press the ▲ or ▼ direction buttons to select
Dynamic.
2. Press the Enter button to enter the setup, the
screen will display as shown on the left:
3. Use the ▲ or ▼ direction buttons to adjust.
4. Press the Enter button again to confirm setting
and return.
5. Press the button to return.
Hdcd Setup
In the Audio Setup Page, use the ▲ or ▼ direction buttons to select Hdcd Setup, press the Enter
button to enter the setup mode, the screen shown will be displayed;
1. Press the Enter button to enter the setup.
2. Use the ▲ or ▼ direction buttons to select an
item.
3. Press the Enter button again to confirm
selection and return.
4. Press the button to exit
Video Setup
Press the Setup button to enter the General setup menu, then use the ◄ or ►direction buttons to
select Video Setup Page, the screen will display as shown below:
Use the ▲ or ▼ direction buttons to select the
desired item. Press the Enter button to enter the
setup mode for the desired item. Press the button
to return.
- 38 -
DVD System Setup (Continued)
HD Mode
Use the ▲ or ▼ direction buttons to select HD Mode, press the Enter button to enter the menu.
The following screen will be displayed:
1. Press the Enter button to enter the setup.
2. Use the ▲ or ▼ direction buttons to select
items.
3. Press the Enter button again to confirm
selection and return.
4. Press the button to exit.
Video Quality Setup
Select Quality then press the Enter button to enter the setup mode. The screen shown below will be
displayed:
1. Use the ▲ or ▼ direction button to select the
desired item.
2. Press the Enter button to select the item for
setup.
3. Press the button to return.
Sharpness
1. Press the ▲ or ▼ direction buttons to select
Sharpness.
2. Press the Enter button to enter the setup mode.
3. Use the ▲ or ▼ direction buttons to select
High, Medium or Low.
4. Press the Enter button to confirm selection and
return.
Brightness
1. Press the ▲ or ▼ direction buttons to select
Brightness.
2. Press the Enter button to enter the setup mode,
the screen will display as shown on the left:
3. Use the ◄ or ► direction buttons to adjust the
level.
4. Press the Enter button to confirm setting and
return.
- 39 -
DVD System Setup (Continued)
Contrast
1. Press the ▲ or ▼ direction buttons to select
Contrast.
2. Press the Enter button to enter the setup mode,
the screen will display as shown on the left:
3. Use the ◄ or ► direction buttons to adjust the
level.
4. Press the Enter button to confirm setting and
return.
Preference Setup
Press the Setup button to enter the General setup menu, then use the ◄ or ► direction buttons to
select Preference Page, the screen will display as shown below:
Use the ▲ or ▼ direction buttons to select the
desired item for setup. Press the Enter button to
enter the item setup mode. Press the button to
return.
TV Type
1. Press the ▲ or ▼ direction buttons to select Tv
Type.
2. Press the Enter button to enter the setup mode,
see the figure to the left:
3. Press the ▲ or ▼ direction buttons to select TV
type.
4. Press the Enter button again to confirm setting
and return.
Audio
1. Press the ▲ or ▼ direction buttons to select
Audio.
2. Press the Enter button to enter the setup mode,
see the figure to the left:
3. Press the ▲ or ▼ direction buttons to select
audio language.
4. Press the Enter button again to confirm setting
and return.
- 40 -
DVD System Setup (Continued)
Subtitle
1. Press the ▲ or ▼ direction buttons to select
Subtitle.
2. Press the Enter button to enter the setup mode,
see the left figure:
3. Press the ▲ or ▼ direction buttons to select
Subtitle language.
4. Press the Enter button again to confirm setting
and return.
Disc Menu
1. Press the ▲ or ▼ direction buttons to select
Disc Menu.
2. Press the Enter button to enter the setup mode,
see the figure to the left:
3. Press the ▲ or ▼ direction buttons to select
Menu language.
4. Press the Enter button again to confirm setting
and return.
Parental
1. Press the ▲ or ▼ direction buttons to select
Parental
2. Press the Enter button to enter the setup mode,
see the figure to the left:
3. Press the ▲ or ▼ direction buttons to select the
rating level.
4. Press the Enter button again to confirm setting
and return.
Default
1. Press the ▲ or ▼ direction buttons to select
Default.
2. Press the Enter button twice, all the settings will
return to the factory default status.
- 41 -
Troubleshooting
SYMPTOM
CHECK ITEM
The player does not play.
Make sure disc is loaded in.
Make sure disc is loaded with label facing you.
Make sure disc is not dirty or warped.
Make sure the player’s region code is the same as region code
of DVD disc.
Make sure water condensation has not occurred. If it occurs,
take out disc and leave the player on for at least one hour.
There is no sound.
Make sure system connection is correct.
Make sure the sound setup of DVD disc is correct.
Make sure disc is not dirty or warped.
Clean or replace the disc.
Make sure the speakers are not muted.
In the TV mode, set the correct sound mode.
LCD is no display
Make sure the unit is turned on and the connections are
correct.
Make sure the power adapter is correctly connected.
DVD does not continue to play
or plays the same section Make sure disc is not dirty or damaged.
repeatedly.
There is no picture or picture
moves up and down.
Check if the connections with the external AV signal source are
correct.
Correctly set the items in the picture menu.
Check if the video type input signal is not corresponding to the
unit.
Make sure the unit is turned on and in correct video type.
The remote control does not
work.
Make sure there are no obstructions between the remote
control and the player.
Make sure the remote control is pointing at the player.
Make sure batteries are inserted and the polarity is correct.
Make sure batteries are not weak.
Other Notes:
Static or other external interference may cause the player to behave abnormally. In this occurrence,
unplug the power-supply cord from the outlet and plug it in again to reset the player. If the problem
persists, then please disconnect the power and consult a qualified technician.
- 42 -
Specifications
TFT-LCD Resolution
1366x768
TFT-LCD Screen Size
27 inches
Laser Wavelength
780/650 nm
Video System
NTSC
Frequency Response
20Hz 20kHz
Audio Signal-to-noise Rate
≥85dB
Audio distortion+noise
≤ 70dB (1kHz)
Channel Separation
≥70dB (1kHz)
Dynamic Range
≥80dB (1kHz)
±2.5dB
Audio Out
Analog Audio Out
Out Level: 1.5V±0.2
1.0 , Load: 10KΩ
Video Out
Video Out
Out Level: 1VP-P±0.1, Load: 75Ω
Unbalanced Negative
Power
AC110 220V 50/60Hz
Power Consumption
<230W
Dimension
690mm × 555mm × 280mm LXWXD
Ambient Temperature
10~45˚C
Weight
About 20 Kg
DESIGN AND SPECIFICATIONS ARE SUBJECT TO CHANGE WITHOUT NOTICE
Manufactured under license from Dolby Laboratories.
“Dolby” and the double-D symbol are trademarks of Dolby Laboratories.
Confidential unpublished works. © 1992 -1997 Dolby Laboratories, Inc.
All rights reserved.
is a trademark of SRS Labs, Inc.
TruSurroundXT technology is incorporated under license from SRS Labs, Inc.
128-7726
- 43 -