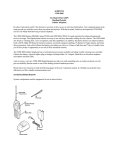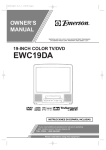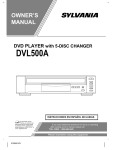
1
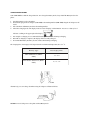
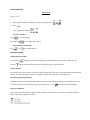
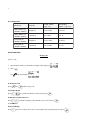
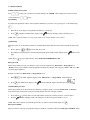
AUDIOVOX
CDM-9000
Tri-Mode CDMA/AMPS
Handheld Portable
Cellular Telephone
In today’s fast paced world, it has become a necessity to have access to real-time information. Your communications tools
must provide you with this access from anywhere and anytime. With that in mind, Audiovox developed the CDM-9000,
our first Tri-Mode Web Browsing wireless telephone.
The CDM-9000 features 800 MHz Amps/CDMA and 1900 MHz CDMA Tri-mode operation for enhanced nationwide
service coverage. The digital phone features two easy to use soft keys that make surfing the web a breeze. The CDM-9000
also boasts a vibrating alert, voice recognition, and data capabilities. In addition, the phone features an enhanced phone
book with 99 Alpha/198 Numeric memory locations, one touch emergency dialing, 15 distinctive ringer options, and menu
driven operation. And with a Lithium Ion battery providing you with over 3 hours of talk time and 7 days of standby time,
you’ll have plenty of opportunity to use all of these advanced features.
The CDM-9000 cellular telephone has several optional accessories available, including: leather carrying case, extended
Lithium Ion battery, cigarette lighter plug-in charger, desktop holder, AC Adapter, Handsfree car kit and an earphone
microphone and data cable.
And, of course, your new CDM-9000 digital handset provides you with something only an Audiovox phone can: the
proven reliability that has made us one of the leading wireless handset providers.
Please take a few moments to read the following pages of the user’s operation manual. It will help you make the most
efficient use of this valuable communications tool.
SYSTEM CONFIGURATION
System configuration and the equipment list are as shown below.
WRIST STRAP ATTACHMENT
Attach the wrist strap to the phone through the strap hole as shown below 1.
Then pull the long loop through the smaller loop as shown below 2.
BATTERY INSTALLATION AND RECHARGING
To Attach the Battery Pack
1.
2.
Insert the hook at the end of the Battery Pack into the slot at the end of the phone.
Press the Battery Pack down to lock the Battery Pack onto the phone.
To Detach the Battery Pack
1.
2.
Slide back the Release Latch as shown below.
Lift up to remove the Battery Pack from the phone gently.
TO RECHARGE BATTERY
Your CDM-9000 has a built in charger function. To re-charge the Battery Pack, always install the Battery Pack to the
phone.
1.
2.
3.
4.
Attach the Battery pack to the Phone
Insert the DC plug of the AC Adapter (CNR-4000) to the Desktop Holder (DTH-4000). Plug the AC Adapter to AC
outlet.
Place the Phone with Battery Pack into the Desktop Holder.
Then the recharging starts. The display indicates “Now Charging” with animation. You can see a battery level
indicator scrolling at the upper-right of the display.
5.
6.
7.
For complete recharging, it is recommended that the phone is turned off during recharging.
When the recharging is completed, the display indicates “Fully Charged”.
It is normal that Battery Pack may become a little warmer during recharging.
The charging time, from empty to full, depends on the environmental temperature, 0 to +35 °C.
Battery Type
Recharging Time
Slim Lithium Ion (BTR4000)
1.5- 2 h
Extended Lithium Ion (BTE4000)
2.5- 3.5 h
Alternatively you can recharge the Phone using AC Adapter as illustrated below.
NOTE: Do not feed the power to the phone without Battery Pack
FUNCTIONS
External View
BASIC OPERATION
Placing Calls
To place a call:
1.
Enter the phone number.( a maximum of 32 digits will be displayed.)
2.
Press
The
·
.
indicator will light.
To Correct a Number
Press
to clear the last digit.
Press and hold
·
to erase all the digits entered.
If the Call Fails to Go Through
Press
, and
to redial the number.
GETTING STARTED
Turning the phone On/Off
Press and hold
indicator
. All the indicators and the digit display will light momentarily, and a tone will be heard. The
will stay while the phone is turned on. To turn the phone off, press and hold .
Antenna Position
The antenna can be used in its fully extended or fully retracted position only. It is recommended that the antenna should
be fully extended for optimum performance and signal strength or while operating in poor signal areas.
Receiving Signal Strength Indicator
The number of lines indicates the Signal Strength in your area. Four lines show maximum level. The display will vary as
you move with the phone. If the signal is not strong enough to place a call,
will appear on the LCD display.
Battery Level Indicator
You can always monitor the battery charge condition with the constant battery level indicator. The number of blocks
indicates the battery conditions as follows:
+
Power Management
Battery
Mode
Talk Time
(up to)
Standby
Time (up to)
Slim Battery
(BTR- 4000)
Digital
190 min.
170 h
Slim Battery
(BTR- 4000)
Analog
65 min.
12 h
Extended
(BTE- 4000)
Digital
380 min.
340 h
Extended
(BTE- 4000)
Analog
130 min.
24 h
BASIC OPERATION
Placing Calls
To place a call:
1.
Enter the phone number.( a maximum of 32 digits will be displayed.)
2.
Press
.
The
indicator will light.
To Terminate a Call
Press
. The
indicator will go out.
Last Number Redial
to recall the last number you dialed, then press
Press
.
To Dial the Last Number Received
Press
,
to dial the last number with caller ID you received, then press
.
See Call History.
Phonebook Dialing
Press
and enter an address (01 to 99) to recall a number from your phonebook, then press
.
See Phonebook Recall.
To Mute A Phone Conversation
Press
to mute your conversation at any time during a call. “MUTE” will be displayed. To return to normal
conversation, Press
again.
Speed Dialing
If you know the phonebook address of the telephone number that you want to call, you may place a call without using
.
1.
Enter the one or two digits of your phonebook address (1~9 or 10~99).
2.
Press
. The phone number will be displayed. The
indicator will light, and the call will be placed.
NOTE: If two telephone numbers are stored in the address, the Primary Number will be dialed.
Quick Dialing
When this feature is on, the Primary number in your Phonebook address 02 to 09 can be dialed with just one push of the
key.
to
) for more than one second
1.
Press a digit key (
2.
The number in your phonebook is automatically dialed. The phone number will be displayed. The
indicator will
light.
NOTE: The key
is not for Quick Dialing, but for ONE TOUCH EMERGENY CALL
Emergency Call
This feature permits you to place an emergency call even if your telephone is in “Phone Lock”, “Keypad Lock” or
“Restrict” mode. Up to 3 numbers can be programmed as Emergency numbers. The emergency number “911” and “*911”
are already preprogrammed.
Example: To Call 911 in “Phone Lock” or “Keypad Lock” mode.
1.
Enter
2.
Press
. The “911” will not be displayed, but “Phone Lock” or “Keypad Lock” will be displayed.
. The “911” will be displayed. The
indicator will light, and the call will be placed.
OneTouch Emergency Call
This feature permits you to dial an emergency number by a single keystroke, even in the “Phone Lock” or “Restrict”
mode. This feature can be turned off to prevent unintentional calls to the emergency number.
1.
Press and hold
2.
Then the
for more than 2 seconds. The number in emergency memory location “1” will be dialed.
indicator will light, and the call will be placed. (The factory preset number is “911”.)
NOTE: The feature cannot be used if the Keypad Lock is on. You need to dial all the digits and
.
Emergency Call Mode
When you dial one of the 3 pre-programmed emergency numbers, your phone will enter the Emergency Call Mode. In this
mode, the phone will attempt to complete the emergency call using any available cellular system from which it can obtain
service.
After it places an emergency call, the phone will stay in the Emergency Call Mode, and will display Emergency Call
Mode, END to exit”. In the Emergency Call Mode, the phone will attempt to continue to receive service from the cellular
system that it used to complete the call. The phone will automatically exit the Emergency Call Mode after 5 minutes or
after you press END.
Receiving Calls
To Receive a Call
When the telephone rings, press
to answer the call. The
indicator will light.
Any Key Answering
This feature permits you to answer an incoming call by pressing any key on the keypad except
and
.
Caller ID with Name
This feature allows you to preview in your display the number and name of the party calling you before you answer the
call. The name is as you programmed it in your phonebook.
1.
When the phone rings, the Calling Number appears in the display.
2.
The last 10 caller ID’s are stored in the memory for your review and redial.
NOTE: “Number Restricted” or “Number Unavailable” is displayed when the caller ID is restricted or not available.
Automatic Calls-in-Absence Indictor
This feature indicates the number of unanswered incoming calls. If incoming calls are not answered, the LCD display will
indicate “Called XX”. ”XX” is the number of calls (01 to 99) missed. Depressing any key will clear the display.
Ringing Tone with Melody
The CDM-9000 offers you 15 styles of ringer tones and melodies for alerting incoming calls. Ringer volume can also be
adjusted. See Ring Type Selection (F32), Alert Tone Volume control (F31), and Vibrator Alert (F8).
Distinctive Ringing (Audible Caller ID)
You may program different ringer styles for different phonebook address. See To Store Ring Type with the Phone
Number.
During Calls
To Adjust the Earpiece Volume
Simply press the
or
to adjust Earpiece Volume during a call.
Scratch Pad Dialing
If you enter a telephone number during a call, the number will be stored in the Scratch Pad memory.
After terminating the call, the number you entered can be dialed by
.
NOTE: You can deactivate “ Sending DTMF” so that keypad tones will not be transmitted to the calling party. See
Sending DTMF (F35).
Automatic Talk Timer
The talk time of the current call will be automatically displayed. For example, “1h23m45s”.
Call Waiting
Your service provider may provide Call Waiting service. When you are on a call, you may hear beep tone alerting you of
another incoming call. Your phone displays “New Caller” and the caller’s ID with the name. The name is as you programmed it in your phonebook.
1.
Press
to answer the new call.
2.
Press
again to switch between the two calls.
Three- Way Calling
Your Service provider may provide Three-Way calling service. When a call is already in progress, you may call the Third
party.
1.
Enter a number and press
2.
Press
to call the third party.
again to connect all three parties.
Ask your service provider for the detailed information.
Standby
Clock Indicator
Date and Time are automatically displayed, if this feature is enabled. See Clock Indicator (F42) to turn this feature on/off.
Clock Alarm
This feature alert you repeatedly at the alarm time that you programmed. See Clock Alarm (F44) for setting.
Countdown Timer
This feature alerts you when the countdown timer expires. The timer can be set to 1 through 99 minutes. See Countdown
Timer (F45) for setting.
End to End Signaling
To utilize certain phone services, such as accessing an alternate long distance network, signaling a pager or banking by
phone etc., Touch Tone™ signaling is required. The following features will make it easy to send frequently used Touch