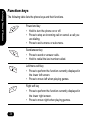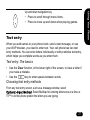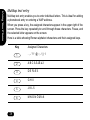
1
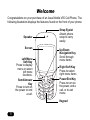
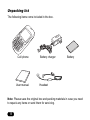
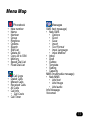
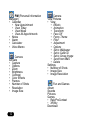
Asus Mobile
V55 Cell Phone
User Guide
Contents
Welcome . . . . . . . . . . . . . . . . . . . . . . . . . . . . . . . . . . . . . . . 8
Overview . . . . . . . . . . . . . . . . . . . . . . . . . . . . . . . . . . . . . . . . 9
Unpacking list . . . . . . . . . . . . . . . . . . . . . . . . . . . . . . . . . . . 10
Menu Map . . . . . . . . . . . . . . . . . . . . . . . . . . . . . . . . . . . . . 11
Specifications . . . . . . . . . . . . . . . . . . . . . . . . . . . . . . . . . . 14
Getting Started . . . . . . . . . . . . . . . . . . . . . . . . . . . . . . . . .
Inserting the SIM card and battery . . . . . . . . . . . . . . . . . . .
Turning the phone on . . . . . . . . . . . . . . . . . . . . . . . . . . . . .
Turning the phone off . . . . . . . . . . . . . . . . . . . . . . . . . . . . .
Charging the battery . . . . . . . . . . . . . . . . . . . . . . . . . . . . . .
Making a call . . . . . . . . . . . . . . . . . . . . . . . . . . . . . . . . . . . .
Answering a call . . . . . . . . . . . . . . . . . . . . . . . . . . . . . . . . .
Options during a call . . . . . . . . . . . . . . . . . . . . . . . . . . . . . .
16
16
18
18
19
20
20
20
Using Your Phone. . . . . . . . . . . . . . . . . . . . . . . . . . . . . . .
Standby mode. . . . . . . . . . . . . . . . . . . . . . . . . . . . . . . . . . .
Menu . . . . . . . . . . . . . . . . . . . . . . . . . . . . . . . . . . . . . . . . . .
Function keys . . . . . . . . . . . . . . . . . . . . . . . . . . . . . . . . . . .
Text entry . . . . . . . . . . . . . . . . . . . . . . . . . . . . . . . . . . . . . .
21
21
23
26
27
2
Text entry: The basics . . . . . . . . . . . . . . . . . . . . . . . . .
Choosing text entry methods . . . . . . . . . . . . . . . . . . . .
Multitap text entry. . . . . . . . . . . . . . . . . . . . . . . . . . . . .
T9™ text entry . . . . . . . . . . . . . . . . . . . . . . . . . . . . . . .
27
27
28
30
Calling Features . . . . . . . . . . . . . . . . . . . . . . . . . . . . . . . .
Redialing a number. . . . . . . . . . . . . . . . . . . . . . . . . . . . . . .
Caller ID . . . . . . . . . . . . . . . . . . . . . . . . . . . . . . . . . . . . . . .
Showing or hiding personal information . . . . . . . . . . . .
Canceling an incoming call . . . . . . . . . . . . . . . . . . . . . . . . .
Call logs . . . . . . . . . . . . . . . . . . . . . . . . . . . . . . . . . . . . . . .
Returning a missed call . . . . . . . . . . . . . . . . . . . . . . . .
Dialed and received Calls . . . . . . . . . . . . . . . . . . . . . .
Answer mode . . . . . . . . . . . . . . . . . . . . . . . . . . . . . . . . . . .
Silent mode . . . . . . . . . . . . . . . . . . . . . . . . . . . . . . . . . . . . .
Call waiting . . . . . . . . . . . . . . . . . . . . . . . . . . . . . . . . . . . . .
Call barring . . . . . . . . . . . . . . . . . . . . . . . . . . . . . . . . . . . . .
Call timer. . . . . . . . . . . . . . . . . . . . . . . . . . . . . . . . . . . . . . .
International calls . . . . . . . . . . . . . . . . . . . . . . . . . . . . . . . .
32
32
32
32
33
33
33
34
34
35
35
35
36
36
Phonebook . . . . . . . . . . . . . . . . . . . . . . . . . . . . . . . . . . . .
Adding contacts . . . . . . . . . . . . . . . . . . . . . . . . . . . . . . . . .
Using a group list . . . . . . . . . . . . . . . . . . . . . . . . . . . . .
Editing contact information . . . . . . . . . . . . . . . . . . . . . . . . .
Searching for a contact . . . . . . . . . . . . . . . . . . . . . . . .
37
37
38
39
39
3
Copying contact information to a SIM card . . . . . . . . .
Deleting a contact . . . . . . . . . . . . . . . . . . . . . . . . . . . .
Using a fixed dialing list . . . . . . . . . . . . . . . . . . . . . . . .
Speed dialing . . . . . . . . . . . . . . . . . . . . . . . . . . . . . . . .
Setting your own phone number. . . . . . . . . . . . . . . . . .
Viewing the status of the phone . . . . . . . . . . . . . . . . . .
39
40
40
40
41
41
Messages. . . . . . . . . . . . . . . . . . . . . . . . . . . . . . . . . . . . . .
Sending messages . . . . . . . . . . . . . . . . . . . . . . . . . . . . . . .
New SMS . . . . . . . . . . . . . . . . . . . . . . . . . . . . . . . . . . . . . .
Shortcut keys . . . . . . . . . . . . . . . . . . . . . . . . . . . . . . . .
Options. . . . . . . . . . . . . . . . . . . . . . . . . . . . . . . . . . . . .
Settings . . . . . . . . . . . . . . . . . . . . . . . . . . . . . . . . . . . .
Multimedia Messages (MMS) . . . . . . . . . . . . . . . . . . . . . . .
Composing a new multimedia message . . . . . . . . . . .
Add text . . . . . . . . . . . . . . . . . . . . . . . . . . . . . . . . . . . .
Add images . . . . . . . . . . . . . . . . . . . . . . . . . . . . . . . . .
Add audio . . . . . . . . . . . . . . . . . . . . . . . . . . . . . . . . . . .
Sending the MMS. . . . . . . . . . . . . . . . . . . . . . . . . . . . .
Additional multimedia message options. . . . . . . . . . . .
Information Services . . . . . . . . . . . . . . . . . . . . . . . . . . . . . .
Voicemail . . . . . . . . . . . . . . . . . . . . . . . . . . . . . . . . . . . . . .
42
42
42
43
44
46
47
47
47
47
48
48
50
53
54
Using the Camera and Managing Photos . . . . . . . . . . . . 55
Taking a photo . . . . . . . . . . . . . . . . . . . . . . . . . . . . . . . . . . 55
4
Self-portrait. . . . . . . . . . . . . . . . . . . . . . . . . . . . . . . . . .
Settings . . . . . . . . . . . . . . . . . . . . . . . . . . . . . . . . . . . . . . . .
Managing your photos . . . . . . . . . . . . . . . . . . . . . . . . . . . .
Adding effects to your photos. . . . . . . . . . . . . . . . . . . .
56
56
59
61
Fun and Games . . . . . . . . . . . . . . . . . . . . . . . . . . . . . . . . .
Album . . . . . . . . . . . . . . . . . . . . . . . . . . . . . . . . . . . . . . . . .
Sounds . . . . . . . . . . . . . . . . . . . . . . . . . . . . . . . . . . . . . . . .
Pictures . . . . . . . . . . . . . . . . . . . . . . . . . . . . . . . . . . . . . . . .
Composer . . . . . . . . . . . . . . . . . . . . . . . . . . . . . . . . . . . . . .
Games . . . . . . . . . . . . . . . . . . . . . . . . . . . . . . . . . . . . . . . .
66
66
66
67
68
70
General Phone Settings . . . . . . . . . . . . . . . . . . . . . . . . . .
Time and date . . . . . . . . . . . . . . . . . . . . . . . . . . . . . . . . . . .
Ring style . . . . . . . . . . . . . . . . . . . . . . . . . . . . . . . . . . . . . .
Ring volume . . . . . . . . . . . . . . . . . . . . . . . . . . . . . . . . . . . .
Display . . . . . . . . . . . . . . . . . . . . . . . . . . . . . . . . . . . . . . . .
Wallpaper . . . . . . . . . . . . . . . . . . . . . . . . . . . . . . . . . . .
Start-up animation . . . . . . . . . . . . . . . . . . . . . . . . . . . .
Greeting . . . . . . . . . . . . . . . . . . . . . . . . . . . . . . . . . . . .
Menu display schemes. . . . . . . . . . . . . . . . . . . . . . . . .
Language . . . . . . . . . . . . . . . . . . . . . . . . . . . . . . . . . . . . . .
Security . . . . . . . . . . . . . . . . . . . . . . . . . . . . . . . . . . . . . . . .
SIM card lock . . . . . . . . . . . . . . . . . . . . . . . . . . . . . . . .
Phone lock . . . . . . . . . . . . . . . . . . . . . . . . . . . . . . . . . .
71
71
71
72
72
72
73
73
74
74
74
74
75
5
Keypad lock . . . . . . . . . . . . . . . . . . . . . . . . . . . . . . . . . 75
Network information . . . . . . . . . . . . . . . . . . . . . . . . . . . . . . 76
Reset settings . . . . . . . . . . . . . . . . . . . . . . . . . . . . . . . . . . . 76
Personal Information Manager (PIM) . . . . . . . . . . . . . . .
Calendar . . . . . . . . . . . . . . . . . . . . . . . . . . . . . . . . . . . . . . .
Adding a new appointment. . . . . . . . . . . . . . . . . . . . . .
Viewing and editing appointments . . . . . . . . . . . . . . . .
Deleting appointments . . . . . . . . . . . . . . . . . . . . . . . . .
Setting the calendar as wallpaper . . . . . . . . . . . . . . . .
Notes. . . . . . . . . . . . . . . . . . . . . . . . . . . . . . . . . . . . . . . . . .
Adding Notes . . . . . . . . . . . . . . . . . . . . . . . . . . . . . . . .
Viewing and editing notes . . . . . . . . . . . . . . . . . . . . . .
Deleting notes . . . . . . . . . . . . . . . . . . . . . . . . . . . . . . .
Sending notes . . . . . . . . . . . . . . . . . . . . . . . . . . . . . . .
Alarm. . . . . . . . . . . . . . . . . . . . . . . . . . . . . . . . . . . . . . . . . .
Calculator . . . . . . . . . . . . . . . . . . . . . . . . . . . . . . . . . . . . . .
Voice Memo . . . . . . . . . . . . . . . . . . . . . . . . . . . . . . . . . . . .
Creating voice memos . . . . . . . . . . . . . . . . . . . . . . . . .
Listening to voice memos. . . . . . . . . . . . . . . . . . . . . . .
Viewing information about voice memos . . . . . . . . . . .
Renaming voice memos. . . . . . . . . . . . . . . . . . . . . . . .
Setting voice memos to a ringtone. . . . . . . . . . . . . . . .
Deleting voice memos . . . . . . . . . . . . . . . . . . . . . . . . .
6
77
77
77
78
79
80
80
80
80
81
81
82
82
84
84
85
85
85
86
86
SIM Application Toolkit (STK) . . . . . . . . . . . . . . . . . . . . . 87
Additional Information . . . . . . . . . . . . . . . . . . . . . . . . . . .
FCC Regulation: . . . . . . . . . . . . . . . . . . . . . . . . . . . . . . . . .
European Notice . . . . . . . . . . . . . . . . . . . . . . . . . . . . . . . . .
RF Exposure Information (SAR) . . . . . . . . . . . . . . . . . . . . .
88
88
90
91
WAP . . . . . . . . . . . . . . . . . . . . . . . . . . . . . . . . . . . . . . . . . .
Setting up WAP. . . . . . . . . . . . . . . . . . . . . . . . . . . . . . . . . .
Setting a profile . . . . . . . . . . . . . . . . . . . . . . . . . . . . . .
Homepage . . . . . . . . . . . . . . . . . . . . . . . . . . . . . . . . . . . . .
WAP push . . . . . . . . . . . . . . . . . . . . . . . . . . . . . . . . . . . . . .
WAP setup . . . . . . . . . . . . . . . . . . . . . . . . . . . . . . . . . .
93
93
93
96
97
97
7
Welcome
Congratulations on your purchase of an Asus Mobile V55 Cell Phone. The
following illustration displays the features found on the front of your phone.
Strap Eyelet
Attach phone
strap to carry
easily.
Speaker
Screen
Left/Menu
Soft Key
Press to display
menu or select
left menu
functions.
Send/Answer
Key
Press to turn on
the power or end
a call.
Up/Down
Navigation Key
Scroll through
menu items.
Right Soft Key
Press to select
right menu items
3
1
4
7
2
5
8
6
9
Power/End Key
Press to turn on
the power, end a
call, or to exit
menu.
0
Keypad
8
Overview
The V55’ stylish design and color display make it a pleasure to carry around.
The V55 has features to meet your communication needs and more.
Stay in touch with wireless networking
The V55 is a phone for people who want to stay in touch with the world. In
addition to all the basic calling and messaging functions you would expect
with a cell phone, it supports multimedia messaging, enabling you to send
and receive pictures. Wireless networking capabilities enable you to check
e-mail or browse web services covering news, entertainment, reservations,
finance, navigation services (GPS), and more.
Manage your time with the PIM
The V55 is a phone for people on the go. The Personal Information
Manager (PIM) helps you schedule appointments in the calendar, set
alarms, or jot down important notes.
Play and create with camera, photo editing, and games
The V55 is also a phone for people with a sense of creativity and fun. Not
only does it have a built-in camera, but it offers a variety of photo editing
options. Finally, for a moment of fun, there are games and a music
composer.
9
Unpacking list
The following items come included in the box.
Cell phone
Battery charger
Battery
User Ma
nual
User manual
Headset
Note: Please save the original box and packing materials in case you need
to repack any items or send them for servicing.
10
Menu Map
•
•
•
•
•
•
•
•
•
•
•
•
•
Phonebook
New number
Name
Number
Group
Ringtone
Options
Search
SIM List
Delete All
Copy All to SIM
Memory
Speed Dial List
Fixed Dial List
Call Logs
Dialed Calls
Missed Calls
Received Calls
All Calls
Call Info
• Call Costs
• Call Timer
•
•
•
•
•
Messages
SMS (text message)
• New SMS
• Options
• Send
• Save
• Insert
• Text Format
• Input Language
• Input Method
• Inbox
• Draft
• Outbox
• Template
• Setting
• Capacity
MMS (multimedia message)
• New MMS
• Add text
• Add image
• Add audio
Info Message
Voicemail
11
PIM (Personal Information
Manager)
• Calendar
• New Appointment
• View Today
• View Week
• View All Appointments
• Notes
• Alarm
• Calculator
• Voice Memo
Camera
Activate
• Capture
• Options
• Zoom
• Brightness
• Contrast
• Color Effects
• Frames
• Number of Shots
• Resolution
• Image Size
12
Camera
View Pictures
• View
• Effects
• Animation
• Transform
• Face Off
• Funny Theme
• Filter
• Adjustment
• Options
• Set to Wallpaper
• Set to Caller ID
• Set to Group Image
• Send from MMS
• Delete
Settings
• Number of Shots
• Image Size
• Image Resolution
Fun and Games
Album
Sounds
Pictures
Games
• RallyProContest
• XFinity
Download
Settings
Profile
Sound and Alert
Handset Setting
• Language
• Display
• Clock
• Greeting
• Auto Keylock
• PLMN Display
• Scheme
• Reset Setting
Settings
Call Setting
• Answer Mode
• Call Waiting
• Call Barring
• Hide Number
• Minute Minder
Network Setting
Security Setting
• PIN Codes
• Phone Lock
• Fixed Dialing
Bearer Setting
• GPRS Setting
• CSD Setting
WAP
Homepage
Profile Setting
Push Setting
STK
(Sim Application Toolkit)
This menu guide lists the main set of keys that are frequently accessed
items in the menu.
13
Specifications
Antenna
Internal antenna
Battery
Lithium ion, >700 mAh
Talk Time / Stand by 2.5-5 hours/140-200 hours
time
Sounds
• 40 SW-MIDI tones
• 20 pre-defined ringtones
• 4-track midi music composer
Display
• Color display
• 20 wallpapers (pre-defined)
Power on-off
Animations
(pre-defined)
1 animations
Alarms
1 single, 1 recurring alarm
Camera
•
•
•
•
Networks
GSM, GPRS
14
Digital zoom, 2x,4x
4 sequential shooting modes (multi-shot)
Night shot mode
Natural/sepia/monochrome tone effects
Messaging
• Text message (SMS)
• Multimedia message (MMS)
• Enhanced messaging service (EMS) to support
formatting and multimedia
• 7 changeable message groups
Text input
• Multitap
• T9™ text entry (predictive input)
WAP
WAP 2.0, bookmarks, offline browsing
Information
Management
• Calendar, appointment scheduling
• Voice recording and text notes
• Calculator
Games
1 Mophun/WBE game
Security
• SIM lock
• Phone lock
• Keypad lock
15
Getting Started
Inserting the SIM card and battery
When you register with a service provider, you receive a SIM card
(Subscriber Identity Module card). Your phone must have a SIM card in
order to make calls. The SIM card is a computer chip that contains your
phone number, phonebook information, and service provider information.
Handle it with care and do not bend it or expose it to static electricity or dirt.
Be sure the power to your phone is off before you insert your SIM card.
1. Press the notch on the back
cover and slide to remove.
2.
Remove the battery. The battery
has side tabs to make it easier to
grasp and remove.
Place the new SIM card in the
lower right corner. The gold plate
on the SIM card should face
downward.
4.
Slide the SIM card into position,
and secure it under the metal
clips.
Getting Started
3.
Metal
Clips
17
Getting Started
5.
Replace the battery cover. Place
the back cover against the
phone case, then slide it
upwards to lock into place.
Turning the phone on
1. Hold down the
2.
power/end key until the screen lights up.
If needed, enter your SIM card PIN code and press OK.
Turning the phone off
Press the
18
power/end key and hold until the phone shuts down.
Getting Started
Charging the battery
1. Connect the charger
plug to an outlet.
2.
Connect the charger to
the socket at the bottom
of the phone. The
connector can only be
inserted one way.
Note: For best battery performance, allow the battery
to charge and discharge
completely the first few
times you use it.
7
4
1
0
8
5
2
9
6
3
Low Battery Indicators
The battery indicator in the upper right corner of the screen indicates how much
charge remains in the battery. As additional reminders, when the battery is low, the
phone emits a double beep. The message “battery low” also appears on the
screen.
Note: If the battery has been deeply discharged, it may take several minutes
before the battery level indicator is displayed
19
Getting Started
Making a call
1. Enter the number you wish to dial. If you make a mistake, select Clear
to delete. The
right soft key is just under the word Clear on the
lower right screen, so select this key to clear a number. Press and hold
down the
or end key to return to idle screen.
2.
Press the
send/answer key to connect.
3.
Press the
power/end key to disconnect.
Answering a call
1. Press the
send/answer key to answer a call.
2.
power/end key to end the call.
Press the
Options during a call
• Phonebook
•
•
•
•
•
•
Volume
Hold
End all calls
Mute
DTMF
New SMS
20
Check a contact phone number in your phonebook during a call.
Adjust speaking and listening volume during a call.
Hold a call.
End all calls currently in progress.
Mute a call.
Allow the recipient to hear key press tones.
Type a text message during a call.
(this is convenient in loud speaker mode)
Using Your Phone
Standby mode
When your phone is on, but not in use, it is in standby mode. During standby
mode, the upper part of the display screen shows various icons.
11/11/2005 14:35
Menu
Camera
The date and time is displayed at the bottom of the screen. Beneath the date
and time are Menu in the left corner and Camera in the right corner. Press the
left menu/soft key to view the menu, and the right soft key to use the camera.
The Standby screen icons are as follows:
Bars indicate the strength of the GSM network signal. Five
bars means your current position has the best reception.
Alarm is set.
Using Your Phone
A text message has been received.
A multimedia message has been received.
Call forwarding is activated.
The SMS memory is full.
Musical notes indicate sound-on mode. Notes with a line
over them indicate silent mode.See Silent mode on
page 35.
Roaming means your phone searches for available service
providers when outside of your service provider range.
22
Using Your Phone
Menu
To view the menu, select the left menu/soft key from the main display.
Select
Exit
After the menu appears, scroll through menu items by pressing the navigation
key .
Beneath the main menu are Select, to the left, and Exit, to the right. Press the
key just under Select, the left soft key, to select an item. Press the key just
under Exit, the right soft key, to exit the menu.
The right and left soft keys can also be used for selecting various options in submenus.
For example, to view missed calls:
1. Use the
2.
Press the
up and down navigation key to scroll to Call Logs.
left soft key to select.
23
Using Your Phone
3.
In the submenu, scroll down to Missed Calls, the second item, then
press the
left soft key to select
Tip: Hitting the power/end key is an alternative way to exit
any menu.
Here are the icons for categories in the main menu:
Phonebook is the place to store names and telephone numbers
for easy access and caller recognition.
Call logs store information about calls made, received, and
missed.
Messages gives you access to messages received. Compose
and send text and multimedia messages here.
Personal Information Manager (PIM) contains a simple
calculator and a calendar for scheduling appointments. You
can also enter notes or record memos.
24
Fun and Games has a number of games as well as tools to
manipulate audio and pictures.
Settings lets you adjust settings including time, display, and
security settings.
WAP provides you with wireless access to the internet and email.
STK provides you with access to services and information
through your SIM card.
25
Using Your Phone
Camera enables you to take pictures with your phone. Pictures
are also stored here.
Using Your Phone
Function keys
The following table lists the phone keys and their functions.
Power/end key
• Hold to turn the phone on or off.
• Press to stop an incoming call or cancel a call you
are dialing.
• Press to exit a menu or sub-menu.
Send/answer key
• Press to send or answer calls.
• Hold to redial the last number called.
Left/menu soft key
• Press to perform the function currently displayed in
the lower left screen.
• Press to move left when playing games.
Right soft key
• Press to perform the function currently displayed in
the lower right screen.
• Press to move right when playing games.
26
Using Your Phone
Up and down navigation key
• Press to scroll through menu items.
• Press to move up and down when playing games.
Text entry
When you add names to your phone book, send a text message, or use
your WAP browser, you need to enter text. Your cell phone has two text
entry methods. You can enter letters individually or with predictive text entry,
which helps you complete words as you enter them.
Text entry: The basics
• Use the Clear function, in the lower right of the screen, to clear a letter if
you make a mistake.
• Use the #
key to enter spaces between words.
Choosing text entry methods
From any text entry screen, such as a message window, select
Options>Input Method. Select Multitap for entering letters one at a time or
T9™ to let the phone predict the letters you are typing.
27
Using Your Phone
Multitap text entry
Multitap text entry enables you to enter individual letters. This is ideal for adding
a phonebook entry or entering a WAP address.
When you press a key, the assigned characters appear in the upper right of the
screen. Press the key repeatedly to scroll through these characters. Pause, and
the selected letter appears on the screen.
Here is a table showing Roman alphabet characters and their assigned keys.
Key
28
Assigned Characters
1
.,-?!‘@:;/()1
2
ABCÅÄÆà2
3
D E Fè É 3
4
GHIÌ
5
JKL5
6
MNOÑÖØò6
Assigned Characters
7
PQRSß7
8
YUVÜü8
9
WXYZ9
0
+0
Using Your Phone
Key
For practice, try entering text into a text message (SMS).
From the menu, go to Messages>New SMS. To enter the word, “hello,” first
make sure that the entry method is set to multitap. Press Options, then
select Input Method. Select Multitap. To enter the words “my phone” into
the text entry area, follow these steps:
1. Press the 6
key to select m.
2.
Press the
3.
Press
4.
Press 7 to enter p, then press
until the word “phone” is entered.
#
9
key three times to select y.
to enter a space.
4
two times to enter h. Continue
29
Using Your Phone
T9™ text entry
T9™ text entry is a predictive text entry method. It uses a built-in dictionary to
predict the word you are typing. You can choose the correct word from the
suggestions on the bottom of the screen. By reducing the number of keystrokes,
the T9™ text entry method helps some users to type messages more quickly.
Whenever you press a key, a list of possible characters or character
combinations appears on the screen. To enter text, use the up and down
navigation key to find the character combination you want. Press Select and the
characters appear in your message text. If you make a mistake, press Clear.
Here is an example of how to enter a word using T9™ text entry.
1. Let’s say that we want to write the word “baby.”
2.
First press the
3.
Scroll to b, then press Select.
4.
Press the 2 key again. The first choice of characters is cc. The
screen also changes to cc. Do not worry that your first choice has been
deleted.
5.
Scroll to the pair ba and press Select. The letters ba now appear on the
screen.
6.
Press the 2 key once again for the third letter b. cab is the first
character combination that appears on the screen,
7.
Scroll to bab, select, and bab appears on the screen.
30
2
key. The choices a, c, b appear on the screen.
Press the 9 key. The T9™ system predicts that baby is the
probably the only word in English beginning with bab, and this word only
appears on the screen.
9.
Select to enter.
Note: For T9™ text entry to work properly, ensure the language settings in your
phone match the language you want to type in. see Language on page 74.
31
Using Your Phone
8.
Calling Features
Redialing a number
1.
Press the
send/answer key. A list of numbers dialed appears, with
the last number dialed at the beginning of the list.
2.
Select the number you wish to dial and press the
send/answer key.
Dialed numbers can also be accessed from Call Logs>Dialed.
Caller ID
If you have entered a contact’s name and phone number into the
phonebook, when the contact calls you, the name appears on the screen.
Showing or hiding personal information
When you make calls to other people, your phone number appears on their
phone display. If your name and number are in your contact’s phonebook,
your name appears alongside the number. There is, however, an option for
calling without allowing your phone number to appear on your contact’s
telephone. You may choose to hide your number for the next call, or for all
calls made.
To hide or show your phone number, go to Settings>Call Settings>Hide
Number.
If you would like to cancel an incoming call, press the
power/end key.
Depending on your service provider, the caller may be transferred to your
voice mail or may hear a busy signal.
Call logs
To view missed calls, as well as logs of dialed calls and received calls,
select Call Logs from the main menu. The number of calls in a list is limited
to ten. Older calls are dropped from the list when the limit is reached. Most
recent calls appear first in a list.
Returning a missed call
If you have missed a call, a message appears on your standby screen to tell
you a call was missed.
1. To view missed calls, go to call Call Logs>Missed Calls. Scroll
through telephone numbers of missed calls and view additional
information, such as the time and date received.
2.
Select View for details including the complete number and time
received.
3.
To call the number, press and hold the
also select Options>Call.
send/answer key. You may
33
Calling Features
Canceling an incoming call
Calling Features
Dialed and received Calls
Call Logs also contain lists of dialed and received calls. To dial one of these
numbers, follow the same process as for returning a missed call.
While viewing a call log number, you can select Options to other functions:
Edit
Edit the number. This may be useful for adding an area
code, for example.
Save
Adds the number to the phonebook.
Delete
Delete all
Deletes the number from the list. Deleting can create space
for other numbers.
Deletes all numbers in the list.
Call Logs>All Calls contains a combined list of dialed, missed, and
received calls.
Answer mode
The default setting for the phone is to answer when you press the send/
answer key. However, you can also set the phone to pick up with any key or
to answer automatically. Select any of these options in Settings<Call
Settings<Answer Mode.
34
Calling Features
Silent mode
During silent mode, the phone vibrates for an incoming call.
Press and hold the
*
key to enable or disable silent mode.
When silent mode is not enabled, the
icon appears in the standby
screen. When silent mode is enabled, the
appears.
Call waiting
If your service provider offers call waiting, you first need to enable the call
waiting option by selecting activate at Settings<Call Settings<Call
Waiting.
1. When a call comes during another call, press the
key to receive the second call.
2.
send/answer
Press the
send/answer key to switch back to the first call, or to
switch between calls.
Call barring
Call barring is a service available through your service provider. This service
restricts different types of incoming and outgoing calls. In addition, you may
select barring voice calls, data, faxes, messages, or all services. This is a
password-enabled service; the call barring menu includes an option for
setting a password.
Find call barring at Settings<Call Settings<Call Barring.
35
Calling Features
Call timer
Depending on the type of service package you have, you may pay
according to the length of your calls. Some users like to monitor the length
of their calls. Your phone offers a convenient and accurate way to keep
track of length and costs of calls at Call logs>Call Info>Call Costs and
Call Timers.
You can even set a limit for call length and have a tone sound to remind you
that the time limit has been reached. To do this, go to Settings>Call
Settings>Minute Minder. This is a reminder function only, and does not
close a call.
International calls
To dial an international call:
1. First enter a + by holding down the
2.
0
key.
After the +, insert the international access code for the country you wish
to dial, followed by the telephone number.
36
Phonebook
The phonebook enables you to store information about your contacts,
including phone numbers, fax numbers, addresses, and e-mail addresses.
You can also set up special information for contacts, such as ringtones,
pictures, and groups.
Adding contacts
Add new contacts from Phonebook>New Number.
1. Enter the name of the contact, mobile phone number, and home
number in the given fields. Use the up and down navigation key to
move between fields. Use the number keys to enter information into the
fields.
2.
Select Save to save the contact information.
3.
Select Options to change the input method and language.
Note: You may leave some fields blank. However, you must give the
contact a name before you can save.
Tip: There is a quick method for starting a
new entry in the phonebook. Enter a number
into the standby screen. Select Save from
the lower left screen.
Phonebook
Groups
You may add the contact to a group. To add a contact to a group:
1. Select Options>Grouplist
2.
A list of groups appears. Scroll to the desired group, then select.
3.
Select View to edit group settings.
4.
Select Options>View Members then select numbers to add phonebook
entries to the group.
5.
Select Options>Send SMS to Group, then select Change to select all
group members you wish to send MMS to.
Note: Only contacts stored in the handset, not the SIM, can be set into
groups.
Using a group list
Group Lists are a convenient way to group contacts. For example you can
send a text message to a group, rather than having to send many individual
text messages. You can also set ringtones and pictures for the group.
For more information on groups, see Using a group list on page 38.
Pictures
You may set camera photos to appear each time a contact calls.
38
1. Select the contact.
2.
Select View>Edit to edit contact information.
Phonebook>Options offers convenient tools for accessing contact
information, such as searching and speed dialing, as well as editing options.
Searching for a contact
1. To search for a contact, enter a contact’s name in the Options>Search
menu display. In the contact list menu, you may also search by entering
only the first letter or letters of the name.
2.
Press the
send/answer key to search.
To view all contacts stored on the SIM card, select SIM List.
Copying contact information to a SIM card
Normally, phonebook information is stored on the phone. Copying contact
information to the SIM card means the phonebook information can be still be
accessed when you use the SIM card with another phone.
• Copy a single contact by selecting Copy to SIM.
• Copy all contacts by selecting Copy All to SIM.
39
Phonebook
Editing contact information
Phonebook
Deleting a contact
• To delete the current contact, select Delete.
• To delete all contacts, select Delete All.
Editing a group list.
1. Go to Phonebook>Options>Group List. Select a group, then select
View.
2.
Information fields appear for name, picture and ringtone. Select any of
these fields to edit them.
The phone comes with five preset groups: VIP, Family, Friends, Colleagues,
and Biz. The phone can contain only five groups. However, you may change
the names of the groups by entering a new name in the name field.
Using a fixed dialing list
Fixed Dialing Lists restrict the calls that can be made with the SIM card to
those specified in the list. To specify a number in the Fixed Dialing List,
select Fixed Dial List and then select an entry to view, edit, or delete. You
can also add a number to the group.
Speed dialing
Speed dialing enables you to dial numbers by pressing a single key. To
assign a speed dial number to a contact:
1. Select a contact name in the phonebook.
40
Select Options>Speed Dial List.
3.
Nine frames appear, labeled Key 1 through Key 9. These correspond to
keypad numbers 1 through 9 . Scroll to highlight the speed
dialing key you wish to assign. Select edit.
You can assign a contact’s number to a key by selecting Speed Dial List.
Setting your own phone number.
To set, edit, or delete your own number, select
Phonebook>Options>Own Number.
Viewing the status of the phone
To view the status of the phone and SIM card memory, select Memory.
41
Phonebook
2.
Messages
Messages enables you to send and receive text messages (SMS, or Short
Message Service) or multimedia messages containing a combination of
audio, pictures, or text (MMS, or Multimedia Messaging Service).
If you have received a new text message or voice message, the envelope
icon in the standby screen will flash on and off. To view a text message,
select the Messages icon on the main menu and a list of text messages
appears, with messages sorted from newest to oldest.
When your phone displays Memory Full, you must delete some messages
from your received messages or your drafts folder before you can receive
new messages.
Sending messages
New SMS
To compose and send a text message:
1. Go to Messages>New SMS
2.
A text entry box appears. Enter your message.
3.
Select Options>Send, to send the message.
4.
A frame appears, with the prompt Enter Number. Enter your number in
the frame and select Send.
1. Enter the text of your message.
2.
To send the message, select Options>Send.
Shortcut keys
*
The
key switches between different case entry methods. The text
entry icon at the top of the screen shows text entry modes. The book symbol
on the icon shows that you are in text-entry mode.
Upper case letters “ABC” indicate upper case mode.
“Aa” indicates that the first letter of words is capitalized.
All other letters are lower case.
“abc” indicates lower case mode.
The middle symbol indicates the text entry method. “T9”
indicates T9™ predictive text input. If the middle space
is empty, then the current text entry method is multitap.
43
Messages
The phone supports two types of text entry, Multitap, and T9™ predictive
text input. For more information, see Text entry: The basics on page 27.
Messages
Options
Selecting Options from the text entry box also enables you to select the
following options:
Send
Save
Insert
Text format
44
Prompts you to enter a phone number and send the
message.
If you are not ready to send a message, you may save it
as a draft.
New paragraph enables paragraph formatting by adding a line space.
Template inserts ready-made phrases, such as “I’ll be
late,” or “Thank you.”
Phone number enables you to add a phone number
directly from the phonebook.
Pre animation enables you to add a preset animation.
Own picture inserts your own picture.
Own animation enables you to insert an animation of
your own.
Pre sound enables you to insert a preset sound.
Own melody enables you to insert a melody of your
own.
Add emphasis to text with bold, italic, underline, or
strikeout formatting.
Change your input language. This is essential for T9™
predictive text input.
Go to SMS>Inbox to view all SMS messages stored in
your handset.
Select View to read the SMS
Select Options to:
Draft
Template
Input method
Setting
Capacity
• Delete - Delete the SMS
• Reply - Reply with a message to the sender
• Edit To edit the message
• Forward - To forward the message to a friend
• Call To call the sender
Go to SMS>Draft to view a list of draft messages.
Go to SMS>Template to view a list of preset short
messages.
Switch between Multitap and T9™ predictive text input.
Adjust phone settings. See Settings on page 46 for
more information.
Check how much of the phone’s capacity is in use.
When capacity is reached, older messages are deleted.
The phone can hold eight SMS messages on the SIM
and 50 stored on the phone card.
45
Messages
Input
language
Inbox
Messages
Settings
Change the following settings in Messages>SMS>Setting:
Message Centre
Enter the number to call to retrieve voicemail messages. You must obtain this number from your service provider.
Message Format
Set the format to Normal (SMS cell phone message),
Fax, Voicemail, Internet.
Message Lifetime
Sets the length of time your service provider holds
the message, if it cannot be immediately sent. This
can be set to 1 hour, 2 hours, 6 hours, 1 day, 2 days,
1 week, 4 weeks, or 6 months.
Status Report
Set to on or off. When activated, an SMS receipt is
sent to you when the message is successfully sent.
Pay for Reply
Gives your consent to pay for a reply. Whether you
need to pay for a reply depends on your service provider.
46
Composing a new multimedia message
To compose a multimedia message, select Messages>New MMS. Three
options appear:
Add Text
Add Image
Add Audio
Add text
Scroll to Text and select to enter text. The text entry box is the same as
the text entry box for an SMS message.Enter text.
In MMS text mode, only three options are available when you select
Options: Save, Input Language, and Input Method.
Unlike a simple text message, you must save your text in order to
incorporate it into your MMS. Select Options>OK.
Add images
1. Select Image to add a picture or photograph to the message. A list of
images in the phones Album folder is displayed.
47
Messages
Multimedia Messages (MMS)
Messages
2.
Select the photo you wish to add and select OK. The photo is
automatically added to the MMS message. In the main MMS screen, you
see the text and images of your message combined together.
Add audio
1. Select Audio to add an audio file. Two items appear, Sounds and
Recording. Select Sounds. A list of audio files available in the phone’s
Ring Tone folder appears.Select Recording to attach a recorded
message. See Voice Memo on page 84 for information on recording
voice memos.
2.
Select Options, then Send to send the message, enter the phone
number or numbers to send the message to. Four fields appear on the
screen, “To”, “Subject”, “cc”, and “bcc”. However, you cannot enter
numbers directly on this screen. Select “To” and a separate screen
appears. Choose either phone number or email and type in the
recipient’s contact information (phone number or email).
Sending the MMS
1. From the main MMS screen, press the
2.
Select Send.
48
Options key.
Messages
When you press the
options key from the main MMS screen, the
following options also appear:
Send
Sends the message.
Preview
Preview the message before sending it.
Remove
Object
Removes currently selected object in MMS message.
(Text, image, audio).
Insert new
page
Inserts a new page into the message.
Save
Saves the message.
Save as
template
Saves the message as a template.
Page timing
Controls the speed at which pages change, if there is
more than one page.
Background
color
Sets the messages background color.
49
Messages
Additional multimedia message options
When you select Messages<MMS, the following MMS options also appear
on the screen:
Inbox
Received messages are stored here.
Drafts
You may select a previous draft to work with or delete
drafts.
Outbox
Sent messages are stored here.
Templates
Templates can be sorted by date or type.
Settings
Controls how messages are sent and received. See
details on Settings below.
MMS Profile
MMS Profile refers to the service or service provider
used to send and receive messages.
50
Sending
Validity period
Set a number of days for the service provider to
continue trying to send a message. This setting is useful
if your contact’s phone is turned off.
Read report
Request a receipt from your contact when the message
is received.
Note: A receipt is only sent when the person receiving
the message agrees to send it.
Delivery
report
Check to see if the service provider has sent the
message.
Priority
Set the priority for the message as Low, Normal, or
High. The message may appear on the receiver’s
phone with a priority marking, depending on the type of
phone of the receiver.
Show number
Choose to show or hide your number when the
message is delivered.
51
Messages
Settings options
Messages
Retrieval
Retrieval
mode
Set retrieval of MMS to manual or automatic.
Read report
Set read report to On Request, Always, or Never.
Delivery
report
Set whether to send delivery report after sending an
SMS.
52
Information services distribute content as text messages with content about
weather, news, and financial markets. Manage information services at
Messages>Message Info.
The phone comes with an information message box already set up.
However, you need to enable various settings for it to work:
Reception
Enable on.
Auto Display
Enable on or off according to your preference
Set Info.
Choose among services offered by your provider. This
will not work if you do not yet have a provider.
Language
Choose the language of the information service.
53
Messages
Information Services
Messages
Voicemail
Voicemail is provided by your service provider. Voicemail messages are
stored on the network server and not on your phone’s SIM card.
Your service provider will give you a number to dial to hear your voicemail
messages. You may directly dial the number, but you may also store and
access the number from Messages>Voicemail<Get Voicemail.
Enter the phone number for voicemail in Messages>SMS>Setting. See
Settings on page 46 for more information.
If you have more than one voicemail, select the voicemail box you wish to
call in Messages>Voicemail<Box Numbers.
54
Using the Camera and Managing
Photos
Your phone has an easy-to-use, built-in digital camera. After you take
photos with it, you can send them to friends and family, set them as
wallpaper, or even add a photo to your phonebook, so that the picture
appears when someone calls you.
Taking a photo
1. Select Camera from the main menu, or from the lower left of the
standby screen.
2.
Select Activate. The image from the camera
lens appears on your screen.
3.
The camera lens is on the back of the phone,
just above the battery.
4.
Hold the phone upright and point the lens in
the desired direction.
5.
Press Capture to take a photo.
6.
The still photo image appears on the screen.
If you are satisfied with the photo, press
Save to add it to your photo album. If you do
not wish to save the photo, press Back.
Mirror
Lens
Using the Camera
Self-portrait
You can take a self-portrait by using the small
mirror on the back of your phone. Hold the
camera with one hand and use another to
press Capture. Look at your reflection in the
mirror to position the camera.
Settings
There are two ways to adjust settings. Select
from a list of settings in Camera>Settings or
while in picture taking mode, press Options to make adjustments using
camera setting icons on the screen.
From Camera>Settings, the following settings can be adjusted:
Number of
shots
When you select Capture, the camera normally takes one
picture. You can also select from 1, 3,6, or 9 sequential
shots. This is a useful option for situations where the action
is changing rapidly, such as a sporting event.
Image size
Four sizes are available: 80 X 60, 160 X 120, 320 X 240,
and 640 X 480.
Image
Resolution
“Resolution” refers to image quality and clarity. Select high,
medium, or low resolution.
56
Tip: High resolution photos require a lot of
memory. To save memory space, select
middle or low resolution. Lower resolution,
however, also produces lower quality
photos.
57
Using the Camera
Note: If you plan to share photos with others, keep in mind that all phones
that support photos can receive 120 X 160 photos. Other sizes may not be
supported.
Using the Camera
While in picture-taking mode (Camera>Activate), select Options to view
camera setting icons and adjust camera settings. Scroll through the various
options by selecting Options with the
right soft key. Adjust the settings
for an option using the up and down navigation key.
Zoom. Three zoom setting icons appear in the lower left
screen, for normal view, 2x and 4x zoom.
Brightness. Adjust brightness according to environmental
conditions. A sunny day requires lower settings while a
cloudy higher ones.
Contrast. Contrast makes dark areas darker and light ones
lighter.
Color effects. Scroll through several color effects. Color
filters add a certain color to the entire shot. For example, with
a blue filter, all objects in the picture are taken with a blue
shade or overtone. There is also a photo negative effect and
a color inversion effect, which replaces original colors with
other colors.
58
Number of shots. (See Settings above.)
Resolution. (See Settings above.)
Image size (See Settings above.)
Managing your photos
View the photo album by selecting Camera>View Pictures. If you prefer to
scroll through full-frame views of individual photos, select any individual
photo, then push the scroll button to view the next photo.
Select a photo, then select Options to view the various ways you can use
your photos:
Set to wallpaper. Set a photo as wallpaper, the picture displayed in standby
mode. You may select Fit to Screen or Put on Center views. For more
information on wallpaper, see Display on page 72
59
Using the Camera
Frames. Select a decorative frame for your picture. You may
also add a frame in Camera>View
Pictures>View>Effects.
Using the Camera
Set to Caller ID. Associate a photo with a contact in your phonebook. When
the contact calls you, the contact’s photo is displayed.
1. Select Options>Caller ID.
2.
A list of contacts in your phonebook appears. Select the desired contact.
Set to group image. For more information on groups and how to set a
group in your phonebook, see Using a group list on page 38.
1. Select Options>Group Image.
2.
A list of groups in your phonebook appears. Select the desired group.
Send via MMS. Attach the photo to a multimedia message. For more
information on multimedia messages, see Multimedia Messages (MMS) on
page 47.
Delete. Delete the selected photo from the photo album. Select Yes to
confirm the deletion or No to cancel.
Delete all. Delete all pictures in the handset.
60
61
Using the Camera
Adding effects to your photos
The variety of effects offered in your camera helps you to improve the look
of your photos or add creative touches. Bring out the best of a photo by
changing the layout or editing photographic elements such as brightness
and hue. Add decorative frames and animations or change the look of a
photo through artistic filters.
Using the Camera
Animation
Animated Frame
Adds a decorative animated picture frame.
Animated Morph
Animates a portion of the photo. The up and
down navigation key scrolls among styles. Move
the animation frame around different portions of
the photo using the 2,4,6, and 8 number keys.
Animated Effect
Adds a sparkling animation effect to the photo.
Transform
Rotate
Select the best layout for a photo with Rotate.
Rotate photo position by 90°, 180°, or
270°clockwise.
Flip
Reverses the image.
Flip Horizontally
Mirrors the image horizontally.
Flip Vertically
Inverts the image.
62
Morph
Distorts appearances much like a funhouse mirror does. You
may reapply this function several times to create even
weirder effects. Reapply by pressing on the up and down
navigation key.
Mask
Superimposes masks on faces in the picture so you can
dress up a friend in a wizard’s hat or Halloween mask
Hairdo
Adds hairdos to people in the picture.
Funny Theme superimposes decorative graphics on photos.
Frame
Adds a frame to the edges of a photo.
Greeting Card
Adds text and graphics to turn photos into greeting
cards.
Text
Places text over photos.
Stamp
Places stamp graphics on a photo.
63
Using the Camera
Face Off contains the types of effects you would expect to find at a carnival
funhouse.
Using the Camera
Filter applies a variety of artistic effects to your photos.
Blur
Decreases definition and contrast of objects. A radius
bar appears. Increase or decrease the amount of blur by
setting levels on the bar, using the up and down
navigation key.
Sharpen
increases definition and contrast of objects.
Fill Flash
distributes light evenly over both the subject and the
background.
Smart Blur
retains the sharpness of the foreground image while
creating a blurring effect in the background.
Oil Paint
adds brush-stroke effects to the photo.
Frosted Glass
adds a frosted glass effect to the borders of the photo.
Beautify Skin
smooths skin appearance and can cover skin
blemishes.
Sepia
changes photo colors to the brownish sepia tones of old
photographs
64
Hue/
Saturation
Refers to the purity of a color, without dilution by black
or white. Increasing hue/saturation makes the colors
look deeper and more intense.
Color
Balance
Changes the balance of colors in the photo by adjusting
primary color values.
Mono
creates a black and white photo.
Negative
Creates the look of a photo negative by reversing dark
and light areas.
65
Using the Camera
Adjustment enables you to adjust some of the basic visual components of
a photo. After viewing an adjustment, press select to either undo or save the
changes.
Fun and Games
The Fun and Games section of the menu contains games, as well as
creative sound and image tools.
Album
Selecting Album opens the photo album, along with the same functions
found in Camera>View Pictures. For more information on managing and
editing photos, see Managing your photos on page 59.
Sounds
Select, set, delete and share ringtones here.
1. When you select Sounds, a list of available ring tones appears. Scroll
to a ringtone.
2.
Select Sounds to set any of the following ring tone options:
The ring sounds for all incoming calls, unless
otherwise specified.
Set to personal
ring
Assign a ring for calls from a phonebook contact or for
a phonebook group.
Set to group ring
tone
Assign a ring tone to a group.
Send via MMS
Attach a ringtone as an MMS audio file.
Delete
Delete a ringtone.
Info
View information about a ringtone.
Pictures
Selecting Pictures opens an album of artwork and graphics that you can set
as wallpaper, send as part of a multimedia image, and more.
To view an individual photo, select View.
Select Options for ways to display or share a picture. These are the same
options as in the photo album: Camera>View Pictures>Options. See
Managing your photos on page 59 for more information.
67
Fun and Games
Set to default
ring
Fun and Games
Composer
Composer is a midi music composition tool that enables you to compose
and edit tunes with up to four channels. Composer stores up to five tunes.
The factory default setting for these phones is empty, so you can create
completely new melodies.
Here is how to create a melody in Composer:
1.
Select a melody, then select Edit.
2.
Choose one channel, from channels 1-4.
3.
A keyboard and blank music score appear on the screen.
You may choose from a scale of seven notes, from do to si/C to B. The
number keys correspond to these notes.
68
Keys
through
9
*
0
1
7
Rnotes on a seven-note scale from do/C to si/B.
R Adds a dot to a note. (Lengthens duration.)
Select notes using the up and down navigation key.
Press
to change the value of notes, among X
IRFYSChange the values of rests, among
*
Adds a rest.
4.
Select Options>Play to hear your tune.
5.
Select Options, and adjust Tempo, Instrument, and Volume to your
liking.
6.
Save your work to avoid losing it. Select Options>Set to Ringtone if you
would like to set it as a ringtone. Select Save>Exit to leave editing mode.
69
Fun and Games
Below is a table of the keys and the corresponding notes and symbols.
Fun and Games
Games
Your phone contains the exciting Xfinity game.
To navigate through games:
, Use the
4
and
6
keys to move right and left.
up and down
navigation key
Move up and down
4
6
Move right and left.
and
keys
If you receive a phone call or message or an alarm sounds while you are
playing a game, the game pauses.
70
General Phone Settings
In the settings section of the menu, you can edit settings for personal
preferences, such as display or ring style. You can also set useful features
such as time and date or security features. This section of the manual
introduces the most commonly used features.
Time and date
Setting the time and the date enables you to use your cell phone as a clock
and calendar. You also need to set the time and date before using the
Personal Information Manager (PIM). Set the time and date at
Settings>Handset Setting>Clock.
Ring style
To set the phone to your favorite ring, go to Settings>Sound and
Alert>Ring Tone. You may also choose to have the phone vibrate only,
without making any sound, when a call arrives.
*
Tip:
is a shortcut key for setting the
phone to silent mode.
General Phone Set-
You may also compose your own ring tone. For more information, see
Composer on page 68
Ring volume
To adjust ring volume, go to Settings>Sound and Alert>Ring Volume.
You can adjust the ring volume of the following features:
Any call, Alarm, Message, Cell Broadcast.
To adjust the volume, click on Edit (left soft key) then use the
"4" and “#” keys to turn the volume higher or lower.
After you are satisfied with the volume, select save.
Earpiece and ring volume, ring style, and answering settings can also be set
in Settings>Profile.
In profile, select the type of environment you are in, and earpiece and ring
volume adjust accordingly. For example, if you choose outdoors, the
settings will be louder than if you choose quiet.
Display
Wallpaper
The wallpaper image is the image that appears in the background when in
standby mode. You can set a picture or a photo as a wallpaper image or
even select the calendar as the wallpaper image.
To set a photo or picture as wallpaper:
72
2.
Select Pictures, Calendar, or No Wallpaper. If you select Pictures, an
album of artwork and graphics appears.
3.
Select the picture you would like to set as wallpaper.
There are two display options: Fit to Screen, and Put on Center.
Choosing Fit to Screen means the picture fills the entire screen.
Choosing Fit to Screen places the picture over the entire screen. Put on
Center centers an image which is smaller than the size of the screen.
To set a photo taken with the phone’s camera as wallpaper, go to
Camera>View Pictures>Options>Set to Wallpaper. For more
information, see Managing your photos on page 59.
Start-up animation
Start-up animation sets an animated image to display briefly when you turn
on your phone.
Greeting
You can enter a personalized message, such as a favorite saying, to appear
when you turn on the phone. This is called a greeting, and can be set in
Settings>Handset Settings>Greetings.
73
General Phone Set-
1. Go to Settings>Handset Settings>Display>Wallpaper. Select
Change.
General Phone Set-
Menu display schemes
You can also choose between two different menu display schemes. The
circular icon scheme displays round icons in a spherical orbit, while the grid
icon scheme displays icons in a grid. Set schemes in
Settings>Handset>Scheme.
Language
Set the language for the main display and menus, as well as for language
input in Settings>Handset>Language. When set to Automatic, the phone
adjusts to the main language of the regional service provider.
Security
SIM card lock
To protect your phone from unauthorized use, you can enable PIN
(Personal Identification Number) protection. Blocking access to the SIM
card prevents others from accessing information on the phone or making
calls. When you turn on the phone, or when the phone is locked, you must
enter the PIN before the phone can be used.
To set Security and PIN settings, go to Settings>Security Setting>PIN
codes. After enabling the PIN protection option, you may set the PIN of your
choice under Change PIN.
If you enter the wrong PIN code three times in a row, the SIM card is
disabled. You must then contact your service provider for a PIN unblocking
key (PUK) in order to enable the SIM card.
74
The phone lock offers an addition level of protection for your phone. The
SIM card lock prevents unauthorized use of your service provider
subscription. The phone prevents others from using the phone, even if your
SIM card is replaced with another SIM card.
To activate phone lock:
1. Go to Settings>Security Setting>Phone Lock.
2.
Protection should be set to On. Select Change to toggle between On
and Off settings.
3.
Select Change Code. The phone comes with a default code of 1234.
Change the code to any 4-8 digit code.
Keypad lock
When you are carrying the phone, keys could accidentally be
pressed.Locking the keypad prevents numbers from accidental dialing. To
lock the keypad, press the #
key. To unlock the keypad, press on the
left soft
key and the #
key.
You may also set the phone to automatically lock the keypad when the
phone is unused for a certain period of time, by going to
Settings>Handset>Auto Keylock. The auto keylock can be set to on or
off.
75
General Phone Set-
Phone lock
General Phone Set-
Network information
View information about the type of network your phone is operating on at
Settings>Handset Setting>PLMN. (PLMN stands for Public Land Mobile
Network Info). For example, if your phone might display “GSM 1800” to
show it is on a GSM-type network, with 1800 MHz frequency.
Reset settings
You can restore the phone’s original settings at Settings>Handset>Reset
Settings. The prompt “Restore factory settings? Yes/No” appears.
Choosing “Yes” restores the settings that were in the phone at the time of
purchase.
76
Personal Information Manager (PIM)
Your phone has a Personal Information Manager which includes a calendar,
notebook, alarm clock, and calculator. Select PIM on the main menu to
access the Personal Information Manager.
Calendar
Your phone has a calendar which you can use to keep track of your
appointments. To navigate the calendar:
• Select PIM>Calendar. Press the up and down navigation key to scroll
through the days.
• Hold down the key continuously to go back or forward a week.
• By scrolling beyond the first or last days of the month, you can view the
previous or next month.
• When you select a day, appointments for the day appear.
Adding a new appointment
1. Scroll to the desired day on the calendar.
2.
Select Options>New Appt.
3.
Several fields appear for you to enter details about the date, time, and
type of meeting, and alerts, and reminders. Scroll to select fields.
Use the number keys to change the Start Time, End Time, Subject and
Note fields.
Personal Informa-
If the Date field is not correct, change it by pressing Select, choosing a
day from the calendar, then pressing Select again
To enter information in other fields, you must select from preset options.
In these fields, red arrows appear at the right of the field. Press the
right soft key to select and view options.
Reminders and alerts
Whenever you set an appointment in the calendar, the phone sends a text
reminder before the appointment. In the new appointment Reminders field,
select a reminder time of either 5 or 10 minutes before the appointment
time.
You may also choose to have a sound alert accompany the reminder. Select
On or Off for this option.
Note: You will not be able to insert spaces or upper case letters in fields
where letters are used.
Viewing and editing appointments
After creating an appointment, you can view or modify it.
To view an appointment:
1. Select the day of the appointment from the calendar.
2.
Press Select to view the day’s appointments. You may also view
appointments for a day, week, or all appointments by selecting Options.
78
Select an appointment from the list and press View for more details of
the appointment.
4.
Press Save to save the appointment or the power/end key to cancel.
To edit an appointment:
1. Select Options. Follow the previous steps for viewing an appointment.
2.
Select Edit. Edit the details as described in Adding a new appointment
on page 77, and press Save.
Deleting appointments
The steps for deleting an appointment are similar to those for viewing an
appointment.
1. Select the day of the appointment from the calendar.
2.
Press Select to view the day’s appointments or press Options to
appointments by day, week, or all.
3.
Select an appointment from the list and press Options.
4.
Select Delete to delete the selected appointment or Delete All to delete
all appointments.
5.
Press Select, then Yes to delete the appointment or appointments.
79
Personal Informa-
3.
Personal Informa-
Setting the calendar as wallpaper
Select Set to Wallpaper to set the calendar as the wallpaper. see Display
on page 72.
Notes
You can use the phone to record important information such as names of
people or places or record important reminders.
Select Notes from the PIM sub-menu and press the
to access notes.
left menu/soft key
Adding Notes
To add a note:
1. Select New Entry and press Select to add a new note. For details on
entering text, see Text entry on page 27.
2.
After entering the notes you wish to make, press Options, select Save
from the list and press Select.
Viewing and editing notes
After creating a note, you can view or modify it if you need to. To view a
note, select the note you want to view and press View.
To edit a note:
1. Select the note you want to edit and press Options.
2.
Select Edit from the list and press Select.
80
After modifying the notes, select Options, then Save.
Personal Informa-
3.
You can also press Edit from the view mode to edit a note.
Deleting notes
To delete a note:
1. Select the note you want to delete and press Options.
2.
Select Delete to delete the selected note or Delete All to delete all
notes.
3.
Press Select then Yes to delete the note or notes.
Sending notes
You can send notes to another person’s cell phone. To send a note:
1. Select the note you want to send and press Options.
2.
Select Send from the list and press Select.
3.
Enter the phone to send the note to and press Send.
81
Personal Informa-
Alarm
Use the alarm to set a time for waking up in the morning or remind you of
important times.
To set the alarm:
1. Select Alarm from the PIM sub-menu and press the
key.
left menu/soft
2.
Select Set Time.
3.
Use the number keys to set the time for the alarm. Press OK.
4.
Select Repeat Daily. Press Select to turn the setting on or off. When set
to On, the alarm will activate at the same time each day.
5.
You may also turn the alarm on or off by selecting Alarm Status. Press
Select to turn the alarm on or off.
Calculator
The calculator offers basic calculation functions such as addition and
subtraction.
Select Calculator from the PIM sub-menu and press the left menu/soft key
to access the calculator. The following table lists the keys you can press to
perform a simple calculation.
82
Phone Key
Entering
numbers
Press the number buttons on the phone keypad.
– , +, x , ÷
Use the up and down navigation key to scroll through
these arithmetic operations. The current arithmetic
operation is displayed in the left side of the calculator
display window.
Clear/
delete
Press the
right key located just under the c symbol on
the calculator to clear the last number entered. This is also
used to calculator window after the value has been
calculated.
=
Press the
calculator’s
Negative
numbers
Press the *
key to switch between a negative or
positive number.
Decimal
point
Press the
Personal Informa-
Calculator
Function
left menu/soft key, located just under the
= symbol to perform the calculation.
#
key to enter a decimal point.
83
Personal Informa-
Voice Memo
The Voice Memo tool is similar to Notes tool, except that you record your
voice instead of words. (See Notes on page 80.)
Creating voice memos
To create a voice memo:
1. Select PIM>Voice Memo>New.
2.
Select the record button with the
left menu/soft key to begin
recording a memo.The record button has a red circle in the middle.
3.
To stop recording, select the stop button with the
left menu/soft
key. When you are recording, the record button changes to a stop
button, with a blue square in the middle.
4.
To listen to the recording, select the play button with the
left menu/
soft key. When you stop recording, the stop button changes to a play
button with a blue triangle in the middle.
5.
Select the save button with the
floppy disk image in the middle.
6.
Enter a name for the recorded memo and press Options.
7.
Select Save to save the recorded memo.
right soft key. The save button has
NOTE: If you save a voice memo with the same name as an existing one,
the new voice memo will record over the old one.
84
To listen to a voice memo:
1. A list of voice memos appears. Select the voice memo that you want to
listen to and select Play.
2.
Select Stop to stop playback.
Viewing information about voice memos
PIM>Voice Memo>Options>Info provides details about a voice memo
such as the file name, time and date it was created, file size and time length.
Renaming voice memos
To rename a voice memo.
1. Select the voice memo you want to rename from the list and select
Options.
2.
Select Rename.
3.
Type in a new name and select Options.
4.
Select Save to rename the voice memo.
85
Personal Informa-
Listening to voice memos
Personal Informa-
Setting voice memos to a ringtone
To set a voice memo as a ringtone:
1. Select the voice memo you want to set as a ringtone and press
Options.
2.
Select Set to Ringtone.
Deleting voice memos
To delete a voice memo:
1. Select the voice memo you want to delete and press Options.
2.
Select Delete to delete the selected voice memo or Delete All to delete
all voice memos.
3.
Press Select then press Yes to delete.
86
SIM Application Toolkit (STK)
SIM Application Toolkit (STK) technology acts as a bridge between your
SIM card and your service provider’s network, enabling your service
provider to make SIM card updates, send you SMS messages, and offer
other services via your SIM card.
Additional Information
FCC Regulation:
This model phone complies with part 15 of the FCC Rules. Operation is
subject to the condition that this device does not cause harmful interference.
This device complies with Part 15 of the FCC Rules. Operation is subject to
the following two conditions:(1) this device may not cause harmful
interference and (2) this device must accept any interference received,
including interference that may cause undesired operation.
This equipment has been tested and found to comply with the limits for a
Class B digital device, pursuant to Part 15 of the FCC Rules. These limits
are designed to provide reasonable protection against harmful interference
in a residential installation. This equipment generates, uses and can
radiated radio frequency energy and, if not installed and used in accordance
with the instructions, may cause harmful interference to radio
communications. However, there is no guarantee that interference will not
occur in a particular installation If this equipment does cause harmful
interference to radio or television reception, which can be determined by
turning the equipment off and on, the user is encouraged to try to correct the
interference by one or more of the following measures:
Changes or modifications not expressly approved by the party responsible
for compliance could void the user‘s authority to operate the equipment.
The antenna(s) used for this transmitter must not be co-located or operating
in conjunction with any other antenna or transmitter.
This EUT is in compliance with SAR for general population /uncontrolled
exposure limits in ANSI/IEEE C95.1-1999 and had been tested in
accordance with the measurement methods and procedures specified in
OET Bulletin 65 Supplement C.
89
Additional Informa-
• Reorient or relocate the receiving antenna.
• Increase the separation between the equipment and receiver.
• Connect the equipment into an outlet on a circuit different from that to
which the receiver is connected.
• Consult the dealer or an experienced radio/TV technician for help.
Additional Informa-
European Notice
Products with the CE marking comply with the Radio & Telecommunication
Terminal Equipment Directive (1999/5/EEC), the Electromagnetic
Compatibility Directive (89/336/EEC) and the Low Voltage Directive (73/23/
EEC) - as amended by Directive 93/68/ECC - issued by the Commission of
the European Community.
Compliance with these directives implies conformity to the following
European Standards:
• 1999/5/EEC Radio & Telecommunication Terminal Equipment Directive
(R&TTE) EN 301 511
• Specific Absorption Rate (SAR) Standard: EN 50360, EN 50361
• 73/23/EEC Low Voltage Directive (LVD) Standard: EN 60950:2000
• 89/336/EEC Electromagnetic Compatibility (EMC-Directive) Standard:
EN 301489-1/7
The manufacturer cannot be held responsible for modifications made by the
user and the consequences thereof, which may alter the conformity of the
product with the CE Marking.
90
This model phone meets the government’s requirements for exposure to
radio waves.
This phone is designed and manufactured not to exceed the emission limits
for exposure to radio frequency (RF) energy set by the Federal
Communications Commission of the U.S. Government.
The exposure standard for wireless mobile phones employs a unit of
measurement known as the Specific Absorption Rate, or SAR. The SAR
limit set by the FCC is 1.6W/kg. Tests for SAR are conducted using
standard operating positions accepted by the FCC with the phone
transmitting at its highest certified power level in all tested frequency bands.
Although the SAR is determined at the highest certified power level, the
actual SAR level of the phone while operating can be well below the
maximum value. This is because the phone is designed to operate at
multiple power levels so as to use only the poser required to reach the
network. In general, the closer you are to a wireless base station antenna,
the lower the power output.
The highest SAR value for the model phone as reported to the FCC when
tested for use at the ear is 0.654 W/kg and when worn on the body, as
described in this user guide, is 0.826 W/kg. (Body-worn measurements
differ among phone models, depending upon available enhancements and
FCC requirements.)
91
Additional Informa-
RF Exposure Information (SAR)
Additional Informa-
While there may be differences between the SAR levels of various phones
and at various positions, they all meet the government requirement.
The FCC has granted an Equipment Authorization for this model phone with
all reported SAR levels evaluated as in compliance with the FCC RF
exposure guidelines. SAR information on this model phone is on file with the
FCC and can be found under the Display Grant section of tap://
www.fcc.gov/oet/fccid after searching on FCC ID: SNFG01
For body worn operation, this phone has been tested and meets the FCC
RF exposure guidelines for use with an accessory that contains no metal
and the positions the handset a minimum of 1.5 cm from the body. Use of
other enhancements may not ensure compliance with FCC RF exposure
guidelines. If you do not use a body-worn accessory and are not holding the
phone at the ear, position the handset a minimum of 1.5 cm from your body
when the phone is switched on.
92
WAP
Wireless Application Protocol (WAP), enables you to browse the web, much
like you would on a regular computer. Unlike regular websites, though, sites
designed for WAP include only key content, and generally do not include
graphics.
WAP access is provided through your service provider. Check with your
service provider to see if your service package includes WAP access.
Setting up WAP
Before you begin using WAP, you need to have a WAP subscription and
enter correct settings in the phone. Your settings may already be on your
SIM card, or your provider may send them to you as an SMS. Check with
your service provider for information about WAP settings.
The first step in setting up WAP is to select a profile.
Setting a profile
1. Go to WAP> Profile Setting. A list of service providers appears.
2.
Scroll to the desired service provider and select.
WAP
Note: You can select one or more service providers, as long as you have an
account with the provider. Different configurations for providers are stored
as profile settings. Although you only need one profile to browse using
WAP, you may wish to set up different accounts for different purposes (such
as secure online banking).
Adding a new profile setting
If a profile does not appear, you may add it by following these steps:
1. Go to WAP>Profile Setting>Options.
2.
•
•
•
•
•
•
•
•
•
Several setting fields appear:
Profile
Homepage
Gateway IP
Port Type
Preferred Service
GPRS Setting
CSD Setting
Linger Time
Connect Timeout
Obtain the appropriate information to enter in these fields from the
service provider.
3.
Save the new profile by selecting Options>Save.
94
WAP
Deleting a profile setting
1. Go to WAP>Profile Setting, scroll to the profile you would like to
delete.
2.
Select Options>Delete. Enter Yes or No.
Editing a profile setting
You may need to change the profile settings to establish connection, or you
may want to enhance or tailor your WAP connection.
Profile Name
Edit the name of the profile.
Homepage
Enter URL, or web address, of homepage you use when
opening the web browser.
Gateway IP
Enter the IP address, as given by your service provider.
Port Type
Enter the port type, as given by your service provider.
Preferred
Service
Press the
right soft key to choose GPRS First,
GPRS, or CSD network types.
GPRS Setting
Select GPRS network type service provider.
CSD
Select CSD network type service provider.
95
WAP
Linger Time
Sets an amount of time of no activity, after which the
phone disconnects.
Connect
Timeout
Sets a time limit for connection. If the phone does not
successfully connect within this time limit, it stops trying
to connect.
General Packet Radio Service (GPRS)
GPRS is a type of wireless access network. GPRS is used for MMS and
SMS, as well as WAP access. Your phone can have two simultaneous
GPRS connections, which means you can send and receive messages and
have an ongoing web session at the same time.
Contact your service provider for details about GPRS availability and
access.
Homepage
Selecting Homepage opens an internet browser. Browse by manually
entering URLs, or web addresses, or by accessing stored bookmarks. To
stop browsing, press
. When browsing, you can:
•
•
•
•
Add the current address to your bookmarks
Save a picture from the site
Send a text message containing the current address (WAP Push)
Set the current address to be the homepage for the current Profile
96
3.
Select Save to save the settings.
WAP push
WAP Push is a method for sending multimedia content to your phone. If
your service provider offers WAP push services, you may use WAP push to
receive such content as wallpaper, ringtones, or java games.The message
is sent as a WAP-accessible URL, or web address.
WAP setup
The phone must be set to receive WAP push messages. Do this at
WAP>WAP Push>Setting. To receive WAP Push messages, select
Accept all. To refuse WAP Push messages, select Deny all.
Viewing WAP push messages
• View received WAP Push messages at WAP>WAP Push>Inbox.
• To delete a message, press Select then Delete.
97
WAP
Note: “Homepage” is also a term for the start page that opens each time
you open you browser. Many service providers offer specialized WAP
homepages which offer links to WAP services and other WAP-optimized
web pages. Set the start page for your browser in WAP>Profile
Setting>Homepage. (See Editing a profile setting on page 95.)
B
Battery, charging 19
Battery, Inserting 16
C
Calendar 77
Call 33
Call barring 35
Call logs 33
Call waiting 35
Call, answering 20
Call, making 20
Caller ID 32
Calling, answer mode 34
Calling, call barring 35
Calling, call waiting 35
Calling, caller ID 32
Calling, canceling incoming call 33
Calling, features 32
Calling, international calls 36
Calling, missed call 33
Calling, returning missed call 33
98
Calling, voicemail 36
Calls, timing 36
Camera 55
Camera, sequential shots 56
CSD 95
D
Date 71
Display 72
G
GPRS 95, 96
I
Info. messages 53
Info. services 53
International calls 36
K
Keypad lock 75
Keys, assigned characters 28
Keys, function keys 23
Keys, left/menu soft 26
Keys, power/end 26
Keys, right soft 26
99
Keys, send/answer 26
Keys, up and down navigation 27
L
Language 74
Lock, SIM card 74
M
Menu 27
Messages 42
Messages, info. messages 53
Messages, MMS 47
Messages, multimedia message 47
Messages, sending 42
Messages, SMS 42
Missed call 33
MMS 47
Multimedia message 47
N
Network information 76
P
Phonebook 37
Photos 55
100
Photos, taking 55
PIN, change 74
R
Reset settings 76
Ring, ring style 71
Ring, volume 72
S
Security 74
Security, change PIN 74
Security, keypad lock 75
Security, SIM card lock 74
Sequential shots 56
Settings, display 72
Settings, general phone settings 71
Settings, Language 74
Settings, reset 76
Settings, ring style 71
Settings, security 74
Settings, time and date 71
Settings, volume 72
SIM Card, Inserting 16
101
SIM card, lock 74
SMS 42
Standy mode 21
T
Text entry 27
Text entry, multitap 28
Text entry, T9™ predictive 30
Time 71
Timing Calls 36
V
Voicemail 54
Volume, adjusting 20
Volume, Adjusting speaker volume 20
Volume, ring 72
W
WAP 93
WAP, homepage 96
WAP, Profile 93
WAP, push 97
WAP, Setting up 93
WAP, setup 97
102