1
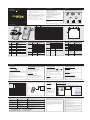
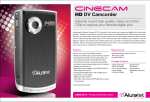
DV Camcorder
Quick Start Guide
Introduction
Features and Requirements
Thank you for choosing Aluratek’s® CINECAM DV Camcorder. In addition to making sure
only quality materials are used for manufacturing, Aluratek® is also dedicated to
provide the best customer satisfaction and support.
ADVC01F
The goal of Aluratek is to embody "Simple Elegance" in every product it designs,
manufactures and sells.
The product focus of Aluratek is to bring simple yet elegant connectivity solutions to
the consumers to enhance their consumer electronics, communications and computing
experience. Each product is carefully designed with the consumer in mind. Each
product is solution-driven to address the need of the consumers and deliberately
planned to provide the ultimate user experience.
Read this guide thoroughly and follow the installation and operation procedures
carefully to prevent any damage to the unit and / or any of the devices it connects to.
Package Contents
Features:
• Easy to use, pocket-sized digital camcorder
• Simple user interface lets you start recording in seconds
• Convenient flip-out USB connector plugs directly into your computer to
transfer your pictures and videos
• Convenient and fun way to easily upload your photos and videos to social
networking sites such as Facebook, MySpace and YouTube etc.
• Expand the memory capacity up to 8GB with the SD card slot
• 5.0 Mega Pixels CMOS Sensor / 8x Digital Zoom
• Color LTPS 2.0" LCD display
• 16MB built-in flash memory
• 30 FPS@QVGA with sound / 25 FPS@VGA with sound
• 1 Year Warranty
Requirements:
• Windows XP(SP2) / Vista or later OR Mac 10.4.9 or later
• Available USB port
qsg Q10120
aluratek.com
Copyright © 2009 Aluratek, Inc. All Rights Reserved.
Highlights and Application
1
2
3
4
5
6
7
8
9
10
11
12
13
14
15
16
17
18
19
8
7
4
6
14
13
3
16
18
11
9
15
2
19
17
10
1
Strap hook
SD card slot
AV port
Macro switch
LCD screen
Microphone
Lens
USB interface
USB switch
Battery door
Delete
Mode
Left
UP
Right
Power on / off
Speaker
REC
Down
Battery indicator
2
Memory or SD card
indicator
3
4
White balance
Selected Resolution
5
Recording mode
6
Normal / Macro
mode indicator
Zoom
Exposure value
Counting indicator
7
8
9
AV Cable
(2) AA Batteries
Hand Strap
Installation CD
Hook for attaching the wrist strap to the camera.
SD card slot.
For television connection.
Normal mode: photographs from 0.5m - infinity.
Macro mode: close-up photographs (11cm - 18cm).
Display photographs, video clips, camera setting and menu.
For voice input.
Records the image to be taken. Note: Keep the lens clean. Dirt and fingerprints will affect the quality of the picture.
Download photographs and video clips to a computer.
Slide it to pop-up the USB interface.
2xAA alkaline batteries.
Press it to delete the photo or video clip in playback mode.
Press it to select different mode/Press and hold it to enter setting menu.
For LEFT selection in menu mode.
For UP selection. Digital zoom in.
For Right selection in menu mode.
Press this button to turn on, press again to turn off.
Speaker.
Press this button to take photographs, start/stop recording a video clip or to confirm changes in menu mode.
For Down selection in menu mode. Digital zoom out.
Camera Settings
1
Cinecam
DV Camcorder
Carrying Case
Warranty / Registration Card
Quick Start Guide
Status Icons
5
12
Your order has been carefully packaged and inspected. The following should be included in your package. Please
inspect the contents of the package to ensure that you have received all items and that nothing has been damaged.
If you discover a problem, please contact us immediately for assistance.
The batteries are full.
The batteries are empty.
Internal Memory or SD card. Photos will be
stored in SD card. If not, photos will be
stored in built in memory.
White balance selection.
12M= 3920x2940; 8M= 3264x2448
5M= 2560x1920; 3.1M = 2048x1536;
1.3M= 1280x960; VGA= 640x480
Photograph mode.
Videos capture mode.
Normal mode (0.5m – infinity).
Macro mode (11cm –18cm).
Show zoom value.
Show EV± value.
Show time left in DV mode
Show pictures left in DC mode
Show recording time during recording
Quality setup
Image Size
White Balance
EV setup
Stamp
Camcorder Settings
Super Fine (Default) /
Fine / Normal
12M pixel resolution
8.0M pixel resolution
5.0M pixel resolution
3.1M pixel resolution
1.3M pixel resolution
VGA resolution
Auto (Default)
Sunny
Cloudy
Fluorescent
Tungsten
0.0,+/-0.3, +/-0.7,
+/-1.0,
+/-1.3, +/-1.7,
+/-2.0
Off (Default) / Set
Picture quality set-up
Movie Size
3920 x 2940
3264 x 2448
2560 x 1920
2048 x 1536
1280 x 960
640 x 480
Automatic white balance
Select for daylight surrounding
Select for cloudy surrounding
Select for fluorescent surrounding
Select for tungsten lighting
White Balance
EV setup
VGA
QVGA
Auto (Default)
Sunny
Cloudy
Fluorescent
Tungsten
0.0,+/-0.3, +/-0.7,
+/-1.0,
+/-1.3, +/-1.7,
+/-2.0
3
4
AWB
VGA
2
1
5
6
1.0x
7
EV0.0
[ 00:00 ]
8
9
Setup Settings
640 x 480
320 x 240
Automatic white balance
Select for daylight surrounding
Select for cloudy surrounding
Select for fluorescent surrounding
Select for tungsten lighting
Level of exposure
Auto off
1min / 3min / Off
Beep
Brightness
Display setup
On / Off
0.0,+/-2.0, +/-1.0,
NTSC
PAL
Yes/No
YYYY / MM / DD
50Hz
60Hz
Yes / No
English (Default) / TChinese / S-Chinese /
French / Deutsch /
Italian / Spanish /
Portuguese / Japanese
Format
Date/Time
Flicker
Default setup
Language
Level of exposure
Auto power off in1min, 3min(default)
if no operation or Off
Turn On / Off the beep sound
American & Japanese video format
European video format
Format the memory card
Date and Time setting
Main European electricity frequency
Main American electricity frequency
Restore to default setting
Select display language
DD, MM, YYYY
Operating Instructions
STEP 1. Installing the Battery:
Formatting the Memory or SD Card:
STEP 3. Taking Video or Photographs:
STEP 4. Playback Photographs / Videos Clips :
1. Open the battery door.
2. Insert (2) AA alkaline batteries into the camera.
3. Power on / off by holding
for 3 seconds.
Warning: Formatting will erase everything on the card
1. Power on ADVC01F.
2. Press Mode to set ADVC01F to photo mode (
) or video mode (
).
3. Depending on the distance to the object being photographed, use Macro switch
to adjust the distance. Select the flower symbol ( ) to take a close up phot
graph (11cm –18cm). To take video or photograph of surroundings or people
(0.5m - infinity), set the Macro switch to Normal mode (
).
4. Use the LCD screen to aim the object you wish to take video or photograph.
5. Press REC button.
Photographs Playback :
STEP 2. Inserting a Memory Card (not included)
ADVC01F has a very small amount (16MB) of built-in memory. It is highly recommended to increase the memory capacity with a SD or SDHC memory card (not
included). Follow the instructions below to insert the optional SD / SDHC memory
card into the camera.
1. Turn off the camera.
2. Insert the SD card into the camera.
Note: There is only one correct direction to insert the SD memory card into the slot. Do not force the
card into the slot, or else it may damage both the camera and the SD memory card.
Note: Most memory cards come pre formatted. If your memory card is not formatted, please follow
these simple procedures.
Setting the Resolution:
Caution: 1) Taking picture for fast-moving object is not recommended.
2) Image may be distorted when taking picture in a moving vehicle.
ADVC01F can be set to different resolutions.
1. Press and hold Mode button to enter setting menu;
2. Select Resolution by navigation keys and press REC to confirm;
3. Different resolutions will be displayed. Select the desired resolution by
navigation keys and press REC to confirm the selection.
DV
DC
Lens
Focus range
Macro mode
Digital zoom
LCD display
White balance
Built-in memory
External memory card
File format
PC interface / TV-out
Power source
5.0 Mega pixel CMOS sensor
VGA (640x480) / QVGA (320x240)
12.0 Mega pixels: (3920x2940) (Hardware Interpolation)
8.0 Mega pixels: (3264x2448) (Hardware Interpolation)
5.0 Mega pixels: (2560x1920)
3.1 Mega pixels: (2048x1536)
1.3 Mega pixels: (1280x960)
VGA: (640x480)
F/2.8 f=8.5mm
0.5m. ~ Infinity
11cm – 18cm
8x
2.0" real color LTPS TFT
Auto /Sunny / Cloudy / Fluorescent / Tungsten
16 MB Flash memory
SD card supports up to 8GB
Picture: JPEG, Video: AVI,
USB 1.1 / NTSC, PAL
2xAA alkaline batteries. (rechargeable batteries not recommended)
Yellow
White
For standard
definition TV
Audio
TV
Cause
Solution
Can not power on the unit
Low battery power. Battery placed at wrong
polarities.
The memory card hasn’t been formatted
correctly or memory is full.
Replace or install the battery correctly.
Connection failure.
Make sure all cable connections are secured and restart the computer if necessary.
1. ADVC01F is not held steadily
2. ADVC01F lens is dirty.
3. ADVC01F is set to the wrong focus mode.
1. Hold ADVC01F steadily until it beeps when taking video photo.
2. Clean the lens with soft dry cloth.
3. Set the macro/normal mode according to the distances of subject.
If the memory is full, use a different memory card. Format the memory card if it was
not formatted.
Warning: Format will erase everything on the card.
If you need further assistance, please contact the Aluratek support department for troubleshooting prior to returning this device.
E-mail: [email protected]
Web: www.aluratek.com/support
keys to select the
Video Clips Playback:
1. When video clips are displayed, press REC to play, and press again to pause;
2. Press
or
keys for fast forward or backward;
3. Press Mode to exit.
STEP 5. Delete Photographs and Video Clips:
1. Press MODE to select Playback mode.
2. Press and hold MODE button to enter Delete mode.
3. Select single or all then press REC to confirm.
Note: you can also press Delete button to delete photograph or video clips in playback mode.
Software Installation:
How to upload to Youtube from MediaImpression:
1. Insert CD to your computer.
2. Select “Install MediaImpression”
3. Follow the onscreen instruction to install the
software.
1. Select the video that you like to upload
2. Click on the YouTube icon in menu bar
3. Complete your YouTube
account information
4. Fill in the video info and click “Upload”
Connect to computer:
1. Power on ADVC01F
2. Slide the USB switch to open the USB connector
3. Connect ADVC01F to the USB port on your
computer
4. ADVC01F will appear on your computer as a
“Removable Drive” in “My Computer”
5. You can manage your pictures/videos using the
MediaImpression software or click on the
“Removable Drive” directly.
Radio and TV Interference Statement
Problem
Can not find removable disk after
connecting the camera to the
computer.
Photos are blurry
ADVC01F has 8X zoom.
Zoom in or out by pressing the ▲or ▼ button, a number will appear on the display.
8.0x is the maximum zoom.
or
Red
Troubleshooting
Photos can not be saved when
taking pictures.
Zoom IN and OUT:
1. Press Mode button to enter Playback mode, use
desired video clip or photo.
2. Press ▲ or ▼ to zoom in or out the image.
Connect to Computer
Connect to TV
Specifications
Sensor
Image
resolution
1. Press and hold Mode button to enter setting menu;
2. Select Setup mode by navigation keys and press REC to confirm;
3. Select Format by navigation keys and press REC to confirm;
4. Press REC to format the card or memory.
Local (Irvine, CA): 949-419-6504
Toll free: 1-866-580-1978
WARNING!!! This equipment has been tested and found to comply with the limits of a
Class B digital device, pursuant to part 15 of the FCC rules. These limits are designed to
provide reasonable protection against harmful interference in a residential installation.
This equipment generates, uses and can radiate radio frequency energy and, if not
installed and used in accordance with the instruction, may cause harmful interference to
radio communications. However, there is no guarantee that interference will not occur in
a particular installation. If this equipment does cause harmful interference to radio or
television reception, which can be determined by turning the equipment off and on, the
user is encouraged to try to correct the interference by whatever measures may be
required to correct the interference.
Warranty
Aluratek warrants this product against defect in material or workmanship for 1 Year
from the date of purchase.
This warranty becomes invalid if the factory-supplied serial number or "warranty void"
sticker has been removed or altered on the product.
This warranty does not cover:
A) Cosmetic damage or damage due to acts of God
B) Accident, misuse, abuse, negligence or modification of any part of the product.
C) Damage due to improper operation or maintenance, connection to improper equipment,
or attempted repair by anyone other than Aluratek.
D) Products sold AS IS or WITH FAULTS.
IN NO EVENT SHALL ALURATEK'S LIABILITY EXCEED THE PRICE PAID FOR THE
PRODUCT FROM DIRECT, INDIRECT, SPECIAL, INCIDENTAL, OR CONSEQUENTIAL
DAMAGES RESULTING FROM THE USE OF THE PRODUCT, IT'S ACCOMPANYING
SOFTWARE, OR IT'S DOCUMENTATION.
Aluratek makes no warranty or representation, expressed, implied, or statutory, with
respect to it's products, contents or use of this documentation and all accompanying
software, and specifically disclaims it's quality, performance, merchantability, or fitness for
any particular purpose. Aluratek reserves the right to revise or update it's product, software
or documentation without obligation to notify any individual or entity.
DV Camcorder
Quick Start Guide
Introduction
Features and Requirements
Thank you for choosing Aluratek’s® CINECAM DV Camcorder. In addition to making sure
only quality materials are used for manufacturing, Aluratek® is also dedicated to
provide the best customer satisfaction and support.
ADVC01F
The goal of Aluratek is to embody "Simple Elegance" in every product it designs,
manufactures and sells.
The product focus of Aluratek is to bring simple yet elegant connectivity solutions to
the consumers to enhance their consumer electronics, communications and computing
experience. Each product is carefully designed with the consumer in mind. Each
product is solution-driven to address the need of the consumers and deliberately
planned to provide the ultimate user experience.
Read this guide thoroughly and follow the installation and operation procedures
carefully to prevent any damage to the unit and / or any of the devices it connects to.
Package Contents
Features:
• Easy to use, pocket-sized digital camcorder
• Simple user interface lets you start recording in seconds
• Convenient flip-out USB connector plugs directly into your computer to
transfer your pictures and videos
• Convenient and fun way to easily upload your photos and videos to social
networking sites such as Facebook, MySpace and YouTube etc.
• Expand the memory capacity up to 8GB with the SD card slot
• 5.0 Mega Pixels CMOS Sensor / 8x Digital Zoom
• Color LTPS 2.0" LCD display
• 16MB built-in flash memory
• 30 FPS@QVGA with sound / 25 FPS@VGA with sound
• 1 Year Warranty
Requirements:
• Windows XP(SP2) / Vista or later OR Mac 10.4.9 or later
• Available USB port
qsg Q10120
aluratek.com
Copyright © 2009 Aluratek, Inc. All Rights Reserved.
Highlights and Application
1
2
3
4
5
6
7
8
9
10
11
12
13
14
15
16
17
18
19
8
7
4
6
14
13
3
16
18
11
9
15
2
19
17
10
1
Strap hook
SD card slot
AV port
Macro switch
LCD screen
Microphone
Lens
USB interface
USB switch
Battery door
Delete
Mode
Left
UP
Right
Power on / off
Speaker
REC
Down
Battery indicator
2
Memory or SD card
indicator
3
4
White balance
Selected Resolution
5
Recording mode
6
Normal / Macro
mode indicator
Zoom
Exposure value
Counting indicator
7
8
9
AV Cable
(2) AA Batteries
Hand Strap
Installation CD
Hook for attaching the wrist strap to the camera.
SD card slot.
For television connection.
Normal mode: photographs from 0.5m - infinity.
Macro mode: close-up photographs (11cm - 18cm).
Display photographs, video clips, camera setting and menu.
For voice input.
Records the image to be taken. Note: Keep the lens clean. Dirt and fingerprints will affect the quality of the picture.
Download photographs and video clips to a computer.
Slide it to pop-up the USB interface.
2xAA alkaline batteries.
Press it to delete the photo or video clip in playback mode.
Press it to select different mode/Press and hold it to enter setting menu.
For LEFT selection in menu mode.
For UP selection. Digital zoom in.
For Right selection in menu mode.
Press this button to turn on, press again to turn off.
Speaker.
Press this button to take photographs, start/stop recording a video clip or to confirm changes in menu mode.
For Down selection in menu mode. Digital zoom out.
Camera Settings
1
Cinecam
DV Camcorder
Carrying Case
Warranty / Registration Card
Quick Start Guide
Status Icons
5
12
Your order has been carefully packaged and inspected. The following should be included in your package. Please
inspect the contents of the package to ensure that you have received all items and that nothing has been damaged.
If you discover a problem, please contact us immediately for assistance.
The batteries are full.
The batteries are empty.
Internal Memory or SD card. Photos will be
stored in SD card. If not, photos will be
stored in built in memory.
White balance selection.
12M= 3920x2940; 8M= 3264x2448
5M= 2560x1920; 3.1M = 2048x1536;
1.3M= 1280x960; VGA= 640x480
Photograph mode.
Videos capture mode.
Normal mode (0.5m – infinity).
Macro mode (11cm –18cm).
Show zoom value.
Show EV± value.
Show time left in DV mode
Show pictures left in DC mode
Show recording time during recording
Quality setup
Image Size
White Balance
EV setup
Stamp
Camcorder Settings
Super Fine (Default) /
Fine / Normal
12M pixel resolution
8.0M pixel resolution
5.0M pixel resolution
3.1M pixel resolution
1.3M pixel resolution
VGA resolution
Auto (Default)
Sunny
Cloudy
Fluorescent
Tungsten
0.0,+/-0.3, +/-0.7,
+/-1.0,
+/-1.3, +/-1.7,
+/-2.0
Off (Default) / Set
Picture quality set-up
Movie Size
3920 x 2940
3264 x 2448
2560 x 1920
2048 x 1536
1280 x 960
640 x 480
Automatic white balance
Select for daylight surrounding
Select for cloudy surrounding
Select for fluorescent surrounding
Select for tungsten lighting
White Balance
EV setup
VGA
QVGA
Auto (Default)
Sunny
Cloudy
Fluorescent
Tungsten
0.0,+/-0.3, +/-0.7,
+/-1.0,
+/-1.3, +/-1.7,
+/-2.0
3
4
AWB
VGA
2
1
5
6
1.0x
7
EV0.0
[ 00:00 ]
8
9
Setup Settings
640 x 480
320 x 240
Automatic white balance
Select for daylight surrounding
Select for cloudy surrounding
Select for fluorescent surrounding
Select for tungsten lighting
Level of exposure
Auto off
1min / 3min / Off
Beep
Brightness
Display setup
On / Off
0.0,+/-2.0, +/-1.0,
NTSC
PAL
Yes/No
YYYY / MM / DD
50Hz
60Hz
Yes / No
English (Default) / TChinese / S-Chinese /
French / Deutsch /
Italian / Spanish /
Portuguese / Japanese
Format
Date/Time
Flicker
Default setup
Language
Level of exposure
Auto power off in1min, 3min(default)
if no operation or Off
Turn On / Off the beep sound
American & Japanese video format
European video format
Format the memory card
Date and Time setting
Main European electricity frequency
Main American electricity frequency
Restore to default setting
Select display language
DD, MM, YYYY
Operating Instructions
STEP 1. Installing the Battery:
Formatting the Memory or SD Card:
STEP 3. Taking Video or Photographs:
STEP 4. Playback Photographs / Videos Clips :
1. Open the battery door.
2. Insert (2) AA alkaline batteries into the camera.
3. Power on / off by holding
for 3 seconds.
Warning: Formatting will erase everything on the card
1. Power on ADVC01F.
2. Press Mode to set ADVC01F to photo mode (
) or video mode (
).
3. Depending on the distance to the object being photographed, use Macro switch
to adjust the distance. Select the flower symbol ( ) to take a close up phot
graph (11cm –18cm). To take video or photograph of surroundings or people
(0.5m - infinity), set the Macro switch to Normal mode (
).
4. Use the LCD screen to aim the object you wish to take video or photograph.
5. Press REC button.
Photographs Playback :
STEP 2. Inserting a Memory Card (not included)
ADVC01F has a very small amount (16MB) of built-in memory. It is highly recommended to increase the memory capacity with a SD or SDHC memory card (not
included). Follow the instructions below to insert the optional SD / SDHC memory
card into the camera.
1. Turn off the camera.
2. Insert the SD card into the camera.
Note: There is only one correct direction to insert the SD memory card into the slot. Do not force the
card into the slot, or else it may damage both the camera and the SD memory card.
Note: Most memory cards come pre formatted. If your memory card is not formatted, please follow
these simple procedures.
Setting the Resolution:
Caution: 1) Taking picture for fast-moving object is not recommended.
2) Image may be distorted when taking picture in a moving vehicle.
ADVC01F can be set to different resolutions.
1. Press and hold Mode button to enter setting menu;
2. Select Resolution by navigation keys and press REC to confirm;
3. Different resolutions will be displayed. Select the desired resolution by
navigation keys and press REC to confirm the selection.
DV
DC
Lens
Focus range
Macro mode
Digital zoom
LCD display
White balance
Built-in memory
External memory card
File format
PC interface / TV-out
Power source
5.0 Mega pixel CMOS sensor
VGA (640x480) / QVGA (320x240)
12.0 Mega pixels: (3920x2940) (Hardware Interpolation)
8.0 Mega pixels: (3264x2448) (Hardware Interpolation)
5.0 Mega pixels: (2560x1920)
3.1 Mega pixels: (2048x1536)
1.3 Mega pixels: (1280x960)
VGA: (640x480)
F/2.8 f=8.5mm
0.5m. ~ Infinity
11cm – 18cm
8x
2.0" real color LTPS TFT
Auto /Sunny / Cloudy / Fluorescent / Tungsten
16 MB Flash memory
SD card supports up to 8GB
Picture: JPEG, Video: AVI,
USB 1.1 / NTSC, PAL
2xAA alkaline batteries. (rechargeable batteries not recommended)
Yellow
White
For standard
definition TV
Audio
TV
Cause
Solution
Can not power on the unit
Low battery power. Battery placed at wrong
polarities.
The memory card hasn’t been formatted
correctly or memory is full.
Replace or install the battery correctly.
Connection failure.
Make sure all cable connections are secured and restart the computer if necessary.
1. ADVC01F is not held steadily
2. ADVC01F lens is dirty.
3. ADVC01F is set to the wrong focus mode.
1. Hold ADVC01F steadily until it beeps when taking video photo.
2. Clean the lens with soft dry cloth.
3. Set the macro/normal mode according to the distances of subject.
If the memory is full, use a different memory card. Format the memory card if it was
not formatted.
Warning: Format will erase everything on the card.
If you need further assistance, please contact the Aluratek support department for troubleshooting prior to returning this device.
E-mail: [email protected]
Web: www.aluratek.com/support
keys to select the
Video Clips Playback:
1. When video clips are displayed, press REC to play, and press again to pause;
2. Press
or
keys for fast forward or backward;
3. Press Mode to exit.
STEP 5. Delete Photographs and Video Clips:
1. Press MODE to select Playback mode.
2. Press and hold MODE button to enter Delete mode.
3. Select single or all then press REC to confirm.
Note: you can also press Delete button to delete photograph or video clips in playback mode.
Software Installation:
How to upload to Youtube from MediaImpression:
1. Insert CD to your computer.
2. Select “Install MediaImpression”
3. Follow the onscreen instruction to install the
software.
1. Select the video that you like to upload
2. Click on the YouTube icon in menu bar
3. Complete your YouTube
account information
4. Fill in the video info and click “Upload”
Connect to computer:
1. Power on ADVC01F
2. Slide the USB switch to open the USB connector
3. Connect ADVC01F to the USB port on your
computer
4. ADVC01F will appear on your computer as a
“Removable Drive” in “My Computer”
5. You can manage your pictures/videos using the
MediaImpression software or click on the
“Removable Drive” directly.
Radio and TV Interference Statement
Problem
Can not find removable disk after
connecting the camera to the
computer.
Photos are blurry
ADVC01F has 8X zoom.
Zoom in or out by pressing the ▲or ▼ button, a number will appear on the display.
8.0x is the maximum zoom.
or
Red
Troubleshooting
Photos can not be saved when
taking pictures.
Zoom IN and OUT:
1. Press Mode button to enter Playback mode, use
desired video clip or photo.
2. Press ▲ or ▼ to zoom in or out the image.
Connect to Computer
Connect to TV
Specifications
Sensor
Image
resolution
1. Press and hold Mode button to enter setting menu;
2. Select Setup mode by navigation keys and press REC to confirm;
3. Select Format by navigation keys and press REC to confirm;
4. Press REC to format the card or memory.
Local (Irvine, CA): 949-419-6504
Toll free: 1-866-580-1978
WARNING!!! This equipment has been tested and found to comply with the limits of a
Class B digital device, pursuant to part 15 of the FCC rules. These limits are designed to
provide reasonable protection against harmful interference in a residential installation.
This equipment generates, uses and can radiate radio frequency energy and, if not
installed and used in accordance with the instruction, may cause harmful interference to
radio communications. However, there is no guarantee that interference will not occur in
a particular installation. If this equipment does cause harmful interference to radio or
television reception, which can be determined by turning the equipment off and on, the
user is encouraged to try to correct the interference by whatever measures may be
required to correct the interference.
Warranty
Aluratek warrants this product against defect in material or workmanship for 1 Year
from the date of purchase.
This warranty becomes invalid if the factory-supplied serial number or "warranty void"
sticker has been removed or altered on the product.
This warranty does not cover:
A) Cosmetic damage or damage due to acts of God
B) Accident, misuse, abuse, negligence or modification of any part of the product.
C) Damage due to improper operation or maintenance, connection to improper equipment,
or attempted repair by anyone other than Aluratek.
D) Products sold AS IS or WITH FAULTS.
IN NO EVENT SHALL ALURATEK'S LIABILITY EXCEED THE PRICE PAID FOR THE
PRODUCT FROM DIRECT, INDIRECT, SPECIAL, INCIDENTAL, OR CONSEQUENTIAL
DAMAGES RESULTING FROM THE USE OF THE PRODUCT, IT'S ACCOMPANYING
SOFTWARE, OR IT'S DOCUMENTATION.
Aluratek makes no warranty or representation, expressed, implied, or statutory, with
respect to it's products, contents or use of this documentation and all accompanying
software, and specifically disclaims it's quality, performance, merchantability, or fitness for
any particular purpose. Aluratek reserves the right to revise or update it's product, software
or documentation without obligation to notify any individual or entity.