1
PocketCam X
User Manual
AIPTEK Service
AIPTEK, Inc.
51 Discovery, Suite 100
Irvine, CA 92618, USA
TEL: 949-585-9600
FAX: 949-585-9345
http://www.aiptek.com
Online registration
http://www.aiptek.com/registration/registration.
htm
(Online registration entitles you to special
services, downloads and promotions.)
1. Do not drop, puncture or disassemble
the camera; otherwise the warranty
will be voided.
2. Avoid all contact with water and dry
hands before using.
3.
Do not expose the camera to high
temperature or leave it in direct
sunlight. Doing so may damage the
4. camera.
5.
Use the camera with care. Avoid
pressing hard on the camera body.
1
2
3
For your own safety, avoid using the
6. camera when there is a storm or
lightning.
Avoid using batteries of different
brands or types at the same time.
7. There is potential of explosion by doing
that.
Remove batteries during long periods
between usage, as deteriorated
8.
batteries may affect the functionality of
the camera.
9.
Remove batteries if they show signs of
leaking or distortion.
We suggest using only the accessories
supplied by the manufacturer.
4
5
6
7
8
9
Contents
Getting Started
3
1. Your camera parts
3
2. Loading the battery
4
3. Inserting and removing the SD/MMC card (optional)
5
Inserting the card
5
Removing the card
5
4. Attaching the strap (optional)
6
5. Using the tripod (optional)
6
Basic operation
7
1. Powering on and off
7
Using the Lens cover
7
Using the Power button
7
2. Setting the Mode switch
7
3. Taking still pictures
8
Snapshot
8
Focus
8
Zoom in/out
8
Flash strobe and self-timer
9
The LCD display under
mode
4. Recording movies
9
10
The LCD display under
mode
Playing Your Images on the LCD at Once
1. Viewing pictures and movies
The LCD display under
2. Deleting the picture and movie
~1~
10
11
11
mode
11
12
Advanced Operation and Settings
13
1. Using the MENU button
13
MENU under
mode
13
MENU under
mode
14
MENU under
mode
15
2. Configuring settings
16
Enjoying Viewing Your Images on a PC
17
1. Installing the PocketCam X driver
17
2. Connecting your camera to your computer
20
3. Copying pictures and movies to your computer
21
4. Viewing on your computer
23
Using the PC Camera Function for Fun
24
1. Installing the PocketCam X driver
24
2. Connecting your camera to your computer
24
3. Capturing immediate images to your computer
26
4. Advanced settings
28
Format settings
28
Properties settings
29
Troubleshooting
30
Other Information
32
1. Life of battery
32
2. LED indicator events
32
3. Storage Capacity
33
4. More on flicker
33
5. Specification
34
~2~
Getting Started
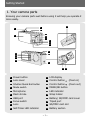
1. Your camera parts
Knowing your camera parts well before using it will help you operate it
more easily.
1
2
18
3
4
5
6
7
8
9
10
15
11
12
13
16
14
17
19 20
1
Power button
11
LCD display
2
Lens cover
12
Control button
(Zoom in)
3
Shutter /Quick Exit button
13
Control button
(Zoom out)
Mode switch
5 Microphone
14
MENU/OK button
15
LED indicator
6
Flash strobe
16
Strap holder
7
USB port
17
Battery/ SD/MMC card cover
8
Focus switch
18
9
Lens
19
Tripod port
SD/MMC card slot
10
Self-Timer LED indicator
20
Battery section
4
~3~
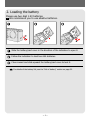
2. Loading the battery
Please use two AAA 1.5V batteries.
! We recommend you to use alkaline batteries.
Slide the battery/card cover in the direction of the indication to open it.
Follow the indication to load two AAA batteries.
Close inward and slide upward the battery/card cover to lock it.
For details of the battery life, see the "Life of battery" section on page 32.
~4~
3. Inserting and removing the SD/MMC card
(Optional)
!
Never eject the SD/MMC card while the camera is processing
data. (The LED indicator lights red while the camera is
processing data. For more information on the LED messages,
please see the "LED indicator events" section on page 32)
Inserting the card
Open the battery/card cover .
Insert the card in the direction of the
indicatior and push it in till the end of
the card plot.
Close the battery/card cover .
MENU/OK
Removing the card
Push in and release the card to remove it.
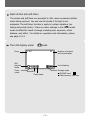
The camera comes with 16MB flash
memory built inside for storage. If
you do not insert a SD/MMC card, the
data will be saved in the built-in flash
memory automatically.
For details of the storage capacity of the SD/MMC card and internal memory (16MB
flash memory), please see the "Storage capacity" section on page 33.
~5~
4. Attaching the strap (Optional)
For convenience and safety, you may wish to
attach the carrying strap.
Thread the strap loop through the holder in the
direction indicated.
Fasten the strap as indicated.
5. Using the tripod (Optional)
The tripod can be attached to your camera to minimize camera
movement and ensure optimal image quality, particularly while taking
self-portraits, longer movies or in a macro mode.
Tight
Loose
Serrated wheel
Attach the tripod to the port on the bottom of the camera and rotate the
serrated wheel to lock it.
Unfold the legs to set up.
Adjust the alignment to the desired position.
~6~
Basic Operation
1. Powering on and off
Slide the Lens cover or press the Power button to power on or off the
camera.
Using the Lens cover
Using the Power button
Slide the Lens cover in the
direction of the arrow to turn the
power on or off.
Press the Power button to turn
the power on or off.
ON
OFF
While the Lens cover is open, you
can also press the Power button to
deactivate your camera.
If the camera is idle for over 60 seconds, the LCD display will be
turned off to conserve battery power; press any key to wake up
the camera. If it is idle for over 3 minutes, the camera will shut
down automatically.
2. Setting the Mode switch
This camera provides three modes to use. Push the Mode switch to
select the mode that you want to use.
Movie mode
Still Picture mode
Playback mode
~7~
3. Taking still pictures
Follow the steps to snap stills. Also use the Focus switch to set the
focus and the Control buttons
to adjust zoom in or zoom out so that
you can get best result.
Snapshot
Set the Mode switch to
.
Press the Shutter button to take pictures.
While the LED indicator is flashing red, the image is being captured; while the LED
turns green, the picture processing is done. (For more information of the LED message,
please see the "LED indicator events" section on page 32.)
Focus
Zoom in/out
Adjust the focus
before taking the
still picture. Push
the Focus switch ,
then select the
mode best for your picture. The
following table tells you which
focus mode you may choose
with the distance from the
object.
Press the Control button to
zoom in or the Control button
to zoom out.
USB
Macro
12"~24" (30cm~60cm)
Micro
24"~
(60cm~
)
~8~
Flash strobe and self-timer
The strobe and self-timer are provided to offer more convenient utilities
when taking pictures. You can use the strobe if the light is not
adequate. The self-timer function is useful in certain situations (ex.
taking self-portait photo). There are other settings in the MENU under
mode to affect the result of image, including size, exposure, white
balance, and effect. For details on operation and information, please
see page 13-14.
The LCD display under
Zoom
mode
1.0X
20
Still
pictures
mode
Focus
mode
Number of pictures
and movies taken
Life of battery
Storage mode
Resolution
Flash status
~9~
SD/MMC card:
Flash memory: non-icon
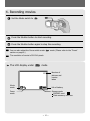
4. Recording movies
Set the Mode switch to
.
Press the Shutter button to start recording.
Press the Shutter button again to stop the recording.
You can also adjust the Focus switch under
section on page 8.)
mode. (Please refer to the "Focus"
The resolution of movie is 320*240 pixels.
The LCD display under
mode
20
Movie
mode
Number of
pictures and
movies
taken
Life of battery
Focus
mode
Storage mode
SD/MMC card:
Flash memory: non-icon
~ 10 ~
Playing Your Images on the LCD at Once
1. Viewing pictures and movies
Set the Mode switch to
.
The last image taken will be highlighted first on the LCD display.
Press the Control buttons
to select the previous or the next image,
then view it on the LCD display.
While playing a movie on the
camera, sound playback is not
available. Please copy the
movie to your computer (for
details, see page 17) to view it
with sound playback.
The LCD display under
Control buttons
mode
Picture and movie
number
The type
you are
viewing
Picture:
Movie:
1/20
Number of pictures
and movies taken
Life of battery
! It appears under the status
of low battery only.
Playback
mode
Storage mode
SD/MMC card:
Flash memory: non-icon
~ 11 ~
2. Deleting the picture and movie
Follow the steps if you want to delete one picture or movie.
Control buttons
MENU/OK button
Push the Mode switch to
image you want to delete.
, then press the Control buttons
to pick the
Press the MENU/OK button to enter the MENU.
Press the Control buttons
MENU/OK button.
to choose "Delete One", then press the
Pick "Yes" with the Control buttons
complete the action of deletion.
, then press the MENU/OK button to
Press the Shutter/Quick Exit button if you want to quick exit the MENU at anytime.
~ 12 ~
Advanced Operation and Settings
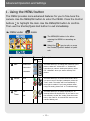
1. Using the MENU button
The MENU provides more advanced features for you to fine-tune the
camera. Use the MENU/OK button to enter the MENU. Press the Control
buttons to highlight the item. Use the MENU/OK button to confirm.
Then use the Shutter/Quick Exit button to exit immediately.
MENU under
mode
The MENU/OK button is for either
entering the MENU or executing an
action.
Select the
icon to exit; or press
the Shutter/Quik Exit button to quick
exit.
Item
Option
Icon
MENU
Size
Description
LCD
display
2048x1536
This item allows you to change the resolution of the
picture. Select the "1600x1200" or "2048x1536"
type when you want to develop 4x6 photos; select
the "1280x960" when you want to develop 3x5
photos.
1600x1200
1280x960
Strobe
This item allows you to set the flash strobe. When
you are not sure if the light is adequate, select the
"Auto" mode. The strobe will fire automatically if
more light is needed. If you have problems when
using the strobe, please refer to "Troubleshooting".
Auto
Off
SelfTimer
On
Off
N/A
This item allows you to specify the delay for 10
seconds before the shutter fires. If you want to use
the self-timer, set the "On" mode, press the Shutter
button, then wait for 10 seconds with Self-Timer LED
indicator flashing red.
~ 13 ~
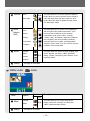
Exposure
Auto
N/A
Back Light
White
Balance
[WB]
N/A
Auto
Sunny
Cloudy
Fluorescent
Tungsten
Effect
Normal
B&W
N/A
Classic
Solarize
Setting
Option
Icon
Description
LCD
display
Normal
B&W
Setting
This item offers four scenes of photo imaging, such
as the "Normal" (no effect), "B&W" (black and
white), "Classic" (old picture), and "Solarize" (overexposed) effects.
mode
MENU
Effect
This item allows you to set the color temperature
with the light in the certain environment. If you
know the color conditions of your shooting
environment, such as the "sunny" (bright),
"cloudy" (dim), "fluorescent" (high color condition)
and "tungsten" (low color condition) situations,
select the mode you consider most appropriate.
Select the "Auto" mode if you are not sure the color
condition of the environment.
See page 16 for details.
MENU under
Item
This item allows you to set the exposure-metering
mode. When you are not sure the source of light or
when the object faces the light, select the "Auto"
mode. When the object is against the light, select
the "Back Light" mode.
N/A
This item allows you to set the effect of the
image, such as the "Normal" (no effect) and
"B&W" (black and white) effects.
See page 16 for details.
~ 14 ~
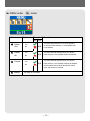
MENU under
Item
mode
Option
Icon
MENU
Delete
One
Yes
Delete
All
Yes
Format
Yes
No
No
No
Setting
Description
LCD
display
N/A
N/A
N/A
This item allows a picture or a movie stored in
your built-in flash memory or the SD/MMC card
to be deleted.
This item allows all files stored in your built-in
flash memory or the SD/MMC card to be deleted.
This item allows all files stored in your built-in
flash memory or the SD/MMC card will be deleted
and formatted. Note that all stored files will be
gone and cannot be restored.
See page 16 for details.
~ 15 ~
2. Configuring settings
Highlight the
icon with the Control buttons
in the MENU for
configuration. The following figures are the Setting displays under the
three modes. The table is the description of all items in the Setting.
Setting under
mode
Setting under
mode
Setting under
mode
The description of the Setting items
Item
Time
Option
Icon
Function
N/A
This item allows you to set the time of the camera.
Use the Control buttons to change the number of
settings. Press the MENU/OK button to confirm.
Year
Month
Day
Hour
Minute
Beep
Display
Date Stamp
On
Off
On
Off
On
Off
Flicker
50HZ
60HZ
This item determines whether the beep sounds
when operating the camera.
This item determines whether the small icons for
illustration will appear on the LCD screen.
This item determines whether a date stamp will
appear on the pictures taken.
This item allows you to set the flicker to prevent
nosie and get the best image. The default flicker
value is based on your country. See the "More on
flicker" section on page 33 for details.
Language
English
Duestch
This item allows you to set the usage of language
on the LCD display.
Default
Yes
No
This item determines whether all your settings will
be returned to the original factory default.
~ 16 ~
Enjoying Viewing Your Images on a PC
1. Installing the PocketCam X driver
Install the PocketCam X driver before connecting your camera to your
computer for the first time. Please follow the steps to complete the
installation.
! For Windows XP users: Skip step 1. (Installing the PocketCam X driver) and go to step 2.
(Connecting your camera to your computer) if you do not use the PC Camera function.
Turn on your computer.
! Do not connect the USB cable to your computer at this stage.
! Turn off other applications running on your computer.
Place the supplied CD into the CD-ROM drive.
Move the mouse to "PocketCam X Driver " and click it.
The title appears on the screen in
a few seconds.
Click the "PocketCam X Driver"
item.
If no title appears on the screen
Please follow the steps:
Double-click the "My computer " icon.
Double-click the CD-ROM drive icon ("PocketCam X (E:)*").
*The name of CD-ROM drive changes depending on how your
computer is set up.
~ 17 ~
The "Install Shield Wizard" dialog box is occurring and the automatic
installation begins. When a window as Fig1 appears, click "Next".
Fig 1
Notice for Windows 2000 users
The "Digital Signature Not Found" dialog box might show twice.
Please simply click "Yes". This camera works well for Windows 2000.
Follow the on-screen instructions and click "Finish".
! Do not restart your computer at this step.
~ 18 ~
When a window as Fig2 appears, please click "Yes" or "No" according to
your circumstance.
If you are not a Windows XP user, or never install DirectX 8.0 or above, click "Yes".
If you are a Windows XP user, or you already installed DirectX 8.0 or above, click
"No".
Fig 2
When a window as Fig3 or Fig4 appears, please click "Finish" or "Ok" to
complete the installation.
Fig 3
Fig4
The driver will be available after restarting your computer.
Take the CD out.
~ 19 ~
2. Connecting your camera to your computer
Turn on your computer.
Set the Mode switch on your camera to
or
.
Insert the USB cable to the USB port on your computer.
Insert the other end of the USB cable to the USB port on your camera.
~ 20 ~
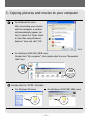
3. Copying pictures and movies to your computer
For Windows XP users
After connecting your camera
with the computer, a window
will automatically appear (as
Fig 5). Select the "Open folder
to view files using Windows
Explorer" item and click "Ok".
Fig 5
For Windows 2000/ ME/ 98SE users
Double-click "My computer", then double-click the new "Removable
Disk" icon.
Double-click the "DCIM" file folder.
For Windows XP users
For Windows 2000/ ME/ 98SE users
~ 21 ~
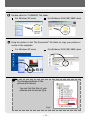
Double-click the "100MEDIA" file folder.
For Windows XP users
For Windows 2000/ ME/ 98SE users
Drag the picture to the "My Documents" file folder to copy your picture or
movie to the computer.
For Windows XP users
For Windows 2000/ ME/ 98SE users
The storage positions of the
pictures and movies
You can find the files of your
pictures and movies as Fig 6.
Fig 6
~ 22 ~
4. Viewing on your computer
Double-click "My Documents".
For Windows XP users
For Windows 2000/ ME/ 98SE users
Select the desired file and double-click it to view your picture or movie.
For Windows XP users
For Windows 2000/ ME/ 98SE users
Notice on disconnecting the camera from the computer for
Windows 2000/ ME users
To disconnect your camera from the computer, please follow these
steps:
Double-click
Click
on the task bar.
(USB Disk), then click "Stop ".
Confirm the device ( PocketCam X) on the confirmation screen
and click "Ok".
Follow the on-screen instruction to disconnect your camera
from your computer correctly and safely.
~ 23 ~
Using the PC Camera Function for Fun
1. Installing the PocketCam X driver
You need to install PocketCam X driver before using PC Camera or Video
Conferencing function.
! Skip step 1. (Installing the PocketCam X driver) and go to step 2. (Connecting your
camera to your computer) if you have already installed PocketCam X driver.
! If you never install PocketCam X driver, please finish the installation first. For details,
please see step 1. in the "Enjoying Viewing Your Image on a PC" section on page 17.
2. Connecting your camera to your computer
Turn on your computer.
Set the Mode switch on your camera to
.
Slide the Lens cover on your camera to prepare for capturing images.
Insert the USB cable to the USB port on your computer.
Insert the other end of the USB
cable to the USB port on your
camera.
~ 24 ~
Notice for Windows 2000/ ME/ 98SE users when using PC camera
function for the first time
When using PC Camera function (or Video Conferencing) for the first
time, please follow the steps below.
For Windows 2000 users
The dialog box "Digital Signature Not Found" might appear twice,
please simply click "Yes". This camera works well for Windows
2000.
For Windows ME users
Please select "Automatic search
for a better driver" when a
window as Fig 7 appears.
Fig 7
For Windows 98SE users
Click "Next" when a window as
Fig 8 appears.
Select "Search for a best driver
for your device" and click
"Next" when a window as Fig
9 appears.
Fig 8
Select the position where your
Windows 98SE driver is. You
might be asked to insert the
licensed Windows 98SE CDROM in your CD-ROM drive.
Follow the on-screen
instructions to complete the
installation.
~ 25 ~
Fig 9
3. Capturing immediate images to your computer
After the installation of driver and hardware, you can start to use the PC
Camera function or run other Video Conferencing applications. (This
manual provides information related to PC camera function only.)
Double-click the "PocketCam X" icon on the desktop to execute the
program, then you can begin to capture immediate images on your
computer.
OR
Click the "Start" menu and go up to "Programs", then go to the folder
named "PocketCam X" and click it.
If you want to use Video Conferencing function
Open the NetMeeting interface or other Video Conferencing
application and then start to use it.
~ 26 ~
Press the icon at the bottom on the PC camera panel to use the functions.
Preview Window
Record
Stop Recordings
Snapshot
Format
Setting
Preview or Stop Preview
Open Album
Video Source
Viewing your pictures and movies with PC camera interface
Click the "Open Album " icon at the bottom on the PC
camera panel, or go to the follow path to find the files.
C:\Program Files\PocketCam X\Work Temp
~ 27 ~
4. Advanced settings
Click the "Format" and "Setting" icon on the PC camera panel to bring
up advanced settings.
Format settings
Color Space / Compressio
Select one of the following
functions according to your needs.
RGB 24: Better image quality.
I420: The file will be
compressed to add
advantage for fasterspeed transformation.
Output Size
Set output size to change the size
of the preview window. The
default size is 320x240. Select
larger pixels when you need a
larger preview window.
~ 28 ~
Properties settings
Video Setting
Banding Filter
If the screen of your computer flickers when using PC Camera
function, change the "Banding Filter" item on the "Video Setting"
tab to avoid noise. Select "50Hz" or "60 Hz" until the screen stops
flickering. If you want to restore the default setting, select "Normal
AE".
Bandwidth
If the controller has no enough bandwidth available for the
PocketCam X USB camera, select a smaller value in the "Bandwidth"
item on the "Video Setting" tab. The smaller the bandwidth value is,
the less the bandwidth is occupied.
Custom Setting
You can use the default settings
or change the settings of
brightness, contrast, saturation,
sharpness, and hue on your own.
~ 29 ~
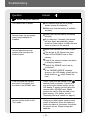
Troubleshooting
Question
Answer
When using the camera
The camera has no power.
The batteries may be out of power,
please change the batteries.
Make sure that the battery is installed
correctly.
Cannot power on my camera
even though batteries is
installed.
Make sure that the battery is installed
correctly.
Cannot take pictures and
movies when pressing the
Shutter button .
Make sure that the Lens cover is open.
If it is idle over 3 minutes, the camera
will shut down automatically, please
press the Power button or slide the Lens
cover to power on the camera.
The storage is full. Please free some
space of the SD/MMC card or flash
memory.
Check if the camera is under the status
of charging batteries.
Check if the SD/MMC card is set to
"protected".
If the "MEMORY ERROR" message
shows on the LCD display, please set the
Mode switch to
mode format the
card.
I did not delete the picture
and movie, but cannot find
the data in the SD/MMC card.
Check if your files are stored in the
camera's built-in memory. If there is a
icon at the right bottom section on the
LCD display, it means you are using the
camera with a SD/MMC card. Please
remove the card to find the data in the
flash memory. (For details, see the
"Removing the card" section on page 6)
Cannot set the strobe to the
"On" mode.
Charging the flash strobe requires more
power of batteries. When the battery is
under the status of low power, the strobe
On cannot be set. Please change the
batteries.
~ 30 ~
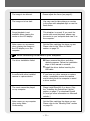
The image is too blurred.
Please adjust the focus (see page 8).
The image on is too dark.
You may need to take pictures or movies
in the place with adequate light or use the
flash strobe.
Sound playback is not
available when viewing the
movie on the LCD display.
This situation is normal. If you want the
movie with sound playback, please copy
the movie to your computer and view it on
the computer.
Noise occurs on my camera
when viewing the image on
the LCD display or on the
computer.
Set the filter matching the place you are.
Please refer to the "More on flicker"
section on page 33.
When connecting the camera to your computer
The driver installation failed.
Please remove the driver and other
related programs. Follow the installation
steps in this manual to reinstall.
Install the driver before inserting the
USB cable.
A conflict with other installed
camera or capture device.
If you have any other camera or capture
device, completely remove the camera
and its driver form the computer to avoid
a driver conflict.
The movie cannot be played
on my computer.
Please install DirectX 8.0 or above. (See
the "Installing the PocketCam X driver"
section on page 17 or download DirectX
8.0 and get more information on Microsoft
website.)
Noise occurs on my computer
when using Video
Conferencing.
Set the filter matching the place you are.
Please refer to the "Banding Filter" section
on page 29.
~ 31 ~
Other Information
1. Life of battery
Number
Condition
Taking Still Pictures
1600x1200
(without flash strobe)
Number
of images
Battery life
(minutes)
650
45
* Data above is for using alkaline batteries and in 25 C, with pictures taken every four
seconds.
!
Notes: 1. Life of battery will be shorten in the following conditions.
(1) Taking snapshot at low temperature.
(2) Turn on/off power repeatedly.
2. The table above is for reference only.
3. Using the flash light will decrease the number of pictures to be taken.
2. LED indicator events
Condition
LED color
Meanings
Status
(LED indicator)
Red
Busy (mode change, storage, or capture)
Green
Ready (waiting for command)
Flash
(LED indicator)
Red
Charging flash
Green
Ready (waiting for command)
Data
transformation
(LED indicator)
Red
Data transformation
Green
Ready (waiting for command)
Self-Timer
(Self-Timer
indicator)
Red (regularly)
Counting
Red (rapidly)
Capturing the picture
! Never eject the card or remove the batteries while the LED indicator is lit up red.
~ 32 ~
3. Storage capacity
Still picture
Memory
!
Movie
1280x960
Maximum
recording time
2048x1536
1600x1200
Flash memory (16MB)
20
30
48
2
SD/MMC card (32MB)
40
60
96
4
SD/MMC card (64MB)
80
120
192
8
SD/MMC card (128MB)
160
240
384
16
SD/MMC card (256MB)
320
480
768
32
SD/MMC card (512MB)
640
960
1536
64
Notes: 1. Actual number of pictures stored may vary (up to-+ 30%) depending
on the resolution and color saturation.
2. The table above is for reference only.
4. More on flicker
The default flicker setting of your camera is based on your country.
When using the camera abroad, please refer to the table below to
match the flicker setting with the place you go.
Country
England
Germany
France
Italy
Spain
Netherlands
Setting
50Hz
50Hz
60Hz
50Hz
50Hz
50Hz
Country
Portugal
America
Taiwan
China
Japan
Korea
Setting
50Hz
60Hz
60Hz
50Hz
50/ 60Hz
60Hz
~ 33 ~
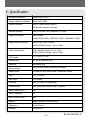
5. Specification
Hardware resolution
2048x1536 (3.1MP)
Sensor effective resolution
1600x1200 (2MP)
Internal memory
Built-in 16MB SDRAM (buffer)
16 MB flash memory (storage)
External memory
Built-in SD/MMC slot (maximum: 512 MB)
Digital still camera
JPEG Format
2048x1536 (3.1MP); 1600x1200 (2MP); 1280x960 (1.3MP)
Digital video camcorder
Motion JPEG (AVI) Format
QVGA (320x240 pixels) / up to 20 fps
Video conferencing
VGA (640x480 pixels) / up to 10 fps
QVGA (320x240 pixels) / up to 20 fps
LCD display
1.5" Color TFT LCD
Digital zoom
4x (for still pictures only)
Exposure
Auto/Back light
White balance
Auto/Sunny/Cloudy/Fluorescent/Tungsten
Image effect
4 modes for still pictures and 2 modes for videos
Lens
F=3.5, 8.5mm
Self Timer
10 seconds
Interface
USB 1.1 (USB 2.0 compatible)
Power saving
Auto power-off if idle for over 3 minutes
Built-in microphone
Yes
Built-in speakers
No
Built-in flash strobe
Yes
Battery
AAAx2 (alkaline recommended)
Dimension
3.4"x1.6"x1.2"
Package
PocketCam X
~ 34 ~
82-220-90270v1.0