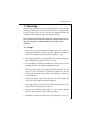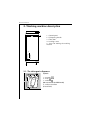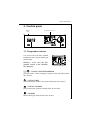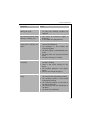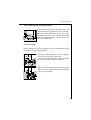
1
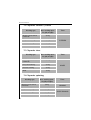
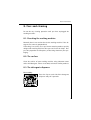
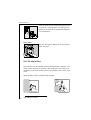
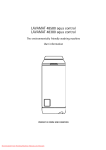
LAVAMAT 40810
LAVAMAT 40820
The environmentally friendly washing machine
User information
PERFEKT IN FORM UND FUNKTION
Summary
SUMMARY
Warnings .......................................................................................................3
Usage ..............................................................................................................3
Precautions against frost .........................................................................4
Scrapping ......................................................................................................4
Protection of the environment ..............................................................5
Washing machine description ................................................................6
The detergents dispenser ..........................................................................6
Control panel ...............................................................................................7
Programme selector ...................................................................................7
Additional programme pushbuttons ....................................................9
Consumptions and programme durations ....................................... 11
Washing guide .......................................................................................... 12
How to do a wash ..................................................................................... 15
Programmes tables .................................................................................. 17
Care and cleaning .................................................................................... 19
Operating problems ................................................................................ 22
Installation and connection instructions ......................................... 25
Warnings .................................................................................................... 25
Washing machine dimensions ............................................................. 26
Installation ................................................................................................ 27
Technical characteristics ....................................................................... 31
Garantee conditions and After Sales Service ................................. 31
2
User’s instructions
1. Warnings
Keep this user’s manual with your washing machine. If you sell your
washing machine or give it away, make sure that it is accompanied by
its user’s manual. The new user can then be informed of how the
washing machine operates and read relevant warnings.
These warnings have been written for your safety and for the safety of others. Please read these comments carefully before installing and using your washing machine. Thank you for your
attention.
1.1. Usage
• When you receive your washing machine, unpack it or have it
unpacked immediately. Check its general appearance. Make any
reserves in writing on the delivery form and keep a copy.
• Your washing machine was designed for use by adults. Make sure
that children do not touch it or use it as a toy.
• Do not modify or attempt to modify the characteristics of this
washing machine. This could be dangerous for you.
• Your washing machine is intended for normal domestic use. Do
not use it for commercial or industrial purposes of for any
purpose other than that for which it was designed : to wash, to
rince and to spin.
• Unplug the power suplly plug and close the water supply tap
every time after using your washing machine.
• Only wash articles that can resist machine washing. Refer to the
instructions on the label for each article.
• Do not wash underwear with bones, or any material without
hems, or torn materials in your washing machine.
• Remember to remove all coins, safety pins, boraches, screws, etc.,
3
User’s instructions
before each wash. They can cause serious damage if they are left in
your washing.
• Do not put articles in your washing machine if you have used a
solvent, alcohol, trichloroethylene, etc., to remove stains from
them. If you must use these stain removers, wait until the product
has evaporated before putting the articles in the drum.
• Collect all small articles such as socks, belts, etc., in a small cloth
bag or pillow case.
• Use the quantity of detergent indicated in the «proportioning of
detergents» section.
• Always unplug the washing machine before cleaning it and doing
any maintenance.
1.2. Precautions against frost
If your washing machine is exposed to temperatures below 0°C, take
the following precautions :
• Close the tap and disconnect the water supply pipe.
• Put the end of this pipe and the drain pipe into a bowl on the floor.
• Select the «Drain» programme and make sure it works until it is
complete.
• Switch the washing machine off by putting the program selector
to the «Off»* position or pressing on the «On/Off»* key.
• Unplug the washing machine.
• Screw in the water inlet pipe and install the drain pipe.
Water that remained in the pipes will then be evacuated, thus preven-
4
*depending on model
User’s instructions
ting the formation of frost or ice that can damage your washing
machine.
The next time you want to use your washing machine, make sure that
it is installed in a room in which the temperature is above 0°C.
1.3. Scrapping
All materials marked with the
symbol can be recycled. Put them
in a waste tip (ask for information from your municipal offices) so
that they can be recovered and recycled.
When you take your washing machine to the tip, make sure that
everything that could be dangerous is out of service ; cut the power
supply cable flush with the surface of your washing machine.
The symbol
on the product or on its packaging indicates that
this product may not be treated as household waste. Instead it shall
be handed over to the applicable collection point for the recycling of
electrical and electronic equipment. By ensuring this product is disposed of correctly, you will help prevent potential negative consequences for the environment and human health, which could
otherwise be caused by inappropriate waste handling of this product.
For more detailed information about recycling of this product, please
contact your local city office, your household waste disposal service
or the shop where you purchased the product.
1.4. Protection of the environment
We recommend that the following instructions should be followed to
achieve savings in water and energy and therefore to contribute to
protection of the environment:
• If possible, use the washing machine at full capacity rather than
with partial loads (however, do not overload the drum).
• Only use the Prewash or Soak function for very dirty washing.
• Use a detergent dose adapted to the water hardness (see «proportioning of detergents» section) and to the amount of washing
and how dirty it is.
5
User’s instructions
2. Washing machine description
1
2
1 - Control panel
2 - Lid opening handle
3 - Filter door
4 - Leveling screws
5 - Lever for moving the washing
machine
3
5
4
2.1. The detergents dispenser
Symbols
1
4
6
2
3
1 - prewash
2 - wash
3 - softener
(do not exceed the MAX mark)
4 - softener overflow
(if overfilled).
User’s instructions
3. Control panel
Control
lamp
Programmes selector
Pushbuttons
Thermostat
3.1. Programmes selector
It is used to select the most suitable
programme to the type and soiling of
your laundry.
Warning : never turn the programme selector in the anticlockwise direction.
- COTTON / LINEN WITH PREWASH
Prewash at 40°C - Main washing for cotton / linen to be boiled from
30°C to 95°C.
- COTTON / LINEN
Main washing for cotton / linen to be boiled from 30°C to 95°C.
- COTTON / COLOREDS
Main washing for cotton or coloreds from 30°C to 60°C.
- COLOREDS
Main washing for coloreds from 30°C to 40°C.
7
User’s instructions
- SYNTHETICS WITH PREWASH
Prewash at 40°C - Main washing for synthetics from 30°C to 60°C.
- SYNTHETICS
Main washing for synthetics from 30°C to 60°C.
- SYNTHETICS
Main washing for synthetics from 30°C to 40°C.
- DELICATES
Main washing for delicates from 30°C to 40°C.
- WOOL
Main washing for machine washable wool at 40°C.
- RINSES
3 separate rinses which can, for instance, be used to rinse and spin
handwash garments.
- SOFTENER
1 separate rinse which can, for instance, be used to rinse and spin
handwash garments.
- SPINNING
Separate spin for cotton and coloureds programmes.
- SHORT SPINNING
Separate short spin for synthetics, delicates and wool programmes.
- DRAIN
Drain water without spin afterwards.
8
User’s instructions
3.2. Additional programme pushbuttons
These pushbuttons can adapte the washing
programme to the degree of dirtiness of the
laundry. But it is not necessary to select them
in case of garments normally soiled.
Depending on the selected programme, different functions can be
combined.
- SPINNING SPEED REDUCTION PUSHBUTTON 800/400
The pushbutton 800/400 allows to realize a spinning to 400 rpm
(pressed pushbutton) or to 800 rpm (released pushbutton) on the cotton programmes.
If you wish end the synthetics, delicates and wool programmes by a
short spinning, the spinning speed will be either 600 rpm (released
pushbutton) either 400 rpm (pressed pushbutton).
- SPINNING SUPPRESSION
This pushbutton eliminates spin drying on all programmes. They terminate then with a drain.
- RINSE PLUS
This option adds more water in rinses on Cotton programmes. It is advised for allergic people to detergent products and in areas with fresh
water.
3.3. Thermostat
Use the thermostat to choose the temperature of the washing water. You can choose any
temperature between cold « » and 95°C.
You can use the «E» position if you want to
realize an economical programme.
The temperatures given in the programmes
table are provided as a guide. You can vary
them using the thermostat knob on your
washing machine. Always scrupulously respect the temperature shown on the label on each item of washing.
9
User’s instructions
3.4. Progress within the programme
The programme selector turns gradually and shows you how far the
programme has advanced.
10
User’s instructions
4. Consumptions and programme durations
Timer / Temperature
Washing
load
in kg
Water
consumption
in liters
Energy
consumption
in kWh
Duration in
minutes
WHITE/COLOUREDS 95
4,5
63
2,00
130
WHITE/COLOUREDS 60*
4,5
59
1,20
130
WHITE/COLOUREDS 40
4,5
59
0,70
85
SYNTHETICS 60
2,0
47
1,00
80
DELICATES 30
2,5
47
0,40
55
WOOL 30
1,0
45
0,50
50
*Programme setting for testing in accordance with standard EN 60456.
Values given in the above table are provided as a guide and may vary
depending on the water supply temperature and pressure, and your
electricity power supply mains voltage.
11
User’s instructions
5. Washing guide
5.1. Sorting and preparing your washing
• Sort the washing by type and care symbol (see chapter 5.4: International symbols for care of textiles): normal wash for strong
washing that can resist energetic wash and spin; delicate wash for
delicate washing that should be treated more carefully. For mixed
loads composed of articles of different types of fibers, choose a
program and temperature suitable for the most fragile fiber.
• Wash white washing and color washing separately. Otherwise, the
white washing may be colored or look gray.
• New clothes very often have too much color. Preferably wash new
clothes separately for the first time. Respect "wash separately" and
"wash several times separately" care instructions.
• Empty pockets and spread out the washing.
• Take off all loose buttons, pins and hooks and eyes. Close zip fasteners, tie knots in laces and straps.
• Turn clothes made of several layers of textiles (sleeping bags, anoraks, etc.), colored hosiery and wool and textiles with add-on decorations, inside out.
• Wash small delicate items (socks, tights, bras, etc) in a washing net.
• Treat curtains with special care. Remove curtain hooks and put net
curtains in a net bag or a sachet.
5.2. Washing load depending on the nature of the
material
The quantity of washing that you put in your drum must not exceed
the maximum capacity of your washing machine. This capacity may
vary depending on the nature of your textiles. Reduce the quantity of
washing if it is very dirty or if you have terry cloth type materials.
12
Not all textiles have the same volume and the same water retention capacity. This is why in general the drum should be filled:
• completely, but without excessive pressure for cotton and linen,
and for mixed washe,
• half full for treated cottons and synthetic fibers,
User’s instructions
• about one third full for very delicate articles such as net curtains
and wool.
For a mixed wash, fill the drum as required for the most delicate material.
5.3. Detergents and additives
Only use detergents and additives suitable for use in a washing machine. Read the manufacturer's instructions and respect sections 2.1
and 3.2.
Powder detergents can be used without restriction; liquid detergents
should be poured either in the proportioning bowl directly in the
drum, or in the wash compartment provided that the washing machine is started immediately; detergents in tablets or doses must be put
into the wash compartment of the detergents dispenser in your
washing machine.
The quantity of detergent to be used depends on the amount of
washing to be washed, the hardness of the water and how dirty the
washing is.
If the water is soft, you can reduce the doses slightly. Increase the
doses slightly if the water is hard (it is recommended to use a water
softener) or if the washing is very dirty or stained.
You can ask the water distribution company in your region or any
other competent authority to find out the degree of hardness of your
water.
13
User’s instructions
5.4. International symbols
14
User’s instructions
6. How to do a wash ?
Before the first wash in your washing machine, we recommend that
you should do a preliminary wash at 95°C with detergent but without
any washing to clean the tub.
6.1. Loading the washing
• Lift the machine cover.
• Open the drum by pressing on the locking button A; the two
flaps automatically separate.
• Insert the washing, close the drum and the cover of your washing
machine.
Warning : before you close the cover of
your washing machine, make sure that the
drum door is properly closed:
•the two flaps latched together,
•the locking button A extended.
A
6.2. Detergents
Your washing machine has been produced in order to reduce water
and detergents consumptions, so you can reduce the doses recommended by detergent manufacturers. Pour the powder detergent
dose into the wash compartment
and into the prewash compartment
if you chose the «prewash» option. Pour in the softener into
the
compartment. If you are using a different type of detergent,
refer to the «detergents and additives» section in the washing guide.
6.3. Press the pushbutton(s) if you wish.
6.4. Select the desired temperature
Choose a temperature that is appropriate for the programme that you
have chosen, with reference to the information given on the programmes table.
15
UIser’s instructions
6.5. Select the desired washing programme
Choose the programme depending on the natrue and dirtiness of your
washing. Turn the knob in the clockwise direction until you find the
chosen programme.
6.6. Start the washing programme
Check that the water tap is open.
Press the ON/OFF pushbutton
to start your washing machine : the
relevant light illuminates and the programme starts.
6.7. End of programme
The washing machine stops automatically and the programme selector
stops on a stop position.
The programmes end :
• by a spinning for the cotton and coloureds programmes.
• by a short spinning for the synthetics, delicates and wool programmes
Release the ON/OFF pushbutton
at the end of the cycle to switch
your washing machine off. The control lamp lights off. Release any
other pushbuttons.
Warning :
You can not open the lid until about 2 minutes after the appliance has
stopped.
Remove the laundry. Unplug the appliance and switch off the water inlet tap. Check that the drum is empty : any garments left in the appliance may be damaged during the next wash (shrinkage) or their
colour may run onto other garments.
Note : we recommend you to leave the lid and the drum opened after
use in order to air the tub.
16
User’s instructions
7. Programmes tables
7.1. Washing
This table does not include all possibilities, simply the best and most
usual adjustments in practice.
Washing
type
Washing to
be boiled
Max.
washing
quantity
5 kg
Timer
Temperature
Cotton / linen with
prewash
30-95
Cotton / Linen
without prewash
30-95
Cotton /
Coloureds
5,0 kg
Other possible
options
Resistant coloureds
30-60
800 / 400
NO SPINNING
RINSE PLUS
Delicate coloureds
30-60
Easy care
washing
2,5 kg
Resistant synthetics
with prewash
30 - 60
Resistant synthetics
30 - 60
Delicate synthetics
30 - 40
Delicate
washing
2,5 kg
Delicates
30 - 40
Wool
1,0 kg
Wool
40
800 / 400
NO SPINNING
17
User’s instructions
7.2. Separate softener / starch
Washing type
Max. washing quantity (dry weight)
Washing to be boiled
Coloureds
5,0 kg
Easy care washing
2,5 kg
Delicate washing
2,5 kg
Wool
1,0 kg
Timer
SOFTENER
7.3. Separate rinse
Washing type
Max. washing quantity (dry weight)
Washing to be boiled
Coloureds
5,0 kg
Easy care washing
2,5 kg
Delicate washing
2,5 kg
Wool
1,0 kg
Timer
RINSES
7.4. Separate spinning
Washing type
18
Max. washing quantity (dry weight)
Washing to be boiled
Coloureds
5,0 kg
Easy care washing
2,5 kg
Delicate washing /
2,5 kg
Wool
1,0 kg
Timer
SPINNING
SHORT SPINNING
User’s instructions
8. Care and cleaning
Do not do any cleaning operation until you have unplugged the
washing machine.
8.1. Descaling the washing machine
Normally there is no need to descale the washing machine if the detergent was correctly proportioned.
If descaling is necessary, use a special non-corrosive product specially
designed for washing machines that you can find in the shops. Respect the proportion and frequency of descaling shown on your packaging.
8.2. The surface
Clean the surface of your washing machine using lukewarm water
and a mild detergent. Never use alcohol, solvents or similar products.
8.3. The detergents dispenser
Disassembly:
Press the clips on each side of the detergents
dispenser and pull it upwards.
19
User’s instructions
You can thus clean it using running water and
a brush or a twisted cloth. Check that the siphons at the back of the detergents dispenser
are not blocked.
Reassembly :
Put the detergents dispenser in the notches
until they lock.
8.4. The drain filter
Clean the filter at the bottom of the washing machine regularly. The
"filter"* light comes on if the filter is blo-cked. In this case clean it immediately. If you wash washing that is very fluffy, clean it after each
wash.
Open the door, with a screwdriver for example:
20
*depending on model
User’s instructions
Drain residual water:
Put a receptacle under the drain. Turn the
cap in the anti-clockwise direction until it is
vertical to release residual water.
Remove the filter:
Unscrew the cap all the way and take it off.
Clean it tho-roughly with running water.
Put the assembly back and screw it in the
clockwise direction.
After cleaning the filter, you are required to closed the door. In fact,
for reasons of safety, the door must be closed when the appliance is
working.
21
User’s instructions
9. Operating problems
Many checks have been carried out during the manufacture of your
washing machine. However, if you face a problem with its operation,
please read the following sections before calling the After Sales service.
22
Symptom
Cause
The washing machine will
not start or will not fill:
• the washing machine is not correctly
connected, the electrical installation is
not working,
• the lid of your washing machine and
the drum flaps are not correctly
closed,
• you did not control the program start
correctly,
• there is a power failure,
• the water supply is closed off,
• the water tap is closed,
• the water inlet is blocked.
The washing machine fills
up but empties again immediately:
• the drain siphon is attached too low
(see installation section).
The washing machine fills,
then the programme knob
advances quickly to the
end of the cycle and the
machine drains or the wash
does not take place:
• the drum doors are not closed correctly.
The washing machine will
not spin or will not empty:
• the drain pipe is blocked or kinked,
• the drain filter is blocked,
• the «Drain» program or the «Rinse
hold»* option is selected,
• the height of the drain siphon is
wrong.
User’s instructions
Symptom
Cause
The cover does not open
during the cycle :
• the lid cannot open until 1 to 2 minutes after the washing machine has
stopped.
The washing machine stops
during a washing cycle :
• the water or electricity supply is
defective,
• a rinse hold* was programmed.
There is water on the floor
around the washing machine:
• excess detergent has made too much
foam that overflowed,
• the detergent is not suitable for
washing machine,
• the drain siphon is not hooked on properly,
• the drain filter was not put back into
place,
• the water inlet pipe is leaking.
Washing results are not satisfactory:
• the detergent is not suitable for
machine washing,
• there is too much washing in the
drum,
• the washing program is not appropriate,
• there is not enough detergent.
The machine is vibrating or
noisy:
• not all the packing was removed from
the machine (see unpacking section),
• the washing machine is not leveled
and properly packed,
• the washing machine is too close to
the wall or furniture,
• the washing is not well distributed in
the drum,
• the load is not sufficient.
23
User’s instructions
Symptom
Cause
The washing cycle is much
too long :
• the water inlet is blocked,
• there was a power supply failure or the
water was cut off,
• the motor temperature safety device
tripped,
• the water inlet temperature is lower
than normal.
Softener or Javel* water
flows through the overflow orifice when filling :
• you did not put in the right amount,
• the siphons at the back of the detergents dispenser are blocked.
*Depending on the model
24
User’s instructions
10. Installation and connection
instructions
10.1. Warnings
• This washing machine is heavy. Take care when moving it.
• You must remove the packing on the washing machine before
use. Failure to remove all transport protection devices can cause
damage to the washing machine or nearby furniture. The
washing machine must be unplugged while packing is being
removed.
• Do not allow any one other than a qualified plumber to make the
hydraulic connections necessary to install your washing machine.
• The washing machine must be plugged in to a power outlet with
a conform earth.
• Call a qualified electrician if the electrical installation in your
residence is such that you have to modify it before you can connect your washing machine.
• Please read the instructions in the "electrical connections" chapter carefully before connecting your washing machine.
• After installing your washing machine, make sure that it is not
standing on its electrical power supply cable.
• When your machine is installed on a carpeted floor, make sure
that the carpet does not close off the ventilation openings near
the bottom of the machine.
• The power supply cable may be only replaced by the After Sales
Service.
• Your manufacturer cannot be held responsible for any damage
resulting from a nonconform installation.
25
User’s instructions
10.2. Washing machine dimensions
Front and side views
Back view
26
User’s instructions
10.3. Installation
10.3.1. Unpacking
Packing used to protect internal parts of the washing
machine during transport must be removed before the
washing machine is put into service for the first time.
Remove all packing from the washing
machine. Tilt the washing machine sideways
and then remove the packing under the
motor, and straighten the washing machine.
Tilt the washing machine back-wards, rotate it
by a quarter of a turn on one of its corner to
remove the transport base.
Open the washing machine lid and remove the
immobilization packing and plastic films.
Close the lid.
Use a 10 mm spanner to remove the two
screws and spacers at the back.
27
User’s instructions
You can now see the openings that must be
closed with the caches in the pack attached to
the washing machine; do not forget to fold
down the central capsule.
Make sure that you have removed all these
parts from your washing machine and keep
them so that you can use them again if you
need them for future transport.
If you want to keep your washing machine aligned with the adjacent furniture, you can cut
the pipe support strip at the back of your
washing machine. Leave the two side closers in
place.
10.3.2. Position
Put the washing machine on a flat hard floor in a well ventilated room.
Make sure that your washing machine does not touch the wall or any
other furniture in the room.
28
User’s instructions
10.3.3. Moving your washing machine
If you want to move your washing machine, lift
it onto its rollers by pulling the lever at the bottom of the washing machine all the way to the
left. When you have put your washing machine
into the required location, put the lever back
into its initial position.
10.3.4. Leveling
Precise leveling will prevent vibrations, noise and movements of the
washing machine during operation.
Make the washing machine level by adjusting
the leveling screw that is too short.
Unscrew the stand and locking collar assembly
(lift the washing machine if necessary).
When the washing machine is stable, maintain
the stand on the ground and turn the locking
collar as far as posible.
29
User’s instructions
10.3.5. Water inlet
Please install the water inlet hose onto the back of your washing
machine :
- Insert the seal in the hole at the bottom of the
back panel (fig. 1).
- Screw on the bottom fitting of the water inlet
hose as shown in fig. 2 and fig. 3.
- Connect the feed hose connector onto the water
inlet tap, taking care to position the gasket
correctly.
- Turn on the water inlet tap.
The water inlet hose cannot be extended. If it is
too short, please contact the After Sales
Department.
10.3.6. Drain
- Assemble the hose holder onto the drain hose.
- Place the assembly in a drainage pipe (or in a
sink) at a height between 70 and 100 cm. Make
sure that it will not fall out.
You must provide an air intake at the end of the drainage hose, to
avoid any water being siphoned.
Important: the drainage hose must not be extended, on any account.
If it is too short, contact a qualified engineer.
10.3.7. Electrical connection
You can only connect this washing machine to 230 V single phase
power supply.
Check rating of the fuse line: 10 A at 230V.
The washing machine must not be connected through an extension
cable or a power bar. Check that the earthing connection is conform
with the regulations in force.
30
User’s instructions
11. Technical characteristics
DIMENSIONS
Height
Width
Depth
VOLTAGE / FREQUENCY
TOTAL POWER
WATER PRESSURE
Connection to the water
network
850 mm
397 mm
600 mm
230 V / 50 Hz
2300 W
Minimum
Maximum
0,05 MPa (0,5 bar)
0,8 MPa (8 bars)
Type 20x27
This washing machine complies with CEE directive 89-336
about the limitation of radioelectric disturbances and directive CEE 73-23 for electrical safety.
12. Garantee conditions and After Sales
Service
Please contact our AEG agents’ of the country directly.
31
AEG Hausgeräte GmbH
Postfach 1036
D-90327 Nürnberg
http: //www.aeg.hausgeraete.de
©Copyright by AEG
146 5959 01 - 05/06