1
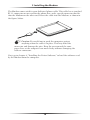
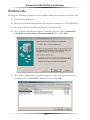
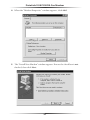
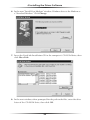
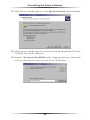
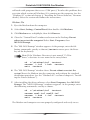
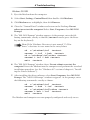
DataLink V.90 PC Card Fax Modem User Guide Table of Contents 1 Introduction 1 Package Contents 1 System Requirements 1 Technical Support 2 Before You Begin 3 DOS and Windows 3.1x 3 Windows 95 and 98 5 Windows NT 4.0 6 3 Installing the Modem 9 4 Installing the Driver Software 11 Windows 95 11 Windows 98 15 Windows Me 19 Windows NT 4.0 20 Windows 2000 23 Windows XP 29 Installing the Communcations Software 31 Troubleshooting 33 Uninstalling the Modem 33 Problems and Solutions 33 Limited Warranty 37 2 5 6 i Table of Contents ii Introduction 1 Thank you for purchasing the Actiontec DataLink V.90 PCMCIA Fax Modem. The Modem offers notebook computer users the mobility and connectivity options only a PCMCIA modem can deliver. Its small size and weight are a perfect match for the latest notebook computers. The Modem supports both the K56flex and ITU-T V.90 standards for connecting to the largest number of Internet Service Providers. It also features automatic selection of the best possible connection protocol. Whether faxing, sending e-mail, or connecting to the Internet, the Actiontec DataLink V.90 PCMCIA Fax Modem delivers the connectivity solutions needed for today’s fast-paced environment. Package Contents • Actiontec DataLink V.90 PCMCIA Fax Modem • Modem/phone cable • DataLink Installation CD System Requirements • Computer with Type II or Type III PCMCIA PC Card slot • MS-DOS, Microsoft Windows for Workgroups 3.11, Microsoft Windows 3.1, 95, 98, Millennium Edition (Me), NT 4.0 , 2000, or XP. 1 1 Introduction Technical Support Actiontec Electronics prides itself on making durable, high-quality, high-performance products. If you need assistance, the Actiontec Technical Support Department is available every day from 6 A.M. to 11 P.M. (MST) to provide professional support. Actiontec Electronics, Inc. 760 N. Mary Avenue Sunnyvale, CA 94085 Techinical Support Phone: 719.884.8300 E-mail: [email protected] Web site: www.actiontec.com/support 2 Before You Begin 2 Before connecting the Modem, select the operating system used and read the pre-installation information. DOS and Windows 3.1x Most portable computers include some form of Card and Socket Services. This software enables the computer’s internal PCMCIA controller to operate. If Card and Socket Services are installed, Windows 3.1 and Windows for Workgroups 3.11 do not require any special drivers to communicate with the Modem; install the communications software to use the Modem. If the version of the Modem purchased included communications software, see chapter 5, “Installing the Communications Software.” If unsure whether Card and Socket Services are installed, insert the Modem. If the computer beeps, the Modem should be configured and ready to use. If Card and Socket Services are not installed, the Point Enabler software must be installed. Installing Point Enabler If the computer does not have Card and Socket Services, the “Point Enabler” software must be installed. This software provides MS-DOS with the necessary drivers to interface with the Modem, but the ability to “hot swap” the Modem is lost. Point Enabler must be reinstalled whenever the Modem is removed. To install Point Enabler: 1. Insert the DataLink Installation CD included with the Modem into the computer’s CD-ROM drive. 2. Find pmxfm.exe and copy it to the root directory of the computer’s default hard drive. 3 2 Before You Begin 3. To run Point Enabler, enter the following at the DOS prompt: pmxfm c=x i=y and then press the Enter key on the keyboard. In the entry above, x specifies the COM port number (1-4) and y specifies the Interrupt (IRQ) used (1-15). Using 3 for the COM port and 9 for the IRQ works in most computers. 4. Once the driver software is loaded and working correctly, add the entry to your autoexec.bat file to run Point Enabler every time the computer is turned on. Example: pmxfm c=3 i=9 5. The config.sys file may need to be modified to exclude an address range when using Point Enabler. The two examples below show the most effective ranges and work with the majority of computers. Example A shows the most common exclusion range. Example B is an alternative if Example A does not work. Add a line to your config.sys file, as follows: Example A: device=c:\dos\emm386.exe noems x=d000-dfff Example B: device=c:\dos\emm386.exe noems x=c800-c8ff x=d000-dfff Note: Point Enabler is used for computers without Card and Socket Services software only. Also, Point Enabler operates in the DOS and Windows 3.1x environment exclusively. Do not use Point Enabler with a Cardbus-capable notebook computer or a computer running the Windows 95 (or newer) operating system. The computer is configured to use the Modem. Next, go to chapter 3, “Installing the Modem,” to continue installing and configuring the Modem. 4 DataLink V.90 PCMCIA Fax Modem Windows 95 and 98 If the Modem is the first PC Card purchased for the notebook computer, ensure the computer’s PCMCIA controller has been initialized and properly configured for Windows 95 and 98 by following these instructions: 1. After booting up the computer, select Start, Settings, then Control Panel. 2. In the “Control Panel” window, double-click PC Card. A properly installed PCMCIA controller causes the “PC Card (PCMCIA) Properties” window to appear. If the “New Hardware Found” window appears, the computer’s PCMCIA ports have not been configured. Follow the installation instructions in the window, and refer to the computer’s documentation for more information. The computer is configured to use the Modem. Next, go to chpater 3, “Installing the Modem,” to continue installing and configuring the Modem. 5 2 Before You Begin Windows NT 4.0 To ensure the computer is configured to use the Modem, the PCMCIA and COM 2 settings must be properly configured. PCMCIA Settings 1. After booting up the computer, select Start, Settings, then Control Panel. 2. In the “Control Panel” window, double-click Devices. 3. The “Devices” window appears. In the list box, scroll down and click Pcmcia once to highlight. If the PCMCIA device is set correctly, “Started” and “Boot” should appear in the “Status” and “Startup”columns, respectively. 4. If the PCMCIA device is not set to Boot and Started, click Startup, select Boot in the “Device” window, then click OK. 5. Close the “Devices” window and restart the computer. 6 DataLink V.90 PCMCIA Fax Modem COM 2 Settings To ensure COM 2 (the preferred COM port for a Windows NT 4.0 installation) is available for the Modem to use, Actiontec recommends disabling COM 2 throughout the System BIOS Setup routine. To do this: 1. See the computer’s documentation for instructions to run BIOS Setup. 2. Once BIOS Setup is running, locate the “Integrated Peripherals” section. 3. Locate the “COM 2” or “COM Port B” entry and disable it. 4. Save the settings before exiting. The computer is configured to use the Modem. Next, go to chapter 3, “Installing the Modem,” to continue installing and configuring the Modem. 7 2 Before You Begin 8 Installing the Modem 3 The Modem is a Type II PCMCIA card and installs in a Type II or Type III 68-pin PCMCIA slot. Notebook computers usually have PC Card slots located on the side of the computer. To install the Modem, slide it gently into the slot, with the label facing up. Press firmly until the Modem is seated completely in the slot. If the slot openings are recessed, it may be difficult to insert the Modem correctly. When the Modem is properly installed, it “clicks” into place, especially in newer notebook computers. The figure below shows the Modem being installed into a typical notebook computer. 9 3 Installing the Modem The Modem comes with its own dedicated phone cable. This cable has a standard RJ-11 connector on one end for the phone line, and a special connector that fits into the Modem on the other end. Insert the cable into the Modem, as shown in the figure, below. M Caution: Be careful not to push the computer against anything when the cable is in place. This may bend the connector and damage the pins. Keep the area around the computer clear, so the computer can move freely without damaging the cable or connector. Next, go to chapter 4, “Installing the Driver Software,” to load the software used by the Modem onto the computer. 10 Installing the Driver Software 4 After installing the Modem, the drivers software must be loaded onto the computer. Select the operating system used, then follow the instructions. Windows 95 There are two version of Windows 95: 95a and 95 OSR2. To discover which version is running on the computer, select Start, Settings, Control Panel, then double-click System. The version is displayed in the “General” tab. If the version is 4.00.950 or 4.00.950A, use the Windows 95a procedure. If the version is 4.00.950B, use the Windows 95 OSR2 procedure. Windows 95a To load the Modem’s software drivers onto a computer running Windows 95a: 1. Turn on the computer. 2. Insert the Modem into the computer’s PCMCIA slot. 3. When Windows detects the new hardware, the “New Hardware Found” window appears. Select Driver from disk provided by hardware manufacturer, then click OK. 11 4 Installing the Driver Software 4. The “Install From Disk” window appears. Insert the DataLink Installation CD in the CD-ROM drive of the computer, then click OK. 5. If Windows asks for an installation disk, click OK and enter the drive letter of the CD-ROM drive in the “Copy manufacturer’s files from” text box. Click OK again. The driver sofware is installed. 6. To determine which COM port and IRQ are assigned to the Modem, select Start, Settings, Control Panel, Modems, then Diagnostics. Click COM Port, then More Info to view the Modem’s properties. ” Next, go to chapter 5, “Installing the Communications Software.” 12 DataLink V.90 PCMCIA Fax Modem Windows 95 OSR2 To load the Modem’s software drivers onto a computer running Windows 95 OSR2: 1. Turn on the computer. 2. Insert the Modem into the computer’s PCMCIA slot. 3. Windows detects the Modem, and the first “Update Device Driver Wizard” window appears. Insert the DataLink Installation CD in the computer’s CD-ROM drive and click Next. 4. Another “Update Device Driver” window appears. After Windows has found the driver software for the Modem, click the Finish button. 5. If Windows asks for an installation disk, click OK, then Other Locations. Select the CD-ROM drive and click OK again. The driver software is installed. 13 4 Installing the Driver Software 6. To determine which COM port and IRQ are assigned to the Modem, select Start, Settings, Control Panel, Modems, then Diagnostics. Click COM Port, then More Info to view the Modem’s properties. Next, go to chapter 5, “Installing the Communications Software.” 14 DataLink V.90 PCMCIA Fax Modem Windows 98 To load the Modem’s software drivers onto a computer running Windows 98: 1. Turn on the computer. 2. Insert the DataLink Installation CD into the computer’s CD-ROM drive. 3. Insert the Modem into the computer’s PCMCIA slot. 4. The “Add New Hardware Wizard” window appears. Click Next. 15 4 Installing the Driver Software 5. When the next “Add New Hardware Wizard” window appears, select Search for the best driver for your device (Recommended), then click Next. 6. In the next window, click the CD-ROM drive check box, then click Next. 7. Windows locates the driver software. Click Next. If a “Can’t Find Driver” error appears, see “Alternate Windows 98 Installation” for an alternate installation procedure. 8. In the next window, click Finish. The driver software is installed. Next, go to chapter 5, “Installing the Communications Software.” 16 DataLink V.90 PCMCIA Fax Modem Alternate Windows 98 Installation 1. If Windows does not find the Modem’s driver software on the CD (see step 7 in the previous procedure), abort the process by clicking Back until the following window appears, select Display a list of all the drivers in a specific location… , then click Next. 2. When the next window appears, click Have Disk. 17 4 Installing the Driver Software 3. When the “Install From Disk” window appears, ensure the DataLink Installation CD is inserted in the computer’s CD-ROM drive. Verify that the drive letter of the CD-ROM drive appears in the “Copy manufacturer’s files from” list box, then click OK. 4. In the next window, ensure “ActionTec DataLink V.90 Fax Modem (LK)” appears in the “Models” text box, then click Next. 5. In the next window, Windows locates the driver software. Click Next. 6. When the last window appears, click Finish. The driver software is loaded. Next, go to chapter 5, “Installing the Communications Software.” 18 DataLink V.90 PCMCIA Fax Modem Windows Me To load the Modem’s software drivers onto a computer running Windows Me: 1. Turn on the computer. 2. Insert the DataLink Installation CD into the computer’s CD-ROM drive. 3. Insert the Modem into the computer’s PCMCIA slot. 4. The “Add New Hardware Wizard” window appears. Select Automatic search for a better driver (Recommended), then click Next. 5. The “Select Other Driver” window appears. Select the driver software located in the “WIN9XME” directory, then click OK. 19 4 Installing the Driver Software 6. When the final “Add New Hardware Wizard” window appears, click Finish. The driver software is loaded. Next, go to chapter 5, “Installing the Communications Software.” Windows NT 4.0 Before beginning this installation, ensure that the COM 2 port has been disabled in the system BIOS, and that the PCMCIA is set to “boot” and “started” as described in chapter 2, “Before You Begin.” To load the Modem’s software drivers onto a computer running Windows NT 4.0: 1. Insert the Modem into the computer’s PCMCIA slot. 2. Turn on the computer. 3. After the computer boots up, select Start, Settings, Control Panel, then Modems. 20 DataLink V.90 PCMCIA Fax Modem 4. When the “Modem Properties” window appears, click Add. 5. The “Install New Modem” window appears. Ensure the check box is not checked, then click Next. 21 4 Installing the Driver Software 6. In the next “Install New Modem” window, Windows detects the Modem as a “Standard Modem.” Click Change. 7. Insert the DataLink Installation CD in the computer’s CD-ROM drive, then click Have Disk. 8. In the next window, when prompted for the path to the files, enter the drive letter of the CD-ROM drive, then click OK. 22 DataLink V.90 PCMCIA Fax Modem 9. When prompted to select the the manufacturer and model of the Modem, click OK, then Next in the following window. The driver software is installed. Note: To verify Windows has found the Modem, select Start, Settings, Control Panel, then Modems. If dialing into a Windows NT Remote Access Server, or connecting to the Internet, Dial-Up Networking must be configured properly. See the Windows NT. documentation for details. Next, go to chapter 5, “Installing the Communications Software.” Windows 2000 To load the Modem’s software drivers onto a computer running Windows 2000: 1. Insert the Modem into the computer’s PCMCIA slot. 2. Turn on the computer. 3. A “Found New Hardware” window appears, stating that Windows has found a “Standard PCMCIA Card Modem.” 4. Right-click My Computer, then select Properties from the pop-up menu. 5. In the “System Properties” window, select Hardware, then Device Manager. 6. When the “Device Manager” window appears, expand the “Modems” section by clicking on the plus sign (“+”). 23 4 Installing the Driver Software 7. Double-click Standard PCMCIA Card Modem 8. The “Standard PCMCIA Card Modem Properties” window appears. Select Driver, then click Update Driver. 24 DataLink V.90 PCMCIA Fax Modem 9. The first “Upgrade Device Driver Wizard” window appears. Click Next. 10. In the next “Upgrade Device Driver Wizard” window, select Search for a suitable driver for my device (recommended), then click Next. 25 4 Installing the Driver Software 11. When the next window appears, select Specify a location, then click Next. 12. When the next window appears, insert the DataLink Installation CD in the CD-ROM drive of the computer. 13. Enter X:\Drivers\WindXP2k in the “Copy manufacturer’s files from” text box, where X is the drive letter of the CD-ROM drive. 26 DataLink V.90 PCMCIA Fax Modem 14. In the next window, click Next. 15. The “Digital Signature Not Found” window appears. Read the warning, then click Yes. 27 4 Installing the Driver Software 16. The last “Upgrade Device Driver Wizard” window appears. Click Finish. The driver software is installed. Note: To verify the driver software installed correctly, return to the Device Manager and locate “Actiontec 56k PCMCIA Fax Modem.” Double-click the icon, and in the Driver tab, view the driver information. Next, go to chapter 5, “Installing the Communications Software.” 28 DataLink V.90 PCMCIA Fax Modem Windows XP To load the Modem’s software drivers onto a computer running Windows XP: 1. Insert the Modem into the computer’s PCMCIA slot. 2. Turn on the computer and while it boots up, insert the DataLink Installation CD in the computer’s CD-ROM drive. 3. A “Found New Hardware” window appears. Select Install the software automatically (Recommended), then click Next. 29 4 Installing the Driver Software 4. The driver software installs. When the last “Found New Hardware Wizard” window appears, click Finish. The driver software is installed. Next, go to chapter 5, “Installing the Communications Software.” 30 Installing the Communcations Software 5 If the Modem came with a communications software package, Actiontec recommends using this software for the Modem. The default installation parameters of the software are specially configured to work with the Modem, and supports both data and fax modes. To install the communications software on your computer: 1. Insert the CD containing the communications sofware into the computer’s CD-ROM drive. 2a. If using Windows 3.1x, select File, Run, enter the CD-ROM drive letter, followed by setup. The software installs on the computer. 2b. If using Windows 95 or above, double-click My Computer, double-click the CD-ROM icon, then double-click setup.exe. The software installs on the computer. If another type of communications software is used, ensure it supports the Modem. Most software manufacturers have a listing of supported modems on their Web sites. If unsure whether the software supports the Modem, select Hayes Compatible or Standard Modem during the setup procedure. Doing this may work in certain cases. Some types of communications software allow manual input of parameters. If this is the case, see the table below, which contains the data/fax command standards supported: Data TIA/EIA-602 Fax TIA/EIA-578 for Class 1 Fax Init String AT&F&C1&D2W2 Note: Some programs must be configured to communicate with the Modem on the same COM port and/or IRQ setting used by the Modem. 31 5 Installing the Communcations Software 32 Troubleshooting 6 This section lists some common problems that may occur while using the Modem, and offers suggestions to solve them. Uninstalling the Modem Before attempting any troubleshooting, ensure the pre-installation procedure outlined in chapter 2, “Before You Begin,” was performed. If the Modem was installed without following the pre-installation procedure, follow these instructions (for Windows 95 and 98 only): 1. Eject the Modem from the computer. 2. Select Start, Settings, then Control Panel. 3. In the “Control Panel” window, double-click Modems. 4. Highlight the Modem, then click Remove. 5. Restart Windows and follow the pre-installation procedure described in chapter 2, “Before You Begin,” before attempting a reinstallation. Problems and Solutions If the Modem has been reinstalled, but it is still not functioning or Windows does not detect it, select the symptom, then follow the procedure. These troubleshooting procedures will correct the majority of installation problems that may be encountered when using the Modem. The Modem is not detected by Windows. Usually, this problem can be fixed by resetting the PCMCIA Socket controller. Before attempting this procedure, uninstall the Modem using the “Uninstalling the Modem” procedure, above. 1. Select Start, Settings, Control Panel, then double-click System. 33 6 Troubleshooting 2. Select Device Manager, then click on the plus sign (+) next to “PCMCIA.” 3. Click on the icon to highlight, then click Remove. 4. Exit Device Manager and restart Windows. 5. After booting up, Windows should detect new hardware for the PCMCIA Socket (if not, select Start, Settings, Control Panel, then double-click PC Card). 6. In the PCMCIA windows that appears, select No, No, and then Finish. The PCMCIA controller is reset. 7. Select Start, Settings, Control Panel, then double-click PC Card. The window that appears should state that socket 1 and socket 2 are empty. 8. Reinstall and reconfigure the modem as explained in chapter 3, “Installing The Modem,” and chapter 4, “Installing the Driver Software.” “Cannot Open COM Port” Error If this error appears, no COM ports available for the Modem to use. To correct, disable any unused COM ports listed in Windows. M Caution: COM Port 1 (COM 1) is usually required by the computer and should not be removed. 1. Go to Start, Settings, Control Panel, then double-click System. 2. Select Device Manager, then double-click Ports. 3. “COM 1” should be listed. If “COM 2,” “COM 3,” or “COM 4” are listed, click the icon once to highlight, then click Properties. 4. When the “Properties” window appears, uncheck “Original Configuration, Current” (Windows 95a), or check “Disable in this hardware profile” (Windows 95 OSR2). 5. If another window appears, select Yes, then click OK. A red “X” appears on the disabled COM port icon. Windows 95 will not load the driver software from the Installation CD. In rare instances, Windows 95 identifies the Modem as new hardware, but will not load the driver software from the Installation CD. Instead, it uses driver software from a previously installed device. As a result, the Modem will not work with Windows 95 programs such as Dial-Up Networking (but 34 DataLink V.90 PCMCIA Fax Modem will work with programs that access COM ports). To solve this problem, first ascertain which version of Windows 95 is running on the computer (see the “Window 95” section of chapter 4, “Installing the Driver Software,” for more details). Select the version and follow the instructions. Windows 95a 1. Eject the Modem from the computer 2. Select Start, Settings, Control Panel, then double-click Modems. 3. Click Modem once to highlight, then click Remove. 4. Close the “Control Panel” window and return to the Desktop. Do not reboot or restart the computer! Select Start, Programs, then MS-DOS Prompt. 5. The “MS-DOS Prompt” window appears. At the prompt, enter the following commands, exactly as shown (<enter> means press the Enter key on the keyboard): Note: If the Windows Directory is not named “C:/Windows,” substitute its new name in the entry below. cd c:\windows\inf <enter> rename *.inf *.bak <enter> exit <enter> 6. The “MS-DOS Prompt” window closes. Do not reboot or restart the system! Insert the Modem into the computer and perform the standard installation procedure (see the “Windows 95” section of chapter 4, “Installing the Driver Software”). 7. After installing the driver software, select Start, Programs, then MS-DOS Prompt. The “MS-DOS Prompt” window reappears. At the prompt, enter the following commands, exactly as shown. cd c:\windows\inf <enter> rename oem0.inf oem20.inf rename *.bak *.inf <enter> exit <enter> The Modem and computer are now properly configured and ready to use. 35 6 Troubleshooting Windows 95 OSR2 1. Eject the Modem from the computer 2. Select Start, Settings, Control Panel, then double-click Modems. 3. Click Modem once to highlight, then click Remove. 4. Close the “Control Panel” window and return to the Desktop. Do not reboot or restart the computer! Select Start, Programs, then MS-DOS Prompt! 5. The “MS-DOS Prompt” window appears. At the prompt, enter the following commands, exactly as shown (<enter> means press the Enter key on the keyboard). Note: If the Windows Directory is not named “C:/Windows,” substitute its new name in the entry below. cd c:\windows\inf <enter> rename *.inf *.bak <enter> cd c:\windows\inf\other <enter> rename *.inf *.bak <enter> exit <enter> 6. The “MS-DOS Prompt” window closes. Do not reboot or restart the computer! Insert the Modem into the computer and perform the standard installation procedure (see the “Windows 95” section of chapter 4, “Installing the Driver Software”). 7. After installing the driver software, select Start, Programs, then MS-DOS Prompt. The “MS-DOS Prompt” window reappears. At the prompt, enter the following commands, exactly as shown. cd c:\windows\inf <enter> rename *.bak *.inf <enter> cd c:\windows\inf\other <enter> rename *.bak *.inf <enter> exit <enter> The Modem and computer are now properly configured and ready to use. 36 Limited Warranty Hardware: Actiontec Electronics, Inc., warrants to the end user (“Customer”) that this hardware product will be free from defects in workmanship and materials, under normal use and service, for twelve (12) months from the date of purchase from Actiontec Electronics or its authorized reseller. Actiontec Electronics’ sole obligation under this express warranty shall be, at Actiontec’s option and expense, to repair the defective product or part, deliver to Customer an equivalent product or part to replace the defective item, or if neither of the two foregoing options is reasonably available, Actiontec Electronics may, in its sole discretion, refund to Customer the purchase price paid for the defective product. All products that are replaced will become the property of Actiontec Electronics, Inc. Replacement products may be new or reconditioned. Actiontec Electronics warrants any replaced or repaired product or part for ninety (90) days from shipment, or the remainder of the initial warranty period, whichever is longer. Software: Actiontec Electronics warrants to Customer that each software program licensed from it will perform in substantial conformance to its program specifications, for a period of ninety (90) days from the date of purchase from Actiontec Electronics or its authorized reseller. Actiontec Electronics warrants the media containing software against failure during the warranty period. The only updates that will be provided are at the sole discretion of Actiontec Electronics and will only be available for download at the Actiontec Web site, www.actiontec.com. Actiontec Electronics’ sole obligation under this express warranty shall be, at Actiontec Electronics’ option and expense, to refund the purchase price paid by Customer for any defective software product, or to replace any defective media with software which substantially conforms to applicable Actiontec Electronics published specifications. Customer assumes responsibility for the selection of the appropriate applications program and associated reference materials. Actiontec Electronics makes no warranty or representation that its software products will meet Customer’s requirements or work in combination with any hardware or applications software products provided by third parties, that the operation of the software products will be uninterrupted or error free, or that all defects in the software products will be corrected. For any third-party products listed in the Actiontec Electronics software product documentation or specifications as being compatible, Actiontec Electronics 37 Limited Warranty will make reasonable efforts to provide compatibility, except where the non-compatibility is caused by a “bug” or defect in the third party’s product or from use of the software product not in accordance with Actiontec Electronics published specifications or user guide. THIS ACTIONTEC ELECTRONICS PRODUCT MAY INCLUDE OR BE BUNDLED WITH THIRD-PARTY SOFTWARE, THE USE OF WHICH IS GOVERNED BY A SEPARATE END-USER LICENSE AGREEMENT. THIS ACTIONTEC ELECTRONICS WARRANTY DOES NOT APPLY TO SUCH THIRDPARTY SOFTWARE. FOR THE APPLICABLE WARRANTY, PLEASE REFER TO THE END-USER LICENSE AGREEMENT GOVERNING THE USE OF SUCH SOFTWARE. Obtaining Warranty Service: Customer may contact Actiontec Electronics Technical Support Center within the applicable warranty period to obtain warranty service authorization. Dated proof of purchase from Actiontec Electronics or its authorized reseller may be required. Products returned to Actiontec Electronics must be pre-authorized by Actiontec Electronics with a Return Merchandise Authorization (RMA) number marked on the outside of the package, and sent prepaid and packaged appropriately for safe shipment, and it is recommended that they be insured or sent by a method that provides for tracking of the package. The repaired or replaced item will be shipped to Customer, at Actiontec Electronics’ expense, not later than thirty (30) days after Actiontec Electronics receives the defective product. Return the product to: (In the United States) Actiontec Electronics, Inc. 760 North Mary Avenue Sunnyvale, CA 94085 Actiontec Electronics shall not be responsible for any software, firmware, information, memory data, or Customer data contained in, stored on, or integrated with any products returned to Actiontec Electronics for repair, whether under warranty or not. 38 DataLink V.90 PCMCIA Fax Modem WARRANTIES EXCLUSIVE: IF AN ACTIONTEC ELECTRONICS’ PRODUCT DOES NOT OPERATE AS WARRANTED ABOVE, CUSTOMER’S SOLE REMEDY FOR BREACH OF THAT WARRANTY SHALL BE REPAIR, REPLACEMENT, OR REFUND OF THE PURCHASE PRICE PAID, AT ACTIONTEC ELECTRONICS’ OPTION. TO THE FULL EXTENT ALLOWED BY LAW, THE FOREGOING WARRANTIES AND REMEDIES ARE EXCLUSIVE AND IN LIEU OF ALL OTHER WARRANTIES, TERMS OR CONDITIONS, EXPRESS OR IMPLIED, EITHER IN FACT OR BY OPERATION OF LAW, STATUTORY OR OTHERWISE, INCLUDING WARRANTIES, TERMS OR CONDITIONS OF MERCHANTABILITY, FITNESS FOR A PARTICULAR PURPOSE, SATISFACTORY QUALITY, CORRESPONDENCE WITH DESCRIPTION, AND NON-INFRINGEMENT, ALL OF WHICH ARE EXPRESSLY DISCLAIMED. ACTIONTEC ELECTRONICS NEITHER ASSUMES NOR AUTHORIZES ANY OTHER PERSON TO ASSUME FOR IT ANY OTHER LIABILITY IN CONNECTION WITH THE SALE, INSTALLATION, MAINTENANCE OR USE OF ITS PRODUCTS. ACTIONTEC ELECTRONICS SHALL NOT BE LIABLE UNDER THIS WARRANTY IF ITS TESTING AND EXAMINATION DISCLOSE THAT THE ALLEGED DEFECT OR MALFUNCTION IN THE PRODUCT DOES NOT EXIST OR WAS CAUSED BY CUSTOMER’S OR ANY THIRD PERSON’S MISUSE, NEGLECT, IMPROPER INSTALLATION OR TESTING, UNAUTHORIZED ATTEMPT TO OPEN, REPAIR OR MODIFY THE PRODUCT, OR ANY OTHER CAUSE BEYOND THE RANGE OF THE INTENDED USE, OR BY ACCIDENT, FIRE, LIGHTNING, OTHER HAZARDS, OR ACTS OF GOD. LIMITATION OF LIABILITY: TO THE FULL EXTENT ALLOWED BY LAW, ACTIONTEC ELECTRONICS ALSO EXCLUDES FOR ITSELF AND ITS SUPPLIERS ANY LIABILITY, WHETHER BASED IN CONTRACT OR TORT (INCLUDING NEGLIGENCE), FOR INCIDENTAL, CONSEQUENTIAL, INDIRECT, SPECIAL, OR PUNITIVE DAMAGES OF ANY KIND, OR FOR LOSS OF REVENUE OR PROFITS, LOSS OF BUSINESS, LOSS OF INFORMATION OR DATA, OR OTHER FINANCIAL LOSS ARISING OUT OF OR IN CONNECTION WITH THE SALE, INSTALLATION, MAINTENANCE, USE, PERFORMANCE, FAILURE, OR INTERRUPTION OF ITS PRODUCT, EVEN IF ACTIONTEC ELECTRONICS OR ITS AUTHORIZED RESELLER HAS BEEN ADVISED OF THE POSSIBILITY OF SUCH DAMAGES, AND LIMITS ITS LIABILITY TO REPAIR, REPLACEMENT,OR REFUND OF THE PURCHASE PRICE PAID, AT ACTIONTEC ELECTRONICS’ OPTION. THIS DISCLAIMER OF LIABILITY FOR DAMAGES WILL NOT BE AFFECTED IF ANY REMEDY PROVIDED HEREIN SHALL FAIL OF ITS ESSENTIAL PURPOSE. 39 Limited Warranty Disclaimer: Some countries, states or provinces do not allow the exclusion or limitation of implied warranties or the limitation of incidental or consequential damages for certain products supplied to consumers, or the limitation of liability for personal injury, so the above limitations and exclusions may be limited in their application to you. When the implied warranties are not allowed to be excluded in their entirety, they will be limited to the duration of the applicable written warranty. This warranty gives you specific legal rights which may vary depending on local law. Dispute Resolution: The customer may contact the Director of Technical Support in the event the Customer is not satisfied with Actiontec Electronics’ response to the complaint. In the event that the Customer is still not satisfied with the response of the Director of Technical Support, the Customer is instructed to contact the Director of Marketing. In the event that the Customer is still not satisfied with the response of the Director of Marketing, the Customer is instructed to contact the Chief Financial Officer and/or President. Governing Law: This Limited Warranty shall be governed by the laws of the State of California, U.S.A., excluding its conflicts of laws and principles, and excluding the United Nations Convention on Contracts for the International Sale of Goods. 40