1
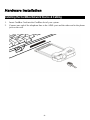
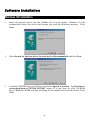
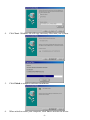
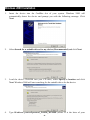
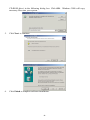
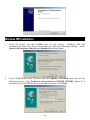
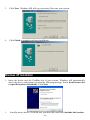
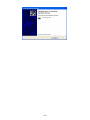
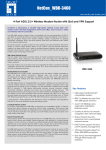
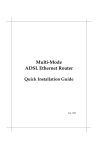
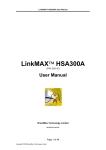
CardBus ADSL Modem Card Quick Installation Guide M73-APO01-350 REGULATORY STATEMENTS Part15, Class B This device complies with Part 15 of FCC rules. Operation is subject to the following two conditions: 1. 2. This device may not cause harmful interface, and This device must accept any interface received, including interface that may cause undesired operation. This equipment has been tested and found to comply with the limits for a Class B digital device, pursuant to Part 15 of the FCC Rules. These limits are designed to provide reasonable protection against harmful interference in a residential installation. This equipment generates, uses and can radiate radio frequency energy, and if not installed and used in accordance with the instructions, may cause harmful interference to radio communications. However, there is no guarantee that interference will not occur in a particular installation. If this equipment does cause harmful interference to radio or television reception, which can be determined by turning off and on, the user is encouraged to try to correct the interference by one or more of the following measures: Reorient or relocate the receiving antenna. Increase the distance between the equipment and receiver. Connect the equipment into an outlet on a circuit different from that to which the receiver is connected. * Changes or modifications not expressly approved by party responsible for compliance could void the user authority to operate the equipment. FCC Part 68 Registration This equipment complies with Part 68 of the FCC Rules. On the bottom of this equipment is label that contains, among other information, the FCC registration Number and Ringer equipment Number (REN) for the equipment. If requested, this information must be given to the Telephone Company. The REN is useful to determine the quantity of devices you may connect to your telephone line and still have all of those devices ring when your telephone number is called. In most, but not all areas, the sum of the REN’s of all devices connected to one line should not exceed five (5.0). To be certain of the number of devices you’re local telephone company to determine the maximum REN for you’re calling area. If your telephone equipment cause harm to the telephone network, the Telephone Company may discontinue your service temporarily. If possible, they will notify you in advance. But if advance notice isn’t practical, you will be informed of your right to file a complaint with the FCC. Your telephone company may changes in its facilities, equipment, operations or procedures that could affect the proper functioning of your equipment. If they do, you will be notified in advance to given you and opportunity to maintain uninterrupted telephone service. If you experience trouble with this telephone equipment, please contact the following address and phone number for information on obtaining service or repairs. The telephone company may ask that your disconnect this equipment from the network until the problem has been corrected or until you are sure that the equipment is not malfunctioning. This equipment may not be used on coin service provide by the telephone company. Connection to party lines is subject to state tariffs. Introduction The CIA3000 is a cost effective ADSL solution that is designed with leading 32-bit bus architecture. With this CIA3000, you can simply plug the cord into a standard phone jack and enjoy faster, less expensive Internet access over an existing telephone line. It is the ideal solution for the entire family and the rising number of households with more than one PC. With the device, you can go to the Internet and talk on the telephone simultaneously. The CIA3000 achieves the transmission rates of up to 8 Mbps downstream and 768 Kbps upstream over existing copper wires. This rate is more than 140 times faster than a 56K analog modem. Each PC in the house simply connects to the nearest telephone jack. It is easy to install, work well, and cost less. Features Build a network using your existing telephone line. No additional hubs or network cables needed Interoperable with all major central office DSLAMs. Most convenient way to share the internet connection, file, printer and peripherals in Home Data rate up to 8Mbps downstream and 768 Kbps upstream (Subject to DSLAM configuration). over telephone lines PC Card CardBus standard with high performance 32-bit PCI-like bus master architecture Works with any CardBus-equipped PC PC Card hot swap supported Supports Microsoft Windows 98/2000/ME/NT4.0 Equipped with one RJ-11 modular telephone port 3 easy-to-read LED status indicators Connects up to 30 computers together on your Phonewire Network up to 1000 feet SPECIFICATIONS Standards: ADSL Modem standard. PCMCIA CardBus PC Card standard Protocol: Compliant with ANSI T1.413 i2, ITU G.992.1(G.dmt), G.992.2 (G.lite), and G.994.1 (G.hs) in ADSL layer. Compliant with ITU-I.432 and ITU-I.363 in ATM TC, SAR and AAL5 layers. Supports RFC2364 (PPPoA), RFC2516 (PPPoE),RFC1483 and RFC1577 over ATM Port: 1 x RJ-11 standard modular telephone port Cabling type: 26 AWG telephone code Performance: Data rates up to 8 Mbps downstream and 768 Kbps upstream (Subject to DSLAM configuration). LEDs: Rx, Tx, Link System requirements An IBM compatible notebook computer with CardBus supported socket Drivers and utilities provided with this product Windows 98/2000/ME/NT4.0 preinstalled -4- Hardware Installation Installing the CardBus Network Device & Cabling 1. 2. Insert CardBus Card into the CardBus slot of your system. Connect one end of the telephone line to the ADSL port and the other end to the phone jack on the wall. -5- Software Installation Windows 98 Installation 1. Insert the network device into the CardBus slot of your system. Windows 98 will automatically detect the device and prompt you with the following message. Click Next. 2. Select Search for the best driver for your device (Recommended) and click Next. 3. Load the CD-ROM into your CD drive and select Specify a location. Type D:\driver\ protocolpath\protocol_WIN98_WINME (where D is the letter of your CD-ROM drive). Windows 98/ME will start searching for the suitable driver for the device. Click Next. -6- 4. Click Next. Windows 98 will copy necessary files onto your system. 5. Click Finish to complete software installation. 6. When asked to restart your computer, click Yes to activate the device. -7- Windows 2000 Installation 1. Insert the device into the CardBus slot of your system. Windows 2000 will automatically detect the device and prompt you with the following message. Click Next. 2. Select Search for a suitable driver for my device (Recommended) and click Next. 3. Load the device CD-ROM into your CD drive, select Specify a location and click Next. Windows 2000 will start searching for the suitable driver for the device. 4. Type D:\driver\ protocol\protocol_WIN98_WINME (where D is the letter of your -8- CD-ROM drive) in the following dialog box. Click OK. Windows 2000 will copy necessary files onto your system. 5. Click Next to continue. 6. Click Finish to complete software installation. -9- Windows ME Installation 1. Insert the device into the CardBus slot of your system. Windows ME will automatically detect the device and prompt you with the following message. Select Specify the location of the driver (Advanced) and click Next. 2. Load CD-ROM into your CD drive and click Specify a Location when you see the following picture. Type D:\driver\ protocol\protocol_WIN98_WINME (where D is the letter of your CD-ROM drive) in the following box. Click Next. - 10 - 3. Click Next. Windows ME will copy necessary files onto your system. 4. Click Finish to complete software installation. Windows XP Installation 1. Insert the device into the CardBus slot of your system. Windows will automatically detect the device and prompt you with the following message. Select Install from a list or specific location (Advanced). Click Next. 1. Load the device driver CD-ROM into your disk drive and check Include this location - 11 - in the search. Type D:\driver\ protocolpath\protocol_WINXP (where D is the letter of your CD-ROM drive)). Click Next to continue. 2. Click Continue Anyway when the following picture appears. 3. The installation program will proceed automatically. 4. Click Finish to complete the software installation. - 12 - - 13 -