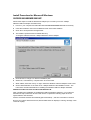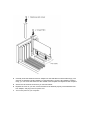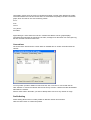
1
11Mbps Wireless LAN
PCI Adapter
User Guide
3CRDW696
http://www.3com.com/
http://www.support.3com.com/registration/frontpg.pl
Published July 2002
User Guide version 4.1.2
3Com Corporation 5400 Bayfront Plaza Santa Clara, California 95052-8145
Copyright © 2002 3Com Corporation. All rights reserved. No part of this documentation may be reproduced in any form or
by any means or used to make any derivative work (such as translation, transformation, or adaptation) without written
permission from 3Com Corporation.
3Com Corporation reserves the right to revise this documentation and to make changes in content from time to time
without obligation on the part of 3Com Corporation to provide notification of such revision or change.
3Com Corporation provides this documentation without warranty, term, or condition of any kind, either implied or
expressed, including, but not limited to, the implied warranties, terms or conditions of merchantability, satisfactory quality,
and fitness for a particular purpose. 3Com may make improvements or changes in the product(s) and/or the program(s)
described in this documentation at any time.
3Com is a registered trademark and the 3Com logo is a trademark of 3Com Corporation. Microsoft and Windows are
registered trademarks of Microsoft Corporation. All other company and product names may be trademarks of the
respective companies with which they are associated.
Unless otherwise indicated, 3Com registered trademarks are registered in the United States and may or may not be
registered in other countries. If there is any software on removable media described in this documentation, it is furnished
under a license agreement included with the product as a separate document or in the hard copy documentation. If you
are unable to locate a copy, please contact 3Com and a copy will be provided to you.
UNITED STATES GOVERNMENT LEGEND
If you are a United States government agency, then this documentation and the software described herein are provided to
you subject to the following:
All technical data and computer software are commercial in nature and developed solely at private expense. Software is
delivered as “Commercial Computer Software” as defined in DFARS 252.227-7014 (June 1995) or as a “commercial item”
as defined in FAR 2.101(a) and as such is provided with only such rights as are provided in 3Com’s standard commercial
license for the software. Technical data is provided with limited rights only as provided in DFAR 252.227-7015 (Nov 1995)
or FAR 52.227-14 (June 1987), whichever is applicable. You agree not to remove or deface any portion of any legend
provided on any licensed program or documentation contained in, or delivered to you in conjunction with, this user guide.
Chapter 1 - INSTALLING YOUR WIRELESS LAN PCI ADAPTER
5
Introduction ................................................................................................................................................................................ 5
Wireless LAN Basics ................................................................................................................................................................. 5
Installation for Microsoft Windows Platforms........................................................................................................................... 6
Install Procedure for Microsoft Windows 95OSR2/98/98SE/ME/2000/XP............................................................................ 7
Install Procedure for Microsoft Windows NT4.0 ...................................................................................................................... 8
Installing the Wireless LAN PCI Adapter Hardware (All Operating Systems)....................................................................... 8
Connecting Network Protocols ............................................................................................................................................... 10
Uninstall Procedure ................................................................................................................................................................. 10
Chapter 2 - USING THE CONFIGURATION UTILITY 11
Configuring the Wireless PCI Adapter ................................................................................................................................... 11
Configuring Automatic Network Connections with Windows XP ......................................................................................... 13
Chapter 3 - TECHNICAL SPECIFICATIONS 16
Technical specifications of 3Com 11Mbps Wireless LAN PCI Adapter .............................................................................. 16
Chapter 4 - TECHNICAL SUPPORT
18
Online Technical Services ...................................................................................................................................................... 18
Support from Your Network Supplier ..................................................................................................................................... 19
Support from 3Com ................................................................................................................................................................. 19
Region
URL for Regional Web Site .................................................................................. 19
Returning Products for Repair ................................................................................................................................................ 20
3Com Connection Assistant ................................................................................................................................................... 20
Chapter 5 - REGULATORY COMPLIANCE INFORMATION
21
FCC Part 15 Notice (Applicable to use within the USA) ....................................................................................................... 21
FCC Declaration of Conformity............................................................................................................................................... 21
Industry Canada Notice (Applicable for use within Canada)................................................................................................ 22
Industry Canada (IC) Emissions Compliance Statement ..................................................................................................... 22
European Community Declaration of Conformity.................................................................................................................. 22
1
Installing Your Wireless LAN PCI
Adapter
Introduction
Thank you for purchasing the 3Com 11Mbps Wireless LAN PCI Adapter. This user guide
will assist you with the installation procedures for the PCI Adapter.
Your package should contain the 3Com 11Mbps Wireless LAN PCI Adapter and the
Installation CD. The Installations CD contains the following items:
•
Drivers and Configuration Utility program used to manage the 3Com 11Mbps Wireless LAN
PCI Adapter and to establish a wireless connection with your LAN
•
README.TXT file with updated information about your Wireless LAN PCI Adapter
•
This Wireless LAN PCI Adapter User Guide
•
3Com Connection Assistant
•
Adobe Acrobat Reader
Wireless LAN Basics
Wireless LAN (Local Area Networks) systems offer a great number of advantages over a
traditional, wired system. Wireless LANs (WLANs) are more flexible, easier to setup and
manage and often more cost effective than their wired equivalents.
Using radio frequency (RF) technology, WLANs transmit and receive data over the air,
minimizing the need for wired connections. Thus, WLANs combine data connectivity with
user mobility, and, through simplified configuration, enable movable LANs.
With wireless LANs, users can access shared information without looking for a place to
plug in and network managers can set up or augment networks without installing or
moving wires. Wireless LANs offer the following productivity, convenience and cost
advantages over traditional wired networks:
Mobility—Wireless LAN systems can provide LAN users with access to real-time
information anywhere in their organization. This mobility supports productivity and service
opportunities not possible with wired networks.
Installation Speed and Simplicity—Installing a wireless LAN system can be fast and easy
and can eliminate the need to pull cable through walls and ceilings.
Installation Flexibility—Wireless technology allows the network to go where wires
cannot go.
Reduced Cost-of-Ownership—While the initial investment required for wireless LAN
hardware might be higher than the cost of wired LAN hardware, overall installation
expenses and life-cycle costs will be significantly lower. Long-term cost benefits are
greatest in dynamic environments requiring frequent moves, adds, and changes.
Scalability—Wireless LAN systems can be configured in a variety of topologies to meet
the needs of specific applications and installations. Configurations are easily changed and
range from peer-to-peer to full infrastructure networks, also allow roaming over a broad
area.
Installation for Microsoft Windows Platforms
The following section will assist you in installing the 3Com 11Mbps Wireless LAN PCI Adapter
successfully. For operating systems except Windows NT 4.0, you will first install the software
(Utility) and then attach the 3Com11Mbps Wireless LAN PCI Adapter in your system, and finally
set the network properties to accommodate resource sharing and select the type of wireless
network that you wish to install. For Windows NT 4.0, you will insert the 3Com11Mbps Wireless
LAN PCI Adapter in your system, then install the software. The 3Com 11Mbps Wireless LAN PCI
Adapter can easily be installed and used, allowing your computer to use network resources.
Installation Overview
Here are some steps you will perform in establishing your wireless network connection:
•
Install the 11Mbps Wireless Access Point (AP) first if you plan to use one. The AP is needed
to use with Infrastructure network mode, but is not needed for ad hoc (peer to peer) mode.
•
Install the software using the Install CD. (For Windows NT 4.0 install the hardware first, then
the software)
•
Install the 3Com 11Mbps Wireless LAN PCI Adapter hardware.
•
Install the network protocol(s) required to communicate on your network. Typically you will
need the TCP/IP protocol.
Install Procedure for Microsoft Windows
95OSR2/98/98SE/ME/2000/XP
Follow these steps to install the WLAN PCI Adapter (do not insert your 3Com 11Mbps
Wireless LAN PCI Adapter until instructed):
1
Power on your computer and allow Windows 95OSR2/98/98SE/ME/2000/XP to load fully.
2
Insert the Installation CD in the CD-ROM and then click Install Software.
3
Click Yes to accept the license agreement.
4
The installer copies the files into default directory:
C:\Program Files\3Com\3Com 11Mbps Wireless LAN PCI Adapter
5
Click Browse to change to a different installation path .
6
Select “No, I will restart my computer later” and click Finish.
7
When asked, select the country or region where the Wireless LAN PCI Adapter will be used.
8
Click Install Hardware on the main 3Com 11Mbps Wireless LAN installation screen. The
instructions are also listed below for Installing the Wireless LAN PCI Adapter hardware.
Additional Install Procedure for Microsoft Windows XP
After completing the installation of the Wireless LAN PCI Adapter hardware in your system as
described in step 8, Windows XP users will need to complete the following steps when the
system detects new hardware:
1 Select “Install the software automatically (Recommended) ”, and then click Next to continue.
2 Once your system detects the driver, Microsoft Windows XP displays a warning message. Click
Continue Anyway.
3 After copying the files to your system, click Finish to complete the setup.
Install Procedure for Microsoft Windows NT4.0
1
Install the Wireless LAN PCI Adapter Hardware first. Click Install Hardware on the main
3Com 11Mbps Wireless LAN installation screen. The instructions are also listed below for
Installing the Wireless LAN PCI Adapter hardware.
2
Go to the Network Control panel-> select “Adapter” tab, and then add “Adapter”.
3
Respond to the prompts as they appear Click “Have Disk”.
4
If you are prompted for the drivers, enter d:\drivers\NT, where d: is the location of the CDROM
5
The device will show up on the device list
6
Select the “3Com 3CRDW696 Wireless LAN PCI Adapter” and proceed with the installation
instructions.
7
The system will prompt for the IP address setting.
8
Restart the system
9
Insert the Installation CD in the CD-ROM and then click Install Software.
10 Follow the setup wizard step by step to complete the Utility installation.
Installing the Wireless LAN PCI Adapter Hardware (All Operating
Systems)
Follow these steps to install the 3Com 11Mbps Wireless LAN PCI Adapter to your system after
installing software and drivers as described above.
(Windows will recognize the WLAN adapter and auto detect the driver):
1
Turn off power to your computer and unplug the power cord.
2
Remove the cover of your computer.
3
Locate an empty PCI slot and remove its slot cover. Save the screw.
4
Carefully insert the Wireless LAN PCI Adapter into the selected slot until it seats snugly. The
antenna on Wireless LAN PCI Adapter is a separate piece. Once the PCI Adapter is seated
firmly, you can screw the antenna to the outside of the faceplate and adjust for best reception.
5
Secure the card with the screw that you removed earlier.
6
Replace the cover of your PC, ensure the antenna is attached properly to the Wireless LAN
PCI Adapter, and plug in the PC power cord.
7
Turn on the power to your computer.
Connecting Network Protocols
Follow the instructions in your operating system help Start Menu>Help for Connecting to
Networks. Check with your network administrator to know which protocols to add and to get other
network configuration information.
Uninstall Procedure
If you want to uninstall the Wireless LAN PCI Adapter, just select
Start Menu>Program File>3Com Wireless>Uninstall
The uninstall removes Program icons, registry entry files, and files used by the adapter.
2
Using the Configuration Utility
The 3Com 11Mbps Wireless LAN PCI Adapter uses its own management software for all
supported operating systems except Microsoft Windows XP (see the section “Configuring
Automatic Network Connections with Windows XP” for XP specific information). All functions
controlled by the user are provided by this application. Usually this application starts automatically.
You can also click the Configuration Utility icon from Start Menu to start the utility application.
A new icon appears in your Icon systems tray.
The icon appears green when the wireless LAN adapter is operating normally or the connection
between the adapter and an access point has a strong signal/link. The icon appears yellow if
there is a marginal connection with an access point. If the icon is red, it means that the Wireless
LAN PCI Adapter configuration is invalid or incomplete. A red icon may also indicate a poor
connection between the Wireless LAN PCI Adapter and an access point.
Configuring the Wireless PCI Adapter
Click the tabs to navigate through the configuration settings:
Link Status
Status—used to display the current status of connection. When the state shows “Connected to
SSID“ the card is operating normally in Infrastructure mode--the computer is connected to an
access point and networking is available.
Scanning—the node is searching for an available access point and is unable to detect the SSID
(sometimes referred to as ESSID) for an available access point within range. This field will also
display an error message if the driver failed to initialize.
Network Type
Infrastructure Mode—the driver scans all available channels continuously until it finds one or
more Access Points that matches its SSID. At that point it tries to authenticate and associate with
the Access Point.
Ad Hoc Mode—the driver scans for 5 seconds looking for an existing Ad Hoc network using the
same SSID.
Current Channel and Transmit Rate—shows the channel of the radio and the transmit rate that is
being currently used for an active connection. This value has no meaning whenthe radio is
“Scanning”
Link Quality—active when the node is in Infrastructure Mode. The bar graph displays the quality
of the link between the node and Access Point. It summarizes the quality of the link over the bar
graph, which can take on one of the following values:
“Poor”
“Fair”
“Good”
“Very Good”
“Excellent”
Signal Strength—active when the node is in Infrastructure Mode. The bar graph displays
normalized signal strength as reported by the radio, averaged over all frames over 100 bytes long
that are received from the Access Point.
Connections
The Connections Tab shows the current status of available APs or Ad-Hoc channels within the
network.
You may select a profile or SSID from above the list, click “Connect” to connect with the AP.
Click “Refresh” to rescan the network with the site survey function. It detects and lists all available
APs within the network.
Place a check mark in the field if you wish to Attempt Auto-connect to any network in range.
Profile Setting
Profile Setting allows users to create profiles for different network environments.
Click the “New” button to create new profiles.
Click the “Edit” button to edit the selected profile.
Click the “Delete” button if you wish to delete selected profiles.
Profile Name —the name of the profile or group of setting used to connect with a particular
network. The name is for your benefit and can consist of up to 48 characters.
SSID — Service Set Identifier may also be referred to as a Network Name because it is the name
that identifies a wireless network service set. The SSID you enter must match the network SSID
on the access point in infrastructure mode or the other devices in Ad Hoc mode in order to
connect.
Network Type—allows you to select from a list of supported Network “Modes”. The two modes
displayed will be: “Ad Hoc” or “Infrastructure”.
Ad Hoc—the IEEE 802.11 peer-to-peer mode of operation. In 802.11Ad Hoc only one wireless
“cell” is supported for each different SSID. All communication is done from
Client to Client without the use of an Access Point. 802.11 Ad Hoc networking uses the same
SSID for establishing the wireless connection over the selected channel.
Infrastructure—this mode of operation requires the presence of an 802.11 Access Point. All
communication is done via the Access Point, which relays packets to other wireless Clients in the
Access Point's Basic Service Set (BSS) as well as to nodes on a wired network such as Ethernet.
Transmit Rate—rate at which the client of an AP transmits the data packets. You may set this to
fixed 1Mbps, fixed 2 Mbps, fixed 5.5 Mbps, fixed 11 Mbps, and/or Auto (tries 11Mbps and falls
back to lower rates).
Encryption (WEP)—additional measure of security on your wireless network which can be
achieved by using WEP (Wired Equivalent Privacy) encryption.
When an encrypted frame is received it will only be accepted if it decrypts correctly. This happens
only if the receiver has the WEP Key used by the transmitter.
This panel allows the selection of none, 64-bit, or 128-bit encryption and the entry of up to four
encryption keys according to the WEP function select. (This is also sometimes referred to as 40bit or 104-bit encryption) To be written to the driver and registry, each key must consist of either
hexadecimal digits, which means that only digits 0-9 and letters A-F are valid entries, or
alphanumeric. If entered incorrectly the program will not write keys to a driver. The key used
must match exactly the key used by your access point or by other clients in Ad Hoc mode in order
to connect.
About
The About tab shows the product version including the detail of Driver, Application and firmware
version. Users must use this version number when reporting their problems to technical support.
Configuring Automatic Network Connections with Windows XP
Microsoft Windows XP provides a Wireless LAN Zero Configuration, which means that Windows
XP recognizes the adapter and provides the necessary driver and configuration software instead
of the Configuration Utility software provided with the adapter.
If your station is within range of a Wireless LAN access point, Windows XP announces that one
or more wireless networks are available and suggests that you click the Network icon to see a list
of available networks.
To configure one or more wireless networks for auto connection, follow these steps:
1 Right-click the Network icon in the notification area at the bottom of the screen to display a popup menu. Click Open Network Connections.
2 Right-click the Wireless Network Connection icon and click Properties in the Pop-up menu.
Windows XP displays the Wireless Network Connection Properties dialog.
3 Select the Wireless Networks tab. Notice that the wireless network that was present when you
first inserted the wireless NIC is already listed.
4 To add another network to the list, click the Add button on the Wireless Networks tab to display
the Wireless Network Properties dialog.
5 Type a network name (SSID) in the Network name test box.
6 If you have implemented a system automatically providing users with network keys and/or WEP
keys, click OK to save this network SSID and move on to the next network that you want to
configure.
7 If you are setting up an ad hoc mode wireless connection, click the last check box in the dialog.
Otherwise, if you are configuring a connection to an AP, leave the check box uncheck and click
OK.
Windows XP adds the network to the list of preferred networks in the Wireless Network
Connection Properties dialog box.
8 When you finish adding all wireless networks to which your computer needs access, click OK.
Note: XP includes support for the IEEE 802.1X standard for port–level authentication of stations
in the network.
If for some reason you prefer to use the Configuration Utility that came with the Wireless LAN PCI
Adapter with Windows XP, you should not use Windows to configure wireless network settings.
Note: Only follow these steps if you wish to disable Windows XP Wireless LAN Zero
Configuration.
1
Select START>CONTROL PANEL
2
Double click NETWORK and INTERNET CONNECTIONS
3
Double click NETWORK CONNECTIONS icon
4
Highlight the Wireless Network Connection by clicking only once
5
Under Network Tasks on the left, click CHANGE settings of this Connection
6
Select the WIRELESS NETWORKS tab
7
Uncheck the box labeled Use Windows to configure my wireless network settings
8
Click OK
3
Technical Specifications
Technical specifications of 3Com 11Mbps Wireless LAN PCI
Adapter
Driver support
Microsoft Windows XP
Microsoft Windows 98
Microsoft Windows 98SE
Microsoft Windows 2000
Microsoft Windows ME
Microsoft Windows 95 OSR2
Microsoft Windows NT 4.0 (Service Pack 6 or above)
Standards supported
IEEE 802.11b standard for Wireless LAN
Wi-Fi
All major networking standards (including TCP/IP, IPX)
PCI Bus power management interface specification 1.0
ACPI 1.0
PCI 2.2
Environmental
Operating temperature:
0°C to 55°C (Operating), -20 to 65°C (Storing)
Max. Humidity: 95% Non-condensing
Power specifications
Transmit power:: +18 dBm @ Nominal Temp Range (Typical)
Operating Voltage: 3.3V and 5V ± 5%
Radio specifications
Operating Range:
Open space: up to 300m;
Indoor: up to 70m
Frequency range:
2.4-2.4835 GHz, direct sequence spread spectrum
Number of Channels:
Europe: 13 (1-13 )
US: 11 (1-11 )
France: 4 (10-13 )
Antenna system:
Detachable dipole antenna with SMA (male) connector
Mobility:
Seamless roaming across cell boundaries with handover
Specific features
Supported bit rates:
11 Mbps
5.5 Mbps
2 Mbps
1 Mbps
Data encryption:
64 /128 bit WEP Encryption
Utility Software:
Configuration utility software
A
Technical Support
3Com provides easy access to technical support information through a variety of services. This
appendix describes these services.
Information contained in this appendix is correct at time of publication. For the most recent
information, 3Com recommends that you access the 3Com Corporation World Wide Web site.
Online Technical Services
3Com offers worldwide product support 24 hours a day, 7 days a week, through the following
online systems:
•
World Wide Web site
•
3Com Knowledgebase Web Services
•
3Com FTP site
World Wide Web Site
To access the latest networking information on the 3Com Corporation World Wide Web site, enter
this URL into your Internet browser:
http://www.3com.com/
This service provides access to online support information, such as technical documentation and
a software library, as well as support options that range from technical education to maintenance
and professional services.
3Com Knowledgebase Web Services
The 3Com Knowledgebase is a database of technical information to help you install, upgrade,
configure, or support 3Com products. The Knowledgebase is updated daily with technical
information discovered by 3Com technical support engineers. This complimentary service, which
is available 24 hours a day, 7 days a week to 3Com customers and partners, is located on the
3Com Corporation World Wide Web site at:
http://knowledgebase.3com.com
3Com FTP Site
Download drivers, patches, software, and MIBs across the Internet from the 3Com public FTP
site. This service is available 24 hours a day, 7 days a week.
To connect to the 3Com FTP site, enter the following information into your FTP client:
•
Hostname: ftp.3com.com
•
Username: anonymous
•
Password: <your Internet e-mail address>
NOTE: With Web browser software, such as Netscape Navigator and
Internet Explorer, you do not need a user name and password.
Support from Your Network Supplier
If you require additional assistance, consult your network supplier. Many suppliers are authorized
3Com service partners who are qualified to provide a variety of services, including network
planning, installation, hardware maintenance, application training, and support services.
When you consult your network supplier, have the following information ready:
•
Product model name, part number, and serial number
•
A list of system hardware and software, including revision levels
•
Diagnostic error messages
•
Details about recent configuration changes, if applicable
If you are unable to consult your network supplier, see the following section on how to contact
3Com.
Support from 3Com
If you are unable to obtain assistance from the 3Com online technical resources or from your
network supplier, 3Com offers technical telephone support services. To find out more about your
support options, go to the Web site associated with your region of the world shown below.
Region
URL for Regional Web Site
Asia and the Pacific Rim
ap.3com.com/contacts/support-contacts.html
Africa, Europe, and the Middle East
emea.3com.com/support/supportnumbers.html
Latin America
lat.3com.com/lat/support/index.html
North America
csoweb4.3com.com/contactus/
When you contact 3Com for assistance, have the following information ready:
•
Product model name, part number, and serial number
•
A list of system hardware and software, including revision levels
•
Diagnostic error messages
•
Details about recent configuration changes, if applicable
Returning Products for Repair
Before you send a product directly to 3Com for repair, you must first obtain an authorization
number. Products sent to 3Com without authorization numbers will be returned to the sender
unopened, at the sender’s expense. To obtain an authorization number, go to the Web site listed
above for your region.
3Com Connection Assistant
The 3Com Connection Assistant is included on the Installation CD and is interactive software that
gives you an easy to use diagnostic and repair tool. Using this tool makes troubleshooting easier
and helps you quickly resolve problems. Go to D:\Install\Connection Assistant\Install.exe (where
D: is your CD-ROM drive) to find this utility.
Using the Connection Assistant you can:
•
Automatically check your computer and repair problems
•
Search for solutions for specific hardware or software problems
•
Connect, via the Internet, to technical support when you need assistance with your computer
hardware and software
•
Get assistance even if you are not connected to the Internet
Connection Assistant Toolbar
The toolbar at the top of the Connection Assistant Home Page includes these options:
•
Connection Assistant Home—clicking this link will always return you to the Connection
Assistant Home Page.
•
Assisted Service—Click this link to send a request for assistance to a technical support
engineer if you need help fixing a Network Interface Card problem.
•
Options—Set different security, message, and display options for your Connection Assitant
pages.
•
Help—Browse Help information for a variety of topics, links and features related to the 3Com
Connection Assistant
Regulatory Compliance Information
NOTE: This product contains encryption. It is unlawful to export out of the U.S. without obtaining a U.S.
Export License.
FCC Part 15 Notice (Applicable to use within the USA)
CAUTION: FCC Radio-Frequency Exposure Notice
This device generates and radiates radio-frequency energy. In order to comply with FCC radio-frequency radiation
exposure compliance requirements, a separation distance of at least 2.5 cm (1.0 inch) must be maintained between the
antenna of the device and all persons.
This product does not contain any user serviceable components. Any unauthorized product changes or modifications will
invalidate 3Com’s warranty and all applicable regulatory certifications and approvals.
Unintentional Radiator
WARNING: This equipment has been tested and found to comply with the limits for a Class B digital device as applicable,
pursuant to Part 15 of the FCC Rules. These limits are designed to provide reasonable protection against harmful
interference in a residential installation. This equipment generates, uses and can radiate radio frequency energy and, if
not installed and used in accordance with the instructions, may cause harmful interference to radio communications.
However, there is no guarantee that interference will not occur in a particular installation. If this equipment does cause
harmful interference to radio or television reception, which can be determined by turning the equipment off and on, the
user is encouraged to try to correct the interference by one or more of the following measures:
•
Reorient or relocate the receiving antenna.
•
Increase the separation between the equipment and receiver.
•
Connect the equipment into an outlet on a circuit different from that to which the receiver is connected.
•
Consult the dealer or an experienced radio/TV technician for help.
This device complies with part 15 of the FCC Rules. Operation is subject to the following two conditions:
1 This device may not cause harmful interference, and (2) this device must accept any interference received, including
interference that may cause undersired operation.
2 The user may find the following booklet prepared by the Federal Communications Commission helpful:The Interference
Handbook
This booklet is available from the U.S. Government Printing Office, Washington, D.C. 20402.
Stock No. 004-000-00345-4.
FCC Declaration of Conformity
3Com Corporation, 3930 W. Parkway Blvd., PO Box 704010, West Valley City, UT 84119, (800) 527-8677
Declares that the Product:
Date: July 1, 2002
Brand Name: 3Com Corporation
Model Number: 3CRDW696
Equipment Type: 802.11b Wireless USB Adapter
Complies with Part 15 of the FCC rules. Operation is subject to the following two conditions:
1 this device may not cause harmful interference, and
2 this device must accept any interference received, including interference that may cause undesired operation.
Industry Canada Notice (Applicable for use within Canada)
This device complies with Canadian RSS-210.
To prevent radio interference to the licensed service, this device is intended to be operated indoors and away from
windows to provide maximum shielding. Equipment (or its transmit antenna) that is installed outdoors is subject to
licensing.
The installer of this radio equipment must ensure that the antenna is located or pointed such that it does not emit RF field
in excess of Health Canada limits for the general population; consult Safety Code 6, obtainable from Health Canada’s
website www.hc-sc.gc.ca/rpb.
Avis de conformité à la réglementation d’Industrie Canada
Cet appareil est conform à la norme CNR-210 du Canada.
Pour empêcher que cet appareil cause du brouillage au service faisant l’objet d’une licence, cet appareil doit être utilisé à
l’intérieur seulement et devrait êtra placé loin des fenêtres afin de fournir un écran de blindage maximal.
L’installateur du présent matériel radio doit s’assurer que l’antenne est située ou pointée de manière à ce que cette
derniére n’émette pas de champs radioélectriques supérieurs aux limites spécifiées par Santé Canada pour le grand
public; condulter le Code de sécurité 6, disponible sur le site Web de Santé Canada, à l’adresse suivante: www.hcsc.gc.ca/rpb.
Industry Canada (IC) Emissions Compliance Statement
This Class B digital apparatus complies with Canadian ICES-003.
Avis de conformité à la réglementation d’Industrie Canada
Cet appareil numérique de la classe B est conform à la norme NMB-003 du Canada.
Safety Notice
This device has been tested and certified according to the following safety standards and is intended for use only in
Information Technology Equipment which has been tested to these or other equivalent standards:
UL Standard 60950 (3rd Edition)/ CSA C22.2 No. 60950
IEC 60950
EN 60950
European Community Declaration of Conformity
Hereby, 3Com Corporation, declares that this Wireless LAN product is in compliance with the essential requirements and
other relevant provisions of Directive 1999/5/EC.
Due to frequency restrictions, it is necessary to select your country before using this radio device. Refer to your 3Com
Wireless LAN Manager online help for details.
3Com Wireless LAN PC Card User Guide version 1.0.0
Published July, 2002